Ignis ADL 831 User manual

ADL
831/ADL
834/ADL
837
Gebrauchsanweisung
Instructions
for
use
Notice
d’emploi
Gebruiksaanwijzing
Instrucciones
para
el
uso
Manual.de
uso
sehen
Istruzioni
per
!’uso
Seite
Page
Page
Bladzijde
Pagina
Pag.
Pagina
14
25
36
47
58
69
gine
eR
PO

GB
TABLE
OF
CONTENTS
THE
DISHWASHER
AND
ITS
ACCESSORIES
Page
15
-THE
PANEL
Page
16
BEFORE
USING
THE
DISHWASHER
Page
17
TRANSPORTATION
Page
17
PRECAUTIONS
AND
GENERAL
SUGGESTIONS
Page
18
HOW
TO
LOAD
THE
CROCKERY
Page
19
HOW
TO
FILL
THE
WATER
SOFTENER
Page
20
HOW
TO
FILL
THE
RINSE
AID
Page
21
HOW
TO
FILL
THE
DETERGENT
DISPENSER
Page
21
HOW
TO
OPERATE
THE
DISHWASHER
Pa
ge
22
HOW
TO
SELECT
THE
WASH
PROGRAMME
Page
22
TROUBLESHOOTING
GUIDE
Page
23
HOW
TO
MAINTAIN
THE
DISHWASHER
Page
23
|
N
—
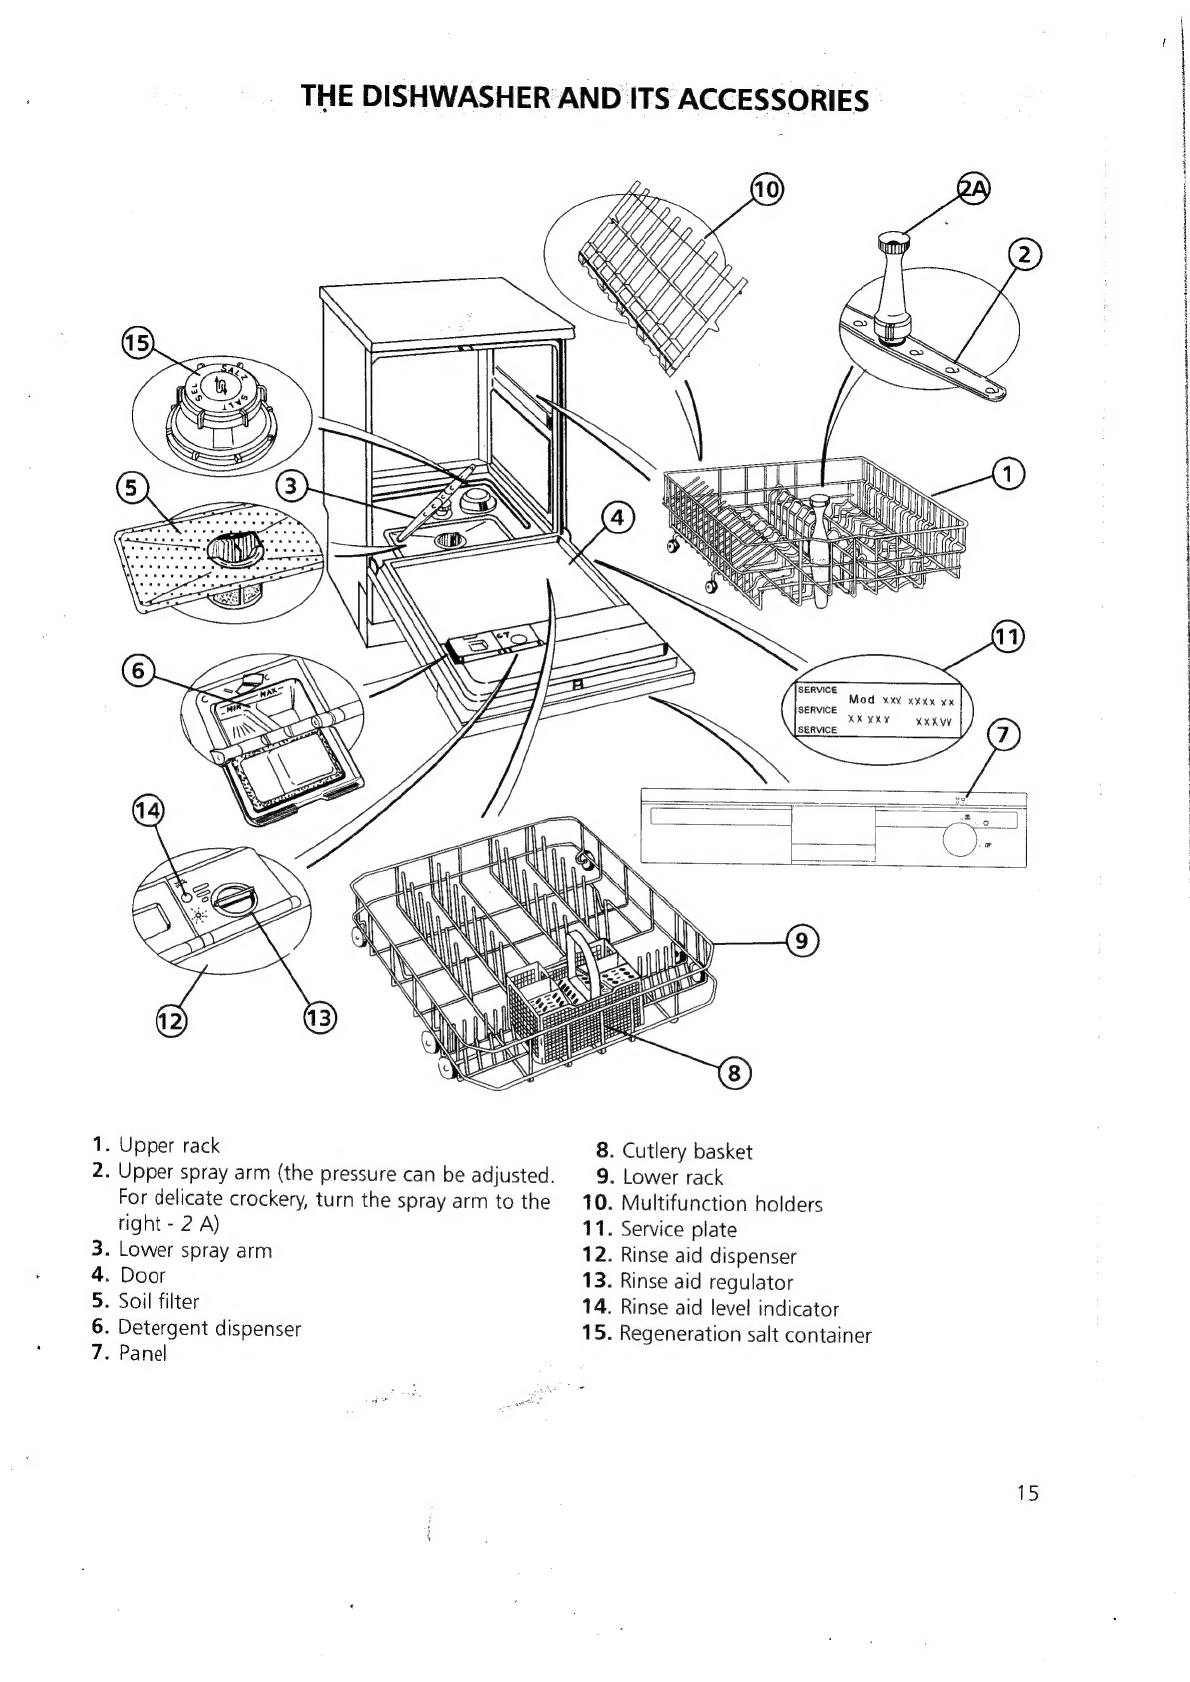
THE
DISHWASHER
AND
ITS
ACCESSORIES
-
Upper
rack
Upper
spray
arm
(the
pressure
can
be
adjusted.
For
delicate
crockery,
turn
the
spray
arm
to
the
right
-
2
A)
.
Lower
spray
arm
Door
.
Soil
filter
.
Detergent
dispenser
.
Panel
zy
Th,
©)
eel
8.
Cutlery
basket
9.
Lower
rack
10.
Multifunction
holders
11.
Service
plate
12.
Rinse
aid
dispenser
13.
Rinse
aid
regulator
14.
Rinse
aid
level
indicator
15.
Regeneration
salt
container
U
I
co
°
sTOP
1
Fe
oo
stor,
“90
|
3W
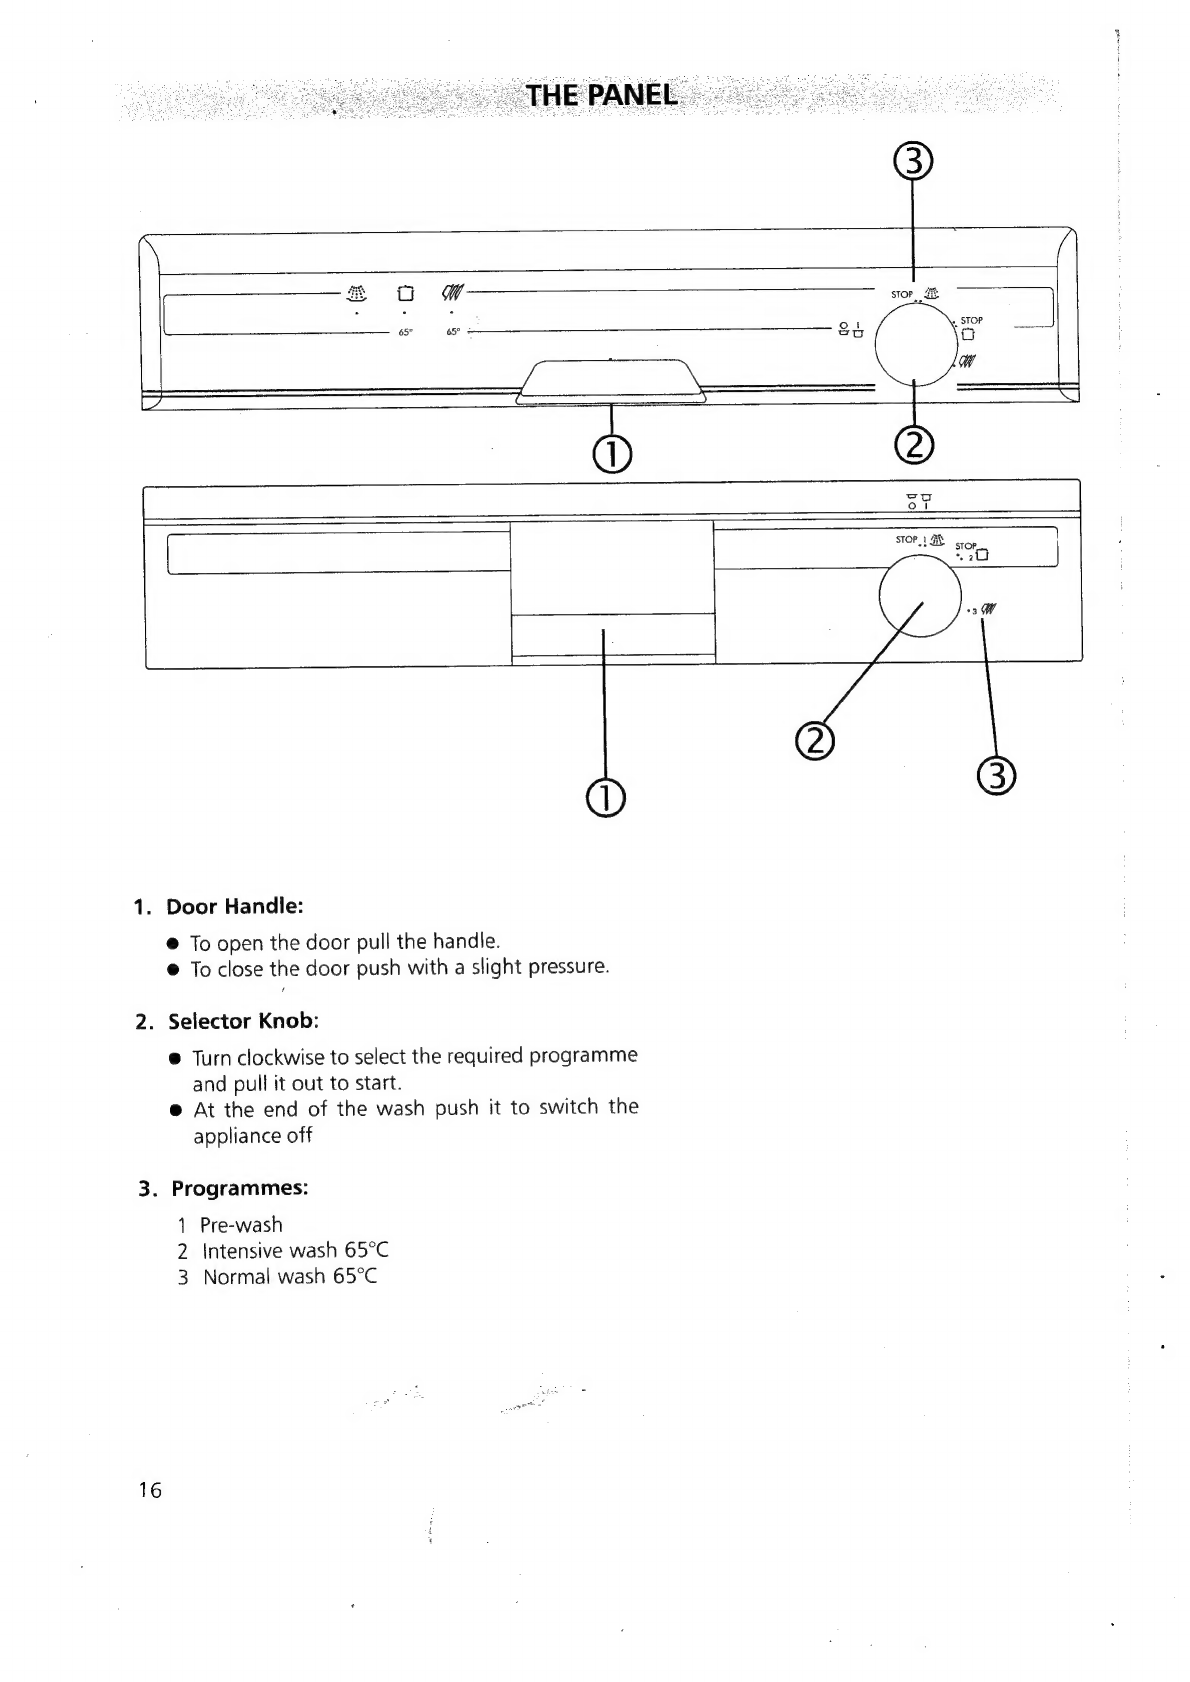
1.
Door
Handle:
@
To
open
the
door
pull
the
handle.
@
To
close
the
door
push
with
a
slight
pressure.
2.
Selector
Knob:
@
Turn
clockwise
to
select
the
required
programme
and
pull
it
out
to
start.
@
At
the
end
of
the
wash
push
it
to
switch
the
appliance
off
3.
Programmes:
1
Pre-wash
2
Intensive
wash
65°C
3
Normal
wash
65°C

To
get
full
satisfaction
from
your
appliance,
please
read
carefully
your
instruction
manual.
1.
Packaging
(plastic
bags,
polystyrene
parts,
etc.)
must
be
stored
out
of
the
reach
of
children
as
they
are
po-
tentially
hazardous.
The
packaging
material
is
recyclable
and
is
marked
with
the
recycling
symbol
“4
The
appliance
is
built
with
re-usable
material.
When
scrapping
follow
the
local
environmental-protecting
regulations.
Render
the
dishwasher
inoperative.
Cut
the
power-cable
off.
Check
that
the
dishwasher
is
not
damaged
and
that
the
door
closes
tightly.
Only
use
the
dishwasher
for
domestic
use
and
for
its
intended
purposes.
Please
ensure
that
the
installation
and
the
electrical
connection
has
been
carried
out
by
a
qualified
techni-
cian
following
the
manufacturer's
instructions
(see
the
separate
instruction
booklet)
and
in
compliance
with
local
safety
regulations.
_
TRANSPORTATION
Close
the
water
tap.
Disconnect
the
inlet
and
drain
hoses
as
well
as
the
electric
plug.
Drain
any
residual
water.
Transport
the
dishwasher
upright.
tate
esata
ai
ipeticeiaam
aren
satneis
RE
TR
PP
LEN
SY
OEE
ES
STO
PTR
ITA
ere
pee

PRECAUTIONS
AND
GENERAL
SUGGESTIONS
Before
any
cleaning
or
maintenance
operation
dis-
connect
the
dishwasher
by
switching
off
the
electricity
at
the
mains
or
by
pulling
the
plug
out.
Mod
XxX
xxXxx
¥x
Do
not
leave
the
appliance
switched
on
unnecessarily.
EAH
SXAME
)
.
Should
any
fault
be
detected,.disconnect
the
ap-
pliance
from
the
mains
and
close
the
water
tap.
Then
contact
our
After
Sale
Service
describing
the
fault
and
giving
the
model
N°
of
the
appliance
and
the
Service
N°
=m
ligt
aS
Well
as
your
address
and
phone
N°.
.Do
not
use
the
open
door
as
a
workbase
and
do
not
allow
children
to
stand
or
sit
on
it.
Store
detergents,
rinse
aid
and
salt
in
a
cool
dry
place,
out
of
the
reach
of
children.
Only
use
detergents,
rinse
aid
and
regenerating
salt
specifically
recommended
for
use
in
domestic
dish-
washers.
Only
wash
crockery
and
cooking
utensils
which
are
dishwasher
safe.
For
best
results
place
all
cutlery
in
the
cutlery
baskets
with
the
handles
downwards.
However,
to
avoid
po-
tential
injuries,
cutlery
may
also
be
placed
in
the
bas-
ket
with
the
handles
upwards.
.
Silver
dishes
and
cutlery
must
be
washed
immediately
after
use
to
avoid
spots
and
discoloration.
.
The
following
utensils
are
unsuitable
for
washing
in
a
dishwasher:
.
Sha
@
Some
aluminum
articles
(they
tend
to
discolour).
See
OLN
@
Pewter
(it
becomes
dull).
\
7
SS
@
Wood
boards,
cutlery
with
wood
or
horn
handles
and
temperature
sensitive
plastic
articles
(they
may
warp,
crack
or
come
unglued).
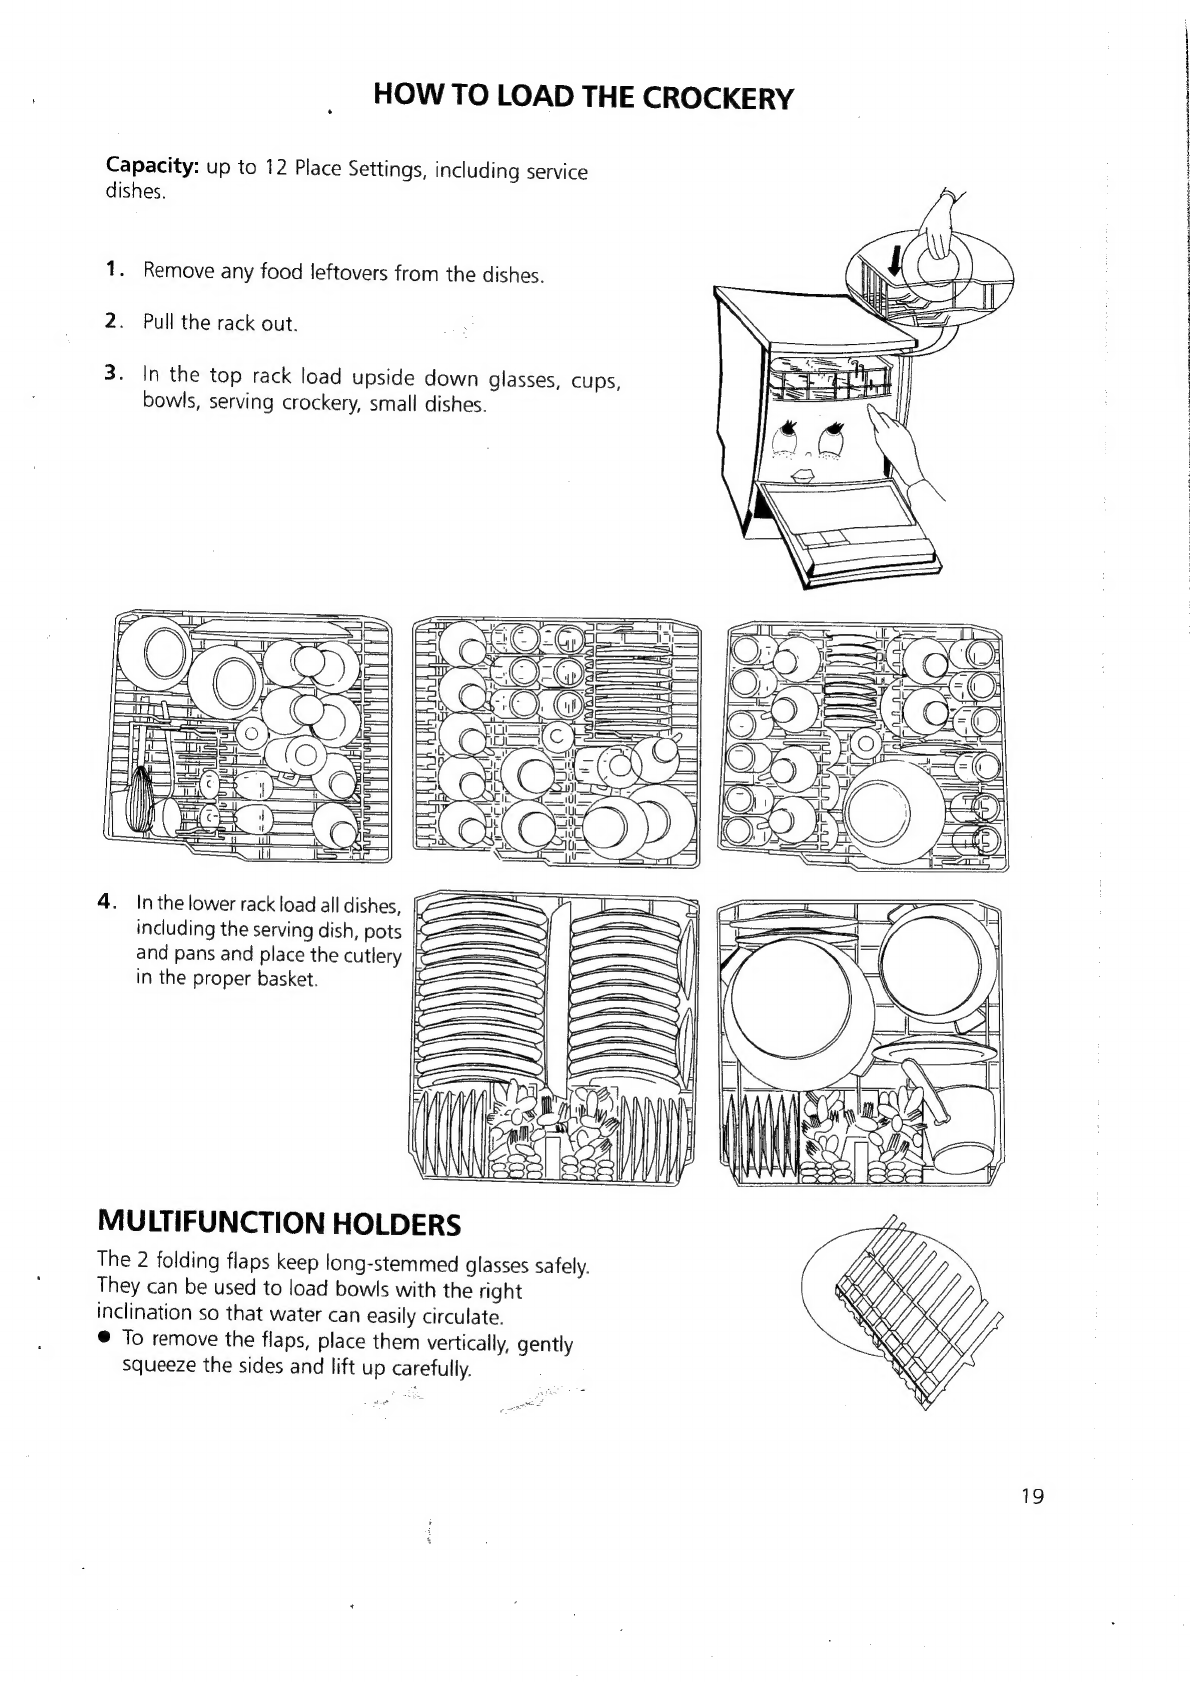
HOW
TO
LOAD
THE
CROCKERY
Capacity:
up
to
12
Place
Settings,
including
service
dishes.
.
ion
SHA
>!
I
Nea
=
a
1.
Remove
any
food
leftovers
from
the
dishes.
2.
Pull
the
rack
out.
3.
In
the
top
rack
load
upside
down
glasses,
cups,
bowls,
serving
crockery,
small
dishes.
Ba
1
ci
_|
y
xt
=
a
v=
il
“6
2
Oo
i]
{
ES
Aa}
OS
i
<a
<<}
\
J)
4.
Inthe
lower
rack
load
all
dishes,
including
the
serving
dish,
pots
=
and
pans
and
place
the
cutlery
_——
in
the
proper
basket.
—
am
———
—
———-.
minniNiese
rs
|
1
“(js
nL
{
if
!
ee
gil
S
et
|
°
OS
WA
|
|
Ne
see
rN
eee
MULTIFUNCTION
HOLDERS
The
2
folding
flaps
keep
long-stemmed
glasses
safely.
They
can
be
used
to
load
bowls
with
the
right
inclination
so
that
water
can
easily
circulate.
@
Jo
remove
the
flaps,
place
them
vertically,
gently
squeeze
the
sides
and
lift
up
carefully.
Pie
Te
Pee
ON
SEO
RIS
A
OSES
ADORE
ET
SEND
Be
Ae
AORN
Y.
RENEE

-HOW
TO
FILL
THE
WATER
SOFTENER
The
water
softener
must
be
filled
prior
to
first
use.
Then
check
periodically.
1.
Fill
in
the
salt.
@
Remove
the
lower
basket.
@
Unscrew
the
cover.
@
Put
in
the
funnel.
@
Fillin
the
salt.
Only
use
regenerating
salt
for
dish-
washers
(if
the
dishwasher
is
new,
pour
1
litre
of
water
in
the
reservoir
first).
@
Fill
the
salt
to
the
edge
(max.
2
kg)
then
stir
with
the
handle
of
a
spoon.
@
Tighten
the
cover
and
start
a
wash
programme
immediately.
®
Failure
to
operate
your
dishwasher
immediately
can
cause
some
corrosion.
(Using
the
pre-wash
is
not
enough).
SALT
LEVEL
INDICATOR
Your
dishwasher
is
equipped
with
a
mechanical
indica-
tor.
The
green
floater
sinks
as
the
level
drops.
@
Refill
with
salt
when
the
floater
is
no
longer
clearly
visible.
20
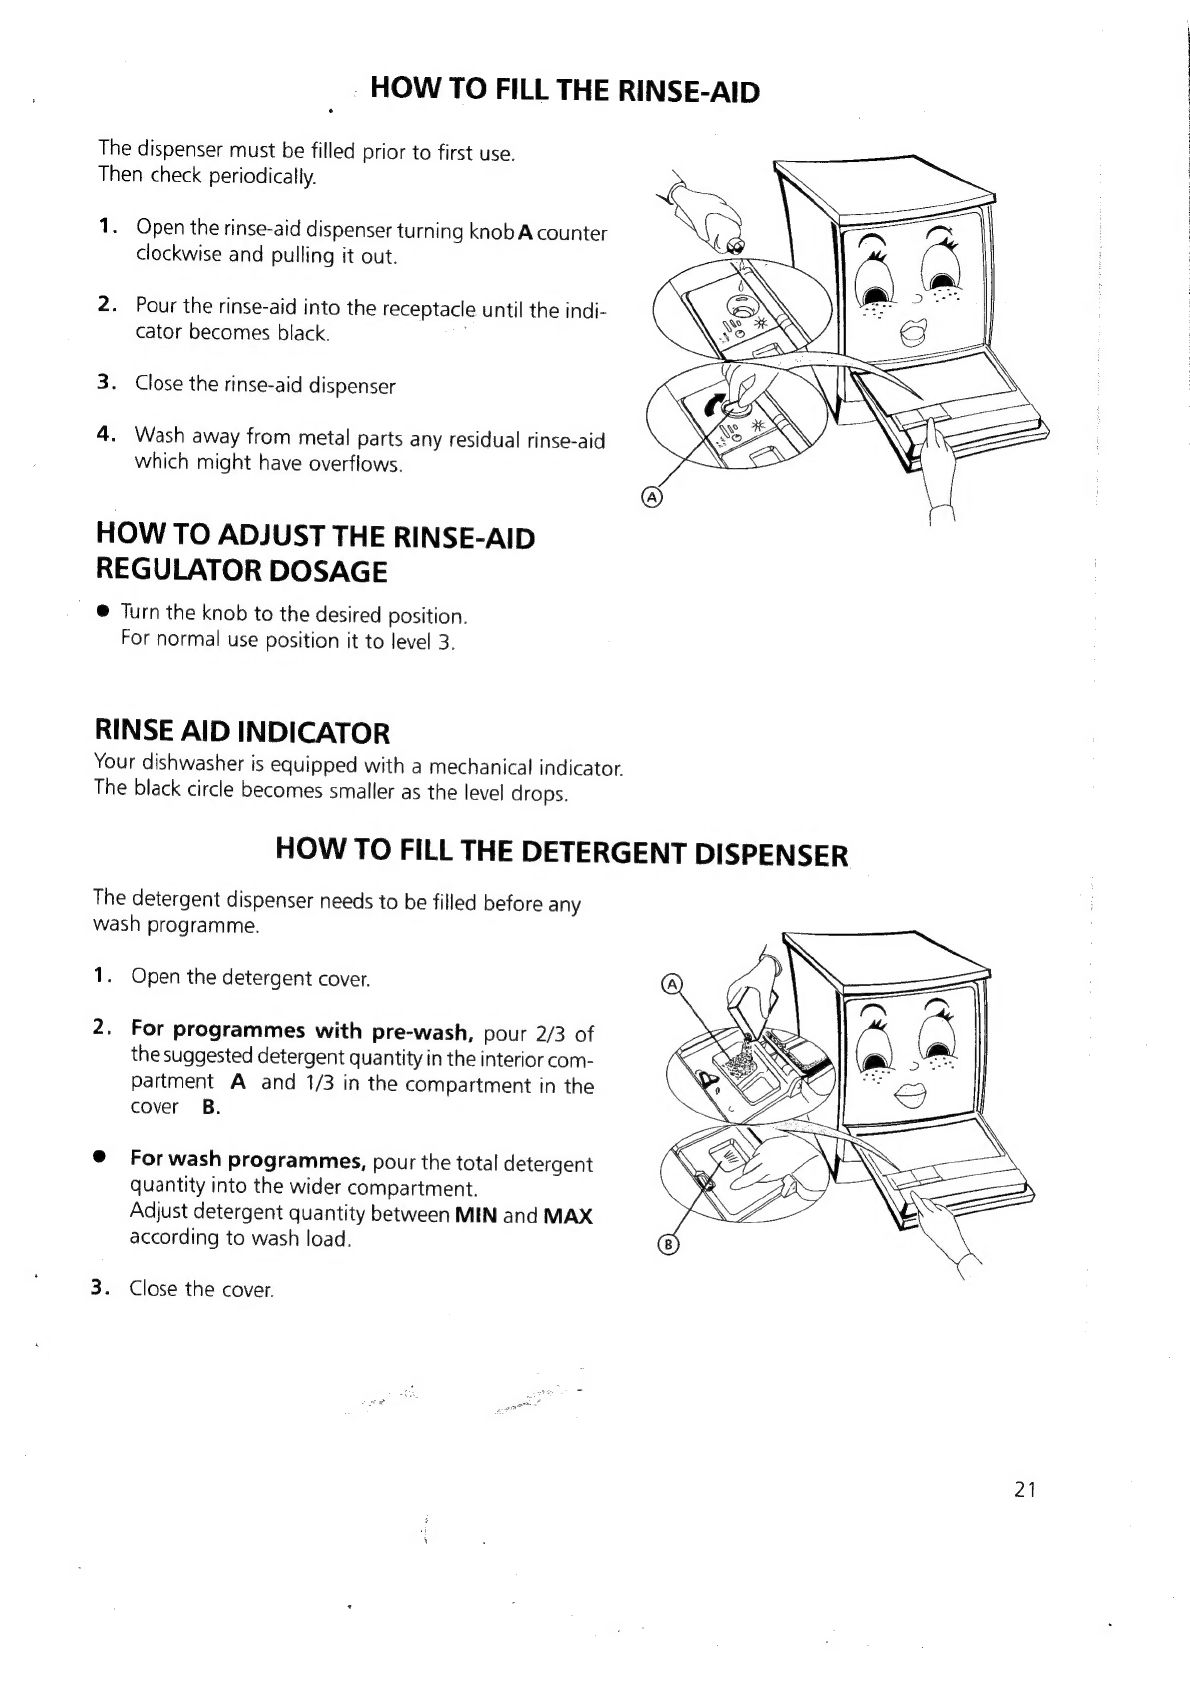
HOW
TO
FILL
THE
RINSE-AID
The
dispenser
must
be
filled
prior
to
first
use.
Then
check
periodically.
1.
Open
the
rinse-aid
dispenser
turning
knob
A
counter
clockwise
and
pulling
it
out.
2.
Pour
the
rinse-aid
into
the
receptacle
until
the
indi-
cator
becomes
black.
3.
Close
the
rinse-aid
dispenser
4.
Wash
away
from
metal
parts
any
residual
rinse-aid
which
might
have
overflows.
HOW
TO
ADJUST
THE
RINSE-AID
REGULATOR
DOSAGE
@
Turn
the
knob
to
the
desired
position.
For
normal
use
position
it
to
level
3.
RINSE
AID
INDICATOR
Your
dishwasher
is
equipped
with
a
mechanical
indicator.
The
black
circle
becomes
smaller
as
the
level
drops.
HOW
TO
FILL
THE
DETERGENT
DISPENSER
The
detergent
dispenser
needs
to
be
filled
before
any
wash
programme.
1.
Open
the
detergent
cover.
2.
For
programmes
with
pre-wash,
pour
2/3
of
the
suggested
detergent
quantity
in
the
interior
com-
partment
A
and
1/3
in
the
compartment
in
the
cover
B.
®@
For
wash
programmes,
pour
the
total
detergent
quantity
into
the
wider
compartment.
Adjust
detergent
quantity
between
MIN
and
MAX
according
to
wash
load.
3.
Close
the
cover.
21
RDO
SS
OTL
TE
a
LL
RI
RT
aE
TEES
RIOR
SIREN:
OE
SPN
REO
Ve
at

HOW
TO
OPERATE
THE
DISHWASHER
Load
the
dishwasher.
Fill
in
the
detergent.
Tightly
close
the
dishwasher
door.
Select
the
appropriate
programme,
turning
the
programme
control
knob
clockwise.
5.
Pull
out
the
selector
knob
to
start
the
programme.
BWN
TO
MODIFY
THE
PROGRAMME
SELECTED
1.
Push
in
the
selector
knob
to
stop
the
programme.
2.
Turn
the
selector
knob
to
the
required
programme.
3.
Pull
out
the
selector
knob
to
start
the
programme
again.
AT
THE
END
OF
THE
WASH
1.
Push
in
the
selector
knob.
2.
Leave
the
dishwasher
closed
for
15
minutes
approx.
to
allow
the
crockery
to
dry.
3.
Unload
the
lower
rack
first
then
the
top
rack.
HOW
TO
SELECT
THE
WASH
PROGRAMME
@
Follow
this
chart
to
select
the
proper
wash
programme.
Programme
Step
Consumption
Data
*)
Backflush
Interme-|
Final
|Drying|
Cold
|Electricity)
Time
or
diate
|
Rinse
Water
kWh
min
prewash
Wash
Litres
Part
load
for
prewash
Prewash
when
a
full
programme
<0,1
Programme
1.
‘
is
not
needed.
Intensive
Heavily
soiled
crockery,
pots
Programme
and
pans
with
dried
on
(65°C)
2
|
food
remains.
Normal
Programme
(65°C)(IEC436)
3
Normally
soiled
crockery
with
dried
on
food
remains.
@
Yes
*)
Figures
vary
according
to
water
pressure,
amount
of
soil,
size
of
load,
water
inlet
temperature,
electricity
fluctuations.
22
TROUBLESHOOTING
GUIDE
The
appliance
does
not
operate
Is
the
plug
connected
to
the
socket?
Is
there
a
power
failure?
Has
the
fuse
blown?
Is
the
door
properly
closed?
Has
the
selector
knob
been
pulled
out?
Is
the
water
tap
open?
The
crockery
is
not
cleaned
properly
@
Has
the
appropriate
programme
been
selected?
@
Has
enough
detergent
been
put
into
the
dispenser?
@
Are
the
filters
clean?
@
Are
the
jets
of
the
spray
arms
clean?
@
Is
the
cover
of
the
salt
container
properly
fitted?
@
Is
the
crockery
loaded
correctly?
@
Is
the
spray
arm
blocked?
The
dishes
are
spotted
@
Has
the
water
hardness
been
checked
and
ad-
justed
correctly?
@
|s
there
too
much
salt
in
the
container?
®@
Does
the
container
need
to
be
replenished?
@
Has
enough
detergent
been
put
into
the
dis-
penser?
Spots
and
glasses
on
cutlery
@
Excessive
amount
of
rinse
aid.
Adjust
the
rinse-aid
regulator
to
a
lower
setting.
Crockery
has
not
dried,
calcium
stains
@
Insufficient
amount
of
rinse-aid.
Adjust
the
rinse-aid
on
a
higher
setting.
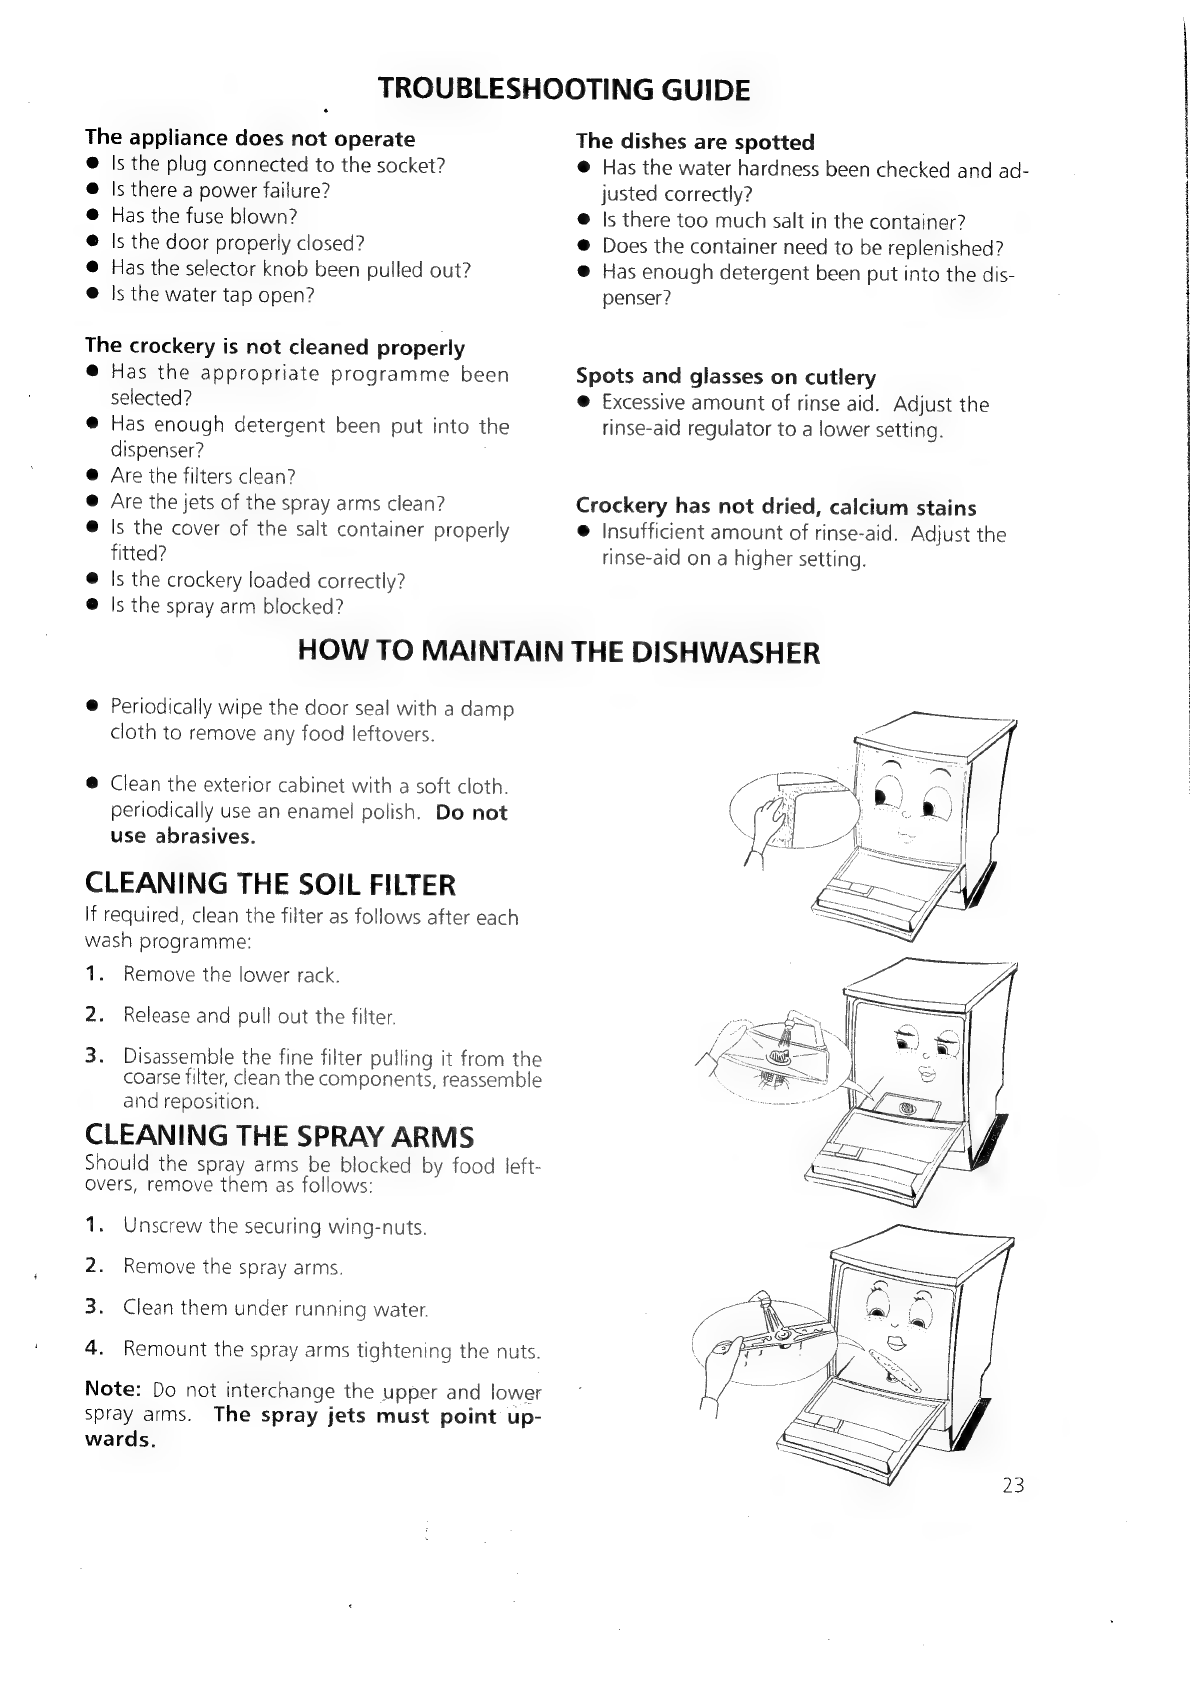
HOW
TO
MAINTAIN
THE
DISHWASHER
@
Periodically
wipe
the
door
seal
with
a
damp
cloth
to
remove
any
food
leftovers.
@
Clean
the
exterior
cabinet
with
a
soft
cloth.
periodically
use
an
enamel
polish.
Do
not
use
abrasives.
CLEANING
THE
SOIL
FILTER
If
required,
clean
the
filter
as
follows
after
each
wash
programme:
1.
Remove
the
lower
rack.
2.
Release
and
pull
out
the
filter.
3.
Disassemble
the
fine
filter
pulling
it
from
the
coarse
filter,
clean
the
components,
reassemble
and
reposition.
CLEANING
THE
SPRAY
ARMS
Should
the
spray
arms
be
blocked
by
food
left-
overs,
remove
them
as
follows:
1.
Unscrew
the
securing
wing-nuts.
2.
Remove
the
spray
arms.
3.
Clean
them
under
running
water.
4.
Remount
the
spray
arms
tightening
the
nuts.
Note:
Do
not
interchange
the
upper
and
lower
spray
arms.
The
spray
jets
must
point
up-
wards.
Before
calling
for
service:
1.
check
the
trouble-shooting
guide
carefully
to
see
if
you
can
correct
the
fault
yourself;
re-run
the
programme
to
check
if
the
fault
has
cleared
itself,
If
both
attempts
fail,
please
call
for
Service.
Describe
the
fault
and
give
the
model
N°
and
Service
N°
of
your
appliance,
your
address
and
phone
N°.
we
:
ue
ELECTRICAL
CONNECTION
©
@
This
appliance
conforms
to
EEC
directive
87/308
on
radiointerference.
@
Please
follow
the
particular
regulations
of
the
local
elec-
tricity
board.
@
Make
sure
that
the
voltage
stated
on
the
rating
plate
corresponds
to
the
voltage
in
your
home.
@
In
case
of
faults,
disconnect
the
plug
or
switch
off
electricity
at
the
mains.
©
|fa
power
cable
is
damaged,
replace
it
with
an
identical
one.
Contact
the
After
Sales
Service;
it
must
only
be
replaced
by
a
qualified
technician
to
prevent
risks.
WATER
INLET
AND
OUTLET
@
Follow
the
particular
regulations
of
the
local
water
board.
@
Ensure
that
the
inlet
and
drain
hoses
are
kink-free.
@
|f
the
length
of
the
hoses
does
not
suffice,
replace
them
with
similar
ones
(from
your
Dealer
or
Service).
@
Clamp
the
drain
hose
to
the
sink
to
prevent
it
from
falling-
off.
®
The
dishwasher
cannot
suck
water
back.
There
is
no
need
to
use
connecting
fittings
with
a
non-return
valve.
e
Valid
only
for
appliances
with
water-stop
system:
there
are
electrical
parts
in
the
inlet
hose
and
the
plastic
casing
of
the
water
connection.
Therefore,
the
hose should
not
be
cut
and
the
plastic
casing
should
not
be
immersed
in
water.
If
the
hose
is
damaged,
immediately
pull
the
plug
out
of
the
socket.
Standard
water
inlet
hose
For
cold
water
inlet
(up
to
25°C),
use
the
inlet
hose
with
the
blue
marking
(if
provided).
For
hot
water
inlet
(up
to
60°C),
use
the
inlet
hose
with
the
red
marking
(if
provided).
INFORMATION
FOR
TEST
LABORATORIES
Capacity
12
international
place
settings
including
serving
dishes
according
to
DIN
44990
-
IEC
436.
yor
Test
programme:
Norma
17,5
g
for
main
wash.
24
|
programme
(65°C).
Detergent:
7,5
g
for
prewash;


Sa
me
A
ae
+
This manual suits for next models
2
Table of contents
Other Ignis Dishwasher manuals

Ignis
Ignis ADL448 User manual

Ignis
Ignis AIE 2B19 A Installation and operation manual

Ignis
Ignis ADL 934 S User manual

Ignis
Ignis ABE 2B19 A X Installation and operation manual

Ignis
Ignis ADL 334 User manual

Ignis
Ignis ADL 101 User manual

Ignis
Ignis AKL 446 Operating manual

Ignis
Ignis Dishwasher User manual


