Beko DW80323 User manual

User’s Manual
Dishwasher DW80323

User’s Manual
Dishwasher
Welcome
Dear customer
Congratulatons on your choce of a Beko qualty dshwasher whch has been
desgned to gve you lastng servce.
Please read these nstructons before nstallng the dshwasher and usng t for
the frst tme. The nformaton contaned heren s provded to avod accdental
rsks and/or damage to your applance
Make sure you understand the controls pror to usng your applance. The
dshwasher must only be used for t’s ntended purpose, .e. the washng of
dshes n the home. Falure to observe these nstructons may nvaldate your
rght to free servce durng the guarantee perod.
Please keep these nstructons n a safe place for your future reference
If you have any questons, or f you are not sure about any nformaton
contaned n ths booklet please contact us - detals are on the back cover.
Beko Customer Servce
Notes
Due to the qualty control processes durng producton, there may be
some water left n your machne. Ths does not cause any damage.
Preparation before use
It is recommended that the dishwasher is operated on the Eco
programme with prewash before loading with dishes.

User’s Manual
Dishwasher DW80323

User’s Manual
Dishwasher
Welcome
Dear customer
Congratulatons on your choce of a Beko qualty dshwasher whch has been
desgned to gve you lastng servce.
Please read these nstructons before nstallng the dshwasher and usng t for
the frst tme. The nformaton contaned heren s provded to avod accdental
rsks and/or damage to your applance
Make sure you understand the controls pror to usng your applance. The
dshwasher must only be used for t’s ntended purpose, .e. the washng of
dshes n the home. Falure to observe these nstructons may nvaldate your
rght to free servce durng the guarantee perod.
Please keep these nstructons n a safe place for your future reference
If you have any questons, or f you are not sure about any nformaton
contaned n ths booklet please contact us - detals are on the back cover.
Beko Customer Servce
Notes
Due to the qualty control processes durng producton, there may be
some water left n your machne. Ths does not cause any damage.
Preparation before use
It is recommended that the dishwasher is operated on the Eco
programme with prewash before loading with dishes.

TABLE OF CONTENTS
1 Know your dshwasher
/ specfcaton 3
2 Warnng and safety
nformaton 5
Electrcal Safety 5
Chldren’s Safety 5
General 5
Recyclng 5
3 Installaton 6
What should not be washed n your
dshwasher 6
4 Before frst use 6
Electrcal requrements 7
Warnng 7
Ths applance must be earthed 7
Important 7
Fttng a derent plug 7
Water nlet hose connecton 8
Dran Hose Connecton 8
5 How to use 10
Water hardness & regeneraton
settngs 10
Water Hardness Level Adjustment
Table 11
Addng Dshwasher Salt 12
Detergent use 12
Fllng detergent dspenser 14
Rnse ad 15
Loadng the dshwasher 16
Foldng plate support rods 17
Movable Cutlery Basket 17
Upper basket heght adjustment 18
Foldng Tnes 18
Basket nsert wth varable heght
settngs 19
Removable 3rd basket 20
6 Programme Selecton and
Operatng Your Machne 21
Button and Button Descrptons 22
Turbo fan heat dryng system 23
Programme Selecton 23
Addng Functons to the Programme
23
Programme Steps Follow-up 24
Cancellng a Programme 24
Changng a Programme 24
Programmng the Tme Delay 24
Salt Indcator 25
Rnse Ad Indcator 25
Rnse Ad Indcator Settng 25
Startng Your Machne 26
7 How to clean your
dshwasher 28
Stanless steel door cleanng
nstructons 28
Upper spray arm 29
Lower spray arm 29
Top spray arm 30
8 Before callng servce
/ Trouble shootng 31

3GB
1Know your dshwasher / specfcaton
Upper basket
Lower basket
Cutlery basket
Detergent and Rinse
aid dispenser
Upper spray arm
Lower
spray arm
Filters
Removable 3rd basket
Top Spray Arm

4GB
Specfcaton
Load Capacity : 13 Place settngs
Height : 850 mm
Width : 598 mm
Depth : 598 mm
Depth/Heght (without worktop) : 570 mm / 820 mm
Net weight : 49 kg
Supply voltage : 220-240 V ~ 50 Hz
Fuse currrent : 10 A
Total power : 1800-2100 W
Heater power : 1800 W
Pump powers : 105/30 W
Diameter of plates for :
Upper basket : 25 cm max.
Lower basket : 31 cm max.
Because we continually strive to improve our products, we may change
our specications and designs without prior notice.
Note for Testng Insttutes
The necessary nformaton for performance testng wll be provded upon
request. The request can be done by e-mal through:
dshwasher@standardloadng.com
Please do not forget to wrte the model code ,stock code and seral number
nformaton of the applance besdes your contact nformaton n the e-mal.
The model code, stock code and seral number nformaton can be found on the
ratng label, whch s placed on the sde of the door.

5GB
2Warnng and safety nformaton
Electrcal Safety
The dshwasher should only be
operated on the voltage specfed.
For electrcal safety, only earthed
plugs and sockets should be used.
Always use the fused plug provded
wth the applance. The user s
responsble for meetng these basc
safety requrements. The lfe of your
machne and your safety depend on
you usng an electrcal nstallaton
complant to standards.
Do not use an extenson cable.
When dsconnectng your machne
from the mans supply, always pull
from the plug. Never pull the cord
tself.
Chldren’s Safety
Never allow your chldren to play wth
your dshwasher.
Dshwasher detergents contan
rrtants and abrasves. These
ngredents mght have caustc
eects n the eyes, mouth and throat.
They can be extremely dangerous f
swallowed. Avod contact wth skn
and eyes. Check that the detergent
receptacle s empty after completon
of the wash cycle.
Keep detergents out of chldren’s
reach and do not put detergent n the
machne untl rght before you start
the washng programme.
The water n your dshwasher s not
sutable for drnkng, for ths reason
do not allow your chldren near your
machne when the front door s open.
Never allow your chldren to play on or
st onto the front door when the front
door s open.
After unpackng your machne, keep
the packng materal out of chldren’s
reach.
Warning !
Long cutlery, such as ladles and
long knives, etc must be placed
horizontally on top of the full cutlery
basket or on the racks to prevent
accidental injury.
General
Ths dshwasher has been desgned to
clean your drty dshes at home.
Never use chemcal solvents n your
machne; ths may lead to exploson
rsk.
Never use materals other than
specally produced softenng salts n
the salt dspenser of your machne.
Never use materals other than
specally produced detergents and
rnse-ads n the detergent and rnse
ad dspensers of your machne.
Please dspose of the packagng
materal and old applances carefully.
Please ensure old machnes do not
become a threat to chld safety. It s
known that chldren lock themselves
n unused machnes. To avod such a
problem t s advsed that you cut the
mans cable o and break the door
latch so t does not lock.
The door of your machne s desgned
to support the weght of a full basket
when the lower basket s pulled all the
way out. Never place any other load
on the door, otherwse the machne
may tp over.
After usng the dshwasher always
close the door as an open door can be
a hazard.
Do not open the door whlst the
applance s n operaton.
Recyclng
Please help us to protect our
envronment. Packng materals
and some parts of your machne are
produced usng recyclable materals.
These materals are marked up wth
recyclng symbol and materal type
nformaton (>PE<, >PS<, >POM< …).

6GB
These raw materals should not be
mxed wth general refuse and should
be gven to recyclng centers.
We suggest you contact your local
authorty for dsposal nformaton and
facltes avalable.
Ths product bears the
selectve sortng symbol
for waste electrcal and
electronc equpment
(WEEE).
Ths means that ths product must
be handled pursuant to European
Drectve 2002/96/EC n order to be
recycled or dsmantled to mnmze
ts mpact on the envronment. For
further nformaton, please contact
your local or regonal authortes.
Electronc products not ncluded
n the selectve sortng process
are potentally dangerous for the
envronment and human health
due to the presence of hazardous
substances.
What should not be washed
n your dshwasher
Do not wash tems soled wth
cgarette ash, candle, pant wax,
dyes, chemcals etc. snce these may
damage your machne
Do not wash forks, knves and spoons
wth wooden or bone handles, tems
stuck together wth adhesves,
plastc tems not resstant to hgh
temperatures. Copper, tn tems and
alumnum ware n your dshwasher.
As wth hand washng, some “on-
glaze” decorated chna, alumnum or
slver have a tendency to dscolour or
fade. Also, certan types of glassware
and crystals may lose ther shne and
become opaque n tme.
A chemcal reacton can occur
between slver cutlery and stanless
steel cutlery. As a precauton, do not
wash together.
Iron and cast ron objects can rust and
stan other tems.
3Before frst use
4
When decdng on where to nstall
your new dshwasher, ensure that the
poston of your dshwasher makes
t easy and quck for you to place the
dshes n the dshwasher and also to
Installaton
After unpackng your dshwasher,
check the machne aganst any
possble transportaton damage.
Never nstall and use damaged
machnes. If your machne s damaged
contact your retaler. Always have
your machne nstalled by qualfed
electrcan/plumber to ensure correct
nstallaton.
Any repars and mantenance work
on ths dshwasher should be carred
out by authorsed servce sta only.
Unauthorised repairs are not only
dangerous, but also lead to the
cancellaton of your warranty.
If your dshwasher has an Internal
Lghtng; ncase of a defect broken
lamps can be changed by an
authorzed servce techncan.
Make sure the electrcty and water
connectons of your dshwasher are
n complance wth the nstructons
for assembly as stated n the relevant
part of ths booklet.
It is recommended that the
dishwasher is operated without
dishes for very rst wash for
hygiene reasons.
Before the frst wash, add 1 lt of
water to the salt container of your
machine.
Pay specal attenton to whether
or not the tem you wash n the
dshwasher s dshwasher-proof.
If n doubt, contact the manufacturer
of the tem.
Do not overload your dshwasher or
do not load tems other than those
mentoned n ths manual.
7GB
losng the fuse cover, the plug must
not be used untl a replacement fuse
cover has been ftted. Colour of the
replacement fuse cover must be the
same colour as that vsble on the
pn face of the plug. Fuse covers are
avalable from any good electrcal
store.
Important
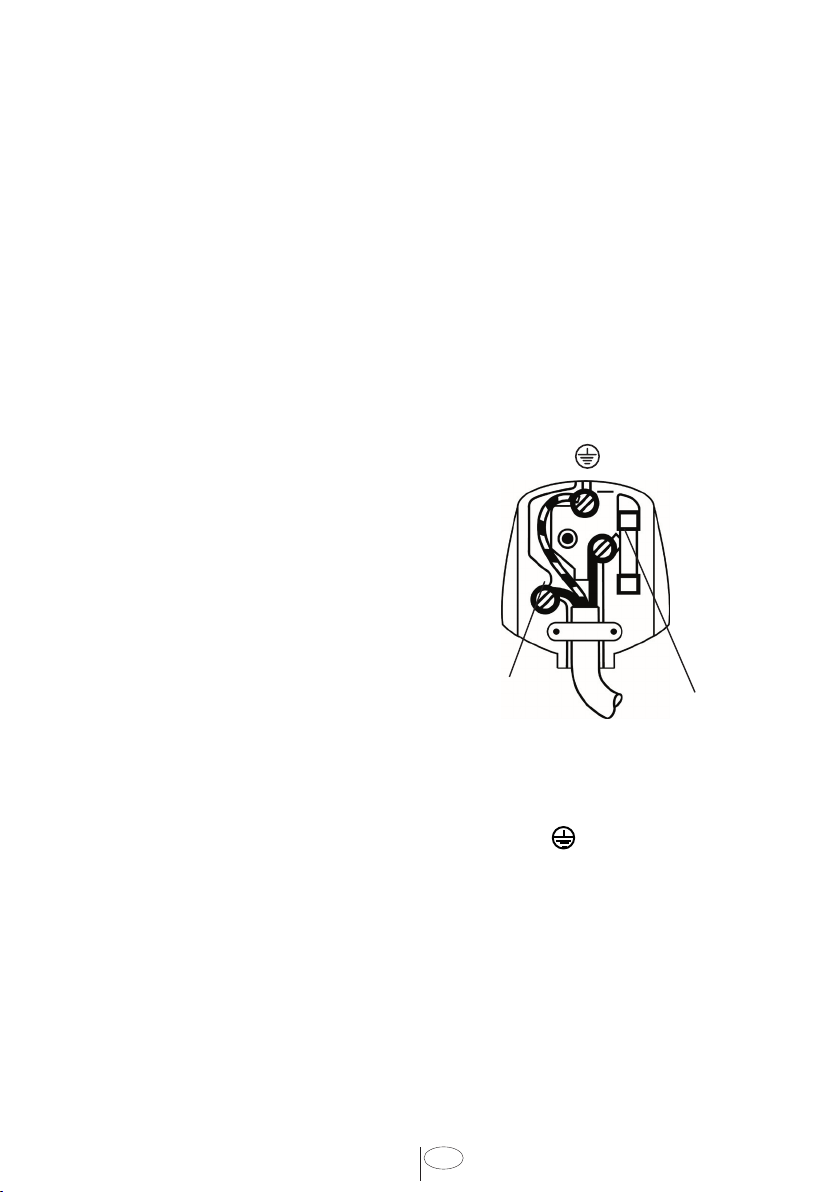
Fttng a derent plug
As the colours of the wres n the
mans lead of ths applance may
not correspond wth the coloured
markngs dentfyng the termnals on
your plug, proceed as follows:
1. Connect the green - yellow or
green (earth) wre to the termnal
n the plug marked ‘E’ or wth the
symbol or coloured green
and yellow or green.
2. Connect the blue (neutral) wre to
the termnal n the plug marked
‘N’ or coloured black.
3. Connect the brown (lve) wre to
the termnal n the plug marked ‘L’
or coloured red.
Wth the alternatve plugs a 13A fuse
must be ftted ether n the plug or
adaptor or n the man fuse box. If n
doubt contact a qualfed electrcan.
Warnng
Ths applance must be
earthed
If the ftted moulded plug s not
sutable for your socket, then the plug
should be cut o and an approprate
plug ftted.
Destroy the old plug, whch s cut
o as a plug wth a bared cord could
cause a shock hazard f nserted nto a
socket elsewhere n the house.
The moulded plug on ths applance
ncorporates a 13A fuse. Should the
fuse need to be replaced an ASTA
approved BS1362 fuse of the same
ratng must be used. Do not forget to
reft the fuse cover. In the event of
Electrcal requrements
Before you nsert the plug nto
the wall socket make sure that the
voltage and the frequency shown n
the ratng label corresponds to your
electrcty supply.
We recommend that ths applance be
connected to the mans supply va a
sutable swtched and fused socket n
a readly accessble poston.
If the supply cord or the mans lead
s damaged please do not replace
t yourself. The supply cord or the
mans lead must be replaced by a
Beko Authorsed Servce Agent or a
smlarly qualfed person.
take them out and store away after
the dshwashng s completed.
Avod placng the dshwasher where
the ambent temperature s lkely to
fall below. 5 degrees C. (41° F)
When postonng your applance,
take care not to damage your oorng,
ppes wall coverngs etc. Do not move
the applance by pullng by the door or
handle
Table of contents
Other Beko Dishwasher manuals

Beko
Beko DSFN 1532 User manual

Beko
Beko DEN48520XAD User manual

Beko
Beko DIN48430 User manual

Beko
Beko DIN35322 User manual

Beko
Beko DISHWASHER User manual

Beko
Beko DUT36420X User manual

Beko
Beko PDSN Series User manual

Beko
Beko DFN28321S User manual

Beko
Beko DFN15R10X User manual

Beko
Beko DFN28432X User manual


