Ignite MARGAY racing K3 User manual

IGNITE K3 SET-UP GUIDE BOOK
margayracing margayracing visit us online at margay.com
margayracing

2015 IGNITE K3 SET-UP
BASELINE SET-UP INFORMATION FOR THE IGNITE K3
Page 1of 29
CONTENTS
2 Chassis Information
3 Quick Start Guide
4 Safety Guide
5 General Maintenance
7 Driving Lines and Terms
8 Tire Pressures
9 Wheels and Tires
8 Front Track Width
11 Front Torsion Bar
12 Front Ride Height
13 Caster/Camber/Toe
16 Rear Track Width
17 Rear Wheel Hubs
18 Rear Axle
19 Rear Ride Height
20 Supplemental Seat Struts
21 Seat Style and Positioning
23 Chassis Scaling
24 Wet Conditions
25 Adjusting for Understeer
27 Adjusting for Oversteer
28 Adjusting for Hopping
29 Adjusting for Flat Tight
2015 IGNITE K3 SET-UP
BASELINE SET-UP INFORMATION FOR THE IGNITE K3
Page 2of 29
CHASSIS INFORMATION
Chassis Model:
2015 Ignite K3
Serial Number:
Chassis Color:
Welded by:
Assembled by:
Spindle heights:
Bodywork Style:
FP7
BDE
Duo
Evo Stilo
Stilo
Bodywork Color:
Black
Red
Blue
Silver
Yellow
Rear Bumper:
RS3
Tris
Metal
Steering Shaft:
17”
19”
21”
Steering Wheel:
Standard Ignite flat top
King 330mm flat top
Steering Hub:
Flat
Angled
Torsion Bar:
None
Tube
Adjustable
Steering Bushing:
Standard (plastic)
Billet toe lock/fairing mount
Seat / Struts:
Standard
Bully adjustable
Axle:
40mm A (soft)
40mm B (std)
40mm C (hard)
Rear Hubs:
65mm wide
95mm wide
125mm wide
Front Wheels:
#75329 –AlumiLite 5” x 135mm DSM
Rear Wheels:
#75425 –AlumitLite 5” x 6.5”
#75415 –AlumitLite 5” x 7.75”
Tires Size:
4.5/10.0-5
6.0/11.0-5
7.1/11.0-5
Tire Compound:
Bridgestone YDS
Bridgestone YLC
Brakes:
MCP Cast system with 8.25” slotted rotor

2015 IGNITE K3 SET-UP
BASELINE SET-UP INFORMATION FOR THE IGNITE K3
Page 3of 29
QUICK START GUIDE
Bridgestone YDS
Bridgestone YLC
Tire Pressure
25 –30 PSI
12 –14 PSI
Wheels
AlumiLite –135mm / 7.75”
AlumiLite –135mm / 7.75”
Front Width
30mm inside wheel
25mm inside wheel
Front Torsion Bar
soft position
soft position
Front Ride Height
neutral
neutral
Caster
neutral
neutral
Camber
-2mm / side
-2mm / side
Toe
+1mm / side
+1mm / side
Rear Width
52” outside / outside
52.5” outside / outside
Rear Hubs
40mm x 65mm
40mm x 65mm
Rear Axle
standard –‘B’
standard –‘B’
Rear Ride Height
axle in upper position
axle in upper position
Seat Struts
none
none
SCALING START GUIDE
Front Percentage: +/- 43%
Left Percentage: +/- 49%
Cross Percentage: +/- 50%
(cross percentage refers to RF and LR as a percentage of the total weight)

2015 IGNITE K3 SET-UP
BASELINE SET-UP INFORMATION FOR THE IGNITE K3
Page 4of 29
SAFETY GUIDE
Always wear a helmet, neck support, driving suit and gloves while operating. Never
drive on public roads, highways or any place other than a sanctioned racing facility.
Karts can cause severe injuries, paralysis or death to the operator or others. Owner
assumes all responsibility for safe operation of the vehicle.
KART INSPECTION
It is the owner’s responsibility to carry out regular inspection of the kart components,
brakes, steering, etc. All steering components should be properly fastened and safety
clipped: steering shaft, tie rods, spindles and kingpins. All braking components should
be properly fastened and safety clipped: master cylinder, brake rod, brake caliper and
brake rotor. All nuts holding on wheels should be locking nuts. All nuts holding on
bodywork components should be locking nuts: front bumper, nerf bars and rear
bumper brackets.
KART MODIFICATIONS
Under no circumstances does Margay Racing authorize or recommend modifications
of any type to the chassis or components we manufacture and distribute. This
includes alternative methods of component assembly, chassis manufacturing, etc.
Altering the chassis or components is solely the responsibility of the owner.
2015 IGNITE K3 SET-UP
BASELINE SET-UP INFORMATION FOR THE IGNITE K3
Page 5of 29
GENERAL MAINTANENCE
Below are a list of items to keep your new kart running at maximum efficiency:
Change oil after Day 1 break-in, and every 2
hours following with 5w30 synthetic engine
oil (any brand).
Ensure front and rear sprockets are aligned
for a smooth chain. Lube chain before every
run with chain lube or a 90w gear oil.
Tension should be loose enough to show 2-3
teeth when pulled up on.
Lube between bearing wall and dust jacket
before every run with Tri-Flo or WD-40. Avoid
the use of white lithium grease.
Inspect and clean clutch components with
brake clean and emery cloth after every 2
hours of use.
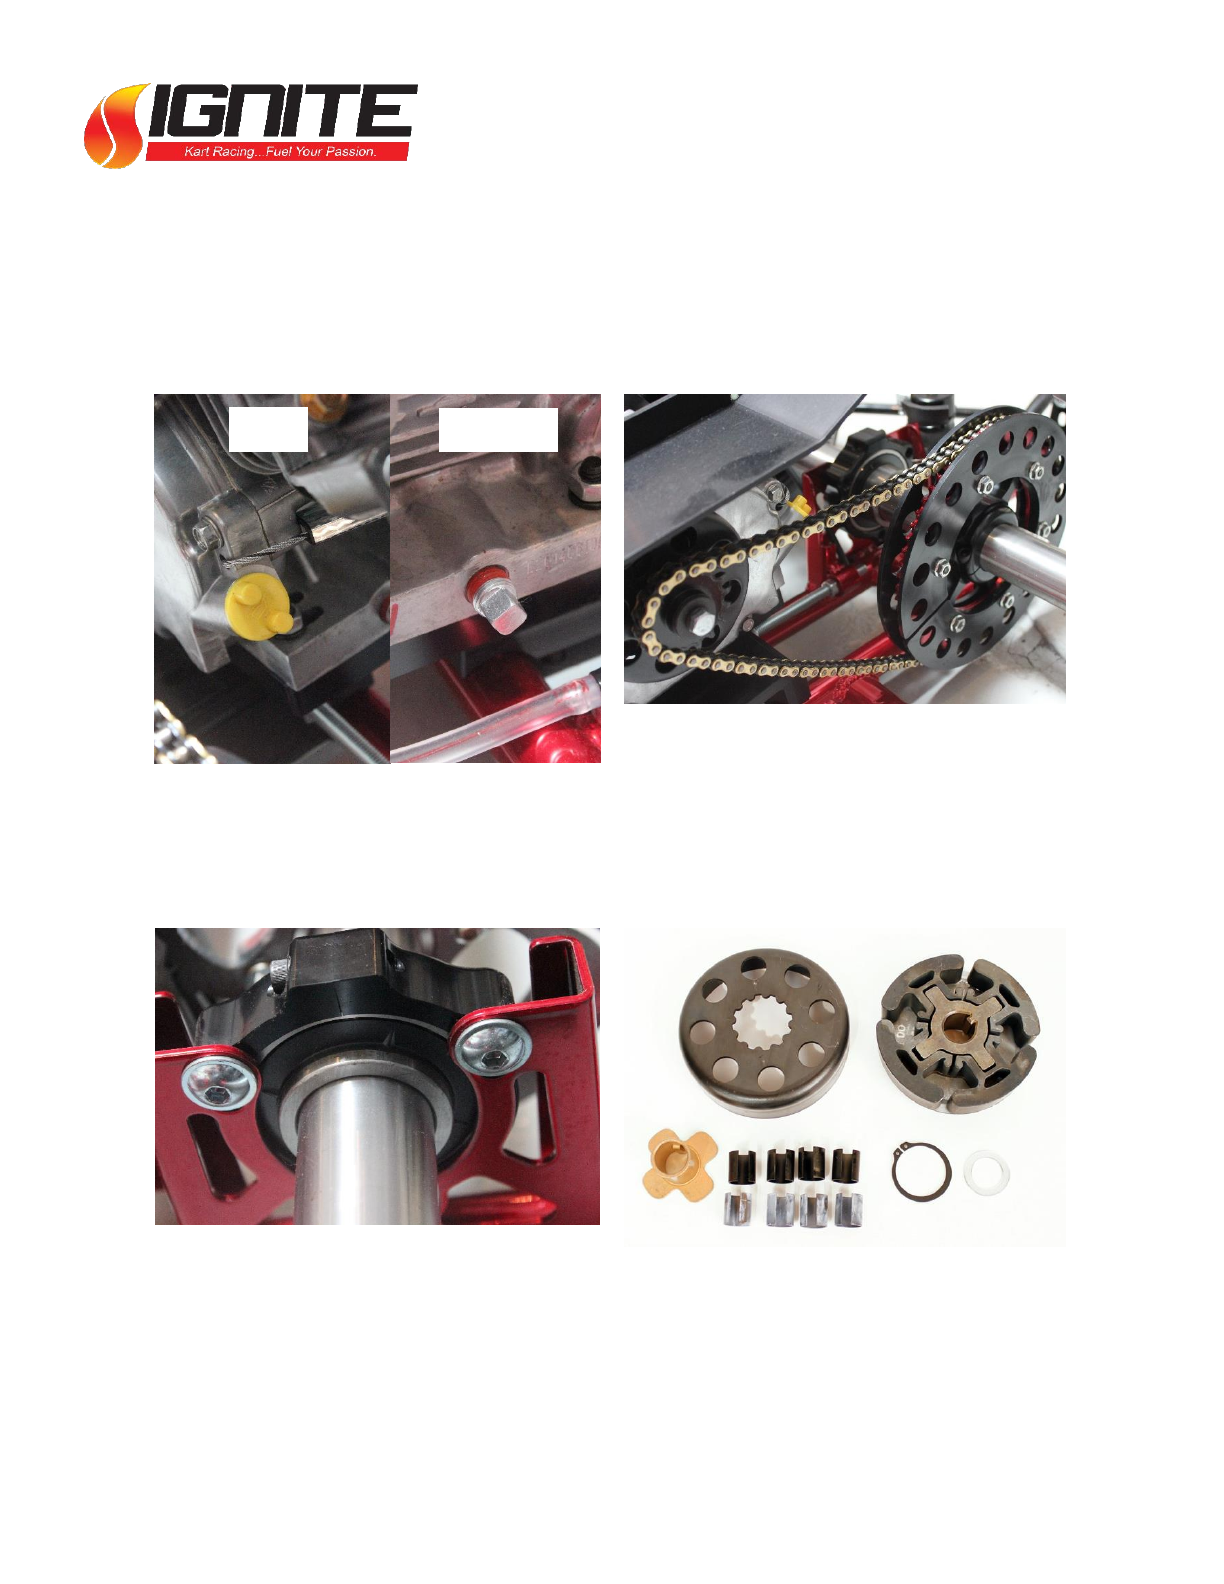
FILL
DRAIN

2015 IGNITE K3 SET-UP
BASELINE SET-UP INFORMATION FOR THE IGNITE K3
Page 6of 29
GENERAL MAINTANENCE (CONT)
At the completion of each days racing
sessions, be sure to pull the carburetor drain
plug screw to empty the float bowl. This will
help limit required maintenance on the
carburetor in the future.
Remove the float bowl on the carburetor and
break clean the brass jets that are screwed
into the housing. This will help ensure your
engine is running at the optimum level.
Check and tighten the axle bearing set
screws after each on track session. This helps
ensure that the axle stays in position and
doesn’t move under load on track.
Check header bolts after each run to ensure
they are always tightly fastened. Also check
header mounting bolts, brackets, silencer,
and silencer clamp.
2015 IGNITE K3 SET-UP
BASELINE SET-UP INFORMATION FOR THE IGNITE K3
Page 7of 29
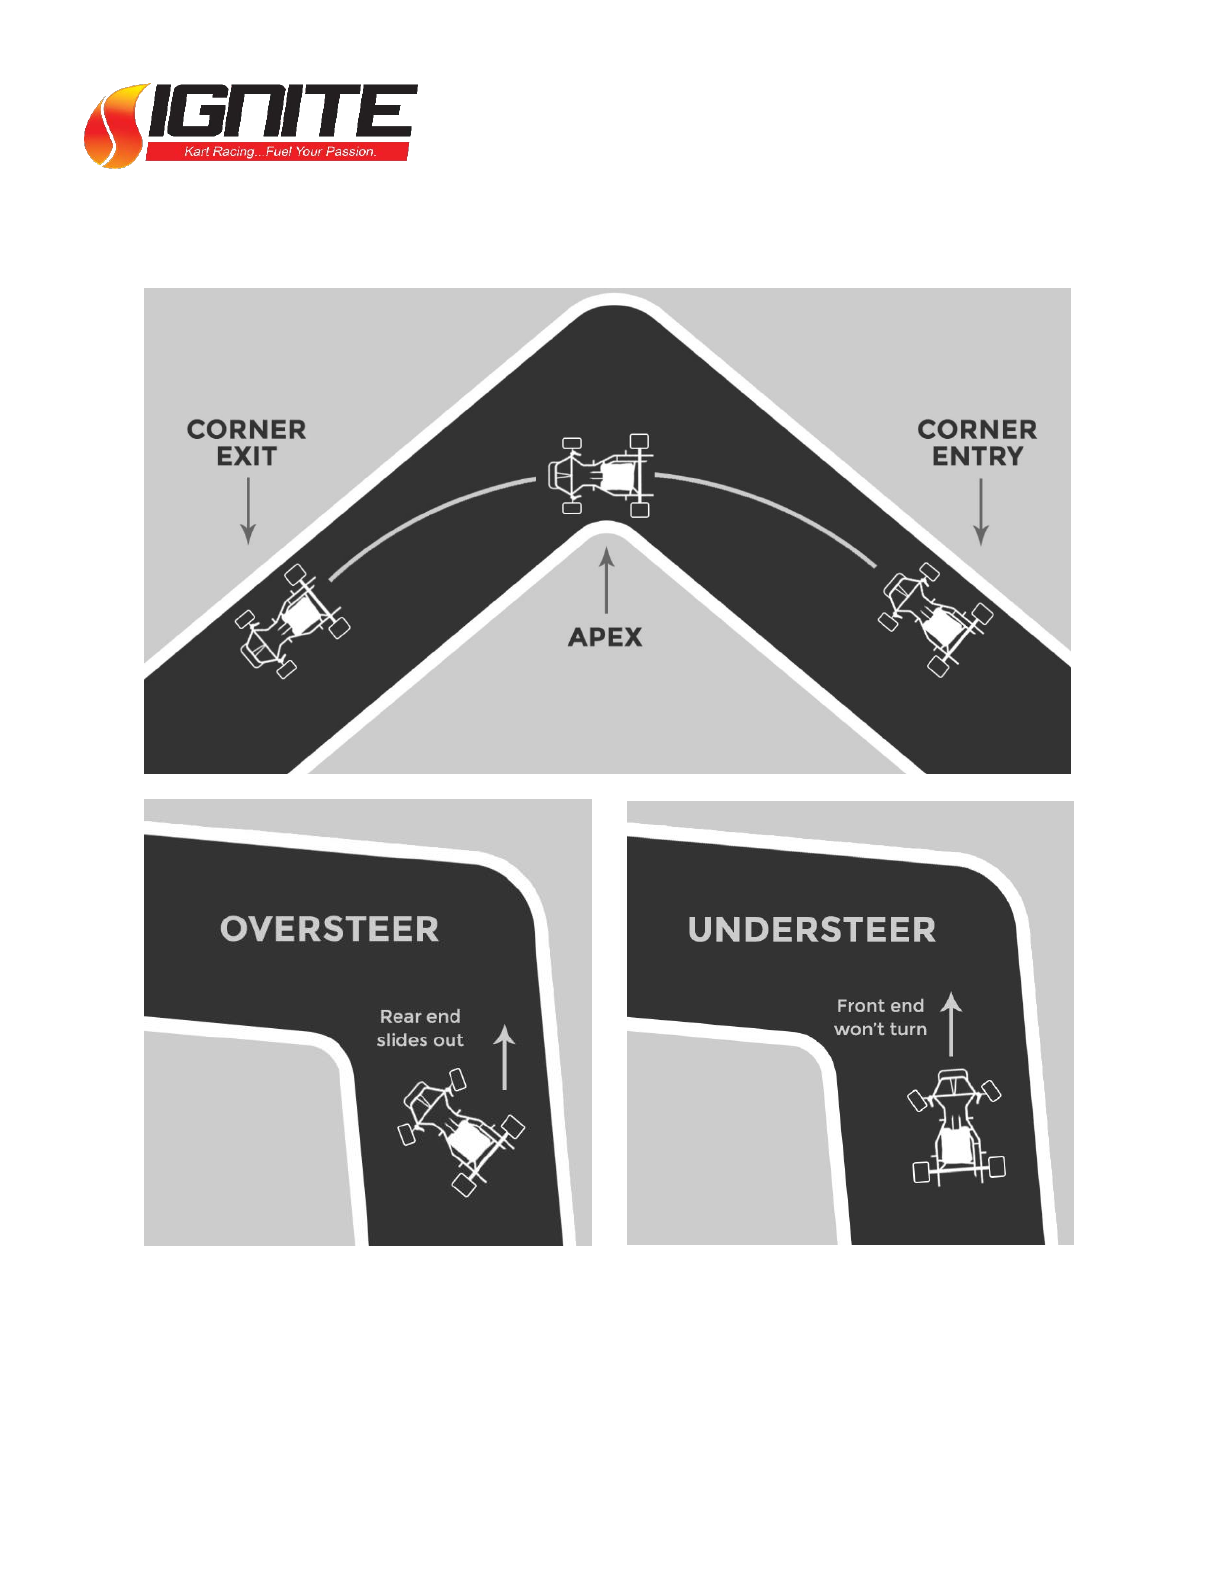
DRIVING LINE AND TERMS
Oversteer is when the rear of the kart
slides more than the front, causing the
driver to counter steer to avoid spinning.
Understeer is when the front slides more
than the rear, causing the kart to ‘push’
forward instead of turning.

2015 IGNITE K3 SET-UP
BASELINE SET-UP INFORMATION FOR THE IGNITE K3
Page 8of 29
TIRE PRESSURES
Tire pressure starting points (set before going on track):
Bridgestone YLB: 10 –12 PSI
Bridgestone YLC: 12 –14 PSI
Bridgestone YDS: 25 –30 PSI
Setting tire pressures for a cold tires is done so the tire can reach maximum
temperature near the last 25% of the race. It is important that you set tire pressures
cold with values that discourage them from becoming too hot during the session.
Using air, each tire should not rise more than 4 PSI during a normal session. We
recommend you check your tires after each session to ensure that they are not
overheating.
PROBLEM: The kart gets better as the race goes on, but by then it’s too late.
SOLUTION: Increase the tire pressures by 1 PSI per session. This will help get the tires
to temperature faster.
PROBLEM: The kart is really good in the first 3 laps, but gets slower from there.
SOLUTION: Decrease the starting tire pressures by 1 PSI per session. Your tires are
getting to temperature too quickly and are likely overheating from there. Decreasing
the starting pressures will allow them to heat slightly slower, making the kart become
progressively better instead of progressively worse.
Cold tire pressures can vary based on ambient temperature. On a cold day, increase
starting tire pressures. On a hot day, decrease starting tire pressures.

2015 IGNITE K3 SET-UP
BASELINE SET-UP INFORMATION FOR THE IGNITE K3
Page 9of 29
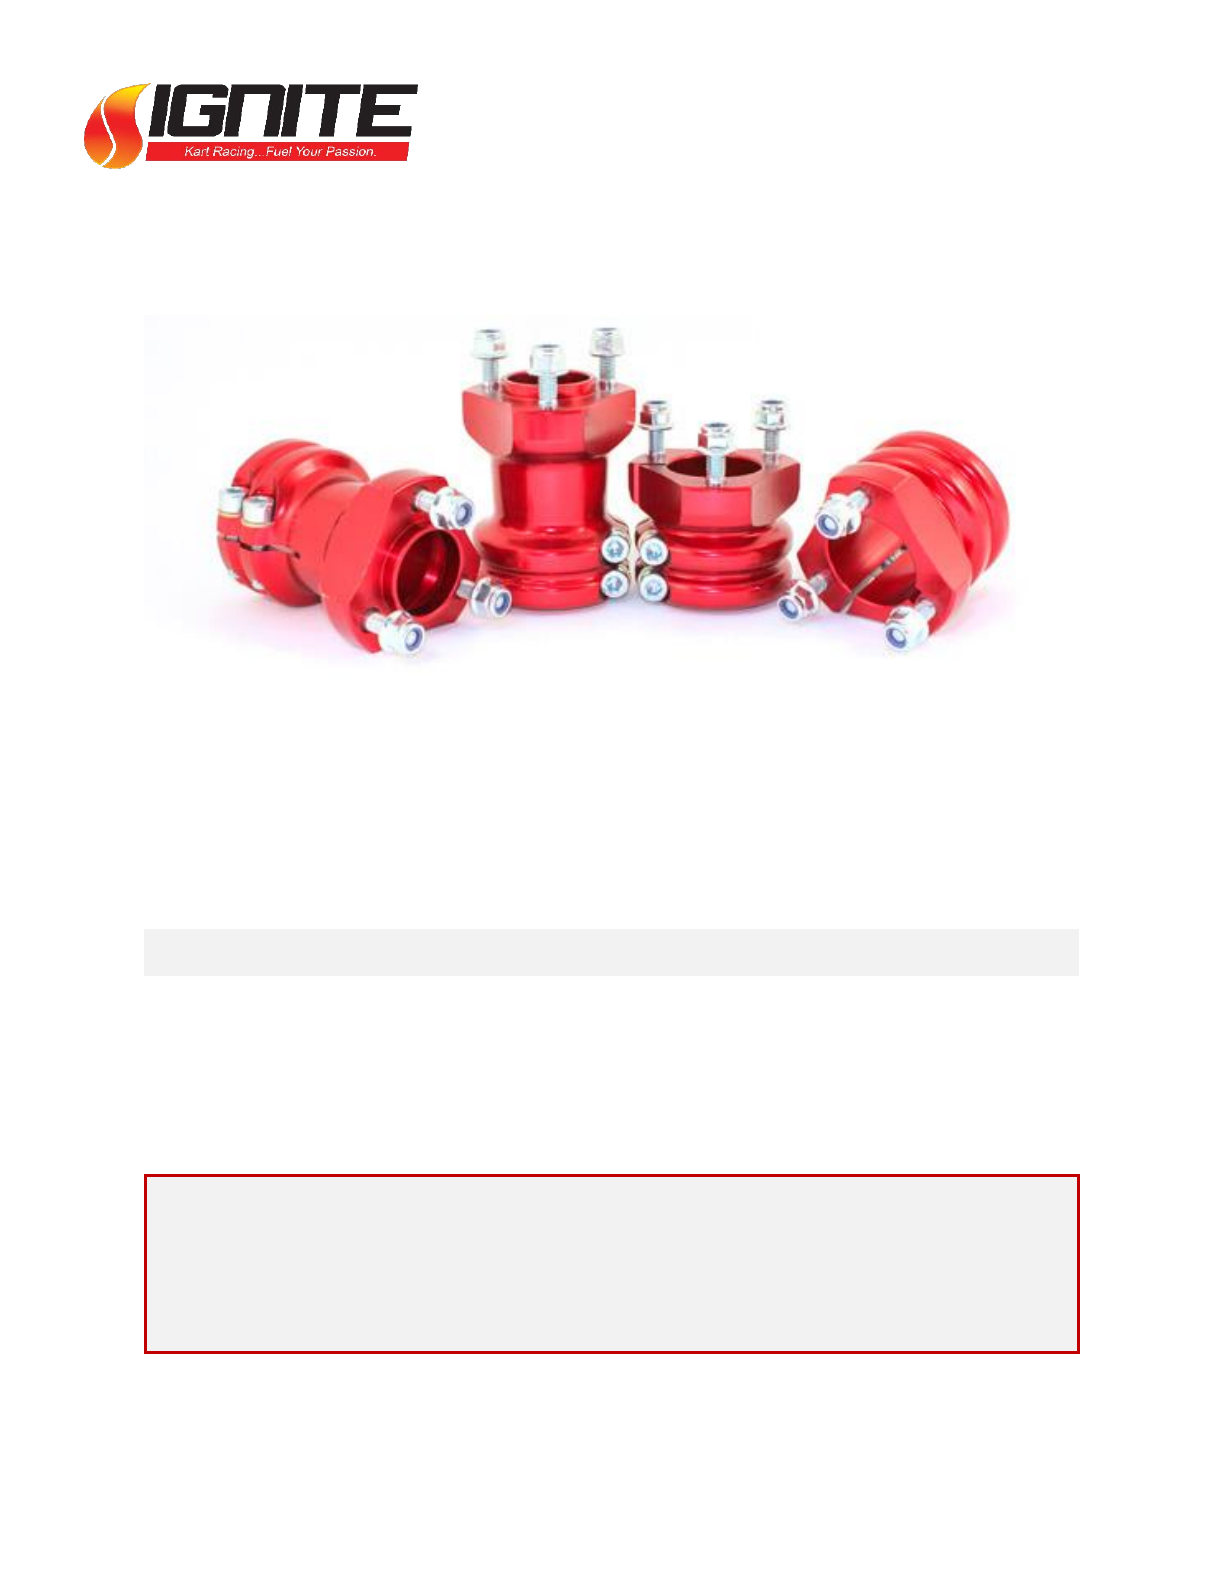
WHEELS AND TIRES
The relationship between wheels and tires is an important one, both for handling and
overall performance. The recommended wheels for the Ignite K3 are:
#75329 –AlumiLite 5” x 135mm DSM front wheel / for 4.5 front tires
#75425 –AlumiLite 5” x 6.5” Euro mount wheel / for 6.0 rear tires
#75415 –AlumiLite 5” x 7.75” Euro mount wheel / for 7.1 rear tires
There are also magnesium M-Series wheels available which are more porous than the
spun aluminum wheels. Because the magnesium are more porous, they are softer and
provide less overall grip.
Balancing tires each time they are mounted on the rim is important to ensure that
all rotational mass is properly balanced.
PROBLEM: The front tires are shaking at the end of the straight sections.
SOLUTION: Your front tires likely need to be balanced. Use stick on wheel weights to
ensure that the wheel/tire combination is properly balanced.
PROBLEM: The kart has too much overall grip.
SOLUTION: Switching to the M-Series magnesium wheel set will help the kart lose
some of its mechanical grip. Maintain the same wheel widths will ensure a true back
to back comparison.
The Ignite Series uses a spec wheel width and type for each class. Please refer to
the Ignite Series rule book for more information.
2015 IGNITE K3 SET-UP
BASELINE SET-UP INFORMATION FOR THE IGNITE K3
Page 10 of 29
FRONT TRACK WIDTH
Front track width can be adjusted by
moving spacers to the inside or
outside of the wheel. Adjusting front
track width can adjust the front
responsiveness on turn-in and also
the resulting inside rear tire lift.
Margay karts come with three spacer
sizes: 5mm (small), 10mm (medium)
and 20mm (large).
Baseline front track width settings:
Bridgestone YLB: 20mm inside the wheel
Bridgestone YLC: 25mm inside the wheel
Bridgestone YDS: 30mm inside the wheel
PROBLEM: The front end understeers on corner entry.
SOLUTION: Widen the front track width by 5mm per side, per session. This will
increase front end weight transfer and grip levels on corner entry.
PROBLEM: The front grips too much and causes the rear end to slide on entry.
SOLUTION: Narrow the front track width by 5mm per side, per session. This will
decrease the front end transfer on corner entry.
NOTE: Tighten the castle nut just enough so there is no lateral movement of the
wheel or spacers. Over-tightening will result in pressure being put on the wheel
bearings, causing them to not spin freely.
2015 IGNITE K3 SET-UP
BASELINE SET-UP INFORMATION FOR THE IGNITE K3
Page 11 of 29
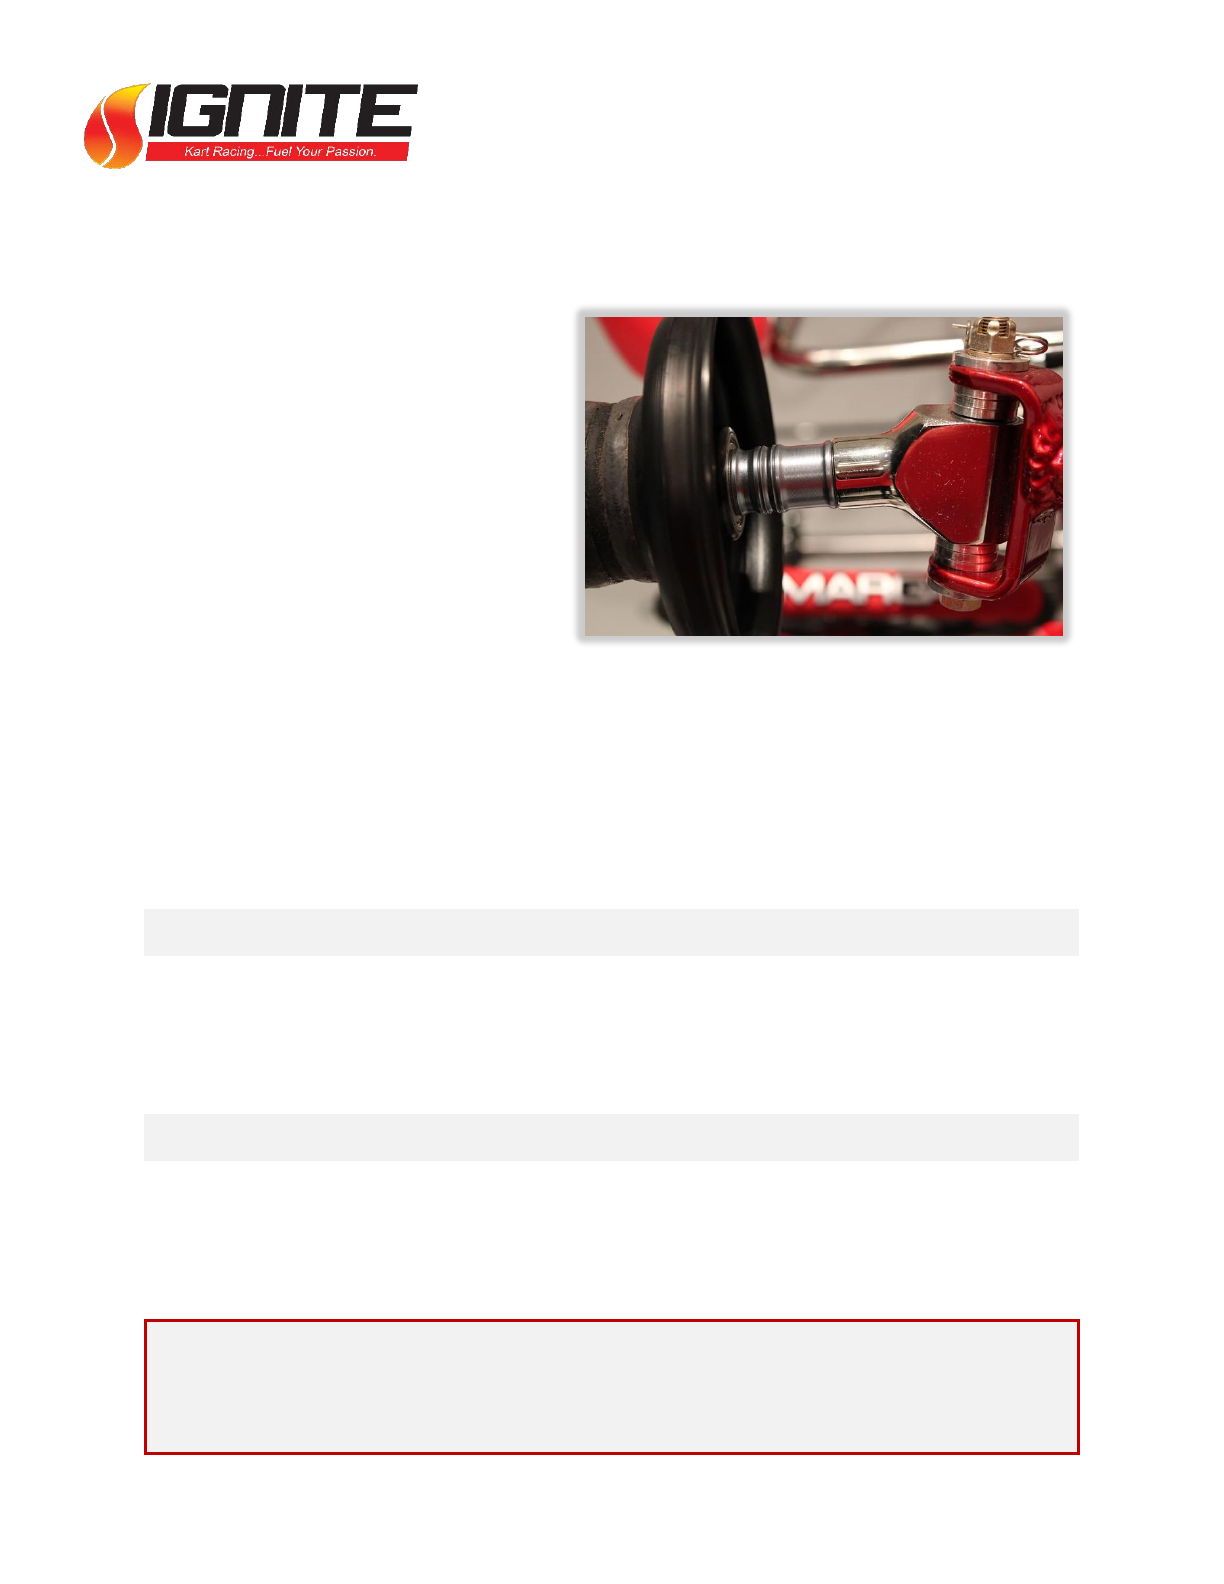
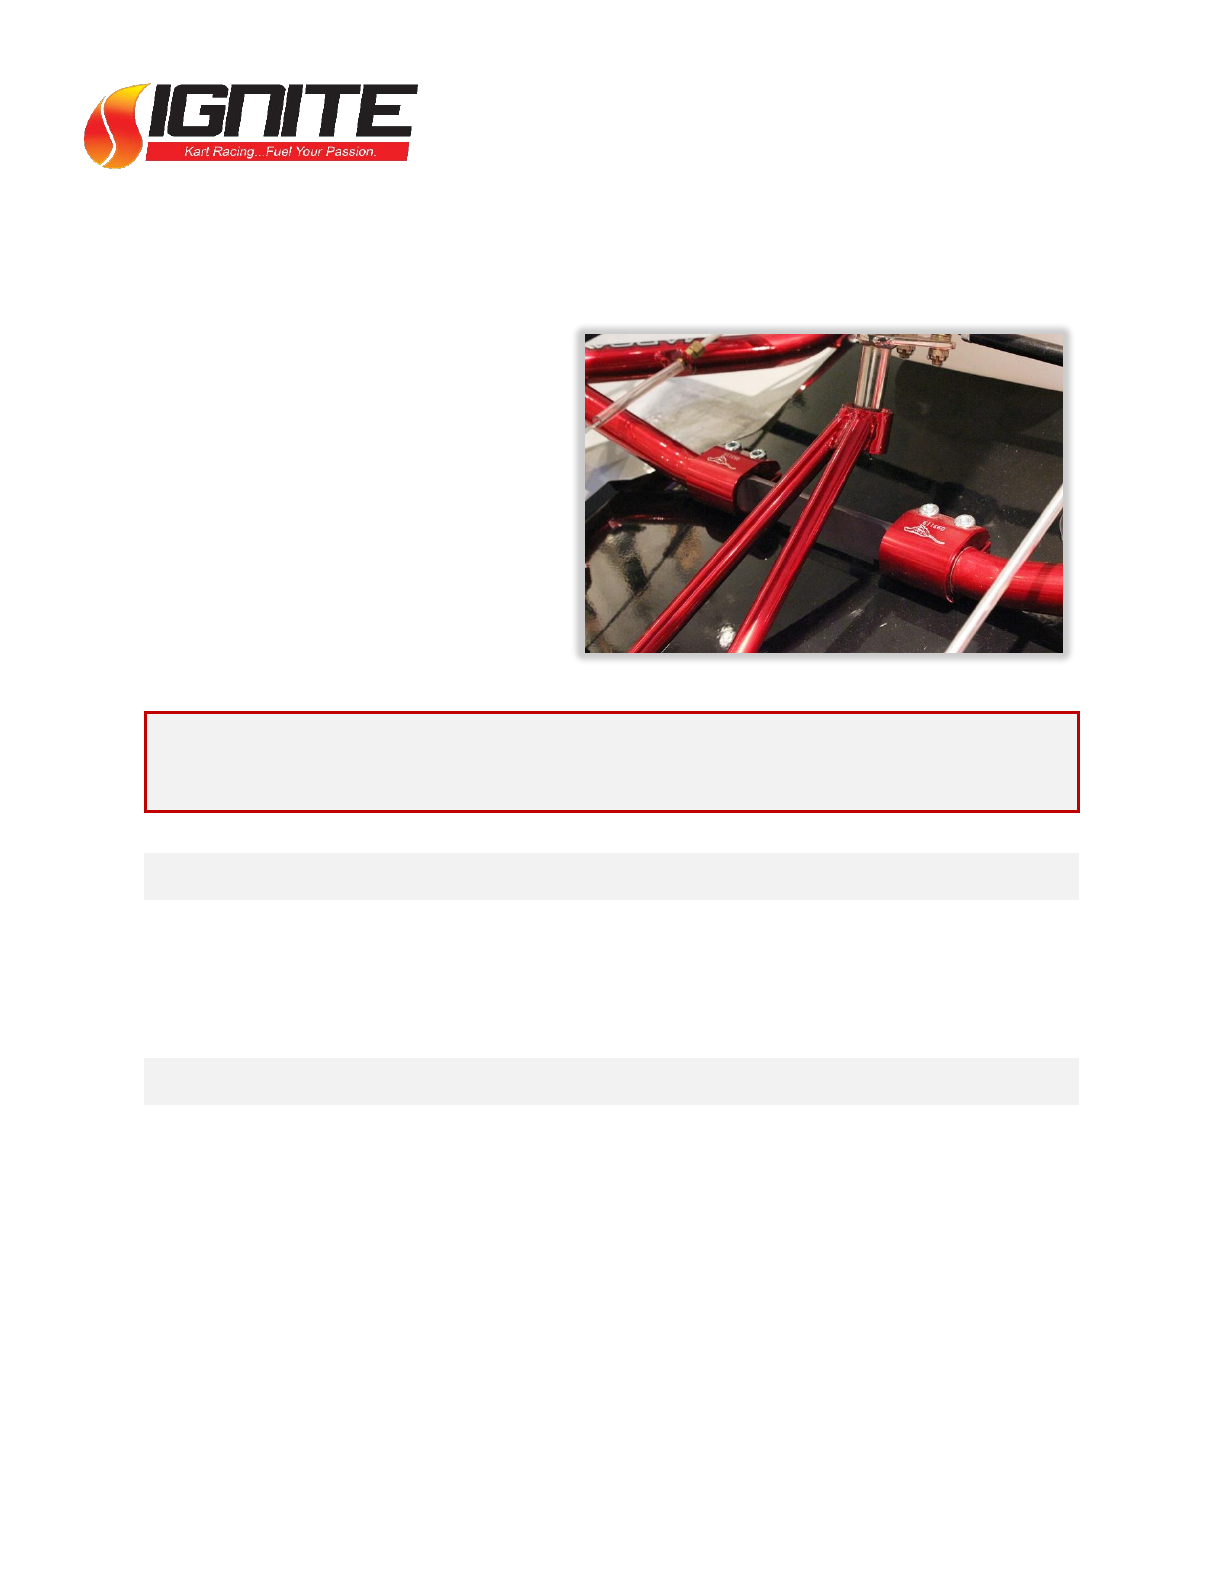
FRONT TORSION BAR
Front torsion bars allow you to adjust
the front end rigidity of your kart.
Adjusting the rigidity of the front end
allows you to control the stability and
responsiveness on corner entry and
exit. A stiff front end will increase
turn in responsiveness and a soft
front end will cause the front end to
be slightly lazier.
NOTE: A softer front end will also help create a more stable straight line braking feel,
but at the expense of front end grip.
PROBLEM: The inside rear lifts too much, causing understeering in the front end.
SOLUTION: Use the adjustable torsion bar and set it in the stiff position (shown above).
This will increase front grip levels and reduce the rotation of the inside rear wheel.
PROBLEM: The front end is too “darty”.
SOLUTION: Move the front bar to the soft position, or if already in the soft position,
remove it entirely. This will help create more chassis flex in the front and reduce the
aggressive turn in response.

2015 IGNITE K3 SET-UP
BASELINE SET-UP INFORMATION FOR THE IGNITE K3
Page 12 of 29
FRONT RIDE HEIGHT
Front ride height can be adjusted for
two reasons: to adjust cross weight
percentages and to adjust front end
responsiveness. A standard Ignite K3
has three adjustment shims on top of
the spindle, and three adjustment
shims on the bottom of the spindle.
Shims can be moved and adjusted
accordingly.
PROBLEM: The front end grips too much, creating oversteer through the corner.
SOLUTION: Dropping the spindle down 1 shim will help move the center of gravity
(C.O.G.) to the rear of the kart, reducing the front end responsiveness and increasing
rear end grip levels.
PROBLEM: I can’t get the front end to be as responsive as I want it to be.
SOLUTION: Raise the spindle 1 shim at a time. This will move the C.O.G. to the front of
the kart and increase your front weight percentage, resulting in an increase in front
end grip levels.
PROBLEM: While scaling, the front weights are off 10lbs from RF to LF.
SOLUTION: Drop the spindle 1 shim on the light side. This will raise that corner and
create a shift of an average of 6lbs and help balance out the front weight transfer.
2015 IGNITE K3 SET-UP
BASELINE SET-UP INFORMATION FOR THE IGNITE K3
Page 13 of 29
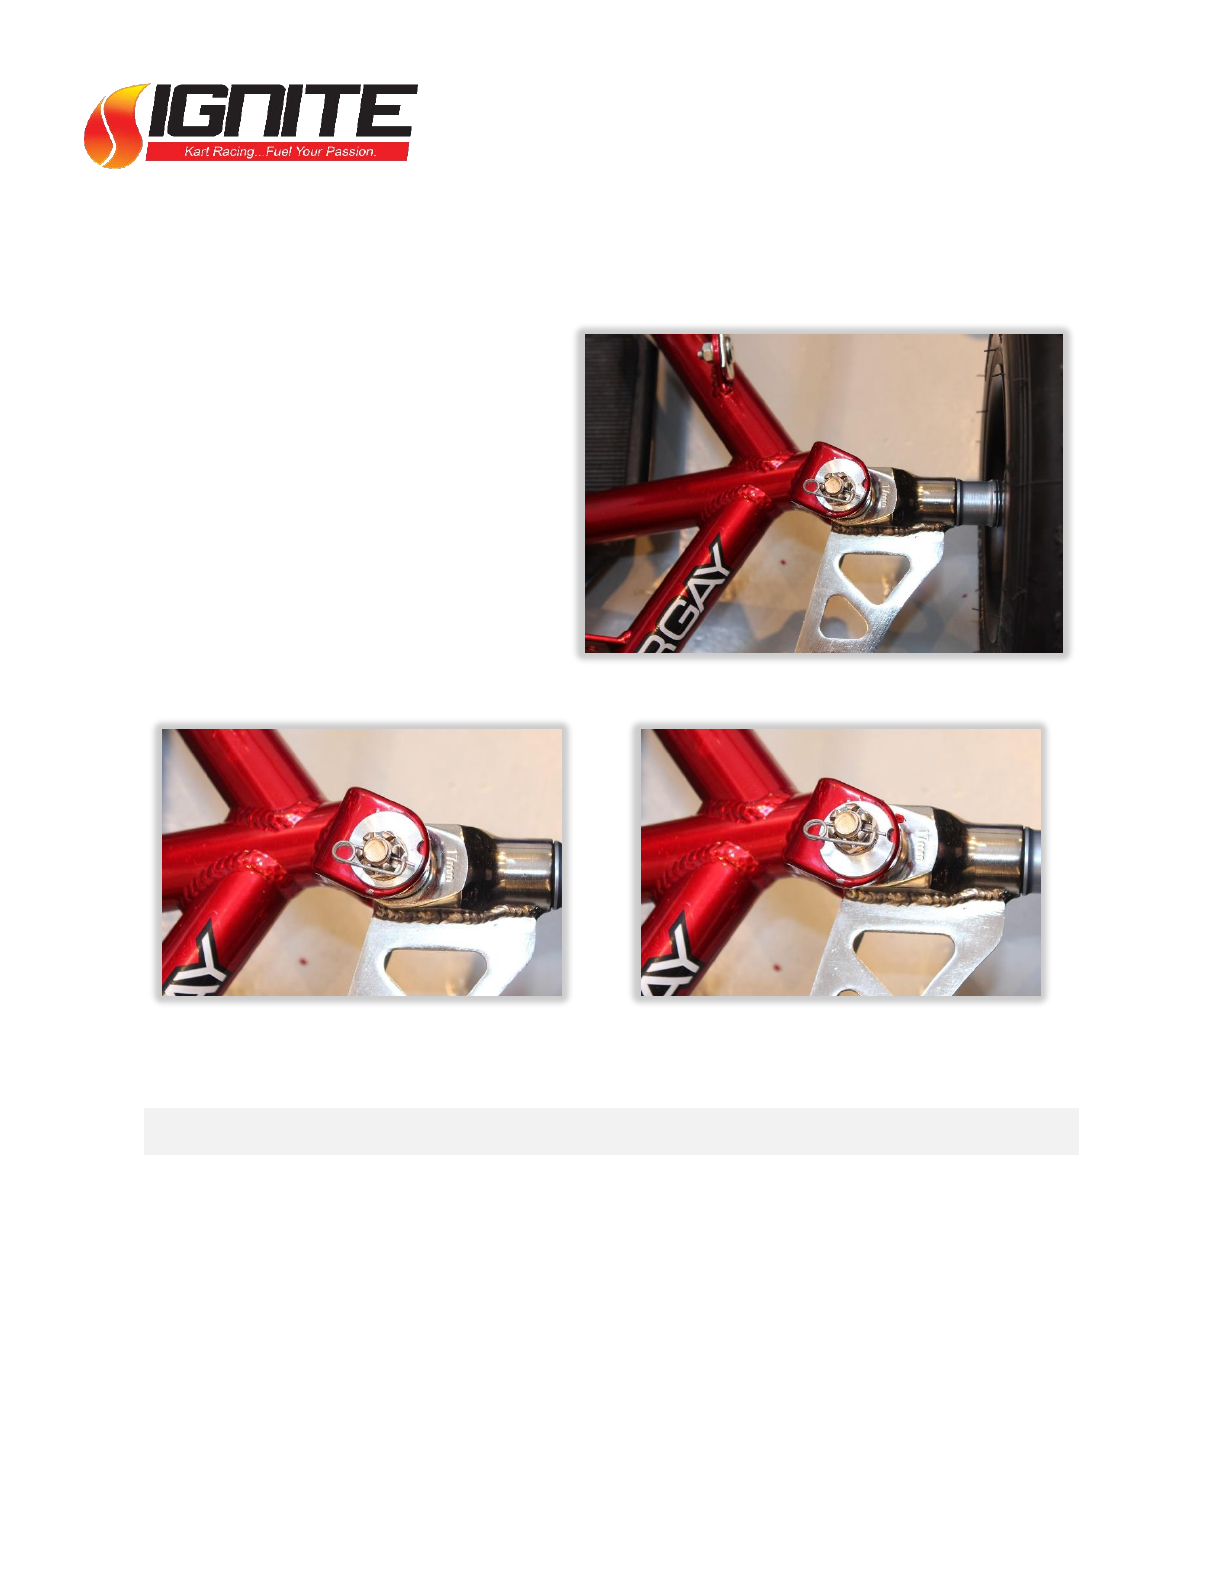
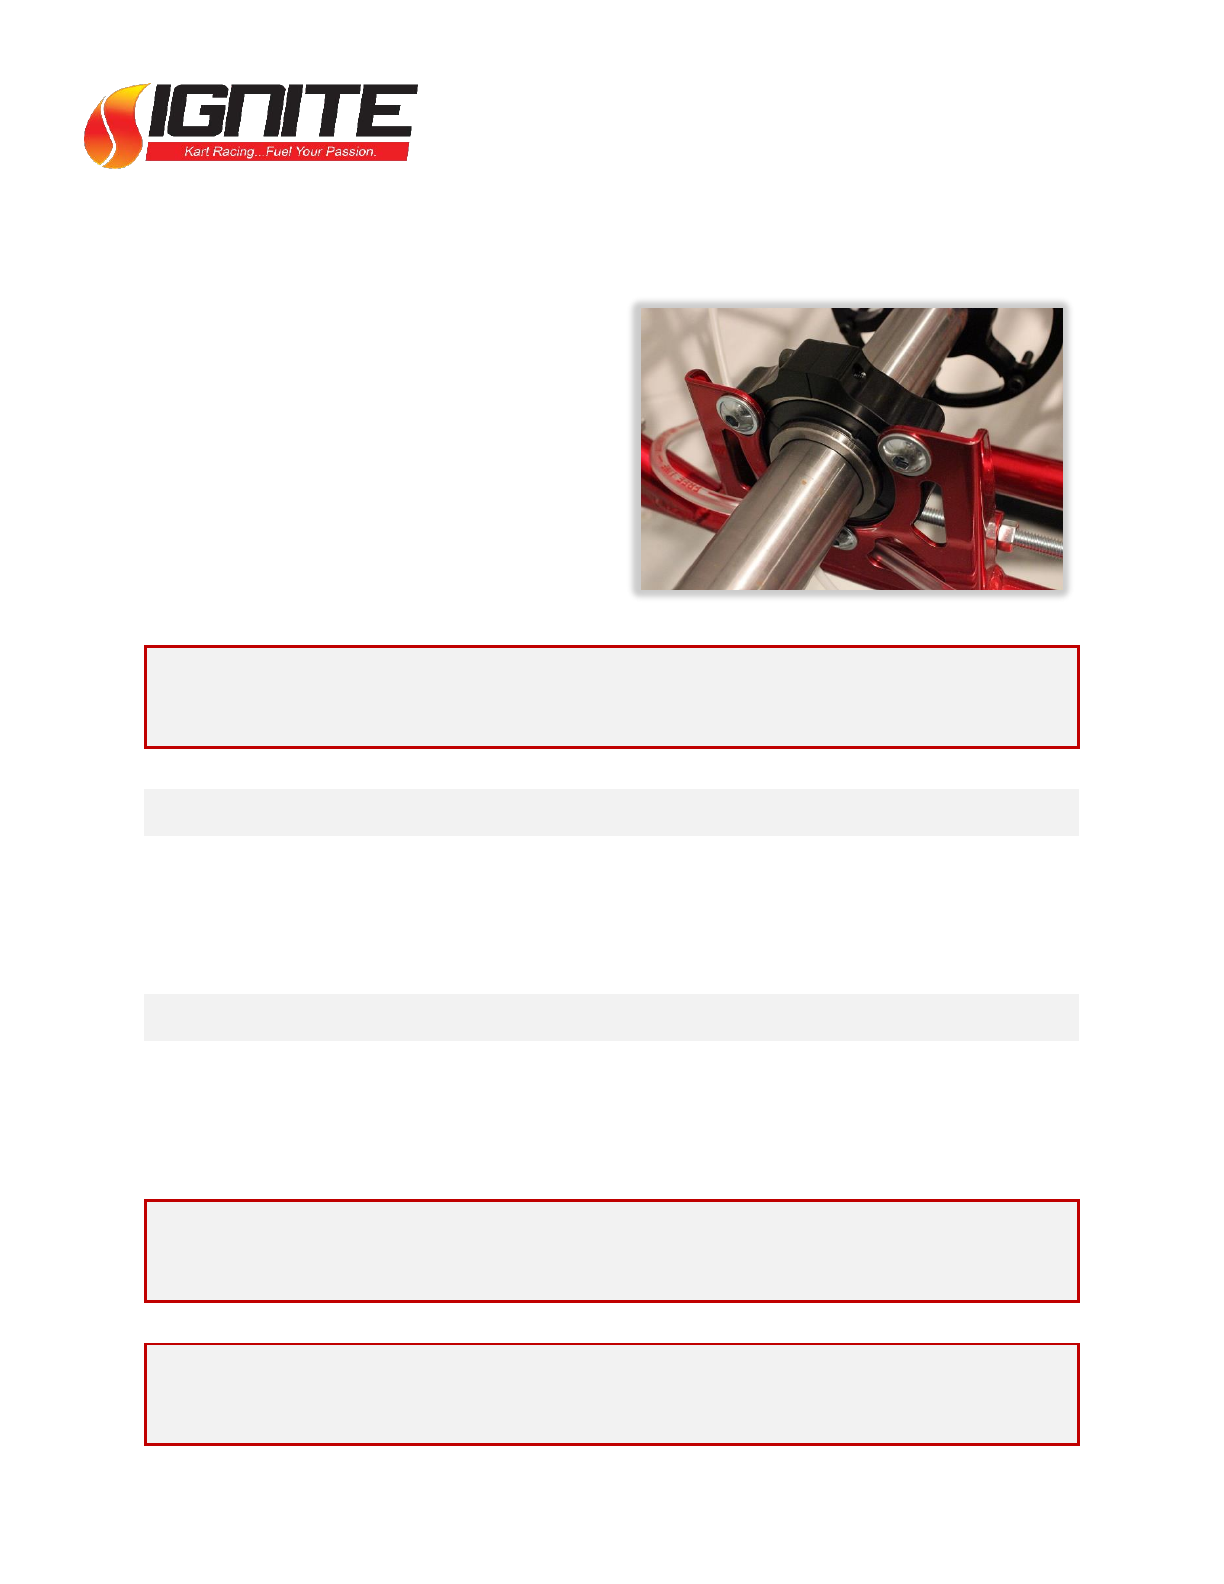
CASTER / CAMBER / TOE
Front end geometry is crucial in
creating the perfect handling kart.
Caster, camber and toe can be
adjusted to achieve almost any
desired handling characteristic.
Standard settings are:
Caster: Neutral (15 degrees)
Camber: -2mm per side
Toe: 1mm toe out per side
POSITIVE CASTER
NEGATIVE CASTER
PROBLEM: The kart sits flat and slides. The inside rear does not pick up on entry.
SOLUTION: Add positive caster using the adjustable caster/camber pills. Rolling the
top of the kingpin towards the rear of the kart increases the caster angle and increases
weight transfer and grip levels.
2015 IGNITE K3 SET-UP
BASELINE SET-UP INFORMATION FOR THE IGNITE K3
Page 14 of 29
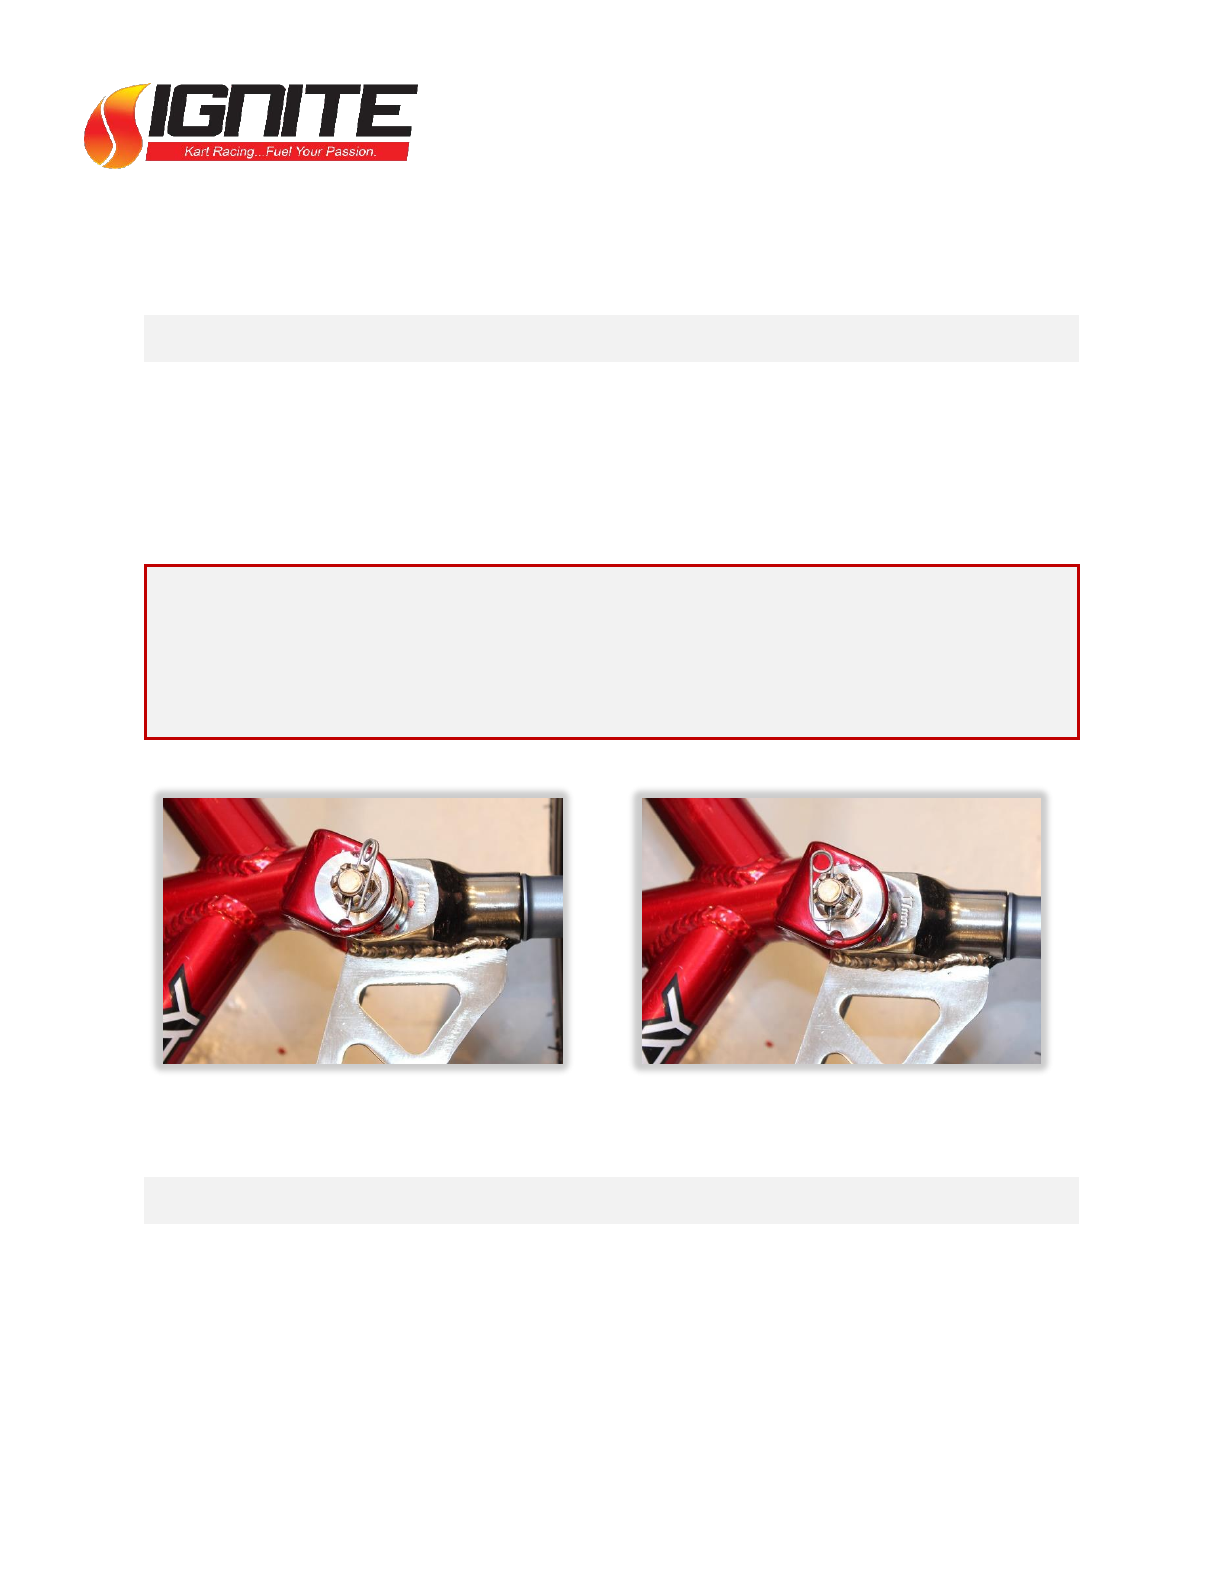
CASTER / CAMBER / TOE (CONT)
PROBLEM: The kart is hopping through the center of the corner.
SOLUTION: The kart is trying to transfer more weight than the flex in the chassis will
allow. Decrease the caster angle to help settle the weight transfer down through the
middle of the corner.
NOTE: Increasing the caster will always help the kart turn better, but at the expense
of corner exit speed. Increasing the vertical weight transfer puts a larger burden on
the engine. An ideal caster setting would be as little as possible so that the inside
rear wheel lifts on entry but does not lift so much that the kart over-grips.
POSITIVE CAMBER
NEGATIVE CAMBER
PROBLEM: The kart understeers on entry, then grabs and becomes loose in the rear.
SOLUTION: Increase the positive camber in the kart. Standing the kingpin upright will
increase the contact patch of the tire and result in more front end grip.
2015 IGNITE K3 SET-UP
BASELINE SET-UP INFORMATION FOR THE IGNITE K3
Page 15 of 29
CASTER / CAMBER / TOE (CONT)
PROBLEM: The kart is “darty” and too responsive in the front end.
SOLUTION: Decrease the camber (increase the negative camber). This will reduce the
contact patch and reduce front end grip levels.
NOTE: While camber is generally used to adjust front end grip, it does effect the rear
end as well. Negative camber will encourage the inside rear tire to lift.
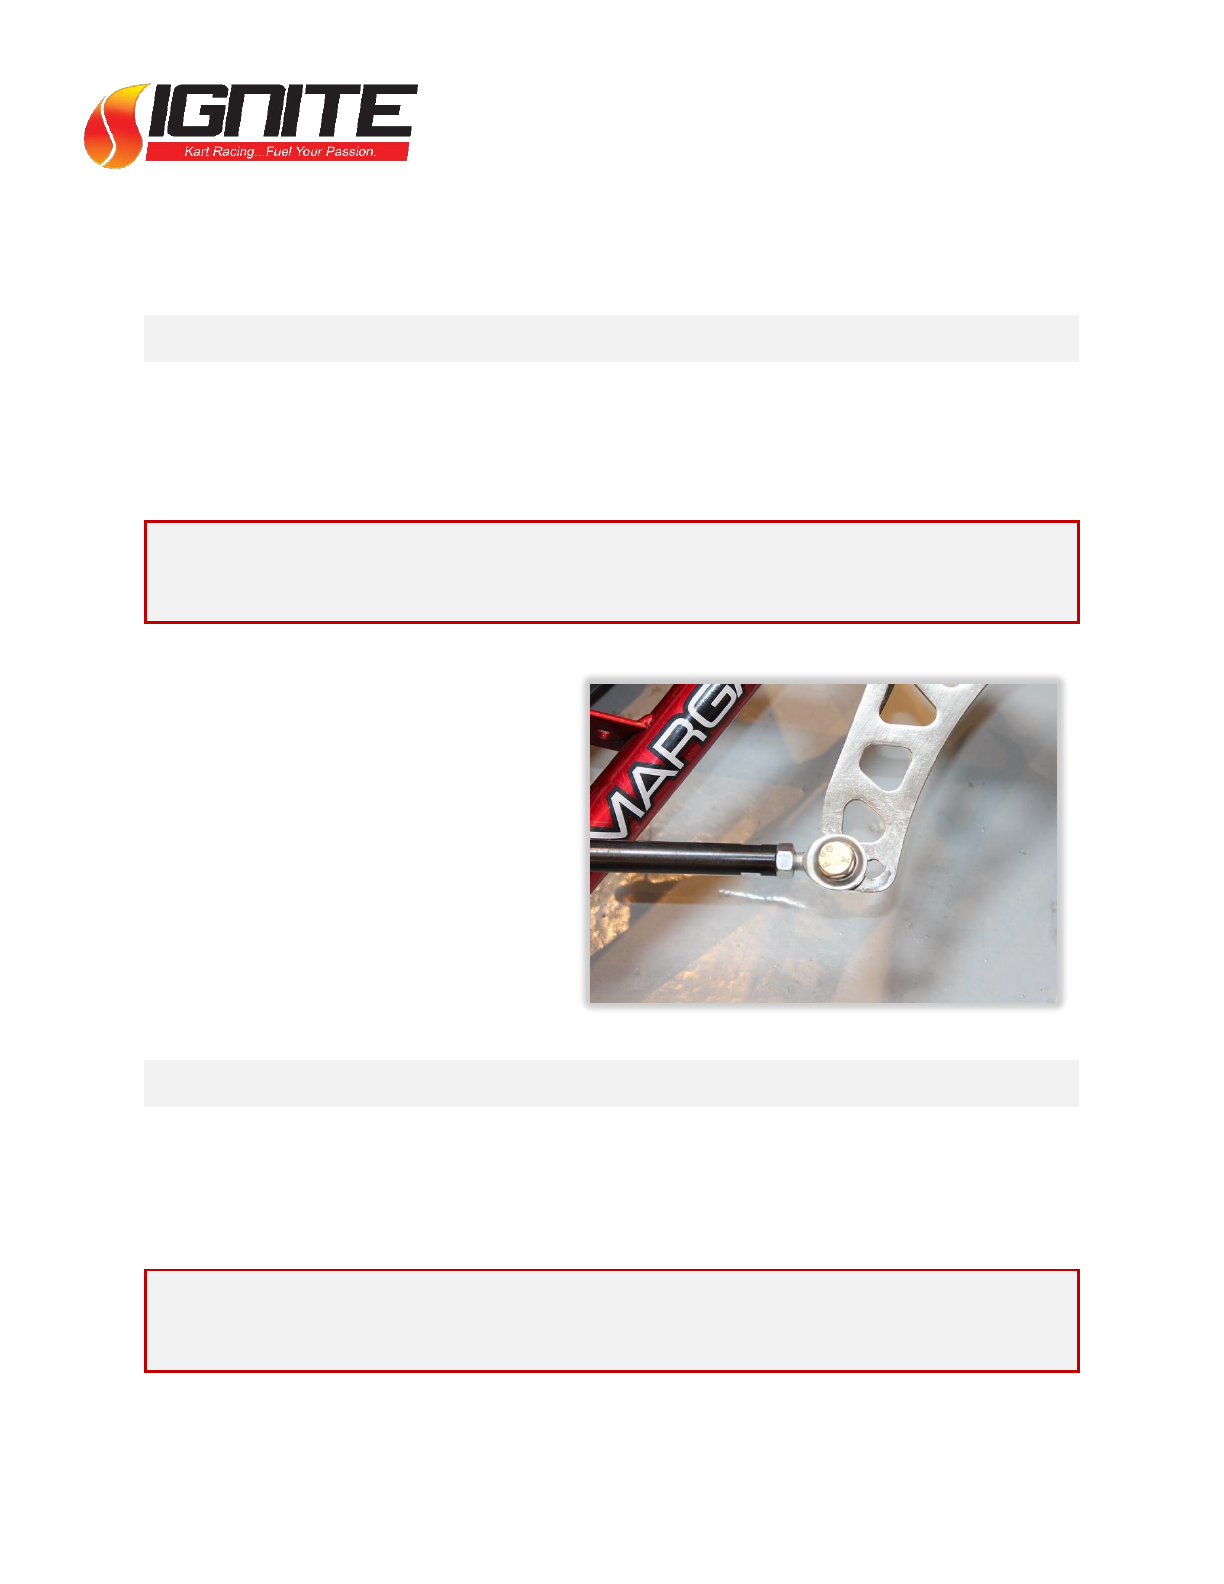
Steering Ackerman can be adjusted
to better suit a drivers required
steering input levels. There are two
adjustment holes on each spindle,
and a center adjustment on the
steering shaft. Recommended
starting positions:
Steering shaft: outer holes
Spindles: inner holes
PROBLEM: The kart lacks steering responsiveness through the corner.
SOLUTION: Increase the amount of Ackerman by moving the tie rods into the inner
holes on the spindle control arm.
NOTE: Any changes in caster, camber, toe or Ackerman will require a realignment of
the front end. The toe generally changes with every adjustment.

2015 IGNITE K3 SET-UP
BASELINE SET-UP INFORMATION FOR THE IGNITE K3
Page 16 of 29
REAR TRACK WIDTH
Rear track width is described as the measurement of the rear width, from the outside
edge of the LR wheel to the outside edge of the RR wheel. Adjusting the rear track
width helps determine the rear weight transfer of the kart. This can be adjusted by
loosening the rear hubs and sliding them in and out to meet your desired width.
Recommended starting positions are:
Bridgestone YLB: 53” outside to outside
Bridgestone YLC: 52.5” outside to outside
Bridgestone YDS: 52” outside to outside
PROBLEM: The rear end of the kart keeps sliding around, forcing oversteer.
SOLUTION: Narrow the rear track width by .25” per side, creating a .5” adjustment
overall. This will stiffen the rear end, and work the outside tire harder.
PROBLEM: The kart is hopping through the middle of the corner.
SOLUTION: Widen the rear track by .25” per side, creating a .5” adjustment overall. This
will soften the rear axle, creating a wider base for the kart through the corner.
2015 IGNITE K3 SET-UP
BASELINE SET-UP INFORMATION FOR THE IGNITE K3
Page 17 of 29
REAR WHEEL HUBS
Rear hubs come in variable lengths, which can be used to adjust rear end stiffness and
rear track width. If rear track width remains the same, and a longer hub is installed,
the leverage point on the axle decreases, causing it to become stiffer and thus working
the outside rear tire harder. Wider hubs can also be used to achieve a wider track
width, because part of the hub can extrude beyond the end of the axle.
PROBLEM: The rear end of the kart keeps sliding around, forcing oversteer.
SOLUTION: Add a longer hub while maintaining the same rear track width. This will
narrow the leverage point of the axle and create a stiffer rear end. A stiff rear end will
ultimately produce more rear grip.
NOTE: Rear hub pinch bolts must remain overlapped with the axle itself. Having
pinch bolts extend beyond the end of the axle can cause them to come off during a
session. Always make sure pinch bolts are tight. If hubs slide in, locking collars can
be added to prevent future movement.

2015 IGNITE K3 SET-UP
BASELINE SET-UP INFORMATION FOR THE IGNITE K3
Page 18 of 29
REAR AXLE
Rear axle stiffness can be adjusted to
create more or less flex in the rear end.
Ultimately, the rule of thumb is: softer
axles create less grip and stiffer axles
create more grip. There are three axle
options available in the 40mm:
40mm ‘A’ Soft
40mm ‘B’ Medium (standard)
40mm ‘C’ Hard
PROBLEM: The rear end of the kart is loose through the middle of the corner.
SOLUTION: Change to a stiffer rear axle. This will direct more weight transfer to the
rear end of the kart, and provide more rear end grip.
PROBLEM: The kart lays flat though the corner with little to no inside rear lift.
SOLUTION: Change to a softer rear axle. This will encourage flex through the rear end
and result in the inside rear lifting easier and with less effort.
PROBLEM: The kart hops through the middle of the corner.
SOLUTION: Change to a stiffer rear axle. This will help keep the kart from flexing too
much through the center, and provide a more stable base throughout the corner.
NOTE: Always tighten axle set screws when changing axles. If needed, use blue
LocTite on each set screw before tightening.
2015 IGNITE K3 SET-UP
BASELINE SET-UP INFORMATION FOR THE IGNITE K3
Page 19 of 29
REAR RIDE HEIGHT
Rear ride height can be adjusted to raise
or lower the center of gravity toward the
rear end of the kart. The Ignite K3 comes
with two vertically adjustable axle
positions. The standard placement is with
the axle in the highest position, which
keeps the rear end of the frame low.
NOTE: Rear ride height positions must be the same for both of the bearing cassettes
to ensure proper alignment of the axle.
PROBLEM: The kart hops through the middle of the corner.
SOLUTION: Drop the rear axle down to the lower ride height holes. This will move the
C.O.G. towards the front of the kart, giving the front end more weight percentage.
PROBLEM: The kart understeers through the center of the corner.
SOLUTION: Make sure your axle is in the upper mounting holes, which will push the
C.O.G. toward the rear of the kart, creating an increase in rear grip.
NOTE: Before changing the axle ride height positions, loosen the bearing set screws.
Occasionally, if left tight, the set screws will cause the axle to bind.
NOTE: Always tighten axle set screws when changing axles. If needed, use blue
LocTite on each set screw before tightening.
Table of contents


