iHome iDL46EU User manual

Model iDL46
FM Stereo Clock Radio
Questions? For latest instructions, visit www.ihomeintl.com
iDL46EU IB Eng/P version
Size: 178 x 178 mm (16 pages)
Printing color: Black
Mat’l: 90gsm book paper
June 13, 2014 6
Modelo iDL46
Rádio Relógio FM Estéreo
Domande? Per le ultime istruzioni, visitare il sito www.ihomeintl.com
6
English
Portuguese
Portuguese
7/16/2014
For New IC (BL55070)

Índice
Controlos e indicadores / Visor...........................................................................................................................................1
Início rápido........................................................................................................................................................................2
Utilizar o aparelho: Hotel, Relógio Utilizando o AutoSync, Ajustar a hora e o calendário manualmente........................3-4
Utilizar o aparelho / Utilização dos alarmes ....................................................................................................................5-6
Ouvir o iPad, iPhone ou iPod Utilizando a Base ou Porta USB .........................................................................................7
Ouvir o rádio/Utilizar o aparelho Noutros Países ...............................................................................................................8
Ouvir outros aparelhos de áudio portáteis/Função de dormir............................................................................................9
Bateria de reserva do relógio ...........................................................................................................................................10
Guia do consumidor para segurança do produto.............................................................................................................11
Resolução de problemas.............................................................................................................................................12-13
6
Manutenção
• Coloque o aparelho numa superfície plana, longe de fontes de luz solar direta ou calor excessivo.
• Proteja sua mobília ao colocar o aparelho em superfícies com acabamento em madeira natural e laqueada. Um pano
ou outro material de proteção deve ser colocado entre o aparelho e o móvel.
• Limpe o seu aparelho com um pano macio humedecido somente com sabão suave e água. Agentes de limpeza mais
fortes, como benzina, removedores de tinta ou materiais similares, podem danificar a superfície do aparelho.
Este produto leva o símbolo de classificação seletiva relativo a equipamento elétrico e eletrónico
usado (WEEE).
Isto significa que este produto deve ser manuseado de acordo com a Diretiva Europeia 2002/96/EC,
para que possa ser reciclado ou desmontado para minimizar seu impacto no meio ambiente.
Para mais informações, entre em contacto com suas autoridades regionais ou locais.
Produtos eletrónicos não incluídos no processo de classificação seletiva são potencialmente
perigosos para o meio ambiente e a saúde humana, devido à presença de substâncias perigosas.
Portuguese June 13, 2014
Table of Contents
Controls and Indicators / Display........................................................................................................................................1
Quick Start..........................................................................................................................................................................2
Using the unit: Hotel, Auto Sync, Setting Time Manually................................................................................................3-4
Using the Alarms .............................................................................................................................................................5-6
Listening to iPad, iPhone or iPod Using the Dock or USB Port..........................................................................................7
Listening to Radio/Using the Unit in other Countries/Listening to other portable audio devices........................................8
Sleep Operation/Nap Operation/Dimmer Operation...........................................................................................................9
Clock Backup Batteries ....................................................................................................................................................10
A Consumer Guide to Product Safety..............................................................................................................................11
Trouble Shooting .........................................................................................................................................................12-13
6
Maintenance
• Place the unit on a level surface away from sources of direct sunlight or excessive heat.
• Protect your furniture when placing your unit on a natural wood and lacquered finish.Acloth or other protective material
should be placed between it and the furniture.
• Clean your unit with a soft cloth moistened only with mild soap and water. Stronger cleaning agents, such as Benzene,
thinner or similar materials can damage the surface of the unit.
This product bears the selective sorting symbol for waste electrical and electronic equipment
(WEEE).
This means that this product must be handled pursuant to European Directive 2002/96/EC in order
to be recycled or dismantled to minimize its impact on the environment.
For further information, please contact your local or regional authorities.
Electronic products not included in the selective sorting process are potentially dangerous for the
environment and human health due to the presence of hazardous substances.
June 13, 2014

1
Controls and Indicators
Alarm Indicators
Battery Low Indicator
Time Display
AM Indicator
NOTE: AM/PM indicators will not appear
in default 24 hour display mode
PM Indicator
Snooze/Dimmer Button
Lower/Raise
Volume Button
Mode Button
EQ Button
iPad Supports
Set –/+ Button,
skip/search FWD/REV
High/Low/Normal
Hotel Switch
Alarm 1 Button
Alarm 2 Button
Rear Panel Bottom Battery Compartment
Top Panel
Nap Button
Play/Pause/
Presets Button
Clock Button
Sleep Button
iHome App Indicator
6
Device rest
Dock: Flexible Lightning
Connector for iPad/iPhone/iPod
Alarm Time /EQ/ Mode Display (Dock/USB Dock/FM/Aux-in)
snooze | dimmer
Alarm Reset/
Power Button
FM Antenna
USB Charging and Playing Dock
DC Jack Aux-in Jack
Display
1
Controlos e indicadores
Indicadores de alarme
Indicador de bateria fraca
Visor da hora
Indicador AM
Indicador PM
Botão de silêncio/redução da
iluminação
Botão de Diminuição/
Aumento do Volume
Botão de Modo
Botão EQ
Suportes iPad
Botão de Definição –/+,
ignorar/procurar
AVANÇAR/RETROCEDER
Botão de Alarme 1
Botão de Alarme 2
Painel traseiro
Painel superior
Botão de silêncio
Botão Reproduzir/
Pausa/Predefinições
Botão do
Relógio Botão de dormir
Indicador da aplicação iHome
6
Base do dispositivo
Estação: Conector de Iluminação
Flexível para iPad/iPhone/iPod
Apresentação do Modo/EQ/Hora do Alarme
(Dock/Dock USB/FM/Entrada auxiliar)
snooze | dimmer
Botão de ligar/
reiniciar alarme
Antena FM
Base para Reprodução e Carregamento USB
Entrada DC Entrada Aux-in
Visor
Observação: ndicadores de AM / PM não
aparecerá em modo display predefinição 24
horas
Portuguese
(High/Low/Normal)
Compartimento da bateria
Chave de hotel

Push plug head in
to change plugs
Push button
to release
plug head
Prima o botão para
soltar a cabeça
da ficha
Insira a nova cabeça
para mudar de fichas
Início rápido
2
6
1: Ligar
Ligar o cabo do adaptador AC à entrada DC na parte
de trás do aparelho, e a outra ponta a uma fonte de
alimentação. Insira 2 pilhas AA incluídas no
compartimento da bateria de suporte, na parte inferior
da unidade. Esticar a antena FM para obter uma melhor
recepção.
Apesar de a base acomoda a maioria dos casos,
poderá necessitar de remover a sua caixa para
colocação correcta na base. Encaixar com suavidade
qualquer iPad, iPhone ou iPod com o conector
Lightning na base Lightning na parte de cima do
dispositivo. O iPad, iPhone ou iPod será recarregado
enquanto permanecer ligado na base. Premir o
botão no dispositivo para reproduzir o seu iPad,
iPhone ou iPod.
3: Definir Relógio com AutoSync
Colocar o seu iPad, iPhone ou iPod na base compatível
com Lightning (consultar o passo 2). O aparelho irá
tentar sincronizar automaticamente para a hora no seu
iPad, iPhone ou iPod. A hora no visor será actualizada.
Este processo demora cerca de 3 segundos
4: Rádio
Premir e libertar o botão Mode conforme necessário
para seleccionar a banda FM. Premir e libertar o botão
+ ou – para sintonizar uma estação. Veja na página 7
como programar estações predefinidas.
2:colocar o seu
iPad/iPhone/iPod
na base Lightning
Portuguese
Quick Start
2
6
1: Power 2: docking your
iPad/iPhone/iPod
in the Lightning
dock
Attach AC adaptor cable to DC jack on back of the unit
and plug the other end into a wall socket. Insert 2
included AA batteries into the backup battery
compartment on the bottom of the unit. Extend FM
antenna for best reception.
While the dock accommodates most cases, you may
need to remove your case for proper docking. Gently
dock any iPad, iPhone or iPod with Lightning connector
onto the Lightning dock on top of the unit. The iPad,
iPhone or iPod will charge while docked. Press the
Button on the unit to play your iPad, iPhone or iPod.
3: Setting Clock with AutoSync
Dock your Lightning-compatible iPad, iPhone or iPod
(see step 2). The unit will attempt to autosync to the time
on your iPad, iPhone or iPod. The time on the display
will update. This process takes about 3 seconds.
4: Radio
Press and release the Mode Button as needed to
select FM band. Press and release the +or –Button
to tune in a station. See page 7 for programming
presets.

P5
Utilizar o aparelho
Ligar o aparelho à Fonte de Alimentação
Ligar a ficha do cabo de adaptador de AC à tomada de DC, na parte posterior do sistema e, em seguida, ligar o
adaptador de AC à tomada de parede. O adaptador tem de estar ligado para o aparelho funcionar. O aparelho não
funciona com pilhas (um sistema de bateria de reserva mantém as definições do relógio durante as falhas de energia).
Utilização da chave de hotel
Esta unidade possui um comutador de 3 posições localizado no compartimento da bateria, na parte inferior da unidade.
Para utilização doméstica regular, mantenha a chave na posição Normal. A posição Hotel Low abaixa a saída do
aparelho, e a posição Hotel High mantém a saída regular. Note que, o áudio poderá ser interrompido por breves
instantes se o comutador for movido durante a reprodução do mesmo. Enquanto estiver num dos modos de hotel:
a) É possível aceder às predefinições do rádio, mas não é possível programar as mesmas
b) O alarme funciona como alarme diário único (que não será renovado para o dia seguinte, mesmo que Reiniciar
alarme seja premido), a operação de 7-5-2 permanece desativada, e não será possível despertar com uma lista de
reprodução.
c) Asuspensão programável está desactivada.
d) Agama de frequência internacional não pode ser alterada.
e) Acampainha e o alarme do rádio soam apenas durante 15 minutos.
f) Afunção de revisão do alarme está desactivada. Ao premir o Botão Alarme apenas Liga e Desliga o Alarme.
g) Durante a definição de alarme, o Botão Alarme deve ser premido para confirmar as definições do mesmo ou as
alterações realizadas não serão consideradas.
h) Aunidade não suporta a aplicação Definição do iHome.
Actualizar o firmware do seu iDL46
Para obter um melhor desempenho, certifique-se de que actualiza o firmware do iDL46. Para fazê-lo, descarregar a
aplicação gratuita iHome Set a partir da App Store. A luz do visor NÃO é mantida no modo de bateria. Iniciar a aplicação,
deslocar-se para “Search for Update” e, em seguida, seguir as instruções para actualizar o firmware.
Ligar ou desligar o aparelho
Premir o botão no aparelho em qualquer momento, para Ligar ou Desligar o aparelho. Note que um iPad, iPhone ou
iPod colocado na base, continuará a carregar quando o aparelho é desligado desde que o adaptador AC esteja ligado.
Pode também LIGAR automaticamente o dispositivo colocando na base um dispositivo a reproduzir (ou ligando um à
base USB), e DESLIGAR o aparelho, desligando o dispositivo que está a reproduzir da base OU da base USB.
3
P5
Portuguese
Using the Unit
Connecting the Unit to Power Source
Connect the AC adaptor cable plug into the DC jack on the back of the system, then plug the AC adaptor into the wall
outlet. Adaptor must be plugged in to operate unit. The unit does not operate on batteries (the battery back up system
maintains clock settings during power failures).
Using the Hotel Switch
This unit has a 3 position switch located in the battery compartment on the bottom of the unit. For regular home use, keep
the switch in Normal position. Hotel Low lowers the output of the unit and Hotel High maintains regular output. While in
either Hotel mode:
a) Clock Adjust/Time Sync Button is disabled
b) Radio presets can be accessed, but not programmed
c) Alarms operate as single day alarms (will not automatically come on the next day even if Alarm Reset is pressed),
7-5-2 operation is disabled, and wake to playlist is disabled.
d) Programmable snooze is disabled.
e) The international frequency range cannot be changed.
f) Buzzer and radio alarm only sounds for 15 minutes.
h) The unit does not support iHome Set app.
Updating your iDL46 firmware
For best performance, make sure to update the iDL46 firmware. To do so, download the free iHome Set app from the App
Store. The 3 position switch of the unit should be in Normal position. Launch the app, scroll to “Search for Update”, then
follow directions to update the firmware.
Turning the Unit ON or OFF
Press the Button on the unit at any time to turn the unit On or Off. Note that a docked iPad, iPhone or iPod will
continue to charge when the unit is turned off as long as the AC adaptor is plugged in. You can also turn the unit ON
automatically by docking a playing device (or connecting one to the USB dock), and turn the unit OFF by disconnecting
a playing device from the dock OR USB dock.
3
P5

Utilizar o aparelho
Definir a Hora do Relógio Utilizando o AutoSync
A funcionalidade AutoSync sincroniza automaticamente a definição de hora no aparelho com a hora no seu iPad, iPhone
ou iPod de modelo recente (iPod touch, iPod nano e iPod Classic; os modelos iPod mais antigos, como o iPod mini, não
suportam esta funcionalidade).
Por predefinição, o dispositivo é definido para o modo AUTO SINC ON e tentará sincronizar automaticamente a hora
sempre que um iPad, iPhone ou iPod está colocado na base Lightning OU ligado à base USB, todos os dias às 2 horas.
Observação: Ahora do iPhone é actualizada automaticamente através das torres de transmissão de telemóveis. A hora
no seu iPad ou iPod, por sua vez, permanece de acordo com a hora do computador com o qual o iPad ou iPod foi
sincronizado da última vez. É possível ter uma diferença máxima de 59 segundos entre o aparelho e um iPad/iPhone/iPod
sincronizado.
Ajustar a hora e o calendário manualmente
A sincronização automática tem de estar DESLIGADA para definir o relógio manualmente.
1. Manter o botão Clock premido, localizado na parte superior do aparelho, até “AUTOSYNC ON” ou “AUTOSYNC
OFF” começar a piscar no visor, (se AUTOSYNC ON aparecer, premir o botão +ou –para alternar com a definição
AUTOSYNC OFF).
2. Premir e libertar o botão Clock.A hora começará a piscar no visor. Premir o botão +ou –para ajustar a hora (manter
o botão premido durante alguns segundos para avançar ou retroceder rapidamente). Lembre-se de ajustar a horaAM
ou PM correcta. Um ícone no lado esquerdo da apresentação da hora indicaAM ou PM. Observação: ndicadores de
AM / PM não aparecerá em modo display predefinição 24 horas
3. Premir e libertar novamente o botão Clock. O ano começará a piscar na parte inferior do visor. Premir e libertar o
botão +ou –até o ano actual ser apresentado.
4. Premir e libertar novamente o botão Clock. O mês e a data começarão a piscar. Premir e libertar o botão +ou –até
o mês e data actuais serem apresentados.
5. Premir e libertar mais uma vez o botão Clock. Dois sinais sonoros serão emitidos para confirmar as suas configu-
rações, saindo então do modo de regulação da hora e calendário.
Alternar entre visor 12 e 24 Horas
Em qualquer momento durante o modo de definição da hora, premir e libertar o botão ou o botão enquanto o visor
está a piscar para alternar entre visor formato 12 horas e 24 horas.
4
P6
Portuguese
Using the Unit
Setting the Clock Time Using AutoSync
The AutoSync feature automatically syncs the time setting on the unit to the time on your iPad, iPhone or recent model
iPod (iPod touch, iPod nano and iPod Classic; older iPod models such as iPod mini do not support this feature).
By default, the unit is set to AUTO SYNC ON mode and will attempt to autosync the time whenever a capable iPad,
iPhone or iPad is docked to the Lightning dock OR connected to the USB dock and at 2AM each day.
To manually time sync at any time to a docked device, press and release the Clock Button.
NOTE: iPhone time is automatically updated to the correct time via cell phone towers. The time on your iPad or iPod is
accurate only to the time on the computer the last time the iPad/iPod was synced to it. It’s possible to have up to 59 seconds
difference between the unit and a synced iPad/iPhone/iPod.
Setting Time and Calendar Manually
Autosync must be OFF to set the clock manually.
1. Press and hold the Clock Button located on the top of the unit until “AUTOSYNC ON” or “AUTOSYNC OFF” flashes
on the display,(if AUTOSYNC ON appears, press the + or – Button to toggle to AUTOSYNC OFF setting).
2. Press and release the Clock Button. The time display will flash. Press the + or – Button to adjust the time (hold for
a few seconds to advance or reverse rapidly). Remember to set the correct AM or PM hour. An icon to the left of the
time display indicates AM or PM. Note that in default 24 hour display mode, the AM/PM indicator will not appear.
3. Press and release the Clock Button again. The year will flash in the lower part of the display. Press and release the
+ or – Button until the current year is displayed.
4. Press and release the Clock Button again. The month and date will flash. Press and release the + or – Button until
the current month and date is displayed.
5. Press and release the Clock Button once more. Two beeps will sound to confirm your settings and you will exit Time
and Calendar Setting mode.
Toggling 12 and 24 Hour Display
At any point during time set mode press and release either the Button or Button while display is flashing to switch
between 12-hour and 24-hour display formats.
4
P6

5
Utilização dos alarmes
Este aparelho possui um sistema de alarme duplo para que possa definir dois alarmes separados com duas horas de alarme,
programas e fontes de despertador diferentes (diário, dias úteis ou fim-de-semana). Conselho: Transferir a aplicação gratuita
iHome Set para funções avançadas de alarme, silêncio e dormir.
Ajustar os alarmes
Observação: O modo de definição do Alarme 1 e o Alarme 2 é igual; o botão Alarm abaixo corresponde ao
botão ( ou ) do alarme que está a definir.
1. Manter premido o botão ou até que a hora do alarme comece a piscar na parte inferior do visor. Premir e libertar o
botão +ou –para definir a hora do alarme (manter o botão premido para uma definição mais rápida). Lembre-se de
ajustar a hora AM ou PM correctamente.
2. Premir e libertar o botão Alarm novamente para confirmar a hora do alarme definida e, em seguida, premir e libertar o
botão +ou –para definir o programa do alarme (“wake 7 days” = toda a semana, “wake weekday” = de Segunda a Sexta,
“wake weekend” = só Sábado e Domingo).
3. Premir e libertar o botão Alarm novamente e, em seguida, premir e libertar o botão +ou –para seleccionar uma fonte do
alarme para despertar: (Base, USB, Rádio ou Campainha).
Para despertar com a Base: seleccionar Dock para despertar com o iPad, iPhone ou iPod ligado na base. Por
predefinição, o alarme da Base soa na última faixa reproduzida num dispositivo ligado à base (“Normal Wake”). Também
pode despertar com uma lista de reprodução personalizada. Para tal, premir e libertar o botão +ou –para seleccionar
“Playlist Wake”. Tem de criar uma lista de reprodução denominada “iHome” no iTunes e de a ter no seu iPad/iPod/i-
Phone. O aparelho reproduzirá música aleatoriamente a partir da lista de reprodução “iHome”. Se não for encontrada
nenhuma lista de reprodução, o aparelho reproduzirá a última faixa por predefinição. Se o aparelho não detectar um
iPad/iPhone/iPod à hora do alarme definida, o aparelho utilizará o alarme da campainha por predefinição. O ciclo do
alarme dura uma hora; verificar se há canções suficientes no seu iPad, iPhone ou iPod para esta duração.
Para despertar com USB: Seleccionar USB para activar um iPad, iPhone ou iPod ligado à base USB. Tal como com a
função para despertar com a Base, pode despertar com a última faixa reproduzida (“Normal Wake”) ou com uma lista de
reprodução personalizada (escolha “Playlist Wake” conforme detalhado abaixo).
Para despertar com rádio: depois de seleccionar Rádio como fonte para despertar, premir e libertar o botão Alarm e,
em seguida, premir e libertar o botão +ou –para seleccionar uma estação de rádio ou premir e libertar o botão
Presets para seleccionar uma estação de rádio predefinida como fonte para despertar (consultar Ouvir Rádio na
página 7 para obter detalhes sobre como definir estações de rádio e predefinições).
4. Premir e libertar de novo o botão Alarm, depois premir e libertar o botão + ou – para definir o volume do alarme (limite é
05 - 40).
5. Premir e libertar o botão Alarm novamente (ou não premir nenhum botão durante 10 segundos) para sair do modo de
definição do alarme. O alarme será armado depois de configurado, e o ícone correspondente ao alarme acender-se-á. A
parte inferior do visor mostrará o alarme mais próximo.
P7
Portuguese
5
Using the Alarms
This unit has a dual alarm system so you can set two separate alarms to different alarm times, wake-to sources and schedules
(daily, weekdays or weekend).Tip: Download the free iHome Set app for advanced alarm, snooze and sleep functions.
Setting the Alarms
Note: Alarm 1 and Alarm 2 are set the same way; Alarm Button below means the button ( or ) for whichever alarm you
are setting.
1. Press and hold the or Button until the alarm time flashes on the lower part of the display. Press and release the +
or – Button to set the alarm time (press and hold for faster setting). Remember to set the correct AM or PM time.
2. Press and release the Alarm Button again to confirm the set alarm time, then press and release the + or – Button to set
the alarm schedule (‘wake 7 days’ = the whole week, ‘wake weekday’ = Monday through Friday, ‘wake weekend’ = Satur-
day and Sunday only).
3. Press and release the Alarm Button again, then press and release the + or – Button to select an alarm source to wake
to: (Dock, USB, Radio or Buzzer).
For wake to Dock: select Dock to wake to a docked iPad, iPhone or iPod. By default, the Dock alarm wakes to the last
track played on a docked device (”Normal Wake”). You can also wake to a custom playlist. To do so, press and release
the + or – Button to select “Playlist Wake”. You must create a playlist named “iHome” in iTunes and have it on your
iPad/iPod/iPhone. The unit will play music randomly from within the “iHome” playlist. If no playlist is found, unit will default
to last track played. If the unit does not detect an iPad/iPhone/iPod at the set alarm time, the unit will default to buzzer
alarm. The alarm cycle lasts for one hour; make sure you have enough music on your iPad, iPhone or iPod to last that
long.
For wake to USB: select USB to wake to an iPad, iPhone or iPod connected to the USB dock. As with wake to Dock, you
can wake to either the last track played (“Normal Wake”) or to a custom playlist (choose “Playlist Wake” as detailed
above).
For wake to radio: after selecting Radio as the wake to source, press and release the Alarm Button and then press and
release the + or – Button to select a radio station or press and release the Presets Button to select a preset radio
station to wake to (see Listening to Radio on page 7 for details on setting radio stations and presets).
4. Press and release the Alarm Button again, then press and release the + or – Button to set the alarm volume (range is
05 - 40).
5. Press and release the Alarm button again (or no button within 10 seconds) to exit the alarm setting mode. The alarm will
be armed once set and the corresponding alarm icon will light up. The lower part of the display will show the earliest set
alarm time.
P7

6
Utilização dos alarmes
Rever, Armar e Desarmar o alarme (Ligar e Desligar a função de alarme
Os alarmes são armados automaticamente quando ajustados. Os alarmes activos são indicados pelos ícones de alarme no
visor.
1. Uma vez armado o alarme, a parte inferior do visor mostrará a hora do alarme. Se houver mais de um alarme armado, o
alarme mais próximo será mostrado.
2. Para rever a hora do alarme, premir um botão de alarme uma vez. A hora do alarme relacionada e a fonte para despertar
serão apresentadas na parte inferior do visor.
3. Durante a revisão do alarme, premir e libertar o botão Alarm uma vez para o ligar ou desligar. Se o alarme estiver
armado, o ícone correspondente acender-se-á.
Reiniciar o alarme para o dia seguinte
1. Quando o alarme estiver a soar, premir e libertar o botão ou , ou os botões para parar o alarme e para o
redefinir para soar no dia seguinte. Por exemplo, se o alarme estiver definido para dias úteis e redefinir o alarme numa
Sexta-feira, o alarme soará novamente na Segunda-feira e não ao Sábado.
Silêncio
1. Para programar um tempo de silêncio personalizado, mantenha premido o botão Snooze durante a operação normal
(quando o alarme não estiver a tocar) até que os minutos da função de silêncio apareçam no visor. Premir e libertar o
botão +ou –para definir o tempo de suspensão de 1 a 29 minutos.
2. Premir o botão Snooze quando o alarme começar a tocar. O alarme será silenciado e voltará depois de 9 minutos (ou o
intervalo de tempo personalizado pelo utilizador). A função de silêncio pode ser utilizada várias vezes durante o ciclo de
uma hora do alarme.
Alarme seguro
O alarme possui uma funcionalidade de alarme seguro para que o alarme da campainha soe no caso de falha de energia,
se a bateria de apoio estiver instalada (consultar a página 7). Se o seu iPad/iPhone/iPod não soar durante 35 segundos
ou se não estiver predefinido, o aparelho ligará automaticamente no alarme de campainha.
P8
Portuguese
6
Using the Alarms
Reviewing, Arming and Disarming Alarm (Turn Alarm Function On and Off)
Alarms are automatically armed when set. Active alarms are indicated by alarm icons on the display.
1. Once an alarm is armed, the lower part of the display will show the alarm time. If more then one alarm is armed, the earliest
alarm time will show.
2. To review the alarm time, press an alarm button once.The related alarm time and wake source will show on the lower part
of the display.
3. During alarm review, press and release the Alarm Button once to toggle it on or off. If the alarm is armed, the related
alarm icon will light up.
Resetting the Alarm to Come on the Next Day
1. When the alarm is sounding, press and release the Button or or Buttons to stop the alarm and reset it to come
on the next set day. For example, if alarm is set for weekdays and you reset the alarm on Friday, the alarm will come on
again on Monday, not Saturday.
Snooze
1. To program a custom snooze time, press and hold the Snooze Button during normal operation (when alarm is not sound-
ing) until the snooze minutes display appears. Press and release the + or – Button to set the snooze time from 1 to 29
minutes.
2. Press the Snooze Button after the alarm sounds. The alarm will be silenced and come on again 9 minutes later (or at the
custom minute interval you set). Snooze can be pressed several times during the 1 hour alarm cycle.
Sure Alarm
The unit has a sure alarm feature so the buzzer alarm still sound in the event of a power failure, if the backup battery is
installed (see page 7). If your iPad/iPhone/iPod has no sound for 35 seconds or is not present, the unit will switch to
buzzer alarm automatically.
P8

Ouvir o iPad, iPhone ou iPod Utilizando a Base ou Porta USB
Este aparelho possui uma base Lightning (situada no topo do aparelho) exclusivamente para reproduzir e carregar os
dispositivos IOS equipado com o conector Lightning mais moderno E uma base USB (situado na parte traseira do
aparelho) que pode reproduzir e carregar ambos os dispositivos iOS com conectores 30 pinos (como o iPhone 4, iPad,
etc.) E dispositivos Lightning usando o cabo de carregamento que é fornecido com o dispositivo.
Reproduzir e fazer pausa num dispositivo ligado a uma base Lightning OU uma porta USB usando o botão
Presets. O último dispositivo ligado reproduzirá (apenas é possível a reprodução de um dispositivo de cada vez). Para
alternar entre a base Lightning ou a base USB, premir e libertar o botão Mode conforme necessário até que apareça
na parte inferior do visor “Dock” ou “USB Dock”, indicando qual a base no aparelho que está no modo iPod. As
indicações abaixo aplicam-se à base que deseja controlar.
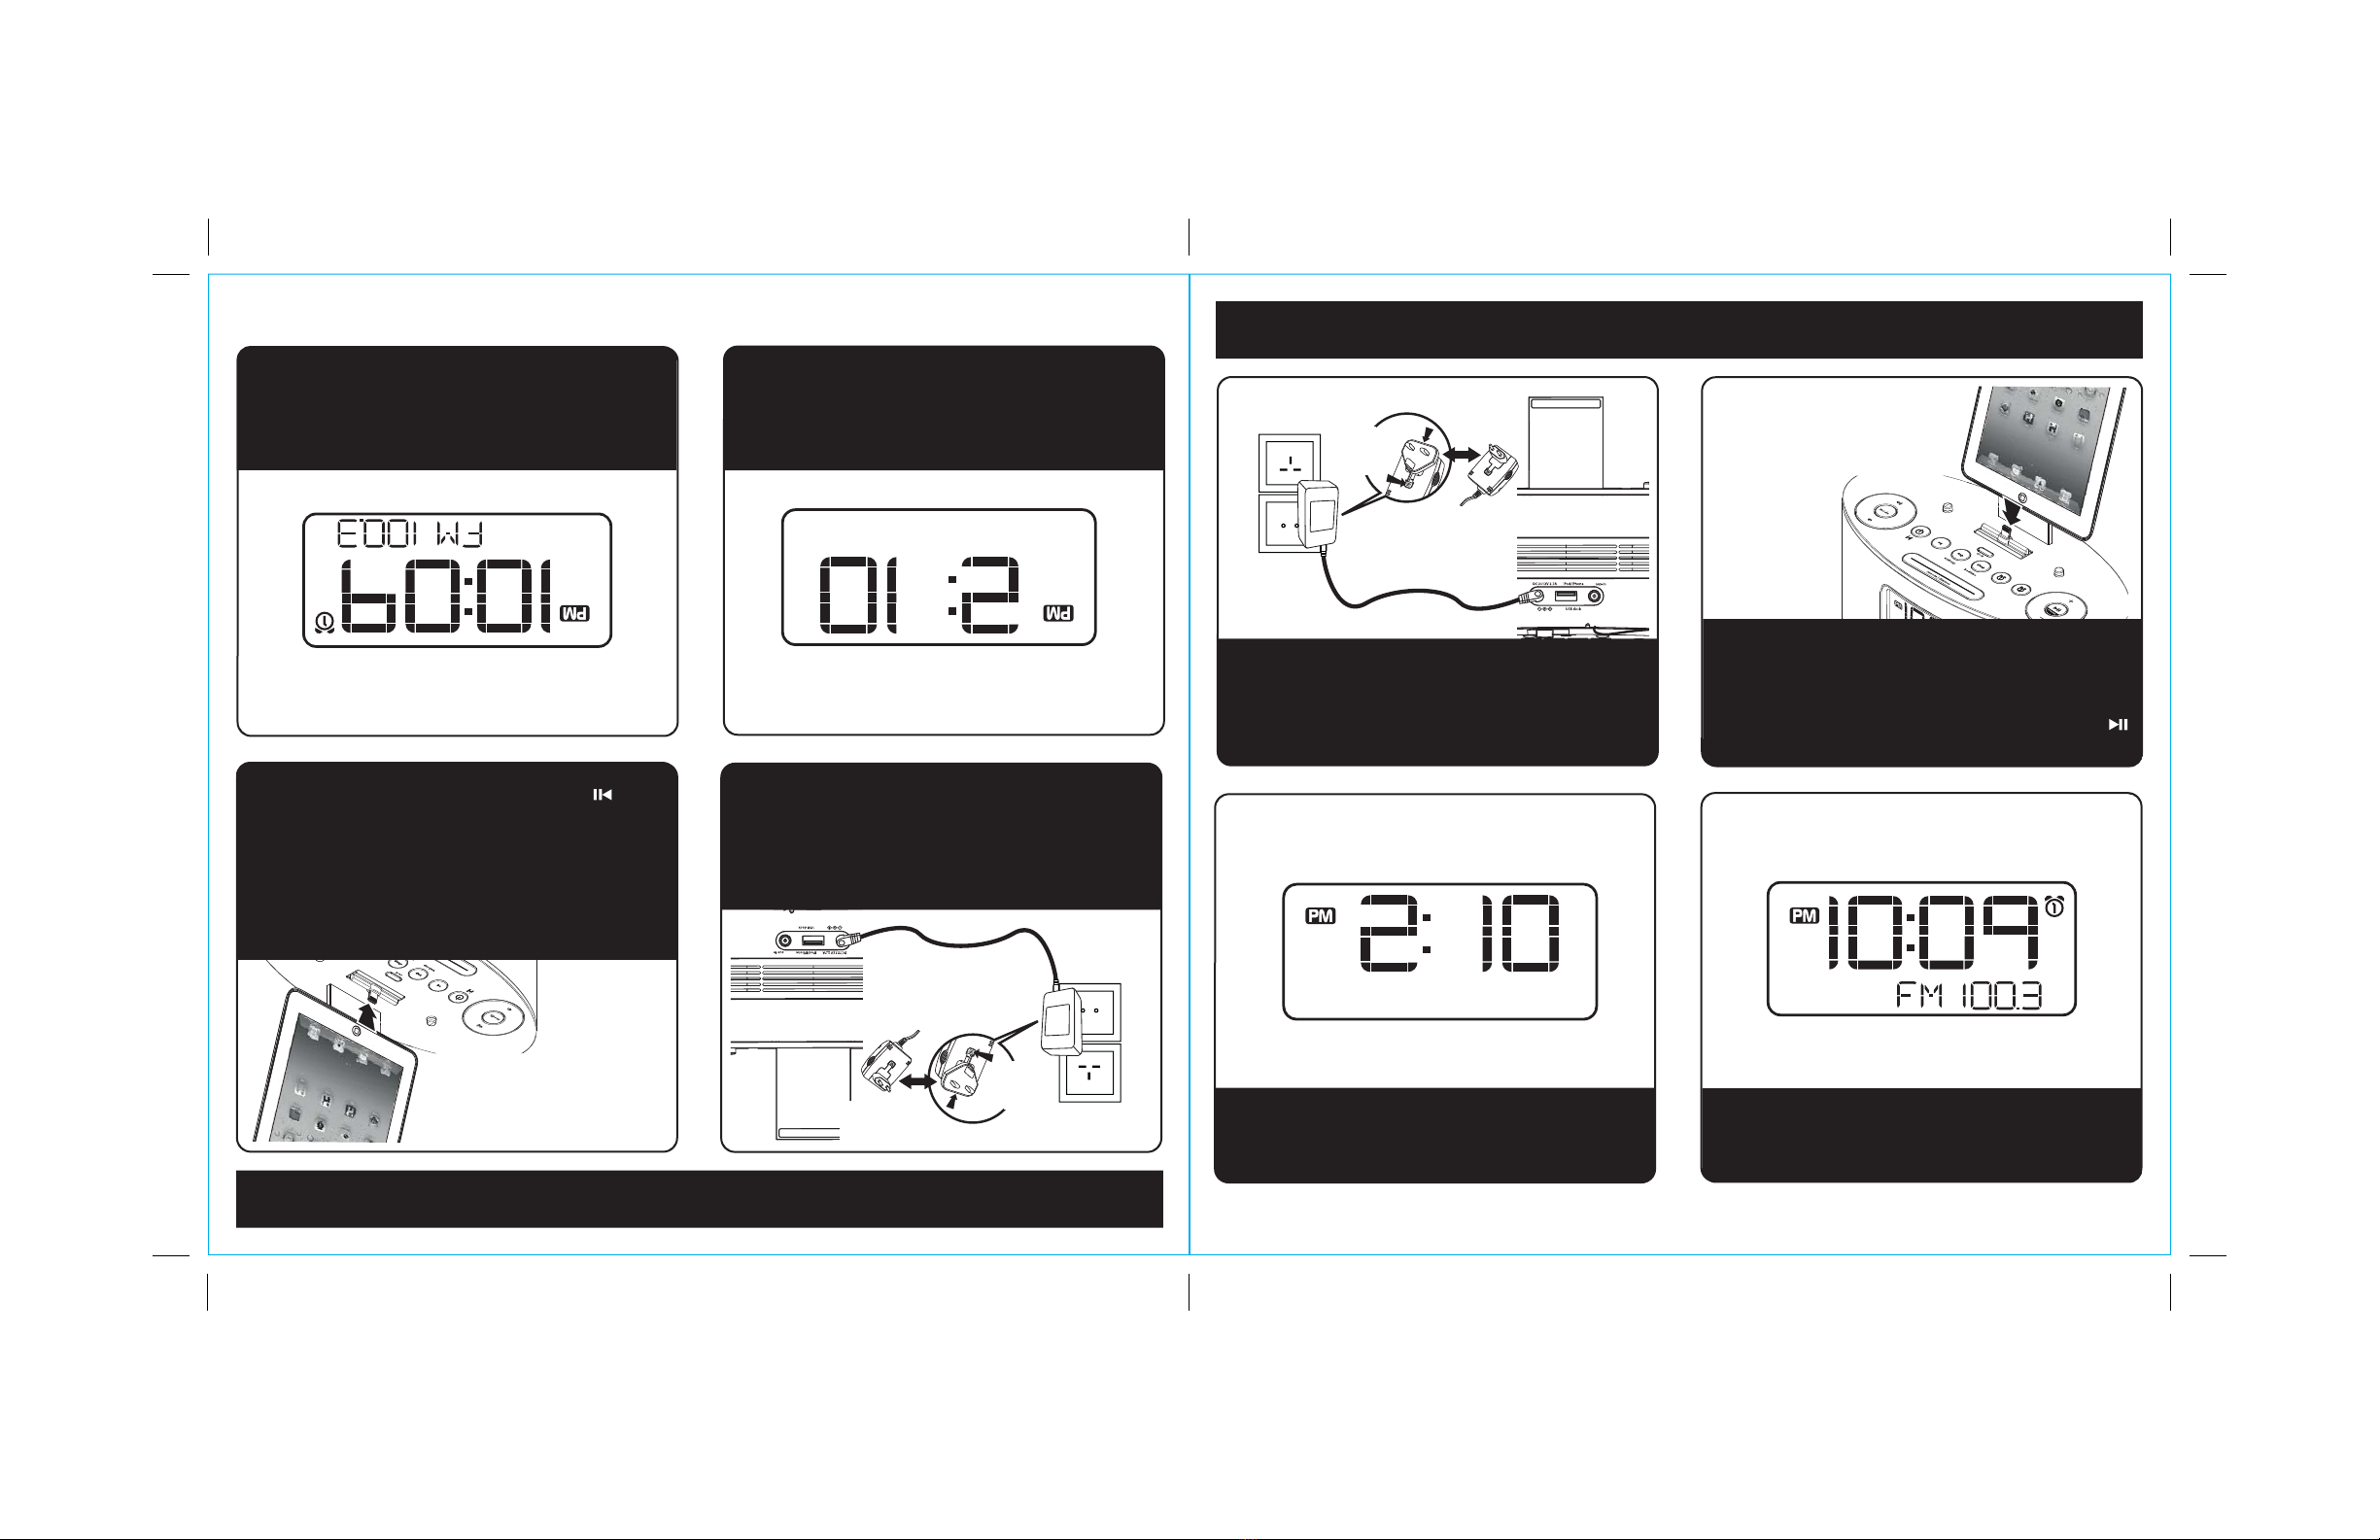
1. Ligar utilizando a Base Lightning: Apesar de a base acomoda a maioria dos casos, poderá necessitar de remover
a sua caixa para colocação correcta na base. Colocar na base qualquer iPad, iPhone ou iPod que já está a reproduzir
com o conector LIghtning na base Lightning no topo do aparelho. O aparelho activar-se-á automaticamente e ouvirá
o áudio a reproduzir a partir do seu iPad/iPhone/iPod. Pode pretender remover qualquer caixa ou “protecção” do seu
dispositivo antes de o colocar na base.
Ligar usando a Base USB: Ligar o seu iPad, iPhone ou iPod à base USB situada na parte de trás do aparelho
usando o cabo de carregamento USB fornecido com o mesmo.
Observação: Se o volume da fonte de áudio estiver demasiado baixo no iPad/iPhone/iPod, o aparelho poderá não
detectar que o seu iPad/iPhone/iPod está em modo de reprodução. Se assim for, premir uma vez o botão Presets no
aparelho para que o mesmo comece a reproduzir.
2. Quando um iPad/iPhone/iPod está colocado na base Lightning ou ligado a uma base USB e no modo em espera,
premir o botão Presets no aparelho para reproduzir o iPad/iPhone/iPod. Se o aparelho estiver já ligado, premir e
libertar o botão Mode conforme necessário até que apareça na parte inferior do visor “Dock” ou “USB Dock”,
indicando qual a base no aparelho que está no modo iPod.
3. Premir o botão Presets no aparelho para parar a reprodução; premir novamente para retomar a reprodução.
4. Premir o botão +ou –no aparelho para ir para a faixa seguinte ou anterior. Manter premidos os botões enquanto a
faixa estiver em reprodução para avançar ou voltar rapidamente dentro da mesma faixa.
Ajustar o Som no aparelho
Pode ajustar o som no aparelho enquanto ouve qualquer fonte de som.
1. Premir o botão ou no aparelho para ajustar o volume do sistema (limite é 00 - 40).
2. Premir e libertar o botão EQ conforme necessário, para seleccionar o efeito de som Agudo, Grave, Equilíbrio ou 3D
e, em seguida, premir o botão +ou –para ajustar as definições.
DICA: Também é possível ajustar EQ com a aplicação iHome Definir.
7
P9
Portuguese
Listening to iPad, iPhone or iPod Using the Dock or USB Port
This unit features both a Lightning dock (located on top of the unit) exclusively to play and charge iOS devices equipped
with the latest Lightning connector AND a USB dock (located on back of the unit) which can play and charge both iOS
devices with 30-pin connectors (such as iPhone 4, iPad, etc.) AND Lightning devices using the charging cable that came
with the device.
Play and pause a device connected to the Lightning dock OR the USB port using the Presets Button. The last
device connected will play (only one device can play at a time). To switch between Lightning dock or USB dock, press and
release the Mode Button as needed until “Dock” or “USB Dock” appears on the lower part of the display, indicating which
dock on the unit is in iPod mode. Directions below apply to whichever dock you wish to control.
1. Connecting using the Lightning Dock: While the dock accommodates most cases, you may need to remove your
case for proper docking. Dock any already playing iPad, iPhone or iPod touch with a Lightning connector in the
Lightning dock on top of the unit. The unit will automatically turn on and in a moment you will hear the audio playing
from your iPad/iPhone/iPod. You may wish to remove any case or “skin” on your device before docking.
Connecting using the USB Dock: Connect your iPad, iPhone or iPod to the USB dock located on back of the unit
using the USB charging cable that came with it.
Note: If the audio source volume is too low on the iPad/iPhone/iPod, the unit may not detect that the iPad/iPhone/iPod is
in play mode. If so, pressing the Presets Button on the unit once should make it play.
2. When an iPad/iPhone/iPod is docked to the Lightning dock or connected to the USB dock and in standby mode, press
the Presets Button on the unit to play the iPad/iPhone/iPod. If the unit is already on, press and release the Mode
Button as needed until “Dock” or “USB Dock” appears on the lower part of the display, indicating which dock on the
unit is in iPod mode.
3. Press the Presets Button on the unit on the unit to pause play; press again to resume play.
4. Press the + or – Button on the unit to go to the next or previous track. Press and hold while track is playing for high
speed forward or reverse music search of the current track.
Adjusting Sound on the Unit
You can adjust the sound on the unit while listening to any sound source.
1. Press the or Button on the unit to adjust the system volume (range is 00 - 40).
2. Press and release the EQ Button as needed to select Treble, Bass, Balance or 3D sound effect, then press the + or
– Button to adjust settings.
TIP: You can also adjust EQ with the iHome Set app.
7
P9

Ouvir o rádio
Ajustar a antena
Estender completamente a antena FM para obter uma melhor recepção. Não desmontar, alterar, nem ligar a outras
antenas.
Sintonizar e Reproduzir o rádio
1. Premir e libertar o botão Mode conforme necessário para alternar entre os modos Dock, USB Dock, rádio FM e
Aux-in.
2. Quando o modo FM está seleccionado, premir os botões +ou –para sintonizar a estação de rádio pretendida. A
frequência actual é mostrada no canto inferior direito do visor. Premir os botões +ou –durante alguns segundos para
procurar a próxima estação com boa sintonia.
3. To memorize a station as a preset:
A. Premir o botão Presets conforme necessário para percorrer as 6 predefinições (P1 - P6) para o número que
deseja atribuir, e depois manter premido o botão Presets até que o número predefinido seleccionado
começar a piscar no visor.
B. Premir os botões +ou –para sintonizar a estação de rádio pretendida. Manter premidos os botões brevemente
para que o rádio procure automaticamente a próxima estação de sinal forte.
C. Premir o botão Presets para confirmar a definição e o número predefinido que deseja atribuir. Repetir os
passos de A a C para armazenar até 6 estações na memória.
4. Para ouvir uma estação predefinida, premir o botão Presets para escolher a predefinição pretendida
5. Premir o botão ou no aparelho para ajustar o volume do sistema.
Utilizar o aparelho Noutros Países
Regiões diferentes do mundo utilizam frequências e faixas de rádio FM diferentes. O utilizador deve seleccionar a que
combina com os padrões de sua região (EUA, EUROPA, JAPÃO, AUSTRÁLIAou CHINA).Aopção padrão é EUAROPA;
se o utilizador morar nos Europa, deve saltar esta secção.
1. Certificar que o aparelho está DESLIGADO (não está em reprodução em nenhum modo). Manter premido o botão de
Mode durante aproximadamente 5 segundos, até que apareça “Radio Europa” na parte inferior do visor. Premir e
libertar o botão + ou - para alterar “EUROPA” para a sua região.
2. Premir e libertar o botão Mode novamente (ou não premir nenhum botão durante 10 segundos) para sair do modo de
definição de frequência do rádio. Dois avisos sonoros irão confirmar a definição da frequência de rádio.
8
P10
Portuguese
P10
Listening to Radio
Setting up the Antenna
Extend FM wire antenna fully for best reception. Do not strip, alter or attach to other antennas.
Tuning and Playing the Radio
1. Press and release the Mode Button as needed to cycle through Dock, USB Dock, FM radio andAux-in modes.
2. When FM mode is selected, press the + or – Button to tune the radio to a desired station. The current radio frequen-
cy appears in the lower right of the display. Press the + or – Button for a few seconds to scan for the next clear
station.
3. To memorize a station as a preset:
A. Press the Presets Button as needed to step through the 6 presets (P1 - P6) to the number you wish to assign,
and then hold the Presets Button until the selected preset number begins flashing in the display.
B. Press the + or – Button to tune the radio to a desired station. Hold briefly to have the radio autoscan/search for
the next clear station.
C. Press the Presets Button to confirm the setting, two beeps will confirm the setting and the preset number you
wish to assign. Repeat steps A-C to preset up to 6 stations.
4. To listen to a preset station, press the Presets Button to choose the desired preset.
5. Press the or Button on the unit to adjust the system volume.
Using the Unit in Other Countries
Different regions of the world use different FM radio frequency steps and ranges. You will need to select the one that
matches the standards in your region (USA, EUROPE, JAPAN, AUSTRALIA, or CHINA).The default setting is EUROPE;
if you live in EUROPE, you may skip this section.
1. Make sure the unit is OFF (not playing in any mode). Press and hold the Mode Button for about 5 seconds until
“Radio Europe” appears in the lower part of display. Press and release the + or – Button to change “EUROPE” to
your region.
2. Press and release the Mode Button again (or no button within 10 seconds) to exit the radio frequency setting mode.
Two beeps will confirm radio frequency setting.
Listening to other portable audio devices
You can play an MP3 player or other portable audio device through the iDL46 via the Aux line-in Jack.
1. Plug one end of a 3.5mm stereo audio cable (available at www.ihome.com) into the headphone or line-out jack on
your device and the other end of the cable into the iDL46 Aux-in Jack located on the back of the unit.
2. Turn on the unit and press and release the Mode Button as needed until “Aux-in” appears in the lower part of the
display, indicating Aux-in playing mode.
3. Turn on and play your device.
4. Press the or Button on the unit to adjust the system volume. You may need to adjust your device volume, too.
Remember to turn off your device when you are done playing it.
8

9
Ouvir outros aparelhos de áudio portáteis
Pode reproduzir um leitor MP3 ou outro dispositivo áudio portátil através do iDL46 com a tomada Aux line-in.
1. Ligar um dos terminais do cabo audio stereo de 3,5mm (disponível em www.ihome.com) ao auscultador ou à tomada
line-out no seu dispositivo e o outro terminal do cabo na tomada iDL46 Aux-in situada na parte de trás do aparelho.
2. Liga o aparelho e premir e libertar o botão Mode conforme necessário até que apareça “Aux-in” na parte inferior do
visor, indica modo de reprodução Aux-in.
3. Ativar e reproduzir a sua dispositivo.
4. Premir o botão ou no aparelho para ajustar o volume do sistema. Você pode precisar de ajustar o volume do
dispositivo, também.
Não se esqueça de desligue seu dispositivo quando você você terminar de jogar ele.
Função de dormir
O modo de suspensão permite-lhe suspender o que quer que esteja em reprodução (iPad/iPhone/iPod ou rádio),
diminuindo gradualmente o volume até o aparelho desligar à hora seleccionada.
1. Premir o botão Sleep para entrar no modo de dormir. O ícone de dormir aparecerá no visor para indicar o modo de
dormir. O modo de dormir possui uma função de dormir aos poucos, que diminui gradualmente o volume. O aparelho
será desligado automaticamente após o tempo seleccionado para a função de dormir.
2. É possível ajustar o tempo de dormir, entre as opções de 120, 90, 60, 30, 15 minutos ou desligado, premindo o botão
Sleep novamente.
3. Quando o visor voltar a mostrar a hora real, premir o botão Sleep uma vez para mostrar o tempo de dormir restante.
Premir o botão novamente para alterar o tempo de dormir para o próximo incremento.
4. O iDL46 possui um ajuste de volume independente para o modo de dormir, de modo que é possível ajustar o volume
de dormir sem que o volume normal seja afectado. Premir o botão ou no aparelho para ajustar o volume de
suspensão do sistema. O volume de dormir permanecerá no mesmo nível quando o aparelho entrar novamente no
modo de dormir, até que os controlos sejam alterados.
5. Para parar de ouvir em qualquer momento, premir o botão no aparelho para o desligar.
Função de silêncio
O modo de silêncio permite-lhe ajustar um alarme separado dos alarmes 1 e 2. Por predefinição, a fonte de despertar o
silêncio é o alarme de campainha.
1. Premir o botão Nap, localizado na parte superior do aparelho, conforme necessário para ajustar o temporizador de
sesta para 5, 10, 15, 20, 30, 45, 60, 90 ou 120 minutos ou DESLIGADO.
2. Quando o alarme de repouso tocar, premir o botão Nap para o desligar.
Função de redução da iluminação
Durante o funcionamento normal, premir e libertar o botão Snooze/Dimmer para controlar a luminosidade do visor LCD.
P11
Portuguese
9
Sleep Operation
Sleep mode lets you sleep to whatever is currently playing (iPad/iPhone/iPod or the radio), gradually lowering the volume
until the unit shuts off at the selected time.
1. Press the Sleep Button to enter sleep mode.The Sleep Icon will appear on the display to indicate sleep mode. Sleep
mode has a Gentle Sleep feature which gradually lowers the volume. The unit will automatically turn off after the
selected sleep time.
2. You can adjust the sleep timer from 120, 90, 60, 30, 15 minutes or OFF by pressing the Sleep Button again.
3. When the display changes back to show the real time, pressing the Sleep Button once will show the sleep time
remaining. Pressing it again will change sleep time to next lowest increment.
4. iDL46 has independent volume setting for sleep mode so you can adjust the sleeping volume without affecting the
alarm volume. Press the or Button on the unit to adjust the system sleep volume. The sleep volume will remain
at that level the next time you enter sleep mode until controls are changed.
5. To stop listening at any time, press the Button on the unit to turn it off.
Nap Operation
Nap mode lets you set an alarm separate from theAlarm 1 andAlarm 2 settings. The nap wake to source by default is the
buzzer alarm.
1. Press the Nap Button located on the top of the unit as needed to adjust the nap timer for 5, 10, 15, 20, 30, 45, 60, 90
or 120 minutes or OFF.
2. Once nap alarm sounds, press the Nap Button to turn it off.
Dimmer Operation
During normal operation, press and release the Snooze/Dimmer Button to control the brightness of the LCD display.
P11

10
Bateria de reserva do relógio
Observação: 2 pilhas AA são incluídas com o aparelho. Instale-as antes de usar o aparelho
Este modelo está equipado com um circuito de pilha de reserva que manterá as definições da hora e do alarme no
caso de interrupção temporária de energia. O visor do relógio não será mostrado. No entanto, no modo de reserva
pode exibir o tempo durante 5 segundos premindo o botão Snooze/Dimmer. O circuito da pilha de reserva também irá
soar o alarme de campainha para despertar à hora seleccionada, no caso de falha de energia. Quando a pilha de
reserva começar a ficar fraca, o Indicador de Pilha de Reserva Fraca começará a piscar no visor. Quando vir este
indicador a piscar, deverá substituir a pilha de reserva o mais brevemente possível. Observação: Para um melhor
desempenho recomendamos o uso de pilhas alcalinas.
Para instalar/substituir as pilhas de reserva:
IMPORTANTE: Quando substituir a pilha de reserva, certificar que o aparelho está ligado à tomada de AC para manter
todas as suas definições, caso contrário, será necessário repor a hora e a hora do alarme após a substituição da pilha.
1. Deslizar e remover a porta do compartimento das pilhas situado na parte inferior do aparelho. Se estiver a substituir
as pilhas, deve remover as pilhas gastas.
2. Inserir 2 pilhas AA novas, no compartimento das pilhas de reserva. Certificar que a polaridade das pilhas (símbolos
“+” ou “-”) coincidem com a figura
3. Deslizar e fechar a porta do compartimento das pilhas. Confirmar que o indicador da pilha de reserva não está piscar
no visor.
Observação: Elimine as pilhas usadas correctamente
(consultar a regulamentação local)
Aviso relativamente às pilhas
• Não as aquecer a mais de 75°C (167°F)
• Não abrir as pilhas
• Não as deitar no fogo
• Não expor o seu conteúdo à água
• Não as instalar de trás para frente
P12
Portuguese-JuLY 16, 2014
10
Clock Backup Batteries
Note: 2 AA batteries are included with the unit. Install them before using the unit.
This model is equipped with a battery backup circuit that will maintain the time and alarm time settings in the event of a
temporary power interruption. The clock display will not be shown. However, in battery backup mode you can display the
time for 5 seconds by pressing the Snooze/Dimmer button. The battery backup circuit will also operate the buzzer alarm
to wake you up at the selected wake up time even if the power is out. When the backup batteries are getting weak the
Low Backup Battery Indicator will begin flashing in the display. When you see this flashing indicator you should replace
the backup batteries as soon as possible. Note: We recommend alkaline batteries for best performance.
To install/replace the backup batteries:
IMPORTANT: When replacing the backup batteries be sure to have the unit connected to the AC outlet to maintain all of
your settings, otherwise it will be necessary to reset the time and alarm time after the batteries are replaced.
1. Slide and remove the battery door located on the bottom of the unit. If replacing batteries, remove the exhausted
batteries.
2. Insert 2 freshAAbatteries in the backup battery compartment. Make sure the polarity of the batteries (“+” or “-” nodes)
matches the illustration.
3. Slide and close the battery compartment door. Confirm that the backup battery indicator is not flashing in the display.
Note: Make sure you dispose of batteries properly (see your local regulations)
Battery Warning
• Do not heat above 75ºC (167ºF) • Do not expose contents to water
• Do not open batteries • Do not dispose of in fire
• Do not install backwards
P12
Replacing Backup Battery
Substituir a Pilha de Reserva

Guia do consumidor para segurança do produto
11
Se utilizado da forma correta, este aparelho foi planejado e fabricado para garantir a sua segurança pessoal. Porém, uma
utilização inadequada pode resultar em eletrocussões ou riscos de incêndio em potencial. Leia todas as instruções de
segurança e operação atentamente antes de instalar e utilizar o aparelho, e guarde estas instruções para referências
futuras. Lembre-se principalmente de todos os avisos listados nestas instruções, bem como no aparelho.
1. Água e humidade – o aparelho não deve ser utilizado próximo à água. Por exemplo: próximo de uma banheira, uma
bacia, um lava-louça, um tanque de lavar roupa, uma piscina ou uma cave húmida.
2. Ventilação – o aparelho deve ser posicionado de forma que sua localização ou posição não interfira em sua ventilação.
Por exemplo, não deve ficar em camas, sofás, alcatifas ou superfícies similares que possam bloquear os orifícios de
ventilação. O aparelho também não deve ser colocado em instalações embutidas, como estantes ou armários, que
podem impedir o fluxo de ar através dos orifícios de ventilação.
3. Calor – o aparelho deve ficar longe de fonte de calor, como radiadores, aquecedores, fornos ou outros aparelhos
(incluindo amplificadores) que gerem calor.
4. Fontes de alimentação – o aparelho deve ser conectado a fontes de alimentação somente do tipo descrito nas
instruções de funcionamento, ou como marcado no aparelho.
5. Proteção do cabo de alimentação – os cabos de alimentação devem ser posicionados de modo que não sejam
pisados ou beliscados por itens colocados sobre ou contra eles. É sempre melhor garantir uma área livre entre o ponto
a partir do qual o cabo sai do aparelho e o ponto onde entra na fonte AC.
6. Limpeza – o aparelho deve ser limpo somente como recomendado. Veja a secção de Manutenção deste manual para
obter instruções de limpeza.
7. Entrada de objetos e líquidos – cuidado para que objetos não caiam e para que água não seja derramada nos
orifícios ou aberturas localizadas no produto.
8. Acessórios – não utilize acessórios diferentes dos recomendados pelo fabricante do produto.
9. Proteção contra surtos de energia e raios – desconecte o aparelho da fonte de alimentação, bem como a antena
ou o sistema de cabos, durante tempestades de raios ou se o aparelho for ficar fora de utilização por um longo período.
Isto evitará danos ao produto devidos a raios ou surtos da rede elétrica.
10.Sobrecarga – não sobrecarregue fontes de alimentação, cabos de extensão ou receptáculos de conveniência integral,
pois isto pode resultar em risco de incêndios ou eletrocussão.
11. Danos que requeiram reparos – o aparelho deve ser reparado por técnicos qualificados se:
A. o cabo ou a ficha de alimentação estiverem danificados.
B. objetos houverem caído ou líquidos houverem sido derramados dentro do aparelho.
C. o aparelho houver sido exposto a chuvas.
D. o aparelho houver sido derrubado ou sua superfície danificada.
E. o aparelho exibir uma mudança notável em sua performance, ou se não estiver a funcionar normalmente.
12.Períodos de inatividade – se o aparelho for ficar fora de utilização por um período estendido, como um mês ou mais,
o cabo de alimentação deve ser desconectado do aparelho para que danos e corrosões sejam evitados.
13.Manutenção – o utilizador não deve tentar consertar o aparelho além dos métodos descritos no manual de instruções.
Os métodos de reparo não cobertos no manual de instruções devem ser realizados por profissionais qualificados.
Dúvidas? Visite www.ihomeintl.com
P13
INSTRUÇÕES IMPORTANTES DE SEGURANÇA
Portuguese
A Consumer Guide to Product Safety
11
When used in the directed manner, this unit has been designed and manufactured to ensure your personal safety. However,
improper use can result in potential electrical shock or fire hazards. Please read all safety and operating instructions
carefully before installation and use, and keep these instructions handy for future reference. Take special note of all warnings
listed in these instructions and on the unit.
1. Water and Moisture – The unit should not be used near water. For example: near a bathtub, washbowl, kitchen sink,
laundry tub, swimming pool or in a wet basement.
2. Ventilation – The unit should be situated so that its location or position does not interfere with its proper ventilation.
For example, it should not be situated on a bed, sofa, rug or similar surface that may block ventilation openings. Also,
it should not be placed in a built-in installation, such as a bookcase or cabinet, which may impede the flow of air through
the ventilation openings.
3. Heat – The unit should be situated away from heat sources such as radiators, heat registers, stoves or other appliances
(including amplifiers) that produce heat.
4. Power Sources – The unit should be connected to a power supply only of the type described in the operating instructions
or as marked on the appliance.
5. Power-Cable Protection – Power supply cables should be routed so that they are not likely to be walked on or pinched
by items placed upon or against them. It is always best to have a clear area from where the cable exits the unit to
where it is plugged into an AC socket.
6. Cleaning – The unit should be cleaned only as recommended. See the Maintenance section of this manual for cleaning
instructions.
7. Objects and Liquid Entry – Care should be taken so that objects do not fall and liquids are not spilled into any
openings or vents located on the product.
8. Attachments – Do not use attachments not recommended by the product manufacturer.
9. Lightning and Power Surge Protection – Unplug the unit from the wall socket and disconnect the antenna or cable
system during a lightning storm or when it is left unattended and unused for long periods of time. This will prevent
damage to the product due to lightning and power-line surges.
10. Overloading – Do not overload wall sockets, extension cords, or integral convenience receptacles as this can result
in a risk of fire or electric shock.
11. Damage Requiring Service – The unit should be serviced by qualified service personnel when:
A. the power supply cable or plug has been damaged.
B. objects have fallen into or liquid has been spilled into the enclosure.
C. the unit has been exposed to rain.
D. the unit has been dropped or the enclosure damaged.
E. the unit exhibits a marked change in performance or does not operate normally.
12. Antenna – Do not connect an external antenna to the unit (other than that provided).
13. Periods of Nonuse – If the unit is to be left unused for an extended period of time, such as a month or longer, the
power cable should be unplugged from the unit to prevent damage or corrosion.
14. Servicing – The user should not attempt to service the unit beyond those methods described in the user’s operating
instructions. Service methods not covered in the operating instructions should be referred to qualified service personnel.
P13
IMPORTANT SAFETY INSTRUCTIONS

O iPad/iPhone/iPod não
carregou
O iPad/iPhone/iPod está bloqueado/congelado
A bateria do iPad/iPhone/iPod está com problemas
Certificar se o seu iPad/iPhone/iPod está a funcionar correctamente antes
de o ligar ao aparelho. Consultar o manual do seu iPad/iPhone/iPod para
mais detalhes.
O iPad/iPhone/iPod não está correctamente ligado Retirar o seu iPad/iPhone/iPod da base ou da base USB e verificar se existe
alguma obstrução nos conectores na base ou no iPad/iPhone/iPod.
Seguidamente, Ligar novamente à base. Tentar retirar a caixa do dispositivo.
12
P14
O aparelho não liga O adaptador AC não está ligado a uma fonte de alimentação
que funcione correctamente, ou não está ligado à entrada
de alimentação na parte de trás do aparelho
Ligar o adaptador AC a uma fonte de alimentação que esteja a funcionar, e
o conector à entrada de alimentação do aparelho
O aparelho necessita de ser reinicializado Se o aparelho estiver ligado e não responder, deve tentar reiniciá-lo
através dos passos seguintes:
a) Remover o iPad/iPhone/iPod da base
b) Desligar o aparelho da fonte de alimentação
c) Remover a pilha de reserva
d) Aguardar alguns minutos e, seguidamente, restaurar a pilha e retomar a
utilização
O iPad/iPhone/iPod não está correctamente ligado Retirar o iPad/iPhone/iPod da base/base USB e verificar se existe alguma
obstrução nos conectores na base e no seu iPad/iPhone/iPod. Seguidamente,
Ligar novamente à base. Tentar igualmente remover qualquer caixa ou
“protecção” no seu dispositivo que possam impedir um contacto correcto.
O ícone de pilha fraca
está sempre a piscar A pilha está fraca Trocar por uma pilha nova
A pilha não foi instalada correctamente Certificar que o lado + está voltado para fora
O iPad/iPhone/iPod não
responde ao aparelho,
o iPad/iPhone/iPod está
em reprodução mas
não é emitido nenhum
som
O iPad/iPhone/iPod não está correctamente ligado Remover o seu iPad/iPhone/iPod da base e verificar se há obstruções nos
conectores entre a base e o seu iPad/iPhone/iPod. Seguidamente, Ligar
novamente à base.
O software do seu iPad/iPhone/iPod é demasiado antigo Actualizar o software do seu iPad/iPhone/iPod através do
iTunes no seu computador
O iPad/iPhone/iPod está bloqueado/reproduz mas não
sai som do aparelho Verificar a regulação do volume. Certificar se o seu iPad/iPhone/iPod
está a funcionar correctamente antes de o ligar ao aparelho. Consultar
o manual do seu iPad/iPhone/iPod para mais detalhes. Ver acima como
actualizar o software. Pode ser necessário reiniciar o seu iPad/iPhone/iPod.
Consultar o manual de instruções do seu iPad, iPhone ou iPod para obter
detalhes acerca de como o reiniciar.
Usar iPod, iPod Shuffle 1st ou 2nd geração ou outros
dispositivos. O aparelho não consegue controlar esses modelos de iPod ou
de outros dispositivos.
Resolução de problemas
SoluçãoSintoma Causa possível
Não é emitido nenhum
som do aparelho A definição do volume está demasiado baixa no aparelho Verificar se o volume pode ser aumentado
Levar o aparelho para longe de fontes de interferências externas em
potencial, como computadores, modems, aparelhos sem fios
(roteadores) ou luzes fluorescentes.
O desempenho do
aparelho/iPad/iPhone/i
Pod está inconstante
O aparelho está a reagir a interferência externa
O aparelho não
responde
Portuguese
P14
12
Unit does not turn on AC adaptor isn't plugged into a working wall
socket or not plugged into the power supply
jack on back of the unit
Plug the AC adaptor into a working wall socket and plug the connector
into the supply jack on the unit
Unit requires a reset If unit is plugged in and doesn't respond, try resetting the unit by
following these steps:
a) remove iPad/iPhone/iPod from dock
b) unplug unit from power source
c) remove back up battery
d) wait a few minutes, then restore battery and resume use
iPad/iPhone/iPod is not docked properly Remove your iPad/iPhone/iPod from the dock/USB dockand check for
obstruction on the connectors in the dock and on your iPad/iPhone/iPod.
Then reseat it in the dock. Also try removing any case or “skin” on your
device that may be preventing proper contact.
Battery Low icon
always flashing Battery is weak Replace with new battery
Battery was not installed properly Check to make sure the + side is facing outwards
iPad/iPhone/iPod does
not respond to the
unit, iPad/iPhone/iPod
is playing but no
sound comes out
iPad/iPhone/iPod is not docked properly Remove your iPad/iPhone/iPod from the dock and check for obstruction
on the connectors in the dock and on your iPad/iPhone/iPod. Then reseat
it in the dock.
Your iPad/iPhone/iPod software is too old Upgrade software on your iPad/iPhone/iPod via iTunes on your
computer
iPad/iPhone/iPod is locked up/plays but no
sound comes out Check the volume setting. Make sure your iPad/iPhone/iPod is working
properly before docking into the unit. Please refer to your iPad/iPhone/iPod
manual for details. See above for software upgrade information.
You may need to reset your iPad/iPhone/iPod. Refer to your iPad, iPhone
or iPod user guide for details on how to perform a reset.
Using 1st or 2nd generation iPod, iPod Shuffle
or other devices. Unit cannot control those iPod models or other devices.
iPad/iPhone/iPod
didn’t charge up
iPad/iPhone/iPod is locked up/ frozen
iPad/iPhone/iPod battery has problem
Please make sure your iPad/iPhone/iPod is working properly before
docking into the unit. Please refer to your iPad/iPhone/iPod manual for
details.
Time sync didn’t work Older iPod models such as iPod mini do not
support time sync function Make sure you are using an iPhone or newer iPod such as touch,
nano or classic. If not available, set time manually (see page 3).
Troubleshooting
SolutionSymptom Possible Problem
No sound from unit Volume is set too low on unit Make sure volume is turned up
Move unit away from potential sources of external interference such as
computers, modems, wireless devices (routers) or fluorescent light.
Unit/iPad/iPhone/iPod
performance is erratic The unit is reacting to external interference
Unit doesn’t respond
iPad/iPhone/iPod is not docked properly Remove your iPad/iPhone/iPod from the dock or USB dock and check
for obstruction on the connectors in the dock and on your iPad/iPhone/iPod.
Then reseat it in the dock. Try removing device case.
Hotel switch on bottom of unit is not set to
Normal position Make sure to set the Hotel switch to Normal for standard operation.
Time sync is disabled in Hotel Hi or Hotel Low modes.

13
Resolução de problemas
Solução
Sintoma Causa possível
O aparelho/adaptador
fica quente após um
tempo alargado de
reprodução com
volumes altos
Isto é normal Desligar o aparelho durante algum tempo ou diminuir o volume
O nível do volume está muito alto
O aparelho/adaptador
fica quente após um
tempo alargado de
reprodução com
volumes altos
Diminuir o volume
A fonte de som está distorcida Se a fonte de som original do iPad/iPhone/iPod (MP3) for antiga ou de baixa
qualidade, podem ser observadas com facilidade distorções e ruídos com
altifalantes de alta potência. Tentar um ficheiro diferente de uma fonte fidedigna,
como o iTunes.
Se estiver a usar uma fonte de audio externa, deve tentar reduzir o volume de
saída no próprio dispositivo. Deve igualmente tentar reduzir os graves no
dispositivo.
Diminuir as configurações de EQAs configurações de EQ estão muito altas
O tempo de silêncio personalizado não foi
ajustado
O alarme não
funciona Hora AM/PM/hora do alarme não ajustadas
correctamente Ao ajustar o relógio ou o alarme, atenção aos indicadores AM/PM
Hora ou fonte ao despertar do alarme para o alarme
2, e não para o alarme 1, ou vice-versa
7 dias corresponde ao alarme de todos os dias, dias úteis corresponde a
Seg-Sex e fim-de-semana corresponde a Sáb-Dom. Veja como ajustar os
alarmes na página 4.
O calendário não está definido correctamente, o que
pode afectar o funcionamento do alarme do
programa de despertar
Veja como ajustar o relógio/calendário na página 3.
Ajustar a hora do alarme e a fonte ao despertar para o ícone 1 ou 2 do
alarme, como mostrado no visor do relógio
Tempo de sesta
É demasiado curto/longo Mantenha premido o botão de silêncio, e então premir + ou – para ajustar
P15
A sincronização da hora
não funcionou Modelos mais antigos de iPod, como o iPod mini, não
suportam a função de sincronização da hora Certificar que está a utilizar um iPhone ou um novo modelo de iPod, como o
touch, o nano ou o classic. Se não estiver disponível, regular a hora
manualmente (consultar a página 3).
A definição do programa de despertar não
está correcta
Portuguese
P15
Sound is distorted Volume level is set too high Decrease the volume
Sound source is distorted If the iPad/iPhone/iPod original sound source (MP3) is old or of poor
quality, distortion and noise are easily noticed with high-power speakers.
Try a different file from a trusted source such as iTunes.
If you are using an external sound source l, try reducing the output volume
on the device itself. Also try turning bass down on the device.
13
Troubleshooting
SolutionSymptom Possible Problem
Unit/adaptor gets
warm after extended
play at high volume
This is normal Turn unit off for awhile or lower volume
Lower EQ settings.EQ settings are too high.
Custom snooze time not set
Alarm not working AM/PM time/alarm time not set correctly When setting clock or alarm time, take note of the AM/PM indicators
Alarm time or source selected for alarm 2 , not
alarm 1 or vice versa
Wake schedule setting is not correct 7 days is every day alarm, weekday is Mon-Fri, and weekend is Sat-Sun.
See page 4 for setting alarms.
Calendar is not set correctly, which can affect
wake schedule alarm operation See page 3 for setting Clock/Calendar Section.
Make sure to set the alarm time and source for the alarm icon 1 or 2
that is shown on the clock display
Snooze time
is too long/short Press and hold Snooze button then press + or - Button to adjust
Unit doesn’t perform as
described Hotel switch on bottom of unit is not set to
Normal position
Make sure to set the Hotel switch to Normal for standard operation. When
set to either of the two hotel settings, the following features are
disabled/effected:
Time Sync (lock/calendar must be set manually)
FM Presets (can be accessed, but not set)
Wake to playlist
Programmable snooze (default 9 minute snooze time only)
Alarm reset (unit operates as single day alarm only; seven day, weekday
and weekend settings are disabled)
Radio frequency setting for other countries (default setting only)
iHome Set App not supported
A chave de Hotel, na parte inferior da unidade, não
está definida na posição Normal Certifique-se de que define a chave de Hotel como Normal para um
funcionamento padrão. A sincronização da hora está desactivada nos modos
Hotel Alto ou Hotel Baixo.
A unidade não funciona
como está descrito A chave de Hotel, na parte inferior da unidade, não
está definida na posição Normal Certifique-se de que define a chave de Hotel como Normal para um
funcionamento padrão. Quando estiver definida com uma das duas definições
de hotel, as seguintes funcionalidades ficarão desactivadas/afectadas:
Predefinições de FM (podem ser acedidas, mas não podem ser
definidas)
Despertar com lista de reprodução
Suspensão programável (apenas 9 minutos de tempo predefinido de
suspensão)
Reprosição do alarme (a unidade funciona apenas como alarme de um dia; as
definições de sete dias, dias úteis e fim-de-semana ficam desactivadas)
Definição de frequência de rádio para outros países (só predefinição)
Aplicação de Definição do iHome não suportada

P16
© 2014 SDI Technologies Todos os Direitos Reservados
questões? visite www.ihomeintl.com
iDL46EU-140716-B (P) Impresso na China
Portuguese-July 16, 2014
P16
© 2014 SDI Technologies, Inc. All rights reserved
Questions? Visit www.ihomeintl.com
DL46EU-140716-B (UK) Printed in China
July 16, 2014
7/16/2014
Table of contents
Other iHome Clock Radio manuals