iHome iPL8XH User manual

Model iPL8XH
Docking FM clock radio for
iPod or iPhone
QUESTIONS? Visit www.ihome.com

1
12 3
WELCOME
Thank you for choosing the iPL8XH from iHome. This user guide will
get you up and running quickly and provide helpful hints to
maximize enjoyment. For more information about this and other
iHome products, please visit www.ihome.com
GETTING STARTED
This unit ships with the following items. Please check to see that all
items are present.
1 iPL8XH speaker system
2 100-240V Universal AC power adaptor
3 FM antenna

FEATURES & FUNCTIONS
Mode Button
Power On/O
Button
Time Sync Button
Sleep Button
Alarm 2 Button
Alarm 1 Button
Snooze/Dimmer Button
2
Back panel
Display
Top panel
Play/Pause/Presets
Button
Backrest
Volume
Control
Buttons
+/– Settings
Buttons
DC Jack
Aux-in jack
FM Antenna jack
USB charging
port
DC 9V 2.7A
Time Display
Volume Indicator
Minute Indicator
Alarm Time/Date Display
PM Indicator
AM Indicator
Wake-To/Mode Indicators
(Tone/Dock/Aux/FM Radio)
Alarm
Indicators
Low Backup
Battery Indicator
Sleep Mode Indicator
Removable rubber
docking insert Lightning Dock
Connector for iPhone/iPod
RED when connected to power
WHITE when unit is powered ON

DC 9V 2.7A
BACKUP BATTERY
The iPL8XH ships with a CR2450 battery installed for backup to provide
continuous alarm operation and clock settings in the event of a power failure.
Remove the pull tab from the battery compartment on the bottom of the unit
before use. If a power failure occurs or the AC cord is accidentally
disconnected, the display backlight will not remain lit, but current time and
alarm time settings will be temporarily maintained. Otherwise, you must reset
the time and alarm settings.
Note: The Battery Low icon is located at the left side of clock display.
When the backup battery is low and needs to be replaced, the Battery
Low icon will flash. To replace, follow steps below:
3
CONNECTING AC ADAPTER
AND FM ANTENNA
This unit operates on AC power
using the included 100V-240V
universal AC adaptor. Place unit on
a stable surface. Plug the power
adaptor into the DC jack on back
of the unit and the other end into a
working wall socket. The Power
Button will glow red. Connect the
included FM radio antenna to the
FM antenna jack on the back of the
unit.
RESET
RESET
TEST
TEST
FM Antenna

4
BACKUP BATTERY (CONTINUED)
1. Please make sure the AC adaptor is connected. Otherwise all settings
may be lost during battery replacement.
2. Use a Phillips screwdriver to open the backup battery compartment
door located on the bottom of the unit.
3. Remove the exhausted battery. Insert a
new CR2450 battery by easing it under the
tabs in the battery well and pressing down.
Make sure the side marked + is facing up.
4. Close the battery compartment door and
tighten the battery door screw.
Note: Make sure you dispose of battery
properly (see your local regulations).
WARNING: Lithium batteries can explode or cause burns if disassembled,
shorted, recharged, exposed to water, fire, or high temperatures. Do not
place loose batteries in a pocket, purse, or other container containing metal
objects, mix with used or other battery types, or store with hazardous or
combustible materials. Store in cool, dry, ventilated area. Follow applicable
laws and regulations for transport and disposal.

5
SETTING THE TIME:
TIME SYNC & MANUAL TIME SETTING
TIME SYNC
This unit is equipped with auto sync. By default, the unit will sync to the
time on your iPhone or iPod whenever you dock it in the Lightning dock.
When successful, the updated time will appear on the display. While the
dock accommodates most cases, you may need to remove your case for
proper docking. To manually sync at any time, press and release the Time
Sync Button. If sync is unsuccessful, try to sync again using a dierent
iPhone or iPod. If sync still doesn’t work, set the time manually (see
below).
SETTING THE TIME MANUALLY
1. Press and hold the Time Sync Button until “SYNC” flashes in the display
and a beep sounds. Press the +or –Buttons so “MANUAL” appears in the
display, indicating manual time setting mode.
2. Press and release the Time Sync Button. The TIME will flash on the display.
Press the +or –Buttons to set the correct time (hold for rapid
adjustment). Make sure to set the correct AM or PM time. (The PM/AM
indicators appear to the left of the time display.)
NOTE: The display can be set to standard 12 hour time (AM and PM) or to
24 hour time. To toggle between 12 and 24 modes, press and release the
Alarm 1 or Alarm 2 Button located on top of the unit at any time
while display is flashing during manual time setting mode.
3. Press and release the Time Sync Button to confirm the current time
setting. The YEAR will flash on the display. Press the +or –Buttons to set
the correct year.
4. Press and release the Time Sync Button to confirm the current year
setting. The DATE will flash on the display. Press the +or –Buttons to set
the correct month and day (hold for rapid adjustment).
5. Press and release the Time Sync Button to confirm the current date
setting. Two beeps will sound to indicate time setting mode is complete.

6
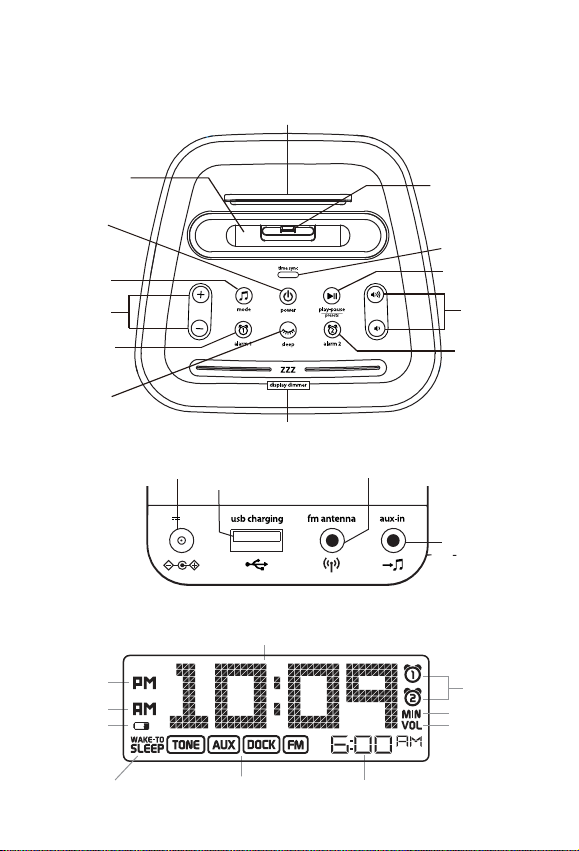
SETTING AND USING THE ALARMS
SETTING THE ALARMS
This unit has two alarms which are set the same way. Instructions below are
for setting alarm 1. Substitute the Alarm 2 Button to set alarm 2. you can
wake to your docked device, FM radio or to the built-in buzzer alarm. The
alarm will sound for 60 minutes or until reset/turned o.
1. Press and hold the Alarm Button until the alarm time display flashes and
one beep sounds.
2. Press the +or –Buttons to adjust the display to the desired alarm time (hold
for rapid adjustment). Remember to set the correct AM or PM alarm time.
3. Press the Alarm Button to confirm the alarm time. The wake to schedule
will flash.
4. Press the +or –Buttons to set the desired alarm schedule: 7 Days (every
day), 5 Days (week days) or 2 Days (weekends only).
5. Press the Alarm Button to confirm the alarm schedule. The WAKE-TO
indicator will flash on the display. Press the +or –Buttons to select Dock
(iPod/iPhone), FM radio or Tone, then press the Alarm Button to access
volume setting for the selected alarm source.
Wake to Dock: If wake to Dock (iPhone) is selected, press the +or –
Buttons to set the Dock volume (can be set from 5–40).
The alarm will wake you to the last track played on your
docked iPhone or iPod.
Wake to Radio: If wake to FM is selected, press the +or –Buttons to select
a radio station to wake to, or press the Play/Pause Presets
Button as needed to select a preset station (see Memoriz-
ing Radio presets on page 8 for details on setting presets).
Confirm your selection by pressing the Alarm Button.
Press the +or –Buttons to set the FM radio alarm volume
(can be set from 5–40). Note: if FM antenna is not detected
at alarm time, alarm will default to tone.
Wake to Tone: Select to wake to tone to wake to buzzer alarm.
6. Press the Alarm Button to exit and confirm alarm settings. An alarm
icon will appear on the display, indicating that the alarm is set and armed.
NOTE: alarm volume is independent from normal volume.
REVIEWING, ARMING/DISARMING AND RESETTING THE ALARM
Press and release the Alarm Button at any time to review the current alarm
settings. To toggle the alarm on or o, press the Alarm Button as needed.
When the alarm icon is displayed, the alarm is armed/on.
Press the Power Button or Alarm Button when the alarm is sounding to
reset it to come on again at the same time the next scheduled day. (For
example, if your alarm schedule is set to 5 Days and you reset the alarm on
Friday, it will come on again on Monday, not on Saturday.)

CHARGING YOUR iPhone OR iPod
While the dock accommodates most cases, you may need to remove
your case for proper docking.
Gently dock your iPhone or iPod into the flexible Lightning dock located
on the top of the unit. While your iPhone/iPod is docked in the unit and
the unit is connected to AC power, it recharges (until fully charged).
Note: Please make sure your iPhone/iPod is properly docked into the unit.
Failure to do so may damage your iPhone/iPod.
Charging Devices Via the USB Port
A 1 Amp USB port is located on the back of the unit for charging devices
while the unit is connected to AC power. Connect one end of a compatible
USB cable (not included) into the standard USB port on the unit and the
other end into the device you wish to charge. Some devices require higher
amperage USB charging ports. Monitor the charging status of your
device. If the device does not charge, you will need to use the charger
that came with your device.
LISTENING TO YOUR iPhone/iPod
While the dock accommodates most cases, you may need to remove
your case for proper docking.
1. Dock your already playing iPhone/iPod. The unit will automatically
turn on and you will hear the music playing from your iPhone/iPod.
The iPhone/iPod Icon will appear at the right side of the display,
indicating iPhone/iPod playing mode.
2. Press the or Buttons on the unit to adjust the system volume.
Note: If the volume is too low on the iPhone/iPod, the unit may not detect
that the iPhone/iPod is in play mode. Press the Button to play it. Press
again as needed to pause and resume play.
3 Press the +or –Buttons to go to the next or previous track (hold to scan
backwards or forwards within a track).
4. Press the Power Button to turn o the unit. You can also turn the
unit o by undocking a playing device.
Note: Press the Mode Button to cycle from Dock to FM radio to AUX
modes.
7

LISTENING TO FM RADIO
Setting up the Antenna
Insert included FM Antenna into FM antenna Jack located on back of the
unit. Extend FM wire antenna fully for best reception. Do not strip, alter or
attach to other antennas. “ANT needed” will appear on display if FM mode
is selected and the antenna is not connected.
Tuning and Playing the Radio
1. Press and release the Power Button to turn on the unit, then press and
release the Mode Button as needed to cycle through Dock, FM radio and
AUX modes.
2. When FM mode is selected, press the +or –Buttons to tune the radio to a
desired station. The current radio frequency appears in the bottom of the
display. Press the +or –Buttons for a few seconds to scan for the next
clear station.
3. To memorize a station as a preset:
A. Press the Play/Pause/Presets Button as needed to step through the 6
presets (P1 - P6) to the number you wish to assign, and then hold the
Play/Pause/Presets Button until the radio frequency begins flashing
in the display.
B. Press the +or –Buttons to tune the radio to a desired station. Hold
briefly to have the radio autoscan/search for the next clear station.
C. Press the Play/Pause/Presets Button. Two confirmation beeps will
confirm the setting and the preset number you wish to assign. Repeat
steps A-C to preset up to 6 stations.
4. To listen to a preset station, use the Mode Button to select FM mode, then
press the Play/Pause/Presets Button to choose the desired preset.
5. Press the or Button on the unit to adjust the system volume.
8

USING THE RADIO IN OTHER COUNTRIES
Dierent regions of the world use dierent FM radio frequency steps and
ranges. You will need to select the one that matches the standards in your
region (USA, EUROPE, JAPAN, AUSTRALIA, or CHINA). The default setting is
USA; if you live in the US, you may skip this section.
1. While unit is OFF, press and hold the
Mode Button
for about 10 seconds
until the region flashes in the display
and a beep sounds
.
2. Press
the +or –Buttons as
needed to set the display to your region: USA,
EU (Europe), JPN (Japan), AUS (Australia), or CHN (China).
3. Press and release the
Mode Button
(or no button within 10 seconds) to
exit the radio frequency setting mode. Two beeps will confirm radio
frequency setting.
LISTENING TO AUX DEVICES
1. Connect a standard audio cable with 3.5mm plug to the headphone or
line-out jack on your AUX device and the other end to the AUX IN jack
located on the back of the iPL8XH.
2. Press and release the Power Button to turn on the unit, then press and
release the Mode Button as needed to cycle through Dock, FM radio and
AUX modes.
3. When AUX mode is selected, turn on your AUX device and use its controls
to play, pause and navigate audio tracks. Adjust the volume on your AUX
device to maximum output.
4. Press the or Button on the unit to adjust the system volume. Press
the Button to mute aux audio, and again to unmute.
5. Press and release the Power Button to turn o the unit when through
listening. Remember to turn o your AUX device, too.
9

SNOOZE/DIMMER OPERATION
1. To program a custom snooze duration, during normal operation (when
alarm is not sounding) press and hold the Snooze/Dimmer Button until
the display flashes, then press the +and – Buttons on the unit to adjust
the snooze time to 1 - 29 minutes.
2. Press the Snooze/Dimmer Button on the iPL8XH after the alarm sounds.
The alarm will be silenced and will come on again in about 9 minutes
(default). You may repeat this cycle several times during the one hour
alarm cycle.
3. During normal operation (when alarm is not sounding), press the
Snooze/Dimmer Button to control the brightness level (8 steps, high
to low and o settings) of the LCD display.
SLEEP MODE
Sleep mode lets you sleep to your playing docked iPhone or iPod or to FM
radio for the set sleep duration, then turns the unit o. Press the Sleep
Button as needed to cycle to the desired sleep duration: 120, 90, 60, 30
or 15 minutes or OFF (turns sleep mode o). Press the or Button on
the unit to adjust sleep listening level (sleep level volume is independent
from normal volume levels). Press the Sleep Button during sleep to view
the remaining sleep time; press again to set sleep to next (lower) sleep
duration.
MAINTENANCE
• Place the unit on a level surface away from sources of direct sunlight or
excessive heat.
• Protect your furniture when placing your unit on a natural wood and
lacquered finish. A cloth or other protective material should be placed
between it and the furniture.
• Clean your unit with a soft cloth moistened only with mild soap and water.
Stronger cleaning agents such as thinner or similar materials can damage
the surface of the unit.
10

TROUBLESHOOTING
Symptom Possible reason Solution
Unit won’t turn
on
Device does not
respond to the
unit and/or
device is playing
but no sound
comes out
AC adaptor isn't
plugged into a working
wall socket or not
plugged into the power
jack on back of the unit
Unit is not properly
connected to power
source and/or Power
Button is not
ON/device is
paused/device is not
docked properly
Plug the AC adaptor into a
working wall socket and plug
the connector into the supply
jack on the unit. Make sure any
associated wall switch that
controls the outlet is ON.
Make sure the unit is properly
connected to AC power source.
Check that the unit is ON. Try
adjusting volume on unit and
audio device. Press the Mode
Button to select Dock, FM or
AUX mode. Also try pressing
the Play/Pause Button. Check
that device is properly docked.
Erratic
performance
No sound
Sound
distorted
Device doesn’t
charge up
External interference
Volume is too low
Volume is too high
Sound source is
distorted
Unit is not properly
connected to AC power
Device is not
docked/connected
properly
Move unit away from potential
sources of external interference
such as computers, modems,
wireless devices (routers) or
fluorescent light.
Turn volume up on your device
Turn volume down on your device
If the original sound file (MP3) is
old or of poor quality, distortion
and noise are easily noticed with
high-power speakers. Try
upgrading file from a trusted
source such as iTunes.
Please make sure the unit is
connected to a working power
outlet. The unit will not charge
while operating on backup battery
Check that device is docked
properly; if needed, remove case
from device.
11

IMPORTANT SAFETY TIPS
When used in the directed manner, this unit has been designed and manufactured
to ensure your personal safety. However, improper use can result in potential
electrical shock or fire hazards. Please read all safety and operating instructions
carefully before installation and use, and keep these instructions handy for future
reference. Take special note of all warnings listed in these instructions and on the
unit.
1. Water and Moisture – The unit should not be used near water. For example: near
a bathtub, washbowl, kitchen sink, laundry tub, swimming pool or in a wet
basement.
2. Ventilation – The unit should be situated so that its location or position does not
interfere with its proper ventilation. For example, it should not be situated on a
bed, sofa, rug or similar surface that may block ventilation openings. Also, it
should not be placed in a built-in installation, such as a bookcase or cabinet,
which may impede the flow of air through the ventilation openings.
3. Heat – The unit should be situated away from heat sources such as radiators, heat
registers, stoves or other appliances (including amplifiers) that produce heat.
4. Power Sources – The unit should be connected to a power supply only of the
type described in the operating instructions or as marked on the appliance.
Only use the AC adapter that came with the unit.
5. Power-Cable Protection – Power supply cables should be routed so that they
are not likely to be walked on or pinched by items placed upon or against them.
It is always best to have a clear area from where the cable exits the unit to
where it is plugged into an AC socket.
6. Cleaning – The unit should be cleaned only as recommended. See the
Maintenance section of this manual for cleaning instructions.
7. Objects and Liquid Entry – Care should be taken so that objects do not fall and
liquids are not spilled into any openings or vents located on the product.
8. Attachments – Do not use attachments not recommended by the product
manufacturer.
9. Lightning and Power Surge Protection – Unplug the unit from the wall socket
and disconnect the antenna or cable system during a lightning storm or when it
is left unattended and unused for long periods of time. This will prevent damage
to the product due to lightning and power-line surges.
10. Overloading – Do not overload wall sockets, extension cords, or integral
convenience receptacles as this can result in a risk of fire or electric shock.
11. Damage Requiring Service – The unit should be serviced by qualified service
personnel when:
A. the power supply cable or plug has been damaged.
B. objects have fallen into or liquid has been spilled into the enclosure.
C. the unit has been exposed to rain.
D. the unit has been dropped or the enclosure damaged.
E. the unit exhibits a marked change in performance or does not operate
normally.
12

13
IMPORTANT SAFETY TIPS (CONTINUED)
12. Periods of Nonuse – If the unit is to be left unused for an extended period of
time, such as a month or longer, the backup battery should be removed from
the unit to prevent damage or corrosion.
13. Servicing – The user should not attempt to service the unit beyond those
methods described in the user’s operating instructions. Service methods not
covered in the operating instructions should be referred to qualified service
personnel.
14. Magnetic Interference: This product’s speakers contain powerful magnets
which could cause interference or damage to sensitive equipment such as hard
drives, CRT televisions and monitors, as well as medical, scientific, and
navigational devices. Keep this unit away from these products at all times.
A GUIDE TO PRODUCT SAFETY
This device complies with Part 15 of the FCC Rules, operation is subject to the
following two conditions: (1) This device may not cause harmful interference,
and (2) this device must accept any interference received, including interference
that may cause undesired operation.
• Warning: Changes or modifications to this unit not expressly approved by the
party responsible for compliance could void the user’s authority to operate the
equipment.
• NOTE: This equipment has been tested and found to comply with the limits for
a Class B digital device, pursuant to Part 15 of the FCC Rules.
These limits are designed to provide reasonable protection against harmful interfer-
ence in a residential installation. This equipment generates, uses and can radiate
radio frequency energy and, if not installed and used in accordance with the
instructions, may cause harmful interference to radio communications.
However, there is no guarantee that interference will not occur in a particular
installation. If this equipment does cause harmful interference to radio or television
reception, which can be determined by turning the equipment o and on, the user
is encouraged to try to correct the interference by one or more of the following
measures:
• Reorient or relocate the receiving antenna.
• Increase the separation between the equipment and receiver.
• Connect the equipment into an outlet on a circuit dierent from that to which
the receiver is connected.
• Consult the dealer or an experienced radio/TV technician for help.
CAN ICES-3 (B)/NMB-3(B)

iHome Products, a division of SDI Technologies Inc. (hereafter referred
to as SDI), warrants this product to be free from defects in workman-
ship and materials, under normal use and conditions, for a period of
one (1) year from the date of original purchase.
Should this product fail to function in a satisfactory manner, it is best
to first return it to the store where it was originally purchased. Should
this fail to resolve the matter and service still be required by reason of
any defect or malfunction during the warranty period, SDI will repair
or, at its discretion, replace this product without charge. This decision
is subject to verification of the defect or malfunction upon delivery of
this product to the Factory Service Center authorized by Customer
Service.
If service is required, please call Customer Service at 1-800-288-2792
to obtain a Return Authorization Number and shipping instructions. A
copy of the sales receipt is required to validate in-warranty coverage.
Disclaimer of Warranty
NOTE: This warranty is valid only if the product is used for the
purpose for which it was designed. It does not cover (i) products
which have been damaged by negligence or willful actions, misuse or
accident, or which have been modified or repaired by unauthorized
persons; (ii) cracked or broken cabinets, or units damaged by
excessive heat; (iii) damage to digital media players, CD’s or tape
cassettes (if applicable); (iv) the cost of shipping this product to the
Factory Service Center and its return to the owner.
This warranty is valid only in the United States of America and does
not extend to owners of the product other than to the original
purchaser. In no event will SDI or any of its aliates, contractors,
resellers, their ocers, directors,
shareholders, members or agents be liable to you or any third party
for any consequential or incidental damages, any lost profits, actual,
exemplary or punitive damages. (Some states do not allow limitations
on implied warranties or exclusion of consequential damages, so these
restrictions may not apply to you.) This warranty gives you specific
legal rights, and you may also have other rights which vary from state
to state.
Your acknowledgment and agreement to fully and completely abide
by the above mentioned disclaimer of warranty is contractually
binding to you upon your transfer of currency (money order, cashier's
check, or credit card) for purchase of your SDI product.
© 2017 SDI Technologies, Inc. All rights reserved
Questions? Visit www.ihome.com
or call 1-800-288-2792 Toll Free
iPL8XH-170828-A Printed in China
LIMITED 1 YEAR WARRANTY
Table of contents
Other iHome Clock Radio manuals