iHome IA100 User manual

•
\
Mode\ \A100
B\uetooth
Aud\O
system
for ,Pad I,Phone I,Pod®
works with
~
iHom
e+S\eep
•alarm clock apP
et
iHom
e+
Radio
, , internet radio
app
.-
Questions? Visit
WWW-ihOmeaudiO.com

Table
of
Contents
Quick Start 1
Controls and Indicators IiA100 Display 4
Using the iA100 5
Using the Alarms 6
Listening to iPad/iPhone/iPod IListening to Radio 7
Listening to other portable audio devices IListening to Bluetooth Music 8
Making Calls with Bluetooth Mobile Phone ISleep Operation INap Operation 9
Dimmer Operation IReplacing Clock Backup Batteries IBattery Warning 10
AConsumer Guide to Product Safety
11
Trouble Shooting
12
Warranty Information
14
•NOTE :The iA100 is designed for use with Bluetooth wireless devices compatible with the
HFP, HSP, A2DP and AVRCP streaming audio profiles. Refer to your Bluetooth device's user
manual
or
technical support to determine if your Bluetooth device supports these profiles.
Maintenance
•Place the unit on alevel surface away from sources
of
direct sunlight or excessive heat.
•Protect your furniture when placing your unit on anatural wood and lacquered finish. Acloth or other protective
material should be placed between it and the furniture.
•Clean your unit with asoft cloth moistened only with mild soap and water. Stronger cleaning agents, such as Benzene,
thinner or similar materials can damage the surface
of
the unit.

FCC and
IC
Information
This device complies with Part 15
of
the FCC Rules and RSS-210 of the
IC
Rules. Operation is subject to the following
two conditions: (1) This device may not cause harmful interference, and (2) this device must accept any interference
received, including interference that may cause undesired operation.
Warning: Changes or modifications to this unit not expressly approved by the party responsible for compliance could void
the user's authority
to
operate the equipment.
NOTE: This equipment has been tested and found to comply with the limits for aClass Bdigital device, pursuant to Part
15
ofthe
FCC
Rules. These limits are designed to provide reasonable protection against harmful interference
in
aresidential
installation. This equipment generates, uses and can radiate radio frequency energy
and,
if not installed and used
in
accordance with the instructions, may cause harmful interference to radio communications.
However, there is no guarantee that interference will not occur
in
aparticular installation. If this equipment does cause
harmful interference to radio or television reception, which can be determined by turning the equipment off and on, the
user
is
encouraged to try to correct the interference by one or more
of
the following measures:
•Reorient or relocate the receiving antenna.
•Increase the separation between the equipment and receiver.
•Connect the equipment into an outlet on acircuit different from that to which the receiver is connected.
•Consult the dealer
or
an experienced radiolTV technician for help.
FCC&IC Radiation Exposure Statement
This equipment complies with FCC radiation exposure limits set forth for an uncontrolled environment and meets the
exemption from the routine evaluation limits
in
section
2.50f
RSS 102.
1.
This Transmitter must not be co-located or operating
in
conjunction with any other antenna or transmitter.
2.
This equipment complies with FCC
RF
radiation exposure limits set forth for
an
uncontrolled environment. This equipment
should be installed and operated with aminimum distance
of
20 centimeters from user and bystanders.
The device meets the exemption from the routine evaluation limits
in
section 2.5
of
RSS 102 and users can obtain
Canadian information
on
RF expOsure and compliance from the Canadian Representative Burnport Holdings Ltd. 72MT
Belcher Pis, East, Calgary, Alberta, T2Z 2G1, CANADA. Tel:403-257-4961
Getting Started
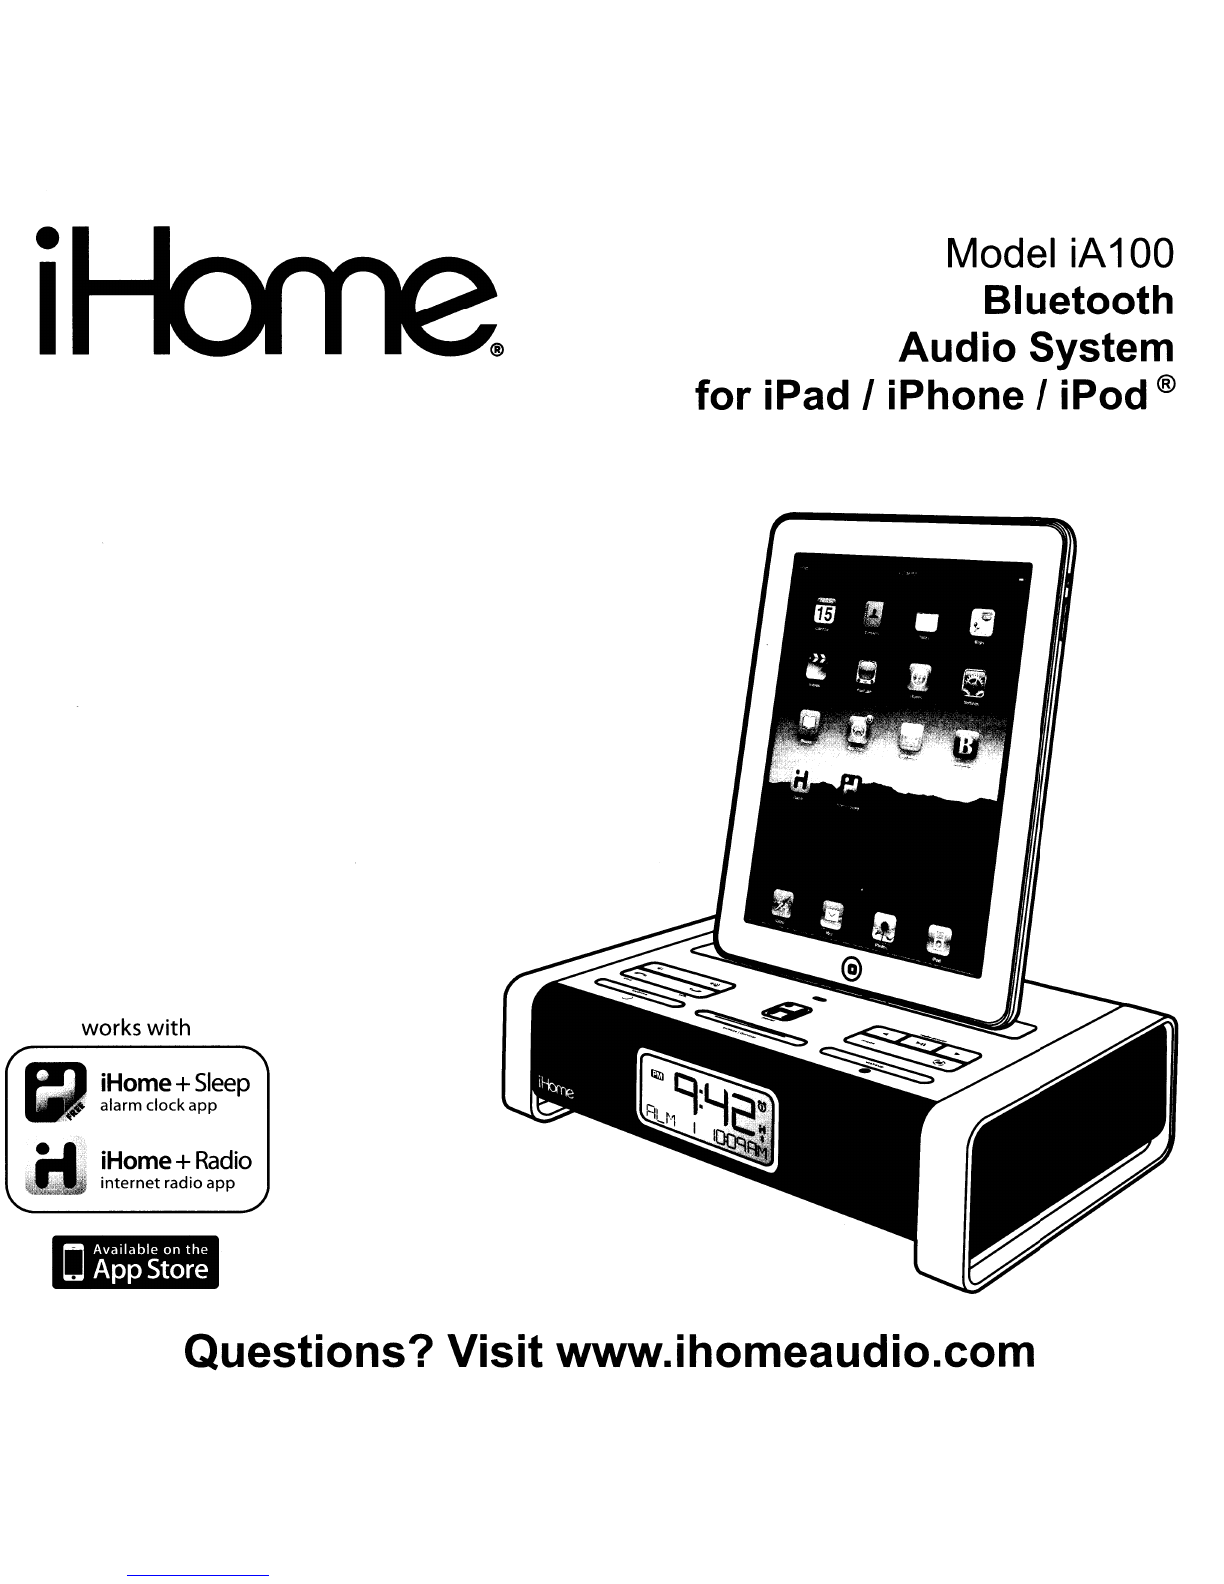
Thank you for purchasing the iHome iA100, the app-enhanced alarm clock radio for iPad, iPhone or iPod. Designed to
play music through Bluetooth from your mobile phone
or
computer (through Bluetooth
or
Line in), the iA100 features
Bongiovi Digital Power Station technology with active digital signal processing.
This instruction booklet explains the basic operation and care of the unit. There are many exciting performance
enhancements available by downloading the free iHome+Sleep app from the iTunes App Store.
In
addition, the iHome+Radio app (available
as
apaid app at the iTunes App Store) gives you access to
thousands
of
internet radio stations around the globe.
For information on the iHome+Sleep app and iHome+Radio internet radio app and how they work with your iA100, please
use these resources:
user forum: http://getsatisfaction.comlihomeapps
web: www.ihomeaudio.com/apps
email: [email protected]
Note: app is for iPad, iPhone and iPod touch only.
Please read this instruction book carefully before the appliance is operated and keep it for future reference.
ODID:8016961

iA100
Quick
Start
1:
Power
2:
Pair Your Bluetooth-enabled Phone with the iA100
-
1-·.11-'-1
,...
I
1
••
.1
,,
I
........
GetWal'-
m
3:
Making and
Answering Calls
[..>
"I»
)
c;=;;;,.
~
end talk
4:
Setting Clock
with Time Sync
Once the iA100 is linked with your phone:
a) Dial the number on your phone then press the Talk Button on the
iA100.
b) To answer the phone, press the Talk Button. Press the End Button
to end the call.
NOTE: If you have call waiting, press the Talk Button to answer a
second call and place the first on hold.
Dock your iPad, iPhone
or
iPod (see steps 7and 8).
Press and release the Clock Button located on back
of
the iA100.
"TIME
SYNC
will appear on the display, followed by ·TIME
UPDATED" upon successful syncing.
1

iA100
Quick
Start
5:
Mode Select/Radio Operation
6:
Setting Alarm 1or Alarm 2
2
a) Press the Mode button as needed to select
iPod, Bluetooth, FM radio
or
Aux-in mode.
b) To set FM presets
in
radio mode, press the
~II
Button to select apreset number
(P1
-P6), and
then hold the
~II
Button until the selected
preset number begins flashing
in
the display.
c) Press the
~
or
~
Button to tune radio to a
desired station.
d) Press the
~II
Button to confirm the preset
number for the current station.
a) Press and hold Alarm 1
or
Alarm 2Button until the
time flashes to set Alarm 1or
2.
(Substitute Alarm 2
button
in
steps below to set Alarm
2)
b)
Press the
~
or
~
Button to set alarm time.
c)
Press Alarm 1then press the
~
or
~
Button to set
alarm frequency (weekdays, etc).
d) Press Alarm 1again then press the
~
or
~
Button
to select alarm source to wake
to.
Ifradio
is
selected
source, press the
~I
Button to select apreset
station, or
~
or
~
Button to tune radio
to
desired
station
e) Press Alarm 1again then press the
~
or
~
Button
to set the alarm volume.
f)
Press Alarm 1again to confirm alarm setting and
exit alarm setting mode.

iA100
Quick
Start
7:
docking your iPad/iPhone/iPod
Note: iHome+S/eep and iHome+Radio apps are not covered
in
detail
in
this booklet.
To
learn more about how
these apps can enhance your experience, please download the free iHome+Sleep app from the App Store and
review the Start Guide.
remove the
rubber dock pad
8:
updating your iA100 firmware
Gently dock your iPad, iPhone or iPod into
the 30 pin dock. If using
an
iPad, iPhone or
iPod with acover or "skin", first remove the
rubber
dock
pad on the iA100. The iPad,
iPhone or iPod will charge while docked. Press
the
~II
Button
on
the iA100
to
play your iPad,
iPhone or iPod.
3

Controls and Indicators
TOPVIEW
Universal dock for iPad/iPhoneliPod
Alarm ReseUPower/App Settings Button Microphone Reverse /Set Button
End Button
-----+
"""
Raise Volume
Forward Button
Mode Button
(iPod, Bluetooth,
FM
or aux-in)
Play/Pause Button
(for iPhone, iPod and Bluetooth music)
Wakeup Button
+----
Bongiovi DPS Button
'--_---:::::0...,..""...._-/
<I
1-'-
Bedtime Button Snooze/Dimmer Button
Talk Button
Lower Volume
Alarm 2Button
EQ Button Pairing Button Nap Button Alarm 1Button
Clock Adjust Button
FM
Antenna Wire
---~=~--------------
AC Adaptor Jack
----==t==~ti::r_o-i!ji(Ji:Je=,......:::::...-_,Q):==+=--
Aux-
in
Jack
REARVIEW
iA
100 Display
Time Display Alarm 1Indicator
Bluetooth Indicator
PM
Indicator--+-~
AM
Indicator--+-mJ
._.. ·
._.tjj
1_1-1_1
__
I
~-1--
Alarm 2Indicator
I-
II
HiHome App Indicator
••
._.
*0
Battery Low Indicator
1-
.•
-,.-,.-,.\
II
f..lo'_"_lfo.1 0
NOTE: AM/PM indicators will not appear
when clock is set to 24 hour display mode Radio /Alarm Time /iPod Display
4

Using the iA100
Connecting the iA100 to Power Source
Connect the AC adaptor cable plug into the DC jack on the back
of
the system, then plug the AC cord of the AC adaptor
into the wall outlet.
Turning the iA100 ON or OFF
Press the Power/App Button
on
the iA100 at any time to turn the iA100 On
or
Off. Note that adocked iPad, iPhone or
iPod will continue to charge when the unit is turned offas long as the AC adaptor
is
plugged in. iPod Classic (1G and 2G)
will not charge.
Time Sync
The iA100 clock is preset to U.S. Eastern Standard Time.
The iA100 Time Syncfeature allows you to sync the time setting
on
the iA100 to the time from your iPad, iPhone or recent
model iPod (iPod touch, iPod nano and iPod Classic; older iPod models such as iPod mini do not support this feature).
1.
Press the Clock Button located at the back ofthe unit, "Time Sync" flashes
on
the lower part ofthe display.
2.
Once sync is completed, "Time Updated" will appear on the display.
3.
If sync was not successful, "Sync Failed" will appear
on
the display. If this happens, please try again, with adifferent
iPad/iPhone/iPod if needed. If sync still fails, please see Setting Time and Calendar below to set the clock.
NOTE: iPhone time is automatically updated to the correct time via cell phone towers. The time on your iPad or iPod is
accurate only to the time
on
the computer the last time the iPad or iPod was synced to it. It's possible to have up to 59
seconds difference between the iA100 and synced iPhone/iPod.
Setting Time and Calendar Manually
1.
Press and hold the Clock Button located on the back
of
the unit until the time display flashes.
2.
Press the
~
or
~
Button to adjust the time (hold for afew seconds to advance or reverse rapidly). Remember to set
the correct AM or PM hour. An icon
in
the upper left hand corner
of
the time display indicates AM or
PM
3.
Press the Clock Button again. The year will flash
in
the lower part
of
the display. Press the
~
or
~
Button until the
current year is displayed.
4. Press the Clock Button again. The month and date will flash. Press the
~
or
~
Button until the current month and
date is displayed. Hold to advance rapidly.
5.
Press the Clock Button once more. Two beeps will sound to confirm your settings and you will exit Time and Calendar
Setting mode.
5

Using the Alarms
Setting
the
Alarms
Alarm
1
a) Press and hold the
Alarm
1
Button
until the alarm time flashes at the bottom
of
the display.
b) Press the
~
or
~
Button
to set the desired alarm time. Hold to advance rapidly.
c) Press Alarm 1again then press the
~
or
~
Button
to set alarm frequency
(7
days,weekdays, weekend or custom).
TIP:
If
custom is selected you must use the iHome+Sleep app to set custom alarm days.
d) Press Alarm 1again then press the
~
or
~
Button
to select an alarm source to wake to (iPod, Radio, Playlist or Tone).
Select iPod
to
wake to docked iPad, iPhone or iPod.
•If radio
is
the selected alarm source, press the
~II
Button
as needed to select apreset station,
or
the
~
or
~
Button
to
tune the radio
to
adesired station.
•If playlist
is
selected, you will wake to arandom song on acustom playlist
on
your iPhone/iPod.
You must first create the custom playlist on your iPad/iPhone/iPod and name it 'iHome'.
•
If
tone is selected, you can use the iHome+Sleep app to choose atone
to
wake
to.
e) Press Alarm 1again then press the
~
or
~
Button
to set
the
alarm volume.
f)
Press Alarm 1again to confirm alarm setting and exit alarm setting mode.
To
set
alarm
2,
follow
above
steps
using
Alarm
2
Button
Note: IfiPod is the selected alarm source but the unit does not detect an iPad/iPhone/iPod, the unit will default to the tone
alarm. If Playlist is the source and the unit does not detect acustom 'iHome' playlist, the alarm will wake to the last played
song
on
your device. The alarm cycle lasts for one hour; make sure you have enough music
on
your iPad, iPhone or iPod
to last that long.
Reviewing
and
Disarming
Alarms
(Turn
Alarm
Function
On
and
Off)
Alarms are automatically armed when set. Active alarms are indicated by alarm icons on the display.
1.
Press the
Alarm
1or
Alarm
2
Button
once. The display will show the currently set alarm source and alarm time.
2.
Press the
Alarm
1or
Alarm
2
Button
again to disarm the alarm (the associated alarm icon will disappear). Press again
to re-arm the alarm.
Resetting
the
Alarm
to
Come
on
the
Next
Day
1.
When the alarm
is
sounding, press the
rt
Button
to stop the alarm and reset it to come
on
the following day at the
same time.
TIP: When the iHome+Sleep app is running, press the
wakeup
button
to access wake profiles. When the app is not
running, you can press the wakeup button
to
shut
off
the unit and reset the alarm
to
come on at the set time.
Snooze
1.
To
program acustom snooze time, press and hold the
Snooze
Button
during normal operation (when alarm is not
sounding) until the snooze minutes display appears. Press the
~
or
~
Button
to set the snooze time from 1to 29
minutes. TIP:
You
can also adjust snooze time with the iHome+Sleep app.
2.
Press the
Snooze
Button
after the alarm sounds. The alarm will be silenced and come
on
again 9minutes later (or at
the custom minute interval you set). Snooze can be pressed several times during the 1hour alarm cycle.
Sure
Alarm
The iA100 has asure alarm feature so the buzzer alarm still sound
in
the event
of
apower failure, if backup batteries are
installed (see page 9). If your iPad/iPhone/iPod has no sound for 20 seconds
or
is
not present, the iA100 will switch to
tone alarm automatically.
Tip:
Download the free iHome+Sleep app for advanced alarm, snooze
and
sleep functions
6

Listening
to
iPad, iPhone
or
iPod
1.
Dock an already playing iPad, iPhone
or
iPod (always use proper insert, see table on page 2). The iA100 will
automatically turn on and you will hear the audio playing from your iPad/iPhone/iPod.
Note: If the audio source volume is too low on the iPad/iPhone/iPod, the iA100 may not detect that the iPad/iPhone/iPod
is
in
play mode. If so, pressing the H
Button
on
the main unit once should make it play.
2.
When the iPad/iPhone/iPod is docked and
in
standby mode, press the
~II
Button
on
the iA100 to play the
iPad/iPhone/iPod. If the iA100 is already on, press the
Mode
Button
until "iPod" appears
on
the lower part of the
display, indicating the iA100 is
in
iPod mode. If your iPad, iPhone or iPod touch is
in
video mode, you may see the
"locked" slider
on
the iPad/iPhone/iPod display. If so, you will need to unlock your iPad/iPhone/iPod.
3.
Press the
~II
Button
on
the iA100 to pause play; press again to resume play.
4.
Press
~
or
~
Button
on
the iA100 to go to the next
or
previous track. Press and hold while track is playing for high
speed forward or reverse music search
of
the current track.
Adjusting
Sound
on
the iA100
You
can adjust the sound on the iA100 while listening to any sound source.
1.
Press the
04>
or
04»)
Button
on
the iA100 to adjust the system volume. For best sound, press and hold the EQ
Button
located on the back
of
the unit and press again as needed to cycle to treble, bass and mid (range) sound options, then
press
~
or
~
Button
to adjust each option. The Bongiovi DPS sound enhancement circuitry is
ON
by default. Press
the
(s)
Button
to toggle the circuit on and off.
TIP:
You
can also adjust EQ
and
Bongiovi effect with the iHome+Sleep app.
Listening
to
Radio
Setting
up
the
Antenna
1.
Extend
FM
wire antenna fully for best reception. Do not strip, alter or attach to other antennas.
Tuning
and
Playing
the
Radio
1.
Press the
Mode
Button
until the current
FM
radio frequency appears
in
the display.
2.
Press the
~
or
~
Button
to tune the radio to adesired station. Hold briefly to have the radio autoscan/search for the
next clear station.
3.
To
memorize astation as apreset, press the
~II
Button
as needed to step through the 6presets
(P1
-P6) to the
number you wish to assign, and then hold the
~II
Button
until the selected preset number begins flashing
in
the
display. Press the
~
or
~
Button
to tune the radio to adesired station. Hold briefly to have the radio autoscan/search
for the next clear station. Press the
~II
Button
to confirm the setting, aconfirmation beep will confirm the setting and
the preset number you wish to assign. Repeat steps 1-3 to preset up to 6stations.
4.
To
listen to apreset stations, use the
Mode
Button
to select
FM
mode, then press the
~II
Button
to choose the desired
preset.
5.
Press the
04>
or
04»)
Button
on
the iA100 to adjust the system volume.
TIP: Download the iHome+Radio app from the App Store to enjoy thousands
of
internet radio stations from around the
globe on
your
iA
100.
7

Listening to other portable audio devices
You
can play
an
MP3 player or other portable audio device through the iA100 via the Aux-in Jack.
1.
Plug one end
of
an audio patch cord (available at httpl/:www.ihomeaudio.com) into the headphone or line-out jack
on
your device and the other end
of
the patch cord into the iA100 Aux-in Jack, located on the back
of
the unit.
2.
Turn on the iA100 and press the Mode Button until "Aux-in" appears in the lower part
of
display, indicating Aux-in
playing mode.
3.
Turn
on
and play your device.
4.
Press the
..
>or
..
»)
Button on the iA100 to adjust the system volume.
You
may need to adjust your device volume, too.
Remember to turn off your device when you are done playing it.
Listening to Bluetooth Music
You
need to pair your Bluetooth device with the iA100 before you can auto-link to play/stream Bluetooth music through
the iA100. Pairing creates apermanent "bond" so two devices can always recognize each other.
Pairing:
1.
Press the Pairing Button to begin pairing operation. The Bluetooth and "pairing" icons will flash.
2.
Activate Bluetooth on your device according to the device's user manual to link to iA100.
You
may need to input the
iHome device pass code:
"1234".
3.
Once connected, the Bluetooth Icon *will remain.
4.
iA100 will auto link with the last linked device when that device
is
in
range.
Playing Bluetooth Music:
1.
Once your device and the iA100 are linked you can start to play Bluetooth music through the iA100.
2.
Turn on the iA100 and press the Mode Button until "Bluetooth" appears
in
the lower part
of
the
display.
3.
Press the
~II
Button
on
the iA100 to play your Bluetooth-enabled device. The display will show "Bluetooth" and aPlay
Icon. (Depending on the Bluetooth device you are using, you may need to manually go into media player mode on your
device to make it work properly).
4.
Press the
HI
Button again to pause play; press again to resume
it.
5.
Press the
..
>or
..
»)
Button on the iA100 to adjust the system volume.
Please remember to turn off Bluetooth device manually.
NOTE: The iA100 must be
in
Bluetooth mode to
playa
Bluetooth-enabled device.
8

Making Calls with aBluetooth Mobile Phone
Before you make acall with the iA100, you need to pair and link your Bluetooth-enabled phone with the iA100.
Please refer to Pairing procedure
on
page
7.
Answer aCall:
1.
To
answer acall, press the
~
Button. Now you can use the iA100 as aspeaker phone.
2.
Speak into the MIC (located above the HButton) and press the
04)
or
04»)
Button
on
the iA100 to adjust the call volume.
3.
To
end the call, press the
CF\:i
Button.
Dial/Re-dial Dialing:
1.
Once the iA100 is paired to aBluetooth mobile phone, you can use the keypad
on
your phone to dial aphone number,
then press the
~
Button. Press the
CF\:i
Button to cancel the call.
2.
To
redial the last dialed number, press the
CF\:i
Button twice (x2).
3.
Press the
04)
or
04»)
Button
on
the iA100 to adjust the call volume.
NOTE: Changes to volume settings for phone operation may affect the volume
of
other modes.
4. To end acall, press the
CF\:i
Button.
Sleep Operation
Sleep mode lets you sleep to iPad/iPhone/iPod, Bluetooth music or the radio, gradually lowering the volume until the unit
shuts off at the selected time.
1.
Press the Bedtime Button to enter sleep mode. The Sleep Icon will appear
on
the display to indicate sleep mode.
Sleep mode has aGentle Sleep feature which gradually lowers the volume. The unit will automatically turn off after the
selected sleep time.
2.
You
can adjust the sleep timer from
120,90,60,30,15
minutes or OFF by pressing the Bedtime Button again.
3.
When the display changes back to show the real time, pressing the Bedtime Button once will show the sleep time
remaining. Pressing it again will change sleep time to next lowest increment.
4. iA100 has independent volume setting for sleep mode so you can adjust the sleeping volume without affecting the
alarm volume. Press the
04)
or
04»)
Button
on
the iA100 to adjust the system sleep volume. The sleep volume will remain
at that level the next time you enter sleep mode until controls are changed.
5.
To
stop listening at any time, press the HButton
on
the iA100 to turn it off.
Nap Operation
Nap mode lets you set an alarm separate from the Alarm 1and Alarm 2settings. The nap wake to source by default
is
the
tone alarm.
1.
Press the Nap Button located
on
the back
of
the unit as needed to adjust the nap timer for
5,
10,
15,
20,
30,
45,
60, 90
or 120 minutes or
OFF.
2.
When the display changes back to show the real time, pressing the Nap Button once will show the nap time remaining.
Pressing it again will change nap time to the next highest setting.
9

Dimmer Operation
During normal operation, press the Snooze Button to control the brightness
of
the LCD display.
Replacing Clock Backup Batteries
The iA100 comes with 2 x AA backup batteries installed to provide backup alarm
operation and clock settings
in
the event
of
apowerfailure. When the battery low
indicator appears
on
the diisplay, it's time to replace the batteries.When the
Backup Batteries have been installed and apower failure occurs or the AC cord
is accidentally disconnected, the display backlight will not remain lit, but current
time and alarm time settings will be temporarily maintained. Otherwise, you must
reset the time and alarm settings.
1.
Open backup battery compartment door located on the bottom
of
the unit.
2.
Please make sure the AC adaptor is connected. Otherwise all settings may be
lost during battery replacement.
3.
Insert 2AA batteries, checking that the polarity
(+
and -ends
of
the battery)
matches the drawing near the battery compartment. Close the compartment
door.
Note: Make sure you dispose
of
batteries properly (see your local regulations).
Replacing Backup Batteries
Battery Warning .
For models that require more than one battery
•Do not mix with used or other battery types/brands
•Replace all batteries at the same time
•Do not open batteries
•Do not dispose
of
in
fire
•Do not heat above 75°C (167°F)
•Do not expose contents to water
•Do not charge or recharge
•Do not install backwards
10

AConsumer Guide to Product Safety
IMPORTANT
SAFETY
INSTRUCTIONS
When used
in
the directed manner, this unit has been designed and manufactured to ensure your personal safety. However,
improper use can result
in
potential electrical shock
or
fire hazards. Please read all safety and operating instructions
carefully before installation and use, and keep these instructions handy for future reference.
Take
special note of
all
warnings
listed
in
these instructions and
on
the unit.
1.
Water and Moisture -The unit should not be used near water. For example: near abathtub, washbowl, kitchen sink,
laundry tub, swimming pool or
in
awet basement.
2.
Ventilation -The unit should be situated so that its location or position does not interfere with its proper ventilation.
For example, it should not be situated
on
abed, sofa, rug or similar surface that may block ventilation openings. Also,
it should not be placed
in
abuilt-in installation, such as abookcase or cabinet, which may impede the flow ofair through
the ventilation openings.
3.
Heat -The unit should be situated away from heat sources such as radiators, heat registers, stoves or other appliances
(including amplifiers) that produce heat.
4.
Power Sources -The unit should
be
connected
to
apower supply only ofthe type described
in
the
operating instructions
or as marked
on
the appliance.
5.
Power-Cable Protection -Power supply cables should be routed
so
that they are not likely
to
be
walked
on
or pinched
by items placed upon or against them. It is always best to have aclear area from where the cable exits the unit to
where it is plugged into an AC socket.
6.
Cleaning -The unit should
be
cleaned only as recommended. See the Maintenance section ofthis manual for cleaning
instructions.
7.
Objects and Liquid Entry -Care should be taken so that objects do not fall and liquids are not spilled into any
openings or vents located on the product.
8.
Attachments -Do not use attachments not recommended by the product manufacturer.
9.
Lightning and Power Surge Protection -Unplug the unit from the wall socket and disconnect the antenna or cable
system during alightning storm or when it is left unattended and unused for long periods
of
time. This will prevent
damage to the product due to lightning and power-line surges.
10. Overloading -Do not overload wall sockets, extension cords,
or
integral convenience receptacles as this can result
in
arisk
of
fire or electric shock.
11.
Damage Requiring Service -The unit should be serviced by qualified service personnel when:
A.
the power supply cable or plug has been damaged.
B.
objects have fallen into or liquid has been spilled into the enclosure.
C.
the unit has been exposed to rain.
D.
the unit has been dropped or the enclosure damaged.
E.
the unit exhibits amarked change
in
performance or does not operate normally.
12. Antenna -Do not connect an external antenna to the unit (other than that provided).
13. Periods of Nonuse -If the unit is to be left unused for an extended period
of
time, such as amonth or longer, the
power cable should be unplugged from the unit to prevent damage or corrosion.
14. Servicing -The user should not attempt to service the unit beyond those methods described
in
the user's operating
instructions. Service methods not covered
in
the operating instructions should
be
referred
to
qualified service personnel.
Questions? Visit www.ihomeaudio.com
or call 1-800-288-2792 Toll Free
11

Trouble Shooting
Symptom Possible Problem Solution
Unit doesn't respond AC adaptor isn't plugged to awall outlet
or
Plug the AC adaptor into awall outlet and plug the connector into
(no power) the connector
is
not plugged into the power the AC jack on the unit
supply jack on the back
of
the unit.
Wall outlet is not functioning Plug another device into the same wall outlet to confirm the outlet
is working. If the outlet
is
controlled by aswitch, check that the
switch is ON.
Power is off Press the Power button on the iA100
Can't play Bluetooth
Device
does
not
support
the
A2DP
and While
you
need
the
A2DP
and
AVRCP Bluetooth profiles
to
stream
music from cellphone AVRCP Bluetooth profiles music to the iA100,
you
can still use the handsfree speaker phone
or
other
Bluetooth functionality
devices Device and iA100 are not paired AND linked Make sure your phone supports the A2DP and AVRCP Bluetooth
profiles before linking/pairing. The iA100 defaults to the last linked
device, so anew device may need to be linked from the device
itself (see your device's user guide).
Bluetooth device iA100
charges
iPhone and
docking
iPod Make sure your device is plugged into aworking charger
didn't charge:up models only, not other devices
Sound is distorted Volume level
is
set too high Decrease the volume
Sound source is distorted If original sound source
is
poor quality, distortion and noise are
easily noticed with high-power speakers.
Try setting EQ to flat on your iPhone, iPod
or
Bluetooth device
Bluetooth
music
is Bluetooth device is out
of
range
of
iA100 Move your Bluetooth device within 30 feet
of
the iA100
broken up
Can't hear caller's Bluetooth device is out
of
range
of
iA100 Move your cell phone closer to iA100
voice Volume
on
iA100
is
too low Raise volume on iA100
My Bluetooth Headsets and other receivers will not pair Pair headset directly with phone or other transmitting device
headset won't pair with the iA100
with the iA100
Others can't hear You are too far from iA100 microphone The mic
is
near the Snooze Button. Move closer to the iA100.
my voice/voice isn't
clear to listener Mic is muted/ Mute operation is on Press the Mute button to release mute
12

Trouble Shooting
Symptom Possible Problem Solution
Can't wake to Device is not
in
play mode Make sure your device is powered and streaming music
Bluetooth music Device is not charged Make sure your device is adequately charged to last through
the set alarm time
Device does not support A2DP and AVRCP If your device does not support the A2DP and AVRCP
Bluetooth profiles profiles, set your alarm to wake to radio
Calls don't Volume on iA100 is too low Raise volume on the iA100
sound clear Poor connection
or
cell phone reception Retry call after moving phone for better reception/connection
Dialing out error Some phones do not support dialing out Check your cell phone owner's manual or website to see if
message while listening to Bluetooth music your phone supports dialing out while listening to Bluetooth
music. If it does not, turn off music before attempting to dial
13

Limited
1Year Warranty
Information
iHome Products, adivision
of
SOl Technologies Inc. (hereafter referred to as SOl Technologies), warrants this product to
be free from defects
in
workmanship and materials, under normal use and conditions, for aperiod
of
1Yearfrom the date
of
original purchase.
Should this product fail to function
in
asatisfactory manner, it is best to first return it to the store where it was originally
purchased. Should this fail to resolve the matter and service still be required by reason
of
any defect
or
malfunction during
the warranty period, SOl Technologies will repair or, at its discretion, replace this product without charge (except for a
$40.00 charge for handling, packing, return UPS/postage, and insurance). This decision is subject to verification
of
the
defect or malfunction upon delivery
of
this product to the Factory Service Center listed below. The product must include
proof
of
purchase, including date
of
purchase. The fee for service without proof
of
purchase is $60.00.
Before returning this product for service, please first replace the batteries (if applicable) with fresh ones, as exhausted
or
defective batteries are the most common cause
of
problems encountered.
If service is still required:
1.
Remove the batteries (if applicable) and pack the unit
in
awell padded, heavy corrugated box.
2.
Enclose aphotocopy
of
your sales receipt, credit card statement, or other proof
of
the date
of
purchase, if within the
warranty period.
3.
Enclose acheck or money order payable to the order
of
SOl Technologies, for the sum
of
$40.00 ($60.00 without proof
of
purchase).
4.
Send the unit prepaid and insured, to the Factory Service Center listed below.
Consumer
Repair
Department
SDI
Technologies
Inc.
1330
Goodyear
Drive
EI Paso, TX 79936·6420
Disclaimer
of
Warranty
NOTE: This warranty is valid only if the product is used for the purpose for which it was designed. It does not cover
(i)
products which have been damaged by negligence or willful actions, misuse or accident,
or
which have been modified or
repaired by unauthorized persons; (ii) cracked
or
broken cabinets, or units damaged by excessive heat; (iii) damage to
digital media players, CD's or tape cassettes (if applicable); (iv) the cost
of
shipping this product
to.
the Factory Service
Center and its return to the owner.
This warranty is valid only
in
the United States
of
America and does not extend to owners
of
the product other than to the
original purchaser.
In
no event will SOl Technologies
or
any
of
its affiliates, contractors, resellers, their officers, directors,
shareholders, members or agents be liable to you
or
any third party for any consequential
or
incidental damages, any lost
profits, actual, exemplary or punitive damages. (Some states do not allow limitations on implied warranties or exclusion
of consequential damages, so these restrictions may not apply to you.) This warranty gives you specific legal rights, and
you may also have other rights which vary from state to state.
Your acknowledgement and agreement to fully and completely abide by the above mentioned disclaimer
of
warranty is
contractually binding to you upon your transfer
of
currency (money order, cashier's check,
or
credit card) for purchase
of
your SOl Technologies product. ©2010 SOl Technologies, Inc. All rights reserved
Questions?
Visit
www.ihomeaudio.com
or
call
1-800-288-2792
Toll
Free
iA100-07211
O-A
Printed in China
440-002374-000VO

Rz3
remote
control
instruction
booklet

iPhone/iPod
Controls
Unit
Controls
Power/Alarm
Reset
Button
•
Turns
unit
ON
or OFF.
•
Shuts
off alarm and
resets
alarm to come on
aga
inat
the
next
set
time.
Sleep
Button
•Powers on unit and
shuts
it off after
set
time
Presets
Button
•Cycles through radio
presets on current band
lower/Raise
Volume
•
Raises
or lowers volume
of
the
unit
Mute
Button
•
Mute
ON/OFF
Mode
Button
•Switches between
available modes (iPod,
FM, Aux-in etc.)
Minus/plus
Buttons
•
Raises
and lowers
EO
settings
•
In
Raoio mode
tunes
in
station
(press
and hold to
scan to next clear station)
Snooze
Button
•Temporarily
mutes
alarm
for predetermined
ti
me
•
When
alarm
is
not
sounding, dims display
EQ
Button
•Cycles EO modes (treble, bass,
mid (range) sound etc.)
•Use -or +
to
ad
i
ust
EO
setti
ngs

<+>
e
e
--
e
e
e
e
e
e
fit
e
Bongiovi
DPS
Button
•
Turns
Bongiovi Digital Power Station processing circuit on
and off
Talk
Button
•
Press
to
answer acall or after dialling anumber
to
connect acall.
End
Button
•
Press
to cancel acall or end acall.
iPhone/iPod
Controls
Play/Pause
Button
•Switches iPhone or iPod between Play and
Pause
modes
Up/Down
Buttons
•Scroll/adjust selected iPhone/iPod
menu
settings
UP
or
DOWN
Menu
Button
•Access iPhone/iPod
menu
Track
Buttons
•
Ski
pto next or previous track
•HOLD to scan reverse or forward within atrack
Enter
Button
•Confirm iPhone/iPod
menu
settings
Shuffle
Button
•Play tracks randomly from
the
selected playlist
Repeat
Button
•Repeat
the
currently playing track
NOTE:
this
remote
control
may have
features
and
functions
that
don't apply
to
or
work
with
your
particular
iHome
model.
Rz3-QS
161
O-A
Printed
in
Chino 2
Other manuals for IA100
3
Table of contents
Other iHome Stereo System manuals