IKK IK-WM01 User manual

iKK – WIRELESS MICROPHONE
USER MANUAL
i
KK
Model: IK- WM01

i
KK
–
UHF Wireless Microphone – IK-WM01
i
kk
1
Welcome
Congratulations on choosing to buy an iKK® product.
All products brought to you by iKK® are manufactured to the highest
standards of performance and safety and, as part of our philosophy
of customer service and satisfaction, are backed by our
comprehensive we hope you will enjoy using your purchase for many
years to come.

i
KK
–
UHF Wireless Microphone – IK-WM01
i
kk
2
Contents
02 - Welcome
03 - Accessories
04 - Basic information
04 - Instruction for use
04 - Battery status
05 - Paring Devices
06; 07; 08; 09 - Installation
10 - Repeater function
10 - Headset,
11 - Features; Specification; Maintenance, Cleaning, Storage,
Troubleshooting

i
KK
–
UHF Wireless Microphone – IK-WM01
i
kk
3
ACCESSORIES:
Cable 3,5mm TRS / TRS
Adapter 3,5mm, TRS (3 pole) / TRRS (4 pole)
Adapter 3,5mm, TRS (3 poles) / 6,5mm, TS (2 poles)
Headset for transmitter (TX)
Short MIC / TRS (3 poles)
Lapel Mic / TRS (3 poles)
Transmitter / Receiver
TX
RX
Cable 3,5mm TRRS (4 poles)/ TRS (3 poles)

i
KK
–
UHF Wireless Microphone – IK-WM01
i
kk
4
BASIC INFORMATION:
1st identifying the devices:
RECEIVER (RX)
TRANSMITTER (TX)
1. This product is a sound signal transmitter and receiver equipment.
2. It needs to be equipped with 3,5mm cable interface, input/ output interface or
suitable Audio, Loudspeaker, Power amplifier, Computer, Camera and others
equipment connected to our device by correct accessories.
3. This product is divided into Two parts: TRANSMITTER and RECEIVER using
3,5mm to connect external for wireless performance. Are provided some basic
accessories for easy help to use our product in most external devices, please
check the INSTALATION for more details.
4. This model WM-01, works by UHF frequency, high end, wireless technology
with good amplification that allow to reach up to 40 meters distance in open
field, no directional restriction, no dead angle or interference, with clear sound,
with high quality performance.
INSTRUCTION FOR USE:
1. TURN ON the Transmitter, will shows the Blue light On.
2. TURN ON the Receiver, will shows the Blue light ON, and both devices will
PAIRING automatically, after will keep Red light On, as well.
3. Connect the Receiver unit into an External device by INPUT connection of
device.
4. Select the Input mode on External Device, by switching “MODE button”, to
confirm the INPUT connection.
5. Connect the microphone into the Transmitter unit, try to speak some word and
check if sound is getting into receiver by External device sounds.
Mic in / Line in
ON/ OFF (key)
RF Antenna
RF Antenna
On/Off (Blue light)
Vol. / Ch (-)
Vol. / Ch (+)
Charging (Red light)
Pairing (Blue light)
Audio Output
3,5mm
ON/ OFF (key)
On/Off (Blue light)
Charging (Red light)
Pairing (Red light)

i
KK
–
UHF Wireless Microphone – IK-WM01
i
kk
5
BATTERY STATUS:
a) Light Status: The transmitter and Receiver are built-in, with re-chargeable
polymer battery.
b) These products can be charged by any Computer USB port or Mobile AC
adapter USB charging, connecting by USB /Micro USB cable.
c) When the Blue Light flashes or goes out, or turning to Red Light, its mean that
the battery power is insufficient, so it requires to be charge both devices
Transmitter/ Receiver at same time.
d) After charging is completed, the Red light will turn off.
PAIRING DEVICES:
Transmitter (Tx) and Receiver (Rx).
Normally the units will be factory default, it means pairing AUTOMATICALLY when
turned ON. If it doesn’t happen please follow the procedures below.
Note:
- The Receiver has a 1 Blue light to indicate unit “ON” mode and 1 Red light to
indicate that Transmitter and Receiver are connected it mean “Paired”.
- The Transmitter has 2 Blue Light, one light to indicate ON mode, and 1 light to
indicate Pairing procedures when it needs to be in pairing mode procedure.
Pairing procedure:
Pairing procedure:
a
Turn the Transmitter ON (Tx)
g
Press and Hold per 1 second “Up” or
b
Confirm if Tx blue light is ON
“Down” key, to confirm the Step.
c
Press and Hold the Vol.keys Up/Down at
h
Now Turn OFF both Rx/Tx units, and
same time, until Tx blue light get flashes
i
Turn ON again Rx and Tx, will be seen
then release the keys.
Rx Red and Blue light “ON” by Tx unit ON.
d
Turn the Receiver ON (Rx)
Its mean that units are paired successfully!
e
Confirm if Rx Red light get 3 flashes
j
If your connection problem persists
and Stopped flash, that indicates Tx and Rx
Please repeat the procedure.
has communicated.
Or make sure the battery are charged
Change Frequency:
If your environment produce interference that can affect your device performance, you
can try to reduce interference by changing the frequency, following the below Step.
Changing Frequency
a
Turn ON both items Rx/Tx
b
At Tx, press and hold per 2 second the key “Up or Down”, pay attention that both
units the lights will flashes, its indicates that frequency is changing in booth units.
c
Release the key and the frequency will stop and keeping automatically paired in
new frequency.
d
If your problem persists, please repeat the procedure to get another frequency

i
KK
–
UHF Wireless Microphone – IK-WM01
i
kk
6
INSTALATION/ Configuration:
2nd Connecting into External Devices.
Receiver + Speaker box by (Line IN)
Transmitter + Lavalier microphone
Receiver + Mixer by (Line IN)
Transmitter + Lavalier microphone
Remark: After the parts are connected, please make some noise into MIC to confirm
the sound is working.
Connect Lapel Mic into Transmitter
(TX)
Note: TRS cable adapter it's included in the
package, to perform all connections.
Please select “Line In" mode at panel control of
Speaker box
+ TRS adapter to
"LINE IN”
Speaker
Box
(RX)
(TX)
Please select “Line In" mode at panel control of
Mixer or Sound table.
Or 3,5mm TRS adapter
to "LINE IN”
Sound table
or Mixer
6,5mm TS adapter
to "LINE IN”
(RX)
Connect Lapel Mic into Transmitter

i
KK
–
UHF Wireless Microphone – IK-WM01
i
kk
7
Receiver + MAC OSX by (Earphone)
Transmitter + Lavalier microphone
How to Set configuration at MAC OSX
2- click in Sound icon
3- select Output,
4- select Mac “Speaker”,
5- select “INPUT”,
6- choose External microphone.
Its Done! Now you can hear or record your
Lavalier Mic into you computer, if needed
just adjust the volume level.
Remark: After all connected and adjusted, please open your APP, ex. “Garage Band”
2
3
4
5
6
(TX)
1- Please select “System" mode at panel
control of Speaker box.
Note: Connect the Receiver into “Earphone”.
1
(RX)
Connect Lapel Mic into Transmitter

i
KK
–
UHF Wireless Microphone – IK-WM01
i
kk
8
Receiver + Windows PC (front/ top)
OR Receiver + Windows PC (back side)
1- With “Right click” on speaker Icon in your screen below, right side, to open
sound setup.
How to Set configuration at Windows PC
2- click in Open sound setting
3- select Input device,
4- Make some noise in your TX Microphone,
5- Check out if the “blue bar” will working by
Mic sound.
6- choose External microphone.
Its Done! Now you can hear or record your
Transmitter Mic into your computer, if needed
adjust the volume level.
Remark: After all connect and adjusted, please open your APP, ex. “AUDACITY”
2
3
4
5
+ Cable adapter
to "LINE IN”
(RX)
1
Note: PC front or Top panel, Connect the
Receiver into “Mic in”.
+ Cable adapter
to "MIC IN”
(RX)
i
KK
–
UHF Wireless Microphone – IK-WM01
i
kk
9
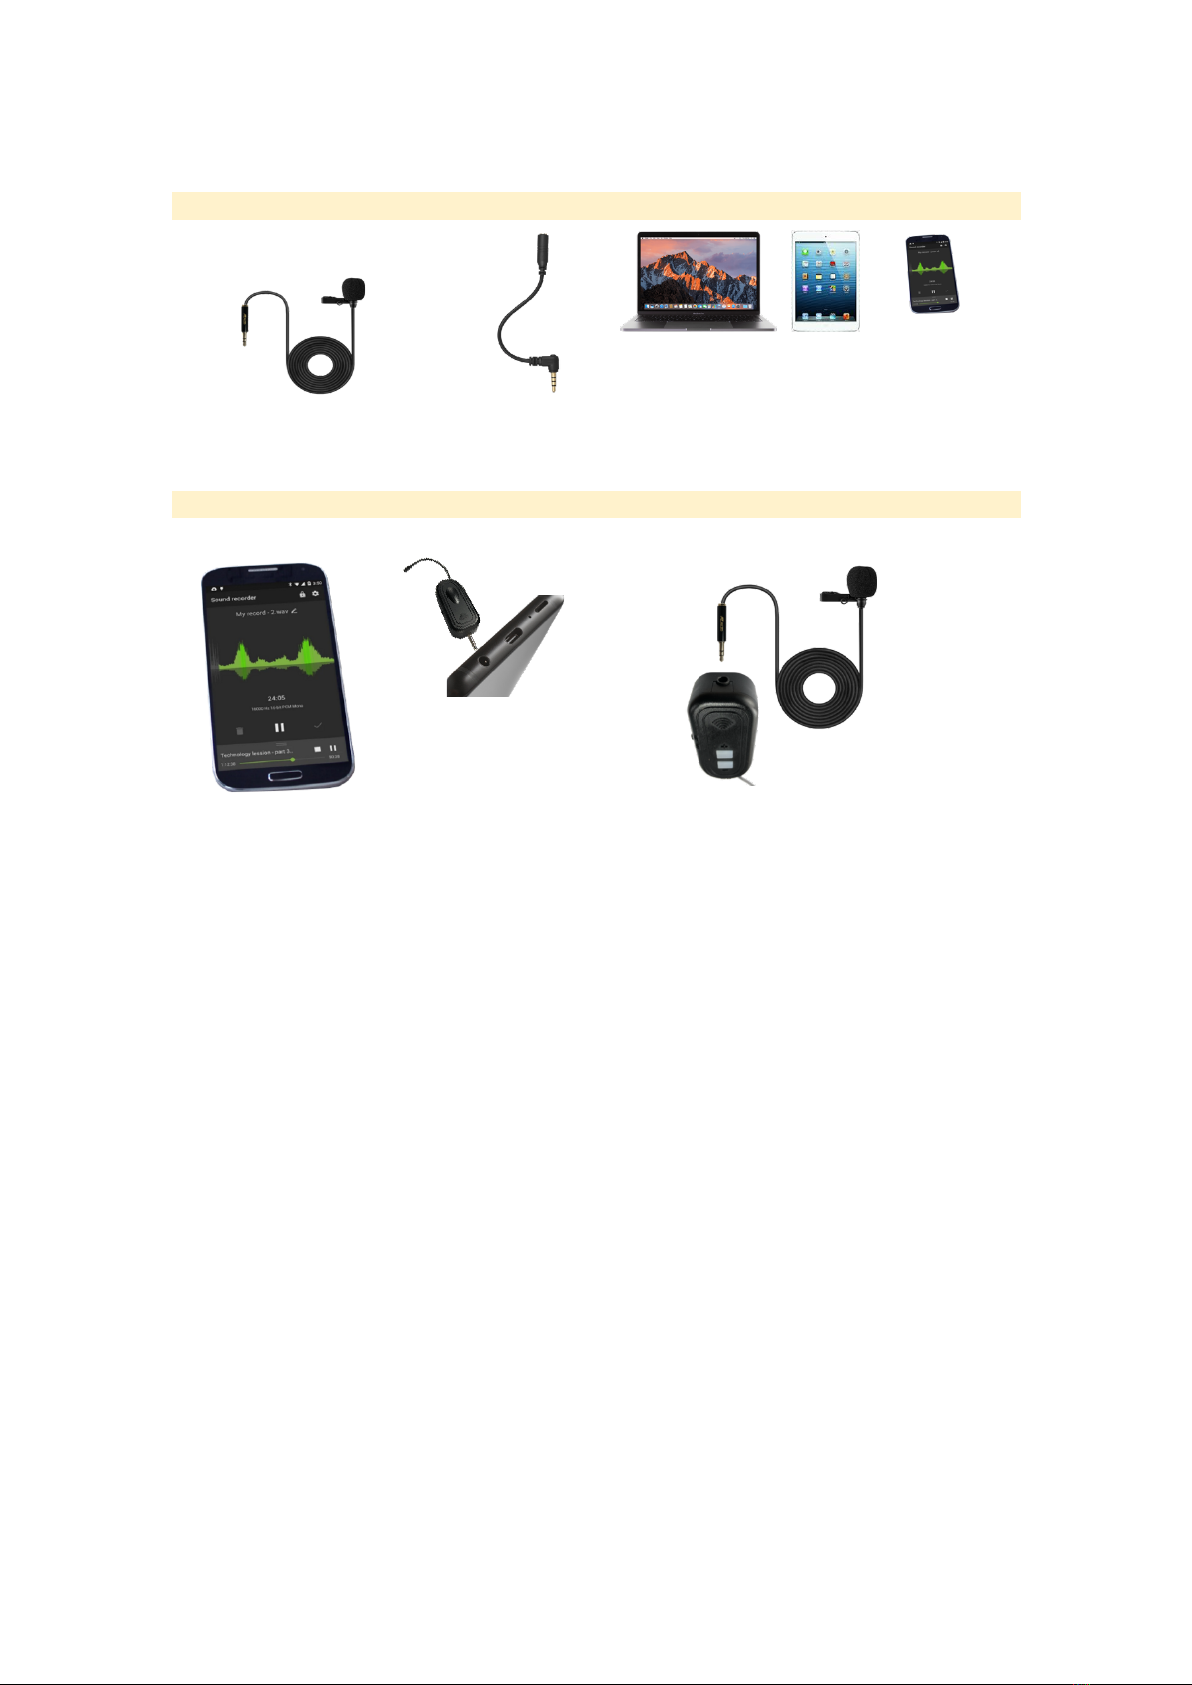
Mic direct connections
3 pole/ 4 pole
Lapel Mic direct to devices below
Apple system. and Android system
If wishes, the microphone can be connected direct to devices using the adapter.
Receiver + MOBILE by (Earphone)
Transmitter + Lavalier microphone
How to Set configuration for Android or iOS devices
1- Insert the Receiver into “Earphone
jack”.
2- Open your App to “Record”the sounds
3- Speak to microphone and check
Its Done! Now you can hear or record
your Lapel Mic into your mobile, if
needed just adjust the volume level in your
APP.
Reminding: Some version Apple devices
requires specific adapter, that you should
provide by your own.
Remark: After all connect and adjusted, please open your APP, ex. “Garage Band”
NOTE: Apply this same configuration for iPad;
iPhone.
Connect Lapel Mic into jack IN of “Transmitter".
(TX)
Note: Using the earphone as an Input "Line IN".
(RX)
Lapel Mic / TRS (3 poles)

i
KK
–
UHF Wireless Microphone – IK-WM01
i
kk
10
REPEATER FUNCTION: Repeater audio from “device to device”
You also can use the Transmitter (TX) to repeat and Record audio from device to device”
(Computer/Mobile, etc) far a way between 30 to 40 meters longer and receiving in another
devices (Speaker/ Computer, etc) with great performance and audio quality.
Following the same above connection way for the Receiver only.
But for the Transmitter (TX) should be used a TRS male cable and connection type as
below.
Connect the 3-pin plug into “earphone jack” of
Mobile/ Computer, play some music by your
App player.
Then you can monitor the sound transmitted
where another device “Receiver (RX)” is
connected.
Connect the 3-pin plug into “Line Out” jack of
Table sound/ Mixer.
All devices sound that are sending audio to table
sound will be transmitted and you can monitor
where the “Receiver (RX)” is connected.
HEADSET: Assembling way
3,5mm TRS adapter
to "LINE OUT” or
“Earphone" Jack
Mobile/ Computer,
Table sound/ Mixer,
etc.
(TX)
May need to use
this 6,5mm TS
adapter
+
1)
2)
3)
4)
Fit inside guide
Align to be straight

i
KK
–
UHF Wireless Microphone – IK-WM01
i
kk
11
FEATURES:
- UHF wireless microphone audio transmitter
- Automatic frequency design to make simple operation
- Ultra-low noise transfer circuit
- Main plug is 3,5mm
- Accessories for most device connections type in the market
- Plug and play, operation system MAC OSX / Windows PC connection, just connect and
go.
- Can be used as an Audio Repeater “Device to Device” for long distance.
- Battery over 4 hours working time
SPECIFICATION:
Main Plug standard
3,5mm
Frequency range:
UHF 500 – 599Mhz
Modulation:
Digital
Audio Power:
200mV
Frequency response:
50Hz – 18Khz
Battery type:
Li-Po 3,7v / 800mAh
SNR:
90 dB
Distortion:
0,5% / 1Khz
Unit size: (RX / TX)
6 x 3 x 2,3 cm
Weight (RX+TX):
70g
Accessories weight
40g
Total packing weight
210g
MAINTENANCE / CLEANING
1. Plug and Unplug the devices and accessories accordingly and completely
2. To keep unit clean, the outer parts should be cleaned with a soft, damp cloth. You may
use a alcohol if necessary.
3. CAUTION: DO NOT let liquid enter the product.
4. DO NOT use water, detergent, abrasive powders, furniture polish to clean the product.
These may cause damages or deterioration to the surface of product.
5. DO NOT immerse the product into water.
STORAGE
During the off-season or after extended periods of non-use, to ensure long life of the product, it
is recommended to store the device in a cool and dry location. To prevent from accumulating
dust overtime, place the device and accessories in retail carton if available.
TROBLESHOOTING
If the product will not operate, please check the following, before seeking for repairing service:
1. Check if the Audio cable is plugged into external device, if not, plug in.
2. Check if the device or cable has no appearance of damages.
3. Check if the devices are paired, if not, follow the pairing instruction.
4. Re-check the steps of Quick Guide configuration.
Table of contents
Other IKK Microphone manuals


