Ildvr Digital Technology USA IL6000HCS User manual

C922
Edition 9.2
Issued on September 2009
NetDVR User Manual
2/5
IP-CCTV Solution Manuals

No part of this manual, including the products and software described in it, may be reproduced, transmitted, transcribed, stored in a
retrieval system, or translated into any language in any form or by any means, except documentation kept by the purchasers for
backup purposes, without the express written permission of ILDVR Digital Technology. (“ILDVR”)
Product warranty or service will not be extended if: (1) the product is repaired, modified, or altered, unless such repair, modification
of alteration is authorized in writing by ILDVR; or (2) the serial number of the product is defaced or missing.
ILDVR PROVIDES THIS MANUAL “AS IS” WITHOUT WARRANTY OF ANY KIND, EITHER EXPRESS OR IMPLIED,
INCLUDING BUT NOT LIMITED TO THE IMPLIED WARRANTIES OR CONDITIONS OF MERCHANTABILITY OR
FITNESS FOR A PARTICULAR PURPOSE. IN NO EVENT SHALL ILDVR, ITS DIRECTORS, OFFICERS, EMPLOYEES OR
AGENTS BE LIABLE FOR ANY INDIRECT, SPECIAL, INCIDENTAL, OR CONSEQUENTIAL DAMAGES (INCLUDING
DAMAGES FOR LOSS OF PROFITS, LOSS OF BUSINESS, LOSS OF USE OR DATA, INTERRUPTION OF BUSINESS AND
THE LIKE), EVEN IF ILDVR HAS BEEN ADVISED OR THE POSSIBILITY OF SUCH DAMAGES ARISING FROM ANY
DEFECT OR ERROR IN THIS MANUAL OR PRODUCT.
SPECIFICATIONS AND INFORMATION CONTAINED IN THIS MANUAL ARE FURNISHED FOR INFORMATIONAL USE
ONLY, AND ARE SUBJECT TO CHANGE AT ANY TIME WITHOUT NOTICE, AND SHOULD NOT BE CONSTRUED AS A
COMMITMENT BY ILDVR. INACCURACIES THAT MAY APPEAR IN THIS MANUAL, INCLUDING THE PRODUCTS
AND SOFTWARE DESCRIBED IN IT.
Products and corporate names appearing in this manual may or may not be registered trademarks or copyrights of their respective
companies, and are used only for identification or explanation and to the owners’ benefit, without intent to infringe.
Copyright ©2009 ILDVR DIGITALTECHNOLOGY all rights reserved.

To contact us:
Manufacturer
China: www.ildvr.com
U.S.A.: www.ildvr-usa.com
ILDVR Global Distribution & Service
Armenia: www.ildvr.am
Bulgaria: www.ildvr.bg
Canada: www.ildvrusa.com
Germany: www.ildvr.de
Indonesia: www.ildvr.com.id
Kazakhstan: www.ildvr.kz
Netherland: www.ildvr.nl
Norway: www.ildvr.no
Poland: www.ildvr.pl
Russia: www.il-dvr.ru,
www.ildvrcom.ru
Tunisia: www.ildvr-tn.com
Turkey: www.ildvr.com.tr
Ukraine: www.ildvr.com.ua

Directory
Introduction…………………………………………………………………………………………………………………………………..………1
1Product Features and Specifications………………………………….……………………………….………………………………….…………3
1.1 Compression…………………………………………………………………………………….…………………………………………….….………..3
1.2 Local Function………………………………………………………………………………………………………………………………..….…………3
1.3 Network…………………………………………………………………………..……………….……………………………………..…………………4
1.4 Specification……………………………………………………………………………………………………………………………..…………………4
2Installation………………………………….……………………………….…………………………………………………………………………….6
2.1 Before Installation…………………………………………………………………………………………………………………….……………………6
2.2 HDD Installation………………………………………………………………………………………………………………….…………..……………6
2.3 Rear Panel Description…………………………………………………………………………………………………….……………………………….7
2.4 External Alarm In/Out Connection……………………………………………………………………………………………….……………………..…10
3Front Panel and Remote Controller Introduction………………………………….…………………………………………………….………..11
3.1 NetDVR Front Panel…………………………………………………………………………………….…………………………………………………11
3.2 IR Remote Controller…………………………………………………………………………..……………………………………….…………………14
4Basic Operation………………………………….……………………………….………………………………………………….………………….16
4.1 Power on………………………………………………………………………………………………………….………………….…………………….16
4.2 Preview………………………………………………………………………………………………………………………….……..…………………..16
4.3 User Name and Password……………………………………………………………………………………………………….……..…………………..18
4.4 PTZ Control………………………………………………………………………………………………….…………………..…………………………20
4.5 Manual Record…………………………………………………………………………………………………………………...…………………………21
4.6 Playback………………………………….……………………………….……………………………………...………………….……………………..22
4.7 Backup Record File………………………………………………………………………………………………………………….……………..………25
4.8 Voice Talk………………………………………………………………………………………………….……………………………………………….27
4.9 Auxiliary Video Output……………………………………………………………………………………………………………….……………………27
4.10 Shut Down NetDVR……………………………………………………………………………………….………….……………………………………27
5System Menu Operation and Parameters Configuration………………………………….……………………………..…………….………..29
5.1 Main Menu Overview…………………………………………………………………………………………………………………..………………….29
5.2 Basic Menu Operation…………………………………………………………………………………………………………..…………………………31
______________________________________________________________________________________________________________________________________________________________
NetDVR User Manual

______________________________________________________________________________________________________________________________________________________________
NetDVR User Manual
5.3 Display…………………………………………………………………………………………………………………………………..…………………32
5.4 Image……………………………………………………………………………………………………………….………………………………..…….34
5.4.1 OSD Display Mode……………………………………………………………………………………………………………….……………………..….34
5.4.2 Display Position and Format……………………………………………………………………………………………………………….………….…….34
5.4.3 Camera Name and Position……………………………………………………………………………………………………………….………………….35
5.4.4 Video Parameters Setup……………………………………………………………………………………………………………….……………………..36
5.4.5 Mask Area Setup……………………………………………………………………………………………………………….…………………………...36
5.4.6 Video Tampering Alarm……………………………………………………………………………………………………………….…………………….37
5.4.7 Video Lost Alarm……………………………………………………………………………………………………………….……………………………39
5.4.8 Motion Detect Alarm……………………………………………………………………………………………………………….………………………...41
5.5 Recording……………………………………………………………………………………………………………….…………………………………..44
5.6 Network……………………………………………………………………………………………………………….……………………………………47
5.7 Alarm……………………………………………………………………………………………………………….………………………………………48
5.8 Exceptions……………………………………………………………………………………………………………….…………………………………52
5.9 PTZ…………………………………………………………………………………………………….………………………….…..…………………...52
5.10 RS232………………………………………………………………………………………………………………….…………………………………..55
5.11 Preview………………………………………………………………………………………………………………..…………….……………………..59
5.12 User………………………………………………………………………………………………………………………………...……………………….60
5.13 Transact………………………………………………………………………………………………………………………….…..……………………..63
5.14 Utilities……………………………………………………………………………………………………………………………………………………..66
6IE web Client……………………………………………………………………………………………………….……………………………………………71
6.1 Login to NetDVR…………………………………………………………………………………………….………………………..….. ………………71
6.2 Remote Live Viewing……………………………………………………………………………………………………………….……………………..74
6.3 Remote Search and Download……………………………………………………………………………………………………………….…………….78
6.4 Remote Setup ……………………………………………………………………………………………………………….……………………………..79
Appendix A Trouble Shooting……………………………………………………………………………………………………………………………..…87
Appendix B Compatible Hardware Lists………………………………………………………………………..……………………………………………88
Appendix C IKB-2888 keyboard Operation…………………………………………………………………..…………………………………………..….89

___________________________________________________________________________________________________________________________________________________________
NetDVR User Manual [1]
Introduction of IP-CCTV Solutions
Thank you for choosing this product for your security video surveillance system. This operation manual illustrates how to set up hardware and
software explains each individual icon function and demonstrates how to use the system effectively in a stable environment. Prior to install/utilize
the system, operators should go through this manual thoroughly. Local suppliers may support them in due course.
IP-CCTV Product Lines
Item Product Name Video Record Type Why it?
1 PC-DVR
(DVR card) Local HDD High resolution, high quality, friendly GUI interface, convenient operation, easy
to expand cameras, powerful integration ability.
2 NetDVR
(Stand Alone) Local HDD Stable, no risk of computer virus, easy maintenance
3 IP Camera Local SD card and network Next generation product, all in one combo, easy installation, the best cost
effective.
4 IP Speed Dome Network stream Has all traditional high speed dome features but overcome the coaxial cable
distant limit
5 IP Video Server Network stream
(5001HS both SD card and
network)
Convert existing analog camera to IP camera, directly upgrade to IP video
surveillance system
6
IP
Matrix/TV-out
(Decode card) N/A Utilize existing TV-wall facility

___________________________________________________________________________________________________________________________________________________________
NetDVR User Manual [2]

___________________________________________________________________________________________________________________________________________________________
NetDVR User Manual [3]
1Product Features and Specifications
1.1 Compression
•H.264 hardware compression. Support up to 16 channels video input (PAL/NTSC). Each channel is independent and real time (PAL: 25 FPS, NTSC: 30FPS).
Support both variable bitrate and variable frame rate.
•Support up to 16 channels audio input. Each channel is independent OggVorbis compression and bitrate is 16Kbps.
•Compressed video and audio are synchronous. You can select either mixed stream or only video stream.
•Support 4CIF, DCIF, 2CIF, CIF and QCIF resolution.
•Support multi-area motion detection.
•Support OSD and changeable OSD position.
•Support LOGO and changeable LOGO position.
1.2 Local Function
Record
•Support multiple record types includes real time record, manual record, motion detect record, external alarm record, motion & alarm record, motion | alarm
record.
•Support 8 IDE HDD and each HDD can support 2000GB.
•Support FAT 32 file system.
•Support HDD S.M.A.R.T technology.
•Support auto-cycle or none cycle record.
•Support multiple backup media and file clips. Support USB memory, USB HDD, USB CD-R/W and IDE CD-R/W.
Preview and playback
•Support analog monitor and VGA output.
•Support multiple preview modes.
•Support sensitive area mask.
•Support camera spiteful block alarm.
•Support 2-ch synchronous playback. Support multiple operations: forward, backward, pause, frame-by-frame, etc.
•Support play back by files or by time.
•Display local record status.
PTZ

___________________________________________________________________________________________________________________________________________________________
NetDVR User Manual [4]
•Support many kinds of PTZ protocol.
•Support preset, sequence and tour.
Alarms
•Support Email AlarmNotification
•Support exception alarm, motion detection alarm, external alarm, etc.
Others
•Support IR remote control.
•Support RS-485 keyboard.
•Support multi-level user management.
1.3 Network
•Support TCP, UDP, RTP, Multicast for network preview.
•Support PPPoE for broadband dialup.
•Support PSTN for narrow band dialup.
•Support dynamic DNS (DDNS)
•Support remote parameters setup.
•Alarm information can be sent to remote center.
•Network control PTZ.
•Network record the real time stream.
•Network download and playback the recorded files in NetDVR.
•Remote upgrade the firmware.
•RS-232 supports transparent channel function so that the remote PC can use NetDVR to control serial devices.
•Support bi-direction voice talk or one-way voice broadcast.
•Support IE to preview and configure NetDVR.
1.4 Specification
Version Difference
Firmware Version1.5 is used for IDE interface hard disk (discontinuous IL6000HC series)
Firmware Version2.0 and later version are used for SATA interface hard disk (IL6000HCS series, IL6000HDS series and IL6000HN(S))

Model Description
IL – 6 0 x x H X S
SATAHDDSupport
Modelname(HC/HCS/HDS)
Channel / camera number
NetDVR Product Line code name
ILDVRDigitalProduct
Specification
IL6000HN IL6000HCS IL6000HDS
Video compression H.264
Preview resolution PAL: 704*576, NTSC: 704*480
Playback resolution QCIF/CIF QCIF/CIF/2CIF/
DCIF
QCIF/CIF/2CIF/
DCIF/4CIF
Video input 4/8 4/8/12/16 4/8/12/16
Video input interface BNC (Electrical Level: 1.0Vp-p, resistance: 75Ω)
Video output 1 channel, BNC (Electrical Level: 1.0Vp-p, resistance: 75Ω)
Video loop out No
Video aux output Yes
Frame rate PAL: 1/16—25FPS, NTSC: 1/16—30FPS
Stream type Video/Video&Audio
Max bit rate 32Kbps--2Mbps, self-define
Audio input 1 4/8/12/16 4/8/12/16
Audio input interface BNC (Linear Electrical Level, Resistance: 1kΩ)
Audio output 1 channel, BNC (Linear Electrical Level, Resistance: 600Ω)
Audio compression OggVorbis
Audio compression rate 16Kbps
___________________________________________________________________________________________________________________________________________________________
NetDVR User Manual [5]

___________________________________________________________________________________________________________________________________________________________
NetDVR User Manual [6]
Voice talk 1 channel, BNC (Linear Electrical Level, Resistance: 1KΩ)
Communication interface
1 RJ45 10M/100M Self-adaptive Ethernet Interface
1 RS232 interface
1 RS485 interface
Keyboard interface 2 RJ45
HDD interface 1 SATA HDD can support
2000GB
Up to 8 SATA interface support 8 SATA HDD and each HDD can support
2000GB
USB interface 1 USB interface, USB1.1, can support USB flash memory, USB HDD and USB CR-R/W
VGA interface 1 VGA interface, support resolution: 800×600/60Hz, 800×600/75Hz, 1024×768/60Hz
External alarm in 4/8/16
Relay output 2/4
Power supply 100~240VAC, 6.3A, 50~60 HZ
Power consumption 20-42W (without HDD)
Working temperature -10 to +55 centigrade degree
Working humidity 10°C--90°C
Size 315mm x 230mm x 45mm 19” Standard (450mm*450mm*95mm)
Weight Less than 8Kg (without HDD)
For IL6000HCS series, only 1st, 5th, 9th and 13th channels can support 2CIF/DCIF/4CIF. Other channels can only support QCIF/CIF.
NTSC: 176*120(QCIF), 352*240(CIF), 704*240(2CIF), 528*320(DCIF), 704*480(4CIF)
PAL: 176*144(QCIF), 352*288(CIF), 704*288(2CIF), 528*384(DCIF), 704*576(4CIF);
2Installation
2.1 Before Installation
•When you get the product, please check all items included in packing list. If any of the items is missing, please contact your dealer.
•Before you install the NetDVR, please make sure the power of NetDVR is switched off
•Check the 220V/110V shift switch if it is set correctly to your city power
•Check your HDD interface if it matches your NetDVR HDD interface (refer to specifications)
•Installation instrument: One cross screwdriver (#2 or 6.0 mm).
In order to run NetDVR stably, please install the NetDVR in well ventilation space with allowed range of temperature and humidity as claimed in specifications.
2.2 HDD Installation
Installation notice: The NetDVR has no HDD when leaving factory. After you install the HDD, you must format them. Please refer to section 5.14
•Open the NetDVR cover. Take off the HDD mounting plate.
•If you install IDE interface HDD, please set master and slave HDD correctly.
•Place the HDD on the mounting plate and fix it with screws.
•Place the mounting plate back to the NetDVR and fix it with screws.
•Connect the ATA/SATA data cable correctly.
•Plug the HDD power connector.
•Cover and fix the NetDVR case.
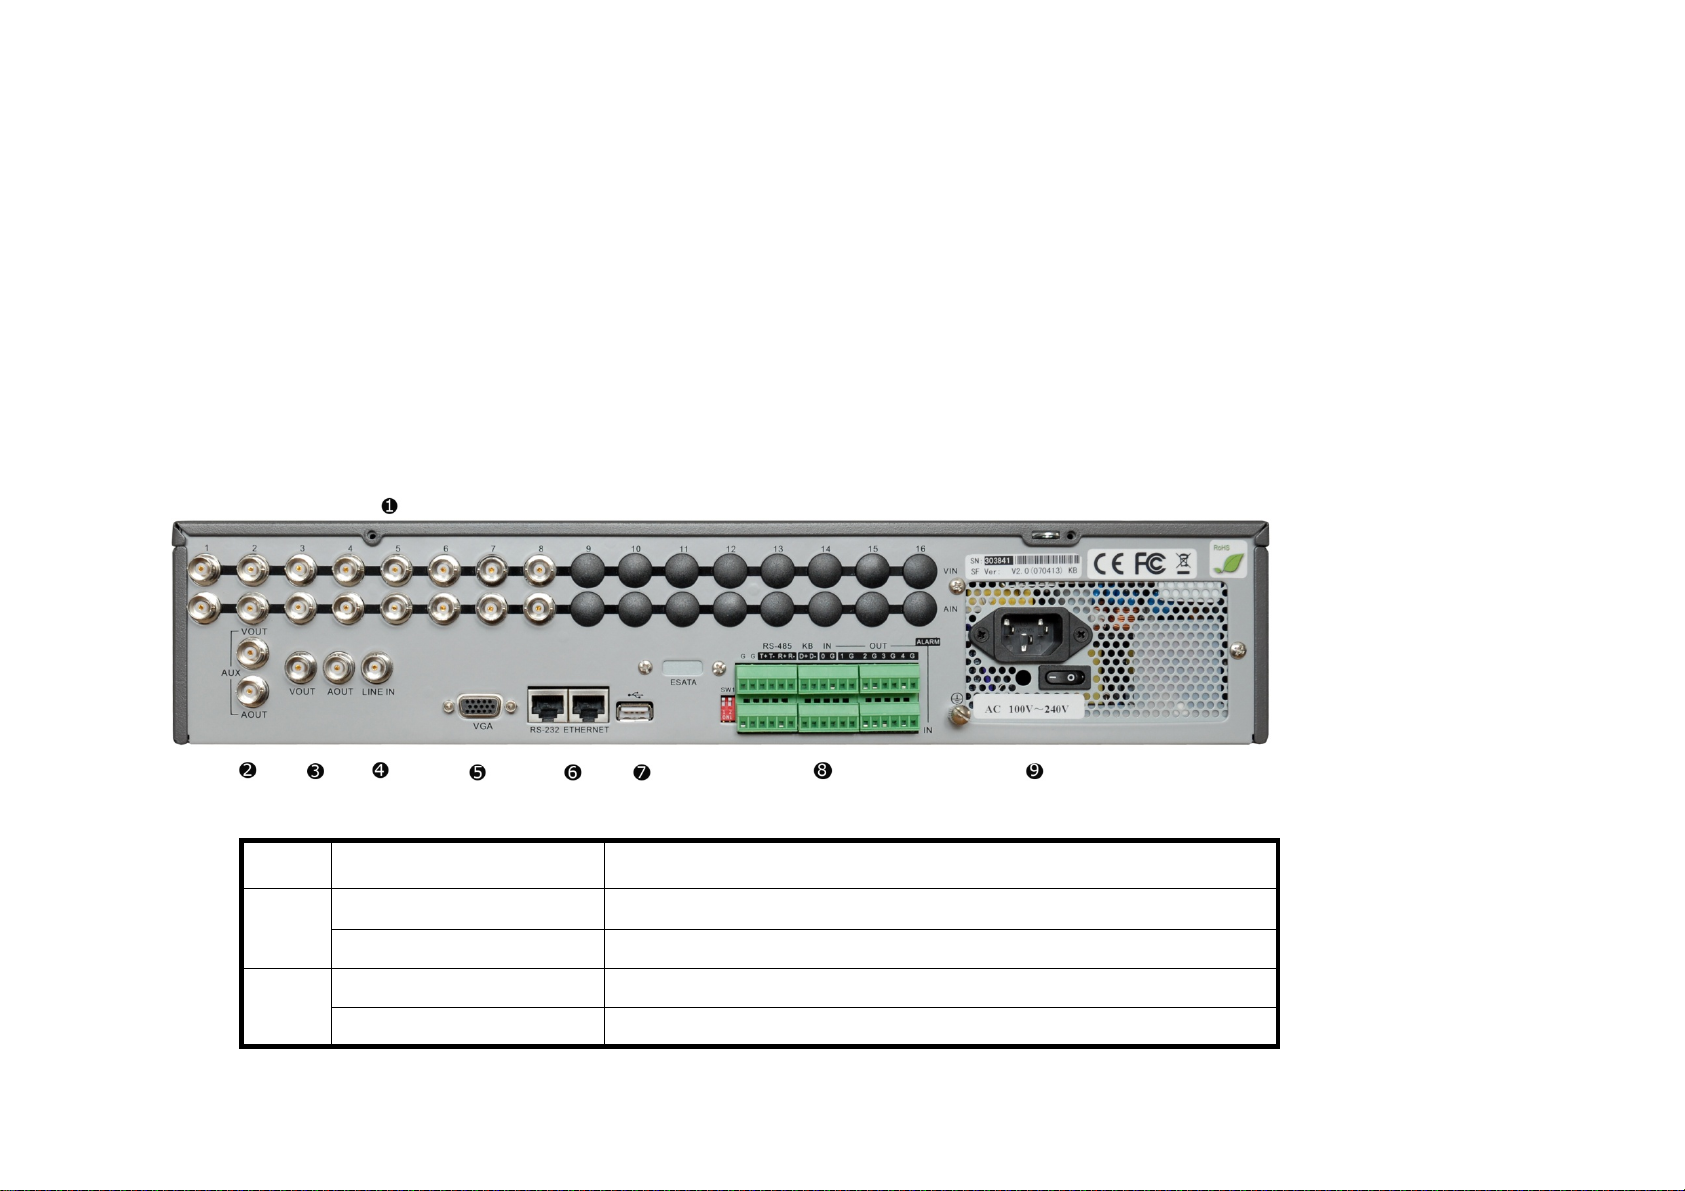
2.3 Rear Panel Description
IL6008HDS Rear Panel (Please refer to real product for different model)
Index Physical Interface Description
1
Video Input Standard BNC.
Audio Input Standard BNC.
2 AUX Video Output Auxiliary video output
AUX Audio Output Auxiliary Audio output
___________________________________________________________________________________________________________________________________________________________
NetDVR User Manual [7]
3
Video Output Connect monitor, output video and menu.
Audio Output Local audio output.
4 Line In Audio line input for voice.
5 VGA Interface VGA display.
6
RS-232 Connect RS-232 devices. Refer to Appendix B for pin definition.
RJ45 Network Interface Connect network devices. Refer to Appendix B for pin definition.
7 USB Interface USB memory disk, USB HDD, USB CD-R/W
8
RS-485 PTZ connection. Refer to Appendix B for pin definition.
Keyboard Interface One is for ILDVR keyboard. Another is for NetDVR cascade.
External Alarm Input 8/16 Alarm in.
Relay Output 4 Alarm out
9 AC Input Use switch to change AC voltage 220/110V.
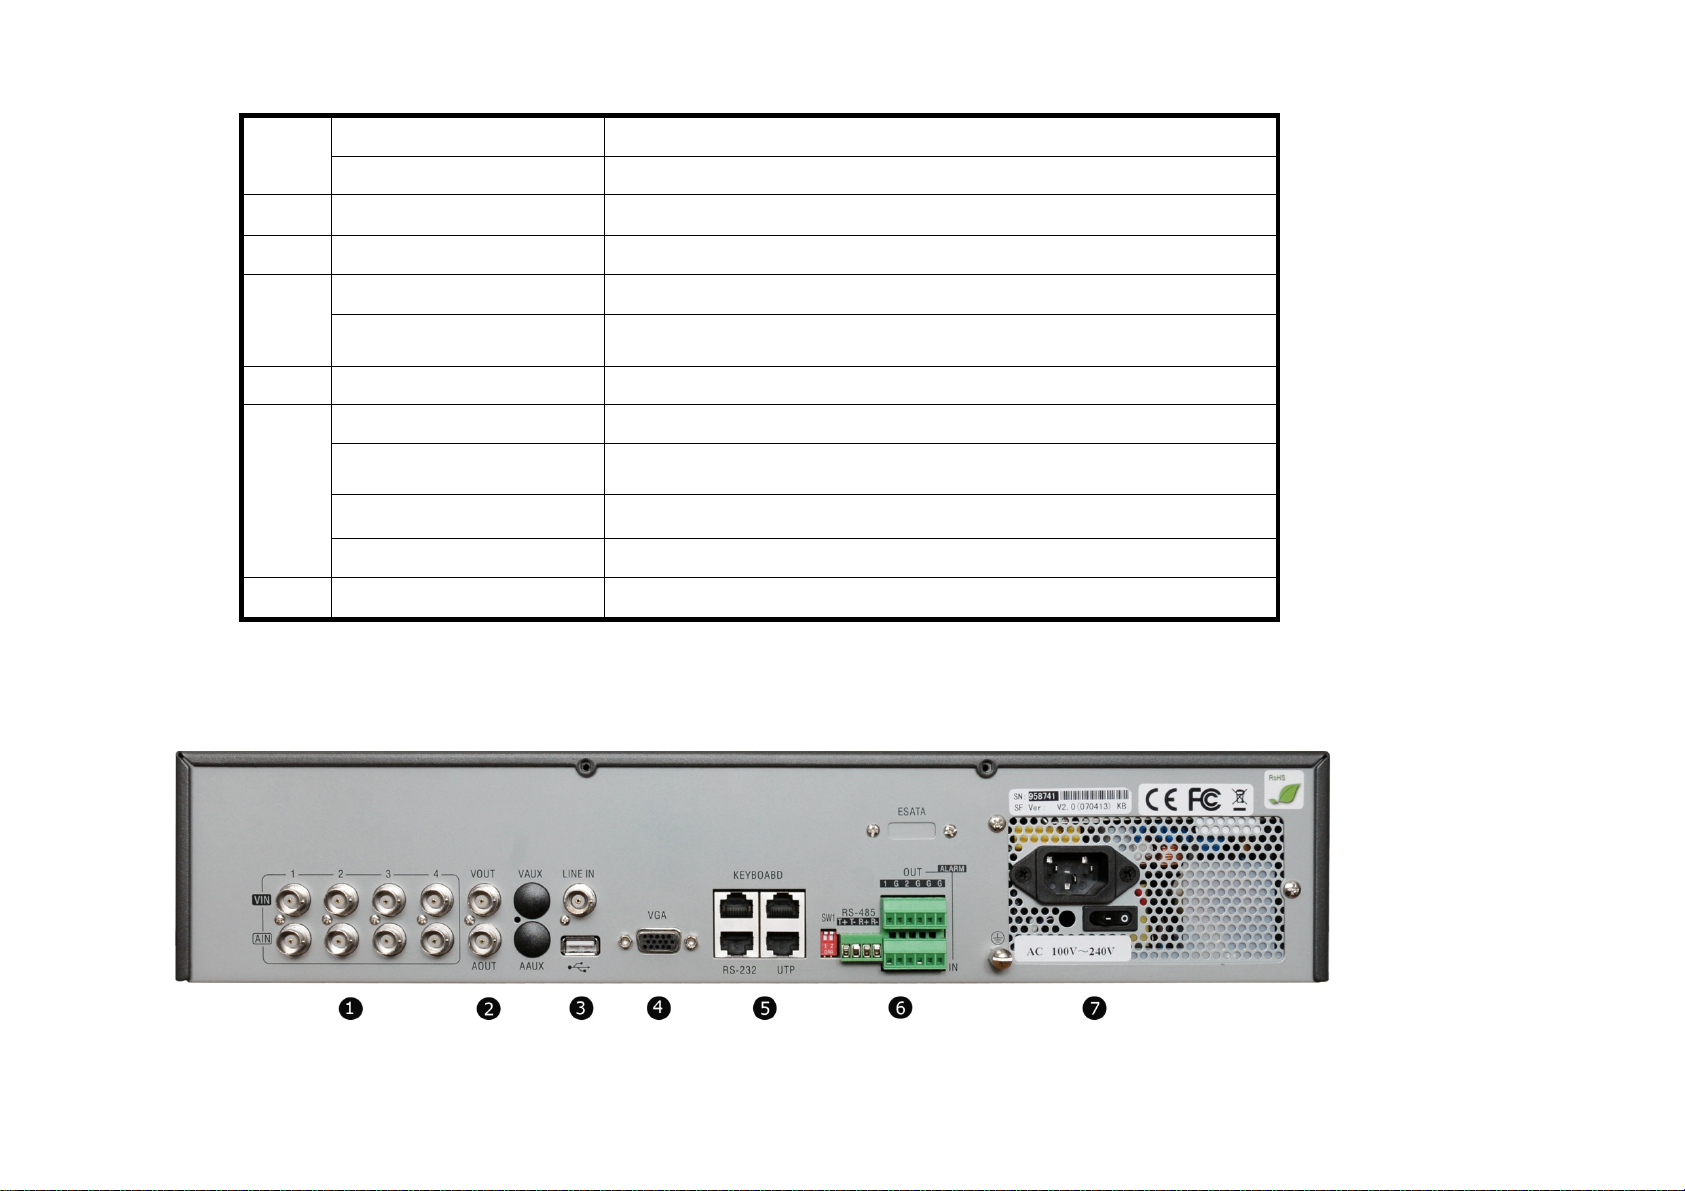
IL6004HDS Rear Panel (Please refer to real product for different model)
___________________________________________________________________________________________________________________________________________________________
NetDVR User Manual [8]

Index Physical Interface Description
1
Video Input Standard BNC
Audio Input Standard BNC
2 Video Output Connect monitor, output video and menu.
3 Audio Output Local audio output.
Line In Audio line input for voice.
USB Interface USB memory disk, USB HDD, USB CD-R/W
4 VGAInterface VGA display.
5
Keyboard Interface One is for ILDVR keyboard. Another is for NetDVR cascade.
RS-232 Connect RS-232 devices. Refer to Appendix B for pin definition.
UTP Network Interface Connect network devices. Refer to Appendix B for pin definition.
6
RS-485 PTZ connection. Refer to Appendix B for pin definition.
External Alarm Input 4 Alarm in
Relay Output 4 Alarm out
7 AC Input Use switch to change AC voltage 220/110V.
___________________________________________________________________________________________________________________________________________________________
NetDVR User Manual [9]
___________________________________________________________________________________________________________________________________________________________
NetDVR User Manual [10]
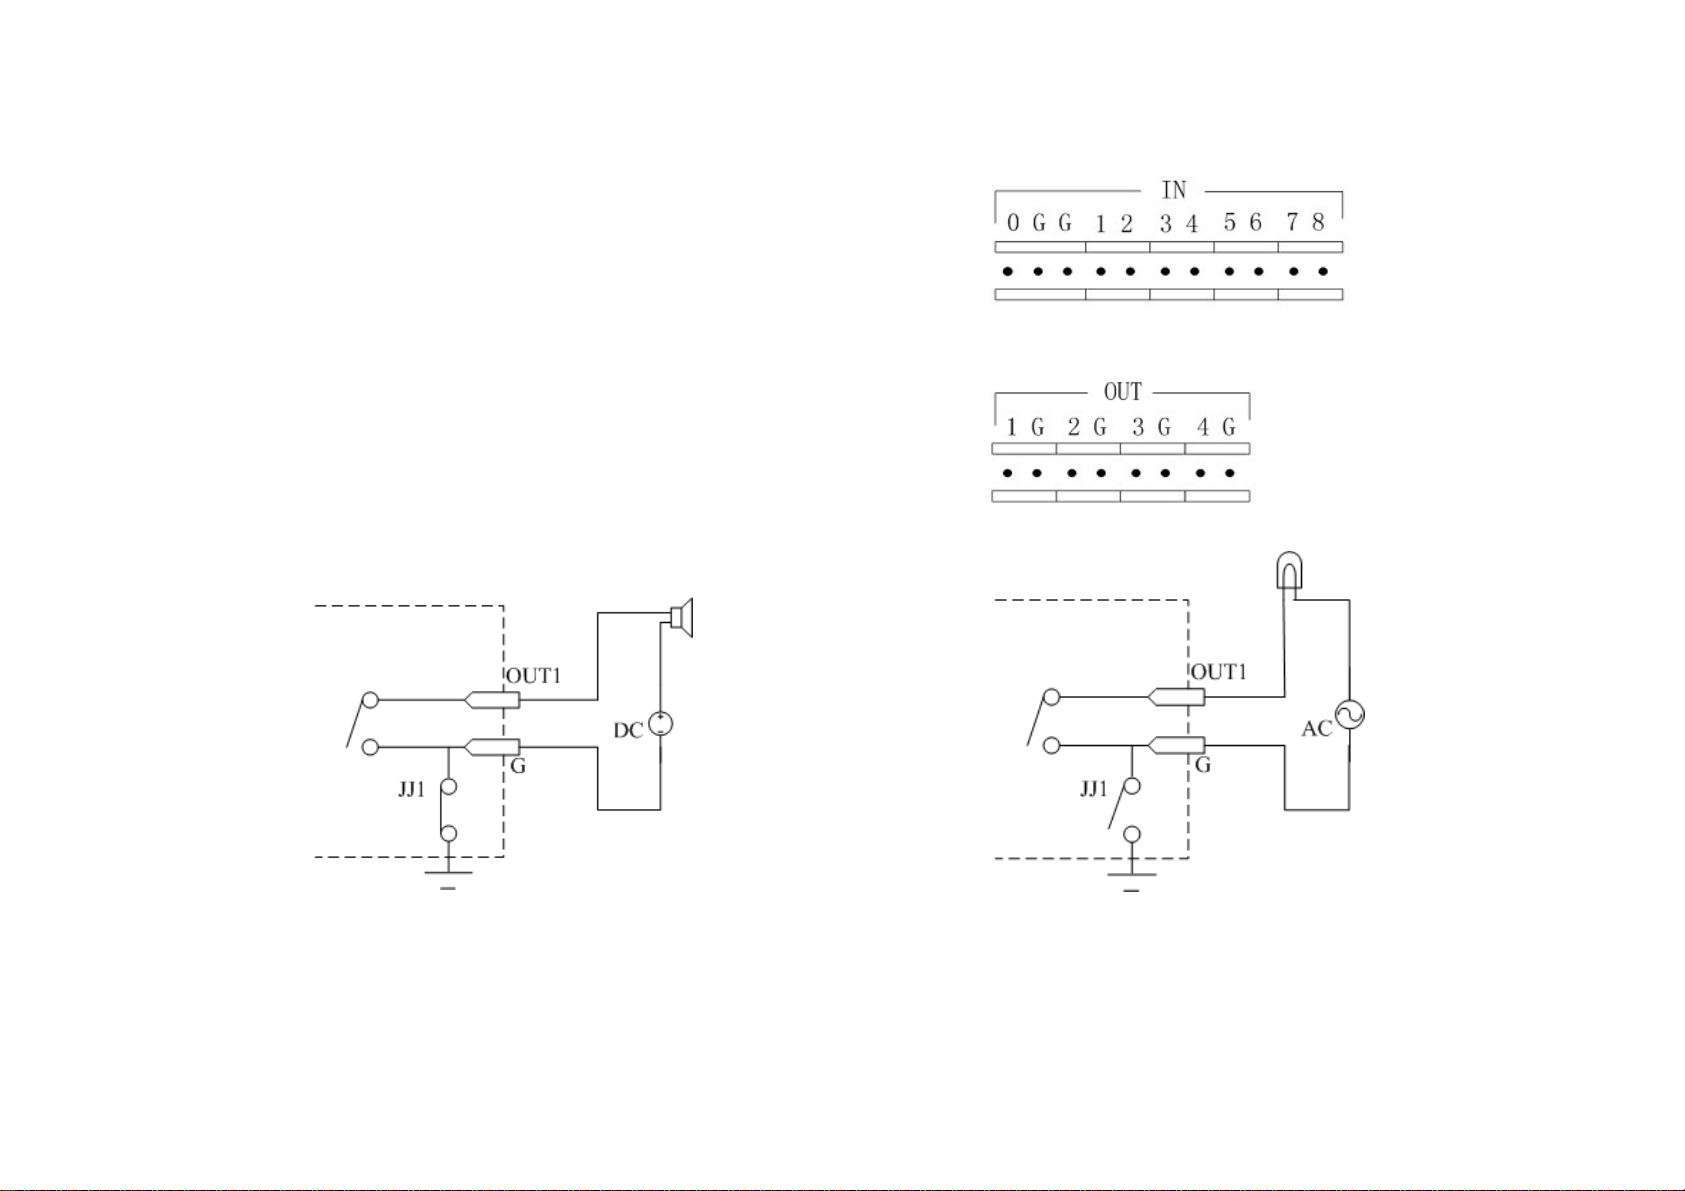
2.4 External Alarm In/Out Connection
Alarm input connection
Alarm output connection
Please note the usage of jumper JJ1. If you use DC, either connection is OK. We suggest you to use those DC under 12V, 1A.
If you use AC power supply for relay output, please open the jumper. There are 4 jumpers (JJ1, JJ2, JJ3 and JJ4) in NetDVR main board, corresponding with 4 alarm
outputs. The default is closed.
Alarm input port
1~8: Alarm inputs, support normal open/normal close.
G: GND of sensor.
0: Reserved.
Alarm output
1G~4G: 4 relay outputs.
(G= GND)
Warning: If you use AC input for relay output, please open the jumpers.
3Front Panel and Remote Controller Introduction
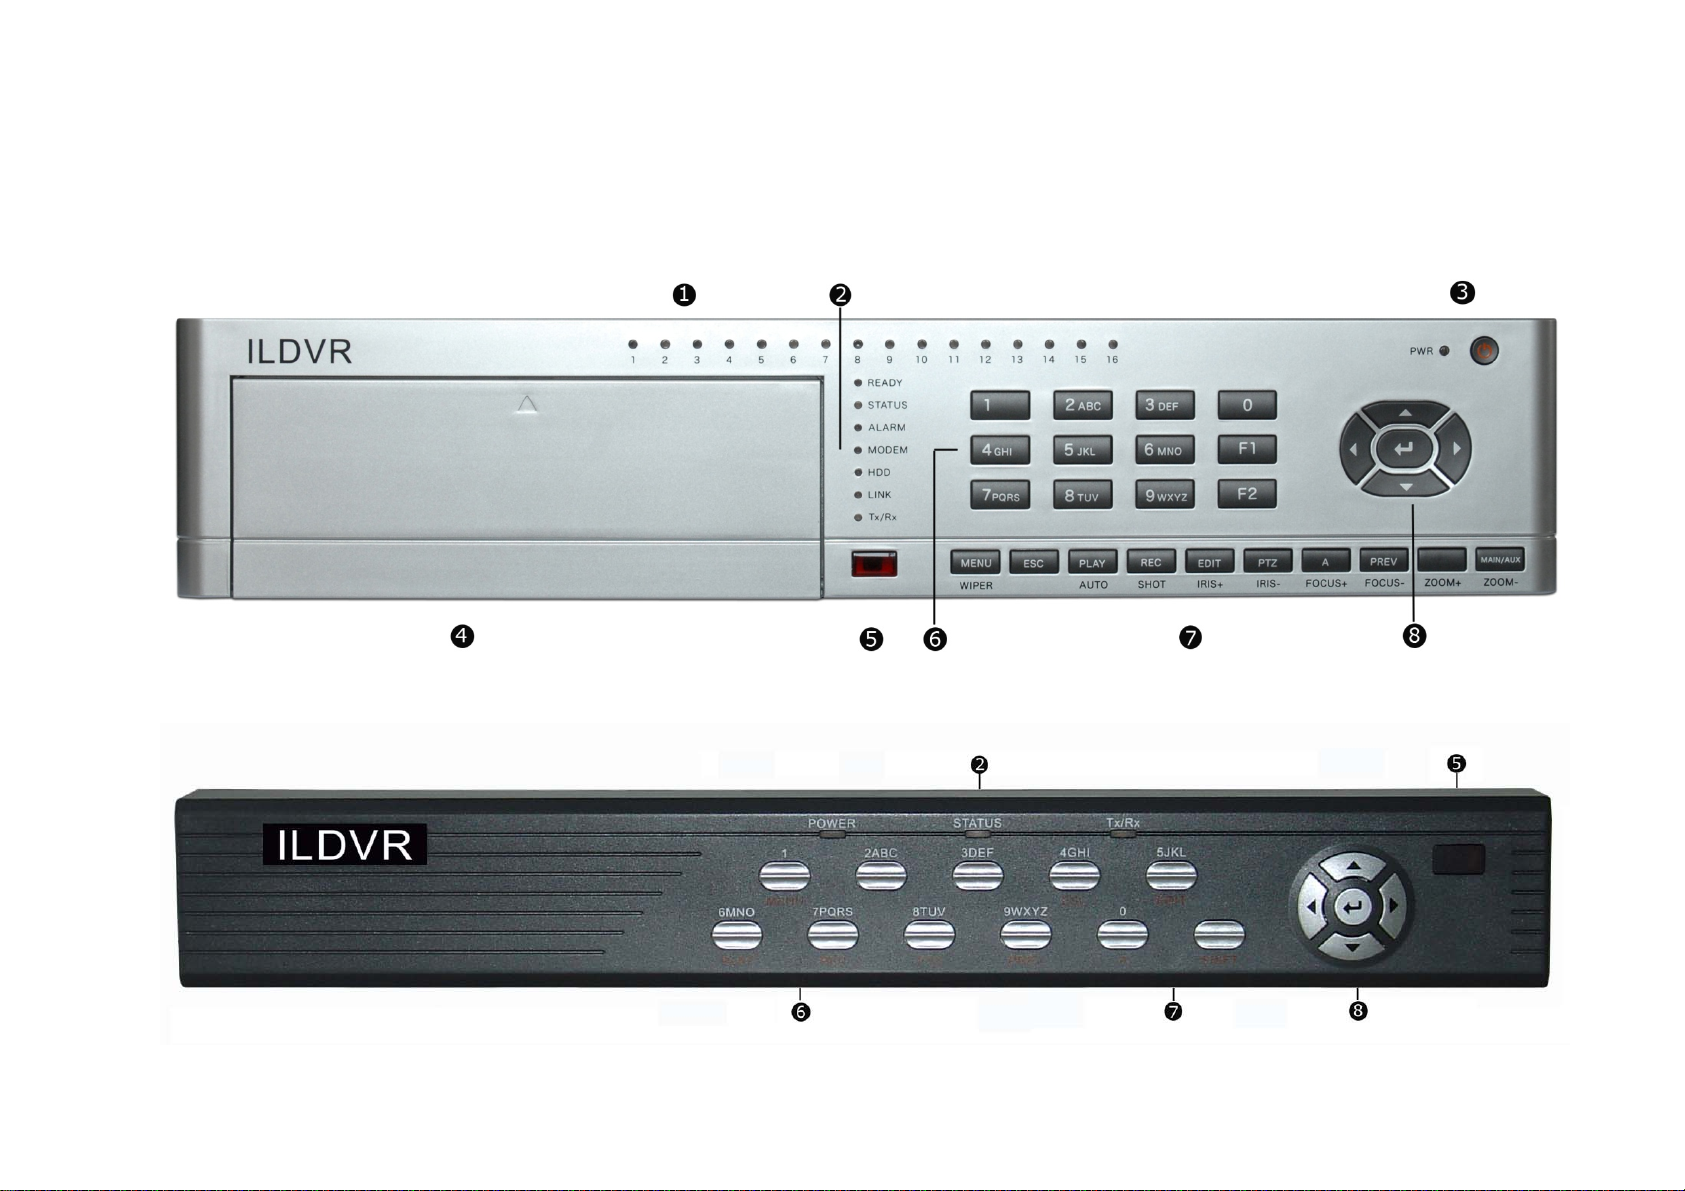
3.1 NetDVR Front Panel
IL6000HCS series and IL6000HDS series front panel
IL6004HN front panel
____________________________________________________________________________________________________________________________________________________________
NetDVR User Manual [11]

Index Type Name Description
1 Camera Status Lamps 1-16 Show channel 1-16 status. Green means recording; Red means network transmission; Orange
means recording and network transmission. Lamp flicker and red means the corresponding HDD
has error.
2 System Status Lamps
READY NetDVR is ready.
STATUS Green means you can use IR remote control.
ALARM Red means there is alarm.
MODEM Green means modem connection and dial-up successful.
HDD Twinkle in red means reading or writing HDD.
LINK Green means network is OK.
Tx/Rx Twinkle in green means data is being transmitted.
3
Power Lamp PWR Device switch with power indicator lamp. Green means NetDVR is working; Red means NetDVR
is powered off. No light means no power is supplied.
Power On/Off Button Turn on and /or shut down NetDVR
4 CDRW Cover Push to open CDRW
5 IR Receiver When using the remote controller keep it face to IR Receiver
6 Input Keys
Numeric
Keys Input number, lower case and upper case character and symbols
F1 Function key = [LIGHT] in PTZ control.
F2 Function key = [AUX] in PTZ control.
____________________________________________________________________________________________________________________________________________________________
NetDVR User Manual [12]

7 Compound Keys
MENU
1. Switch preview mode into menu
2. Brush control short key [WIPER]
3. Press [MENU] for more than 5 seconds to cancel button beep sound
ESC Cancel and back to parent menu
PLAY 1. Local playback
2. [AUTO] in PTZ mode
REC 1. Manual record;
2. [SHOT] in PTZ mode (adjust preset)
EDIT 1. In edit state, delete current cursor character
2. [IRIS+] in PTZ control
3. Select 9to enable or “X” to disable
PTZ 1. Enter into PTZ control mode
2. [IRIS-] in PTZ control
A
1. Input switch (number, lower case, upper case and symbol)
2. [FOCUS+] in PTZ control
3. In preview mode, display or hide the channel status bar
PREV
1. Multi screen preview switch
2. Switch menu mode into preview
3. [FOCUS-] in PTZ control
(Blank) [ZOOM+] in PTZ control
MAIN/AUX 1. Auxiliary video out and audio out
2. [ZOOM-] in PTZ control
Shift Switch key function between control and input, only apply to IL6004HN
8 Control Keys
Direction Keys
Composed of [Ç] , [È] , [Å] and [Æ]
1. Menu mode, use [Å] / [Æ] to select [Ç] / [È] to edit
2. PTZ direction control
3. Playback speed control
ENTER
1. Menu confirmation
2. Select 9to enable or “X” to disable
3. Pause playback
____________________________________________________________________________________________________________________________________________________________
NetDVR User Manual [13]
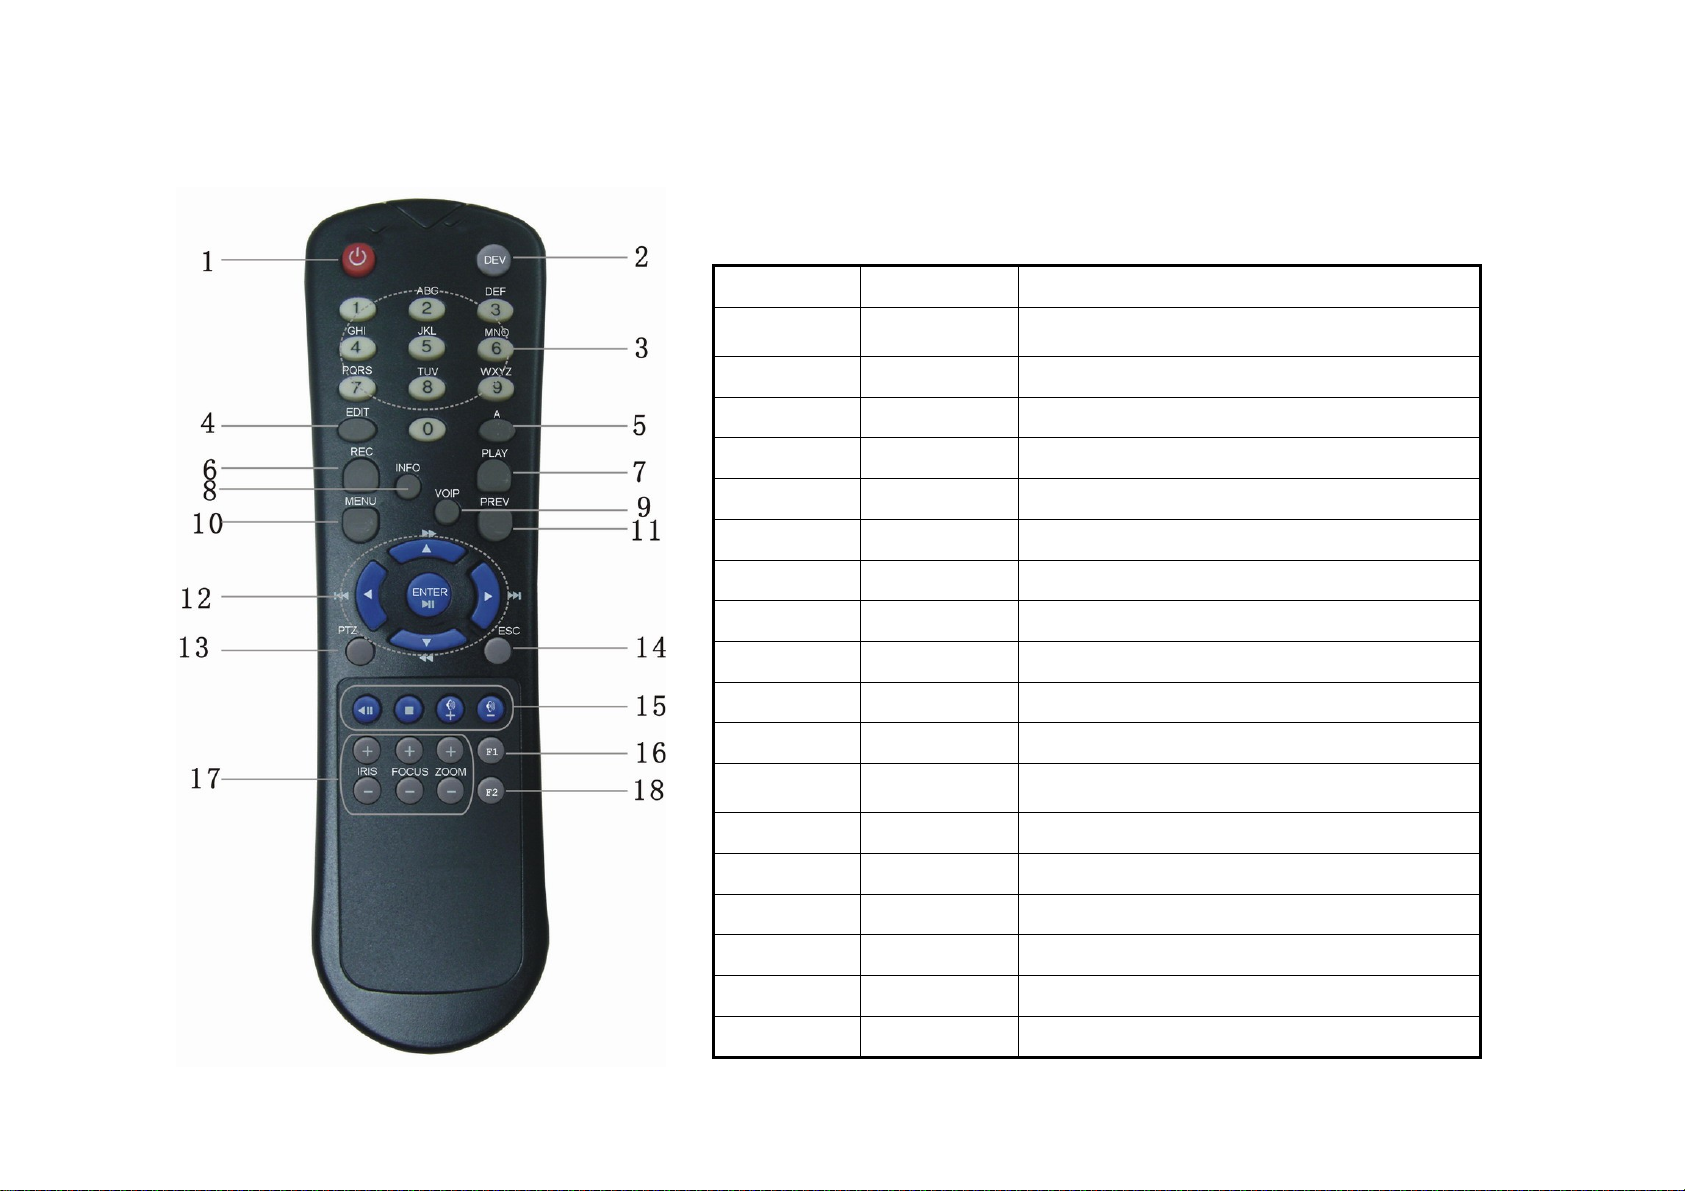
3.2 IR Remote Controller
____________________________________________________________________________________________________________________________________________________________
NetDVR User Manual [14]
Index Name Description
1 POWER
Button Turn off NetDVR device
2 DEV Enable/Disable IR remote control
3 Numeric Keys Same as numeric keys of front panel.
4 EDIT Same as EDIT key of front panel.
5 A Same as A key of front panel.
6 REC Same as REC key of front panel.
7 PLAY Same as PLAY key of front panel.
8 INFO
9 VOIP
10 MENU Same as MENU key of front panel.
11 PREV Same as PREV key of front panel.
12 Direction Keys
ENTER Same as direction keys and enter key of front panel.
13 PTZ Same PTZ key of front panel.
14 ESC Same as ESC key of front panel.
15 Reserved
16 F1 Same as [F1] key of front panel.
17 Lens control IRIS, FOCUS ZOOM for lens control.
18 F2 Same as [F2] key of front panel.

Loading the batteries into the IR controller
•Remove the battery cover.
•Insert a pair of AAA 1.5V battery. Please take care that the poles (+ and -) are correctly positioned.
•Replace the battery cover.
Start to use IR controller
IR controller is designed to control multiple NetDVR devices. It recognizes the target NetDVR by device ID.
Press [DEV] key, input the NetDVR device ID (default is “03”, it can be changed in “Display” menu) and then press [ENTER] key. If the “STATUS” lamp of NetDVR
front panel is turned into green, it means you can use IR controller to operate this NetDVR.
Stop using IR controller
When IR controller status is on, press [DEV] key again, the “STATUS” lamp will be turned off. The IR controller cannot control this NetDVR.
Turn off the NetDVR
When IR controller status is on, press [POWER] key for several seconds, the NetDVR will be turned off.
When IR controller cannot work normally
•Check IR Receiver if it is masked
•Check IR Controller’s sensor if it is masked
•Replace new batteries
•It the problem still exists, please change another IR Controller to try again or contact your dealer for repair.
____________________________________________________________________________________________________________________________________________________________
NetDVR User Manual [15]
Table of contents
Other Ildvr Digital Technology USA DVR manuals


