Ildvr Digital Technology USA IL7104HV-A User manual

M0240
Edition 10.3
Issued on March 2012
NetDVR User Manual
For
IL7100HV-ASeries

No part of this manual, including the products and software described in it, may be reproduced, transmitted, transcribed, stored in a
retrieval system, or translated into any language in any form or by any means, except documentation kept by the purchasers for backup
purposes, without the express written permission of ILDVR Digital Technology USA Inc. (“ILDVR”)
Product warranty or service will not be extended if: (1) the product is repaired, modified, or altered, unless such repair, modification of
alteration is authorized in writing by ILDVR; or (2) the serial number of the product is defaced or missing.
ILDVR PROVIDES THIS MANUAL “AS IS” WITHOUT WARRANTY OF ANY KIND, EITHER EXPRESS OR IMPLIED,
INCLUDING BUT NOT LIMITED TO THE IMPLIED WARRANTIES OR CONDITIONS OF MERCHANTABILITY OR FITNESS
FOR A PARTICULAR PURPOSE. IN NO EVENT SHALL ILDVR, ITS DIRECTORS, OFFICERS, EMPLOYEES OR AGENTS
BE LIABLE FOR ANY INDIRECT, SPECIAL, INCIDENTAL, OR CONSEQUENTIAL DAMAGES (INCLUDING DAMAGES
FOR LOSS OF PROFITS, LOSS OF BUSINESS, LOSS OF USE OR DATA, INTERRUPTION OF BUSINESS AND THE LIKE),
EVEN IF ILDVR HAS BEEN ADVISED OR THE POSSIBILITY OF SUCH DAMAGES ARISING FROM ANY DEFECT OR
ERROR IN THIS MANUAL OR PRODUCT.
SPECIFICATIONS AND INFORMATION CONTAINED IN THIS MANUAL ARE FURNISHED FOR INFORMATIONAL USE
ONLY, AND ARE SUBJECT TO CHANGE AT ANY TIME WITHOUT NOTICE, AND SHOULD NOT BE CONSTRUED AS A
COMMITMENT BY ILDVR. ILDVR ASSUMES NO RESPONSIBILITY OR LIABILTY FOR ANY ERRORS OR INACCURACIES
THAT MAY APPEAR IN THIS MANUAL, INCLUDING THE PRODUCTS AND SOFTWARE DESCRIBED IN IT.
Products and corporate names appearing in this manual may or may not be registered trademarks or copyrights of their respective
companies, and are used only for identification or explanation and to the owners’ benefit, without intent to infringe.
Copyright ©2012 ILDVR DIGITALTECHNOLOGY USAINC all rights reserved.

To contact us:
Headquarter: www.ildvr.com
Branches
Europe: www.ildvr.eu
Russia: www.ildvrcom.ru,
China: www.ildvr.net
ILDVR Global Distribution & Service
Danmark: www.ildvr.dk
Germany: www.ildvr.de
Hungary www.ildvr.hu
Italy: www.ildvr.it
Netherland: www.ildvr.nl
Russia: www.il-dvr.ru
www.ildvr-video.ru
Ukraine: www.ildvr.com.ua
USA: www.ildvr-usa.com
Tech-support: support@ildvr.com

____________________________________________________________________________________________________________________________________________________________
NetDVR User Manual 4 / 97
Directory
Introduction…………………………………………………………………………………………………………………………………..………7
1Product Features and Specifications………………………………….……………………………….………………………………….…………9
1.1 Compression…………………………………………………………………………………….…………………………………………….….………..9
1.2 Local Function………………………………………………………………………………………………………………………………..….…………9
1.3 Network…………………………………………………………………………..……………….……………………………………..…………………10
1.4 Specification……………………………………………………………………………………………………………………………..…………………11
2Installation………………………………….……………………………….…………………………………………………………………………….12
2.1 Rear Panel Description…………………………………………………………………………………………………………………….……………………12
2.2 External Alarm In/Out Connection…………………………………………………………………………………………………….…………..……………14
3Front Panel and Remote Controller Introduction………………………………….…………………………………………………….………..15
3.1 NetDVR Front Panel…………………………………………………………………………………….…………………………………………………15
3.2 IR Remote Controller…………………………………………………………………………..……………………………………….…………………20
3.3 Using USB Mouse………………………………………………………………..…………………………………………...……………….…………………21
4Basic Operation………………………………….……………………………….………………………………………………….………………….22
4.1 Power on and shut down……………………………………………………………………………………………….………………….…………………….22
4.2 User Name and Password…………………………………………………………………………………………………………….……..…………………..23
4.3 Running Setup Winzard……………………………………………………………………………………………………………….……..…………………..23
4.4 Set Date and Time…….………………………………………………………………………………………….…………………..…………………………26
5Live Video Preview Operation………………………………….…………………………………………………………..………..…………….………..26
5.1 Mouse Operation in Live Preview…………………………………………………………………………………………………………..………………….27
5.2 Configure Live Preview Display.……..……………………………………………………………………………………………………..…………………27
5.3 Set Camera Order……………………………………………………………………………………………………….………………………………..…….28
6Record Setup……………………………………………………………………………………………………….……………………………………………29
6.1 Initializing Record Settings……………………………………………………………………………………….……………………………………………29
6.2 Scheduling a Recording……………………………………………………………………………………….………………….………………………………………30
6.3 Starting a Manual Recording……………………………………………………………………………………….……………………….……………………………31
6.4 Lock/Unlock a Recorded File……………………………………………………………………………………….……………………………………………………31
6.5 Set HDD to Read Only……………………………………………………………………………………….…………………………………..………………………31

____________________________________________________________________________________________________________________________________________________________
NetDVR User Manual 5 / 97
7Playback………………………………………………………………………………….……………………………………………………………….……………33
7.1 Playback by Search……………………………………………………………………………………….………………………………………………………………33
7.2 Playback in Live Preview Mode……………………………………………………………………………………….……….………………………………………34
7.3 Playback by System Log……………………………………………………………………………………….…………………….…………………………………34
7.4 Playback Frame-by-Frame………………………………………………………………………………………………...……………………………………………35
7.5 Digital Zoom……………………………………………………………………………………….……………………………………………………………………35
8Backup………………………………………………………………………………………………………………………………….………………………………35
8.1 Export Files………………………………………………………………………………….……………………………………………………..…………….………35
8.2 Export Video Clip…………………………………………………………………………………….……………………………………………………..……………37
8.3 Manage Backup Devices………………………………………………………………………………….……………………………………….……………………38
9Alarm Setup……………………………………………………………………………………….………………………………………………..…………………38
9.1 Motion Detection Alarm………………………………………………………………………………….……………………………………………..……….………38
9.2 Sensor Alarm Settings………………………………………………………………………………….………………………………………………..…..……..……40
9.3 Manual Alarm Trigger………………………………………………………………………………….………………………………………………..…….…..……43
9.4 Video Loss Detection………………………………………………………………………………….…………………………………………………..…….………43
9.5 Video Tamper Detection…………………………………………………………………………………….……………………………………………………………44
9.6 Exception Settings…………………………………………………………………………………….………………………………………………………….………45
9.7 Understand Exception Trigger Options…………………….………..……………………………………………………….…………………………….……………46
10 Network Settings……………………………………………………………………………………….……………………..……………………………………47
10.1 Configure General Settings……………………………………………………………………………………………….……………………………………………47
10.2 PPPoE Settings……………………………………………………………………………………………………….…….……………………………………………48
10.3 Configure DDNS……………………………………………………………………………………………..…………….……………………………………………48
10.4 NTP Server Settings…………………………………………………………………………………………..…………….……………………………………………49
10.5 Remote Alarm Host Settings………………………………………………………….…………………………………….……………………………………………50
10.6 Configure Multicast…………………………………………………………………………………………………….……………………………………………50
10.7 Configure Server and HTTP Ports………………………………………………………..……………………………….……………………………………………51
11 PTZ Control……………………………………………………………………………………….…………………………………………………………………52
11.1 Configure PTZ Settings……………………………………………………………………………….…………………….……………………………………………52
11.2 Understand PTZ Control………………………………………………………..………………………………………….……………………………………………53
11.3 Customize Presets………………………………………………………….……………………………………………….……………………………………………53
11.4 Customize Patrols…………………………………..………..…………………………………………………………….……………………………………………54

____________________________________________________________________________________________________________________________________________________________
NetDVR User Manual 6 / 97
11.5 Customize Patterns…………………………………………..…………………………………………………………….……………………………………………55
12 Camera Management………………………………………………………………………………………………….……………………………………………55
12.1 OSD Settings…………………………………………………………………………………………….………………….……………………………………………55
12.2 Display Settings………………………………………………………………………………………………………….……………………………………………56
12.3 Privacy Mask Settings…………………………………………….……………………………………………………….……………………………………………56
13 HDD Management………………………………………………………………………………………………….……………………………………………57
13.1 Initializing HDD…………………………………………………………………………………………………….……………………………………………57
13.2 Set HDD Group………………………………..…………….……………………………………………………….……………………………………………57
13.3 Set HDD Status……………………………..……………….……………………………………………………….……………………………………………58
13.4 Configure HDD Alarm…………………………….…….……………………………………………………………….……………………………………………61
13.5 HDD Calculation Chart…………………………………….……………………………………………………………….……………………………………………61
14 DVR Management………………………………………………………………………..…………………………….……………………………………………61
14.1 Configure General Settings…………………………………………………………………………………………..…….……………………………………………61
14.2 Configure Advance Settings……………….……………………………………………………………………………….……………………………………………62
14.3 RS-232 Port Settings……………………….……………………………………………………………………………….……………………………………………63
14.4 Manage User Accounts…………………………..………………………………………………………………………….……………………………………………64
14.5 Manage System……………………………………………………………………………………………………….……………………………………………67
15 IE Web Client…………………………………………………………………………………….….………………………………………………………………70
16 Search and Modify IP Address……………………………………………………………………………………….…………………………………………73
17 Connect to HVR Server and Live Center ………………………….………………………….……………………………….……………………………74
18 Remote Management From HVR Server and Live Center………………………………...……………………………………………………….………76
19 Network Redundancy Record……………………………………………………………………………….……………………………………………….78
19.1 Continuous Record Setup……………………………………………………………………………….………………………………………………………..…78
19.2 Motion Detect Alarm Record Setup……………………………………………………………………………….………………………………………………..78
19.3 Sensor Trigger Alarm Record Setup……………………………………………………………………………….………………………………………………..80
20 Remote PTZ Operation…………………………..……………………………………………………….…………………………………………………….82
21 Display on TV-wall……………………………………………………………………………….………………………………………………………………….85
22 Audio Chat……………………………………………………………………………….……………………………………………………………………………86
23 Manually Trigger Alarm out……………………………………………..………………………………….……………………………………………………86
Appendix IKB-2888 keyboard Operation…………………………..………………………………….……………………………………………………87

_____________________________________________________________________________________________________________________________________________________________
NetDVR User Manual 7 / 97
Introduction of IP-CCTV Solutions
Thank you for choosing this product for your security video surveillance system. This operation manual illustrates how to set up hardware and software
explains each individual icon function and demonstrates how to use the system effectively in a stable environment. Prior to install/utilize the system,
operators should go through this manual thoroughly. Local suppliers may support them in due course.
IP-CCTV Product Lines
Item Product Name Video Record Type Why use it?
1 iHVR
(Hybrid DVR) Local HDD High resolution, high quality, friendly GUI interface, convenient operation, easy
to expand cameras, powerful integration ability.
2 NetDVR
(StandAlone) Local HDD Stable, no risk of computer virus, easy maintenance
3 IP Camera Local SD card and network Next generation product, all in one combo, easy installation, the best video
quality.
4 IP Speed Dome Network stream Has all traditional high speed dome features but overcome the coaxial cable
distant limit
5 IP Video Server Network stream
(5001HS both SD card and
network)
Convert existing analog camera to IP camera, directly upgrade to IP video
surveillance system
6 IP Matrix/TV-out
(Decode card) N/A Utilize existing TV-wall facility

_____________________________________________________________________________________________________________________________________________________________
NetDVR User Manual 8 / 97

_____________________________________________________________________________________________________________________________________________________________
NetDVR User Manual 9 / 97
1Product Features and Specifications
1.1 Compression
•H.264 hardware compression. Support up to 16 channels video input (PAL/NTSC). Each channel is independent and real time (PAL: 25 FPS, NTSC: 30FPS). Support
both variable bit rate and variable frame rate.
•OggVorbis audio compression standard.
•Independent video encoding parameters, including frame rate, resolution, bit rate, video quality, etc.
•Scheduled and event recording parameters configurable for per individual camera.
•Support dual stream.
•Encoding for both audio/video composite stream and video stream; audio and video synchronization during composite stream encoding.
•Compression, storage and network transmission of video image at 4CIF or CIF resolution.
1.2 Local Function
Record
•Cycle and non-cycle recording mode.
•Scheduled and event video encoding parameters.
•Multiple recording types, including manual, continuous, alarm, motion, motion | alarm and motion & alarm recording, etc.
•8 recording time periods with separate recording types.
•Pre-record and Post-record time for alarm and motion detection, and pre-record time for schedule and manual recording.
•Lock and unlock of video files.
•HDD property can be set to read-only.
•Video data search and playback by channel number, recording type, time etc.
•Digital zoom function in playback mode.
•Pause, play fast, play slow, skip forward, and skip backward when playback, locating in progress bar by dragging the mouse.
•Up to 4/8/16-channel synchronous playback.
Local Monitoring
•Up to 1024×768 resolution for VGA output display.
•Simultaneous VGA and CVBS output.
•1/4/9/16-camera video live view, with the camera order adjustable.
•Group switch, manual switch and automatic cycle modes selectable for video live view, with the auto cycle period configurable.
•Digital zoom in live view mode.
•Shield of assigned channel for live view.
•Privacy masking capability.
•Multiple PTZ protocols supported, and settings and call up of presets, patrols and patterns.
•Video image zoom-in by clicking the mouse and tracing by dragging mouse in PTZ control mode.
Alarm & Exception

_____________________________________________________________________________________________________________________________________________________________
NetDVR User Manual 10 / 97
•Configurable arming time for alarm in/out.
•Various alarm types supported: alarms for video loss, motion detection, video tempering, video in/out format unmatched, illegal access, network disconnection, IP
conflict, hard disk error and hard disk full.
•Various alarm response actions supported: camera recording, relay out, on-screen warning, audible warning and upload to center, etc.
•Auto recovery from exceptions.
Backup
•Record files backed up via USB or SATA device.
•Bunch backup by file or by time.
•Record files edited for backup in playback.
•Management and maintenance for backup devices.
PTZ
•Support many kinds of PTZ protocol.
•Support preset, sequence and tour.
Alarms
•Support Email Alarm Notification
•Support exception alarm, motion detection alarm, external alarm, etc.
Others
•Control of DVR via front panel keys, mouse, and IR remote control.
•Three-level user management, each user with individual operating permission for DVR and camera.
•Powerful record and search for log of operation, alarm and exceptions.
•Import/export of device configuration files.
1.3 Network
•10/100M adaptive network interface.
•TCP/IP protocol suites, PPPoE, DHCP, DNS, DDNS, NTP, SADP protocols, etc.
•Unicast and multicast supported; TCP and UDP protocols applicable in unicast transmission.
•Remote search, playback and download, lock/unlock of video files.
•Support breakpoint resume.
•Remote access and configuration of parameters; remote import/export of device configuration parameters.
•Remote access of device running status, system log and alarm status.
•Remote control of DVR via button operation.

_____________________________________________________________________________________________________________________________________________________________
NetDVR User Manual 11 / 97
•Remote lock/unlock of panel buttons and mouse.
•Remote formatting of hard disk, upgrade, reboot/shutdown and other system maintenance operations.
•RS-232 and RS -485 transparent channel transmission.
•Event alarm and exceptions upload to remote management host.
•Remote manual recording.
•Remote video image capture in JPEG format.
•Remote PTZ control.
•Voice talk and broadcast.
•Built-in Web Server.
1.4 Specification
Model
IL7104HV-A
IL7108HV-A
IL7116HV-A
Video/Audio input
Video compression
H.264
Analog video input
4-ch
8-ch
16-ch
Video interface
BNC connector (1.0 Vp-p, 75 Ω); PAL / NTSC adaptive
Audio compression
G.711
Audio input
1-ch,RCA connector (2.0 Vp-p, 1 KΩ)
1-ch,RCA connector (2.0 Vp-p, 1 KΩ)
4-ch,RCA connector (2.0 Vp-p, 1 KΩ)
Voice talk input
1-ch, RCA (2.0 Vp-p, 1 KΩ)
VGA output 1-ch, resolution: 1280 × 1024 / 60 Hz, 1024 × 768 / 60 Hz
CVBS output
2-ch, BNC connector (1.0 Vp-p, 75 Ω);
Resolution: PAL: 704 × 576, NTSC: 704 × 480
Audio output
1-ch, RCA connector (Linear, 1 KΩ)
Video/Audio output
Recording
Resolution
4CIF/2CIF/CIF
Frame rate
Main stream:
4CIF / 2CIF@12 fps, CIF@25fps (P)/30 fps(N)
Sub stream:
CIF / QCIF@ up to 25 fps (P) / 30 fps (N)
Main stream:
4CIF / 2CIF@8 fps, CIF@25 fps (P) /30fps (N)
Sub stream:
CIF / QCIF@ up to
25 fps (P) / 30 fps (N)
Main stream:
4CIF / 2CIF@6 fps, CIF@25 fps (P) / 30fps (N)
Sub stream:
CIF / QCIF@ up to 25 fps (P) / 30 fps (N)
Video bit rate 32 kbps ~ 2048 kbps, or user-defined (Max. 3072 kbps)
Stream type
Video/ Video & Audio
Audio bit rate
64 kbps
Dual stream
Support
Synchronous
playback
4-ch
8-ch
16-ch
Hard disk
Type
1 SATA interface
1 SATA interface
2 SATA interfaces
Capacity
Up to 2TB capacity for each interface
Network interface
1, RJ45 10 M / 100 M adaptive Ethernet interface

_____________________________________________________________________________________________________________________________________________________________
NetDVR User Manual 12 / 97
External interface
Serial interface
1 RS-485 interface, 1 RS-232 interface (IL7116HV-A only)
USB interface
2, USB 2.0
Alarm in
4
4
16
Alarm out
1
1
4
Others
Power supply
12 VDC
Consumption
≤10 W (without hard
disk or DVD-R/W)
≤10 W (without hard
disk or DVD-R/W)
≤15 W (without hard
disk or DVD-R/W)
Working
temperature
-10 ºC ~ +55 ºC
Working humidity 10% ~ 90%
Chassis Stand-alone 1U chassis Stand-alone 1U chassis
19-inch rack-mounted
1.5U chassis
Dimensions
(W× D × H)
315 × 230 × 45 mm 315 × 230 × 45 mm 445 × 390 × 70 mm
Weight ≤2 kg (without hard disk or DVD-R/W)
≤2 kg (without hard disk or
DVD-R/W) ≤4 kg (without hard disk or
DVD-R/W)
2Installation
In order to run NetDVR stably, please install the NetDVR in well ventilation space with allowed range of temperature and humidity as claimed in specifications.
2.1 Rear Panel Description
IL7104HV-A/7108HV-ARear Panel (Please refer to real product for different model)
No.
Item
Description

_____________________________________________________________________________________________________________________________________________________________
NetDVR User Manual 13 / 97
1
VIDEO IN
BNC connectors for analog video input
2
VIDEO OUT
VIDEO OUT1 is main video out
3
AUDIO IN
RCA connectors for analog audio input
4
AUDIO OUT
RCA connector for audio output
5
VGA
DB15 connector for VGA output. Display local video output and menu
6
LAN
Connector for LAN (Local Area Network)
7
USB
Connector for USB devices
8
RS-485 Interface
Connector for RS-485 devices. T+, T- pin connects to PTZ
9
ALARM IN
Connector for alarm input
ALARM OUT
Connector for alarm output
10
POWER
Switch for turn on/off the device
11
12V
12VDC power supply
12
GND
(needs to be connected when DVR starts up)
IL7116HV-ARear Panel (Please refer to real product for different model)
No.
Item
Description
1
MAIN VIDEO OUT
BNC connectors for main video out
_____________________________________________________________________________________________________________________________________________________________
NetDVR User Manual 14 / 97
SPOT VIDEO OUT
BNC connectors for spot video out
2
VIDEO IN
BNC connectors for analog video input
3
AUDIO IN
RCA connectors for analog audio input
4
LINE IN
RCA connector for audio input (Remote Chat)
5
AUDIO OUT
RCA connector for audio output
6
VGA
DB15 connector for VGA output. Display local video output and menu
7
RS-232 Interface
DB9 connector for RS-232 devices.
8
LAN
Connector for LAN (Local Area Network)
9
USB
Connector for USB devices
10
RS-485 Interface
Connector for RS-485 devices. T+, T- pin connects to PTZ
11
ALARM IN
Connector for alarm input
ALARM OUT
Connector for alarm output
12
12V
12VDC power supply
13
POWER
Switch for turn on/off the device
14
GND
Ground(needs to be connected when DVR starts up)
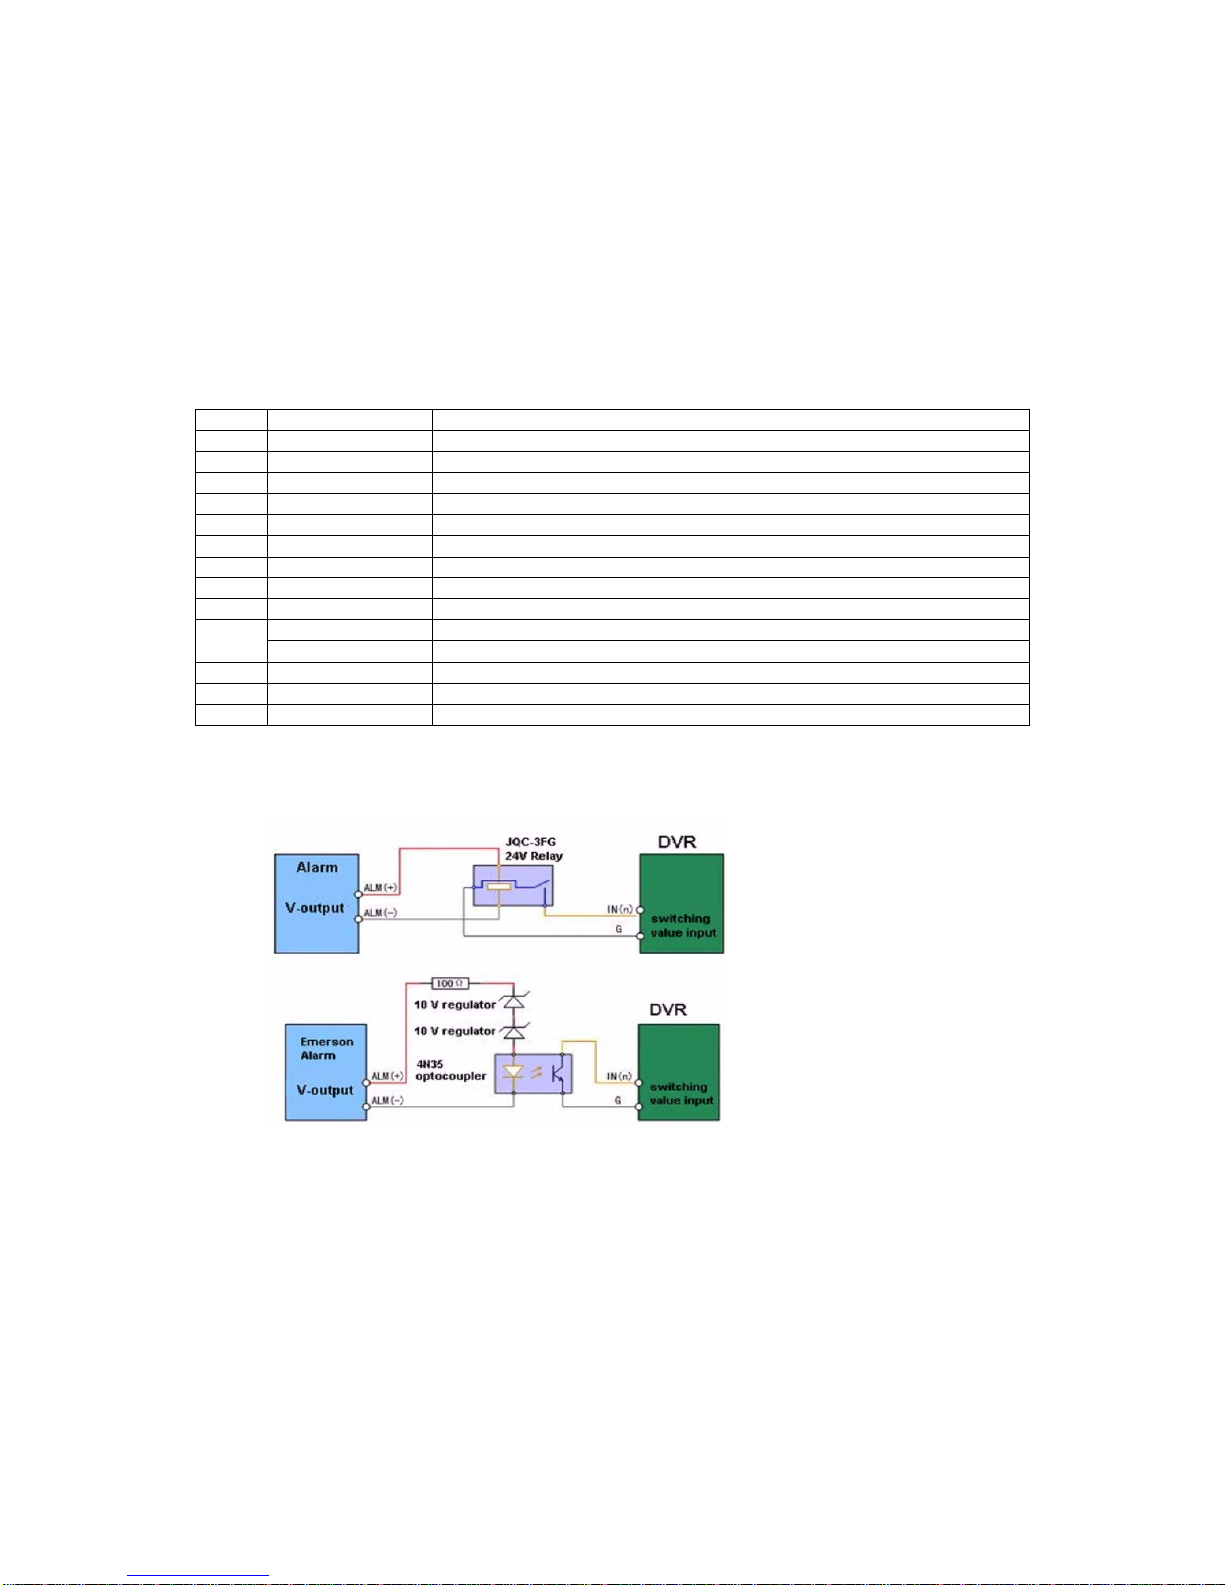
2.2 External Alarm In/Out Connection
The alarm input is a Normal Open/Closed relay. If the input is not a Normal Open/Closed relay, follow the connection diagram below:
Figure 2.2.1

_____________________________________________________________________________________________________________________________________________________________
NetDVR User Manual 15 / 97
To connect to an AC/DC load, use the following diagram:
Figure 2.2.2
For DC load, JP4 can be used within the limit of 12V/1A safely. If the interface is connected to an AC load, JP4 should be left open. Use an external relay for safety (as
shown in the figure above).
There are 4 jumpers (JP4, JP5, JP6, and JP7) on the motherboard, each corresponding with one alarm output. By default, jumpers are connected. To connect an AC load,
jumpers should be removed.
For your attention: An external relay is needed to prevent electric shock when connecting to an AC load.
3Front Panel and Remote Controller Introduction
3.1 NetDVR Front Panel
3.1.1 IL7104HV-A/7108HV-A front panel control buttons include:
1) Status Indicators:
• POWER: the POWER indicator turns green when DVR is powered up.
• STATUS: the indicator lights when the compound key switches to numeric/letter input mode.
• Tx/Rx: TX/RX indictor flickers green when network connection is functioning normally.

_____________________________________________________________________________________________________________________________________________________________
NetDVR User Manual 16 / 97
2) IR Receiver: operation by IR remote control.
3) Compound Buttons:
• 1 MENU: (1) Enter numeral “1”; (2) Access the main menu interface
• 2ABC/F1: (1) Enter numeral “2”; (2) Enter letters “ABC”; (3) The F1 button when used in a list field will select all items on the list. In PTZ Control mode, it will turn
on/off PTZ light.
• 3DEF/F2: (1) Enter numeral “3”; (2) Enter letters “DEF”; (3) The F2 button is used to cycle through tab pages. It will also bring up the Channel & OSD Position
settings.
• 4GHI/ESC: (1) Enter numeral “4”; (2) Enter letters “GHI” (3) Exit and back to the previous menu
• 5JKL/EDIT: (1) Enter numeral “5”; (2) Enter letters “JKL”;(3) Delete characters before cursor. (4)Select the checkbox and ON/OFF switch; (5) Start/stop record
clipping in playback
• 6MNO/PLAY: (1) Enter numeral “6”; (2) Enter letters “MNO”. (3) Playback, for direct access to playback interface

_____________________________________________________________________________________________________________________________________________________________
NetDVR User Manual 17 / 97
• 7PQRS/REC: (1) Enter numeral “7”; (2) Enter letters “PQRS”; (3) Manual record, for direct access to manual record interface; manually enable/disable record
• 8TUV/PTZ: (1) Enter numeral “8”; (2) Enter letters “TUV”; (3) Access PTZ control interface
• 9WXYZ/PREV: (1) Enter numeral “9”; (2) Enter letters “WXYZ”; (3) Multi-camera display in preview
• 0/A: (1) Enter numeral “0”; (2) switch between input methods (upper and lowercase alphabet, symbols and numeric input)
4) SHIFT: Switch of compound keys between the numeric/letter input and functional control.
5) Control Buttons:
• Directional buttons: In menu mode, the direction buttons are used to navigate between different fields and items and select setting parameters. In playback mode,
the Up and Down buttons are used to speed up and slow down record play, and the Left and Right buttons are used to select the recording 30s forwards or backwards.
In preview mode, these buttons can be used to cycle through channels.
• Enter: The Enter button is used to confirm selection in menu mode; or used to select checkbox fields and ON/OFF switch. Inplayback mode, it can be used to
play or to pause the video. In single-frame play mode, pressing the Enter button will advance the video by a single frame. And in auto sequence preview mode, the
buttons can be used to pause / resume auto sequence.
6) USB Interface: Connects USB mouse or USB flash memory devices.
3.1.2 IL7116HV-A front panel control buttons include:
1) IR Receiver: Operation by IR remote control.
2) USB Interface: Connects USB mouse or USB flash memory devices.
3) Status Indicators:
• POWER: the indicator lights in green when DVR is powered up.
• READY: the indicator lights in green when the device is running normally.
• STATUS: the indicator lights when the compound key switches to numeric/letter input mode.
• ALARM: the indicator lights in red when there is sensor alarm occurring.
• HDD: the indicator flickers in red when HDD is reading/writing.
• Tx/Rx: TX/RX indictor flickers green when network connection is functioning normally.
4) DVD-ROM: Space for DVD-ROM.
5) Control Buttons:
• Directional buttons: In menu mode, the direction buttons are used to navigate between different fields and items and select setting parameters. In playback mode,

_____________________________________________________________________________________________________________________________________________________________
NetDVR User Manual 18 / 97
the Up and Down buttons are used to speed up and slow down record play, and the Left and Right buttons are used to select the recording 30s forwards or backwards.
In preview mode, these buttons can be used to cycle through channels.
• Enter: The Enter button is used to confirm selection in menu mode; or used to select checkbox fields and ON/OFF switch. In playback mode, it can be used to play
or pause the video. In single-frame play mode, pressing the Enter button will advance the video by a single frame. And in auto sequence preview mode, the buttons
can be used to pause / resume auto sequence.
6) SHIFT: Switch of compound keys between the numeric/letter input and functional control.
7) Compound Buttons:
• 1 MENU: (1) Enter numeral “1”; (2) Access the main menu interface
• 2ABC/F1: (1) Enter numeral “2”; (2) Enter letters “ABC”; (3) The F1 button when used in a list field will select all items on the list. In PTZ Control mode, it will turn

_____________________________________________________________________________________________________________________________________________________________
NetDVR User Manual 19 / 97
on/off PTZ light.
• 3DEF/F2: (1) Enter numeral “3”; (2) Enter letters “DEF”; (3) The F2 button is used to cycle through tab pages. It will also bring up the Channel & OSD Position
settings.
• 4GHI/ESC: (1) Enter numeral “4”; (2) Enter letters “GHI” (3) Exit and back to the previous menu
• 5JKL/EDIT: (1) Enter numeral “5”; (2) Enter letters “JKL”;(3) Delete characters before cursor; (4)Select the checkbox and ON/OFF switch; (5) Start/stop record
clipping in playback
• 6MNO/PLAY: (1) Enter numeral “6”; (2) Enter letters “MNO”; (3) Playback, for direct access to playback interface
• 7PQRS/REC: (1) Enter numeral “7”; (2) Enter letters “PQRS”; (3) Manual record, for direct access to manual record interface; manually enable/disable record
• 8TUV/PTZ: (1) Enter numeral “8”; (2) Enter letters “TUV”; (3) Access PTZ control interface
• 9WXYZ/PREV: (1) Enter numeral “9”; (2) Enter letters “WXYZ”; (3) Multi-camera display in preview
• 0/A: (1) Enter numeral “0”; (2) switch between input methods (upper and lowercase alphabet, symbols and numeric input)
8) JOG SHUTTLE Control: The JOG SHUTTLE control can be used to move the active selection in a menu. The inner ring will move the selection up and down; the
outer ring will move it left and right. In the Playback mode, the inner ring is used to jump 30 seconds forward/backward in a video. The outer ring can be used to
speed up/slow down the video. In Preview mode, it can be used to cycle through different channels.
For your attention:
It is important to note that you must click the EDIT button on either the remote or front panel on a text field before you are able to edit its content. After you’re done
entering text, you must hit the ENTER button to be able to move on to the next field.

_____________________________________________________________________________________________________________________________________________________________
NetDVR User Manual 20 / 97
3.2 IR Remote Controller
Index Name Description
1
POWER
Button Turn off NetDVR device
2 DEV Enable/Disable IR remote control
3 Numeric Keys Same as numeric keys of front panel.
4 EDIT Same as EDIT key of front panel.
5 A Same as A key of front panel.
6 REC Same as REC key of front panel.
7 PLAY Same as PLAY key of front panel.
8 INFO
9 VOIP
10 MENU Same as MENU key of front panel.
11 PREV Same as PREV key of front panel.
12
Direction Keys
ENTER
Same as direction keys and enter key of front panel.
13 PTZ Same PTZ key of front panel.
14 ESC Same as ESC key of front panel.
15 Reserved
16 F1 Same as [F1] key of front panel.
17 Lens control IRIS, FOCUS ZOOM for lens control.
18 F2 Same as [F2] key of front panel.
Loading the batteries into the IR controller
•Remove the battery cover.
This manual suits for next models
2
Table of contents
Other Ildvr Digital Technology USA DVR manuals


