ILP SWP Series User manual

INSTALLATION INSTRUCTIONS
SWP LED SLIM WALL - Dark Sky ModelsPACK
CAUTION
WARNING
Introducon:
PLEASE READ INSTRUCTIONS BEFORE COMMENCING INSTALLATION AND RETAIN FOR FUTURE REFERENCE.
Electrical products can cause death or injury, or damage to property. If in any doubt about the installaon or use of this product, consult a competent electrician.
This LED Wall-Pack uses the latest in solid-state lighng technology for long life, low maintenance, and high efficiency.
• This luminaire has a fixed color temperature of 3000K
• This luminaire can field adjust the brightness through the FAO opon.
• The opcal part (LED Head) is fixed to 0° (facing down) to meet International Dark Sky Association requirements.
This luminaire can be installed with a pencil type photocell threaded through a conduit entry opening.
The solid-state driver allows operaon on nominal 120-277V / 347-480V*, 50-60Hz AC supply without any variaon in light output.
Suitable for use in the following locaons:
• Min. Ambient Temp: -40°F (-40°C)
• Max Ambient Temp: 104°F (40°C) Consult Factory For Higher Ambient
• Suitable for Wet Locaons
to meet International Dark Sky Association requirements.
Installaon Instrucons:
1. Read all Warnings and Installer Notes before proceeding with this installaon.
2. Check to ensure all parts listed are included in your installaon
* For 5L, 8L, 10L only, alternave driver to be ordered separately
Universal voltage driver permits operaon at 120-277V / 347-480V*, 50-60Hz.
0-10V control wires must be rated for 300V minimum.
For 0-10V Dimming, follow the wiring direcon as in Figure 1.
1. Connect the black fixture lead to the (+) LINE supply lead.
2. Connect the white fixture lead to the (-) COMMON supply lead.
3. Connect the GROUND wire from fixture to supply ground. Do NOT connect the
GROUND of the dimming fixture to the output.
4. Connect the violet fixture lead to the (V+) Dim lead.
5. Connect the gray fixture lead to the (V-) Dim lead.
To avoid the risk of fire, explosion, or electric shock, this product shall be installed, inspected, and maintained by a qualified electrician, in accordance with all
applicable electrical codes.
General Wiring Diagram
Black (Line)
120-277V
or
347V-480V
White (Neutral)
Green (Ground)
Purple (Dim+)
Gray (Dim-)
LED DRIVER
!
!
WARNING
To avoid electric shock:
•Be certain electrical power is OFF before and during installaon or maintenance.
•Luminaire must be connected to a wiring system with equipment-grounding conductor
To avoid explosion:
•Make sure the supply voltage is the same as the rated luminaire voltage.
•Do not install where marked operang temperatures exceed the ignion temperature of the hazardous atmosphere.
•Do not operate in ambient temperatures above those indicated on the luminaire.
!
Figure 1
SWP LED ADJUSTABLE SLIM WALL PACK
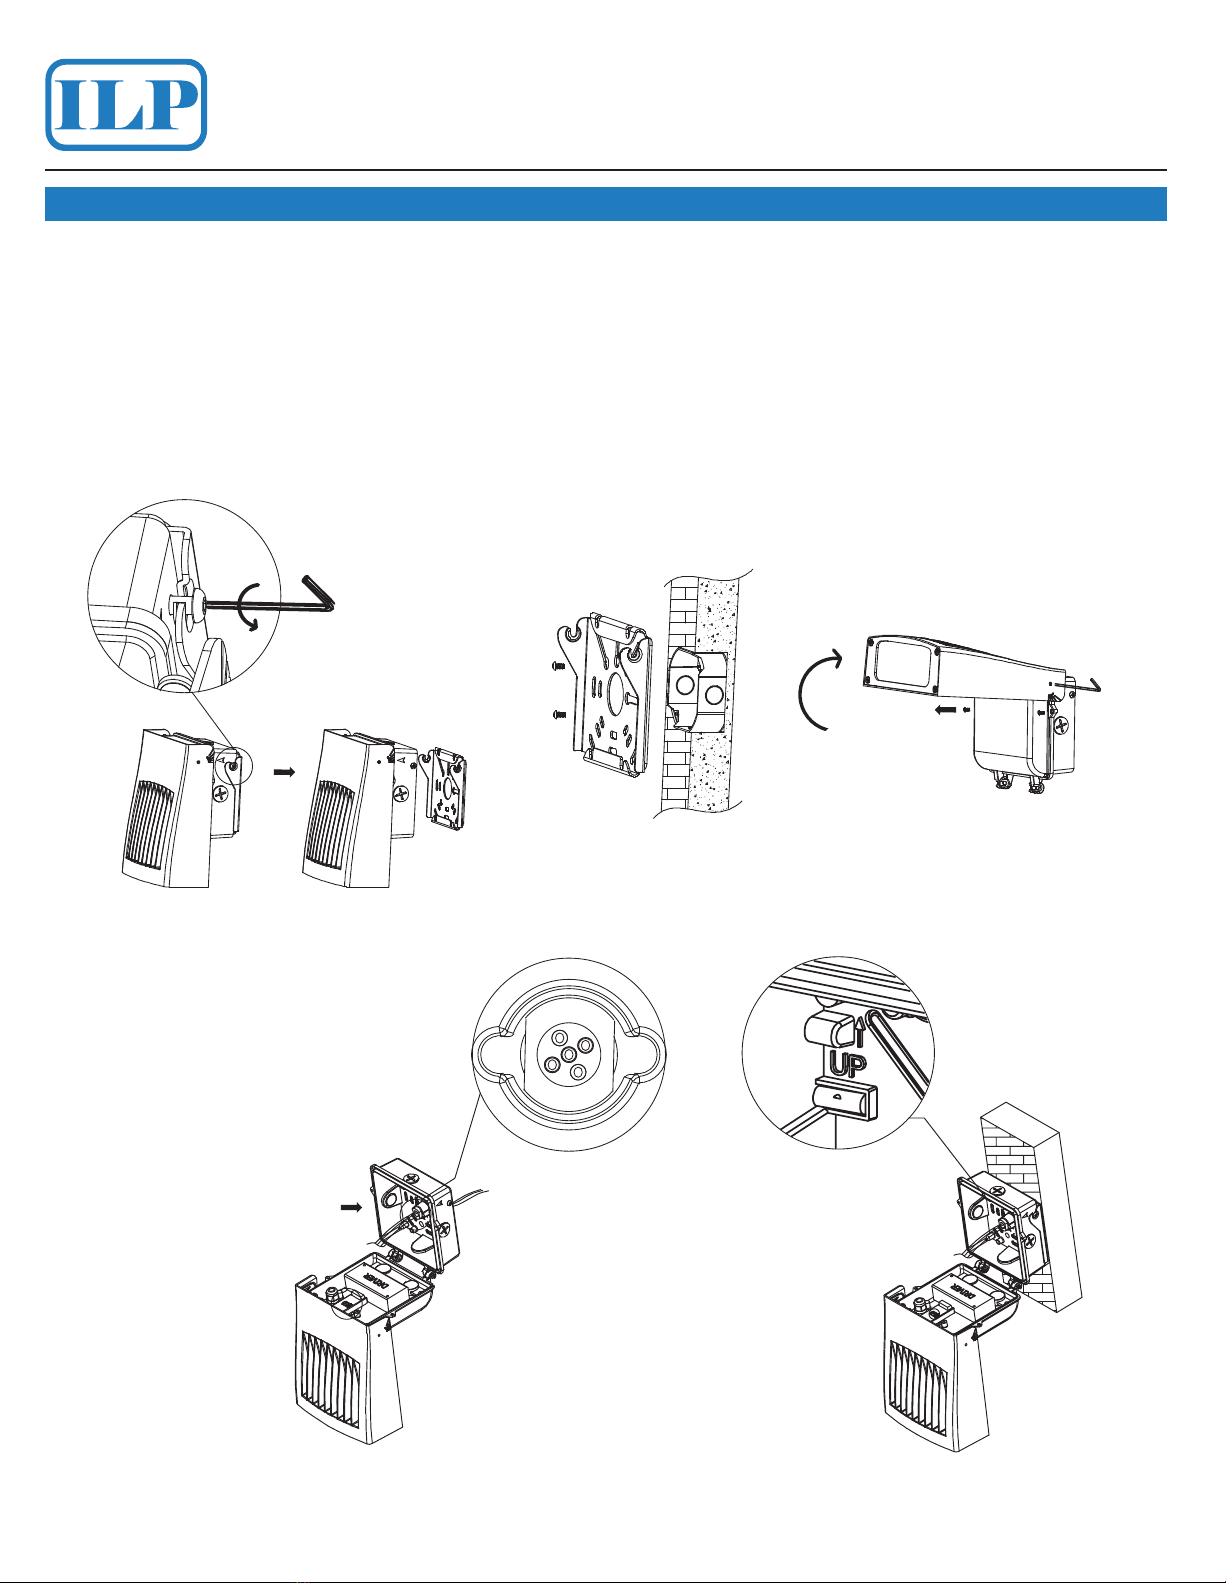
• Use a 3/32 hexagon wrench to detach the mounng plate from the fixture by unscrewing halfway the 2 side retaining screws, unl the mounng plate is loose. (Figure 1)
• Use mounng screws (not provided) to fix mounng plate to the J-box (not provided). Note the screw hanging hooks should be facing out once installed. (Figure 2)
• Use a 3/32 hexagon wrench to loose the side hex screws and adjust luminaire head upward to 90 degrees. (Figure 3). NOTE: THIS ADJUSTMENT IS ONLY
USED DURING INSTALLATION. WHEN CLOSING THE ENCLOSURE, YOU MUST ROTATE THE LED HEAD BACK TO 0° (FACING DOWN).
• Open the driver box by unscrewing the top part of the driver box. (Figure 3).
• Pull out the power supply wires (L black, N White), grounding wire (G Green), and dimming wires (purple and gray) (if needed), by breaking through the 5 holes
wire gasket. (Figure 4)
• Hang the luminaire on the mounng hooks and check the internal bubble level to verify that the fixture is plumb and level. (Figure 5)
Figure 1 Figure 2 Figure 3
INSTALLATION INSTRUCTIONS
Installaon Steps - Quick Install
TURN OFF POWER FROM MAIN CIRCUIT BREAKER
Loose
Figure 4 Figure 5
Wire gasket Bubble level
Maximum Torque:
1.5 N-m (13.28 in-lbs)
SWP LED ADJUSTABLE SLIM WALL PACK
INSTALLATION INSTRUCTIONS
AFTER INSTALLATION IS COMPLETE, PLEASE CHECK THE FOLLOWING:
• Ensure the lighng fixture is firmly fixed to the wall.
• Ensure wires are connected correctly before applying power.
• At last, turn on the power, and check if the lighng fixture works properly. If not, turn off the power and contact your local dealer.
WARNING: The luminaire shall be installed by qualified electrician
Aer Installaon:
Installaon Steps - Quick Install
CAUTION: Be sure fixture temperature is cool enough to touch. Do not clean or maintain while fixture is energized.
1. Clean lens & fixture with non-abrasive cleaning soluon.
2. Do not allow LED modules or other electronics to come into contact with water, solvents, or other chemicals
3. Clean the diffuser only with a mild soap and water. Do not use solvents such as alcohol or bleach.
4. Clean painted surfaces only with a mild soap, isopropyl alcohol, or acec acid soluon.
Cleaning and Maintenance:
121219
Figure 7
Figure 8
Figure 6
Tight
Figure 9
Silicone caulk
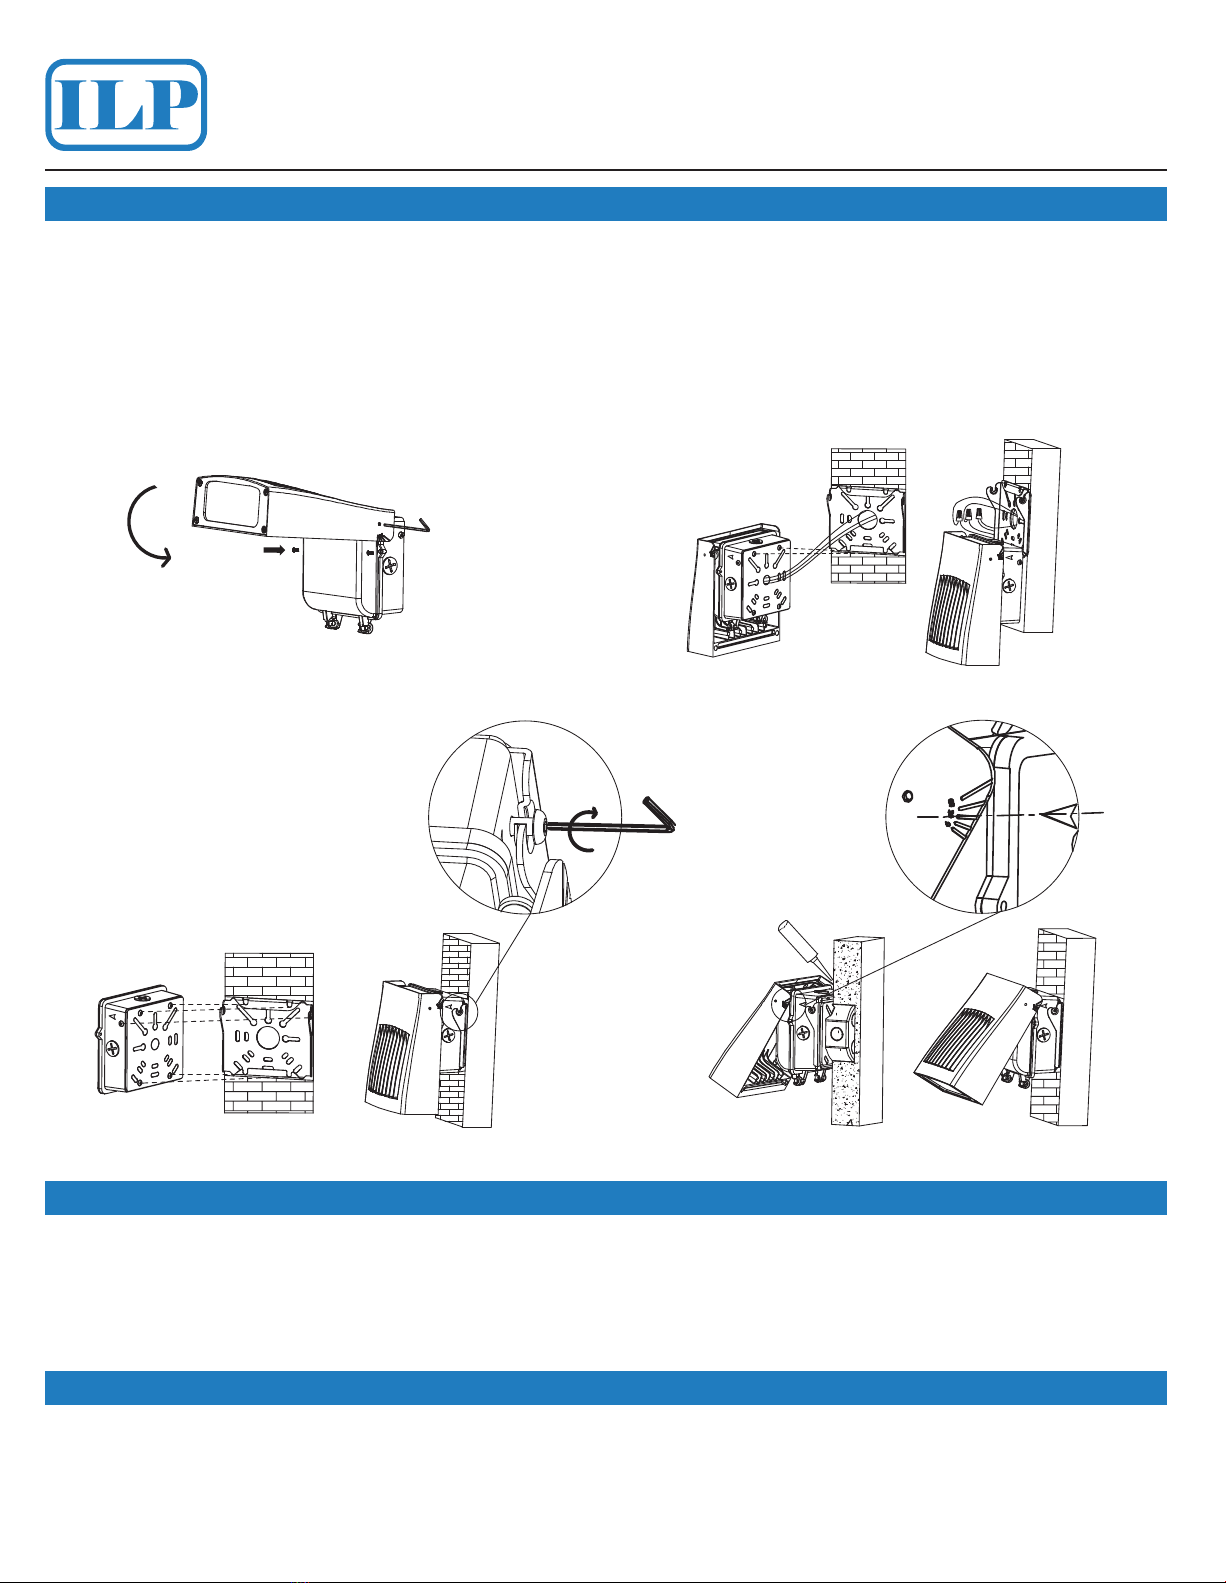
• Close and secure the driver box, by screwing back the driver box screws. Adjust back the luminaire head to downward posion. (Figure 6)
• Using the 2 top back hanging screws of the fixture, temporarily hang the fixture on the boom hooks of the mounng plate to safely make appropriate electrical
connecons by following the wiring diagram, use electrical connectors. Carefully tuck all the wires and connectors into the J-box. (Figure 7).
• Pull up and detach the fixture. Posion it to the mounng plate using all the back top, boom and side hanging screws into the appropriate hooks of the mounng
plate (top to top, boom to boom, side to side). Secure the fixture by ghtening the two side retaining screws. (Figure 8).
• Applying silicone caulk around the perimeter of the driver box where it meets the wall to ensure a water-ght seal. Finally adjust the fixture head angle BACK TO
0° (FACING DOWN) and secure it by locking the side hex screw and installaon is complete. (figure 9).
TURN OFF POWER FROM MAIN CIRCUIT BREAKER
Maximum Torque:
1.5 N-m (13.28 in-lbs)
Table of contents
Popular Outdoor Light manuals by other brands

LIGMAN
LIGMAN TU-10136-SB installation manual

LAMPTAN
LAMPTAN GALAXY instruction manual

Home Zone Security
Home Zone Security ELJ6842V installation instructions

Conrad
Conrad 57 19 18 operating instructions

LIGMAN
LIGMAN GINI 2 GN-30031 installation manual

Schrack Technik
Schrack Technik ALMERIA Small LILX0001 Assembly instructions

ABBA
ABBA DL05 installation guide

nordlux
nordlux CROSS 25 manual

Inspire
Inspire Gao instruction manual

WE-EF
WE-EF CFY259 LED Installation and maintenance instructions

HUDSON VALLEY LIGHTING
HUDSON VALLEY LIGHTING TROY LIGHTING LAKE COUNTY P2522 installation instructions

Timbertech
Timbertech DeckLites Installation & maintenance guide


