Imagine Infocaster DS600 User manual

Infocaster™ DS600
6/19/2014
175-100471-00
Hardware Manual

Infocaster™ DS600 Hardware Manual
© 2014 Imagine Communications. Proprietary and Confidential. 6/19/2014 | Page 2
Publication Information
© 2014 Imagine Communications.
Proprietary and Confidential.
Imagine Communications considers this document and its contents to be proprietary and confidential.
Except for making a reasonable number of copies for your own internal use, you may not reproduce this
publication, or any part thereof, in any form, by any method, for any purpose, or in any language other
than English without the written consent of Imagine Communications. All others uses are illegal.
This publication is designed to assist in the use of the product as it exists on the date of publication of
this manual, and may not reflect the product at the current time or an unknown time in the future. This
publication does not in any way warrant description accuracy or guarantee the use for the product to
which it refers. Imagine Communications reserves the right, without notice to make such changes in
equipment, design, specifications, components, or documentation as progress may warrant to improve
the performance of the product.
Trademarks
Nexio®, Infocaster™, and Infocaster Manager™ are trademarks or trade names of Imagine
Communications or its subsidiaries.
Microsoft® and Windows® are registered trademarks of Microsoft Corporation. All other trademarks and
trade names are the property of their respective companies.
Contact Information
Imagine Communications has office locations around the world. For domestic and international location
and contact information, visit our Contact page
(http://www.imaginecommunications.com/company/contact-us.aspx).
Support Contact Information
For domestic and international support contact information see:
Support Contacts (http://www.imaginecommunications.com/services/technical-support.aspx)
eCustomer Portal (http://support.imaginecommunications.com)
Academy Training (http://www.imaginecommunicationsacademy.com)

Infocaster™ DS600
Hardware Manual Contents
© 2014 Imagine Communications. Proprietary and Confidential. 6/19/2014 | Page 3
Contents
Preface................................................................................................................... 5
Manual Information ................................................................................................................................. 5
Purpose................................................................................................................................................. 5
Audience............................................................................................................................................... 5
Writing Conventions............................................................................................................................. 5
Unpacking/Shipping Information ............................................................................................................. 5
Safety Standards and Compliances .......................................................................................................... 6
Safety Terms and Symbols ................................................................................................................... 6
Restriction on Hazardous Substances (RoHS) Directive....................................................................... 6
Waste from Electrical and Electronic Equipment (WEEE) Directive .................................................... 7
Declaration of Conformity........................................................................................................................ 8
FCC........................................................................................................................................................ 8
Safety Guidelines...................................................................................................................................... 8
Electrical Safety Guidelines .................................................................................................................. 8
General Safety Guidelines .................................................................................................................... 9
ESD Safety Guidelines......................................................................................................................... 10
Operation Safety Guidelines ..............................................................................................................10
Overview.............................................................................................................. 11
Product Description................................................................................................................................ 11
Main Features.....................................................................................................................................11
System Chassis........................................................................................................................................ 12
Chassis ................................................................................................................................................ 12
Top Panel............................................................................................................................................12
Back Panel .......................................................................................................................................... 13
Get Started .......................................................................................................... 14
Mounting Concepts ................................................................................................................................ 14
Desktop Base......................................................................................................................................15
VESA Mounting................................................................................................................................... 15
Set Up Your System ................................................................................................................................18
Before You Turn Your System On ........................................................................................................... 18
Turn on the System ................................................................................................................................ 18

Infocaster™ DS600
Hardware Manual Contents
© 2014 Imagine Communications. Proprietary and Confidential. 6/19/2014 | Page 4
Infocaster Quick Start Dialog.............................................................................................................. 19
Security................................................................................................................................................... 19
Administrator Account ........................................................................................................................... 20
Launch Infocaster ................................................................................................................................... 20
Change Settings ...................................................................................................................................... 20
Enable Onboard Audio .......................................................................................................................20
Configure the NVIDIA Video Card....................................................................................................... 22
Maintenance........................................................................................................ 24
Back Up Files........................................................................................................................................... 24
Defragment Hard Drive ..........................................................................................................................24
System Restore....................................................................................................................................... 24
Recovery Solutions ............................................................................................................................. 24
Create Your Backup Media................................................................................................................. 25
Recovery Options ............................................................................................................................... 25
Launch Recovery ................................................................................................................................ 25
Choose a Recovery Option ................................................................................................................. 25
Specifications....................................................................................................... 26
System Technical Specifications .............................................................................................................26
Power Supply Specifications................................................................................................................... 27
Index.................................................................................................................... 28

Infocaster™ DS600
Hardware Manual Preface
© 2014 Imagine Communications. Proprietary and Confidential. 6/19/2014 | Page 5
Preface
Manual Information
Purpose
This manual details the features, installation, operation, maintenance, and specifications of the DS600
system.
Audience
This manual is written for engineers, technicians, and operators responsible for the system installation
and set up.
Writing Conventions
This manual adheres to the following writing conventions.
Writing Conventions
Term or Convention
Description
CAPS
Indicates a specific key on the keyboard, such as ENTER,
TAB, CTRL, ALT, DELETE
Code
Indicates variables or command-line entries, such as a
DOS entry or something you type into a field.
>
Indicates the direction of navigation through a hierarchy
of menus and windows.
hyperlink
Indicates a jump to another location within the electronic
document or elsewhere.
Note:
Indicates important information that helps to avoid and
troubleshoot problems.
Unpacking/Shipping Information
Imagine Communications has carefully inspected, tested, and calibrated this product prior to shipment
to ensure years of stable and trouble free service.
Before you install and configure your system, follow these steps:
1. Check equipment for any visible damage that may have occurred during transit.
2. Confirm that you have received all items listed on the packing list.

Infocaster™ DS600
Hardware Manual Preface
© 2014 Imagine Communications. Proprietary and Confidential. 6/19/2014 | Page 6
3. Contact your Imagine Communications sales representative if any parts are missing.
4. Contact the carrier if any item is damaged.
5. Remove all packaging material from the product and its associated components before you install
the unit.
Keep at least one set of original packaging, in the event that you need to return a product for servicing.
If the original packaging is not available, you can purchase replacement packaging from Imagine
Communications at a modest cost or supply your own packaging as long as it meets the following
criteria:
The packaging must be able to withstand the weight of the product.
The product must be held rigid within the packaging.
There must be at least two inches (5 cm) of space between the product and the container.
The corners of the product must be protected.
If the product is still within the warranty period, Imagine Communications will return the product to you
prepaid after servicing.
Safety Standards and Compliances
Safety Terms and Symbols
This manual uses the following safety terms and symbols to identify certain conditions or practices.
WARNING
Identifies conditions or practices that can result in personal
injury or loss of life—high voltage is present. Uninsulated
dangerous voltage within the product’s enclosure may be
sufficient to constitute a risk of electric shock to persons.
CAUTION
Identifies conditions or practices that can result in damage to
the equipment or other property. Important operating and
maintenance (servicing) instructions are included in the
literature accompanying the product.
Restriction on Hazardous Substances (RoHS) Directive
Directive 2002/95/EC–commonly known as the European Union (EU) Restriction on Hazardous
Substances (RoHS)–sets limits on the use of certain substances found in electrical and electronic
equipment. The Directive takes effect on July 1, 2006, and it refers to the following hazardous
substances:

Infocaster™ DS600
Hardware Manual Preface
© 2014 Imagine Communications. Proprietary and Confidential. 6/19/2014 | Page 7
Lead (Pb)
Mercury (Hg)
Cadmium (Cd)
Hexavalent Chromium (Cr-V1)
Polybrominated Biphenyls (PBB)
Polybrominated Diphenyl Ethers (PBDE)
All relevant Imagine Communications products either comply with the legislation or are exempt. For
example, spare parts supplied for the repair and upgrade of equipment sold before July 1, 2006 are
exempt from the legislation.
Figure 1: RoHS Compliant Symbol
Waste from Electrical and Electronic Equipment (WEEE)
Directive
The European Union (EU) Directive 2002/96/EC on Waste from Electrical and Electronic Equipment
(WEEE) deals with the collection, treatment, recovery, and recycling of electrical and electronic waste
products. The objective of the WEEE Directive is to assign the responsibility for the disposal of
associated hazardous waste to either the producers or users of these products. Producers or users are
required to recycle electrical and electronic equipment at end of its useful life, and must not dispose of
the equipment in landfills or by using other unapproved methods.
In accordance with this EU Directive, Imagine Communications has affixed labels indicating that such
products must be properly recycled. Contact your local Imagine Communications sales representative
for information on returning these products for recycling. Imagine Communications equipment that
complies with the EU directive will be marked with a WEEE-compliant symbol, as shown below.
Figure 2: WEEE Compliance Symbol

Infocaster™ DS600
Hardware Manual Preface
© 2014 Imagine Communications. Proprietary and Confidential. 6/19/2014 | Page 8
Declaration of Conformity
Imagine Communications declares that the following DS600 system options are in conformity with the
standards stated in this note.
Part Number
Description
INCS-DS600
Infocaster Small Form Factor ION Based Digital Signage
Platform
INCS-OPT-KBM
USB keyboard and mouse option
The Imagine Communications system options previously listed are in conformity with the following
standards.
FCC
FCC 47 CFR Part 15 Subpart B/Oct. 2010
CISPR 22/1997 (Class B Limit)
ANSI C63.4-2003
Safety Guidelines
Adhere to the following safety guidelines to avoid personal injury or damage to your system.
Electrical Safety Guidelines
Power Cords
WARNING
To avoid electrical shock, check the power cords properly.
Use the exact type of power cords as required.
Be sure to use power cord(s) that came with safety certifications.
The power cord(s) must be compliant with the AC voltage requirements in your region.
The power cord plug cap must have an electrical current rating that is at least 125% of the electrical
current rating of this product.
The power cord plug cap that plugs into the AC receptacle on the power supply must be an IEC 320,
sheet C13, type female connector.
Plug the Power cord(s) into a socket that is properly grounded before turning on the power.
This hardware contains hazardous voltage levels. To avoid electrical shock, disconnect all cords
before accessing the system chassis or its components.

Infocaster™ DS600
Hardware Manual Preface
© 2014 Imagine Communications. Proprietary and Confidential. 6/19/2014 | Page 9
General Electrical Safety Guidelines
WARNING
Adhere to the following Electrical Safety Guidelines to avoid
possible damages to the system or injury to yourself.
Be aware of the locations of the power switches on the chassis and in the room, so you can
disconnect the power supply if an accident occurs.
Take extra precautionary measures when working with high voltage components. It is not
recommended to work alone.
Before removing or installing main system components, be sure to disconnect the power first. Turn
off the system before you disconnect the power supply.
Use only one hand when working with powered-on electrical equipment to avoid possible electrical
shock.
Use rubber mats specifically designed as electrical insulators when working with computer systems.
The power supply or power cord must include a grounding plug and must be plugged into grounded
outlets.
This product is suitable for connection to IT power sources.
CAUTION - RISK OF EXPLOSION IF BATTERY IS REPLACED BY AN INCORRECT TYPE. DISPOSE OF USED
BATTERIES ACCORDING TO THE INSTRUCTIONS.
Make sure not to install the motherboard battery upside down to avoid possible explosion. Make
sure that the positive side should be facing up on the motherboard.
Protective Earth Requirements
The building installation shall provide a means for connection to protective earth; and
The equipment is to be connected to that means; and
A service person shall check whether or not the socket-outlet from which the equipment is to be
powered provides a connection to the building protective earth. If not, the service person shall
arrange for the installation of a protective earthing conductor from the separate protective
earthing terminal to the protective earth wire in the building.
General Safety Guidelines
WARNING
Adhere to the following General Safety Guidelines to ensure
your personal safety.
Equipment is for use only in restricted access locations where only trained personnel have access.
Keep the area around the the chassis clean and free of clutter.
Avoid wearing loose clothing to preventing it from coming into contact with power circuits.
After removing the components or chassis cover from the system, place them on a table for
safeguard.
Be sure to remove any jewelry or metal objects before working on the chassis to avoid short circuits
should these objects come into contact with power circuits.
After accessing the interior of the chassis, be sure to replace and secure the chassis cover.

Infocaster™ DS600
Hardware Manual Preface
© 2014 Imagine Communications. Proprietary and Confidential. 6/19/2014 | Page 10
ESD Safety Guidelines
CAUTION
Electric Static Discharge (ESD) can damage electronic
components. To prevent damage to your system board, it is
important to handle it very carefully.
The following measures are generally sufficient to protect against Electric Statics Discharge (ESD).
Use a grounded wrist strap designed to prevent static discharge.
Keep all components and printed circuit boards (PCBs) in their anti-static bags until ready for use.
Touch a grounded metal object before removing the board from the anti-static bag.
Do not let components or PCBs come into contact with your clothing, which may retain a charge
even if you are wearing a wrist strap.
Touch a grounded metal object before removing the board from the anti-static bag.
Handle a board by its edges only; do not touch its components, peripheral chips, memory modules
or contacts.
When handling chips or modules, avoid touching their pins.
Put the motherboard and peripherals back into their anti-static bags when not in use.
For grounding purposes, make sure your computer chassis provides excellent conductivity between
the power supply, the case, the mounting fasteners and the motherboard.
Operation Safety Guidelines
CAUTION
Do not open the casing of a power supply. Power supplies can
only be accessed and serviced by a qualified technician of the
manufacturer.
Adhere to the following safety guidelines to avoid personal injury when accessing the chassis.
1. Turn off all peripheral devices connected to the chassis.
2. Power off the system.
3. Unplug all power cords from the system or wall outlets.
4. Disconnect all the cables and label the cables for easy identification.
5. Use a grounded wrist strap designed to prevent static discharge when handling components.

Infocaster™ DS600 Chapter 1
Hardware Manual Overview
© 2014 Imagine Communications. Proprietary and Confidential. 6/19/2014 | Page 11
Overview
This chapter provides an introduction to the DS600 systems, and includes the following topics:
Product Description (on page 11)
System Chassis (on page 12)
Product Description
The DS600 turnkey system is your single source solution for high-impact digital signage.
DS600 is an out-of-the-box communications solution that produces powerful, multi-zone broadcast
quality page layouts for immediate display on video monitors.
Main Features
These are the main features of your DS600 digital signage system.
Superior graphics: create multiple layers of independent bugs, crawls, animations, clocks and more.
Data integration: link on-air graphics with databases, data feeds, or text files for automatic updates
to keep the information current.
Quick editors: modify content with fast and easy updates.
Control Choices: GPI, automation, manual.
Intuitive interface: drag and drop user interface makes it simple to learn and allows users to get to
air quickly.
Multi-zone display: zones can be set up to display either, stills, rolls, crawls, animations, clocks, or
video. Each zone is an independent item, and can be customized with different attributes.
Live video input: DV or composite video playback using a 3rd party capture device.
Video output: support for MPEG1, MPEG2, MPEG4, AVI and Windows Media video clips.
Audio output: support for video clips, or add audio to a specific zone.
Animation: import and convert sequences of TGAs from third party animation software.
Flexible scheduling: powerful weekly scheduling of Infocaster multi-zone displays.
Network Control (optional): Use the Infocaster Manager application to manage multiple Infocaster players.
Chapter 1
Infocaster™ DS600 Chapter 1
Hardware Manual Overview
© 2014 Imagine Communications. Proprietary and Confidential. 6/19/2014 | Page 12
System Chassis
Chassis
The following figure shows the DS600 system.
Front Panel Power Button
To allow you to power the DS600 system on and off, the front of the system features a power button.
The green LED above the power button indicates when the system is on.
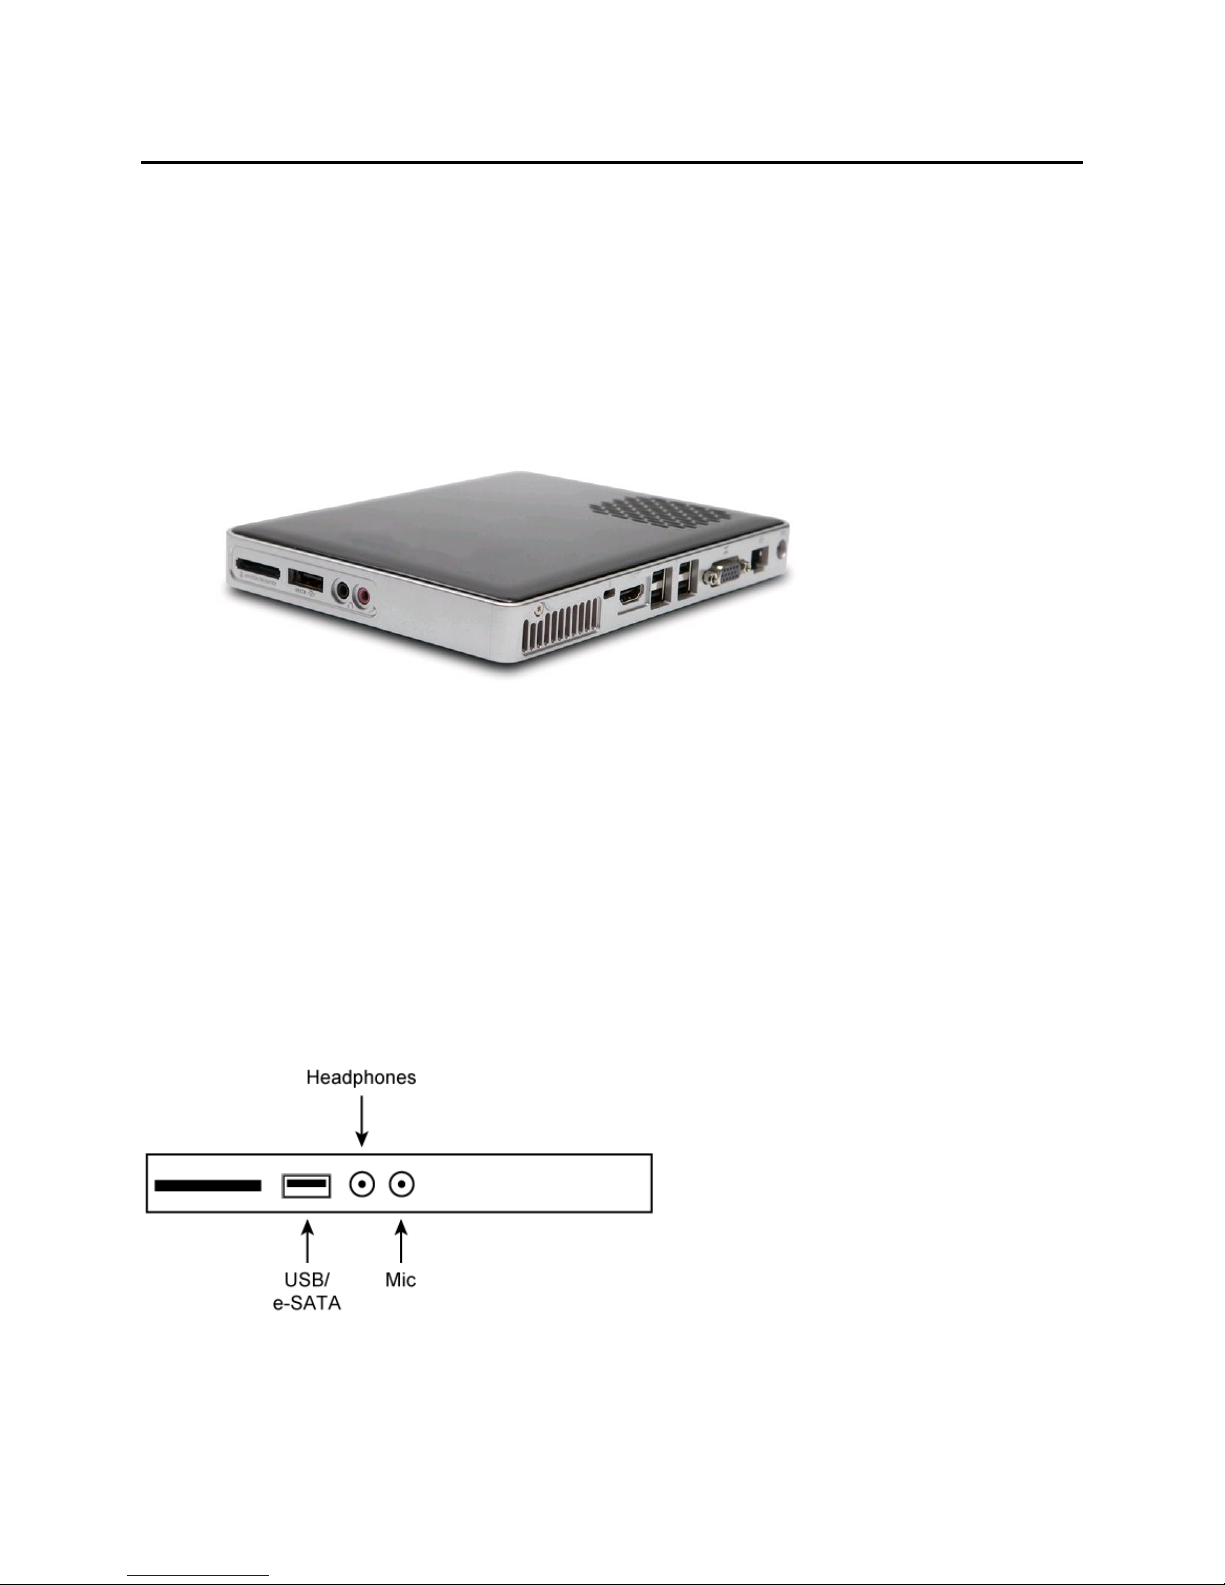
Top Panel
The following figure illustrates the DS600 top panel.
Figure 3: DS600 Top Panel Connections
Infocaster™ DS600 Chapter 1
Hardware Manual Overview
© 2014 Imagine Communications. Proprietary and Confidential. 6/19/2014 | Page 13
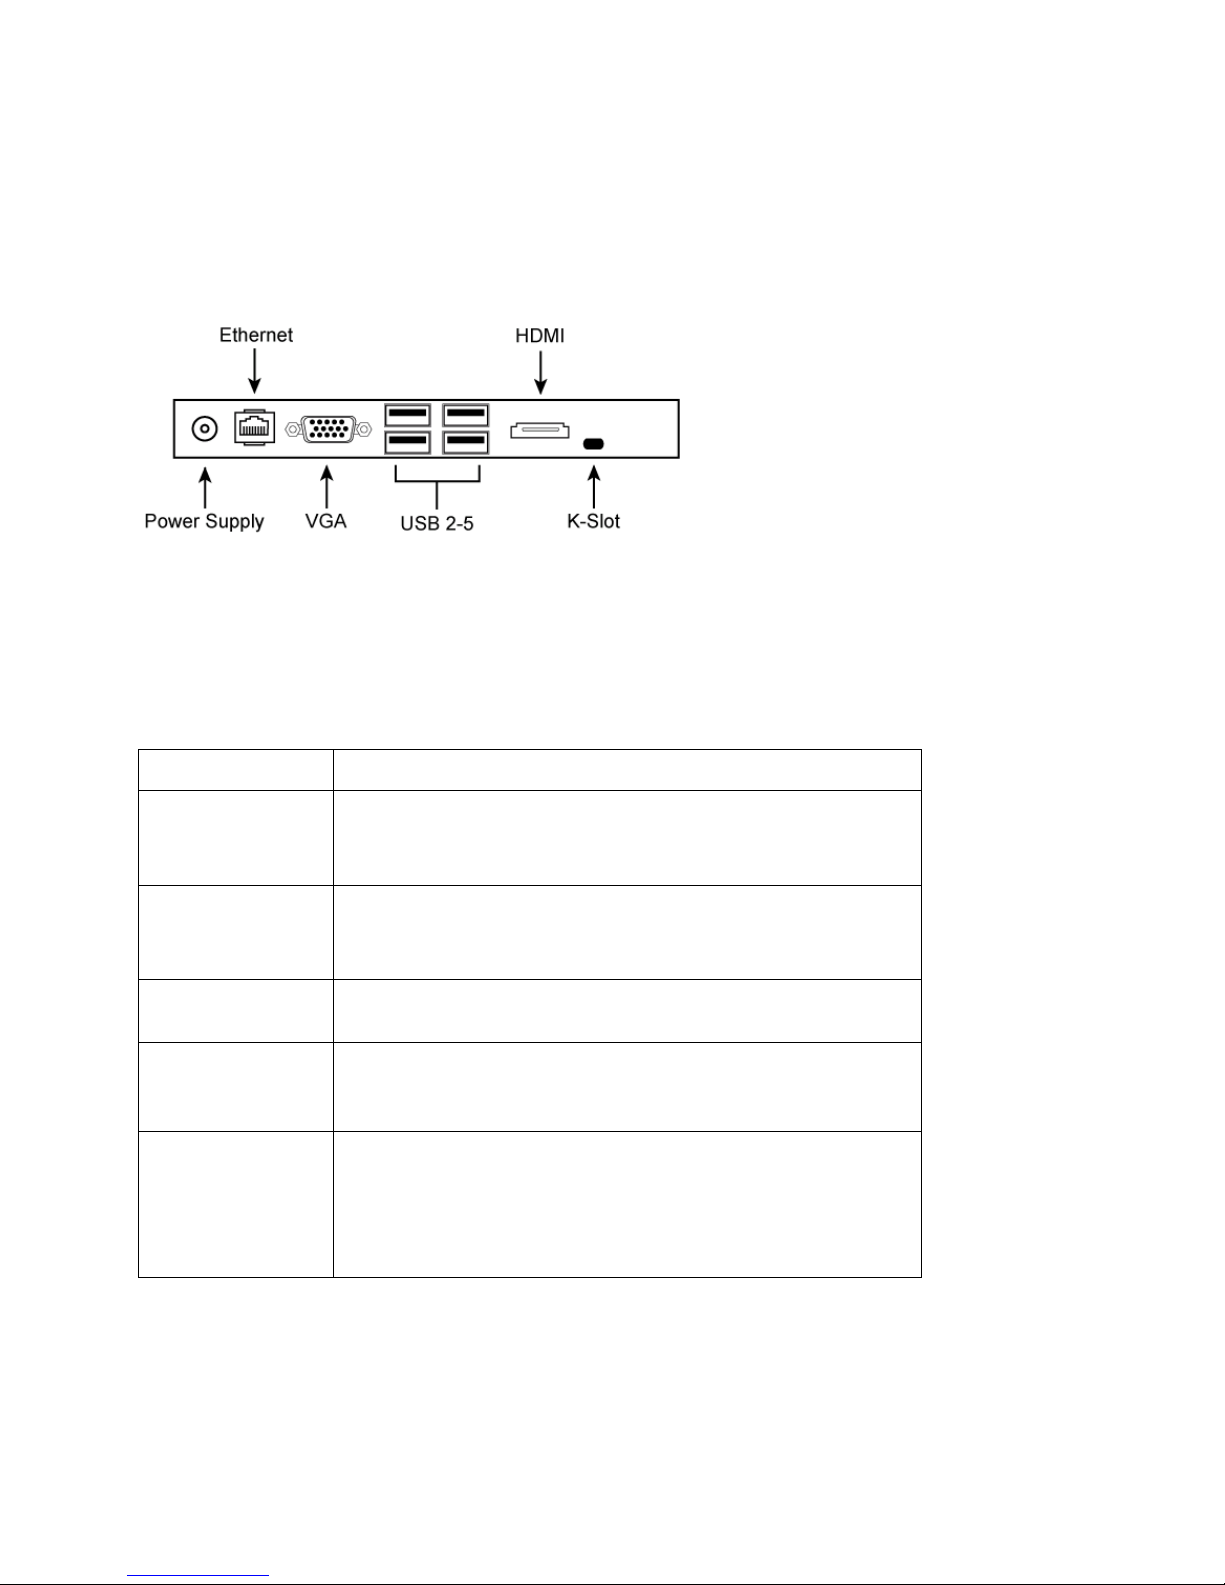
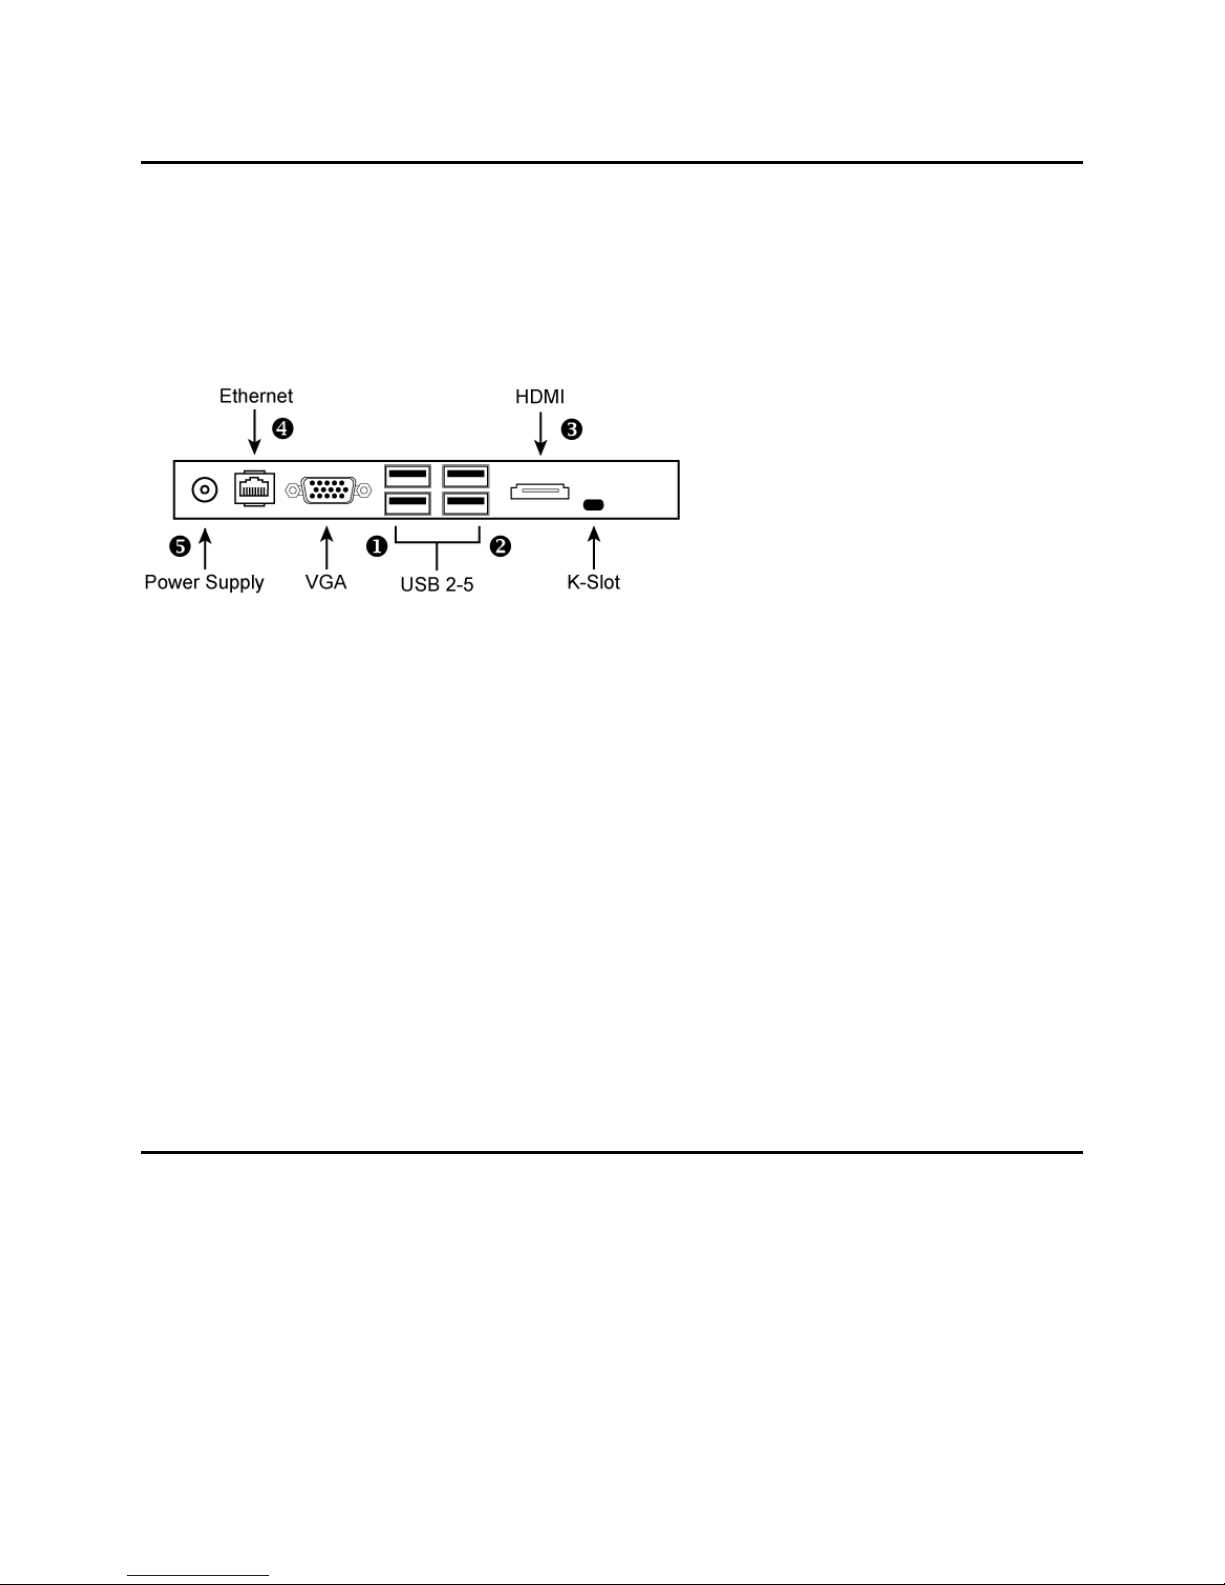
Back Panel
The following figure illustrates the DS600 back panel configured with the maximum options. Note that
the exact component placement on your system may vary slightly depending on your system
specifications.
Figure 4: DS600 Back Panel Connections
Top and Back Panel Connections
The following table lists and describes the functions of the top and back panel connectors.
Top and Back Panel Connectors Description
Port
Description
Audio I/O
Two Plug & Play user-configurable audio I/O ports.
The Headphone port is disabled by default. See Enable Onboard
Audio (on page 20) for more information.
USB 1-5
4-pin Universal Serial Bus (USB) ports to connect USB 2.0
devices.
1 USB/e-SATA.
Ethernet
Ethernet port enables Gigabit connection to a Local Area
Network (LAN) through a network hub.
HDMI
Video output through the HDMI (high-definition multimedia
interface) port. Audio is configured to be sent through the
HDMI port by default.
VGA
Video output through the VGA port.
Only one video output port can be used at a time. DS600
automatically detects which port is attached to a monitor, and
configures its output accordingly.

Infocaster™ DS600 Chapter 2
Hardware Manual Get Started
© 2014 Imagine Communications. Proprietary and Confidential. 6/19/2014 | Page 14
Get Started
This chapter provides information about getting started with your DS600 system.
The following topics are included in this chapter:
Mounting Concepts (on page 14)
Set Up Your System (on page 18)
Change Settings (on page 20)
Mounting Concepts
The DS600 system can be mounted in a variety of ways, depending on your requirements.
Chapter 2
Infocaster™ DS600 Chapter 2
Hardware Manual Get Started
© 2014 Imagine Communications. Proprietary and Confidential. 6/19/2014 | Page 15
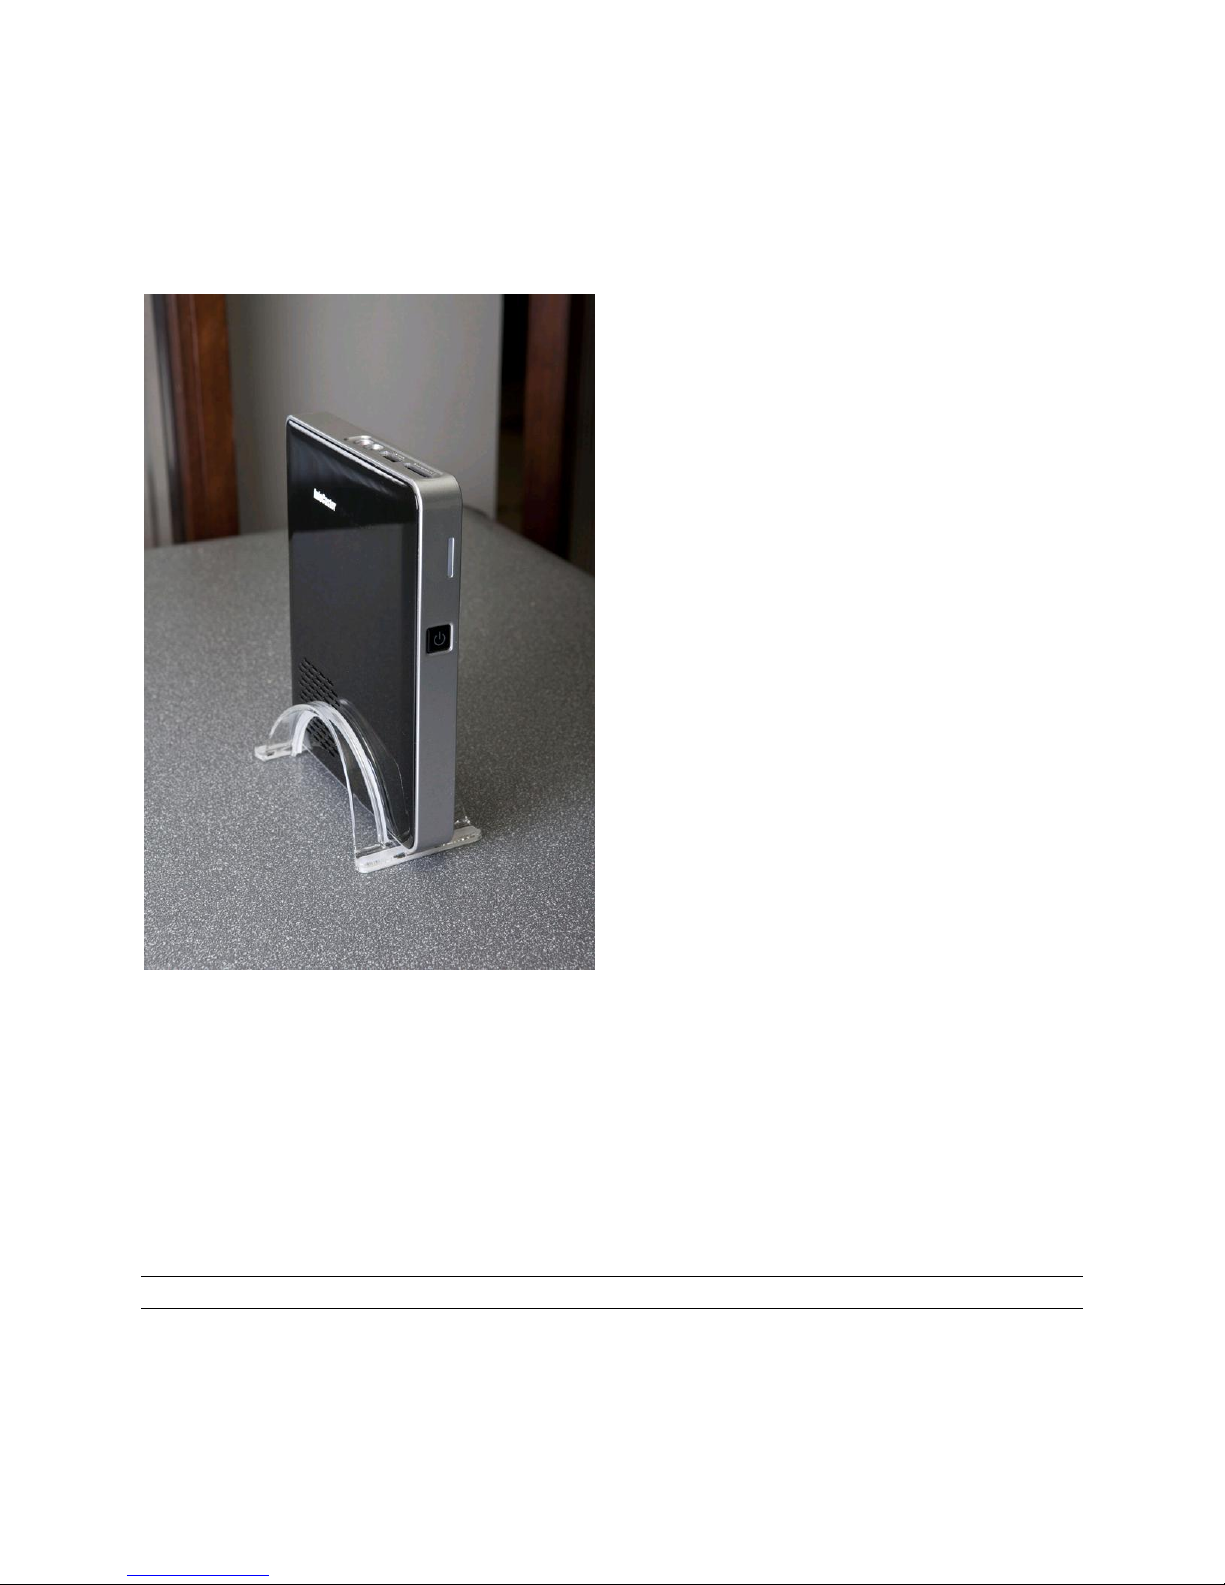
Desktop Base
The DS600 can be placed on a desktop with the included desktop base. The base attaches to the bottom
of the DS600 system.
Figure 5: DS600 Mounted on Desktop Base
The DS600 system is inserted between the two prongs of the desktop base, leaving the power button
and connections freely accessible.
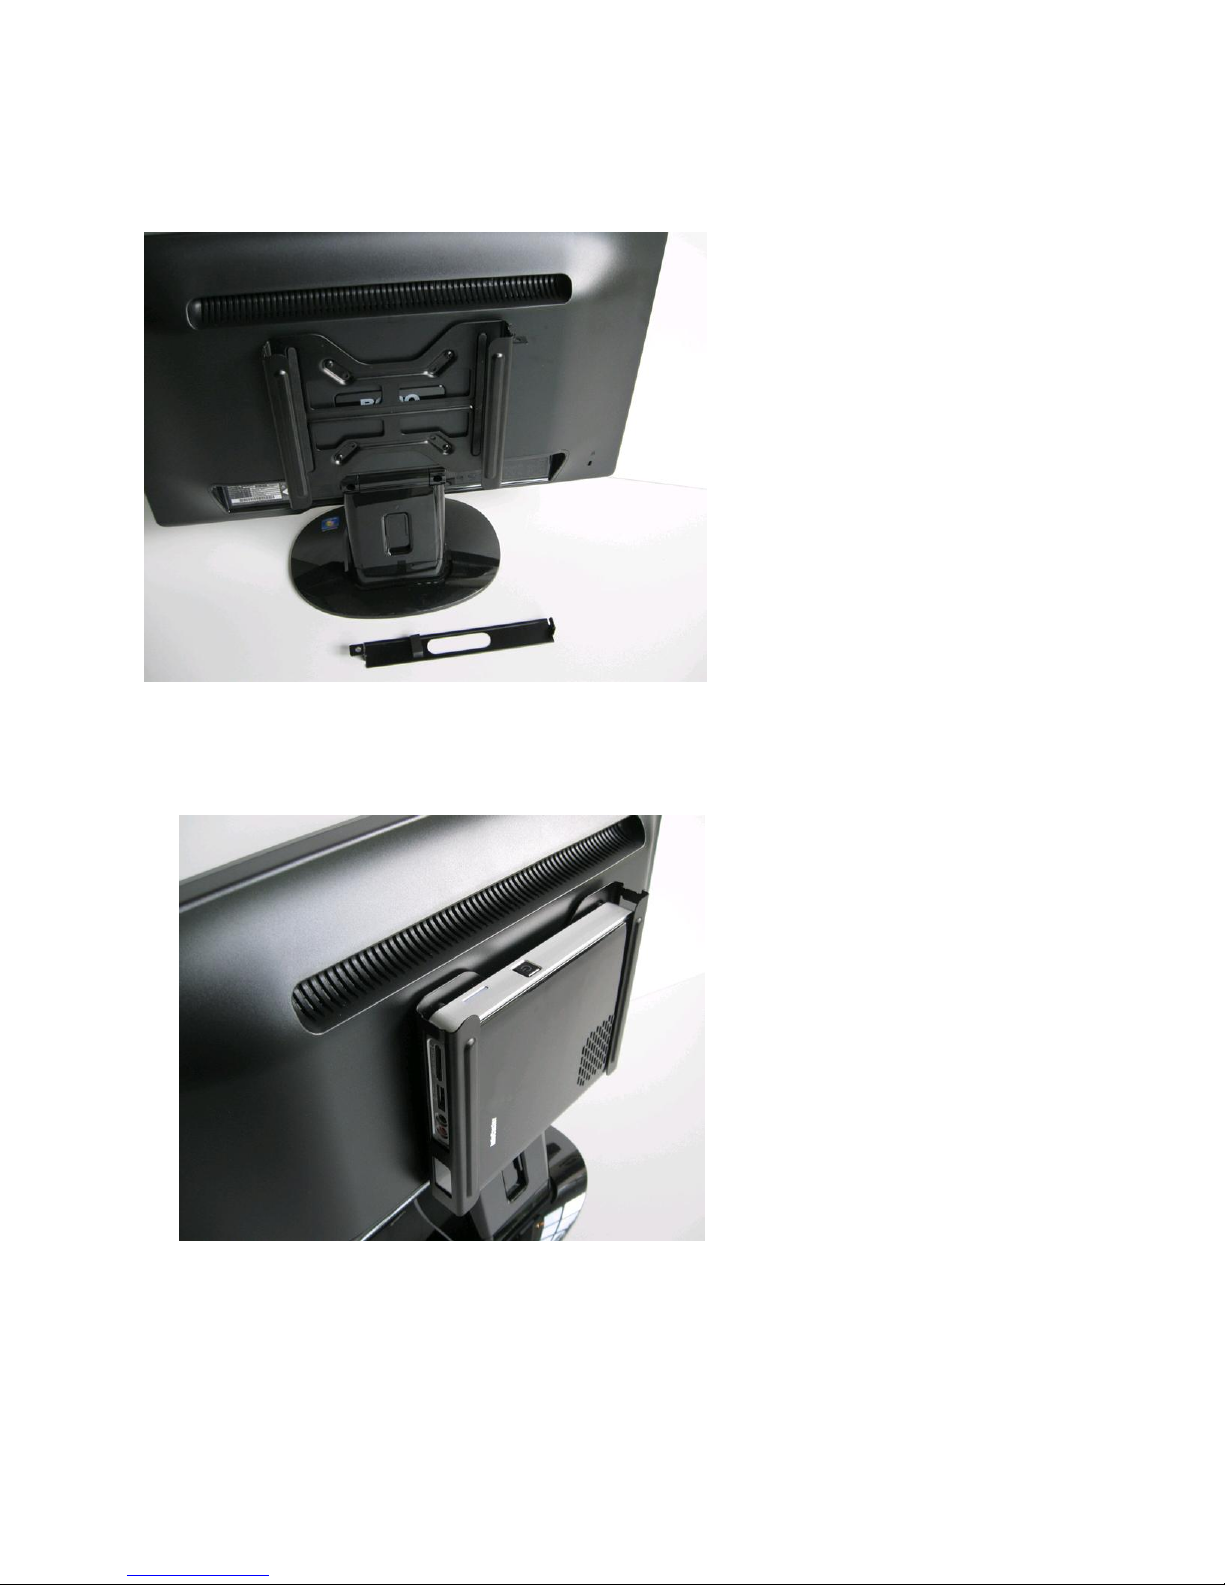
VESA Mounting
DS600 comes with a mounting bracket which complies to the Flat Display Mounting Interface
(FDMI/VESA) mounting standards, allowing it to be mounted on walls, ceilings, or VESA-compliant
monitors and display arms.
Note: The bracket must be mounted before inserting the DS600 system.
Infocaster™ DS600 Chapter 2
Hardware Manual Get Started
© 2014 Imagine Communications. Proprietary and Confidential. 6/19/2014 | Page 16
After the bracket is firmly screwed to a mounting surface, follow these steps to insert the DS600 system
into the bracket.
Figure 6: Bracket Attached to a VESA-Compliant Monitor
1. Insert the DS600 system into the bracket, with the power button facing the open part of the bracket
and the Infocaster logo facing away from the mounting surface.
Figure 7: DS600 in Mounting Bracket
Infocaster™ DS600 Chapter 2
Hardware Manual Get Started
© 2014 Imagine Communications. Proprietary and Confidential. 6/19/2014 | Page 17
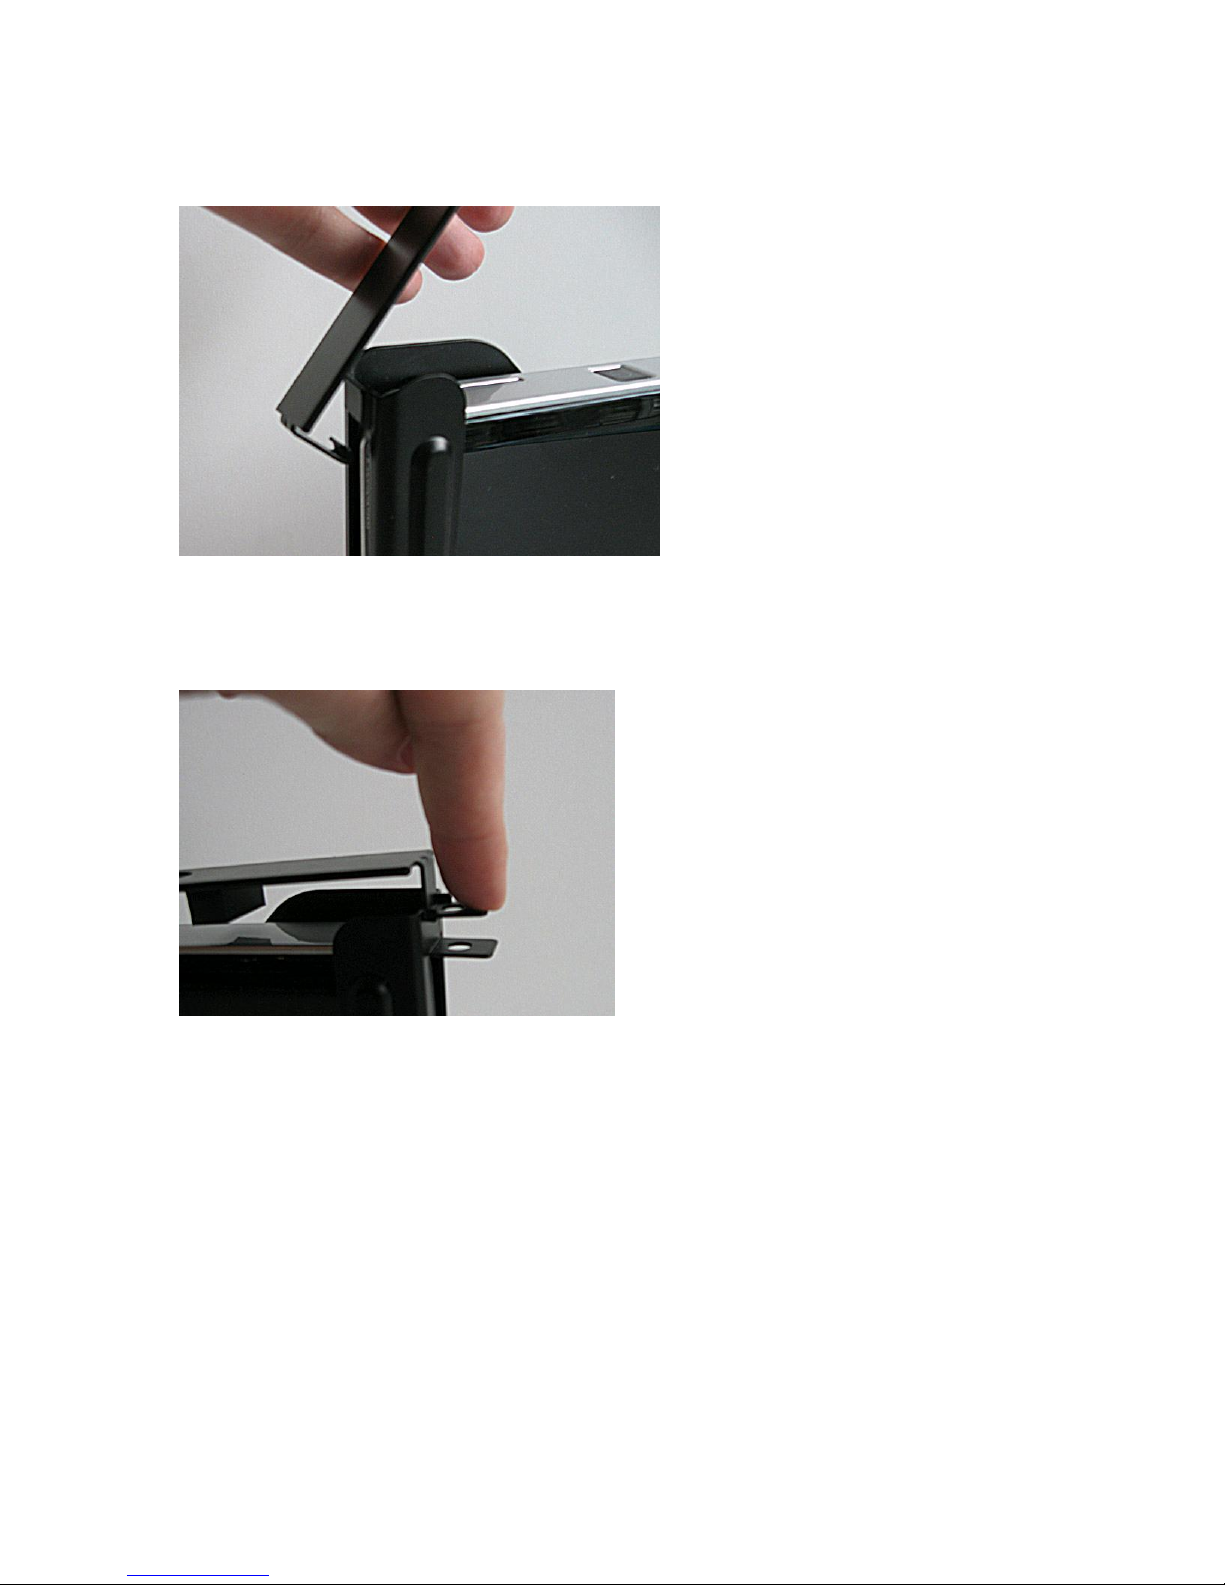
2. Insert the hook of the bracket lid into the corresponding slot in the edge of the bracket.
Figure 8: Open Mounting Bracket
3. To secure the lid, push the tab on the other side of the lid down so it touches the tab on the
mounting bracket.
Figure 9: Closed Mounting Bracket
4. To open the mounting bracket, slip a thin object (such as a flathead screwdriver bit) between the
tabs and pry the tabs apart.
Infocaster™ DS600 Chapter 2
Hardware Manual Get Started
© 2014 Imagine Communications. Proprietary and Confidential. 6/19/2014 | Page 18
Set Up Your System
Before You Turn Your System On
After you have unpacked your DS600 system, follow these steps before turning the system on.
Figure 10: DS600 Back Edge
1. If your system came with a dongle for Infocaster, attach it to one of the USB ports.
2. Connect the mouse and keyboard to the USB connector ports.
3. The DS600 system automatically detects which output port is attached to a monitor, and configures
itself appropriately.
If you are using an HDMI monitor, attach your monitor to the HDMI port.
If you are using a VGA monitor, attach your monitor to the VGA port.
DS600 is configured to use the HDMI connection for audio output, and the onboard audio is
disabled. Audio is sent to the HDMI monitor. To learn how to activate the Headphone port by
enabling onboard audio, see Change Settings (on page 20).
4. If you are connecting the DS600 system to a local area network, connect the DS600 ethernet port to
your network.
5. Connect the power supply socket to a wall receptacle using the included power cable. The DS600
system automatically powers on.
In the future, the Power switch on the top of the DS600 system can be used to turn the system on
and off.
Turn on the System
The first time you turn on the DS600 system, it goes through the following steps.
1. A white dot appears on the screen during the BIOS post cycle.
2. Your personal settings are automatically applied.
3. The Windows 7 boot logo appears while the operating system loads.
4. You are automatically logged into the "Infocaster" user account.
5. A green dot appears on the screen when the mouse pointer appears.

Infocaster™ DS600 Chapter 2
Hardware Manual Get Started
© 2014 Imagine Communications. Proprietary and Confidential. 6/19/2014 | Page 19
6. The mouse pointer is represented by a dot and the task bar is hidden.
7. The Infocaster Quick Start dialog appears.
Infocaster Quick Start Dialog
The first time you turn on the DS600 system, the Infocaster Quick Start dialog appears. This dialog
provides quick access to the settings you will for video card and Infocaster configuration.
Figure 11: Infocaster Quick Start Dialog
If you need to configure your video card (to rotate the display, for example), see Configure the
NVIDIA Video Card (on page 22) for full instructions.
If you need to configure the Infocaster video and audio settings, you can click the Configure button
in the Set Up Infocaster Configuration Utility section of the dialog. Consult Appendix C of the
Infocaster User Guide to learn how to use the Configuration Utility.
Note: To help you fine-tune your output settings, the Quick Start dialog automatically appears the first
five times you boot your DS600 system, unless you uncheck the Show On Next Startup checkbox.
After the fifth launch, the Show On Next Startup checkbox is automatically unchecked. This is an
automatic measure to prevent the Quick Start dialog from interfering with regular Infocaster operation.
Security
For security reasons we strongly suggest your administrator change or create the passwords for the
following accounts.
The Administrator account.
The Infocaster user account(s).
The VNC account.
Your DS600 system comes pre configured with two user accounts.
User Accounts
Account
Password

Infocaster™ DS600 Chapter 2
Hardware Manual Get Started
© 2014 Imagine Communications. Proprietary and Confidential. 6/19/2014 | Page 20
Account
Password
Administrator
Infocaster!
Infocaster
Infocaster
Your DS600 system comes pre configured with two UltraVNC accounts.
UltraVNC Accounts
Account
Password
View-only
viewonly
Full
Infocast
Administrator Account
The Administrator account is intended to be used for administrating the system, and therefore provides
more access to advanced settings and maintains more of the Windows look and feel. We do not
recommend you operate Infocaster as an Administrator because it bypasses the optimal operating
system settings that have been applied.
Launch Infocaster
To launch Infocaster, choose START > Infocaster. If you are not using the Administrator account then you
will need to move your mouse cursor to the bottom of the screen to make the START button appear.
Note: After your player has started playback you will be unable to return to the desktop without
shutting down Infocaster. If you need to switch back to the desktop at any time, hold down the
CTRL+ALT+SHIFT+HOME key combination for five seconds.
Change Settings
The Infocaster User Guide describes how to configure systems to use different settings. Please consult
the guide for more information.
In most situations you do not need to change the configuration of the DS600 system.
Enable Onboard Audio
The DS600 system is configured to use the HDMI connection for audio output, and the onboard audio is
disabled. Follow these steps if you wish to enable onboard audio and activate the Headphone port on
the DS600 system.
1. Open the START menu.
Table of contents


