VESTEL QN65B/4F User manual

65” (164cm) DIGITAL SIGNAGE DISPLAY
ENGLISH
USER MANUAL
QN65B/4F


English - 1 -
Contents
Important Safety Information ..................................2
General View..........................................................6
Control Buttons on the Display...............................7
Connecting the IR Receiver....................................8
.....................................8
Remote Control ......................................................9
First Time Installation............................................10
Using Main Display Menu.....................................10
Vsign Lite.............................................................. 11
Media Playback via USB Input .............................12
CEC and CEC RC Passthrough...........................13
Usage of the Start URL ........................................13
Settings Menu Content.........................................15
Connectivity..........................................................22
Apps .....................................................................24
Internet Browser ...................................................25
OSD Rotation Support..........................................25
DisplayPort ...........................................................25
HDMI Out..............................................................26
Real Time Clock (RTC).........................................26
Controlling With An External PC...........................26
RS232/LAN Command Tables..............................28
RS232 HEX Commands.......................................57
Maximum Pixel Rates...........................................61
Input Matrix...........................................................61
Supported Media Formats from USB ...................62
System Features ..................................................64
Federal Communication Commission Interference
Statement ............................................................64
Accessories Included............................................65
Information for Users on Disposal of Old Equipment
and Batteries ........................................................65
..............................................65
Creston Connected...............................................66
Vesa Wall Mount Measurements..........................67
Installation On An Indented Wall ..........................67

English - 2 -
Please place the product in a position that electric
product.
Follow all warnings and instructions marked on the
product.
Follow the on screen instructions for operating the
related features.
do not overuse the plugs and extension cords.
Please do not open the lid of the monitor to service
yourself. If the required service needs are not met
other risks may occur.
If you will not use the product for a long period of
Put the product on a well-ventilated place and
The product should be kept in 0 C° - 40 C°.
permanently.
Plug the appliance to a grounded outlet. Always use
the grounded power cord supplied with your product.
Manufacturer is not responsible for any damage
caused unearthed usage.
The socket-outlet shall be installed near the
equipment and shall be easily accessible.
Do not stay in contact with the parts of the product
that become hot for long periods of time. Doing so
may result in low-temperature burns.
The LCD panel used in this product is made of glass.
or applied with impact. Be careful not to be injured by
broken glass pieces in case the LCD panel breaks.
Usage of the monitor must not be accompanied
missile launch control in a weapon system.
Do not expose the product to direct sunlight or do
of or near the product.
Do not place any heat sources such as electric
product from the mains.
Do not touch the controls other than those described
in the operating instructions. Improper adjustment of
controls not described in the instructions can cause
Important Safety Information
CAUTION
RISK OF ELECTRIC SHOCK
DO NOT OPEN
CAUTION: TO REDUCE THE RISK OF ELECTRIC SHOCK DO NOT
REMOVE COVER (OR BACK).
NO USER-SERVICEABLE PARTS INSIDE. REFER
SERVICING TO QUALIFIED SERVICE PERSONNEL.
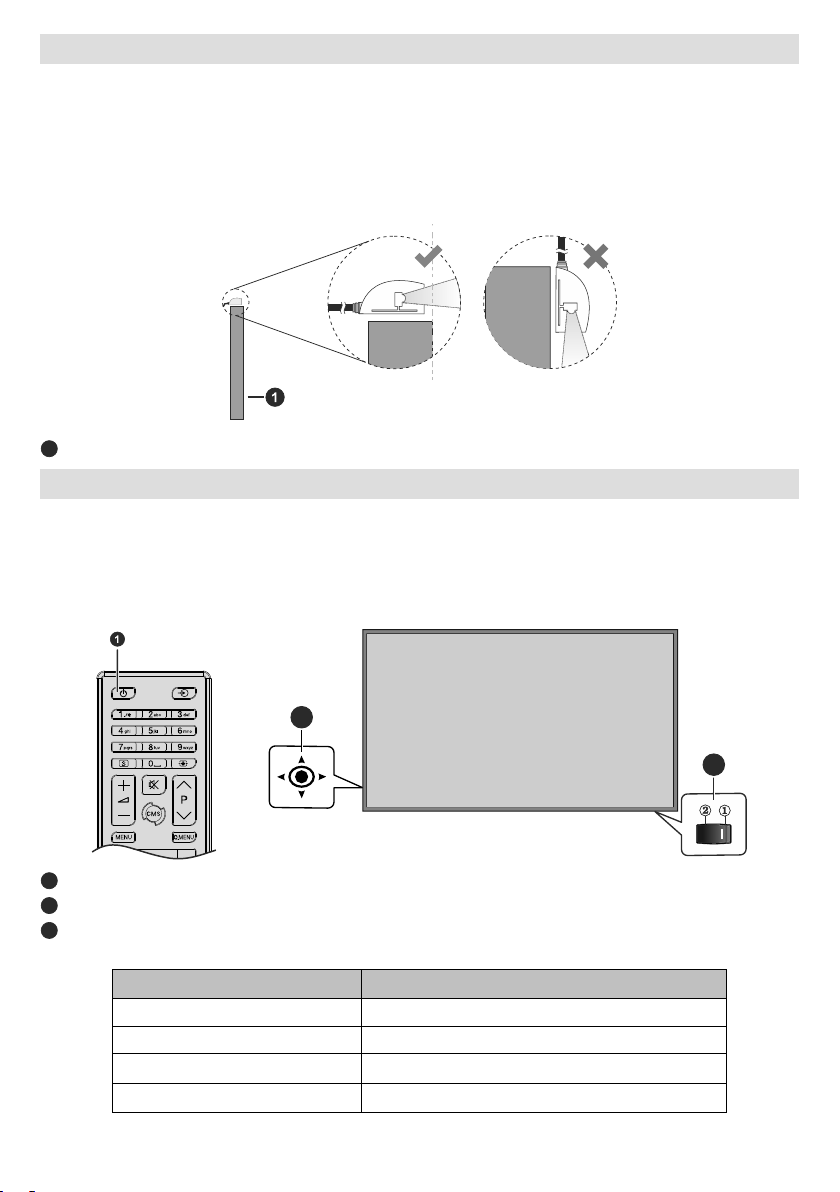
OPS USAGE WARNING: Do not plug the OPS unit while the Display is
turned on. Turn on the OPS unit using the remote control or the buttons
Please read these instructions fully
and carefully before use and keep for
future reference
WARNING: This device is not intended for
use by persons (including children) without
physical, sensory or mental capabilities, or lack
of experience and/or knowledge unless they have
been given supervision or instruction concerning
use of the device by a person responsible for
their safety.
This product is for indoor use only.
Use this product at an altitude of less than 2000
meters above the sea level and in dry locations and
in regions with moderate or tropical climates.
Please keep this manual for further use.
Unplug your product before starting to clean. Do
not clean the product when it is on. Do not use
liquid or aerosol cleaners. Use a damp cloth for
display cleansers. Do not apply the cleaner directly
on the product.
accessories.
Do not expose the product to dripping or splashing
Please leave at least 5 cm of free space between the
product and walls or other furnitures for ventilation
purposes.
power source on its rating plate. For further
please do not make any change on the grounding
plug. Always use earthed socket outlet for product.
Please provide the plug and socket to supply the
needed power for appliance.

English - 3 -
Do not shake the product. Ensure that it stays in a
balanced stance on its position.
Do not throw or drop any object on your product.
Do not interfere on your products screen or any other
surface with a sharp object.
Do not keep your product in a humid environment.
Do not keep your product in an extremely cold
environment.
Do not keep your product in an extremely hot
environment.
surfaces.
animals.
Vent holes of the product
The vent holes are designed to provide the product
to work constantly and prevent it from overheat. Do
not block these openings in anyway. For the same
Never insert an object into the product through vents
inserting any objects in the vents or openings of the
spill water or liquid on the product.
Repair
Unless a basic implementation on the product is
you may risk your health or your product. In case of
If the product has been dropped or the cabinet has
been damaged.
If the performance of the product is changed or the
appliance needs to be repaired.
When a liquid was spilled on the product or when
objects have fallen into the product.
When the product has been exposed to rain or water.
When the product does not operate properly as
described in the operating instructions.
Replacement parts
sure that the service person uses replacement parts
characteristics and performance as the original parts.
shock and/or other danger.
Safety checks
service technician to perform safety checks to ensure
that the product is in proper operating condition.
Wall mounting
the product according to the method recommended
by the manufacturer.
Read the instructions before mounting the product
on the wall.
The wall mount kit is optional. You can obtain from
Do not install the product on a ceiling or on an
inclined wall.
accessories.
the product from fall. Do not over-tighten the screws.
Power Cord
The power cord is used to disconnect the product
from the mains and therefore it must remain
readily operable. If the product is not disconnected
power for all situations even if the product is in
Use only the power cord supplied with the monitor.
Do not damage the power cord nor place heavy
on the plug. Do not pull from the cable when
unplugging the appliance.
Do not use the power cord with a power tap. Adding
overheating.
Do not remove or insert the power plug with wet
hands. Doing so could result in electric shock.
Unplug the power cord if it is not used for a long time.
Do not attempt to repair the power cord if it is
broken or malfunctioning. When damaged it must
personnel.
Especially for child safety
monitor.
easily be used as steps.
Remember that children can become excited while
monitor. Care should be taken to place or install the

English - 4 -
Foreseeable misuse and incorrect use
or aircraft or at altitudes exceeding 2000m above sea
other than mentioned in user manual additional
requirements may be necessary.
CAUTION
Do not leave a static image displayed for pro-
longed period of time. If a static image is displayed
may cause image sticking on the display. This con-
-
erable amount of operational display time to dissi-
120 minutes of continuous motion display will elim-
temperature (not lower than 10 C).
-
fect the performance of the computer and are not
accepted as a defect.
Warning
This is a class A. In a domestic environment this may
cause radio interference in which case the user may
be required to take adequate measures.
BATTERY SAFETY GUIDELINES
dependable source of portable power. Problems
can occur if they are misused or abused resulting in
Here are some simple guidelines to safe battery use
designed to eliminate any such problems.
plus and minus marks on the battery and appliance.
care not to mix old and new batteries or batteries of
Store unused batteries in their packaging and away
from metal objects which may cause a short-circuit
even an explosion.
knocked down.
Care should be taken to route all cords and cables
connected to the monitor so that they cannot be
pulled or grabbed by curious children.
Connections
disconnect the plug from the power outlet before
manual of the equipment to be connected.
Be careful not to confuse the input terminal with the
output terminal when connecting cables. Accidentally
reversing cables connected to the input and output
terminals may cause malfunctions and other
problems.
Positioning
by taking simple pre-cautions such as:
Using fixing devices like wall mount brackets
recommended or supplied by the manufacturer.
Educating children about the dangers of climbing on
furniture to reach the monitor or its controls. If your
same considerations as above should be applied
Transport and Shipping
Your device must be kept in its original package
to protect from damage to its accessories during
transport and shipping.
Keep the product in normal position during transport.
Do not drop the device during transport and protect
it against impacts.
Damages and faults that occur during transport after
the delivery of the appliance to the customer are not
included in the warranty cover.
personnel.
Intended Use
This product is intended to be used in public places
Product is only suitable for connecting commercial
mains socket outlets. Do not connect product
industrial socket outlets.

English - 5 -
Remove dead batteries from equipment and all
batteries from equipment you know you are not going
to use for a long time. Otherwise the batteries may
leak and cause damage.
Batteries must not be exposed to excessive heat
explode. Please recycle dead batteries; do not put
with the normal household waste.
in a charger or by applying heat to them. They may
rechargeable batteries which are clearly marked
as such.
Supervise children if they are replacing batteries
themselves in order to ensure these guidelines are
followed.
This product or the accessories supplied with the
product may contain a coin/button cell battery. If the
severe internal burns in just 2 hours and can lead
to death.
Remember that small button cell batteries such as
and this can be dangerous.
Make sure battery compartments are secure. If the
rinse immediately and thoroughly. If it gets into your
seek medical treatment immediately. Leaked battery
cause a skin irritation or damage your eye.
CAUTION
RISK OF EXPLOSION IF BATTERY IS
REPLACED BY AN INCORRECT TYPE.
DISPOSE OF USED BATTERIES ACCORDING
TO THE INSTRUCTIONS.
Markings on the Product
The following symbols are used on the product as
a marker for restrictions and precautions and safety
such information for security reasons.
Class II Equipment: This appliance is
designed in such a way that it does not require
a safety connection to electrical earth.
Class II Equipment With Functional
Earthing: This appliance is designed in such
a way that it does not require a safety
used for functional purposes.
Protective Earth Connection: The marked
terminal is intended for connection of the
protective earthing conductor associated with
the supply wiring.
Hazardous Live Terminal: The marked
terminal(s) is/are hazardous live under normal
operating conditions.
Caution, See Operating Instructions: The
marked area(s) contain(s) user replaceable
coin or button cell batteries.
Any issues which are caused by customer mis-adjustment
of any software including the operating system are not
covered by the warranty.
Depending on the model you buy, the actual
appearance of the product may dier from the images
used in this manual.
i

English - 6 -
General View
Front Side
1. LCD Panel
Rear Side (1)
1 2 345
9
13
14
8
7
6
10
15 16
11
12
1. RS232
2. VGA
3. Ethernet
4. USB (2.0)
5. USB (2.0)
6. HDMI2 In
7. HDMI3 In
8. HDMI4 In
9. IR Input
10.
11. DP In
12. DP Out
13. HDMI1 In
14. HDMI Out
15. Internal USB Compartment
16. Connector for PC (OPS) Module

English - 7 -
Rear Side (2)
1
3
4
2
1.
2. Audio In
3. RJ12 (for sensor)
4. RJ12 (service use only)
To turn on the Display: Press the centre of
the joystick in and hold it down for a few
Press the centre
of the joystick in and hold it down for a few
mode.
To change source: Press the centre of the
screen. Scroll through the available sources
by pushing the joystick up or down.
To change volume: Increase the volume
by pushing the joystick right. Decrease the
volume by pushing the joystick left.
Note: Main menu OSD cannot be displayed via
joystick.

English - 8 -
Connecting the IR Receiver
Display. Place the IR receiver in sight of your own remote control. Simply operate your remote control whilst
pointed at the IR receiver and it will relay the control signal to your Display.
In case your Display has touch screen feature and if the IR receiver is going to be placed on the Display it
may interfere with each other. To improve the performance of your remote control place the IR receiver as
shown in the drawing below.
1
Front side of the Display
Turning the Display On/O
into standby mode. Press the Standby button on the remote or press the centre of the joystick in located on
the rear left side of the Display and hold it down for a few seconds to switch it on from standby.
Press the centre of the joystick in and hold it down for a few seconds or press the Standby button on the remote
2
3
1
Standby button
2Joystick
3
(*)
(*) The location of the On/O switch may dier depending on the model.
LED Status Status of the monitor
Power LED not lit Power on
Power LED lit
Scheduler active (optional)
Software update

English - 9 -
Remote Control
19
20
22
24
26
27
29
7
6
5
4
3
2
1
10
11
12
13
15
16
17
8
9
28
23
14
21
18
25
30
31
1. Standby:
2. Numeric buttons: Enters a number or a letter in the text
box on the screen.
3. Signage: Displays Settings>Signage menu
4. Volume +/-: Increases or decreases the volume
5. CMS:Start url (in Settings>Sig-
nage>Link Options menu). Press and hold 3 seconds
Settings url (in Settings>Sig-
nage>Link Options menu)
6. Menu: Displays the main menu
7. Directional buttons:
8. Exit: Closes and exits from displayed menus or returns
to previous screen
9. Network: Displays Network/Internet Settings menu
10. Sound: Displays Sound menu
11. Coloured Buttons: Follow the on-screen instructions
for coloured button functions
Blue Button: Freezes the currently displayed picture on
the screen. Press again to cancel the freeze function.
12. Picture Mode: Cycles between picture modes
13. Rapid reverse: Moves frames backwards in media
such as movies
14. Pause: Pauses the media being played
15. Media browser: Opens the media browsing screen
16. Play: Starts to play selected media
17. Stop: Stops the media being played
18. Rapid advance: Moves frames forward in media such
as movies
19. No function
20. Info: Displays information about on-screen content
21. No function
22. Picture: Displays Picture menu
23. Internet: Opens the predefined Start url (in Set-
tings>Signage>Link Options menu).
24. Wireless Display: Opens the wireless display connection
screen
25. Back/Return: Returns to previous screen
26. OK:
27. Quick Menu: Displays picture and sound setting menus
28. No function
29. Mute:
30. Screen: Changes the aspect ratio of the screen
31. Source: Shows all available content sources
Inserting the Batteries into the Remote
Remove the screw that secure the battery compartment cover
gently. Insert two AAA batteries. Make sure the (+) and (-)
signs match (observe correct polarity). Place the cover back
on. Then screw the cover back on again.

English - 10 -
First Time Installation
selection screen will be displayed. Select the desired
language and press OK.
press OK to continue.
0000
number combination. You have to enter this PIN if you
are asked to enter a PIN for any menu operation later.
The Signage Settings menu will be displayed next.
Set ID OSD Orientation Auto Software Update
Model
nameSerial number and Software version options
are for information only. They will be grayed out and
not selectable. You can save the model information
data of the Display to a connected USB device using
the Save model information option. You can also
copy
the Display using the Clone from USB option. Refer
to the Signage Settings Menu Content section for
more information on the options of this menu. After
Next and press
OK to continue.
The Auto Launch Selection screen will be displayed
next. Vsign Lite, CMS, Open Browser and Disabled
options will be available. Highlight the desired option
and press OK to proceed.
Network/Internet Settings
menu will be displayed. Please refer to
Wake On
highlight Next and press OK
The First Time Installation is completed.
To repeat this process and reset the Display's settings
to the factory defaults enter the Settings>Signage
First time installation and press
OK. You will be asked to enter the PIN that you have
asking whether you want to delete all settings and
reset the Display. Select Yes and press OK
Note: Do not turn o the Display while initializing rst time
installation. Note that, some options may not be available
depending on the country selection.
Using Main Display Menu
When the Menu
menu will appear at the bottom of the screen. You can
navigate through the menu items using the directional
buttons on the remote. To select an item or see the
sub-menu options of the highlighted menu press OK
button. When you highlight a menu option some of
the sub-menu items of this menu may appear on the
upper side of the menu bar for quick access. To use
OK and set as
desired using the Left/Right directional buttons. When
OK or Back/Return button to exit.
Press Exit button to close the main menu.
1. Home
When main menu is opened Home menu bar will
be highlighted. The content of the Home menu can
be customised by adding options from other menus.
Just highlight an option and press the Down direction
button on the remote. If you see Add to Home option
you can add it to the Home menu. Same way you
can delete or change the position of any item in the
Home menu. Press the Down direction button and
select Delete or Move option and press OK. In order
to move a menu item use the Right and Left direction
buttons to select the position that you want the item
to move to and press OK.
2. Settings
You can manage the settings of your Display using
the options of this menu. Refer to Settings Menu
Contents section for more information.
3. Apps
When your Display is connected to the Internet related
Apps related
contents. Using the Apps menu you can access
your applications. Refer to Apps section for more
information.
4. Sources
You can manage your input source references using
the options of this menu. To change the current source
highlight one of the options and press OK.
4.1. Source Settings
Regular Enhanced and
Regular
and Enhanced
Enhanced
Regular
.
You can reset your customizations on the Home
and Apps menus to defaults using the Reset Menu
option in the Settings menu. Highlight this option and
press OK
Highlight Yes and press OK to proceed.

English - 11 -
Vsign Lite
Vsign Lite is a signage application runs without CMS
and managed through Display. Display software is
integrated with it.
1. Setup
1.1.
Requirements
Display Platform MB135VS
Firmware Version 7.33 & Higher Version
Language Options
Hardware Requirements USB
1.2. How is it opened?
Auto Launch
should be selected as
.
2. Vsign Application Display
These are PlayerSchedule and Template
Import/Export
part.
2.1. PLAYER
-
are played here.
2.1.1. File Management
OK
can be selected and processed.
Select:
Play:
Send:
Delete:
2.1.2. Multi-Selection Mode
OK
button on Select
OK
Select All:
Delete All:
Play All:
Send All:
Cancel:
2.2. SCHEDULE
2.2.1. Channel/Program Addition
OK
added to the channel as content.
-
2.2.1.1. Channel/Program Editing Screen Input
Fields
Add Content: If the OK
OK button.
Channel:
Memory:
2.2.2. Supported Files
mkv
2.3. TEMPLATE
-
My Templates folder.

English - 12 -
2.3.1. Creation of the Templates
and press OK. When the OK
Pre-
Save button can be
selected and saved.
2.3.1.1. Add Content to Templates Input Fields
If the area on the template accepts
-
2.4. Export/Import
-
2.5. Switch to Vsign
2.6. Switch to Vsign Lite Portrait Orientation
or
2from
Media Playback via USB Input
external power supply) external hard disk drives or
USB memory stick to your Display by using the USB
input/s of the Display.
IMPORTANT! Back up the files on your storage
devices before connecting them to the Display.
Manufacturer will not be responsible for any file
damage or data loss. Certain types of USB devices
(e.g. MP3 Players) or USB hard disk drives/memory
sticks may not be compatible with this Display. The
Display supports FAT32 and NTFS disk formatting.
Wait a little while before each plugging and unplugging
so may cause physical damage to the USB player
and the USB device itself. Do not pull out your drive
input/s. External power supplied USB hubs are
recommended in such a case.
Note: When viewing image les the Media Browser menu
can only display 1000 image les stored on the connected
USB device.
Media Browser Menu
photo files stored on a USB storage device by
connecting it to your Display. Connect a USB storage
device to one of the USB inputs located on the rear
side of the Display.
After connecting a USB storage device to your Display
Media Browser menu will be displayed on the screen.
You can access the content of the connected USB
device any time later from the Sources menu. Select
the related USB input option from this menu and press
OKOK
to display or play it back.
You can set your Media Browser preferences by
using the Settings menu. Settings menu can be
accessed via the information bar which is displayed on
the bottom of the screen when pressed the Info button
Info
symbol positioned on the right side of the information
bar and press OK. Picture SettingsSound Settings
Media Browser Settings and Options menus will be
available. The contents of these menus may change
Only Sound Settings menu will be available while
Loop/Shue Mode Operation
Start playback and activate -
uously played in original order
Start playback and activate The same file will be played
continuously (repeat)
Start playback and activate
once in random order
Start playback and activate
-
tinuously played in the same
random order.
To use the functions on the information bar highlight
the symbol of the function and press OK. To change
the status of a function highlight the symbol of the
function and press OK as much as needed. If the
deactivated.
USB Auto Play Feature
USB AutoPlay feature is to start playing the media
It uses the Media Browser. The media content types

English - 13 -
for Video content and as last Audio.
This feature will only work if all of the following cir-
cumstances occur:
The USB device is plugged in.
USB Auto Play option is enabled. It is placed in the
Settings>System>More menu.
USB Auto Play Feature with Playlist
Scenario
displayed according to the entered sequence.
Files which to be displayed/played must be written line
volume and standby buttons are used. Other buttons
perform the exit operation.
picture.jpg
video.mp4
picture2.jpg
video2.mp4
Scheduler playlist scenario
Source option is set as USB
is started.
Failover Feature
If No Signal option in the Settings>Signage>Controls
menu is set as Failover the Display checks the
period of 5 minutes.
Note: The setting of the USB Auto Play option in the
Settings>System>More menu is not important, in Failover
mode it will function anyway.
CEC and CEC RC Passthrough
This function allows to control the CEC-enabled
using the remote control of the Display.
The CEC option in the Settings>System>More menu
should be set as EnabledSource
button and select the HDMI input of the connected
CEC device from the Sources List menu. When
in source menu with its own name instead of the
Recorder 1 etc.).
The Display remote is automatically able to perform
the main functions after the connected HDMI source
has been selected. To terminate this operation and
seconds.
You can disable the CEC functionality by setting the
related option under the Settings>System>More
menu accordingly.
The Display supports ARC (Audio Return Channel).
This feature is an audio link meant to replace other
cables between the Display and an audio system (A/V
receiver or speaker system).
other audio outputs automatically. You will need to
decrease Display volume to zero manually if you
wish to hear the ARC audio only (same as optical or
co-axial digital audio outputs). If you want to change
that device from the source list. In that case volume
control keys are directed to connected audio device.
System Audio Control
Display. The volume can be controlled using the remote
control of the Display. To activate this feature set the
Speakers option in the Settings>System>More
menu as . The Display speakers will be
muted and the sound of the watched source will be
provided from the connected sound system.
Note: The audio device should support System Audio Control
feature and CEC option should be set as Enabled.
Usage of the Start URL
of any USB storage device. Make sure that the

English - 14 -
Notepad.
Connect the USB strorage device to the
Display. Highlight USB Operations option in the
Settings>Signage>USB menu and press OK.
Note: You can check if the Start URL have the desired link
from the Settings>Signage>Link Options menu.

English - 15 -
Settings Menu Content
Picture Menu Content
Mode You can change the picture mode to suit your preference or requirements. Picture mode can
be set to one of these options: TextGameSportsSignage and Natural.
Contrast
Adjusts the light and dark values on the screen.
Brightness
Adjusts the brightness values on the screen.
Sharpness
Sets the sharpness value for the objects displayed on the screen.
Colour
Energy Saving
This Display is designed to be environmentally friendly. If you set this option to Minimum
MediumMaximum or Auto the Display will reduce energy consumption by regulating
Custom and adjust the Backlight (located under this setting) manually using Left or Right
buttons on the remote. Set as
If pressed Right button while Auto option is selected or Left button while Custom option
Select Proceed and press OK
Display to turn the screen on again.
plug. This will also reduce energy consumption.
Note: Available options may dier depending on the selected Mode.
Backlight This setting controls the backlight level. The backlight function will be inactive if the
Energy Saving is set to an option other than Custom.
Advanced Settings
Dynamic
Contrast You can change the dynamic contrast ratio to desired value.
Noise Reduction Noise Reduction setting to reduce
the amount of noise.
Colour Temp Sets the desired colour temperature value. Cool (1300K)Normal (9300K) and Warm
(8500K) options are available.
Picture Zoom Sets the desired image size format.
Picture Shift This option may be available depending on the Picture Zoom setting. Highlight and press
OK.
Film Mode
Skin Tone Skin tone can be changed between -5 and 5.
RGB Gain
adjustment of white balance in the picture.
HDMI Full Range
enhance blackness in the picture.
Reset Resets the picture settings to factory default settings (except Game mode).
Sound Menu Content
Volume Adjusts the volume level.
Equalizer Selects the equalizer mode. Custom settings can be made only when in User mode.
Balance Adjusts whether the sound comes from the left or right speaker.
Headphone
Sets headphone volume.
Please ensure before using headphones that the headphone volume is set to a low
Headphone/Lineout
option is set to Headphone.

English - 16 -
Audio Link (Optional) Press OK to open the Audio Link menu screen. Using this screen you can discover
and connect the sound devices to your Display wirelessly.
AVL (Automatic
Volume Limiting)
If the Dolby Audio menu item is set to an option other than the AVL setting options
will change. AutoNight Normal and options will be available. In Auto mode
the TV will switch to Normal or Night mode automatically according to the current
time information. If no time information is available this option will always function as
Normal. When the TV switches to Night
as Auto
Please note that compared to Normal mode Night mode provides more aggressive
dynamic compression control which is suitable for silent environments.
Headphone/Lineout
can select this option as Lineout
set this option as Headphone.
Please ensure before using headphones that this menu item is set to Headphone. If it
is set to Lineout
could damage your hearing. A warning message will be displayed on the screen when
switched to Lineout option. Remove your headphone and press OK to continue.
Dynamic Bass Enables or disables the Dynamic Bass.
Dolby Audio SmartMovieMusicNews and options will be available. Set as to disable.
Note: Some items in Sound menu will be grayed out and unavailable if set to an option other than O.
Surround Sound Surround sound mode can be changed as On or .
Digital Out Sets digital out audio type. PCM and Compressed options are available.
Network Menu Content
Network Type
Disable the network connection or change the connection type.
Scan Wireless
Networks
Start a search for wireless networks. This option will be available if the Network Type
is set as Wireless Device.
Press WPS on your
Highlight this option and press OK. Go to your modem/router device and press the
WPS button on it to make the connection. This option will be available if the Network
Type is set as Wireless Device.
Internet Speed Test Start a speed test to check your connection bandwidth. The result will be displayed
Advanced Settings
Wake On
Enable or disable this feature by setting it as On or .
Note: For detailed information on the options of this menu refer to the Connectivity section.
Signage Menu Content
Device Info
Set ID Sets the device ID. You can select a value between 0-99 using the numeric buttons
on the remote in order to identify your Display.
Software
upgrade
Displays current software version. Press OK to see the upgrade options. You can use
these options to start a manual search for software updates and set your automatic
scan preference.
Serial number
Displays serial number of the unit. (Cannot changed by user)
Model name Displays model name of the unit. (Cannot changed by user)
Save model
information
Copies the model information data of the unit to a connected USB device.
Display Life Time Displays the duration of life of the unit.

English - 17 -
Controls
OSD Orientation Sets the OSD (On Screen Display) rotation of your Display. LandscapePortrait 1
and
Portrait 2
options are available.
Browser
Orientation
Sets the rotation of the browser. LandscapePortrait1 and Portrait2 options are
available. One of the portrait options will be set by default depending on the model.
This option will rotate the browser only and the changes will be applied after the
Note: Portrait mode does not support html pages which include videos.
Pixel shift
Enables or disables pixel shifting. This option can be used to avoid image retention
No Signal
set input source. Failover and Input Search options are available.
If Failover
is selected the Display checks the connected USB device for available
USB Auto
Play option in the Settings>System>More
will function anyway.
If Input Search is selected the Display will search all available input sources consecutively
How to install No Signal Image
menu and press OK.
No Signal Delay
If the No Signal
option is set as Input Search
No Signal Power
received from the selected source.
This feature will only work if all of the following circumstances occur:
-No Signal option is set as Failover.
-USB device is not connected to the Display / USB device is connected but there are
If the No Signal option is set as Input Search
Panel Lock Set as to prohibit the use of the buttons on the Display.
RCU Inhibit
Set as On
to inhibit the use of the remote. Remote control will function in Stand-By
mode independently from the setting of this option.
MENU/M-1-9-7-3
buttons on the remote consecutively. Signage menu will appear. Enter the Controls
menu and set this option as
.
UART 0
Select ASCII/HEX protocol for UART 0. Default value is ASCII. There is no need to
restart the Display after selection in order to work with the protocols correctly. If the
the Display is booted up.
Note that ASCII/HEX selection is not working while debug logs are enabled. If it is
reboot the Display in order to correct the debug logs and the ASCII protocol behaviour.
Also note that HEX protocol will work with the baud rate value 19200 for UART 0.

English - 18 -
UART 1
Select ASCII/HEX protocol for UART 1. Default value is HEX. There is no need to
restart the Display after selection in order to work with the protocols correctly. If the
the Display is booted up.
Note that ASCII/HEX selection is always working as expected. It does not matter if the
debug logs are enabled or not.
Also note that HEX protocol will work with the baud rate value 9600 for UART1
(Optional)
Sets the source option for these funtions. AutoDisplay and Android options will be
available.
Menu lock
You can block the usage of the menu button on the remote by setting this item as All
menus
to disable this function.
Auto Source
Switch
If this option is enabled the Display will switch to the currently active HDMI source
automatically when a device is connected to the Display through the HDMI1 or
HDMI2 input socket. Set as Enabled to enable this feature.
When the HDMI source is removed the Display will switch to other active HDMI
source. If there isn't any other device connected to the Display and the HDMI Wake
UP option for the related HDMI source is enabled the Display will switch into the
standby mode.
There is also a 3-second restriction for the successive connected HDMI sources.
device is plugged in.
Note: This feature applies for HDMI1 and HDMI2 input sockets only. Refer to the
General View section to see the HDMI inputs.
Power Up Settings
Power Up Mode Last State, Always On and Standby
options are available.
Quick Standy
If this feature is enabled the Display can be turned on again
commands Left or Right button to enable or disable
the feature.
Power on Delay Sets a delay value at power on. This value can be set from 0 to 2000 ms in steps of 100
ms. The Display will turn on after the set delay time is expired.
Auto Launch CMS(Start url)Open Browser(Open Browser
initial page) and Disabled options are available.
Boot Up Picture
Mode
the last set picture
mode will be used at power on.
HDMI1 Wake Up
If this option is set as Enabled
when it is switched on. This feature works based on HDMI 5V signal. When this signal
is active the Display wakes up and when the signal is inactive the Display shuts down.
You can disable this option by setting as Disabled.
In order to use this feature in
conjunction with the Auto Source Switch feature it is recommended to enable the
Auto Source Switch option in the Signage>Controls menu.
If any Scheduler is set this option will be inactive and can not be set as Enabled.
Note: This feature may not be available depending on the model of your unit.
HDMI2, HDMI3,
HDMI4 Wake Up
(optional)
If this option is set as Enabled
on. This feature works based on HDMI 5V signal. When this signal is active the Display
wakes up and when the signal is inactive the Display shuts down. You can disable this
option by setting as Disabled.
In order to use this feature in conjunction with the
Auto Source Switch feature it is recommended to enable the Auto Source Switch
option in the Signage>Controls menu.
If any Scheduler is set this option will be inactive and can not be set as Enabled.
Note: This feature or HDMI3 and HDMI4 options may not be available depending on the model of your
unit. If multiple devices are connected to the Display through HDMI input sockets, this feature will not work.
Table of contents