Imation IMWDVRW16DLI User manual

DVD±R/RW
Drive
D
D+
ub
e
La
er
dvd
internal
burner
Dual
Format
Special
Features
-
imation
c
SMART-BURN:
Avoid
Buffer
Under
Run
Error,
Automatically
adjust
writing
strategy
and
running
OPC
to
provide
the
best
burning
quality
SMART-X:
Adjusts
CD-DA/VCD/DVD
data
extraction
to
a
fastest
allowable
speed
according
to
both
data
request
rate
from
host
and
disk
quality
VAS
(Vibration
Absorber
System):
Reduce
vibration
and
no
i
se
during
recording
and
read
i
ng
Double
The
Layer,
Twice
The
Fun!
The
new
Imation
Double
Layer
burner
is
a
breakthrough.
You
can
put
8.5GB
storage
capacity
on
a
DVD
disc,
without
needing
to
turn
it
over.
This
equates
to
four
hours
of
DVD-quality
video
or
16
hours
of
VHS-quality
vi
deo.
It
is
ideal
for
storing
important
personal
and
business
data,
from
home
movies
,
music,
photographs
to
backups
of
important
files
,
applications,
presentations
and
reports.
Each
DVD
Burner
kit
comes
complete
with
an
Imation
drive
,
software
and
instruction
manuals
to
get
you
started
on
your
digital
masterpieces
.
Just
add
a
little
imagination,
and
you
will
find
a
whole
assortment
of
uses
for
this
versatile
drive.
Important
data
and
precious
moments
are
now
stored
permanently
onto
DVD
or
CD
format
without
wearing
out
or
lost,
and
ready
to
be
shared.
The
Imation
drive
delivers
unrivalled
performance
,
reliability
and
speed.
Beyond
its
superb
performance
,
the
true
value
is
the
assurance
and
trust
that
your
important
data
are
reliably
created,
preserved
and
protected.
Something
Imation
has
been
doing
for
more
than
50
years.
Create
,
preserved,
protect
your
important
data
and
precious
moments
Store
up
to
8.5GB
on
a
DVD
DL
disc
and/or
4.7GB
on
a
DVD
media
Superb
performance
,
reliable
and
speedy
Compatible
wi
th
major
DVD
and
CD
formats
Easy
to
use
software
Backed
with
1-year
warranty
and
lmation
's
50+
years
of
storage
innovation
DVD +R DL R W DVD+ReWrltable
SMART-X
SMART
-BURN
vIBRATION REDUCTION SYSTEM
Windows®
Compatible
SA
J
an

Singapore
Imation
Singapore
Pte
Ltd
23
New
Industrial
Road
#03-01
Century
Industrial
Building
Singapore
536209
Tel:
(65)
6383
7676
Fax:
(65)
6383
7600
/ l
Technical
Hotline:
(65)
6383
7655
Technical
Email:
Company
Registration
Number:
199603239Z
Malaysia
Imation
(Malaysia)
Sdn
Bhd
Tel:
(60
3)
7803
7576
Fax:
(60
3)
7803
5352
Philippines
Telefax:
(63
2)
687
24691252112539
Thailand
Imation
(Thailand)
Ltd
Tel:
(66
2)
576
0067-91576
0064
Fax:
(66
2)
576
0065
India
Calcutta
Telefax:
(91
33)
2511
6025
Mobile:
(91)
98
3123
2885
India
Mumbai
Tel:
(91
22)
2837
705312820
6830
Fax:
(91
22)
2837
8258
Mobile:
(91)
98
2103
2582
India
New
Delhi
Telefax:
(9111)
5574
4283
Mobile:
(91)
98
7308
2066
Indonesia
Telefax:
(62
21)
5576
7607
Mobile:
(62)
816
110
8342
Pakistan
Tel:
(92
21)
584
0176
Fax:
(92
21)
584
0177
Mobile:
(92)
300
822
2848
Product
Specifications
Imation
Internal
DVD
Burner
General
Information
Model
IMWDVRW16DLI
Type
Internal
Interface
E-IDE
Interface
Dimension
145
x
170
x
41.3mm
+/-0.5mm
(Width,
Depth,
Height)
Weight
-0.9kg
Warranty
1
Year
Performance
Acces
lime
(1/3
Stroke)
160
msec
(Typical)
DVD
Mode
Write
Transfer
Rate
DVD+R:
16x
(22.0MB/sec
max)
DVD-R:
16x
(22.0MB/sec
max)
DVD+R
DL
4x
(5.5MB!sec
max)
DVD
Mode
Rewrite
Transfer
Rate
DVD+RW:
8x
(11.0MB/sec
max)
DVD-RW:
6x
(8.3MB/sec
max)
DVD
Mode
Read
Transfer
Rate
DVD+R/+RW:
8x
(11.0MB/sec
max)
DVD-R/-RW:
8x
(11.0MB/sec
max)
DVD-ROM:
16x
(22.0MB/sec
max;
Single-Layer)
DVD-ROM:
8x
(11.0MB/sec
max;
Dual-Layer)
DVD+R
DL
6x
(8.3MB!sec
max)
CD-RW
Mode
Write
Transfer
Rate
48x
(7.0MB/sec
max)
CD-RW
Mode
Rewrite
Transfer
Rate
24x
(3.5MB/sec
max)
CD-RW
Mode
Read
Transfer
Rate
48x
(7.0MB/sec
max)
Applicable
Formats
DVD-ROM,
DVD-Video,
DVD-Audio,
DVD-R
Single/Multi
Border(s),
DVD+R
Single/
Multi
Session(s),
DVD+R/DVD+R
DL
Single/Multi
Session(s),
DVD-RW
and
DVD+RW
CD-DA,
CD-Text,
CD-ROM
Mode-1,
CD-ROM/XA
Mode
2
Form-1
and
Form-2,
COi-Ready,
Video-CD,
Karaoke-CD,
Photo-CD,
Enhance
CD,
CD
Extra,
UDF
(Fixed/Variable
Packet
Mode)
Applicable
Media
Types
CD-ROM,
CD-R
and
CD-RW,
DVD-ROM
(4.7G/8.5G)
Single-Layer
on
Single/Double-Side,
DVD-ROM
Double-Layer
(PTP,
OTP)
on
Single/Double-Side,
DVD-R
(3.9G/4.7G
for
General
and
Authoring),
DVD-RW
and
DVD+RW
(4.lG),
DVD+R
and
DVD+R
DL
discs
of
8cm
or
12cm
diameter
Buffer
2MB
Disc
Loading/Eject
Power-Assisted
Auto-Tray
or
Manual
Emergency
Eject
Pin-Hole
Anti
Vibration
VAS
Vibration
Reduction
System
for
extra
reliable
DVD
signals
retrieval
SMART-X
Smart
Monitoring
and
Adapting
Recording
Technology
for
data
eXraction
SMART-BURN
Smart
Monitoring
and
Adapting
Recording
Technology
for
best
data
recording
quality
and
buffer
under-run
protection
Mounting
Direction
Horizontal
within
+/-
10°
tilt
CD-RW
Ultra-Speed
Plus
Compatible
System
Requirements
Windows®
98SE/ME/2000/XP
(with
latest
updates),
CPU
Pentium
Ill
800MHz
or
Higher
PC,
256MB
RAM
or
higher,
650MB
available
for
s/w;
5GB
free
or
higher
HOD
space
for
creating
single-sided
DVD
image
file;
9GB
for
creating
single-sided,
double-layer
8.5GB
DVD
image
file.
Recommendation:
Use
Imation
or
certified
CD/DVD
media
to
ensure
recording
quality
Content
Inside
Box
One
Imation
Internal
DVD
Drive,
Nero
6.0
Suite
CD,
PowerDVD
CD,
Quick
Setup,
Operating
Manual
(Nero
Software
Guide
is
found
in
the
Nero
CD),
CD-ROM
Audio
Cable,
4 x
Mounting
Screws,
IDE
Cable,
Warranty
Card.
Imation,
the
Imation
logo
are
trademarks
of
Imation
Corp.
Windows
is
a
registered
trademark
of
Microsoft
Corporation.
All
other
trademarks
are
the
property
of
their
respective
owners.

1
ENGLIS
H
SAFETY INSTRUCTIONS
1. Please read these safety instructions carefully.
2. Please keep this User’s Manual for your reference.
3. Please disconnect the equipment from your AC outlet before cleaning.
Do not use liquid or sprayed detergent for cleaning.
Use moist sheet or cloth for cleaning.
4. For pluggable equipment, the socket-outlet shall be installed near the equipment and
shall be easily accessible.
5. Please keep this equipment away from humid areas.
6. Install this equipment on a reliable surface. If the equipment is not on a reliable surface,
it may drop and cause injury.
7. The openings on the enclosure are for air convection. Please protect the equipment from
overheating . DO NOT COVER THE OPENINGS.
8. Make sure the voltage of the power source is appropriate when connecting the
equipment to the power outlet.
9. Place the power cord where people will not step or trip on it. Do not place objects over
the power cord.
10. All Cautions and Warnings on the equipment should be noted.
11. If the equipment is not in use for several days, disconnect the equipment from the power
outlets to avoid damage by transient power surges.
12. Never pour any liquids into the openings, this could cause fire or electrical shock.
13. Never open the equipment. For safety reasons, the equipment should only be opened by
qualified service personnel.
14. If one of the following situations arises, get the equipment checked by a qualified
service personnel:
(a) The power cord or plug is damaged.
(b) Liquid has penetrated into the equipment.
(c) The equipment has been exposed to moisture.
(d) The equipment has not worked well or you can not get it to work according to the
user’s manual.
(e) The equipment was dropped and damaged.
(f) If the equipment has obvious signs of damage.
15. DO NOT LEAVE THIS EQUIPMENT IN AN ENVIRONMENT UNCONDITIONED;
STORAGE TEMPERATURE ABOVE 60℃(140℉), IT MAY DAMAGE THE
EQUIPMENT. The sound pressure level at the operators position according to IEC704-
1:1982 is equal or less than 70dB(A)
16. DANGER: Invisible laser radiation when opened. Avoid direct exposure to beam.
Complies with FDA radiation performance standards,21 CFR, subchapter J.
Laser power: Wave Length: 783±3nm (CD); 658±3nm (DVD)
Emission power:0.7mW
Laser diode: class 3b

2
ENGLIS
H
PRECAUTIONS
!! Do not attempt to open the drive and
service it. Removing the cover may
cause exposure to harmful laser beams
and electrical voltage. User is
recommended to get service by
returning the defective drive back to
the original vendor where the drive was
purchased.
• Use the original package for transporting the drive or sending back for service. The
original packing was designed and tested to protect your drive under rough conditions.
• Do not put this drive in direct sunlight, on heating units, or near electrical appliances
which draw large amounts of current.
• Use a soft, dust-free cloth for cleaning your drive. Keep your drive away from moisture or
liquids including water, cleaning-fluids, or solvents.
• Keep your disc clean. Using a soft, dust-free cloth to clean the surface of the disc before
recording will improve the burning data integrity.
• Do not drop or jolt the drive.
• Keep the area around the drive clean from dust, smoke, and other contaminants.
• The copyright law of each country governs the reproduction of copyrighted works. The
person using the drives may be liable for its use to make unauthorized copies of
copyrighted works.
• It will increase the success rate for copying the data from HDD, instead of copying the
data by "copy on the fly mode". Therefore we recommend the user reserving sufficient
buffer space for creating a image file (at least 650MB for CD; 5GB for DVD; and if your
drive support Double Layer DVD+R writing, then at least 9GB space is needed).

3
ENGLIS
H
TABLE OF CONTENTS
INTRODUCTION
What the DVD Writer Does…………………………………………4
Format Compatibility…………………………………………………4
Recording Modes………………………………………………………5
What You Can Do with the DVD Writer……………………………5
System Configuration
System Requirements…………………………………………………6
Features and Controls
Front View……………………………………………………………7
Rear View……………………………………………………………8
INSTALLATION
Installing the DVD Writer………………………………………………9
IDE Drive Configuration…………………………………………………9
Changing the Jumper…………………………………………………11
OPERATION
Installing Necessary Device Drivers……………………………14
Loading and Unloading the Tray………………………………14
Recording CDs & DVDs
About Software & Manuals…………………………………………15
Recommended Recordable & ReWritable Media………………15
Playing CDs & DVDs
Playback Software……………………………………………………16
Playing Audio CDs…………………………………………………16
Playing DVDs for the First Time…………………………………17
TROUBLESHOOTING
Read Problems……………………...…………………………………18
Write Problems……………………………….…………………………19

4
ENGLIS
H
INTRODUCTION
Thank you for purchasing this DVD Writer, a reliable, high-performance recordable DVD and
CD writer, rewriter and player. Please read this manual carefully and keep it handy for easy
reference. Use the manual for installation, operation and troubleshooting for this drive.
What the DVD Writer Does
The DVD Writer is a recordable DVD/CD-ReWritable drive that provides professional quality
DVD and CD performance for writing, rewriting and reading. It also reads Digital Versatile
Discs (DVDs) formatted for movies and data. This versatile and remarkable drive can:
For DVDs
Write DVD+R (recordable DVD) media.
* Write Double Layer DVD+R (recordable DVD+R9) media.
Write DVD+RW (re-writable DVD) media.
Write DVD-R (recordable DVD) media.
Write DVD-RW (re-writable DVD) media.
Read DVD (DVD+R, DVD+RW, DVD-R, DVD-RW, and DVD+R9) discs.
For CDs
Write to CD-R (recordable CD) media.
Write to ultra-speed CD-RW (rewritable CD) media.
Read all CD-ROM and CD-R data media.
Read CD-RW and CD-DA (audio) media.
(NOTE: The drive’s maximum Writing, ReWriting, & Reading speeds are printed on the
original box. *Only when your drive supports Double Layer DVD+R writing, it can
write DVD+R9 media.)
The drive supports Running OPC (ROPC) and is compatible with Windows Plug & Play.
Flash memory allows upgrading the drive to the latest firmware revision (available from the
web site) without opening the drive. Buffer Underrun Proof technology eliminates buffer
underrun errors, therefore you can safely use your computer for other things while you’re
writing to a recordable DVD and CD media.
Format Compatibility
This DVD Writer is a versatile optical disk drive. For CD write function, it is capable to write
data, which conforms to Orange Book: Part 2 CD-R Volume 1 / Part 2 CD-R Volume 2 Multi
Speed / Part 3 CD-RW Volume 1 (known as Low Speed) / Part 3 CD-RW Volume2: High
Speed / Part3 CD-RW Volume 3: Ultra Speed, into CD-R/RW disk in combination with write
application software. For DVD write function, this drive confirms to DVD+R Version 1.2 /
DVD+R9 Version 1.0 (only for a Double Layer DVD+R writing support drive) / DVD+RW
Version 1.11 / DVD-R Recordable Disc Part1 Ver2.0 / and DVD-RW Re-recordable Disc
Part1 Ver.1.0. For read function, it is capable to read all of the following media: DVD
single/dual layer (PTP, OPT), DVD-R, DVD+R, DVD-RW, DVD+RW. Besides, it reads all
of CD formats and media: CD-DA, CD-ROM, CD-ROM/XA, Photo-CD, Multi-session,
Karaoke-CD, Video CD, CD-I FMV, CD Extra, CD Plus, CD-R, and CD-RW.

5
ENGLIS
H
Recording Modes
Track at Once
Data can be recorded to a disc, one track at a time. New tracks can be added later. Music CDs
can not be played in a CD player or CD-ROM until the disc is closed.
Disc at Once
Data can be recorded to an entire disc in one pass. In this mode, new data added later is not
allowed.
Session at Once
Data can be recorded to disc one session at a time. New sessions can be written later in this
mode. More disc space can be used because there is no gap between tracks.
Multi session
Data can be recorded to disc in one session. New sessions can be written later in this mode.
Less disc space can be used because a gap is created between sessions.
Packet Writing
This is useful for data back up. Data can be added directly to tracks on media or can be deleted
directly from tracks only on media. To use this mode, your software must support Packet
writing function.
What You Can Do with the DVD Writer
Record digital video or slide shows onto DVD+R, DVD+RW, DVD-R, and DVD-
RW discs.
*A Double Layer DVD+R writing support drive will be able to write DVD+R9 disc.
Play DVD+R, DVD+RW, DVD-R, and DVD-RW discs.
Record data or audio onto recordable or rewritable CD media.
Play music CDs.
Play VCD & DVD movies.
Access interactive reference materials stored on DVD.
Save photos and other images on recordable or rewritable CDs.
Archive images and video to DVD or CD.
Master new software programs on DVD or CD.

6
ENGLIS
H
SYSTEM CONFIGURATION
System Requirements
To ensure stable read/write/rewrite performance, an IBM compatible PC system with the
following features is recommended.
CPU Pentium III 450MHz or higher (Pentium III 800MHz is recommended)
OS Microsoft Windows 98SE/ME/2000/XP.
Memory Must meet recommended RAM requirements for your operating
system. (minimum 256MB is recommended)
Hard Drive Minimum 650MB available capacity for creating a CD image file;
5GB free HDD space for creating a DVD image file to a Single Layer
DVD disc (4.7GB); *and 9GB or above free HDD space for creating a
DVD image file to a Double Layer DVD+R disc (8.5GB).
(Do not enable HDD thermal calibration during operation)
Interface Vacant IDE interface connector
NOTE:
Some high-speed hard drives are equipped with an "Auto Thermal Re-calibration" function.
Please disable it in the BIOS setup to avoid writing errors (Buffer Underrun).
*Check the original box to see if your drive supports writing to a Double Layer DVD+R disc.

7
ENGLIS
H
FEATURES AND CONTROLS
Front View
Figure: Front view of DVD Writer
A Eject/Close Button Push button to eject/close the tray.
B Busy / Write LED Indication of drive's operation status. The light lit stands for
Busy; the light blinking stands for Write/Rewrite.
C Volume Knob Control volume of earphone jack. This control has no effect on
rear panel audio output.
D Earphone Jack Stereo mini-jack for headphones and powered speakers.
E Emergency
Eject Hole
In case the Eject button isn’t working, insert a small stick or
paper clip into this hole to eject the tray.
Note: Turn off the power before doing this manual ejection.

8
ENGLIS
H
Rear View
Figure: Rear view of DVD Writer
A Power Connector Four-pin connector for DC power input.
B Host IDE Interface
Connector
40-pin connector for E-IDE interface.
C Device Configuration
Jumper
Six-pin jumper for selecting drive mode as an IDE master, slave,
or cable select.
D Analog Audio
Output Connector
Four-pin connector for analog audio output. Use to connect to
sound board or audio amplifier.
E Digital Audio
Output Connector
Two-pin connector for digital audio data. For connecting to a
sound board that support Sony/Philips digital interface (SPDIF)
or Digital-In.
9
ENGLIS
H
INSTALLING THE DVD WRITER
This chapter explains how to physically install your DVD Writer in your
computer. The steps you will need to do are as follows:
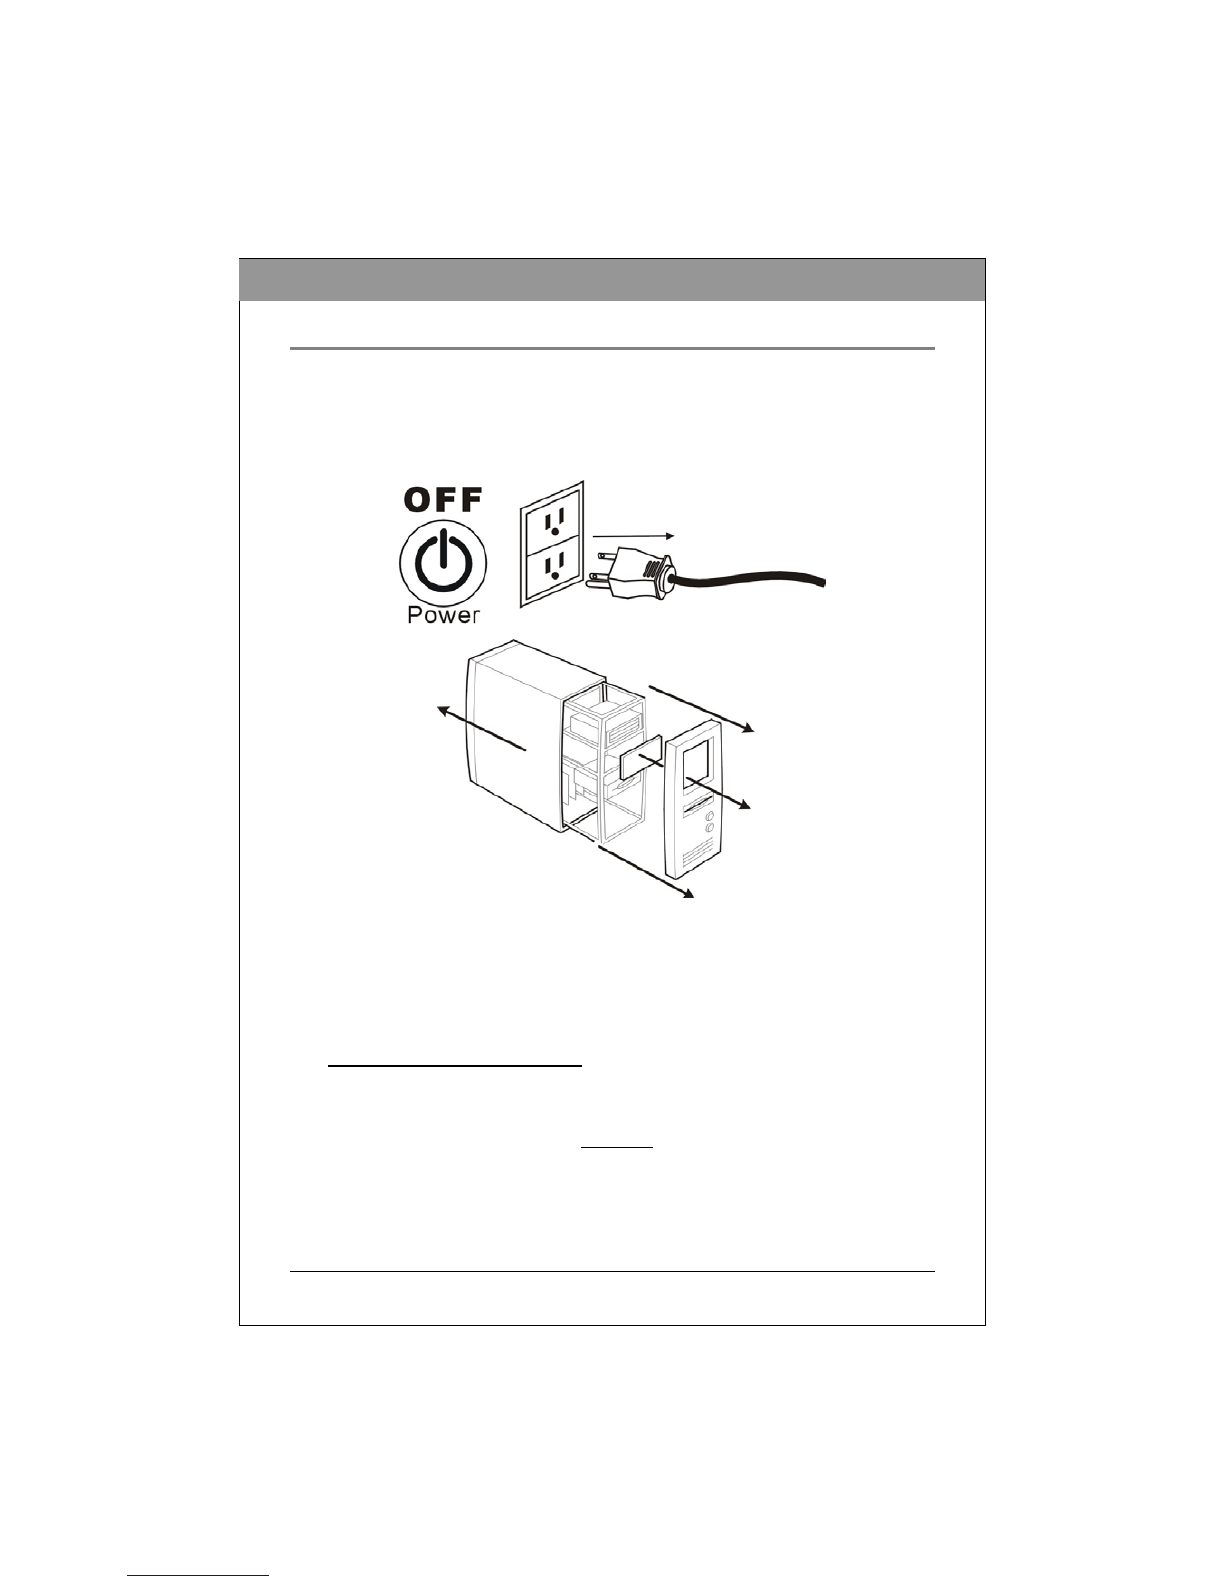
1. Turn off your computer system and unplug from power outlet.
2. Remove the computer cover.
3. Set the Master/Slave jumper on the rear panel of the DVD Writer.
(To get the best operation results of your Hard Disk Drive and the DVD
Writer, we strongly suggest you connection the DVD Writer to the
Secondary IDE port as the MASTER device.)
◆IDE Drive Configurations:
(A) Hard Disk connected as Master device on the Primary IDE port; nothing connected
to the Secondary IDE port.
Set the DVD Writer’s jumper to MASTER, and connect the DVD Writer as Master
to the Secondary IDE port.
10
ENGLIS
H
(B) Hard Disk connected as Master device and CD-ROM or DVD-ROM connected as
Slave on the Primary IDE port; nothing connected to the Secondary IDE port.
Set the DVD Writer’s jumper to MASTER, and connect the DVD Writer as Master
to the Secondary IDE port. (If you are looking for a way of “FAST COPY/On the
Fly Copy”, this setting will bring you with a best result of copying speed.)
Remove the CD-ROM or DVD-ROM, change it to SLAVE and re-connect it to the
Secondary IDE port. Set the DVD Writer’s jumper to MASTER, and connect the
DVD Writer as Master to the Secondary IDE port. (This setting will bring you the
best result for usage of your Hard Disk. Thus, the access speed of the Hard Disk
will not be dragged down while the CD-ROM is working at the same time.)

11
ENGLIS
H
(C) Hard Disks connected as Master and Slave devices on the Primary IDE port; CD-
ROM or DVD-ROM connected as Master on the Secondary IDE port.
Change the CD-ROM or DVD-ROM jumper to SLAVE and re-connect it to the
Secondary IDE port. Set the DVD Writer’s jumper to MASTER, and connect the
DVD Writer as Master to the Secondary IDE port.
◆Changing the Jumper:
The Master/Slave jumper can be used to set the DVD Writer to Master or Slave device.
The following figure is the illustration of jumper setting.
M
A
S
L
C
S
Master Device
M
A
S
L
C
S
Slave Device
(
Default settin
g)
Figure: The setting of Master or Slave device.
NOTE: Do not use two jumpers to set MA and SL simultaneously.
CS (CSEL)
If you choose the CS setting, the Master/Slave setting will be made automatically
depending on your hardware configuration.
12
ENGLIS
H
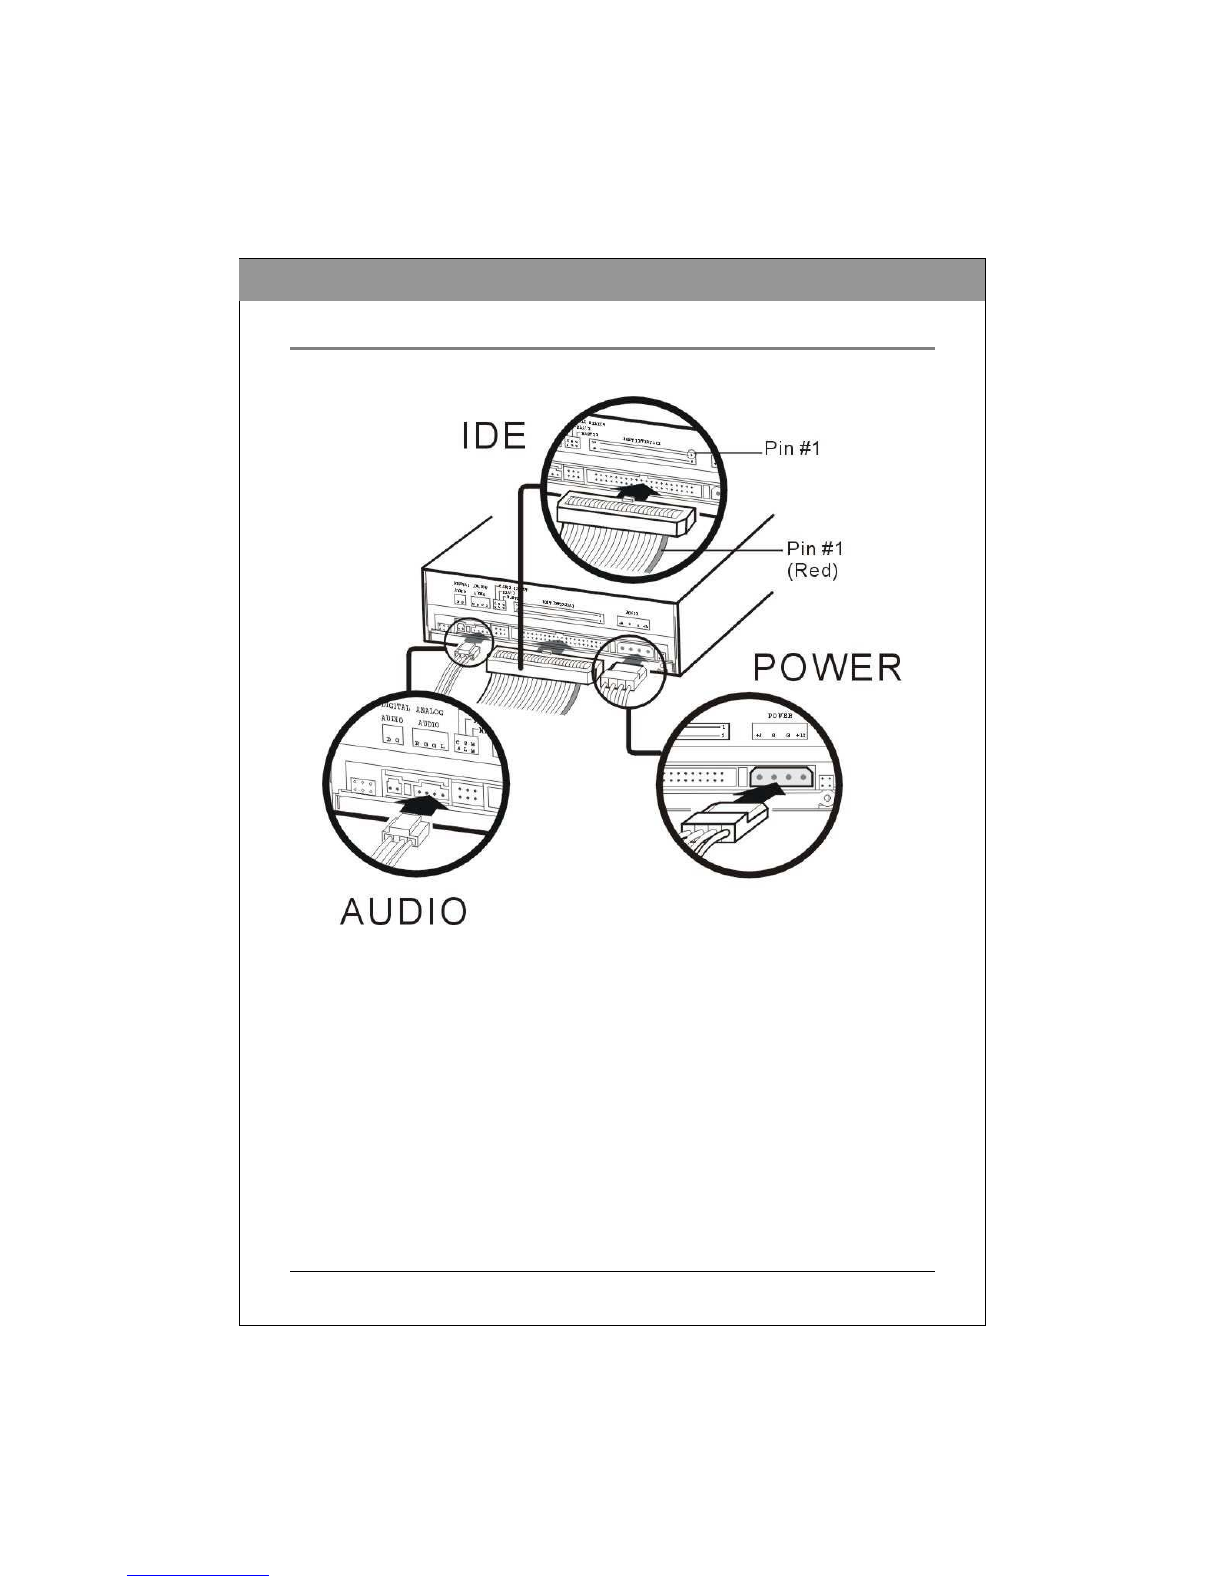
4. Connect the necessary cables to your DVD Writer.
Figure: Connecting Cables
(A) IDE Cable: Plug one connector of the IDE cable into the IDE connector on the rear panel
of the drive before you insert the drive into your computer. Then thread the cable
through the front of the open bay and back toward the motherboard.
(B) Power Cable: Connect a power cable from the computer to the POWER connector of the
drive. In most computers, you will find free power connectors that are ready for you to
use.
(C) Audio Cables (Optional)
You may connect the analog audio cable if you want to use a sound board in your system.
This cable runs from the four-pin analog audio output connector on the rear panel of
your drive to your sound board. Or you may connect a digital audio cable if your sound
board is equipped with the Sony/Philips digital interface (SPDIF) or Digital-In, and you
wish to use the digital audio output from your drive.
13
ENGLIS
H
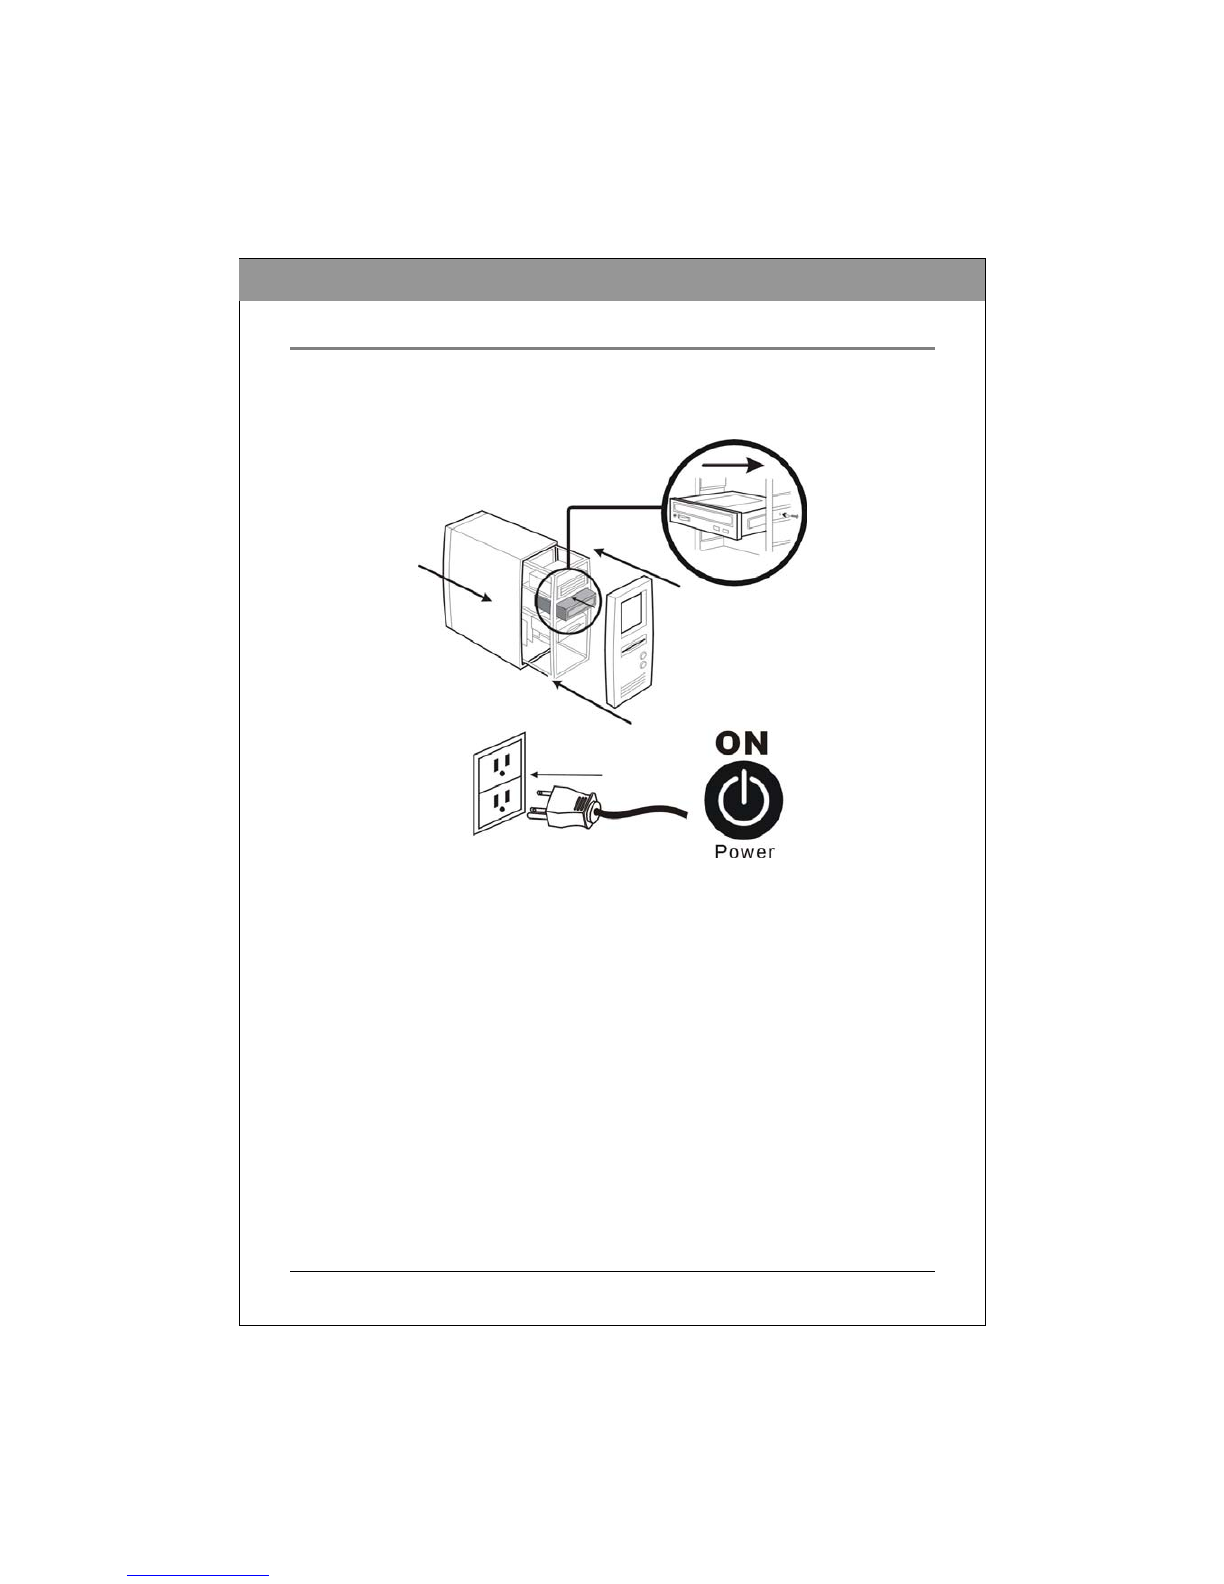
5. Carefully slide the DVD Writer horizontally into the empty bay and
mount it. Then replace the computer cover.
6. Plug your computer back to power outlet and then turn the power on.

14
ENGLIS
H
OPERATION
Installing Necessary Device Drivers
In Windows, the DVD Writer acts as a “CD-ROM Drive” for purpose of installation and
setup. In some cases, you will need to install additional software to make use of all the
features of the DVD Writer.
To use the DVD Writer on a computer:
As a CD-ROM drive: Most Windows Operating Systems (Windows XP,
Windows ME, Windows 2000, Windows 98, and Windows 95) supply a generic
CD-ROM device driver that allows the DVD Writer to function as a standard CD-
ROM drive. You do not need to install anything else.
As a DVD-ROM drive: The computer’s operating system (excluding Windows 95)
also allows the DVD Writer to function as a DVD-ROM drive. You do not need to
install anything else to play DVDs. (In Windows 95, you will need additional
software to play DVD media, which will be included with the DVD Writer software
CD kit.)
As a CD ReWriter or DVD ReWriter: In order to write to CD or DVD media,
you will need additional software. The Recording software kit included with the
package will offer you function like mastering, packet writing, duplicating, backing
up your hard disk or files, capturing audio, and more.
Loading and Unloading the Tray
(1) While the DVD Writer is powered up, push the Eject button on the front panel.
The tray drawer slides out in a few seconds.
(2) Lay a disc with the label facing up in the depression of the tray. The disc
should lie flat in the tray.
Figure: Loading the Tray
(3) Press the Eject button again and the tray will slide shut within seconds.

15
ENGLIS
H
RECORDING CDS & DVDS
Before you start, please make sure you have installed the proper software for
Recording CDs, DVDs and Playing DVDs. The Recording software and the DVD
Playback software are in different CD kits included in the package.
About Software & Manuals
The included software is to give you the best result with ease of use. The detailed user’s
manual for the recording and playback software will be automatically installed into your
computer when you install the recording software. For details on other software packages
that are available for writing DVDs or CDs, please visit the web sites of the companies whose
software you are interested in, refer to their user’s manual, or look at the help option within
the software. Please refer to the user’s manual for the detailed operation procedures.
Recommended Recordable & ReWritable Media
Some CD media or DVD media may not be possible to write on, due to differences in the
manufacturing quality. We recommend you use CD and DVD media from the following
manufacturers that have been proven satisfactory with our drive.
CD-R Media:
CMC, Daxon, DST, Fornet, Fujifilm, GAT, Gigastorage, Infodisc,
KingPro LeadData, Maxell, Mitsubishi, MPO, NanYa, Plasmon,
Postech, Princo, Prodisc, RAMedia, Ritek, SAST, SKC(Korea),
Sony, TDK, Taiyo-Yuden, Xeitek
Low Speed
CD-RW Media:
CMC, Daxon, Gigastorage, Infordisc, LeadData, Mistubishi,
Princo, Prodisc, Ricoh, Ritek
High Speed
CD-RW Media:
CMC, Daxon, Fornet, Gigastorage, Infodisc, LeadData,
Mitsubishi, NanYa, Princo, Prodisc, Ricoh, Ritek
Ultra Speed
CD-RW Media:
CMC, Daxon, Infodisc, Mitsubishi, Prodisc, Ritek
DVD-R
Media:
CMC, GSC, Maxell, Mitsubishi, Prodisc, Ritek, Sony, Taiyo-
Yuden
DVD-RW
Media:
Mitsubishi, Ritek
DVD+R Media:
CMC, Maxell, Mitsubishi, Philips, Prodisc, Ricoh, Ritek, Sony,
Taiyo-Yuden
DVD+R9
Media:
Mitsubishi, Ricoh
DVD+RW
Media:
CMC, Daxon, Infodisc, Mitsubishi, Philips, Prodisc, Ricoh, Ritek,
Sony
NOTE: (1) Only when your drive supports Double Layer DVD+R writing can write
DVD+R9 media.
(2) The drive’s maximum Writing, ReWriting, & Reading speeds are printed on the
original box.
(3) Subject to change without further notice.
16
ENGLIS
H
PLAYING CDS & DVDS
Playback Software
You must install the DVD playback software to your computer first. If you do not have any
DVD playback software installed in your computer, the included DVD playback software in
the CD kit will bring you the best playback result.
You can immediately play Audio CDs and pre-recorded DVD discs, including movies and
other DVDs. To play a CD or a Digital Video Disc (DVD), insert the disc with the label up
(for CDs). This DVD Writer plays both single-layer and dual-layer DVDs.
Playing Audio CDs
In order to listen to an audio CD, connect an audio cable to the analog audio connector on the
rear of the drive and connect the other end to your sound board.
There are two types of audio you may encounter:
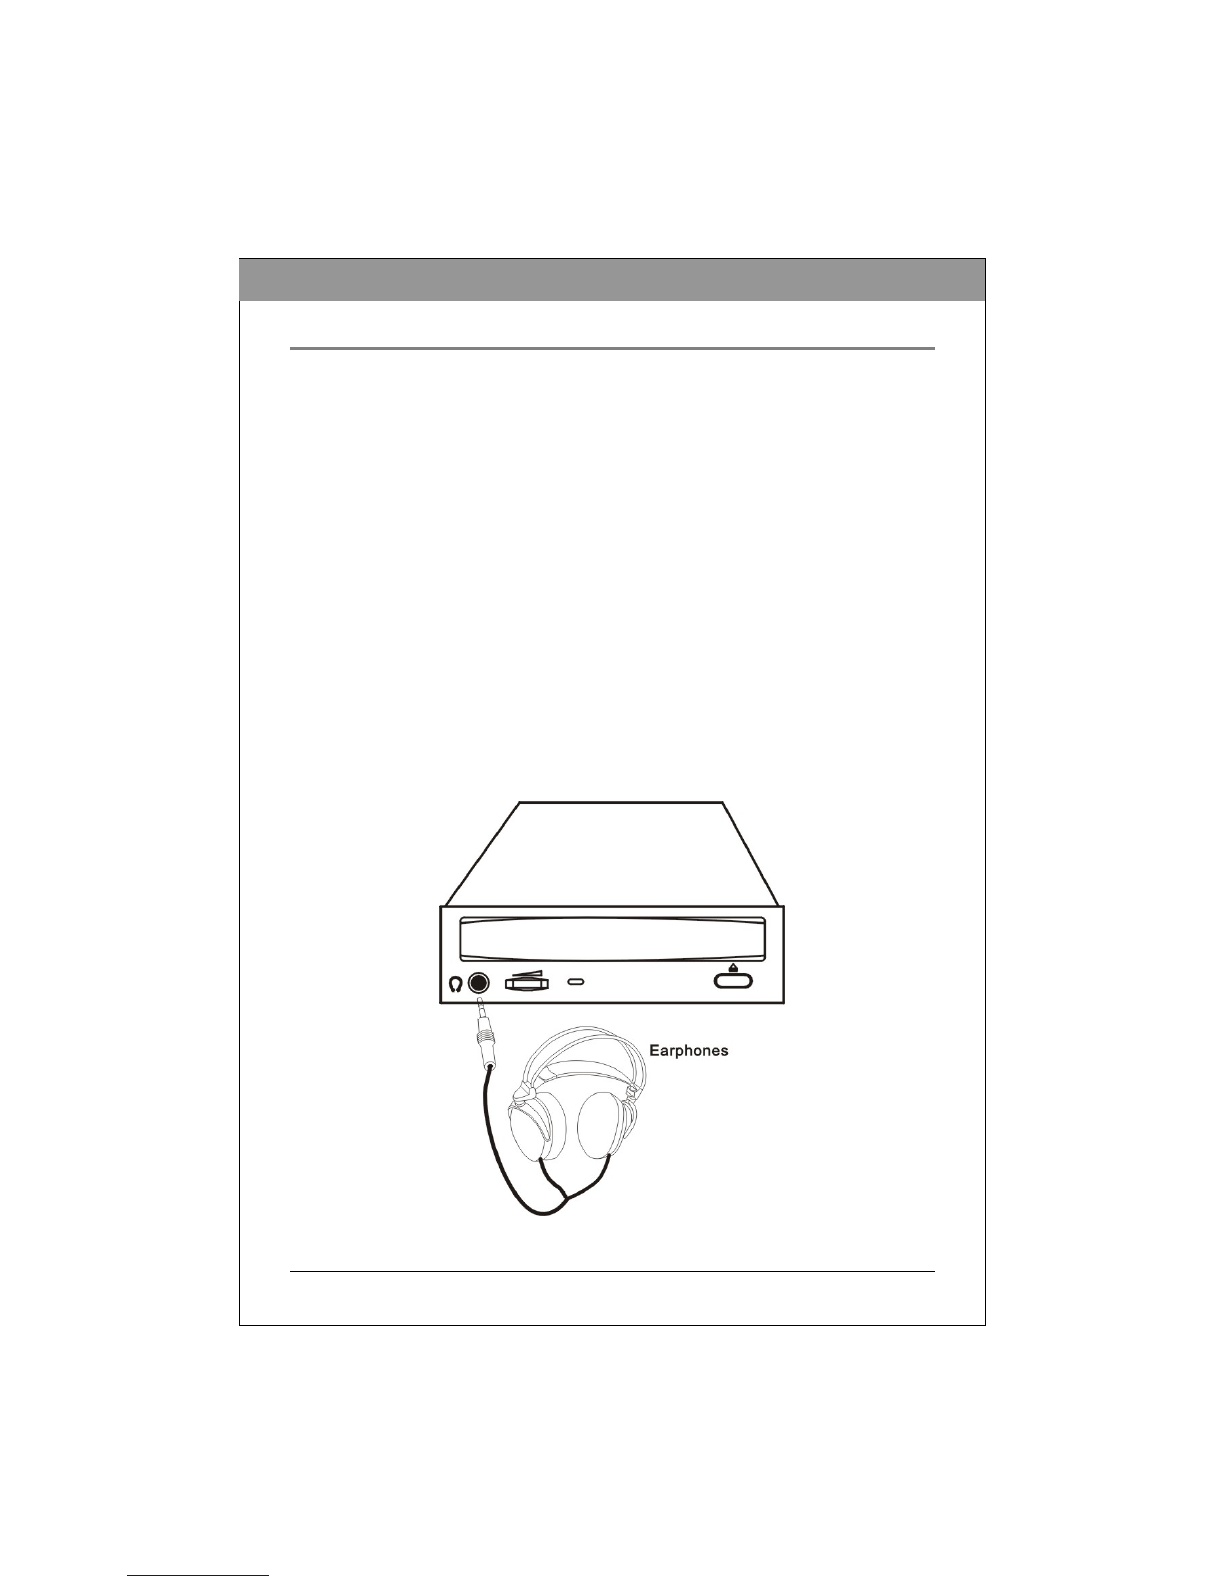
(1) CD-Audio: This comes from audio discs (like the ones you use in your home stereo) that
are translated directly by your DVD Writer into sound. Although, in most cases a sound
board and speakers are use to hear this audio, you can also listen to it by plugging a set
of headphones or powered speakers into the earphone jack on the front of your drive.
You can control audio playback through software, and adjust the volume with the front
panel volume control.
Figure: Using the Earphone Jack for Playing Audio

17
ENGLIS
H
(2) Sound Board Audio: This comes from data files that may be present on a disc, such as a
WAV, WMA, or MP3 files, that are transferred from the CD to your computer via the
IDE interface. The sound board translates the data from the digital files into analog
sound. If you do not have a sound board, you will not be able to hear this form of audio
from your DVD Writer.
To listen to music through the computer’s sound board, you can control volume with the
volume control on the Windows Media Player or CD Player Taskbar. You can also mute
the sound on your sound board and listen to music through headphones or self-powered
speakers.
Playing DVDs for the First Time
A code on some DVDs allows them to be played only in a certain regional area, such as North
America, Europe, etc. When the DVD Writer ships, there is no region code set. The first
time a DVD that has a region setting is inserted into the DVD Writer, the act of inserting the
DVD sets the drive to that region code.
If you later insert a DVD with a different region code, you are prompted to either accept
changing the region code or not. If you do not accept the change, then that DVD will not play.
If you do accept the change, then the DVD Writer’s region code setting is changed. But
advised that you may change the DVD Writer’s region code only 5 times. After that,
you will not be able to change your drive’s code setting.

18
ENGLIS
H
TROUBLESHOOTING
If you meet any trouble during installation or normal use of your DVD Writer, please refer to
the following information.
Read Problems
Symptom Possible Causes Solutions
No power. Check if the power cord is connected
securely to the connector.
No operation.
IDE cable isn't connected
properly.
Ensure that the IDE cable and connectors
are not damaged.
Power is not switched on. Check if LED of your DVD Writer is lit.
If not, there is no power.
No DVD Writer
recognition.
IDE cable is not connected
properly between the
computer IDE port and
DVD Writer.
Ensure that both connectors of the IDE
cable is properly connected to the IDE
ports on the computer and the DVD
Writer.
Eccentric disc loaded. Replace it with another one.Excessive noise when
reading. Seal attached on the surface Detach the seal very carefully. Don't
make any scratches.
Eject locked by software. Stop the applying software and try the
eject button to open the tray.
Cannot open the tray
(Eject).
Disc set incorrectly. Insert a small stick or paper clip into this
hole to eject the tray.
"Load Contents" or "Import
Session" was NOT clicked
on the Software.
If recorded without checked "Load
Contents" or "Import Session", it is
impossible to read. But when using
utility software such as "Session
Selection" from Adaptec, the former
session can be read.
Defective disc. Deep scratches, fingerprints or other
contaminants on the discs surface can
disable the drive from reading data.
Always keep it clean.
Music CD inserted. Because audio compact discs do not have
computer data, typing computer
commands while an audio CD is in your
drive will result in an error message.
Cannot read the
former session of
the CD-RW disc
which has been
written at least
twice.
Read error
occurs.
Disc inserted upside down. Remove the disc from tray and reinsert it
with the label side up.
Table of contents


