LG GDR-H30N User manual

A
Internal ATAPI (E-IDE) Drive
❶
B
C D
❷ ❸ ❹
❶ ❷ ❸ ❹ ➎
❶
❷
❸
❶ Power Cable
❷ IDE Cable
❸ Audio Cable
❶ Netzkabel
❷IDE-Kabel
❸ Audiokabel
❶ Câble
d’alimentation
❷Câble IDE
❸ Câble audio
❶ Cavetto di alimentazione
❷Cavetto di interfaccia IDE
❸ Cavetto di uscita segnale audio
❶Cable de alimentación
❷Cable IDE
❸ Cable de audio
❶ Cabo de alimentação
❷Cabo IDE
❸ Cabo de áudio
ND L SLAVE
MASTER
39
40
CS
SL
MA
CS: Cable Select (CSEL)
SL: Slave
MA: Master
CS: Cable Select (CSEL)
SL: Slave
MA: Master
CS: sélection de câble (CSEL)
SL: esclave
MA: maître
CS: Selezione automatica (CSEL)
SL: Configurazione Slave
MA: Configurazione Master
CS: Selección de Cable (CSEL)
SL: Esclavo
MA: Maestro
CS: seleção de cabo
SL: Slave
MA: Master

English
Features
•E-IDE interface
•Data transfer rate (DVD-ROM max-16X-
speed: 22,100KB/sec, CD-ROM max-52X-
speed : 7,800KB/sec)
•Motorized tray loading system
•Designed for internal mounting
•Emergency eject support
•Read compatible for DVD-R, DVD+R, DVD-
RW, DVD+RW & DVD-RAM discs
•Supports Region playback control Phase II
System Requirements*
•IBM PC AT or compatible, Pentium-266MHz
processor or higher (higher recommended).
•Aminimum of 64MB memory
(higher recommended).
•Asuitable free standard 5 1/4”internal drive
bay.
•OS: Windows 2000, XP, Vista.
•An existing IDE controller with an available
cable connector or a new IDE controller
(recommended with IDE PIO Mode 4 capa-
bility) that you will need to install.
* Please note: Certain software (i.e. particularly
those including Video playback) may require a
considerably increased specification PC to
give acceptable results. While this DVD-ROM
drive can read DVD-video discs, decoding
them to display on your pc’s monitor requires
separate MPEG decoding that is done by
separate hardware (either an MPEG decoder
card or MPEG decoding done by your video
card), or separate software that you install to
do MPEG decoding. These items are sepa-
rate and are not included with this DVD-ROM
drive.
Location and Function of
Controls
Front Panel
1. Disc Tray
2. Drive activity indicator
3. Emergency Eject Hole
4. Stop/Eject Button
Rear Panel
1. Digital Audio Output Connector
This connector is not supported.
2. Analog Audio Output Connector
3. Jumper Connector
This jumper determines whether the drive is
configured as a master or slave. Changing
the master-slave configuration takes effect
after power-on reset.
4. IDE Interface Connector
Connect to the IDE (Integrated Device
Electronics) Interface using a 40-pin flat IDE
cable.
NOTE : Do not connect or disconnect the
cable when the power is on, as this could
cause a short circuit and damage the sys-
tem. Always turn the power OFF when con-
necting or disconnecting the cable.
5. Power Connector
Supplied Accessories
zzOwner’s Manual
zzScrew (4 pieces)
zzMPEG-2 software (Power DVD)
A

Installing the Drive
Before installing the drive, turn off the system
power. Follow the steps below to install the
DVD-ROM drive:
1.
Remove the cover from your computer system.
Refer to manual for the computer for details
about removing the cover.
2.
Adjust the Master/Slave jumpers on the back
of the DVD-ROM drive as necessary.
Connect the DVD-ROM drive to the
IDE ports of your motherboard. In general,
the hard drive will connected to the Primary
IDE port and its jumper set to Master for
booting the operating system. There are two
possible alternate connections for DVD-ROM
drive installation.
A) When using a Primary IDE port
If you need to connect your DVD-ROM drive
to the same Primary IDE port, the DVD-ROM
drive should be set to Slave position.
B) When using a Secondary IDE port
You can also connect DVD-ROM drive to
the Secondary IDE port and set its jumper to
Master.
3. Insert the DVD-ROM drive unit into a free
5.25-inch drive bay. Secure the DVD-ROM
drive to the drive bay rails with the mounting
screws (supplied).
4. Connect the 4-pin power cable and 40-pin
IDE interface cable to the back of the DVD-
ROM drive.
Notes: If there is no spare power cable available in the
computer, you will have to purchase a splitter cable of a
suitable type. The red edge of the IDE cable corresponds
to pin 1 of the IDE interface on the DVD-ROM drive.
Please Note: an IDE cable is not supplied and may be
required to be purchased separately.
If the computer is using a sound card, the drive is
connected to the sound card with an audio cable.
This DVD-ROM drive is supplied with a Creative Labs
SoundBlaster©compatible audio lead, if this is not
suitable for your sound card, it maybe necessary for you
to purchase a suitable lead from your retailer. Refer to
the manual for the sound card for detailed information
regarding connection.
5. When the installation of the drive unit is
complete, replace the computer cover.
6. Reconnect the computer power cord and
turn on the computer.
Device Drivers
When using Windows 2000 Pro/XP or Vista,
the installation of any software driver or
special device is not required.
The DOS and Windows 3.1 users can download
the DOS Device drivers anytime via internet.
For your information, please consult the follow-
ing internet sites:
http://www.lgservice.com
For Windows 2000 Pro/XP Users
[In order to ensure normal drive operation,
please check the following:
•The drive is displayed in
Windows 2000 Pro/XP : [Control Panel]-
[System]-[Hardware]-[Device Manager]-
[DVD/CD-ROM-Drive]
•32-bit is displayed in
[control panel]-[system]-[performance]
[If the drive is not recognized by your
computer, please check the following items.
•If an indicator is displayed on the IDE
controller in [control panel]-[system]-[device
manager]-[harddisk controller], you will
need to contact your PC’s manufacturer or
the motherboard’s manufacturer and get
the appropriate IDE
controller driver.
[Run ADD NEW HARDWARE in Control
Panel to let the PC search again for the new
device.
C
B
English

How to Use the Discs
When using CD-ROM discs, DVD-ROM discs,
CD-R discs or CD-RW discs, don’t attach any
stickers or labels to the discs. Using discs with
them attached not only causes read and write
errors, but data on the disc may be lost due to
damage to the disc itself.
The Discs in this unit operate at a very high
speed! DO NOT use damaged, cracked or
warped discs.
The drive’s optical unit may be damaged if they
break. DO NOT use non-standard discs.
NON-standard discs may not play or store data
properly. Non-standard discs are any discs that
are not the standard 12 cm CD type discs. This
includes Sony Walkman™ discs, non-circular
discs including promotional, business card
discs, and other unusual discs.
Notes on CD-RW/DVD-RW discs
This product can read CD-RW/DVD-RW disc
data. Note the following:
- A little longer time is needed to sense a
CD-RW/ DVD-RW disc when the operation
starts, compared with standard CD-ROM/
DVD-ROM discs.
- Since playback signal level of CD-RW/
DVD-RW is lower than the replicated CD/DVD
discs, reading speed of those discs is lower
than that of the replicated discs to ensure
data reading.
- Blank discs, discs that you failed to write data,
or discs that session close processing has not
been made, cannot be used.
- Operation may not start, or the data may not
be read under the following conditions:
The quality of the recorded signal has deterio-
rated due to the dirt or scratches on the disc,
or frequently rewritten discs. If the drive fails
to read the disc, open the disc drawer, check
the data side of the disc (side opposite the
label side) for dust or scratches, and reinsert
the disc and close the drawer to try to read
the disc again
Emergency Eject
This drive has a feature that allows the CD
to be ejected manually if necessary in an
emergency, such as failure of the drive or a
power outage.
NOTE: Don’t use this feature except in an
emergency.
1) Turn the power to OFF.
2) Poke a fine-tipped object (such as a
straightened heavy duty paper clip) into the
small hole above the eject button.
The front door will pop open and the disk
tray will come partway out.
3) Pull the front door to open it all the way, then
grip the disc tray between thumb and
forefinger and gently pull it straight out.
NOTE: This feature is a last measure to be
used
only in an emergency. Using it excessively will
cause malfunction. If you cannot get a good
grip on the disc tray with your fingers, use a
steel binder clip or spring clamp to pull it out.
D
English

Troubleshooting
* When the DVD-ROM drive does not work with
the hard disk drive in primary IDE channel.
(SOLUTION)
1. Check the DVD-ROM drive Master/Slave
Jumper setting.
The DVD-ROM drive should be set to the
Slave mode if it is on the same IDE cable as
your Hard Drive that is set to the Primary
Master mode.
2. Check to be sure your hard disk Interface
type is IDE type.
3. Check your hard disk Master/Slave Jumper
setting. Some old-version IDE type hard
disks were set to Master Only mode.
In that case, contact your hard disk company
and change your hard disk jumper setting to
master mode.
4. If the DVD-ROM drive does not work with
above methods, you may need a secondary
IDE card.
If you use the secondary IDE card, you
should set the DVD-ROM drive jumper to the
master mode if the DVD-ROM drive is the
first device you are connecting to the sec-
ondary IDE card.
* When the DVD-ROM drive does not install in
OS/2 warp.
(SOLUTION)
1. Select NON-LISTED IDE CD.
* DVD-ROM drive is not present in Windows
3.1 or 3.11 or DOSSHELL.
(SOLUTION)
1. When the WIN or DOSSHELL command
lines are present in your AUTOEXEC.BAT,
make sure that the MSCDEX.EXE command
line appears before the WIN or the
DOSSHELL command lines.
Please Note: Since this product supports
Region Playback Control Phase II, a certain
MPEG decoder card or Software without
regional code setting may cause this drive not
to read DVD-ROM discs.
This DVD-ROM Drive enables you to change
the regional code up to 5 times.
Important Precautions
Follow these precautions when handling the
drive or discs.
Precautions
•Please take notice that the manufacturer of
this equipment does not offer any warranty
against data loss due to inappropriate
installation or handling or direct or indirect
damages.
•Please take notice that the manufacturer will
bear no responsibility for direct or indirect
damages caused by the use of this product
or its malfunction.
•Please take notice that the manufacturer will
bear no responsibility for damage to data
caused by this product.
Installation
•
Avoid placing the drive in a location subject to:
- high humidity
- high temperature
- excessive dust
- mechanical vibration
- direct sunlight
We recommend using the drive in a horizontal
or vertical position. Do not install the drive at an
angle.
Operation
•Don’t move the drive suddenly from a cold
place to a warm one or raise the room tem-
perature suddenly. Condensation may occur,
causing abnormal operation.
•Make sure to remove the disc before moving
the drive. The disc may be damaged, caus-
ing data loss.
•Be careful to prevent foreign objects, such as
liquids or metal, from entering the drive. In
case a foreign object enters the drive,
please consult the dealer where the drive
was purchased.
•Don’t interrupt the electric power while the
drive is operating.
•When connecting two IDE devices to the
Primary or Secondary connectors, make sure
that the two devices are not configured as
both Master, or both Slave. If they are both
set the same, Windows may fail to run or
recognize the drives.
English

English
Specifications
Items CD-ROM DVD-ROM
General Data Capacity
(User Data/Block)
Rotational Speed
Disc Diameter
Supported Disc
Performance Access Time
(Random Access)
Transfer Rate
* Sustained
* Burst (ATAPI)
Interface
MTBF
Buffer size
Audio Frequency Response
Line Output Level
Line Out Jack
Environment Temperature
Humidity
Electrical Power
NOTE : Specifications are subject to change without notice for improvement.
Yellow Book: Book A,B:
2048 bytes/block 2048 bytes/block
(Mode1 & Mode2 Form1)
2336 bytes/block (Mode2)
2328 bytes/block (Mode2 Form2)
2352 bytes/block (CD-DA)
21X~52X (CAV) 6.6X~16X (CAV) Approx.
Approx. 10,430 rpm 9,300 rpm (single layer)
5X~12X (CAV) Approx.
7,600 rpm (dual layer)
12cm/8cm
(8cm disc can be used only with drive placed horizontally.)
DVD-ROM SL/DL, DVD-R, DVD+R, DVD+R DL, DVD-RW,
DVD+RW, DVD-RAM, CD-Digital Audio & CD Extra, CD-ROM,
CD-ROM XA-Ready, CD-I FMV, CD-R, CD-RW, CD-DA, Photo-CD
(Single & Multi-Session), Video CD, CD-Text, DVD–R DL
90ms Typical 100ms Typical
Outer side:Approx 7,800 Kbytes/s Outer side:Approx 22,100 Kbytes/s
Inner side:Approx 3,150 Kbytes/s Inner side:Approx 8,700 Kbytes/s
16.67 Mbytes/s (PIO Mode4)
16.67 Mbytes/s (Multiword DMA Mode2)
33.3 Mbytes/s (Ultra DMA Mode2)
ATAPI/E-IDE
125,000 Power On Hours (Duty Cycle 10%)
198 Kbytes
20Hz ~ 18KHz ± 3dB(Line Output)
0.70 Vrms ± 10% (47KΩ)
4-Pin terminal (Rear)
0° ~ 50 °C (operating)
10% to 80% (operating)
+12/+5V DC

Deutsch
Merkmale
•E-IDE Schnittstelle
•Datenübertragungsrate: DVD-ROM max.
16x : 22.100 KB/s, CD-ROM max. 52x:
7.800 KB/S
•Motorbetriebene Schublade
•Einbauart: intern
•Notauswurf
•DVD-R, DVD+R, DVD-RW, DVD+RW und
DVD-RAM lesen
•
Unterstützt Region Playback Control Phase II.
Systemanforderungen*
•IBM PC AT oder kompatibel, Pentium
266MHz Prozessor oder höher
•Mind. 64 MB RAM oder mehr
•Freier 5,25” Einschub
•OS: Windows 2000, XP, Vista.
•IDE Controller mit einem freien
Anschlussport.
* Bitte beachten Sie: Bestimmte Software
(besonders solche mit Video Abspiel-
Funktion) kann bedeutend höhere
Systemanforderungen benötigen, um akzept-
able Ergebnisse zu erzielen. Obwohl dieses
DVD-ROM Laufwerk Video-DVDs lesen kann,
müssen diese, um auf Ihrem Monitor gezeigt
werden zu können, MPEG decodiert werden.
Das geschieht entweder durch separate
Hardware (entweder eine MPEG Decoder-
Karte oder ein in Ihre Video-Karte integrierter
MPEG-Decoder), oder durch separat
installierte MPEG-Decoder-Software.
Diese Soft- bzw. Hardware ist im
Lieferumfang dieses DVD-Laufwerks nicht
enthalten.
Lage und Funktion der
Bedienelemente
Vorderseite
1. CD-Schublade
2. Betriebsanzeigen
3. Notauswurföffnung
4. Stop-/Auswurftaste
Rückseite
1. Digitaler Audio-Ausgang
Dieser Anschluss wird nicht unterstützt.
2. Analoger Audio-Ausgang
3. Jumper
Dieser Jumper bestimmt, ob das Laufwerk
als Master oder als Slave konfiguriert ist.
Eine Änderung der Master-Slave-
Konfiguration wird erst nach einem Neustart
des Rechners wirksam.
4. IDE-Schnittstellenanschluss
Über diesen Anschluß wird das DVD-ROM-
Laufwerk mit Hilfe eines 40poligen IDE-
Flachkabels an die IDE (Integrated Device
Electronics)-Schnittstelle angeschlossen.
HINWEIS: Das Kabel niemals bei
eingeschaltetem Rechner anschließen oder
abziehen. Dies könnte einen Kurzschluß
verursachen und das System
beschädigen. Schalten Sie den Rechner
stets AUS, bevor Sie das Kabel anschließen
oder abziehen.
5. Spannungsversorgungsanschluss
Mitgeliefertes Zubehör
zzBedienerhandbuch
zzSchraube(4 Stück)
zzMPEG-2 software (Power DVD)
A

Installation des Laufwerks
Bevor Sie mit der Installation beginnen,
müssen Sie das System ausschalten. Anhand
folgender Schritte installieren
Sie das DVD-ROM-Laufwerk:
1. Nehmen Sie die Systemabdeckung ab.
Beziehen Sie sich dabei auf das Handbuch
lhres Systems.
2. Setzen Sie die Master/Slave-Brücken an der
Rückseite des DVD-ROM-Laufwerks, sofern
erforderlich.
Das DVD-ROM-Laufwerk wird über ein IDE-
Schnittstellenkabel mit der Systemplatine des
Host-Rechners verbunden. Sie Können das
DVD-ROM-Laufwerk je nach Rechner als
Slave-oder als Master-Gerät anschließen.
A) Bemerkung
Falls das Betriebssystem von der Festplatte
geladen wird, muss diese in den Master
Mode gesetzt sein und somit das DVD-ROM
Laufwerk in den Slave Modus gesetzt
werden.
B) Fall sie einen zweiten IDE controller
benutzen
"Primary Master" sollte die Festplatte mit
dem Betriebssystem sein, von dem gebootet
wird. lhr DVD-ROM Laufwerk kann "Primary
slave", "Secondary Master" oder "Secondary
Slave" sein. Falls lhr DVD-ROM Laufwerk
"Secondary Slave" sein soll, so muss ein
Gerät (Harddisk oder DVD-ROM) als
"Secondary Master" angeschlossen sein.
3. Schieben Sie das DVD-ROM-Laufwerk in
einen freien 5,25-Zoll-Laufwerkseinschub.
Befestigen Sie das DVD-ROM-Laufwerk mit
entsprechenden Schrauben (im DVD-ROM-
Lieferkarton enthalten) an die
Einschubschienen.
Anweisungen zur lnstallation eines
Laufwerks sind im Handbuch lhres Systems
angegeben.
4.Verbinden Sie einen freien Netzstecker in
lhrem PC mit dem Netzanschluss an der
Rückseite des DVD-ROM-Laufwerks.
Verbinden Sie einen freien IDE-
Anschlussstecker in lhrem PC mit dem
IDE-Interface-Sockel des Laufwerks.
HINWEIS: Der rote Streifen am IDE-Kabelrand
entspricht dem Stift 1 des IDE-lnterface am
DVD-ROM-Laufwerk. Besitzen Sie eine
Soundkarte, können Sie auch ein 4-pol. analoges
Audiokabel mit dem analogen Audioausgang an
lhrem DVD-ROM-Laufwerk und dem
Audioeingang der Soundkarte verbinden.
5. Nach der vollständigen lnstallation des
DVD-ROM-Laufwerks können Sie das
Rechnergehäuse wieder aufsetzen.
6.
Schließen Sie die Stromversorgung wieder an.
Gerätetreiber
Bei Einsatz von Windows 2000 Pro, XP,
Vista braucht kein spezieller Treiber
installiert zu werden.
Das DOS und die Windows 3.1 Benutzer
können den DOS-Gerätetreiber über Internet zu
jeder Zeit downloaden.
Für Ihr Informationen, beraten bitte folgende
Internet-Sites:
http//www. lgsevice.com
Für Benutzer von Windows 2000 Pro
/XP
[Um sicherzustellen, dass das Laufwerk ord-
nungsgemäß läuft, sollten Sie folgendes
überprüfen:
•Das Laufwerk erscheint in
Windows 2000 Pro/XP :
[Systemsteuerung]-[System]-[Hardware]-
[Geräte-Manager]-[DVD/CD-ROM]
•"32-Bit" erscheint in
[Systemsteuerung]-[System]-
[Leistungsmerkmale]
[Wenn lhr Rechner das Laufwerk nicht
erkennt, müssen Sie folgendes überprüfen:
•Erscheint auf dem IDE-Controller in
[Systemsteuerung]-[System]-[Geräte-
Manager]-[Festplattenlaufwerk-Controller]
das Symbol , müssen Sie den korrekten
IDE-Controller-Treiber beim Hersteller Ihres
PCs oder der Systemplatine beschaffen.
[Rufen Sie in der Systemsteuerung die
Option "Hardware" auf, und lassen Sie
Windows erneut nach einem neuen Gerät
suchen.
C
B
Deutsch

Umgang mit den CDs
Kleben Sie keinesfalls Etiketten oder Aufkleber
auf Ihre CD-ROMs, DVD-ROMs, CD-Rs oder
CD-RWs.
Beim Einsatz von beklebten CDs können nicht
nur Lese- und Schreibfehler auftreten, sondern
die auf der CD gespeicherten Daten aufgrund
der Beschädigung der CD verloren gehen.
Die Drehgeschwindigkeit der CDs in diesem
Laufwerk ist sehr hoch! KEINE beschädigten,
gebrochenen oder verbogenen CDs benutzen.
Die optische Einheit des Laufwerks könnte bei
einem Bruch der CDs beschädigt werden.
KEINE anderen CDs als die Standard-CDs
benutzen.
Nicht standardisierte CDs könnten nicht richtig
abgespielt werden oder Daten unvollständig
speichern.
Hinweise zu CD-RWs / DVD-RWs
Dieses Laufwerk kann CD-RWs / DVD-RWs
lesen. Bitte beachten Sie folgendes:
- Das Laufwerk benötigt nach dem Einlegen
von CD-RWs / DVD-RWs etwas mehr Zeit
zum Einlesen als für Standard CD-ROMs /
DVD-ROMs.
- Die Lesegeschwindigkeit von CD-RWs /
DVD-RWs ist niedriger als die von CDs /
DVDs
- Leere CDs, CDs mit fehlgeschlagenen
Schreibversuchen und CDs mit offenen
Sessions können nicht gelesen werden.
- Wenn von der CD nicht gelesen werden kann,
kann das folgende Gründe haben: Die
Qualität des aufgenommenen Signals hat sich
aufgrund von Schmutz, Kratzern oder häufig
wiederbeschriebenen CDs verschlechtert. In
dem Fall nehmen Sie die CD heraus und
überprüfen die Datenseite der CD (die Seite
ohne Beschriftung oder Etikett) nach Staub
oder Kratzern. Legen Sie die CD wieder ins
Laufwerk, schließen Sie die Schublade und
versuchen Sie erneut, ob das Laufwerk die
CD jetzt lesen kann.
Notauswurf
Dieses DVD-ROM-Laufwerk verfügt über eine
spezielle Funktion, über welche die CD im Notfall
manuell ausgeworfen werden kann. Gehen Sie in
einer derartigen Situation - beispielsweise, wenn
das Laufwerk nicht funktioniert oder der Strom
ausgefallen ist - vor wie nachfolgend
beschrieben.
HINWEIS: Diese Funktion ist nur im Notfall
anzuwenden.
1) Schalten Sie den Rechner AUS.
2) Stecken Sie einen spitzen Gegenstand
(beispielsweise eine aufgebogene
Büroklammer) in die kleine Öffnung, die sich
oberhalb der Auswurftaste befindet. Daraufhin
öffnet sich die vordere Abdeckung, und die
CD-Schublade fährt teilweise heraus.
3) Öffnen Sie die vordere Abdeckung vollständig.
Fassen Sie die CD-Schublade zwischen
Daumen und Zeigefinger, und ziehen Sie sie
vollständig heraus.
HINWEIS: Benutzen Sie diese Funktion nur als
letztes Mittel in einem Notfall. Wird sie übermäßig
oft angewendet, können Fehlfunktionen
auftreten. Wenn Sie die CD-Schublade mit den
Fingern nicht fassen können, benutzen Sie eine
Stahlklemme oder einen Klemmhaken, um die
Schublade herauszuziehen.
D
Deutsch

Fehlerbehandlung die Schublade
herauszuziehen
* Wenn das DVD-ROM Laufwerk nicht mit der
Festplatte an der "primary IDE I/O Adresse"
arbeitet.
(Lösung)
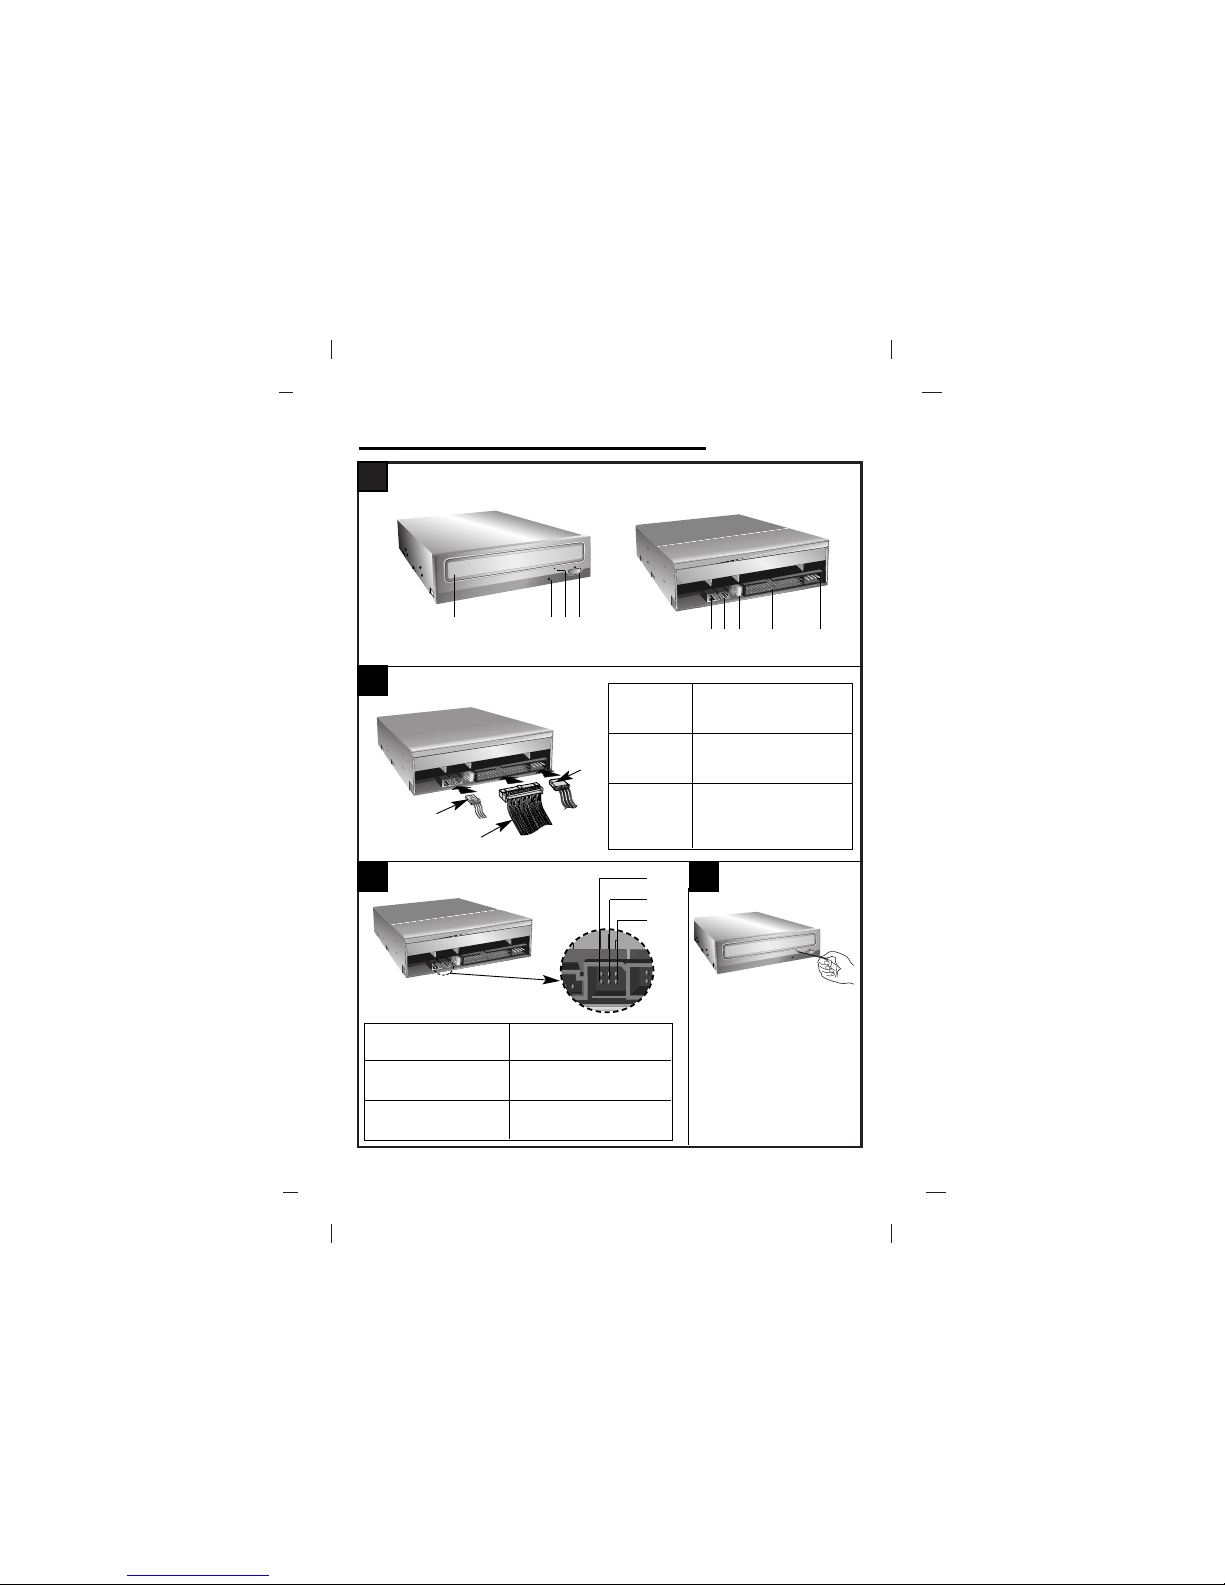
1. Überprüfen Sie den "Master/Slave Jumper"
auf der Rückseite des DVD-ROM
Laufwerkes.
Das DVD-ROM Laufwerk muss auf Slave
gesetzt werden.
2. Stellen Sie sicher, dass lhre Festplatte
wirklich eine IDE Festplatte ist.
3. Überprüfen Sie den "Master/Slave Jumper"
auf der Rückseite der Festplatte.
Die Festplatte muss auf Master gesetzt
werden. Einige alte IDE-Festplatten wurden
vom Hersteller auf "Master only" gesetzt.
In diesem Fall befragen Sie den Hersteller
der Festplatte, wie Sie diese in den Master
Modus setzen können.
4. Falls das DVD-ROM Laufwerk nach
Durchführung obiger Arbeiten noch nicht
funktioniert, benötigen Sie eine zweite IDE
Karte. Wenn Sie eine zweite IDE Karte
benutzen müssen, ist es erforderlich den
"Master/Slave Jumper" des DVD-ROM
Laufwerkes auf "Master" setzen.
*Wird OS/2 Warp nicht vom DVD-ROM
Laufwerk installiert.
(Lösung)
1. Wählen Sie "NON-LISTED IDE CD".
Warnung:
1. Wenn Sie WIN oder DOSSHELL Kommando
in lhre AUTOEXEC.BAT einfügen wollen,
vergewissern Sie sich, ob die MSCDEX.EXE
Datei vor dem Aufruf WIN oder DOSSHELL
steht.
Bitte beachten : Solange dieses Produkt mit
"Region Playback Control Phase II" verwendet
wird, besteht die Möglichkeit, dass andere
MPEG Decoderkarten oder MPEG Software
ohne Ländercodes, das Laufwerk dazu veran-
lassen, DVDs nicht zulesen.
Dieses DVD-ROM Laufwerk erlaubt es Ihnen,
den Ländercode bis zu 5 mal zu ändern.
Wichtige Sicherheitshinweise
Beachten Sie beim Einsatz des DVD-ROM-
Laufwerks oder beim Umgang mit CDs folgende
Hinweise.
Sicherheitshinweise
•Der Hersteller ist weder für Datenverluste, die
durch fehlerhafte Installation oder
unsachgemäßen Umgang mit dem Laufwerk
verursacht wurden, noch für direkte oder
indirekte Schäden haftbar oder verantwortlich.
•Der Hersteller übernimmt keine
Verantwortung für direkte oder indirekte
Schäden, die durch den Einsatz dieses
Produktes oder Funktionsstörungen
verursacht wurden.
•Der Hersteller ist nicht haftbar oder
verantwortlich für von diesem Produkt
verursachte Datenbeschädigungen.
Installation
•Vermeiden Sie Standorte, an denen das
Gerät folgenden Umgebungsbedingungen
ausgesetzt ist:
- Übermäßige Luftfeuchtigkeit
- Hohe Temperatur
- Übermäßige Staubentwicklung
- Mechanische Vibration
- Direkte Sonneneinstrahlung
Wir empfehlen, das Laufwerk in einer
horizontalen Position zu installieren.
Einsatz
•Bringen Sie das Laufwerk nicht plötzlich von
einem kalten an einen warmen Ort, und
erhöhen Sie nicht kurzfristig die
Raumtemperatur.
Die dadurch entstehende Kondensierung
kann zu Betriebsstörungen führen.
•Nehmen Sie vor einem Transport des
Laufwerks die eingelegte CD heraus, damit
sie nicht beschädigt wird. Andernfalls
könnten Datenverluste auftreten.
•Achten Sie darauf, dass keine Fremdkörper-
beispielsweise Flüssigkeiten oder
Metallgegenstände - in das Laufwerkinnere
gelangen. Sollte dennoch ein
Fremdkörper in
das Innere des Laufwerks gelangen,
wenden
Sie sich an den Händler, bei dem Sie das
Laufwerk erworben haben.
•Unterbrechen Sie keinesfalls die
Stromversorgung, während das Laufwerk
läuft.
Deutsch

Français
Caractéristiques
•Interface : E-IDE/ATAPI
•Vitesse de transfert : 22100 KB/Sec
(DVD-ROM), 7800 KB/Sec (CD-ROM)
•Introduction : Tiroir motorisé
•Montage : Montage interne
•Contrôle frontal : Touche d’éjection
d’urgence
•Lisez compatible pour DVD-R, DVD+R,
DVD-RW, DVD+RW & DVD-RAM disques
•Supports Région playback contrôle Phase II
Configuration du système*
•Un ordinateur de bureau avec processeur
Intel Pentium 266 MHz ou supérieur
•64 Mo RAM minimum ou plus
•Baie de 5,25 pouces.
•OS: Windows 2000, XP, Vista.
•Un lecteur de disquettes 31/2standard, Un
contrôleur IDE avec un câble de connection
* Remarque: Certains logiciels, (en particuliers
ceux comprenant la fonction vidéo playback),
exigent un PC vraiment performant en vue
d’atteinre de bons résultats.
Afin que ce lecteur DVD ROM lise les disques
DVD vidéo, en les retranscrivant sur votre
moniteur, grâce à une carte MPEG séparée,
vous avez besoin soit d’un disque séparé
(ou une carte MPEG ou MPEG, décodage
réalisé par votre carte vidéo), soit d’un logiciel
séparé que vous installerez.
Ces produits sont non compris avec le lecteur
DVD ROM.
Emplacement et Fonction des
Commandes
Façade
1. Plateau de chargement
2. Témoins d’activité
3. Trou d’ejection d’urgence
4. Touche d’arrêt/éjection
Panneau arrière
1. Connecteur de sortie audio numérique
Ce connecteur n’est pas supporté.
2. Connecteur de sortie audio analogique
3. Connecteur de Cavalier
La configuration en maître ou en esclave du
lecteur dépend de la position de ce cavalier.
Les modifications de configuration maître-
esclave prennent effet lors du démarrage
suivant.
4. Connecteur d’interface IDE
Pour la connexion de l’interface IDE
(périphérique électronique intégré) au moyen
d’une nappe IDE à 40 broches.
NOTE : ne pas brancher ou débrancher le
câble sous tension ; risque de provoquer un
court-circuit et d’endommager le système.
Couper systématiquement l’alimentation
avant de brancher ou débrancher le câble.
5. Prise d’alimentation
Accessoires fournis avec le lecteur
zzMode d’emploi
zzVis(4pièces)
zzLogiciel MPEG-2 (Power DVD)
A

Installation du lecteur de DVD-ROM
Avant l’installation de lecteur de DVD-ROM,
mettre l’unité centrale hors tension.
1. Retirez le capot de votre unité centrale en
vous reportant au manuel d’utilisation.
2. Ajustez les cavaliers Maître/Esclave au dos
du lecteur de DVD-ROM si nécessaire.
Le lecteur doit être connecté à la carte
mère de l’ordinateur, au moyen d’un câble
d’interface IDE. II peut être configuré en tant
que périphérique maître ou esclave, selon
l’ordinateur.
A) UTILISATION D’UN CONTRÔLEUR IDE
PRINCIPAL
Dans ce cas, l’unité de disque dur qui
contient le système d’exploitation pour
l’initialisation doit être configuré en mode
Maître (MA) et le lecteur
DVD-ROM en mode Esclave (SL).
B) UTILISATION D’UN CONTRÔLEUR IDE
AUXILIAIRE
Dans ce cas, votre système peut prendre
en charge quatre unités périphériques,
configurées comme suit: Maître principal,
Esclave principal, Maître auxiliaire et
Esclave auxiliaire.
3. Insérez le lecteur de DVD-ROM dans un
emplacement 5,5 pouces libre. Fixez le
lecteur au cadre de l’emplacement à
l’aide des vis de montage (comprises dans
l’emballage du lecteur). Reportez-vous au
manuel d’utilisation de votre unité centrale
sur la méthode d’installation d’un lecteur.
4. Branchez un connecteur d’alimentation libre
du PC dans le connecteur d’alimentation sur
l’arrière du lecteur de DVD-ROM.
Branchez un connecteur IDE libre du PC
dans le connecteur d’interface IDE du
lecteur.
NOTE: Le bord rouge du câble IDE correspond
à la broche 1 de l’interface IDE sur lecteur de
DVD-ROM. Si vous avez une carte son, vous
pouvez également connecter un câble audio
analogique à 4 broches au connecteur sortie
son de votre lecteur de DVD-ROM et au
connecteur entrée audio de la carte son.
5. Remettre le capot de l’unité de centrale en
place à l’issue de l’installation du lecteur.
6. Rebranchez l’alimentation électrique.
Périphériques
Aucune procédure spécifique d’installation
de périphérique n’est nécessaire sous 2000
Pro, XP ou Vista.
Pour DOS et Windows 3.1, les utilisateurs
peuvent télécharger le gestionnaire sur
Internet.
Pour plus d’informations ou pour télécharger
les drives, merci de consulter les sites suivants:
http//www. lgsevice.com
Pour Windows 2000 Pro/XP
[Contrôler les points suivants, dont le
fonctionnement normal du périphérique
dépend:
•Le périphérique doit apparaître sous
Windows 2000 Pro/XP : [panneau de
configuration]-[système]-[matériel]-
[gestionnaire de périphériques]-
[DVD/CD-ROM]
•La mention 32 bits doit être affichée
sous [panneau de configuration/
système/performances]
[Contrôler les éléments suivants si
l’ordinateur ne reconnaît pas le
périphérique:
•Si l’indicateur apparaît en regard du
contrôleur IDE sous [panneau de
configuration/système /gestionnaire de
périphériques/contrôleurs de disque dur],
contacter le fabricant du PC ou celui la
carte mère afin d’obtenir le pilote de
contrôleur IDE approprié.
[Depuis le panneau de configuration,
exécuter [Ajout de périphérique] afin de
laisser Windows effectuer une tentative
de recherche du nouveau périphérique.
C
B
Français

Utilisation des disques
Ne coller aucune étiquette sur les CD-ROM,
DVD-ROM, CD-R et CD-RW.
De telles étiquettes risquent en effet non
seulement de provoquer des erreurs de lecture
et écriture, mais également d’endommager le
disque dur et de causer une perte de données.
Sur cette unité, les disques tournent à très
haute vitesse! N’UTILISEZ PAS de disques
endommagés, brisés ou voilés.
Les composants optiques de l’unité pourraient
être endommagés si le disque se brise.
N’UTILISEZ PAS de disques hors normes.
Ceux-ci pourraient ne pas fonctionner ou ne
pas enregistrer convenablement les données.
Remarque sur les CD-RW/DVD-RW
Ce produit est capable de lire les CD et DVD
gravés.
- Il faut un peu plus de temps pour lancer un
CD ou un DVD gravé au début de l’opération,
comparé à un CD ou DVD standard.
- Lorque le niveau du signal playback des
graveurs CD et DVD est plus bas que les CD
et DVD copiés, la lecture de ces disque est
moins rapide que celle des disques reproduits
afin d’assurer la lecture des informations.
- Les disques vierges, les disques non gravés
ou interrompus en cours de gravure, ne
doivent pas être utilisés.
- Les opérations ne doivent pas débuter ou la
lecture des données ne doit pas avoir lieu
dans certaines conditions: La qualité du signal
d’enregistrement est déteriorée s’il y a des
poussières ou des rayures sur le disque ou
s’il s’agit de CD très souvent regravés. En cas
d’échec de la lecture, il faut ouvrir le tiroir du
lecteur et vérifier sur l’état de la face des
informations du disques, celle opposé à la
marque, puis réinsérer le disque dans le
lecteur pour essayer de lire à nouveau.
Ejection manuelle
Ce lecteur est doté d’une fonction permettant
l’éjection manuelle du CD, par exemple en cas
de défaillance ou de coupure de l’alimentation.
La procédure d’éjection manuelle est la
suivante.
Remarque: Cette fonction ne doit être utilisée
qu’en cas de besoin absolu.
1) Couper l’alimentation électrique.
2) Enfoncer une tige fine (grand trombone
redressé, par exemple) dans le petit orifice
situé au-dessus de la touche d’arrêt/éjection.
La trappe s’ouvre et le plateau sort
partiellement.
3) Tirer sur la trappe afin de la sortir
complètement puis saisir le plateau entre
le pouce et l’index et tirer délicatement.
Remarque: Cette fonction de secours ne doit
être utilisée qu’en cas de besoin absolu.
Un recours trop fréquent à l’éjection manuelle
provoquerait une défaillance.
S’il est impossible de bien tenir le plateau à la
main, tirer à l’aide d’une pince métallique à
documents.
D
Français

Dépannage
* Si le lecteur DVD-ROM ne fonctionne pas
lorsque l’unité de disque dur est réglée sur le
canal d’E/S IDE principal.
(SOLUTION)
1. Vérifiez le cavalier maître/esclave du lecteur
DVD-ROM. II doit être réglé sur le mode
esclave.
2. Vérifiez que l’interface du disque dur est bien
du type IDE.
3. Vérifiez le réglage du cavalier maître/esclave
de votre disque dur. Les anciennes versions
des disques durs de type IDE sont parfois
configurées en mode Maître seulement
(Master Only).
Dans ce cas, contactez votre fournisseur de
disque dur et modifiez le réglage du cavalier
pour passer en mode Maître.
4. Si le lecteur ne fonctionne toujours pas, vous
aurez besoin de la carte auxiliaire IDE (IDE
secondary card).
* Quand le lecteur DVD-ROM n’installe pas
OS/2 warp.
(SOLUTION)
1. Sélectionner <NON-LISTED IDE CD>.
AVERTISSEMENT:
1. Si vous voulez ajouter la ligne de
commande WIN ou DOSSHELL dans votre
fichier AUTOEXEC.BAT, veillez à les placer
après la ligne de commande
MSCDEX.EXE.
Remarque: Depuis que ce produit est
compatible avec Region Playback Control
Phase 2, une certaine carte décodeur MPEG
ou un logiciel sans code régional peuvent
entraîner la non lecture des disques
DVD-ROM.
Ce lecteur DVD vous permet de changer le
code regional 5 fois seulement.
Avertissement
Les instructions ci-dessous doivent être
observées lors de toute manipulation du
lecteur comme des disques.
Précautions
•Le fabricant du présent équipement décline
toute responsabilité en cas de perte de
données ou de dommages directs ou
indirects imputables à une installation
ou à une manipulation non appropriée.
•Le fabricant décline toute responsabilité en
cas de dommages directs ou indirects dus à
l’utilisation ou à un mauvais fonctionnement
du présent produit.
•Etablissez une copie de sauvegarde de
toutes les données importantes afin de ne
risquer aucune perte.
Installation
•Eviter les emplacements soumis aux
contraintes suivantes :
- forte humidité
- température élevé
- excès de poussière
- vibrations mécaniques
- rayonnement solaire direct
Il est préférable d’utiliser ce lecteur en position
horizontale.
Fonctionnement
•Ne pas déplacer brusquement le lecteur
d’un endroit froid à un endroit chaud ni
augmenter brutalement la température
de la pièce : la condensation ainsi générée
risque de provoquer une anomalie de
fonctionnement.
•Ne pas omettre de retirer le disque avant
tout déplacement du lecteur :
le disque pourrait subir des dommages,
entraînant ainsi une perte de données.
•Veiller à prévenir toute pénétration d’objets
ou de liquides dans le lecteur.
Si un corps étranger a pénétré, s’adresser
au distributeur ayant vendu le périphérique.
•Ne pas couper l’alimentation électrique
pendant le fonctionnement du lecteur.
Français

DVD-ROM DRIVE
GDR-H30N
English
Deutsch
Français
Italiano
Español
Português
To enjoy fully all the features and functions of your product, please
read this owner’s manual carefully and completely.
Um den Leistungs-und Funktionsumfang lhres Produkts in vollem
Umfang nutzen zu können, sollten Sie dieses Handbuch vollständig
und gewissenhaft drucharbeiten.
Veuillez lire avec attention la totalité de ce guide afin de pouvoir maîtriser
toutes les possibilités de ce produit.
Nel ringraziarvi per avere acquistato questo prodotto, vi raccomandiamo
di leggere attentamente le seguenti istruzioni e di conservare questo
manuale per eventuali consultazioni future.
Rogramos lea detenidamente todo este manual para aprovechar al
máximo todas las características y funciones del producto.
Para usufruir todas as características e funções do seu produto leia
atentamente todas as instruções deste Manual do Usuário.

P/NO: 3828HM1063N (No.2-1) Ver. A
Caution!
The disc rotates at high speed in the drive unit.
Use of worn, damaged, or non-standard CD-
ROM discs can only adversely affect the drive
and cause the disc to shatter or crush while in
use. Disc crush can only occur when you use a
damaged CD-ROM disc in the drive. It is an
extremely rare occurrence, but there are steps
which can be taken to prevent it.
Always check your discs before inserting
them into the drive.
1. Take care not to use worn, cracked, dam-
aged, warped or poor quality CD-ROMs, as
this may cause damage to your drive.
2. Check the clear plastic on the center of
the disc, cracks here are the main cause
of disc crush.
3. Do not play CD-ROMs which are a non-stan-
dard (I.e. non-circular)shape, such as heart
shaped discs, or discs in the shape of a
business card.
How can you keep your discs from becoming
damaged?
1. When not in use, remove discs from the
drive.
2. Keep discs in the packaging supplied with
them and out of direct sunlight and away
from heat sources.
Excessive vibration or a sudden jolt to the drive
during operation may cause a malfunction.
Avoid exposing the drive to sudden changes in
temperature as it may cause condensation to
collect inside the drive.
Copyright ©2007
LG Electronics U.S.A. Inc.
1000 Sylvan Ave.
Englewood Cliffs NJ 07632
U. S. A.
or http://www.lgusa.com
LG Electronics Canada Inc.
550 MATHESON Blvd. East Mississauga.
Ontario L4Z4G3 Canada
LG Electronics Deutschland GMBH
Jakob-Kaiser-Straße 12,
D-47877 Willich, Germany
LG Electronics U. K. Ltd.
LG House, 250 Bath Road,
Slough Berkshire SL1 4DX
United Kingdom
Goldstar France E.U.R.L
Paris Nord II 22, Avenue des
Nations-B.P.50372 VILLEPINTE
95945 ROISSY CDG CEDEX France
LG Electronics Italia S.P.A.
Centro Direzione “IL Quadrate” Via
Modigliani, 20090 Segrate (MI) Italy
LG Electronics España
Complejo Europa Empressaries (Edif.Bruselas)
Ctra. N-VI 28230 Las Rozas Madrid Spain
LG Electronics Australia Pty Ltd.
2 Wonderland drive, Eastern creek, NSW
2766
or http://www.lge.com.au
LG Electronics Portugal S.A.
Quinta da Fonte – Edifício D. Amélia
Rua Vítor Câmara, nº2, Piso 2
2700-229 Paço d´ Arcos, Portugal
ou www.lge.pt
©2007 Made by
Please visit www.lgservice.com and install the automatic firmware
download program, “LG ODD Online F/W update.” This program
will automatically check for new firmware releases and download
them.
Table of contents
Languages:
Other LG DVD Drive manuals