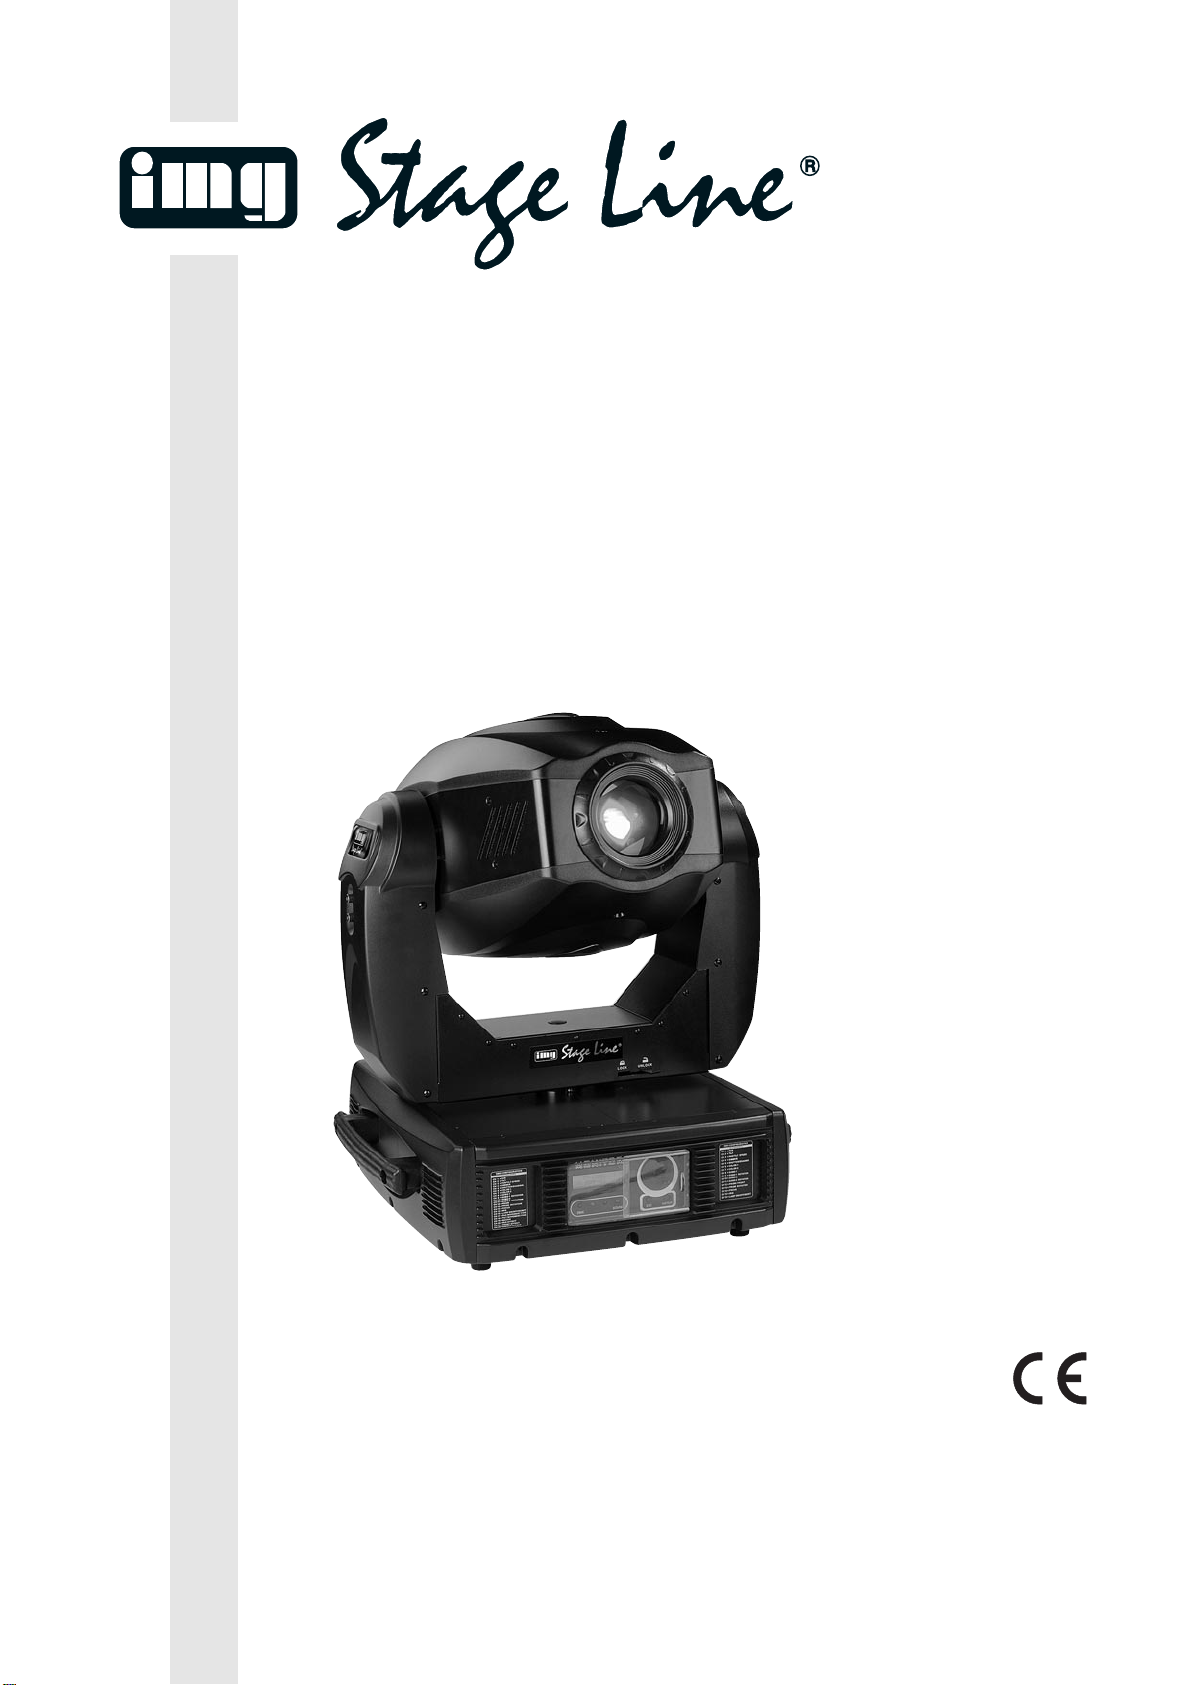
IMG STAGE LINE TWIST-1200 User manual

Technische
Verbesserung
Das Gerät TWIST-1200 wurde technisch verbes-
sert, sodass einige Funktionen dazu gekommen
sind und einige von der Bedienungsanleitung ab-
weichen. Bitte beachten Sie deshalb die folgenden
Beschreibungen.
1DMX-Kanal 16
Die Funktionen „Reset“, „Lampe ein“ und „Lampe
aus“ werden jetzt ausschließlich über den DMX-
Kanal 16 gesteuert und nicht mehr zusätzlich mit-
hilfe des Kanals 8. Außerdem sind einige Funktio-
nen hinzugekommen:
UmeineFunktiondesKanals16zuaktivieren,muss
der zugehörige DMX-Wert mindestens 5 Sekunden
lang unverändert bleiben. Die Funktionen „Shutter
ein“ und „Shutter aus“ beim Gobo- und Farbwechsel
sind nur beim direkten Anwählen einer Farbe oder
eines Gobos aktiv und nicht beim automatischen
ständigen Wechsel (DMX-Werte 128–255 bei den
Kanälen 6, 7, 8, 10).
2Neues Gobo
Das Gobo D wurde gegen ein Glasgobo mit blauem
Hintergrund und gelben Strahlen getauscht.
3Zusätzliche Menüpunkte
Das Hauptmenü wurde um die drei folgenden
Menüpunkte erweitert:
3.1 Menüpunkt „Manual Mode“
DieserMenüpunkt folgt nachdem Menüpunkt „Test“
und dient zur Steuerung der DMX-Kanäle direkt am
TWIST-1200 (ausgenommen Kanal 16):
1) Das Menü mit der Taste ENTER aufrufen.
2) DenMenüpunkt„Manual Mode“ mitdemDrehrad
auswählen und mit der Taste ENTER bestätigen.
3) Mit dem Drehrad die gewünschte Funktion
wählen: Pan (Kanal 1), Tilt (Kanal 2), Speed
(Kanal 3) … Dimmer Effect (Kanal 22) und mit
der Taste ENTER bestätigen.
4) Den gewünschten DMX-Wert mit dem Drehrad
einstellen und mit der Taste ENTER bestätigen.
3.2 Menüpunkt „Lamp On / Power On“
Dieser Menüpunkt folgt nach „Lamp ON/OFF“.
On: Beim Einschalten des Gerätes wird auch die
Lampe eingeschaltet.
Off: Beim Einschalten des Gerätes wird die Lampe
nicht eingeschaltet.
3.3 Menüpunkt „Software Version“
Dieser Menüpunkt folgt nach „Lamp On/Power On“.
Nach dem Drücken der Taste ENTER zeigt das Dis-
play die aktuelle Software-Version an.
4Längere Zeit bis zum Ausblenden des
Menüs
Wird bei einem angewählten Menüpunkt innerhalb
von 60 Sekunden keine weitere Taste gedrückt,
blendet sich das Menü aus (bisher 10 Sek.).
Änderungen vorbehalten.
Technical Improvement
The TWIST-1200 was technically improved, i.e. a
few functions were added while others will deviate
from the instruction manual. Therefore, please note
the following descriptions.
1DMX Channel 16
Thefunctions “Reset”, “Lampon” and “Lampoff”will
now exclusively be controlled via the DMX channel
16; there is no more additional control by means
of channel 8. Furthermore, a few functions were
added:
To activateafunctionofchannel16,thecorrespond-
ing DMX value must remain the same for at least
5seconds. The functions “shutter on” and “shutter
off” for change of gobo and change of colour will
only be activated when a colour or a gobo is direct-
ly selected, not with a constant automatic change
(DMX values 128–255 for the channels 6, 7, 8, 10).
2New Gobo
Gobo D was replaced by a glass gobo with a blue
background and yellow beams.
3Additional Menu Items
The three following menu items were added to the
main menu:
3.1 Menu item “Manual Mode”
This menu item succeeds the menu item “Test” and
serves for controlling the DMX channels directly on
the TWIST-1200 (with the exception of channel 16):
1) Call the menu with the button ENTER.
2) Select the menu item “Manual Mode” with the
rotary wheel and confirm with the button ENTER.
3) Select the desired function Pan (channel 1), Tilt
(channel 2), Speed (channel 3) … Dimmer Effect
TWIST-1200
Best.-Nr. 38.2680
wwwwww..iimmggssttaaggeelliinnee..ccoomm
Copyright©by MONACOR INTERNATIONAL GmbH & Co. KG, Bremen, Germany. All rights reserved. A-0644.99.01.07.2006
®
(channel 22) with the rotary wheel and confirm
with the button ENTER.
4) Adjust the desired DMX value with the rotary
wheel and confirm with the button ENTER.
3.2 Menu item “Lamp On/Power On”
This menu item succeeds “Lamp ON/OFF”.
On: When switching on the unit, the lamp will also
be switched on.
Off: When switching on the unit, the lamp will not be
switched on.
3.3 Menu item “Software Version”
This menu item succeeds “Lamp On/Power On”.
After pressing the button ENTER, the display will
show the current software version.
4Longer Hold Time of Menu
If no further button is pressed within 60 seconds
while a menu item is selected, the menu will disap-
pear (previously within 10 seconds).
Subject to technical modification.
Amélioration technique
La TWIST-1200 a reçu des améliorations techni-
ques : ainsi, quelques fonctions ont été ajoutées et
certaines sont différentes de la notice d’utilisation.
Notez, s’il vous plaît, les descriptifs ci-dessous.
1Canal DMX 16
Les fonctions “Reset”, “Lampe allumée” et “Lampe
éteinte”sont désormais exclusivementgérées via le
canal DMX 16 et non plus via le canal 8. En outre,
certaines fonctions ont été ajoutées :
Pouractiverunefonctionducanal16,lavaleurDMX
correspondante doit rester non modifiée pendant
5 secondes au moins. Les fonctions “Shutter activé”
et “Shutter désactivé” pour le changement de gobo
etde couleurne sont activesque lorsqu’une couleur
ou un gobo est directement sélectionné et pas par
un changement continu automatique (valeurs DMX
128–255 pour les canaux 6, 7, 8 ,10).
2Nouveau gobo
LegoboDaétéremplacéparungobo en verre avec
fond bleu et rayons jaunes.
3Points supplémentaires du menu
Le menu principal a été complété par les trois points
suivants :
3.1 Point “Manual mode”
Ce point du menu suit le point “Test” et sert à gérer
les canaux DMX directement sur la TWIST-1200
(excepté le canal 16) :
1) Appelez le menu avec la touche ENTER.
2) Sélectionnez le pont “Manual Mode” avec la
molette et confirmez avec la touche ENTER.
3) Avec la molette, sélectionnez la fonction voulue :
Pan (canal 1), Tilt (canal 2), Speed (canal 3) …
effet Dimmer (canal 22) et confirmez avec la tou-
che ENTER.
4) Réglez la valeur DMX voulue avec la molette et
confirmez avec la touche ENTER.
3.2 Point “Lamp On/Power On”
Ce point du menu suit “‘Lamp ON/OFF” :
On : lorsqu l’appareil est allumé, la lampe est égale-
ment allumée.
Off : lorsque l’appareil est allumé , la lampe n’est
pas allumée.
3.3 Point “Software Version”
Cepoint suit “Lamp On/PowerOn”.Après une pres-
sionsur la toucheENTER, l’affichage indique laver-
sion actuelle du logiciel.
4Duréeplus longued’affichage dumenu
Si aucune touche n’est enfoncée en l’espace de
60 secondes lorsqu’un point du menu est sélec-
tionné, le menu disparaît (auparavant 10 secondes
d’affichage).
Tout droit de modification réservé.
GB
D A CH
Funktion DMX-Wert
keine Funktion
Shutter zwischen Farbwechsel ein
Shutter zwischen Farbwechsel aus
Shutter zwischen Gobowechsel ein
Shutter zwischen Gobowechsel aus
Lampe ein
keine Funktion
Reset
keine Funktion
Lampe aus
keine Funktion
000 – 089
090 – 099
100 – 109
110 – 119
120 – 129
130 – 139
140 – 199
200 – 209
210 – 229
230 – 239
240 – 255
F B CH
Function DMX value
no function
shutter on between change of colour
shutter off between change of colour
shutter on between change of gobo
shutter off between change of gobo
lamp on
no function
reset
no function
lamp off
no function
000 – 089
090 – 099
100 – 109
110 – 119
120 – 129
130 – 139
140 – 199
200 – 209
210 – 229
230 – 239
240 – 255
Fonction valeur DMX
aucune fonction
Shutter activé entre changement de couleur
Shutter désactivé entre changement de couleur
Shutter activé entre changement de gobo
Shutter désactivé entre changement de gobo
Lampe allumée
aucune fonction
Reset
aucune fonction
Lampe éteinte
aucune fonction
000 – 089
090 – 099
100 – 109
110 – 119
120 – 129
130 – 139
140 – 199
200 – 209
210 – 229
230 – 239
240 – 255

Miglioramento tecnico
L’apparecchio TWIST-1200 è stato migliorato dal
punto di vista tecnico con l’aggiunta di alcune fun-
zioni e con altre funzioni che si usano diversamente
da quanto descritto nelle istruzioni. Vi preghiamo
pertantodi prendere notadelle seguenti descrizioni.
1Canale 16 DMX
Le funzioni “Reset”, “Lampada on” e “Lampada off ”
sono pilotate ora esclusivamente dal canale 16
DMX e non più anche per mezzo del canale 8. Inol-
tre si sono aggiunte alcune funzioni:
Per attivare una funzione del canale 16, il relativo
valore DMX deve rimanere invariato per non meno
di 5 secondi. Le funzioni “Shutter on” e “Shutter off”
durante il cambio di gobo e colore sono attive solo
conlaselezione diretta di uncoloreodiun gobo, ma
non durante il cambio continuo automatico (valori
DMX 128–255 con i canali 6, 7, 8, 10).
2Nuovo Gobo
Il gobo D è stato sostituito con un gobo di vetro con
sottofondo blu e con raggi gialli.
3Voci supplementari del menù
Il menù principale è stato ampliato con le tre
seguenti voci:
3.1 Voce “Manual Mode”
Questa voce si trova dopo la voce “Test” e serve per
pilotare i canali DMX direttamente sul TWIST-1200
(eccetto canale 16):
1) Chiamare il menù con il tasto ENTER.
2) Selezionare la voce “Manual Mode” con la mano-
pola e confermare con il tasto ENTER.
3) Con la manopola scegliere la funzione deside-
rata: Pan (canale 1), Tilt (canale 2), Speed (ca-
nale 3) … Dimmer Effect (canale 22) e confer-
mare con il tasto ENTER.
4) Impostare il valore DMX con la manopola e con-
fermare con il tasto ENTER.
3.2 Voce “Lamp On/Power On”
Questa voce si trova dopo la voce “Lamp ON/OFF”.
On:Accendendo l’apparecchio si accende anche la
lampada.
Off: Accendendo l’apparecchio la lampada non si
accende.
3.3 Voce “Software Version”
Questavocesitrovadopo la voce “Lamp On/ Power
On”. Dopo aver premuto il tasto ENTER, il display
indica la versione attuale del software.
4Periodo più lungo prima che il menù si
spenga
Se entro 60 secondi, con una voce del menù sele-
zionata, non si preme nessun tasto, il menù si
spegne (precedentemente 10 secondi).
Con riserva di modifiche tecniche.
Mejora técnica
La TWIST-1200 ha sido mejorada técnicamente, es
decir, se han añadido algunas funciones mientras
que otras se desviarán desde el manual de instruc-
ciones. Por lo tanto, tome nota de las siguientes
descripciones.
1Canal 16 de DMX
Las funciones “reset”, “lámpara encendida” y “lám-
para apagada” se controlarán exclusivamente me-
diante el canal 16 de DMX; no hay más control adi-
cionalmediante el canal8.Además, se hanañadido
algunas funciones:
Para activar una función del canal 16, el valor DMX
correspondiente debe seguir siendo el mismo
durante al menos 5 segundos. Las funciones “obtu-
radorencendido”y“obturadorapagado” para elcam-
bio de gobo y el cambio de color sólo se activarán
cuando se selecciona directamente un color o un
gobo, no con un cambio automático constante (valo-
res DMX 128–255 para los canales 6, 7, 8, 10).
2Gobo nuevo
El gobo D se ha remplazado por un gobo de cristal
con fondo azul y haces amarillos.
3Puntos de menú adicionales
Se han añadido los tres puntos de menú siguientes
al menú principal:
3.1 Punto de menú “Manual Mode”
Estepunto de menúsucede al puntodemenú “Test”
ysirveparacontrolarlos canales DMX directamente
en la TWIST-1200 (a excepción del canal 16):
1) Seleccione el menú con el botón ENTER.
2) Seleccione el punto de menú “Manual Mode” con
laruedagiratoriay confirme con el botónENTER.
3) Seleccione la función deseada Pan [panorámica
(canal1)],Tilt[inclinación(canal2)],Speed [velo-
TWIST-1200
Best.-Nr. 38.2680
wwwwww..iimmggssttaaggeelliinnee..ccoomm
Copyright©by MONACOR INTERNATIONAL GmbH & Co. KG, Bremen, Germany. All rights reserved. A-0644.99.01.07.2006
®
cidad (canal 3)] ... Dimmer Effect [efecto dimmer
(canal 22)] con la rueda giratoria y confirme con
el botón ENTER.
4) Ajuste el valor DMX deseado con la rueda gira-
toria y confirme con el botón ENTER.
3.2 Punto de menú “Lamp On/Power On”
Este punto de menú sucede a “Lamp ON/OFF”
On: Cuando se encienda la unidad, la lámpara tam-
bién se encenderá.
Off: Cuando se encienda la unidad, la lámpara no
se encenderá.
3.3 Punto de menú “Software Version”
Estepuntodemenúsucedea“LampOn/PowerOn”.
Tras presionar el botón ENTER, la pantalla mos-
trará la versión del software actual.
4Tiempo de mantenimiento más largo
del menú
Si no se presiona ningún otro botón durante 60 se-
gundosmientras se seleccionaun punto demenú, el
menú desaparecerá (previamente en 10 segundos).
Sujeto a modificaciones técnicas.
I
E
Funzione Valore DMX
nessuna funzione
Shutter fra cambio colore on
Shutter fra cambio colore off
Shutter fra cambio gobo on
Shutter fra cambio gobo off
Lampada on
nessuna funzione
Reset
nessuna funzione
Lampada off
nessuna funzione
000 – 089
090 – 099
100 – 109
110 – 119
120 – 129
130 – 139
140 – 199
200 – 209
210 – 229
230 – 239
240 – 255
Función Valor DMX
sin función
obturador encendido entre el cambio de color
obturador apagado entre el cambio de color
obturador encendido entre el cambio de gobo
obturador apagado entre el cambio de gobo
lámpara encendida
sin función
reset
sin función
lámpara apagada
sin función
000 – 089
090 – 099
100 – 109
110 – 119
120 – 129
130 – 139
140 – 199
200 – 209
210 – 229
230 – 239
240 – 255
BEDIENUNGSANLEITUNG • INSTRUCTION MANUAL • MODE D’EMPLOI • ISTRUZIONI PER L’USO
MANUAL DE INSTRUCCIONES • VEILIGHEIDSVOORSCHRIFTEN • ŚRODKI BEZPIECZEŃSTWA
SIKKERHEDSOPLYSNINGER • SÄKERHETSFÖRESKRIFTER • TURVALLISUUDESTA
PROFESSIONELLER MOVING-HEAD
PROFESSIONAL MOVING HEAD
LYRE PROFESSIONNELLE
MOVING-HEAD PROFESSIONALE
TWIST-1200 Best.-Nr. 38.2680

2
wwwwww..iimmggssttaaggeelliinnee..ccoomm
Bevor Sie einschalten …
Wir wünschen Ihnen viel Spaß mit Ihrem neuen Gerät
von „img Stage Line”. Bitte lesen Sie diese Bedienungs-
anleitung vor dem Betrieb gründlich durch. Nur so lernen
Sie alle Funktionsmöglichkeiten kennen, vermeiden
Fehlbedienungen und schützen sich und Ihr Gerät vor
eventuellen Schäden durch unsachgemäßen Gebrauch.
Heben Sie die Anleitung für ein späteres Nachlesen auf.
Der deutsche Text beginnt auf der Seite 4.
Before you switch on …
We wish you much pleasure with your new “img Stage
Line” unit. Please read these operating instructions
carefully prior to operating the unit. Thus, you will get to
know all functions of the unit, operating errors will be
prevented, and yourself and the unit will be protected
against any damage caused by improper use. Please
keep the operating instructions for later use.
The English text starts on page 4.
D
A
CH
GB
Avant toute installation …
Nous vous souhaitons beaucoup de plaisir à utiliser cet
appareil „img Stage Line”. Lisez ce mode d’emploi entière-
ment avant toute utilisation. Uniquement ainsi, vous pour-
rez apprendre l’ensemble des possibilités de fonction-
nement de l’appareil, éviter toute manipulation erronée et
vous protéger, ainsi que l’appareil, de dommages éven-
tuels engendrés par une utilisation inadaptée. Conservez
la notice pour pouvoir vous y reporter ultérieurement.
La version française se trouve page 11.
Prima di accendere …
Vi auguriamo buon divertimento con il vostro nuovo ap-
parecchio di “img Stage Line”. Leggete attentamente le
istruzioni prima di mettere in funzione l’apparecchio.
Solo così potete conoscere tutte le funzionalità, evitare
comandi sbagliati e proteggere voi stessi e l’apparecchio
da eventuali danni in seguito ad un uso improprio. Con-
servate le istruzioni per poterle consultare anche in
futuro.
Il testo italiano inizia a pagina 11.
F
B
CH
I
Voor u inschakelt …
Wij wensen u veel plezier met uw nieuwe apparaat van
“img Stage Line”. Lees de veiligheidsvoorschriften gron-
dig door, alvorens het apparaat in gebruik te nemen. Zo
behoedt u zichzelf en het apparaat voor eventuele
schade door ondeskundig gebruik. Bewaar de handlei-
ding voor latere raadpleging.
De veiligheidsvoorschriften vindt u op pagina 22.
Antes de la utilización …
Le deseamos una buena utilización para su nuevo apa-
rato “img Stage Line”. Por favor, lea estas instrucciones
de uso atentamente antes de hacer funcionar el aparato.
De esta manera conocerá todas las funciones de la
unidad, se prevendrán errores de operación, usted y el
aparato estarán protegidos en contra de todo daño cau-
sado por un uso inadecuado. Por favor, guarde las
instrucciones para una futura utilización.
El texto en español empieza en la página 18.
NL
B
E
Før du tænder …
God fornøjelse med dit nye “img Stage Line” produkt.
Læs venligst sikkerhedsanvisningen nøje, før du tager
produktet i brug. Dette hjælper dig med at beskytte pro-
duktet mod ukorrekt ibrugtagning. Gem venligst denne
betjeningsvejledning til senere brug.
Du finder sikkerhedsanvisningen på side 23.
Ennen kytkemistä …
Toivomme Sinulle paljon miellyttäviä hetkiä uuden “img
Stage Line” laitteen kanssa. Ennen laitteen käyttöä
Sinua huolellisesti tutustumaan turvallisuusohjeisiin.
Näin vältyt vahingoilta, joita virheellinen laitteen käyttö
saattaa aiheuttaa. Ole hyvä ja säilytä käyttöohjeet myöh-
empää tarvetta varten.
Turvallisuusohjeet löytyvät sivulta 24.
DK
FIN
Innan du slår på enheten …
Vi önskar dig mycket glädje med din nya “img Stage
Line” produkt. Läs igenom säkerhetsföreskrifterna noga
innan enheten tas i bruk. Detta kan förhindra att problem
eller fara för dig eller enheten uppstår vid användning.
Spara instruktionerna för framtida användning.
Säkerhetsföreskrifterna återfinns på sidan 23.
S
Przed uruchomieniem …
Życzymy zadowolenia z nowego produktu “img Stage
Line”. Prosimy zapoznać się z informacjami dotyczą-
cymi bezpieczeństwa przed użytkowaniem urządzenia,
w ten sposób zdrowie użytkownika nie będzie zagro-
żone, a urządzenie nie ulegnie uszkodzeniu. Instrukcję
należy zachować do wglądu.
Informacje dotyczące bezpieczeństwa znajdują się na
stronie 22.
PL
Please open the plastic cover this side only for lamp change.
WARNING!
Disconnect the fixture from AC power before re-lamping.
Lamp is hot! Risk of fire! Protect hands and eyes.
Wait at least 15 minutes before opening the covers
and removing lamp from the fixture.
3
CH 1 = PAN
CH 2 = TILT
CH 3 = PAN/TILTSPEED
CH 4 = DIMMER
CH 5 = SHUTTER/SHAKING
CH 6 = COLOR 1
CH 7 = COLOR 2
CH 8 = GOBO 1
CH 9 = GOBO 1 ROTATION
CH 10 = GOBO 2
CH 11 = GOBO 2 ROTATION
CH 12 = PRISM
CH 13 = PRISM ROTATION
CH 14 = FOCUS
CH 15 = IRIS
CH 16 = LAMP ON/ OFF/RESET
CH 17 = PAN MOVEMENT FINE
CH 18 = TILT MOVEMENT FINE
CH 19 = MACRO
CH 20 = IRIS EFFECT
CH 21 = FROST EFFECT
CH 22 = DIMMER EFFECT
DMX CONFIGURATION
22 CHANNELS CH 1 = PAN
CH 2 = TILT
CH 3 = PAN/TILTSPEED
CH 4 = DIMMER
CH 5 = SHUTTER/SHAKING
CH 6 = COLOR 1
CH 7 = COLOR 2
CH 8 = GOBO 1
CH 9 = GOBO 1 ROTATION
CH 10 = GOBO 2
CH 11 = GOBO 2 ROTATION
CH 12 = PRISM / FROST
CH 13 = PRISM ROTATION
CH 14 = FOCUS
CH 15 = IRIS
CH 16 = LAMP ON/ OFF/RESET
DMX CONFIGURATION
16 CHANNELS
ENTERESC
DMX
MONITOR
ENTERESC
MONITOR
ENTERESC
DMX
MONITOR
ENTERESC
MONITOR
789101112137
➀
1
➁
➃
Serial - No. T01/ . . . . . . - 01
HMI-LAMP 100 V / 1200 W / SFc10-4
TWIST-1200 MOVING HEAD
230 V~ / 50Hz / 1900 VA
T 16 AL
2m
230V~
50Hz
1900 VA
POWER
PUSH
P
R
E
S
T
O
R
E
S
E
T
DMX IN
DMX OUT
PUSH
P
R
E
S
T
O
R
E
S
E
T
LAMP FUSE
EL. FUSE
2
14 15 16 17 18
3
5
6
4
➂
1919
20 20
Inhalt
1Übersicht der Bedienelemente und
Anschlüsse . . . . . . . . . . . . . . . . . . . . . . . . . 4
2Hinweise für den sicheren Gebrauch . . . . 4
3Einsatzmöglichkeiten . . . . . . . . . . . . . . . . . 5
4Leuchtmittel einsetzen . . . . . . . . . . . . . . . . 5
5Montage . . . . . . . . . . . . . . . . . . . . . . . . . . . . 6
6Bedienung . . . . . . . . . . . . . . . . . . . . . . . . . . 6
6.1 Ein- undAusschalten . . . . . . . . . . . . . . . . . . 6
6.2 Bedienung über ein Lichtsteuergerät . . . . . . 6
6.2.1 Anschluss . . . . . . . . . . . . . . . . . . . . . . . . . 6
6.2.2 Startadresse einstellen . . . . . . . . . . . . . . . 6
Belegung der DMX-Kanäle
im 16-Kanal-Modus . . . . . . . . . . . . . . . . . . 7
Belegung der DMX-Kanäle
im 22-Kanal-Modus . . . . . . . . . . . . . . . . . . 8
6.3 Betriebsparameter verändern . . . . . . . . . . . . 9
6.4 Korrekturwerte einstellen (Offset-Modus) . . . 9
7Reinigung der Optik . . . . . . . . . . . . . . . . . 10
8Auswechseln der Gobos . . . . . . . . . . . . . 10
9Transport . . . . . . . . . . . . . . . . . . . . . . . . . . 10
10 Technische Daten . . . . . . . . . . . . . . . . . . . 10
Bitte klappen Sie die Seite 3 heraus. Sie sehen
dann immer die beschriebenen Bedienelemente
und Anschlüsse.
1Übersicht der Bedienelemente und
Anschlüsse
1Schrauben (5x) zum Öffnen des Schwenkkopfes
2Scharnier für die Lampenabdeckung
3Schwenkkopf
4Knöpfe zum Arretieren* (rot) und Lösen (grün)
des Schwenkkopfes
5Dreharm
6Hebel zum Arretieren* und Lösen des Dreharms
7Tragegriffe
8alphanumerisches Display
9Kontroll-LED DMX: leuchtet, wenn am Eingang
DMX IN (16) ein DMX-Steuersignal anliegt
10 Drehrad zum Anwählen eines Menüpunktes und
Einstellen einer Funktion
11 Taste ESC zum Verlassen eines Menüpunktes
oder des Menüs
12 Taste ENTER zum Aufrufen oder Speichern
einer Menüeinstellung
13 Schiebetür, schützt gegen versehentliches Ver-
stellen der Bedienelemente
14 DMX-Signal-Ausgänge
(XLR-Buchsen, 3- und 5-polig);
1 = Masse, 2 = DMX
-
, 3 = DMX+
15 DMX-Signal-Eingänge
(XLR-Einbaustecker, 3- und 5-polig);
1 = Masse, 2 = DMX
-
, 3 = DMX+
16 Sicherungsautomaten; hat ein Automat ausge-
löst, zum Einschalten des Gerätes den entspre-
chenden Knopf wieder hineindrücken
17 Ein-/Ausschalter
18 Netzkabel zum Anschluss an eine Steckdose
(230V~/50Hz)
19 Rändelschrauben zum Öffnen des Lampenfachs
(nur bei abgeschraubtem Schwenkkopfoberteil
sichtbar)
20 Rändelmuttern zum Befestigen des Leuchtmit-
tels
2Hinweise für den sicheren Gebrauch
Dieses Gerät entspricht allen erforderlichen Richtli-
nien der EU und ist deshalb mit gekennzeichnet.
Beachten Sie auch unbedingt die folgenden Punkte:
●Verwenden Sie das Gerät nur im Innenbereich
und schützen Sie es vor Tropf- und Spritzwasser,
hoher Luftfeuchtigkeit und Hitze (zulässiger Ein-
satztemperaturbereich 0–40°C).
●Während des Betriebs wärmt sich der Schwenk-
kopf (3) stark auf. Um Verbrennungen zu vermei-
den, berühren Sie den Kopf nicht während des
Betriebs und lassen Sie ihn nach dem Ausschal-
ten einige Minuten abkühlen, bevor Sie ihn berüh-
ren.
●Stellen Sie keine mit Flüssigkeit gefüllten Gefäße,
z.B. Trinkgläser, auf das Gerät.
WARNUNG Das Gerät wird mit lebensgefähr-
licher Netzspannung (230V~) ver-
sorgt. Nehmen Sie deshalb niemals
selbst Eingriffe am Gerät vor, die
nicht in dieser Anleitung beschrie-
ben sind und stecken Sie nichts
durch die Lüftungsöffnungen! Es
besteht die Gefahr eines elektri-
schen Schlages.
Contents
1Operating Elements and Connections . . . 4
2Safety Notes . . . . . . . . . . . . . . . . . . . . . . . . 4
3Applications . . . . . . . . . . . . . . . . . . . . . . . . 5
4Inserting the Lamp . . . . . . . . . . . . . . . . . . . 5
5Mounting . . . . . . . . . . . . . . . . . . . . . . . . . . . 6
6Operation . . . . . . . . . . . . . . . . . . . . . . . . . . . 6
6.1 Switching on/off . . . . . . . . . . . . . . . . . . . . . . 6
6.2 Operation via a light controller . . . . . . . . . . . 6
6.2.1 Connection . . . . . . . . . . . . . . . . . . . . . . . . 6
6.2.2 Adjusting the start address . . . . . . . . . . . . 6
Configuration of the DMX channels
in the 16-channel mode . . . . . . . . . . . . . . . 7
Configuration of the DMX channels
in the 22-channel mode . . . . . . . . . . . . . . . 8
6.3 Changing the operating parameters . . . . . . . 9
6.4 Adjusting correction values (offset mode) . . . 9
7Cleaning the Optical System . . . . . . . . . . 10
8Replacement of the Gobos . . . . . . . . . . . 10
9Transport . . . . . . . . . . . . . . . . . . . . . . . . . . 10
10 Specifications . . . . . . . . . . . . . . . . . . . . . . 10
Please unfold page 3. Then you can always see
the operating elements and connections de-
scribed.
1Operating Elements and Connections
1Screws (5 x) for opening the moving head
2Hinge for the lamp cover
3Moving head
4Buttons for locking* (red) and unlocking (green)
the moving head
5Rotary arm
6Lever for locking* and unlocking the rotary arm
7Carrying handles
8Alphanumeric display
9Indicating LED DMX: lights up with a DMX con-
trol signal at the input DMX IN (16)
10 Rotary wheel for selecting a menu item and for
adjusting a function
11 Button ESC for exiting a menu item or the menu
12 Button ENTER for calling or memorizing a menu
setting
13 Sliding door, protects the operating elements
from accidental misadjustment
14 DMX signal outputs
(XLR jacks, 3-pole and 5-pole);
1 = ground, 2 = DMX
-
, 3 = DMX+
15 DMX signal inputs
(XLR chassis plugs, 3-pole and 5-pole);
1 = ground, 2 = DMX
-
, 3 = DMX+
16 Automatic safety cutouts; after one of them has
been released, depress the corresponding but-
ton again to switch on the unit
17 Power switch
18 Mains cable for connection to a mains socket
(230V~/50Hz)
19 Knurled screws for opening the lamp compart-
ment (only visible with the upper part of the
moving head removed)
20 Knurled nuts for fixing the lamp
2Safety Notes
This unit corresponds to all required directives of the
EU and is therefore marked with .
Please observe the following items in any case:
●The unit is suitable for indoor use only. Protect it
against dripping water and splash water, high air
humidity, and heat (admissible ambient tempera-
ture range 0–40°C).
●The moving head (3) heats up very much during
operation. To prevent burns, never touch the head
during operation; let it cool down for a few minutes
after switching off before you touch it.
●Do not place any vessel filled with liquid on the
unit, e.g. a drinking glass.
●Do not operate the unit or immediately disconnect
the mains plug from the mains socket
1. if there is visible damage to the unit, e.g. to the
housing, the lens, the UV filter, or the mains
cable,
2. if a defect might have occurred after the unit
was dropped or suffered a similar accident,
3. if malfunctions occur.
In any case the unit must be repaired by skilled
personnel.
WARNING The unit is supplied with hazardous
mains voltage (230V~). Leave ser-
vicing to skilled personnel only.
Never make any modification on the
unit not described in this instruction
manual and do not insert anything
into the air vents, otherwise you will
risk an electric shock!
4
GB
D
A
CH
*Um Transportschäden zu vermeiden, müssen vor dem Transport der
Schwenkkopf und der Dreharm arretiert werden.
*To prevent damage during transport, lock the moving head and the
rotary arm prior to transporting the unit.
1) Press the green button (4) for unlocking the
moving head and turn the head in such a way
that the hinge (2) for the lamp cover will point
upwards.
2) Release the five screws (1) and remove the
upper housing shell of the moving head.
3) Release the two knurled screws (19) on the right
and the left of the heat sink to open the lamp
cover. The lampholder will be visible.
4) For replacing the lamp, release the two knurled
nuts (20) of the old lamp and remove the lamp
from its lampholder.
5) Seize the new lamp on both ends (without touch-
ing the glass body) and place it into the lamphold-
er (see fig. 4). Tighten the two knurled nuts (20)
of the lamp.
6) Replace the lamp cover and the housing shell
and retighten the screws.
●The lamp listed above contains slight quantities
of harmful substances (e.g. mercury) which may
affect the environment and therefore requires a
disposal as special waste in Europe. In other
countries, the corresponding national regulations
must be observed.
●Replace the lamp at the latest after its 1.25 fold
average life because with increasing service life
the risk of a lamp explosion will considerably
increase due to structural transformation of the
quartz glass.
WARNING
Always disconnect the mains plug
before inserting or removing the
lamp!
●As the lamp heats up very much during opera-
tion, let the housing and the lamp cool down after
operation (minimum cooling down time 15 min-
utes) before replacing the lamp.
●Never look directly into the lit discharge lamp
when the unit is open; the high brightness and
UV radiation of the lamp may cause eye damage.
●Never pull the mains cable for disconnecting the
mains plug from the mains socket, always seize
the plug.
●Adamaged mains cable must be replaced by the
manufacturer or skilled personnel only.
●When transporting the unit, only seize the carrying
handles (7). Never carry the unit by the moving
head (3) or the rotary arm (5).
●For cleaning the housing only use a dry, soft cloth,
never use chemicals or water. For the optical parts,
a commercial glass cleaner may also be used.
●No guarantee for the unit and no liability for any
resulting personal damage or material damage
will be accepted if the unit is used for other pur-
poses than originally intended, if it is not safely
mounted or correctly operated, or not repaired in
an expert way.
●Important for U.K. Customers!
The wires in this mains lead are coloured in ac-
cordance with the following code:
green/yellow = earth
blue = neutral
brown = live
As the colours of the wires in the mains lead of this
appliance may not correspond with the coloured
markings identifying the terminals in your plug,
proceed as follows:
1. The wire which is coloured green and yellow
must be connected to the terminal in the plug
which is marked with the letter E or by the earth
symbol , or coloured green or green and yel-
low.
2. The wire which is coloured blue must be con-
nected to the terminal which is marked with the
letter N or coloured black.
3. The wire which is coloured brown must be con-
nected to the terminal which is marked with the
letter L or coloured red.
WARNING – This appliance must be earthed.
3Applications
The moving head TWIST-1200 is ideally suited for
professional applications on stage and in disco-
thèques. Due to its extensive features with two gobo
wheels, two colour wheels, prism, focus control, iris,
dimmer and stroboscopic effects, shaking effects,
and rotation effects, it is able to project a variety of
light patterns. The 16-bit resolution for the head
movement allows a most precise positioning of the
light beam. Due to an automatic repositioning
feature, the head will regain its position even if it has
been displaced by external influence.
For controlling the unit, a DMX light controller
(e.g. DMX-1440 or DMX-510USB from “img Stage
Line”) is required.
4Inserting the Lamp
The light effect unit is supplied without lamp. A
discharge lamp of the type HMI1200W/S with a
base SFc10-4 is required.
Never use lamps of a different type!
From the “img Stage Line” product range, the follow-
ing lamp may be used:
Never touch the glass tube of the lamp with your fin-
gers! Finger marks will burn into the glass and
reduce the luminous power.
If the unit is to be put out of operation
definitively, take it to a local recycling
plant for a disposal which is not harmful
to the environment.
3Einsatzmöglichkeiten
Der Moving-Head TWIST-1200 ist besonders für
den professionellen Einsatz auf der Bühne und in
Diskotheken geeignet. Durch seine umfangreiche
Ausstattung mit zwei Goborädern, zwei Farbrädern,
Prisma, steuerbarem Fokus, Iris, Dimmer sowie
Stroboskop-, Wackel- und Rotationseffekten kann
es eine Vielzahl abwechslungsreicher Lichtmuster
projizieren. Die 16-Bit-Auflösung für die Kopfbewe-
gung erlaubt eine sehr genaue Positionierung des
Lichtstrahls. Die automatische Repositionierung
verhindert, dass der Kopf bei Verdrehen durch
äußere Einflüsse die Orientierung verliert.
Zur Steuerung des Gerätes wird ein DMX-Licht-
steuergerät (z.B. DMX-1440 oder DMX-510USB
von „img Stage Line“) benötigt.
4Leuchtmittel einsetzen
Das Lichteffektgerät wird ohne Leuchtmittel gelie-
fert. Es wird eine Entladungslampe vom Typ
HMI1200W/S mit einem Sockel SFc10-4 benötigt.
Auf keinen Fall dürfen Lampen eines anderen
Typs verwendet werden!
Aus dem Sortiment von „img Stage Line“ kann fol-
gendes Leuchtmittel eingesetzt werden:
Den Glaskolben der Lampe nie mit den Fingern
berühren! Hautfett und -schweiß mindern die
Leuchtkraft und brennen sich ein.
1) Den grünen Knopf (4) zum Entriegeln des
Schwenkkopfes drücken und den Kopf so dre-
hen, dass das Scharnier (2) für die Lampenab-
deckung nach oben zeigt.
2) Die fünf Schrauben (1) lösen und die obere
Gehäuseschale des Schwenkkopfes abnehmen.
3) Die beiden Rändelschrauben (19) rechts und
links des Kühlkörpers lösen. Jetzt kann die Lam-
penabdeckung aufgeklappt werden und die Lam-
penfassung wird sichtbar.
4) Bei einem Lampenwechsel die beiden Rändel-
muttern (20) der alten Lampe lösen und die
Lampe aus der Fassung entfernen.
5) Die neue Lampe an den beiden Enden (nicht am
Glaskörper) anfassen und in die Fassung einset-
zen (siehe Abb. 4). Die beiden Rändelmuttern
(20) der Lampe festschrauben.
6) Die Lampenabdeckung und die Gehäuseschale
aufsetzen und wieder festschrauben.
●Die hier aufgeführte Lampe enthält in geringen
Mengen umweltrelevante Schadstoffe (z.B.
Quecksilber) und muss deshalb in Europa als Son-
dermüll entsorgt werden. In anderen Ländern sind
die jeweiligen nationalen Vorschriften zu beachten.
●Die Lampe muss spätestens nach der 1,25fachen
mittleren Lebensdauer gewechselt werden, da
mit fortschreitender Nutzungsdauer das Risiko
eines Lampenplatzers infolge von Gefügeverän-
derungen des Quarzglases deutlich ansteigt.
Das Gerät ist mit einem Betriebsstunden-
zähler ausgestattet. Dieser kann zur Bestimmung
der Lampenbrenndauer genutzt werden. Notieren
Sie sich bei einem Lampenwechsel den Zähler-
stand – siehe Kapitel 6.3 „Betriebsparameter ver-
ändern“, Menüpunkt „Lamp Hours“.
erst abkühlen (Abkühlzeit min. 15 Minuten), be-
vor Sie die Lampe auswechseln können.
●Blicken Sie niemals bei geöffnetem Gerät direkt
in die brennende Entladungslampe. Die hohe
Helligkeit und die UV-Strahlung können zu
Augenschäden führen.
WARNUNG
Ziehen Sie vor dem Einsetzen bzw.
Herausnehmen der Lampe unbe-
dingt den Netzstecker!
●Da die Lampe im Betrieb sehr heiß wird, müssen
das Gehäuse und die Lampe nach dem Betrieb
●Nehmen Sie das Gerät nicht in Betrieb und ziehen
Sie sofort den Netzstecker aus der Steckdose,
wenn:
1. sichtbare Schäden am Gerät, z.B. am Ge-
häuse, an der Linse, am UV-Filter oder an der
Netzanschlussleitung, vorhanden sind,
2. nach einem Sturz oder Ähnlichem der Verdacht
auf einen Defekt besteht,
3. Funktionsstörungen auftreten.
Lassen Sie das Gerät in einer Fachwerkstatt repa-
rieren.
●Ziehen Sie den Netzstecker nie an der Zuleitung
aus der Steckdose, fassen Sie immer am Stecker
an.
●Eine beschädigte Netzanschlussleitung darf nur
durch den Hersteller oder durch eine Fachwerk-
statt ersetzt werden.
●Fassen Sie beim Transport des Gerätes nur an
den Tragegriffen (7) an.Auf keinen Fall das Gerät
am Schwenkkopf (3) oder Dreharm (5) tragen.
●Verwenden Sie für die Reinigung des Gehäuses
nur ein trockenes, weiches Tuch, niemals Wasser
oder Chemikalien. Für die optischen Teile kann
auch ein handelsübliches Glasreinigungsmittel
verwendet werden.
●Wird das Gerät zweckentfremdet, nicht sicher
montiert, falsch bedient oder nicht fachgerecht re-
pariert, kann keine Garantie für das Gerät und
keine Haftung für daraus resultierende Sach- oder
Personenschäden übernommen werden.
Soll das Gerät endgültig aus dem
Betrieb genommen werden, übergeben
Sie es zur umweltgerechten Entsorgung
einem örtlichen Recyclingbetrieb.
5
GB
D
A
CH
Artikel Best.-Nr. mittlere Lebensdauer
HMI-1200W 05.9290 750h
Item Order No. Average Life
HMI-1200W 05.9290 750h
●Nach einem Lampenplatzer während des Be-
triebs sollte die unmittelbare Umgebung der
Lampe vorsichtshalber verlassen werden, um
eine Gesundheitsgefährdung durch frei werdende
Quecksilberdämpfe völlig auszuschließen. Sor-
gen Sie für eine gute Raumdurchlüftung.
5Montage
Der TWIST-1200 lässt sich auf einer festen, ebenen
Fläche aufstellen oder durch die Befestigungsmög-
lichkeiten der Bodenplatte kopfüber an einer Tra-
verse montieren (siehe Abbildung 8 auf der Seite
25). Dazu werden stabile Montageschellen benötigt.
Die Schellen an den mitgelieferten Montagebügeln
(24) befestigen. Die Bolzen (25) der Bügel, wie in
der Abbildung gezeigt, in die vorgesehenen Öffnun-
gen (21 oder 23) der Bodenplatte stecken und im
Uhrzeigersinn verriegeln (bis zum Anschlag dre-
hen). Die Montagestelle muss ausreichend stabil
sein und eine Last von min. 50kg pro Gerät tragen
können.
6Bedienung
6.1 Ein- und Ausschalten
1) Vor der Inbetriebnahme den Schwenkkopf und
den Dreharm entriegeln: Am Dreharm den grü-
nen Knopf (4) drücken und den Hebel (6) in die
Position UNLOCK legen.
2) Den Stecker des Netzkabels (18) in eine Steck-
dose (230V~/50Hz) stecken.
3) Mit dem Netzschalter (17) das Gerät einschalten.
Der Schwenkkopf und alle Steuermotoren fahren
in eine definierte Ausgangsstellung. Das Display
(8) signalisiert währenddessen reseting. . . Da-
nach ist der TWIST-1200 betriebsbereit.
Nach dem Betrieb das Gerät mit dem Netz-
schalter ausschalten.
4) Sollte einer der Sicherungsautomaten auslösen,
nach dem Beheben der Störung den entspre-
chenden Knopf (16) wieder hineindrücken.
Hinweis: Als Lichtquelle dient eine Entladungs-
lampe. Wird das Gerät nur kurz ausgeschaltet oder
nur kurz von der Stromversorgung getrennt, leuchtet
die Lampe nicht sofort wieder auf. Sie muss erst
einige Zeit abkühlen, um erneut zünden zu können.
6.2 Bedienung über ein Lichtsteuergerät
Zur Bedienung über ein Lichtsteuergerät mit
DMX512-Protokoll (wie z.B. DMX-1440 oder DMX-
510USB von „img Stage Line“) ist der TWIST-1200
mit 22 DMX-Kanälen ausgestattet. Stehen am Licht-
steuergerät nicht genügend Kanäle zur Verfügung,
kann in den 16-Kanal-Modus umgeschaltet werden.
Die Tabellen auf den Seiten 7 und 8 zeigen die
Funktionen und die zugehörigen DMX-Werte für die
beiden Modi.
6.2.1 Anschluss
Zum Anschluss besitzt der TWIST-1200 3-polige
und 5-polige XLR-Anschlüsse (1 = Masse, 2 =
DMX
-
, 3 = DMX+). Je nach vorhandener Buchse
am anzuschließenden Gerät entweder den 3-poli-
gen oder 5-poligen Anschluss verwenden.
Zum Anschluss sollten spezielle Kabel für hohen
Datenfluss verwendet werden. Die Verwendung nor-
maler Mikrofonkabel ist nur bei einer Gesamtka-
bellänge bis 100m zu empfehlen. Die besten Über-
tragungsergebnisse werden mit abgeschirmten
Mikrofonkabeln von 2 x 0,25mm2oder speziellen
Datenübertragungskabeln erreicht. Bei Leitungs-
längen ab 150m wird das Zwischenschalten eines
DMX-Aufholverstärkersempfohlen (z.B.SR-103DMX
oder SR-105DMX von „img Stage Line“).
1) Den DMX-Eingang (15) mit dem DMX-Ausgang
des Lichtsteuergerätes verbinden.
2) Den DMX-Ausgang (14) mit dem DMX-Eingang
des nächsten DMX-gesteuerten Gerätes verbin-
den. Dessen Ausgang wieder mit dem Eingang
des nachfolgenden Gerätes verbinden usw., bis
alle DMX-gesteuerten Geräte angeschlossen
sind.
Die DMX-Ausgangsbuchsen besitzen eine
Verriegelung. Zum Herausziehen des Steckers
den PUSH-Hebel drücken.
3) Den DMX-Ausgang des letzten DMX-gesteuerten
Gerätes der Kette mit einem 120-Ω-Widerstand
(>0,3W) abschließen: An die Pins 2 und 3 eines
XLR-Steckers den Widerstand anlöten und den
Stecker in den DMX-Ausgang stecken oder einen
entsprechendenAbschlussstecker (z.B. DLT-123
oder DLT-125 von „img Stage Line“) verwenden.
6.2.2 Startadresse einstellen
Um den TWIST-1200 von einem Lichtsteuergerät
bedienen zu können, muss die DMX-Startadresse
für den 1. DMX-Kanal eingestellt werden. Ist z.B.
am Steuergerät die Adresse 17 für die Steuerung
der Schwenkkopfdrehung vorgesehen, am TWIST-
1200 die Startadresse 17 einstellen.
WARNUNG Die hohe Lichtintensität der Entla-
dungslampe und die UV-Strahlung
können zu Augenschäden führen.
Blicken Sie darum nicht direkt in
den Lichtstrahl des Gerätes.
WARNUNG Das Gerät muss fachgerecht und
sicher montiert werden. Wird es als
schwebende Last über Personen
installiert, muss es zusätzlich gesi-
chert werden (z.B. durch ein Fang-
seil). Das Fangseil durch die beiden
Öffnungen (22) in der Mitte der Bodenplatte ziehen
und so befestigen, dass der Fallweg des Gerätes
nicht mehr als 20cm betragen kann.
WICHTIG
Platzieren Sie das Gerät immer so, dass im Betrieb
eine ausreichende Luftzirkulation gewährleistet ist.
●DerAbstand zur angestrahlten Fläche muss min-
destens 2m betragen.
●Die Lüftungsöffnungen am Gehäuse dürfen auf
keinen Fall abgedeckt werden.
●Achten Sie auch unbedingt auf einen ausrei-
chenden Abstand zu leicht entflammbaren oder
hitzeempfindlichen Materialien.
The unit is provided with a working hour meter
which may be used to determine the lighting
hours of the lamp. Note down the count of the
meter when replacing the lamp – see chapter
6.3“Changing the operating parameters”, menu
item “Lamp Hours”.
●After a lamp explosion during operation, every-
one should leave the immediate surroundings of
the lamp as a precaution to completely exclude a
health risk caused by mercury vapours being
released; ensure a good ventilation of the room.
5Mounting
Set up the TWIST-1200 on a solid and even surface
or mount it upside down to a cross arm via the fixing
facilities of the base plate (see figure 8 on page 25).
For this purpose, stable mounting clips are required.
Fasten the clips to the mounting brackets (24) sup-
plied. As shown in the figure, the bolts (25) of the
brackets are placed into the openings (21 or 23) pro-
vided in the base plate and turned clockwise (to the
stop) until they lock into place. The mounting place
must be of sufficient stability and be capable of
carrying a minimum load of 50kg per unit.
6Operation
6.1 Switching on/off
1) Prior to setting the unit into operation, unlock the
moving head and the rotary arm: Press the green
button (4) on the rotary arm and set the lever (6)
to the position UNLOCK.
2) Connect the plug of the mains cable (18) to a
socket (230V~/50Hz).
3) Switch on the unit with the power switch (17). The
moving head and all control motors will go to a
defined starting position while the display (8) will
show reseting. . . Then the TWIST-1200 is
ready for operation.
After operation, switch off the unit with the
power switch.
4) If one of the automatic safety cutouts has been
released, eliminate the fault and depress the cor-
responding button (16) again.
Note: The light source is a discharge lamp. If, for a
short time only, the unit is switched off or disconnect-
ed from the power supply, the lamp will not imme-
diately light up again. To restart, it must cool down
for some time.
6.2 Operation via a light controller
For operation via a light controller with DMX512 pro-
tocol (e.g. DMX-1440 or DMX-510USB from “img
Stage Line”), the TWIST-1200 is equipped with
22DMX channels. If the number of channels avail-
able on the light controller is insufficient, switch to
the 16-channel mode. The functions and the corre-
sponding DMX values for both modes can be found
in the tables on pages 7 and 8.
6.2.1 Connection
For connection, the TWIST-1200 is equipped with
3-pole and 5-pole XLR connections (1 = ground,
2 = DMX
-
, 3 = DMX+). According to the jack avail-
able on the unit to be connected, either use the
3-pole or the 5-pole connection.
For connection, special cables for high data flow
should be used. The use of standard microphone
cables can only be recommended for a total cable
length of up to 100 m. The best transmission results
are obtained with screened microphone cables of
2x0.25mm2or special data transmission cables.
For cable lengths exceeding 150m it is recommend-
ed to insert a DMX level matching amplifier (e.g.
SR-103DMX or SR-105DMX from “img Stage Line”).
1) Connect the DMX input (15) to the DMX output of
the light controller.
2) Connect the DMX output (14) to the DMX input of
the following DMX-controlled unit. Connect its
output to the input of the following unit, etc. until
all DMX-controlled units have been connected.
The DMX output jacks are provided with a
latching. To remove the plug, press the PUSH
lever.
3) Terminate the DMX output of the last DMX-con-
trolled unit in the chain with a 120Ωresistor
(> 0.3W): Solder the resistor to the pins 2 and 3
of an XLR plug and connect the plug to the DMX
output or use a corresponding terminating plug
(e.g. DLT-123 or DLT-125 from “img Stage Line”).
6.2.2 Adjusting the start address
For operating the TWIST-1200 from a light control-
ler, adjust the DMX start address for the first DMX
channel. If e.g. on the controller the address 17 is
provided for controlling the panning of the moving
head, adjust the start address 17 on the TWIST-
1200.
WARNING The high light intensity of the
discharge lamp and the UV radiation
may cause eye damage; never look
directly into the light beam of the unit.
WARNING The unit must be mounted expertly
and safely. If it is installed as a sus-
pended load above persons, it must
additionally be secured (e.g. by a
safety rope). Pull the safety rope
through the two central openings (22)
of the base plate and fasten it in such a way that
the maximum falling distance of the unit is 20cm.
IMPORTANT
Always place the unit in such a way that a sufficient
air circulation will be ensured during operation.
●Ensure a minimum distance of 2m to the illumi-
nated surface.
●Never cover the air vents of the housing.
●Always ensure a sufficient distance to easily
flammable material or material sensitive to heat.
6
GB
D
A
CH
7
GB
D
A
CH
1) Mit der Taste ENTER (12) das Menü aufrufen, so
dass das Display umspringt von:
IM-1200S
DMX Address xxx
auf
DMX Address
xxx (aktuelle DMX-Adresse).
2) Die Taste ENTER erneut drücken. Der Cursor
hinter der Adresse blinkt.
3) Mit dem Drehrad (10) die vorgesehene Adresse
zwischen 1 und 491 für den 22-Kanal-Modus ein-
stellen oder zwischen 1 und 497 für den Betrieb
im 16-Kanal-Modus.
4) Zum Speichern die Taste ENTER drücken.
Hinweis: Wird die Taste ENTER nicht innerhalb
von 10 Sekunden betätigt, schaltet das Gerät auf
die vorherige Adresse zurück. Mit der Taste ESC
(11) kann das Menü (vorzeitig) verlassen werden.
Nach dem Einstellen der Startadresse für den
1. Kanal sind die Kanäle 2–22 (bzw. 2–16) den
darauf folgenden Adressen zugeordnet. Beispiel:
Startadresse 17 = Kanal für die Drehung des
Schwenkkopfes
Adresse 18 = Kanal für die Kopfneigung
Adresse 19 = Kanal für die Geschwindigkeit
…
Adresse 37 = Kanal für das Frost-Filter
Adresse 38 = Kanal für die Dimmer-Steuerung
5) Nach dem Einstellen der Startadresse lässt sich
der TWIST-1200 über das angeschlossene Steu-
ergerät bedienen. Die eingestellte Startadresse
wird vom Display (8) stets angezeigt. Sobald
Steuersignale vom DMX-Steuergerät empfangen
werden, leuchtet die rote LED DMX (9).
6) Damit ein Lichtstrahl zu sehen ist, die Kanäle 4
(Dimmer) und 5 (Shutter) auf DMX-Werte über 7
einstellen.
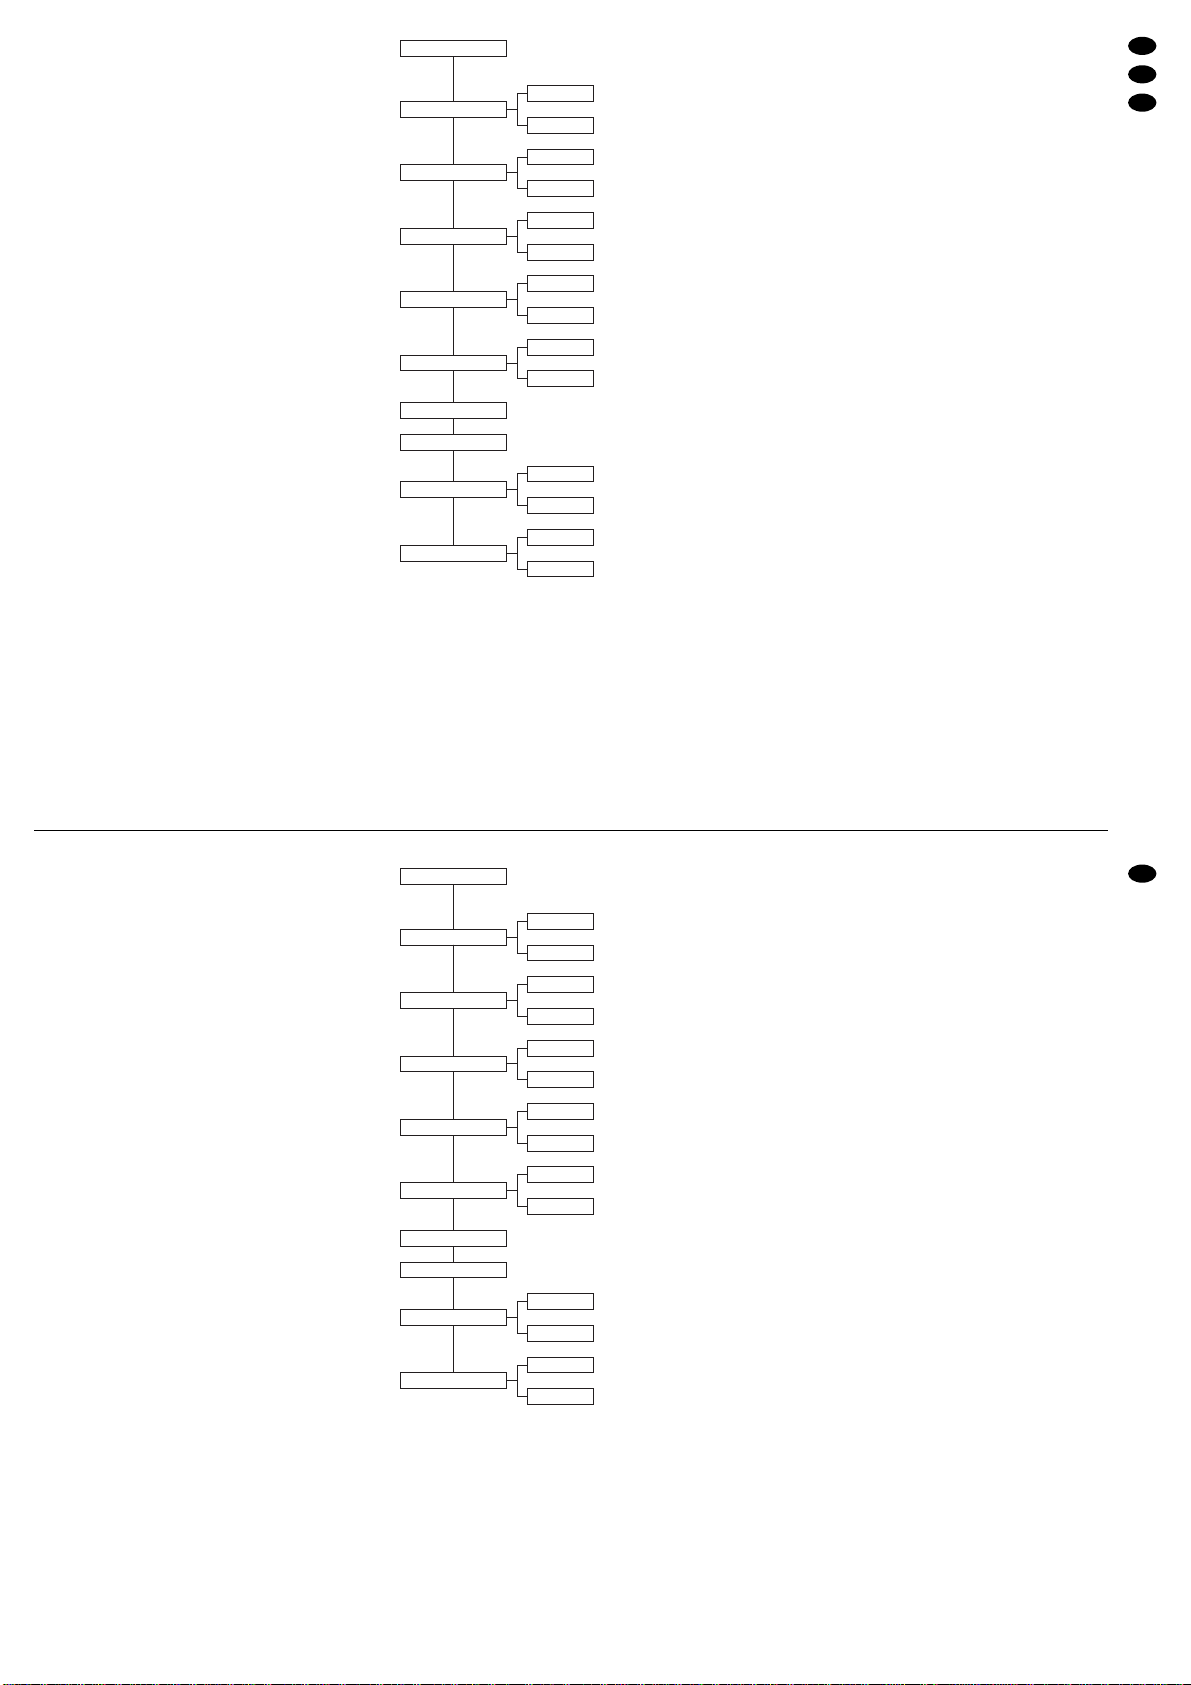
Abb. 5 Belegung der DMX-Kanäle im 16-Kanal-Modus
Die Gobos sind in der Abbildung 9 auf der Seite 25 dargestellt. Die Gobos
F und H sind aus Glas. Durch Vertauschen der Gobos am Goborad kann
ihre Reihenfolge geändert werden (siehe Kapitel 8).
Fig. 5 Configuration of the DMX channels in the 16-channel mode
The gobos are shown in fig. 9 on page 25. Gobos F and H are made of
glass. To change the order of the gobos, interchange the gobos on the
gobo wheel (see chapter 8).
Kanal Funktion im 16-Kanal-Modus DMX-Wert
1Schwenkkopfdrehung (Pan) 540° 000 – 255
2Schwenkkopfneigung (Tilt) 270° 000 – 255
3Pan- und Tilt-Geschwindigkeit
schnell →langsam 000 – 255
4Dimmer dunkel →hell 000 – 255
5
Shutter geschlossen (Blackout)
Shutter offen
Stroboskop langsam →schnell
Wackeleffekt Goborad 1 langsam →schnell
Wackeleffekt Goborad 2 langsam →schnell
Shutter offen
000 – 007
008 – 015
016 – 131
132 – 185
186 – 239
240 – 255
6
Farbe 1
Weiß
Blau
Grün
Orange
Hellgrün
Magenta
Hellgelb
Rot
ständiger Farbwechsel
schnell →langsam
langsam →schnell (Gegenrichtung)
000 – 015
016 – 031
032 – 047
048 – 063
064 – 079
080 – 095
096 – 111
112 – 127
128 – 191
192 – 255
7
Farbe 2
Weiß
Hellblau
Rosa
UV-Violett
Grün, Gelb, Magenta, Blau
Farbtemperatur 3200 K
Farbtemperatur 5600 K
ständiger Farbwechsel
schnell →langsam
langsam →schnell (Gegenrichtung)
000 – 018
019 – 036
037 – 054
055 – 072
073 – 090
091 – 108
109 – 127
128 – 191
192 – 255
Kanal Funktion im 16-Kanal-Modus DMX-Wert
12
Prisma oder Frost-Filter
kein Effekt
Prisma 1
Prisma 2
Frost-Filter
000 – 063
064 – 127
128 – 191
192 – 255
8
Goborad 1
kein Gobo
Gobo A
Gobo B
Gobo C
Gobo D
ständiger Gobowechsel:
schnell →langsam
langsam →schnell (Gegenrichtung)
000 – 025
026 – 050
051 – 076
077 – 101
102 – 127
128 – 191
192 – 255
9
Goborad 1 Rotation
Gobo-Drehwinkel
Rechtsrotation schnell →langsam
Linksrotation langsam →schnell
000 – 127
128 – 191
192 – 255
11
Goborad 2 Rotation
Gobo-Drehwinkel
Rechtsrotation schnell →langsam
Linksrotation langsam →schnell
000 – 127
128 – 191
192 – 255
13
Prisma-Rotation
Prisma-Drehwinkel
Rechtsrotation schnell →langsam
Linksrotation langsam →schnell
000 – 127
128 – 191
192 – 255
15 Iris
Durchmesser groß →klein 000 – 255
14 Fokus
nah →fern 000 – 255
16 Reset, Lampe ein / aus
siehe Seite 8, Abb. 6, Kanal 16
10
Goborad 2
kein Gobo
Gobo E
Gobo F
Gobo G
Gobo H
ständiger Gobowechsel:
schnell →langsam
langsam →schnell (Gegenrichtung)
000 – 025
026 – 050
051 – 076
077 – 101
102 – 127
128 – 187
188 – 255
1) Call the menu with the button ENTER (12) so that
the display will change from:
IM-1200S
DMX Address xxx
to
DMX Address
xxx (current DMX address).
2) Press the button ENTER again. The cursor at the
end of the address starts flashing.
3) With the rotary wheel (10), adjust the corre-
sponding address between 1 and 491 for the
22-channel mode or between 1 and 497 for oper-
ation in the 16-channel mode.
4) To memorize, press the button ENTER.
Note: If the button ENTER is not actuated within
10 seconds, the unit will return to the previous
address. Press the button ESC (11) to exit the
menu (at any time).
After adjusting the start address for the first chan-
nel, the channels 2–22 (or 2–16) are assigned
to the following addresses. Example:
Start address 17 = channel for panning the
moving head
Address 18 = channel for tilting the moving head
Address 19 = channel for the speed
...
Address 37 = channel for the frost filter
Address 38 = channel for the dimmer control
5) After adjusting the start address, the TWIST-
1200 can be operated via the controller con-
nected. The start address adjusted will always be
shown on the display (8). As soon as control sig-
nals are received from the DMX controller, the
red LED DMX (9) will light up.
6) In order to see a light beam, set the channels 4
(dimmer) and 5 (shutter) to DMX values higher
than 7.
Channel Functions in the 16-channel mode DMX value
1Panning of moving head (Pan) 540° 000 – 255
2Tilting of moving head (Tilt) 270° 000 – 255
3Pan and tilt speed
fast →slow 000 – 255
4Dimmer dark→bright 000 – 255
5
Shutter closed (blackout)
Shutter open
Stroboscope slow →fast
Shaking effect Gobo wheel 1 slow →fast
Shaking effect Gobo wheel 2 slow →fast
Shutter open
000 – 007
008 – 015
016 – 131
132 – 185
186 – 239
240 – 255
6
Colour 1
white
blue
green
orange
light green
magenta
light yellow
red
constant change of colour
fast →slow
slow →fast (opposite direction)
000 – 015
016 – 031
032 – 047
048 – 063
064 – 079
080 – 095
096 – 111
112 – 127
128 – 191
192 – 255
7
Colour 2
white
light blue
pink
ultraviolet
green, yellow, magenta, blue
colour temperature 3200 K
colour temperature 5600 K
constant change of colour
fast →slow
slow →fast (opposite direction)
000 – 018
019 – 036
037 – 054
055 – 072
073 – 090
091 – 108
109 – 127
128 – 191
192 – 255
Channel Functions in the 16-channel mode DMX value
12
Prism or frost filter
no effect
prism 1
prism 2
frost filter
000 – 063
064 – 127
128 – 191
192 – 255
8
Gobo wheel 1
no gobo
Gobo A
Gobo B
Gobo C
Gobo D
constant change of gobo:
fast →slow
slow →fast (opposite direction)
000 – 025
026 – 050
051 – 076
077 – 101
102 – 127
128 – 191
192 – 255
9
Gobo wheel 1 rotation
rotating angle of gobo
clockwise rotation fast →slow
counter-clockwise rotation slow →fast
000 – 127
128 – 191
192 – 255
11
Gobo wheel 2 rotation
rotating angle of gobo
clockwise rotation fast →slow
counter-clockwise rotation slow →fast
000 – 127
128 – 191
192 – 255
13
Prism rotation
rotating angle of prism
clockwise rotation fast →slow
counter-clockwise rotation slow →fast
000 – 127
128 – 191
192 – 255
15 Iris
diameter large →small 000 – 255
14 Focus
near →far 000 – 255
16 Reset, lamp on / off
see page 8, fig. 6, channel 16
10
Gobo wheel 2
no gobo
Gobo E
Gobo F
Gobo G
Gobo H
constant change of gobo:
fast →slow
slow →fast (opposite direction)
000 – 025
026 – 050
051 – 076
077 – 101
102 – 127
128 – 187
188 – 255

8
GB
D
A
CH
Abb. 6 Belegung der DMX-Kanäle im 22-Kanal-Modus
Die Gobos sind in der Abbildung 9 auf der Seite 25 dargestellt. Die Gobos
F und H sind aus Glas. Durch Vertauschen der Gobos am Goborad kann
ihre Reihenfolge geändert werden (siehe Kapitel 8).
Die Makros sind programmierte Gobo-, Farb- und Effekt-Wechsel. Die
Lichtstrahlrichtung ändert sich dabei nicht.
Fig. 6 Configuration of the DMX channels in the 22-channel mode
The gobos are shown in fig. 9 on page 25. Gobos F and H are made of
glass. To change the order of the gobos, interchange the gobos on the
gobo wheel (see chapter 8).
The macros are programmed changes of gobo, of colour, and of effect.
These changes will not affect the direction of the light beam.
Kanal Funktion im 22-Kanal-Modus DMX-Wert
1Schwenkkopfdrehung (Pan) 540° 000 – 255
2Schwenkkopfneigung (Tilt) 270° 000 – 255
3Pan- und Tilt-Geschwindigkeit
schnell →langsam 000 – 255
4Dimmer dunkel →hell 000 – 255
5
Shutter geschlossen (Blackout)
Shutter offen
Stroboskop langsam →schnell
Wackeleffekt Goborad 1 langsam →schnell
Wackeleffekt Goborad 2 langsam →schnell
Shutter offen
000 – 007
008 – 015
016 – 131
132 – 185
186 – 239
240 – 255
6
Farbe 1
Weiß
Blau
Grün
Orange
Hellgrün
Magenta
Hellgelb
Rot
ständiger Farbwechsel
schnell →langsam
langsam →schnell (Gegenrichtung)
000 – 015
016 – 031
032 – 047
048 – 063
064 – 079
080 – 095
096 – 111
112 – 127
128 – 191
192 – 255
7
Farbe 2
Weiß
Hellblau
Rosa
UV-Violett
Grün, Gelb, Magenta, Blau
Farbtemperatur 3200 K
Farbtemperatur 5600 K
ständiger Farbwechsel
schnell →langsam
langsam →schnell (Gegenrichtung)
000 – 018
019 – 036
037 – 054
055 – 072
073 – 090
091 – 108
109 – 127
128 – 191
192 – 255
Kanal Funktion im 22-Kanal-Modus DMX-Wert
12
Prisma
kein Prisma
Prisma ein
000 – 127
128 – 255
8
Goborad 1
kein Gobo
Gobo A
Gobo B
Gobo C
Gobo D
ständiger Gobowechsel:
schnell →langsam
langsam →schnell (Gegenrichtung)
000 – 025
026 – 050
051 – 076
077 – 101
102 – 127
128 – 191
192 – 255
9
Goborad 1 Rotation
Gobo-Drehwinkel
Rechtsrotation schnell →langsam
Linksrotation langsam →schnell
000 – 127
128 – 191
192 – 255
11
Goborad 2 Rotation
Gobo-Drehwinkel
Rechtsrotation schnell →langsam
Linksrotation langsam →schnell
000 – 127
128 – 191
192 – 255
13
Prisma-Rotation
Prisma-Drehwinkel
Rechtsrotation schnell →langsam
Linksrotation langsam →schnell
000 – 127
128 – 191
192 – 255
15 Iris
Durchmesser groß →klein 000 – 255
14 Fokus
nah →fern 000 – 255
10
Goborad 2
kein Gobo
Gobo E
Gobo F
Gobo G
Gobo H
ständiger Gobowechsel:
schnell →langsam
langsam →schnell (Gegenrichtung)
000 – 025
026 – 050
051 – 076
077 – 101
102 – 127
128 – 187
188 – 255
Kanal Funktion im 22-Kanal-Modus DMX-Wert
19
Makros
kein Makro
Makro 1
Makro 2
Makro 3
Makro 4
Makro 5
Makro 6
Makro 7
Makro 8
Makro 9
Makro 10
Makro 11
Makro 12
Makro 13
Makro 14
Makro 15
Makro 16
Makro 17
000 – 007
008 – 022
023 – 037
038 – 051
052 – 066
067 – 080
081 – 095
096 – 110
111 – 124
125 – 138
139 – 153
154 – 167
168 – 182
183 – 196
197 – 211
212 – 225
226 – 240
241 – 255
16
Reset, Lampe ein / aus
Bei Kanal 8 den gewünschten Wert einstellen:
Reset: 255
Lampe ein: 247
Lampe aus: 239
Danach Kanal 16 auf den Wert 255 stellen.
Nach 5 Sekunden wird die entsprechende
Funktion ausgelöst.
255
17 Schwenkkopfdrehung (Pan)
Feineinstellung (für 16-Bit-Auflösung) 000 – 255
18 Schwenkkopfneigung (Tilt)
Feineinstellung (für 16-Bit-Auflösung) 000 – 255
20
dynamische Iris-Steuerung
kein Effekt
Iris offen, langsam →schnell schließend
Iris zu, langsam →schnell öffnend
langsam →schnell öffnend + schließend
000 – 009
010 – 091
092 – 173
174 – 255
21
Frost-Filter
kein Effekt
min. Frost →max. Frost
kein Frost, langsam →schnell zunehmend
max. Frost, langsam →schnell abnehmend
000 – 009
010 – 189
190 – 211
212 – 255
22
dynamische Dimmer-Steuerung
kein Effekt
max. hell, langsam →schnell dunkel werdend
max. dunkel, langsam →schnell hell werdend
000 – 007
008 – 131
132 – 255
Channel Functions in the 22-channel mode DMX value
1Panning of moving head (Pan) 540° 000 – 255
2Tilting of moving head (Tilt) 270° 000 – 255
3Pan and tilt speed
fast →slow 000 – 255
4Dimmer dark→bright 000 – 255
5
Shutter closed (blackout)
Shutter open
Stroboscope slow →fast
Shaking effect Gobo wheel 1 slow →fast
Shaking effect Gobo wheel 2 slow →fast
Shutter open
000 – 007
008 – 015
016 – 131
132 – 185
186 – 239
240 – 255
6
Colour 1
white
blue
green
orange
light green
magenta
light yellow
red
constant change of colour
fast →slow
slow →fast (opposite direction)
000 – 015
016 – 031
032 – 047
048 – 063
064 – 079
080 – 095
096 – 111
112 – 127
128 – 191
192 – 255
7
Colour 2
white
light blue
pink
ultraviolet
green, yellow, magenta, blue
colour temperature 3200 K
colour temperature 5600 K
constant change of colour
fast →slow
slow →fast (opposite direction)
000 – 018
019 – 036
037 – 054
055 – 072
073 – 090
091 – 108
109 – 127
128 – 191
192 – 255
Channel Functions in the 22-channel mode DMX value
12
Prism
no effect
prism on
000 – 127
128 – 255
8
Gobo wheel 1
no gobo
Gobo A
Gobo B
Gobo C
Gobo D
constant change of gobo:
fast →slow
slow →fast (opposite direction)
000 – 025
026 – 050
051 – 076
077 – 101
102 – 127
128 – 191
192 – 255
9
Gobo wheel 1 rotation
rotating angle of gobo
clockwise rotation fast →slow
counter-clockwise rotation slow →fast
000 – 127
128 – 191
192 – 255
11
Gobo wheel 2 rotation
rotating angle of gobo
clockwise rotation fast →slow
counter-clockwise rotation slow →fast
000 – 127
128 – 191
192 – 255
13
Prism rotation
rotating angle of prism
clockwise rotation fast →slow
counter-clockwise rotation slow →fast
000 – 127
128 – 191
192 – 255
15 Iris
diameter large →small 000 – 255
14 Focus
near →far 000 – 255
10
Gobo wheel 2
no gobo
Gobo E
Gobo F
Gobo G
Gobo H
constant change of gobo:
fast →slow
slow →fast (opposite direction)
000 – 025
026 – 050
051 – 076
077 – 101
102 – 127
128 – 187
188 – 255
Channel Functions in the 22-channel mode DMX value
19
Macros
no makro
Macro 1
Macro 2
Macro 3
Macro 4
Macro 5
Macro 6
Macro 7
Macro 8
Macro 9
Macro 10
Macro 11
Macro 12
Macro 13
Macro 14
Macro 15
Macro 16
Macro 17
000 – 007
008 – 022
023 – 037
038 – 051
052 – 066
067 – 080
081 – 095
096 – 110
111 – 124
125 – 138
139 – 153
154 – 167
168 – 182
183 – 196
197 – 211
212 – 225
226 – 240
241 – 255
16
Reset, lamp on / off
Adjust the desired value for channel 8:
Reset: 255
Lamp on: 247
Lamp off: 239
Then set channel 16 to the value 255.
After 5 seconds the corresponding function
will be released.
255
17 Panning of moving head (Pan)
fine adjustment (for 16-bit resolution) 000 – 255
18 Tilting of moving head (Tilt)
fine adjustment (for 16-bit resolution) 000 – 255
20
Dynamic iris control
no effect
iris open, shutting slow →fast
iris closed, opening slow →fast
opening + shutting slow →fast
000 – 009
010 – 091
092 – 173
174 – 255
21
Frost filter
no effect
min. frost →max. frost
no frost, increase slow →fast
max. frost, decrease slow→fast
000 – 009
010 – 189
190 – 211
212 – 255
22
Dynamic dimmer control
no effect
max. brightness, dimming slow →fast
max. darkness, brightening slow →fast
000 – 007
008 – 131
132 – 255
6.3 Betriebsparameter verändern
Über ein Menü lassen sich:
–
die nachfolgend beschriebenen Parameter ändern,
um den TWIST-1200 optimal steuern zu können,
–die Betriebsstunden und die Umgebungstempe-
ratur der Lampe anzeigen,
–die Funktionen Selbsttest, Lampe ein/aus und
Reset durchführen.
1) Mit der Taste ENTER (12) das Menü aufrufen.
Das Display springt um von:
IM-1200S
DMX Address xxx
auf
DMX Address
xxx (aktuelle DMX-Adresse).
2) Mit dem Drehrad (10) den Menüpunkt auswählen
und mit der Taste ENTER bestätigen.
3) Mit dem Drehrad den Parameter einstellen und
mit der Taste ENTER bestätigen. Danach kann
der nächste Menüpunkt mit dem Drehrad ausge-
wählt werden.
4) Nach dem Einstellen mit der Taste ESC (11) das
Menü wieder verlassen und auf den DMX-Modus
zurückschalten.
Hinweise
a) Bei Aufruf des Menüs fährt der Schwenkkopf in
die senkrechte Position (vertikal 90°).
b) Wird bei einem angewählten Menüpunkt innerhalb
von 10 Sekunden keine weitere Taste gedrückt,
blendet sich das Menü aus.
c) Mit der Taste ESC (11) kann ein Menüpunkt wie-
der verlassen werden. Ein Eingabewert, der noch
nicht mit der Taste ENTER (12) bestätigt wurde,
wird dann ignoriert und der vorherige Wert wieder
angezeigt.
Abb. 7 Menüstruktur
1) Test Yes Nach dem Drücken der Taste ENTER läuft ein Testprogramm
ab. Zum Beenden die Taste ESC zweimal drücken.
2) Lamp OFF Die Entladungslampe kann nach dem Ausschalten im
heißen Zustand nicht sofort wieder gezündet werden. Das Wiederein-
schalten kann sich dadurch um einige Minuten verzögern.
3) Reset Yes Durch Drücken der Taste ENTER erfolgt eine Rückstellung:
Der Schwenkkopf fährt kurz in die Ausgangsstellung und der Lichtstrahl
wird abgeblendet. Danach schaltet das Gerät in den DMX-Betrieb zu-
rück.
6.4 Korrekturwerte einstellen (Offset-Modus)
Zur Feinjustierung der Schwenkkopfposition, der
Goboräder, der Farbräder, des Prismas und des
Fokus können bei Bedarf Korrektureinstellungen
vorgenommen werden. Sollen mehrere TWIST-1200
synchron über dieselben DMX-Kanäle gesteuert
werden, lassen sich z.B. Abweichungen der Strahl-
richtungen minimieren.
1) Die Taste ENTER (12) einmal kurz drücken.
Dann die Taste ENTER ca. 3 Sekunden gedrückt
halten, bis das Display umspringt von
DMX Address
xxx
auf
Adjust Focus
xxx
2) Mit dem Drehrad (10) den Menüpunkt auswählen
und mit der Taste ENTER bestätigen.
3) Mit dem Drehrad den Korrekturwert einstellen
und mit der Taste ENTER bestätigen. Danach
kann mit dem Drehrad der nächste Menüpunkt
ausgewählt werden.
4) Soll ein Menüpunkt verlassen werden, ohne eine
erfolgte Korrektur zu speichern, die Taste ESC
(11) drücken. Durch zweimaliges Drücken der
Taste ESC wird das Menü wieder verlassen und
in den DMX-Modus geschaltet.
Hinweis: Bei Aufruf des Menüs fährt der Schwenk-
kopf in die senkrechte Position (vertikal 90°). Ist
diese Projektionsrichtung oder der aktuelle Fokus
für die beabsichtigten Korrektureinstellungen nicht
geeignet, zuerst den Menüpunkt Adjust Focus auf-
rufen und eine andere Projektionsrichtung wählen
bzw. den Fokus ändern.
Die hier dargestellte Reihenfolge entspricht der Rei-
henfolge der Menüpunkte:
Adjust Focus Fokuseinstellung
0…255 Um den Schwenkkopf in eine der
vier Hauptrichtungen bei fast
waagerechter Strahlrichtung zu
drehen, die Taste ENTER (mehr-
fach) betätigen. In der Position,
6.3 Changing the operating parameters
The menu allows
–to change the parameters described below for
optimum control of the TWIST-1200.
–to indicate the operating hours and the ambient
temperature of the lamp.
–to perform the functions self-test, lamp on/off,
and reset.
1) Call the menu with the button ENTER (12). The
display will change from:
IM-1200S
DMX Address xxx
to
DMX Address
xxx (current DMX address).
2) Select the menu item with the rotary wheel (10)
and confirm with the button ENTER.
3) Adjust the parameter with the rotary wheel and
confirm with the button ENTER. Then select the
next menu item with the rotary wheel.
4) After adjusting, exit the menu and return to the
DMX mode with the button ESC (11).
Notes
a) When the menu is called, the moving head will go
to the vertical position (vertical 90°).
b) If no further button is pressed within 10 seconds
while a menu item is selected, the menu will dis-
appear.
c) To exit a menu item, press the button ESC (11). In
this case, an input value not yet confirmed with
the button ENTER (12) will be ignored and the
previous value displayed.
Fig. 7 Menu structure
1) Test Yes After pressing the button ENTER, a test programme will be
executed. To terminate this programme, press the button ESC twice.
2) Lamp OFF After switching off, the discharge lamp cannot be restarted
immediately while it is still hot. Therefore, there may be a delay of a few
minutes before it is switched on again.
3) Reset Yes Areset is made when pressing the button ENTER: The
moving head will shortly go to its starting position and the shutter is
closed. Then the unit will return to the DMX mode.
6.4 Adjusting correction values (offset mode)
For fine adjustment of the moving head position, the
gobo wheels, the colour wheels, the prism, and the
focus, readjustments can be made, if required. For
controlling several TWIST-1200 units in sync via the
same DMX channels, e.g. the deviations of the
beam directions can be minimized.
1) Shortly press the button ENTER (12) once. Then
keep the button ENTER pressed for approx.
3seconds until the display will change from
DMX Address
xxx
to
Adjust Focus
xxx
2) Select the menu item with the rotary wheel (10)
and confirm with the button ENTER.
3) Adjust the correction value with the rotary wheel
and confirm with the button ENTER. Then select
the next menu item with the rotary wheel.
4) For exiting a menu item without memorizing a
readjustment made, press the button ESC (11).
To exit the menu and switch to the DMX mode,
press the button ESC twice.
Note: When calling the menu, the moving head will
always go to the vertical position (vertical 90°). If this
direction of projection or the current focus is not suit-
ed for the readjustments intended, call the menu
item Adjust Focus first and select another direction
of projection or change the focus.
The order shown here corresponds to the order of
the menu items:
Adjust Focus Focus adjustment
0 ... 255 Press the button ENTER
(several times) to turn the
moving head to one of the four
main directions with an almost
horizontal direction of the beam.
In the position which is closest to
the intended direction of projec-
tion, the focus for the offset mode
9
GB
D
A
CH
Lamp Termperature
Test No
Yes
Inverse Pan Normal
Inverse
Channel Mode 22 Cannel
16 Channel
DMX Address 1
512
Inverse Tilt Normal
Inverse
Lamp Hours
Reset
Yes
No
Lampe ON/OFF
Yes
No
DMX-Startadresse
22-Kanal-Modus
16-Kanal-Modus
Drehrichtung normal
kein Selbsttest
Drehrichtung
entgegengesetzt
Schwenkrichtung
normal
Schwenkrichtung
entgegengesetzt
Selbsttest1)
Umgebungstemperatur der Lampe
Betriebsstundenzähler für die Lampe
Lampe aus2)
Lampe ein
keine Rückstellung
Rückstellung3)
MENU
Lamp Termperature
Test No
Yes
Inverse Pan Normal
Inverse
Channel Mode 22 Cannel
16 Channel
DMX Address 1
512
Inverse Tilt Normal
Inverse
Lamp Hours
Reset
Yes
No
Lampe ON/OFF
Yes
No
DMX start address
22-channel mode
16-channel mode
pan normal
no self-test
self-test1)
ambient temperature of the lamp
operating hour counter for the lamp
lamp off2)
lamp on
no reset
reset3)
MENU
pan inversion
tilt normal
tilt inversion
die der beabsichtigten Projek-
tionsrichtung am nächsten
kommt, kann der Fokus für den
Offset-Modus mit dem Drehrad
eingestellt werden.
Die hier vorgenommene Jus-
tierung dient nur zur besseren
Einstellbarkeit der anderen Para-
meter im Offset-Modus. Sie hat
für den DMX-Modus keine Be-
deutung.
Pan Offset Feinkorrektur für die horizontale
0…1024 Schwenkkopfposition bei dem
DMX-Wert „0“ (Lichtstrahl nach
vorne)
Tilt Offset Feinkorrektur für die vertikale
0…640 Schwenkkopfposition bei dem
DMX-Wert„127“ (Lichtstrahlsenk-
recht)
Color 1 Offset Drehwinkelkorrektur für das Farb-
-
127…127 rad 1
Color 2 Offset Drehwinkelkorrektur für das Farb-
-
127…127 rad 2
Gobo 1 Offset Drehwinkelkorrektur für das
-
127…127 Goborad 1
R_Gobo 1 Offset Drehwinkelkorrekturfür die Gobos
-
127…127 des Goborads 1
Gobo 2 Offset Drehwinkelkorrektur für das
-
127…127 Goborad 2
R_Gobo 2 Offset Drehwinkelkorrekturfür die Gobos
-
127…127 des Goborads 2
Focus Offset Feinkorrektur für den Fokus
0…255
Prism Offset Feinkorrektur für die Helligkeits-
0…255 verteilung im Prisma
R-Prism Offset Drehwinkelkorrektur für das Pris-
0…255 ma
can be adjusted with the rotary
wheel.
The adjustment made here will
merely help to adjust the other
parameters in the offset mode; it
is insignificant for the DMX
mode.
Pan Offset Fine adjustment for the horizon-
0 ... 1024 tal position of the moving head
with the DMX value “0” (light
beam straight forward)
Tilt Offset Fine adjustment for the vertical
0 ... 640 position of the moving head with
the DMX value “127” (light beam
vertical)
Color 1 Offset Readjustment of rotating angle
-
127 ... 127 for the colour wheel 1
Color 2 Offset Readjustment of rotating angle
-
127 ... 127 for the colour wheel 2
Gobo 1 Offset Readjustment of rotating angle
-
127 ... 127 for the gobo wheel 1
R_Gobo 1 Offset Readjustment of rotating angle
-
127 ... 127 for the gobos of gobo wheel 1
Gobo 2 Offset Readjustment of rotating angle
-
127 ... 127 for the gobo wheel 2
R_Gobo 2 Offset Readjustment of rotating angle
-
127 ... 127 for the gobos of gobo wheel 2
Focus Offset Fine adjustment for the focus
0 ... 255
Prism Offset Fine adjustment for the bright-
0 ... 255 ness distribution in the prism
R-Prism Offset Readjustment of rotating angle
0 ... 255 for the prism
7Cleaning the Optical System
It is recommended to clean the lenses and the filters
at regular intervals, depending on impurities caused
by dust, smoke, or other particles to ensure that the
light is radiated at maximum brightness. Prior to
opening the unit, always disconnect the plug from
the mains socket and let the unit cool down for
15 minutes.
For cleaning use a soft, clean cloth and a com-
mercial glass cleaner. Then carefully wipe the parts
dry.
8Replacement of the Gobos
The rotating gobos on the two gobo wheels can be
replaced and e.g. be exchanged for your own
gobos.
1) Disconnect the mains plug from the socket and
let the unit cool down for 15 minutes.
2) Turn the moving head (3) in such a way that the
hinge (2) for the lamp cover will point upwards.
3) Release the five screws (1) and remove the
upper housing shell of the moving head.
4) Turn the gobo wheel in such a way that the gobo
to be replaced is accessible.
5) Remove the retaining ring on the gobo by means
of a suitable tool and remove the gobo. Never
release the screws on the gobo support; they
keep the ball bearing together!
6) Insert the new gobo into the gobo support and
fasten it with the retaining ring. If the gobo has a
side which is darker or matter, position this side
away from the lamp.
7) Replace the housing of the moving head and
retighten the five screws.
9Transport
To prevent damage during transport, lock the
moving head (3) and the rotary arm (5) prior to trans-
porting the unit.
1) Turn the moving head by hand to a horizontal or
vertical position. Depress the red button (4) on
the rotary arm.
2) Position the rotary arm in parallel to the carrying
handles (7). This is the only position where it can
be locked. Set the lever (6) on the rotary arm to
the position LOCK.
10 Specifications
Power supply: . . . . . . . . . . . 230V~ /50Hz
Power consumption: . . . . . . 1900VA
Lamp: . . . . . . . . . . . . . . . . . . discharge lamp, type
HMI1200W/S with
base SFc10-4
Radiation angle: . . . . . . . . . . 17°
Rotating angle/speed
vertical axis (Pan): . . . . . . 540° in 2.8s
horizontal axis (Tilt): . . . . . 270° in 1.6s
Gobo diameter
metal gobos: . . . . . . . . . . . 51.8mm outside
45.0mm gobo
glass gobos . . . . . . . . . . . 49.8mm outside
45.0mm gobo
Ambient temperature: . . . . . 0–40°C
Dimensions: . . . . . . . . . . . . . 700 x 520 x 510mm
Weight: . . . . . . . . . . . . . . . . . 47kg
Subject to technical modification.
10
GB
D
A
CH
Diese Bedienungsanleitung ist urheberrechtlich für MONACOR®INTERNATIONAL GmbH & Co. KG
geschützt. Eine Reproduktion für eigene kommerzielle Zwecke – auch auszugsweise – ist untersagt.
All rights reserved by MONACOR®INTERNATIONAL GmbH & Co. KG. No part of this instruction manual
may be reproduced in any form or by any means for any commercial use.
7Reinigung der Optik
Die Linsen und die Filter sollten in regelmäßigen
Abständen, je nach Verschmutzung durch Staub,
Rauch oder andere Partikel, gereinigt werden. Nur
dann kann das Licht in maximaler Helligkeit abge-
strahlt werden. Vor dem Öffnen des Gerätes den
Stecker aus der Steckdose ziehen und das Gerät
15Minuten abkühlen lassen.
Zur Reinigung ein weiches, sauberes Tuch und
ein handelsübliches Glasreinigungsmittel verwen-
den. Anschließend die Teile vorsichtig trocken
wischen.
8Auswechseln der Gobos
Die rotierbaren Gobos auf den zwei Goborädern
können ausgewechselt und z.B. durch eigene er-
setzt werden:
1) Den Netzstecker aus der Steckdose ziehen und
das Gerät 15Minuten abkühlen lassen.
2) Den Schwenkkopf (3) so drehen, dass das
Scharnier (2) für die Lampenabdeckung nach
oben zeigt.
3) Die fünf Schrauben (1) lösen und die obere
Gehäuseschale des Schwenkkopfes abnehmen.
4) Das Goborad so drehen, dass das auszuwech-
selnde Gobo zugängig ist.
5) Den Sicherungsring am Gobo mit geeignetem
Werkzeug entfernen und das Gobo entnehmen.
Niemals die Schrauben am Gobohalter lösen, weil
diese das Kugellager zusammenhalten!
6) Das neue Gobo in den Gobohalter einlegen und
mit dem Sicherungsring befestigen. Besitzt das
Gobo eine dunklere oder mattere Seite, muss
diese von der Lampe weg zeigen.
7) Das Gehäuse des Schwenkkopfes wieder mit
den fünf Schrauben verschließen.
9Transport
Um Transportschäden zu vermeiden, müssen vor
dem Transport der Schwenkkopf (3) und der Dreh-
arm (5) arretiert werden.
1) Den Schwenkkopf von Hand in eine waagerechte
oder senkrechte Position drehen. Den roten
Knopf (4) am Dreharm hineindrücken.
2) Den Dreharm parallel zu den Tragegriffen (7)
stellen. Nur in dieser Position lässt er sich arre-
tieren. Den Hebel (6) am Dreharm in die Position
LOCK legen.
10 Technische Daten
Stromversorgung: . . . . . . . . 230V~/50Hz
Leistungsaufnahme: . . . . . . 1900VA
Leuchtmittel: . . . . . . . . . . . . Entladungslampe
Typ HMI1200W/S
mit Sockel SFc10-4
Abstrahlwinkel: . . . . . . . . . . . 17°
Drehwinkel/-geschwindigkeit
senkrechte Achse (Pan): . 540° in 2,8s
waagerechte Achse (Tilt): . 270° in 1,6s
Gobo-Durchmesser
Metall-Gobos: . . . . . . . . . . 51,8mm außen
45,0mm Muster
Glas-Gobos: . . . . . . . . . . . 49,8mm außen
45,0mm Muster
Einsatztemperatur: . . . . . . . . 0–40°C
Abmessungen: . . . . . . . . . . . 700 x 520 x 510mm
Gewicht: . . . . . . . . . . . . . . . . 47kg
Änderungen vorbehalten.

Table des matières
1Eléments et branchements . . . . . . . . . . . 11
2Conseils d’utilisation et de sécurité . . . . 11
3Possibilités d’utilisation . . . . . . . . . . . . . 12
4Placement de la lampe . . . . . . . . . . . . . . . 12
5Montage . . . . . . . . . . . . . . . . . . . . . . . . . . . 13
6Utilisation . . . . . . . . . . . . . . . . . . . . . . . . . 13
6.1 Marche/Arrêt . . . . . . . . . . . . . . . . . . . . . . . 13
6.2 Utilisation via un contrôleur . . . . . . . . . . . . 13
6.2.1 Branchement . . . . . . . . . . . . . . . . . . . . . . 13
6.2.2 Réglage de l’adresse de démarrage . . . . 13
Configuration des canaux DMX
en mode 16 canaux . . . . . . . . . . . . . . . . . 14
Configuration des canaux DMX
en mode 22 canaux . . . . . . . . . . . . . . . . . 15
6.3 Modification des paramètres
de fonctionnement . . . . . . . . . . . . . . . . . . . 16
6.4 Réglage des valeurs de correction
(mode Offset) . . . . . . . . . . . . . . . . . . . . . . . 16
7Nettoyage de l’optique . . . . . . . . . . . . . . . 17
8Remplacement des gobos . . . . . . . . . . . . 17
9Transport . . . . . . . . . . . . . . . . . . . . . . . . . . 17
10 Caractéristiques techniques . . . . . . . . . . 17
Ouvrez le présent livret page 3 de manière à
visualiser les éléments et branchements.
1Eléments et branchements
1Vis (x5) pour ouvrir la tête inclinable
2Charnière pour le couvercle du compartiment
lampe
3Tête inclinable
4Boutons pour verrouiller* (rouge) et déverrouiller
(vert) la tête
5Bras de rotation
6Levier pour verrouiller* et déverrouiller le bras
7Poignées
8Affichage alphanumérique
9LED de contrôle DMX ; brille lorsqu’un signal de
commande DMX est présent à l’entrée DMX IN
(16)
10 Molette pour sélectionner un point du menu et
régler une fonction
11 Touche ESC pour quitter un point du menu ou le
menu
12 Touche ENTER pour appeler ou mémoriser un
réglage de menu
13 Porte coulissante : protège les éléments de com-
mande contre tout déréglage accidentel
14 Sorties signal DMX
(prises XLR femelles, 3 pôles et 5 pôles)
1 = masse, 2 = DMX
-
, 3 = DMX+
15 Entrées signal DMX
(prises XLR mâles châssis, 3 pôles et 5 pôles)
1 = masse, 2 = DMX
-
, 3 = DMX+
16 Coupe-circuits automatiques : si un des coupe-
circuits automatiques a déclenché, enfoncez à
nouveau le bouton correspondant pour allumer
l’appareil
17 Interrupteur Marche/Arrêt
18 Cordon secteur à relier à une prise 230V~/50 Hz
19 Vis moletées pour ouvrir le compartiment lampe
(uniquement visible lorsque la partie supérieure
de la tête est retirée)
20 Ecrous moletés pour fixer la lampe
2Conseils d’utilisation et de sécurité
Cet appareil répond à toutes les directives néces-
saires de l’Union Européenne et porte donc le sym-
bole .
Respectez scrupuleusement les points suivants :
●Cet appareil n’est conçu que pour une utilisation
en intérieur. Protégez-le de tout type de projec-
tions d’eau, des éclaboussures, d’une humidité de
l’air élevée et de la chaleur (plage de température
de fonctionnement autorisée : 0–40°C).
●Pendant le fonctionnement, la tête (3) chauffe de
manière très importante. Pour éviter toute brûlure,
ne touchez jamais la tête pendant le fonctionne-
ment ; après avoir éteint l’appareil, laissez-la
refroidir quelques minutes avant de la toucher.
●En aucun cas, vous ne devez poser pas d’objet
contenant du liquide ou un verre sur l’appareil.
●Ne faites pas fonctionner l’appareil et débran-
chez-le immédiatement du secteur lorsque :
1. des dommages visibles apparaissent sur l’ap-
pareil, par exemple sur le boîtier, sur la lentille,
sur le filtre UV ou sur le cordon secteur,
AVERTISSEMENT L’appareil est alimenté par une
tension dangereuse 230V~.
Ne faites jamais de modifica-
tion sur l’appareil si cela n’est
pas décrit dans la présente
notice et ne faites rien tomber
dans les ouïes de ventilation!
Une mauvaise manipulation
pourrait générer une décharge
électrique.
Indice
1Elementi di comando e collegamenti . . . 11
2Avvertenze di sicurezza . . . . . . . . . . . . . . 11
3Possibilità d’impiego . . . . . . . . . . . . . . . . 12
4Inserire la lampadina . . . . . . . . . . . . . . . . 12
5Montaggio . . . . . . . . . . . . . . . . . . . . . . . . . 13
6Funzionamento . . . . . . . . . . . . . . . . . . . . . 13
6.1 Accendere e spegnere . . . . . . . . . . . . . . . . 13
6.2 Funzionamento tramite un’unità
di comando luce . . . . . . . . . . . . . . . . . . . . . 13
6.2.1 Collegamento . . . . . . . . . . . . . . . . . . . . . 13
6.2.2 Impostare l’indirizzo di start . . . . . . . . . . . 13
Contatti dei canali DMX
nella modalità a 16 canali . . . . . . . . . . . . 14
Contatti dei canali DMX
nella modalità a 16 canali . . . . . . . . . . . . 15
6.3 Modificare i parametri di funzionamento . . . 16
6.4 Impostazione dei valori correttivi
(Modalità Offset) . . . . . . . . . . . . . . . . . . . . . 16
7Pulizia del sistema ottico . . . . . . . . . . . . . 17
8Sostituzione dei gobo . . . . . . . . . . . . . . . 17
9Trasporto . . . . . . . . . . . . . . . . . . . . . . . . . . 17
10 Dati tecnici . . . . . . . . . . . . . . . . . . . . . . . . 17
Vi preghiamo di aprire completamente la pagina 3.
Così vedrete sempre gli elementi di comando e i
collegamenti descritti.
1Elementi di comando e collegamenti
1Viti (5 x) per aprire la testa orientabile
2Cerniere per la copertura della lampada
3Testa orientabile
4Pulsanti per bloccare* (rosso) e sbloccare (verde)
la testa orientabile
5Braccio girevole
6Leva per bloccare* e sbloccare il braccio girevole
7Maniglie
8Display alfanumerico
9LED di controllo DMX: è acceso se all’ingresso
DMX IN (16) è presente un segnale DMX di
comando
10 Manopola per scegliere un punto del menù e per
impostare una funzione
11 Tasto ESC per uscire da un punto del menù o dal
menù stesso
12 Tasto ENTER per chiamare o memorizzare
un’impostazione del menù
13 Sportello scorrevole, esclude uno spostamento
involontario degli elementi di comando
14 Uscite segnali DMX
(prese XLR a 3 e 5 poli);
1 = massa, 2 = DMX
-
, 3 = DMX+
15 Ingressi segnali DMX
(connettori da pannello XLR a 3 e 5 poli);
1 = massa, 2 = DMX
-
, 3 = DMX+
16 Interruttori automatici; se un interruttore ha rea-
gito, per accendere l'apparecchio premere nuo-
vamente il relativo pulsante
17 Interruttore on/off
18 Cavo rete per il collegamento con una presa di
rete (230V~/50Hz)
19 Viti zigrinate per aprire il vano lampada
(visibile solo se la parte superiore della testa
orientabile è stata svitata)
20 Dadi zigrinati per fissare la lampadina
2Avvertenze di sicurezza
Quest’apparecchio è conforme a tutte le direttive
richieste dell’UE e pertanto porta la sigla .
Si devono osservare assolutamente anche i
seguenti punti:
●Far funzionare l’apparecchio solo all’interno di
locali. Proteggerlo dall’acqua gocciolante e dagli
spruzzid’acqua, da altaumidità dell’ariae dalcalore
(temperatura d’impiego ammessa fra 0 e 40°C).
●Durante il funzionamento, la testa orientabile (3) si
riscalda molto. Per evitare ustioni non toccare la
testa durante il funzionamento, e dopo lo spegni-
mento lasciarla raffreddarsi per alcuni minuti
prima di toccarla.
●Non depositare sull’apparecchio dei contenitori
riempiti di liquidi, p.es. bicchieri.
AVVERTIMENTO L’apparecchio funziona con
pericolosa tensione di rete
(230V~). Non intervenire mai
al suo interno al di fuori delle
operazioni descritte nelle pre-
senti istruzioni e non inserire
niente nelle fessure di aera-
zione! Esiste il pericolo di una
scarica elettrica.
11
I
F
B
CH
*Pour éviter tout dommage lors du transport, la tête (3) et le bras (5) doi-
vent être verrouillés avant de transporter l’appareil.
*Per escludere danni durante il trasporto, prima del trasporto occorre
bloccare la testa orientabile e il braccio girevole.

2. après une chute ou un cas similaire, vous avez
un doute sur l’état de l’appareil,
3. des défaillances apparaissent.
En tout cas, faites effectuer les réparations de
l’appareil par un technicien spécialisé.
●Ne débranchez jamais l’appareil en tirant sur le
cordon secteur ; retirez toujours le cordon secteur
en tirant la fiche.
●Tout cordon secteur endommagé ne doit être rem-
placé que par le constructeur ou un technicien
qualifié.
●Pour le transport, saisissez l’appareil uniquement
par les poignées (7). En aucun cas, vous ne
devez le porter par la tête (3) ou par le bras (5).
●Pour nettoyer le boîtier, utilisez un chiffon sec et
doux, en aucun cas, de produits chimiques ou
d’eau. Pour les éléments optiques, vous pouvez uti-
liser des produits de nettoyage pour verres usuels.
●Nous déclinons toute responsabilité en cas de
dommages matériels ou corporels résultants si
l’appareil est utilisé dans un but autre que celui
pour lequel il a été conçu, s’il n’est pas monté de
manière sûre, correctement utilisé ou n’est pas
réparé par une personne habilitée.
3Possibilités d’utilisation
La lyre TWIST-1200 est particulièrement bien adaptée
à une utilisation professionnelle sur scène et en disco-
thèque. Grâce à son équipement complet avec deux
roues de gobos, deux roues de couleurs, un prisme,
un contrôle de focus, un iris, un dimmer et des effets
stroboscope, des effets scintillement et rotation, elle
peut projeter une multitude de modèles de lumière
variés. La résolution 16 bits pour le mouvement de la
tête permet un positionnement très précis du faisceau
lumineux. Le repositionnement automatique empêche
que la tête, en cas de déréglage causé par des in-
fluences extérieures, ne perde son orientation.
Pour la gestion de l’appareil, un contrôleur DMX
(p.ex. DMX-1440 ou DMX-510USB de “img Stage
Line”) est nécessaire.
4Placement de la lampe
Le jeu de lumière est livré sans lampe. Il est néces-
saire d’utiliser une lampe à décharge de type
HMI 1200W/S avec un culot SFc10-4.
En aucun cas, vous ne devez utiliser une lampe
de type différent !
Dans la gamme “img Stage Line”, la lampe suivante
peut être utilisée :
Ne touchez jamais le tube de la lampe avec les
doigts ; la sueur et les pellicules grasses sur les
doigts diminuent la puissance lumineuse de la
lampe et se consument.
1) Appuyez sur le bouton vert (4) pour déverrouiller
la tête et tournez la tête de telle sorte que la char-
nière (2) du couvercle du compartiment lampe
soit dirigée vers le haut.
2) Desserrez les cinq vis (1) et retirez le cache
supérieur du boîtier de la tête.
3) Desserrez les deux vis moletées (19) à droite et
à gauche du refroidisseur. Vous pouvez main-
tenant ouvrir le couvercle du compartiment
lampe, la douille de la lampe est visible.
4) Pour changer la lampe, desserrez les deux
écrous moletés (20) de l’ancienne lampe, retirez
la lampe de la douille.
5) Saisissez la nouvelle lampe par les extrémités
(pas par le corps de verre) et mettez-la dans la
douille (voir schéma 4). Revissez les deux
écrous moletés (20) de la lampe.
6) Replacez le couvercle du compartiment lampe et
le cache supérieur du boîtier de la tête et revissez.
●La lampe proposée contient en faible quantité
des produits toxiques nocifs pour l’environne-
ment (mercure p.ex.). En Europe, il est impératif
de la déposer dans une poubelle adéquate. Dans
d’autres pays, vous devez vous reporter aux lois
nationales en vigueur.
●Il convient de remplacer la lampe après au moins
1,25ème de sa durée moyenne de vie car une
durée d’utilisation croissante augmente de ma-
nière significative le risque d’un éclatement de la
lampe à la suite de modifications de structure du
verre quartz.
La lyre est équipée d’un compteur d’heures de
fonctionnement. Il peut être utilisé pour détermi-
ner la durée d’éclairage de la lampe. Lorsque
vous changez la lampe, notez l’indication du
compteur – Voir chapitre 6.3 “Modification des
paramètres de fonctionnement”, point “Compteur
heures de fonctionnement” (“Lamp Hours”).
●Après un éclatement de la lampe pendant le fonc-
tionnement, il est recommandé de quitter l’environ-
nementimmédiat de lalampe, par précaution, pour
éviter toute mise en danger de la santé générée
par la dispersion à l’air libre des vapeurs de mer-
cure ; veillez à une aération correcte de la pièce.
AVERTISSEMENT Avant d’insérer ou retirer la
lampe, vous devez impérative-
ment débrancher l’appareil du
secteur.
●Pendant le fonctionnement, la lampe est très
chaude, vous devez laisser refroidir le boîtier et
la lampe après toute utilisation et avant tout rem-
placement (refroidissement pendant 15 minutes
au moins).
●Ne regardez jamais directement, appareil ouvert,
vers la lampe à décharge allumée. La luminosité
élevée et le rayonnement UV peuvent causer
des dommages aux yeux.
Lorsque l’appareil est définitivement
retiré du service, vous devez le déposer
dans une usine de recyclage adaptée
pour contribuer à son élimination non
polluante.
●Non mettere in funzione l’apparecchio e staccare
subito la spina rete se:
1. l’apparecchio, p.es. il contenitore, la lente, il fil-
tro UV o il cavo rete presentano dei danni visibili;
2. dopo una caduta o dopo eventi simili sussiste il
sospetto di un difetto;
3. l’apparecchio non funziona correttamente.
Per la riparazione rivolgersi sempre ad un’officina
competente.
●Staccare il cavo rete afferrando la spina, senza ti-
rare il cavo.
●Il cavo rete, se danneggiato, deve essere sosti-
tuito solo dal costruttore o da un laboratorio auto-
rizzato.
●Per trasportare l’apparecchio usare solo le appo-
site maniglie (7). In nessun caso portare l’appa-
recchio prendendolo per la testa orientabile (3) o
per il braccio girevole (5).
●Per la pulizia del contenitore usare solo un panno
morbido, asciutto; non impiegare in nessun caso
prodotti chimici o acqua. Per le parti ottiche si può
usare anche un detergente per vetri che si trova in
commercio.
●Nel caso d’uso improprio, di montaggio non
sicuro, d’impiego scorretto o di riparazione non a
regola d’arte non si assume nessuna garanzia per
l’apparecchio e nessuna responsabilità per even-
tuali danni consequenziali a persone o a cose.
3Possibilità d’impiego
La moving head TWIST-1200 è adatta in modo par-
ticolare per l’impiego professionale sul palcoscenico
e in discoteca. Grazie al vasto equipaggiamento con
due ruote gobo, due ruote colori, prisma, fuoco
regolabile, iride, dimmer nonché effetti strobosco-
pici, di oscillazione e di rotazione, è in grado di pro-
iettare un gran numero di differenti disegni di luci. La
risoluzione a 16 bit per il movimento della testa per-
mette un posizionamento molto preciso del raggio di
luce. Il riposizionamento automatico esclude che la
testa perda l’orientamento durante la rotazione in
seguito ad influenze esterne.
Per il comando dell’apparecchio è richiesta
un’unità di comando luce DMX (p.es. DMX-1440 o
DMX-510USB di “img Stage Line”).
4Inserire la lampadina
L’unità viene consegnata senza lampadina. È richie-
sta una lampadina a scarica elettrica del tipo
HMI 1200W/S con zoccolo SFc10-4.
In nessun caso si devono usare lampadine di un
altro tipo!
Dal programma “img Stage Line” si può usare la
seguente lampadina:
Non toccare mai il bulbo della lampadina con le dita!
I grassi e il sudore della pelle riducono la potenza e
lasciano impronte.
1) Premere il pulsante verde (4) per sbloccare la
testa orientabile e girare il pulsante in modo tale
che la cerniera (2) per la copertura della lampada
sia rivolta in alto.
2) Allentare le cinque viti (1) e togliere la parte
superiore del contenitore della testa.
3) Allentare le due viti zigrinate (19) a destra e a
sinistra del dissipatore di calore.Aquesto punto è
possibile aprire la copertura della lampada e si
vede il porta lampada.
4) Per sostituire la lampada allentare i due dadi
zigrinati (20) della vecchia lampadine e togliere la
lampadina dal suo supporto.
5) Afferrare la nuova lampadina ai due lati (non al
vetro) e inserirla nella sua sede (vedi fig. 4).
Stringere i due dadi zigrinati (20) della lampada.
6) Rimettere la copertura della lampada e la parte
superiore del contenitore e avvitarli.
●La lampadina indicata qui contiene piccole quan-
tità di sostanze nocive all’ambiente (p.es. mercu-
rio), e perciò in Europa deve essere trattata come
rifiuto tossico. In altri paesi si devono rispettare le
norme nazionali.
●Al massimo dopo 1,25 volte la durata media della
lampadina occorre sostituirla perché con l’uso
aumenta notevolmente il rischio di scoppio in
seguito alle modifiche strutturali del vetro di
quarzo.
L’apparecchio è equipaggiato con un contaore
che può essere usato per determinare le ore di
funzionamento della lampadina. Segnalare l’indi-
cazione del contatore quando si sostituisce la
lampadina – vedi cap. 6.3 “Modificare i parametri
di funzionamento”, alla voce “Lamp Hours”.
●Se la lampadina scoppia durante l’uso, conviene
abbandonare per precauzione le dirette vici-
nanze della lampadina per escludere completa-
mente i rischi alla salute per i vapori di mercurio
che si libereranno; provvedere ad una buona
aerazione dell’ambiente.
AVVERTIMENTO
Staccare assolutamente la
spina di rete prima di inserire o
togliere la lampada!
●Poiché la lampadina si riscalda moltissimo
durante il funzionamento, fare raffreddare l’appa-
recchio e la lampadina (minimo 15 minuti), prima
di sostituire la lampadina.
●Non guardare mai direttamente la lampadina
accesa quando l’apparecchio è aperto. L’alta lumi-
nosità e i raggi UV possono danneggiare gli occhi.
Se si desidera eliminare l’apparecchio
definitivamente, consegnarlo per lo
smaltimento ad un’istituzione locale per
il riciclaggio.
12
I
F
B
CH
Article Ref. Num. Durée de vie moyenne
HMI-1200W 05.9290 750h
Articolo N. d’ordine Durata media
HMI-1200W 05.9290 750h

5Montage
La TWIST-1200 peut être posée sur une surface fixe
et plane. La lyre peut également être montée sur une
traverse, la tête en bas, via les possibilités de fixation
de la plaque de base. La plaque de base est pré-
sentée sur le schéma 8 page 25. Pour la fixation, des
clips stables de montage sont nécessaires. Fixez les
clips aux étriers de montage livrés (24). Comme indi-
qué sur le schéma, les boulons (25) sont placés dans
les ouvertures (21 ou 23) prévues sur la plaque de
base et verrouillés dans le sens des aiguilles d’une
montre (tournez jusqu’à la butée). Le lieu de mon-
tage doit être suffisamment stable et pouvoir suppor-
ter une charge de 50kg au moins par appareil.
6Utilisation
6.1 Marche/Arrêt
1) Avant la mise en service, déverrouillez la tête et
le bras:Appuyez sur le bouton vert (4) sur le bras
et mettez le levier (6) sur la position UNLOCK.
2) Reliez la prise du cordon secteur (18) à une prise
230V~/50Hz.
3) Avec l’interrupteur secteur (17), allumez l’appareil.
La tête et tous les moteurs de commande se met-
tent dans une position de départ définie. L’afficha-
ge (8) indique pendant ce temps reseting. . . La
TWIST-1200 est ensuite prête à fonctionner.
Après le fonctionnement, éteignez l’appareil
avec l’interrupteur secteur.
4) Si un des coupe-circuits automatiques venait à
se déclencher, enfoncez à nouveau le bouton
(16) correspondant après avoir éliminé le dys-
fonctionnement.
Conseil : Comme source de lumière, on utilise une
lampe à décharge. Si l’appareil est éteint ou si l’ali-
mentation est interrompue, même brièvement, la
lampe ne se rallume pas tout de suite. Elle doit
refroidir quelques instants pour pouvoir s’allumer à
nouveau.
6.2 Utilisation via un contrôleur
Pour une utilisation via un contrôleur avec protocole
DMX512 (p.ex. DMX-1440 ou DMX-510USB de ”img
Stage Line”), la TWIST-1200 est équipée de 22 ca-
naux DMX. Si le contrôleur ne dispose pas d’assez de
canaux,il peut êtrecommuté enmode 16 canaux.Les
tableaux pages 14 et 15 indiquent les fonctions et les
valeurs DMX correspondantes pour les deux modes.
6.2.1 Branchement
Pour le branchement, la TWIST-1200 possède des
connexions XLR 3 pôles et 5 pôles (1 = masse, 2 =
DMX
-
, 3 = DMX+). Selon la prise existante sur l’ap-
pareil à relier, utilisez soit la connexion 3 pôles, soit
la connexion 5 pôles.
Pour le branchement, il est recommandé d’utiliser
des câbles spécifiques pour des flots importants de
données. L’emploi de câbles micro usuels ne peut
être recommandé que pour des longueurs de câble
de 100m maximum. Les meilleurs résultats de trans-
mission sont obtenus avec des câbles micro blindés
de section 2 x 0,25mm2ou avec des câbles spécifi-
ques pour la transmission de données. Pour des lon-
gueursde liaison àpartir de 150m, il estrecommandé
d’insérer un amplificateur DMX de signal (p.ex.
SR-103DMX ou SR-105DMX de “img Stage Line”).
1) Reliez l’entrée DMX (15) à la sortie DMX du con-
trôleur.
2) Reliez la sortie DMX (14) à l’entrée DMX de l’ap-
pareil suivant géré par DMX. Reliez sa sortie à
l’entrée du prochain appareil géré par DMX et
ainsi de suite jusqu’à ce que tous les appareils
gérés par DMX soient reliés.
Les prises de sortie DMX possèdent un ver-
rouillage. Pour retirer la fiche, enfoncez le levier
PUSH.
3) Terminez la sortie DMX du dernier appareil géré
par DMX de la chaîne avec une résistance 120Ω
(>0,3W) : Soudez la résistance aux pins 2 et 3
d’une fiche XLR et branchez la fiche dans la sor-
tie DMX ou utilisez un bouchon terminal cor-
respondant (par exemple DLT-123 ou DLT-125
de “img Stage Line”).
6.2.2 Réglage de l’adresse de démarrage
Pour pouvoir faire fonctionner la TWIST-1200
depuis un contrôleur, il faut régler l’adresse de
démarrage DMX pour le canal DMX 1. Si p.ex. sur
le contrôleur, l’adresse 17 est prévue pour la gestion
de la rotation de la tête, réglez sur la TWIST-1200
l’adresse de démarrage 17.
AVERTISSEMENT L’intensité lumineuse élevée
de la lampe à décharge et le
rayonnement UV peuvent gé-
nérer des troubles de la vue.
Ne regardez jamais directe-
ment le faisceau lumineux de
l’appareil.
AVERTISSEMENT L’appareil doit être monté de
manière sûre et profession-
nelle. Si l’appareil doit être
installé comme charge suspen-
due au-dessus de personnes,
il doit être en plus solidement fixé (par exemple par
une corde de sécurité). Faites passer la corde de
sécurité via les deux trous (22) au milieu de la base
et fixez la corde de telle sorte que la distance de
chute maximale de l’appareil soit de 20 cm au plus.
IMPORTANT
Placez toujours l’appareil de telle sorte que pen-
dant le fonctionnement, la circulation d’air soit suf-
fisante.
●L’appareil doit être placé à une distance mini-
male de 2m des surfaces illuminées.
●Les ouïes de ventilation sur le boîtier ne doivent
en aucun cas être obturées.
●Veillez impérativement à laisser une distance
suffisante avec des matériaux facilement inflam-
mables ou sensibles à la chaleur.
5Montaggio
La TWIST-1200 può essere collocata su un piano
solido oppure, grazie alle possibilità di fissaggio
della piastra base, l’apparecchio può essere mon-
tato anche a testa in giù, su una traversa (vedi fig. 8
a pagina 25). Per fare ciò occorrono delle fascette
robuste di montaggio. Avvitare le fascette diretta-
mente alle staffe di montaggio (24) in dotazione, i
cui perni (25), come si vede nell’illustrazione, sono
da inserire nelle apposite aperture (21 o 23) della
piastra dove vengono bloccati con una rotazione in
senso orario (fino all’arresto). Il punto di montaggio
deve avere una stabilità sufficiente e supportare un
peso di 50kg min. per apparecchio.
6Funzionamento
6.1 Accendere e spegnere
1) Prima della messa in funzione sbloccare la testa
orientabile e il braccio girevole: sul braccio pre-
mere il pulsante verde (4) e spostare la leva (6) in
posizione UNLOCK.
2) Inserire la spina del cavo rete (18) in una presa di
rete (230V~/50Hz).
3) Accendere l’apparecchio con l’interruttore (17).
La testa orientabile e tutti i motori di comando si
mettono in una precisa posizione di partenza.
Intanto, il display (8) segnala reseting. . . Quindi
la TWIST-1200 è pronta.
Dopo l’uso spegnerla con l’interruttore.
4) Se uno degli interruttori automatici dovesse
reagire, dopo aver eliminato di difetto premere
nuovamente il relativo pulsante (16).
N.B.: Come fonte di luce viene usata una lampada a
scarica elettrica. Se l’apparecchio viene spento bre-
vemente o se la corrente viene interrotta solo breve-
mente, la lampada non si riaccende subito. Deve
prima raffreddarsi per potersi accendere di nuovo.
6.2 Funzionamento tramite un’unità di
comando luce
Per il funzionamento tramite un’unità di comando
luce con protocollo DMX512 (p.es. DMX-1440 o
DMX-510USB di “img Stage Line”), la TWIST-1200
è equipaggiata con 22 canali DMX. Se sull’unità di
comando non è disponibile un numero sufficiente di
canali è possibile attivare la modalità a 16 canali. Le
tabelle alle pagine 14 e 15 indicano le funzioni e i
relativi valori DMX per le due modalità.
6.2.1 Collegamento
Per il collegamento, la TWIST-1200 possiede dei
contatti XLR a 3 e 5 poli (1 = massa, 2 = DMX
-
,
3 = DMX+). A seconda delle prese presenti sull’ap-
parecchio da collegare, usare il contatto a 3 o a
5poli.
Per il collegamento si dovrebbero usare cavi per
un alto flusso di dati. L’impiego di normali cavi per
microfoni è consigliabile solo per una lunghezza
complessiva dei cavi fino a 100m. I migliori risultati
di trasmissione si ottengono con cavi schermati per
microfoni di 2 x 0,25mm2oppure con cavi speciali
per la trasmissione dati. Nel caso di lunghezze oltre
i 150m è consigliabile l’inserimento di un amplifica-
tore DMX (p.es. SR-103DMX o SR-105DMX di
“img Stage Line”)
1) Collegare l’ingresso DMX (15) con l’uscita DMX
dell’unità di comando luce.
2) Collegare l’uscita DMX (14) con l’ingresso DMX
del successivo apparecchio comandato da DMX,
l’uscita di quest’ultimo con l’ingresso dell’appa-
recchio successivo e via dicendo finché tutti gli
apparecchi comandati da DMX sono collegati.
Le prese d’uscita DMX sono equipaggiate con
un dispositivo di blocco. Per sfilare il connettore
premere la levetta PUSH.
3) Terminare con una resistenza di 120Ω(>0,3W)
l’uscita DMX dell’ultimo apparecchio comandato
da DMX della catena: saldare la resistenza ai pin
2 e 3 di un connettore XLR e inserire il connettore
nell’uscita DMX oppure usare un adattatore ade-
guato (p.es. DLT-123 o DLT-125 di “img Stage
Line”).
6.2.2 Impostare l’indirizzo di start
Per potere comandare la TWIST-1200 da un’unità di
comando luce, occorre impostare l’indirizzo di start
DMX per il primo canale DMX. Se, per esempio, per
comandare la rotazione della testa orientabile, sull’u-
nità di comando è previsto l’indirizzo 17, bisogna
impostare sulla TWIST-1200 l’indirizzo di start 17.
AVVERTIMENTO L’alta intensità luminosa della
lampada a scarica elettrica e i
raggi UV possono provocare
delle lesioni agli occhi. Per-
tanto evitare di guardare diret-
tamente nel fascio di luce del-
l’apparecchio.
AVVERTIMENTO L’apparecchio deve esser mon-
tato a regola d’arte e in modo
sicuro. Se viene installato so-
speso, sopra delle persone, è
richiesta una protezione sup-
plementare (p.es. con una fune
di sicurezza). Far passare la fune attraverso le due
aperture (22) nel centro della piastra e fissarla in
modo tale che la caduta dell’apparecchio non
possa superare i 20cm.
IMPORTANTE
Il punto di montaggio deve essere scelto in modo
da garantire una circolazione d’aria sufficiente
durante il funzionamento.
●Lo strumento deve essere ad una distanza
minima di 2m dalla superficie irradiata.
●Le aperture di aerazione del contenitore non
devono essere coperte in nessun caso.
●Considerare anche una distanza di sicurezza da
materiali facilmente infiammabili o sensibili al
calore.
13
I
F
B
CH
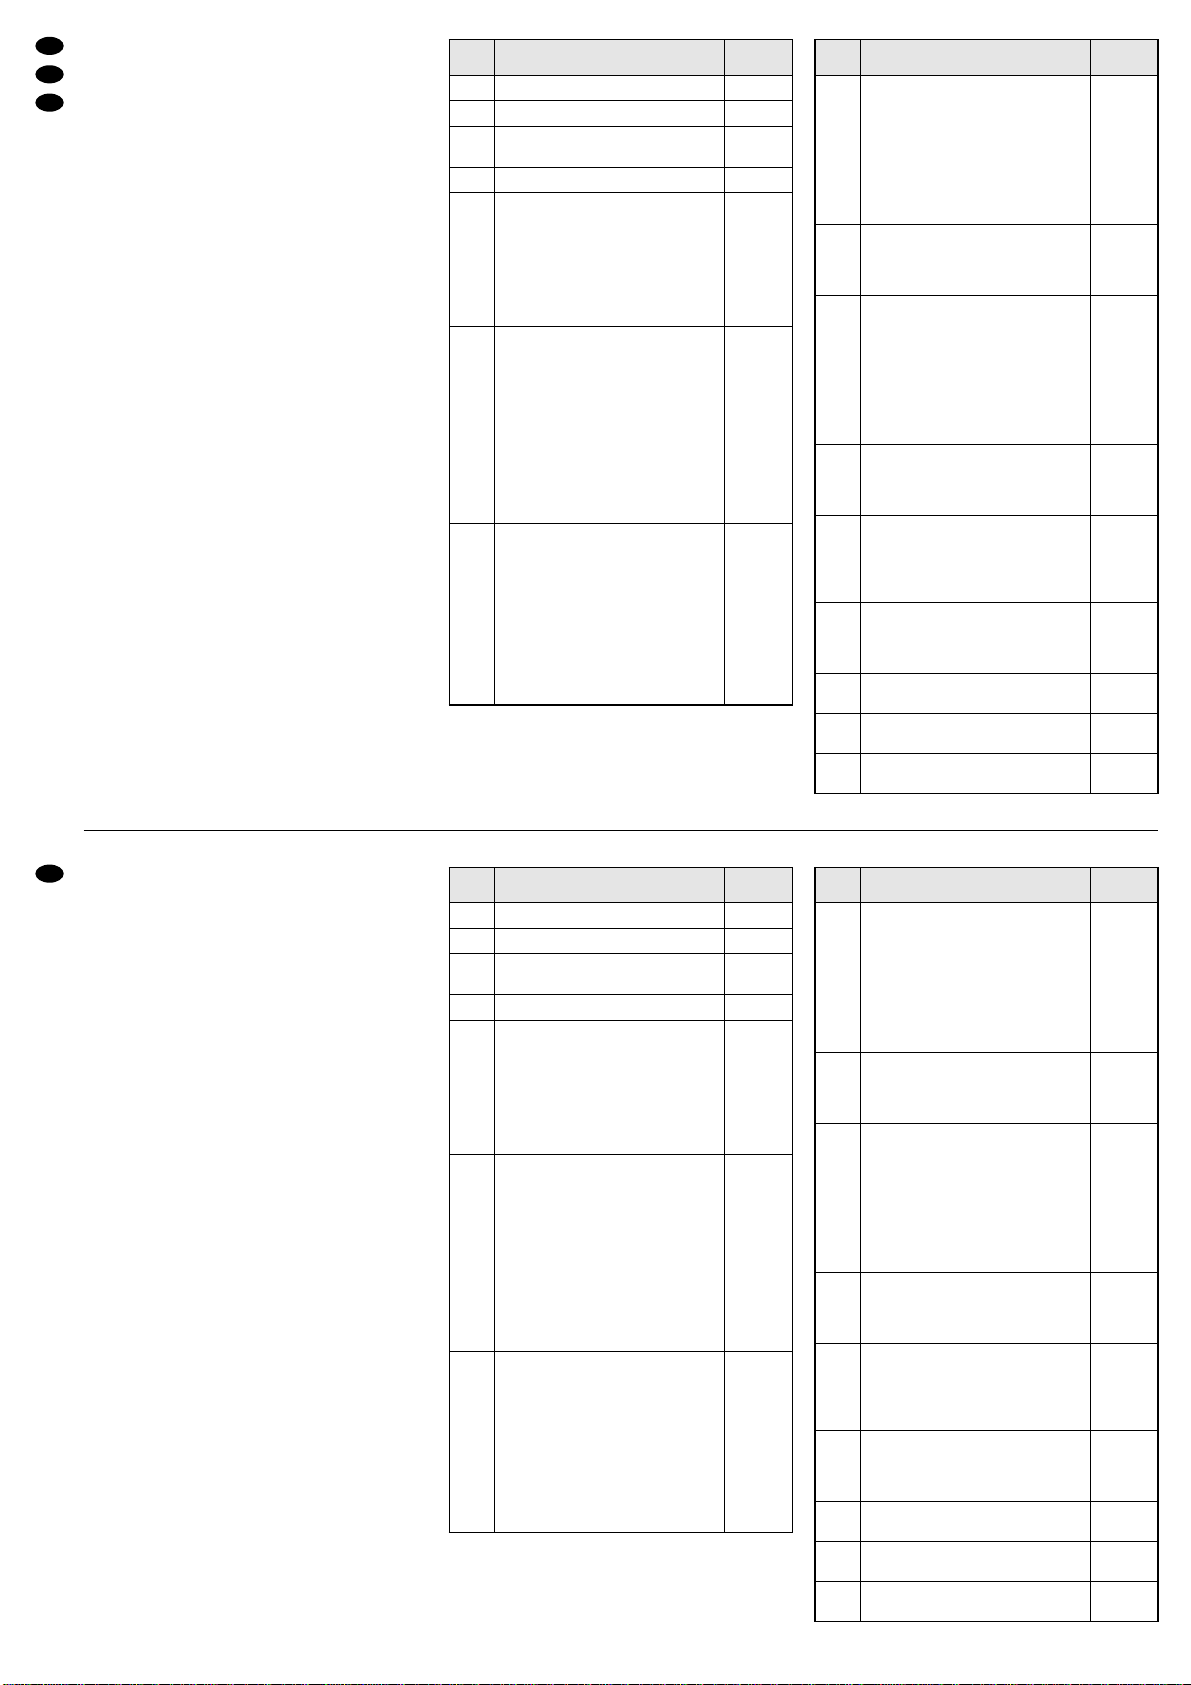
1) Avec la touche ENTER (12), appelez le menu
pour que l’affichage passe de
IM-1200S
DMX Address xxx
à
DMX Address
xxx (adresse DMX actuelle)
2) Appuyez à nouveau sur la touche ENTER. Le
curseur après l’adresse clignote.
3) Avec la molette (10) réglez l’adresse prévue
entre 1 et 491 pour le mode 22 canaux et entre 1
et 497 pour le mode 16 canaux.
4) Pour mémoriser, appuyez sur la touche ENTER.
Conseil : Si la touche ENTER n’est pas activée
en l’espace de 10 secondes, l’appareil revient à
l’adresse précédente. Avec la touche ESC (11),
on peut quitter (prématurément) le menu.
Une fois l’adresse de démarrage réglée pour le
canal 1, les canaux 2 à 22 (ou 2 à 16) sont attri-
bués aux adresses suivantes. Exemple:
Adresse de démarrage 17 = canal pour la rota-
tion de la tête
Adresse 18 = canal pour l’inclinaison de la tête
Adresse 19 = canal pour la vitesse
…
Adresse 37 = canal pour le filtre frost
Adresse 38 = canal pour la gestion dimmer
5) Une fois l’adresse de démarrage réglée, la
TWIST-1200 peut être utilisée via le contrôleur
relié. L’adresse de démarrage réglée est déjà
indiquée sur l’affichage (8). Dès que des signaux
de commande sont reçus en provenance du con-
trôleur DMX, la LED rouge DMX (9) brille.
6) Pour qu’un faisceau lumineux soit visible, réglez
les canaux 4 (dimmer) et 5 (shutter) sur les
valeurs DMX au-delà de 7.
1) Chiamare il menù con il tasto ENTER (12), in
modo che il display passi da:
IM-1200S
DMX Address xxx
a
DMX Address
xxx (indirizzo DMX attuale).
2) Premere di nuovo il tasto ENTER. Il cursor dietro
l’indirizzo lampeggia.
3) Con la manopola (10) impostare l’indirizzo previ-
sto fra 1 e 491 per la modalità a 22 canali, oppure
fra 1 e 497 per la modalità a 16 canali.
4) Per memorizzare la scelta premere il tasto
ENTER.
N.B.: Se il tasto ENTER non viene premuto entro
10 secondi, l’apparecchio ritorna all’indirizzo pre-
cedente. Con il tasto ESC (11) è possibile uscire
dal menù (anche anzitempo).
Dopo l’impostazione dell’indirizzo di start per il
1. canale, i canali 2–22 (oppure 2–16) sono
assegnati agli indirizzi successivi. Esempio:
Indirizzo di start 17 = canale per la rotazione
della testa orientabile
Indirizzo 18 = canale per l’inclinazione della testa
orientabile
Indirizzo 19 = canale per la velocità
…
Indirizzo 37 = canale per il filtro frost
Indirizzo 38 = canale per il comando del dimmer
5) Dopo l’impostazione dell’indirizzo start, la
TWIST-1200 può essere comandata tramite l’u-
nità di comando collegata. L’indirizzo di start
impostato viene sempre indicato dal display (8).
Non appena si ricevono dei segnali di comando
dall’unità DMX si accende il LED rosso DMX (9)
6) Per poter vedere un raggio di luce occorre
impostare, per i canali 4 (dimmer) e 5 (shutter),
dei valori DMX superiori a 7.
14
I
F
B
CH
Schéma 5 Configuration des canaux DMX en mode 16 canaux
Les gobos sont présentés sur le schéma 9, page 25. Les gobos F et H
sont en verre. En intervertissant les gobos sur la roue de gobos, on peut
modifier leur ordre (voir chapitre 8).
Canal Fonction en mode 16 canaux Valeur DMX
12
Prisme ou filtre Frost
aucun effet
Prisme 1
Prisme 2
Filtre Frost
000 – 063
064 – 127
128 – 191
192 – 255
8
Roue de gobos 1
aucun Gobo
Gobo A
Gobo B
Gobo C
Gobo D
changement continu de gobo:
rapide →lent
lent →rapide (sens inverse)
000 – 025
026 – 050
051 – 076
077 – 101
102 – 127
128 – 191
192 – 255
9
Roue de gobos 1 Rotation
angle de rotation du gobo
rotation droite rapide →lent
rotation gauche rotation lent →rapide
000 – 127
128 – 191
192 – 255
11
Roue de gobos 2 Rotation
angle de rotation du gobo
rotation droite rapide →lent
rotation gauche lent →rapide
000 – 127
128 – 191
192 – 255
13
Rotation prisme
angle de rotation du prisme
rotation droite rapide →lent
rotation gauche lent →rapide
000 – 127
128 – 191
192 – 255
15 Iris
diamètre grand →petit 000 – 255
14 Focus
proche →loin 000 – 255
16 Reset, Lampe allumée/éteinte
Voir page 15, schéma 6, canal 16
10
Roue de gobos 2
aucun gobo
Gobo E
Gobo F
Gobo G
Gobo H
changement continu de gobo:
rapide →lent
lent →rapide (sens inverse)
000 – 025
026 – 050
051 – 076
077 – 101
102 – 127
128 – 187
188 – 255
Fig. 5 Contatti dei canali DMX nella modalità a 16 canali
I gobo sono rappresentati in fig. 9 a pagina 25. I gobo F e H sono di vetro.
Scambiando i gobo sulla ruota, il loro ordine può essere modificato (vedi
capitolo 8).
Canale Funzione nella modalità a 16 canali Valore DMX
12
Prisma o Filtro frost
nessun effetto
Prisma 1
Prisma 2
Filtro frost
000 – 063
064 – 127
128 – 191
192 – 255
8
Ruota gobo 1
nessun Gobo
Gobo A
Gobo B
Gobo C
Gobo D
Cambio gobo continuo:
veloce →lento
lento →veloce (senso opposto)
000 – 025
026 – 050
051 – 076
077 – 101
102 – 127
128 – 191
192 – 255
9
Ruota gobo 1 rotazione
Angolo rotazione gobo
Rotazione a destra veloce →lento
Rotazione a sinistra lento →veloce
000 – 127
128 – 191
192 – 255
11
Ruota gobo 2 rotazione
Angolo rotazione gobo
Rotazione a destra veloce →lento
Rotazione a sinistra lento →veloce
000 – 127
128 – 191
192 – 255
13
Rotazione prisma
Angolo rotazione prisma
Rotazione a destra veloce →lento
Rotazione a sinistra lento →veloce
000 – 127
128 – 191
192 – 255
15 Iride
Diametro grande →piccolo 000 – 255
14 Fuoco
vicino →lontano 000 – 255
16 Reset, lampada on/off
vedi pagina 15, fig. 6, canale 16
10
Ruota gobo 2
nessun Gobo
Gobo E
Gobo F
Gobo G
Gobo H
Cambio gobo continuo:
veloce →lento
lento →veloce (senso opposto)
000 – 025
026 – 050
051 – 076
077 – 101
102 – 127
128 – 187
188 – 255
Canale Funzione nella modalità a 16 canali Valore DMX
1Rotazione testa orientabile (Pan) 540° 000 – 255
2Inclinazione testa orientabile (Tilt) 270° 000 – 255
3Velocità Pan e Tilt
veloce →lento 000 – 255
4Dimmer scuro →chiaro 000 – 255
5
Shutter chiuso (Blackout)
Shutter aperto
Stroboscopio lento →veloce
Effetto oscilazione Ruota gobo 1
lento →veloce
Effetto oscilazione Ruota gobo 2
lento →veloce
Shutter aperto
000 – 007
008 – 015
016 – 131
132 – 185
186 – 239
240 – 255
6
Colore 1
bianco
blu
verde
arancio
verde chiaro
magenta
giallo chiaro
rosso
Cambio colori continuo
veloce →lento
lento →veloce (senso opposto)
000 – 015
016 – 031
032 – 047
048 – 063
064 – 079
080 – 095
096 – 111
112 – 127
128 – 191
192 – 255
7
Colore 2
bianco
azzurro
rosa
viola UV
verde, giallo, magenta, blu
Temperatura colore 3200 K
Temperatura colore 5600 K
Cambio colori continuo
veloce →lento
lento →veloce (senso opposto)
000 – 018
019 – 036
037 – 054
055 – 072
073 – 090
091 – 108
109 – 127
128 – 191
192 – 255
Canal Fonction en mode 16 canaux Valeur DMX
1Rotation tête (Pan) 540° 000 – 255
2Inclinaison tête (Tilt) 270° 000 – 255
3Vitesse Pan et Tilt
rapide →lent 000 – 255
4Dimmer sombre →clair 000 – 255
5
Shutter fermé (Blackout)
Shutter ouvert
Stroboscope lent →rapide
Effet scintillement Roue de gobos 1
lent →rapide
Effet scintillement Roue de gobos 2
lent →rapide
Shutter ouvert
000 – 007
008 – 015
016 – 131
132 – 185
186 – 239
240 – 255
6
Couleur 1
blanc
bleu
vert
orange
vert clair
magenta
jaune clair
rouge
changement continu de couleur
rapide →lent
lent →rapide (sens inverse)
000 – 015
016 – 031
032 – 047
048 – 063
064 – 079
080 – 095
096 – 111
112 – 127
128 – 191
192 – 255
7
Couleur 2
blanc
bleu clair
rose
violet UV
vert, jaune, magenta, bleu
température couleur 3200 K
température couleur 5600 K
changement continu de couleur
rapide →lent
lent →rapide (sens inverse)
000 – 018
019 – 036
037 – 054
055 – 072
073 – 090
091 – 108
109 – 127
128 – 191
192 – 255
15
I
F
B
CH
Schéma 6 Configuration des canaux DMX en mode 22 canaux
Les gobos sont présentés sur le schéma 9 de la page 25. Les gobos F et
H sont en verre. En intervertissant les gobos sur la roue de gobos, on peut
modifier leur ordre (voir chapitre 8).
Les macros sont des changements programmés de gobos, de couleurs et
d’effets. Le sens du faisceau lumineux ne se modifie pas.
Canal Fonction en mode 22 canaux Valeur DMX
12
Prisme
aucun prisme
prisme allumé
000 – 127
128 – 255
8
Roue de gobos 1
aucun Gobo
Gobo A
Gobo B
Gobo C
Gobo D
changement continu de gobo:
rapide →lent
lent →rapide (sens inverse)
000 – 025
026 – 050
051 – 076
077 – 101
102 – 127
128 – 191
192 – 255
9
Roue de gobos 1 Rotation
angle de rotation du gobo
rotation droite rapide →lent
rotation gauche rotation lent →rapide
000 – 127
128 – 191
192 – 255
11
Roue de gobos 2 Rotation
angle de rotation du gobo
rotation droite rapide →lent
rotation gauche lent →rapide
000 – 127
128 – 191
192 – 255
13
Rotation prisme
angle de rotation du prisme
rotation droite rapide →lent
rotation gauche lent →rapide
000 – 127
128 – 191
192 – 255
15 Iris
diamètre grand →petit 000 – 255
14 Focus
proche →loin 000 – 255
10
Roue de gobos 2
aucun gobo
Gobo E
Gobo F
Gobo G
Gobo H
changement continu de gobo:
rapide →lent
lent →rapide (sens inverse)
000 – 025
026 – 050
051 – 076
077 – 101
102 – 127
128 – 187
188 – 255
Canal Fonction en mode 22 canaux Valeur DMX
19
Macros
aucune Macro
Macro 1
Macro 2
Macro 3
Macro 4
Macro 5
Macro 6
Macro 7
Macro 8
Macro 9
Macro 10
Macro 11
Macro 12
Macro 13
Macro 14
Macro 15
Macro 16
Macro 17
000 – 007
008 – 022
023 – 037
038 – 051
052 – 066
067 – 080
081 – 095
096 – 110
111 – 124
125 – 138
139 – 153
154 – 167
168 – 182
183 – 196
197 – 211
212 – 225
226 – 240
241 – 255
16
Reset, Lampe allumée/éteinte
Pour le canal 8, réglez la valeur souhaitée :
Reset: 255
Lampe allumée : 247
Lampe éteinte : 239
Réglez ensuite le canal 16 sur la valeur 255.
Après 5 secondes,
la fonction correspondante est déclenchée.
255
17 Rotation tête (Pan)
réglage précis (pour résolution 16 bits) 000 – 255
18 Inclinaison tête (Tilt)
réglage précis (pour résolution 16 bits) 000 – 255
20
Gestion dynamique de l’iris
aucun effet
iris ouvert, fermant lent →rapide
iris fermé, ouvrant lent →rapide
ouvrant + fermant lent →rapide
000 – 009
010 – 091
092 – 173
174 – 255
21
Filtre Frost
aucun effet
min. Frost →max. Frost
aucun Frost, augmentant lent →rapide
max. Frost, diminuant lent→rapide
000 – 009
010 – 189
190 – 211
212 – 255
22
Gestion dynamique du dimmer
aucun effet
max. clair, devenant sombre lent →rapide
max. sombre, devenant clair lent →rapide
000 – 007
008 – 131
132 – 255
Canale Funzione nella modalità a 22 canali Valore DMX
12
Prisma
nessun prisma
Prisma on
000 – 127
128 – 255
8
Ruota gobo 1
nessun Gobo
Gobo A
Gobo B
Gobo C
Gobo D
Cambio gobo continuo:
veloce →lento
lento →veloce (senso opposto)
000 – 025
026 – 050
051 – 076
077 – 101
102 – 127
128 – 191
192 – 255
9
Ruota gobo 1 rotazione
Angolo rotazione gobo
Rotazione a destra veloce →lento
Rotazione a sinistra lento →veloce
000 – 127
128 – 191
192 – 255
11
Ruota gobo 2 rotazione
Angolo rotazione gobo
Rotazione a destra veloce →lento
Rotazione a sinistra lento →veloce
000 – 127
128 – 191
192 – 255
13
Rotazione prisma
Angolo rotazione prisma
Rotazione a destra veloce →lento
Rotazione a sinistra lento →velocel
000 – 127
128 – 191
192 – 255
15 Iride
Diametro grande →piccolo 000 – 255
14 Fuoco
vicino →lontano 000 – 255
10
Ruota gobo 2
nessun Gobo
Gobo E
Gobo F
Gobo G
Gobo H
Cambio gobo continuo:
veloce →lento
lento →veloce (senso opposto)
000 – 025
026 – 050
051 – 076
077 – 101
102 – 127
128 – 187
188 – 255
Canale Funzione nella modalità a 22 canali Valore DMX
19
Macro
nessun macro
Macro 1
Macro 2
Macro 3
Macro 4
Macro 5
Macro 6
Macro 7
Macro 8
Macro 9
Macro 10
Macro 11
Macro 12
Macro 13
Macro 14
Macro 15
Macro 16
Macro 17
000 – 007
008 – 022
023 – 037
038 – 051
052 – 066
067 – 080
081 – 095
096 – 110
111 – 124
125 – 138
139 – 153
154 – 167
168 – 182
183 – 196
197 – 211
212 – 225
226 – 240
241 – 255
16
Reset, Lampada on/off
Per il canale 8 impostare il valore desiderato:
Reset: 255
Lampada on: 247
Lampada off: 239
Quindi mettere per il canale 16 il valore 255.
Dopo 5 secondi
scatta la relativa funzione.
255
17 Rotazione testa orientabile (Pan)
Regolazione fine (per risoluzione a 16 Bit) 000 – 255
18 Inclinazione testa orientabile (Tilt)
Regolazione fine (per risoluzione a 16 Bit) 000 – 255
20
Comando dinamico dell’iride
nessun effetto
Iride aperto, chiusura lenta →veloce
Iride chiusa, apertura lenta →veloce
Apertura + chiusura lenta →veloce
000 – 009
010 – 091
092 – 173
174 – 255
21
Filtro frost
nessun effetto
min. frost →max. frost
nessun frost, in aumento lento →veloce
max. frost, in diminuzione lenta →veloce
000 – 009
010 – 189
190 – 211
212 – 255
22
Comando dinamico del dimmer
nessun effetto
max. luminoso, oscurando lento →veloce
max. scuro, schiarendo lento →veloce
000 – 007
008 – 131
132 – 255
Fig. 6 Contatti dei canali DMX nella modalità a 22 canali
I gobo sono rappresentati in fig. 9 a pagina 25. I gobo F e H sono di vetro.
Scambiando i gobo sulla ruota, il loro ordine può essere modificato (vedi
capitolo 8).
I macro sono cambi programmati di gobo, colori ed effetti. La direzione del
fascio di luce non cambia in questo caso.
Canal Fonction en mode 22 canaux Valeur DMX
1Rotation tête (Pan) 540° 000 – 255
2Inclinaison tête (Tilt) 270° 000 – 255
3Vitesse Pan et Tilt
rapide →lent 000 – 255
4Dimmer sombre →clair 000 – 255
5
Shutter fermé (Blackout)
Shutter ouvert
Stroboscope lent →rapide
Effet scintillement Roue de gobos 1
lent →rapide
Effet scintillement Roue de gobos 2
lent →rapide
Shutter ouvert
000 – 007
008 – 015
016 – 131
132 – 185
186 – 239
240 – 255
6
Couleur 1
blanc
bleu
vert
orange
vert clair
magenta
jaune clair
rouge
changement continu de couleur
rapide →lent
lent →rapide (sens inverse)
000 – 015
016 – 031
032 – 047
048 – 063
064 – 079
080 – 095
096 – 111
112 – 127
128 – 191
192 – 255
7
Couleur 2
blanc
bleu clair
rose
violet UV
vert, jaune, magenta, bleu
température couleur 3200 K
température couleur 5600 K
changement continu de couleur
rapide →lent
lent →rapide (sens inverse)
000 – 018
019 – 036
037 – 054
055 – 072
073 – 090
091 – 108
109 – 127
128 – 191
192 – 255
Canale Funzione nella modalità a 22 canali Valore DMX
1Rotazione testa orientabile (Pan) 540° 000 – 255
2Inclinazione testa orientabile (Tilt) 270° 000 – 255
3Velocità Pan e Tilt
veloce →lento 000 – 255
4Dimmer scuro →chiaro 000 – 255
5
Shutter chiuso (Blackout)
Shutter aperto
Stroboscopio lento →veloce
Effetto oscilazione Ruota gobo 1
lento →veloce
Effetto oscilazione Ruota gobo 2
lento →veloce
Shutter aperto
000 – 007
008 – 015
016 – 131
132 – 185
186 – 239
240 – 255
6
Colore 1
bianco
blu
verde
arancio
verde chiaro
magenta
giallo chiaro
rosso
Cambio colori continuo
veloce →lento
lento →veloce (senso opposto)
000 – 015
016 – 031
032 – 047
048 – 063
064 – 079
080 – 095
096 – 111
112 – 127
128 – 191
192 – 255
7
Colore 2
bianco
azzurro
rosa
viola UV
verde, giallo, magenta, blu
Temperatura colore 3200 K
Temperatura colore 5600 K
Cambio colori continuo
veloce →lento
lento →veloce (senso opposto)
000 – 018
019 – 036
037 – 054
055 – 072
073 – 090
091 – 108
109 – 127
128 – 191
192 – 255
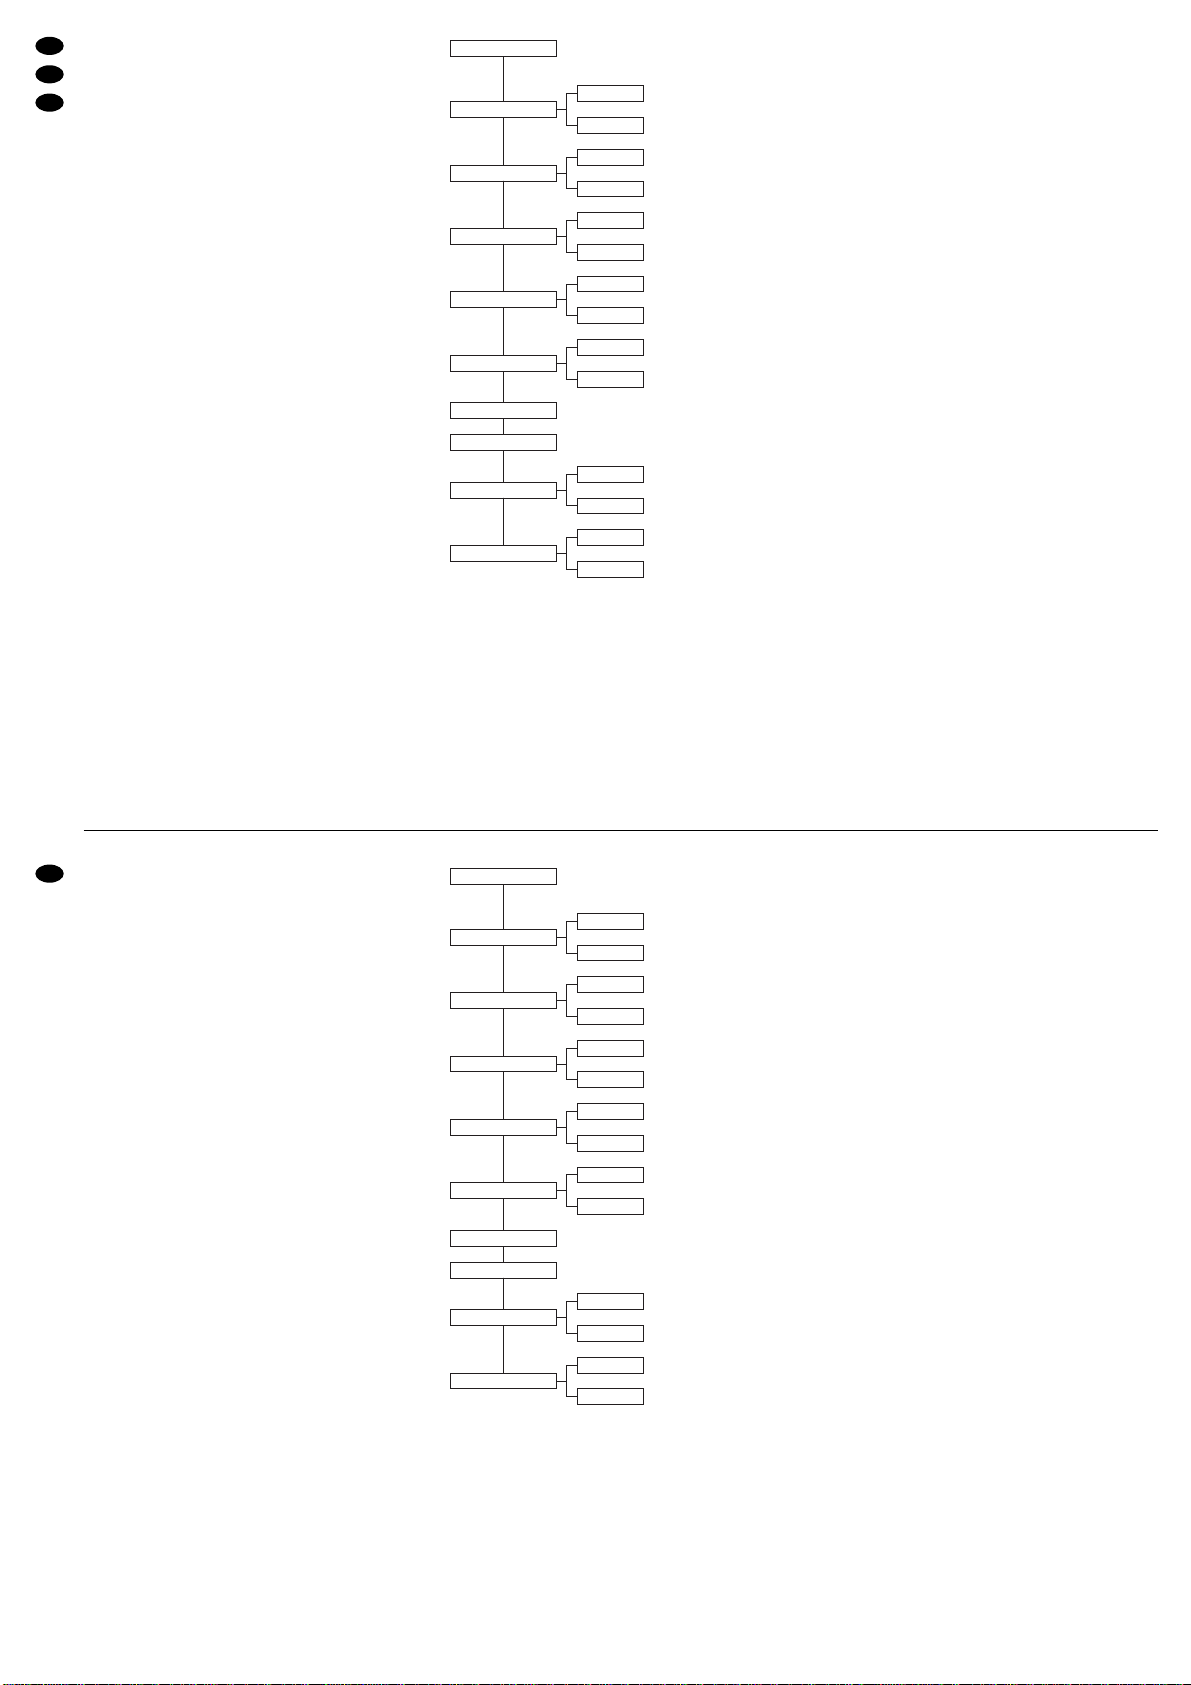
6.3 Modification des paramètres
de fonctionnement
Via un menu, on peut :
–modifier les paramètres décrits ci-après pour pou-
voir contrôler de manière optimale la TWIST-1200,
–afficher les heures de fonctionnement et la
température ambiante de la lampe,
–effectuer les fonctions d’autotest, d’allumage/
extinction de la lampe et la réinitialisation.
1) Avec la touche ENTER (12), appelez le menu.
L’affichage passe de :
IM-1200S
DMX Address xxx
à
DMX Address
xxx (adresse DMX actuelle)
2) Avec la molette (10), sélectionnez le point de
menu et confirmez avec la touche ENTER.
3) Avec la molette, réglez le paramètre et confirmez
avec la touche ENTER. Ensuite, le prochain point
du menu peut être sélectionné avec la molette.
4) Après le réglage, quittez le menu avec la touche
ESC (11) et revenez au mode DMX.
Conseils
a) Lorsque le menu est appelé, la tête va à la posi-
tion verticale (90°).
b) Si aucune autre touche n’est activée en l’espace
de 10 secondes lorsqu’un point de menu est
sélectionné, le menu disparaît.
c) Avec la touche ESC (11), on peut quitter un point
de menu. Une valeur non encore confirmée avec
la touche ENTER (12) est alors ignorée et la
valeur précédente est à nouveau affichée.
Schéma 7 Structure du menu
1) Test Yes Une fois la touche ENTER enfoncée, un programme de test
est lancé. Appuyez deux fois sur la touche ESC pour quitter.
2) Lamp OFF Etant chaude, la lampe à décharge ne peut pas être ral-
lumée immédiatement après avoir été éteinte. Il faut un délai de quel-
ques minutes pour pouvoir la rallumer.
3) Reset Yes En appuyant sur la touche ENTER, une réinitialisation est
lancée : la tête va brièvement à la position de départ et le faisceau
lumineux est coupé. Ensuite l’appareil revient au mode de fonctionne-
ment DMX.
6.4 Réglage des valeurs de correction
(mode Offset)
Pour un réglage précis de la position de la tête, des
roues de gobos, des roues de couleurs, du prisme et
du focus, des réglages de correction peuvent être
faits. Si plusieurs TWIST-1200 doivent être gérées
de manière synchrone via les mêmes canaux DMX,
on peut minimiser par exemple les déviations des
directions de faisceau.
1) Enfoncez brièvement une fois la touche ENTER
(12). Ensuite maintenez la touche ENTER enfon-
cée pendant 3 secondes environ jusqu’à ce que
l’affichage passe de
DMX Address
xxx
à
Adjust Focus
xxx
2) Avec la molette (10), sélectionnez le point de
menu et confirmez avec la touche ENTER.
3) Avec la molette, réglez la valeur de correction et
confirmez avec la touche ENTER. Ensuite, avec
la molette, sélectionnez le point suivant du menu.
4) Pour quitter un point de menu sans mémoriser la
correction effectuée, appuyez sur la touche ESC
(11). Pour quitter le menu et revenir au mode
DMX, appuyez deux fois sur la touche ESC.
Conseil : Lorsque le menu est appelé, la tête va en
position verticale (90°). Si cette direction de projection
ou le focus actuel ne sont pas adaptés pour les ré-
glages de correction envisagés, appelez tout d’abord
le point de menu Adjust Focus et sélectionnez une
autre direction de projection ou modifiez le focus.
La suite présentée ci-dessous correspond à l’ordre
des points du menu :
Adjust Focus Réglage du focus
0 … 255 Pour tourner la tête dans une des
quatre directions principales avec
une direction de faisceau quasi-
ment horizontale, enfoncez (plu-
sieurs fois) la touche ENTER.
Dans la position la plus proche
6.3 Modificare i parametri di funzionamento
Chiamando il menù, si possono
–modificare i parametri descritti qui di seguito per
un controllo ottimale della TWIST-1200,
–visualizzare le ore di funzionamento e la tempe-
ratura ambiente della lampada,
–eseguire le funzioni autotest, lampada on/off e
reset.
1) Chiamare il menù con il tasto ENTER (12). Il dis-
play passa da:
IM-1200S
DMX Address xxx
a
DMX Address
xxx (indirizzo DMX attuale).
2) Con la manopola (10) scegliere il punto del menù
e confermarlo con il tasto ENTER.
3) Impostare il parametro con la manopola e confer-
mare con il tasto ENTER. Quindi si può scegliere
il punto successivo del menù con la manopola.
4) Al termine dell’impostazione, uscire dal menù
con il tasto ESC (11) e ritornare nella modalità
DMX.
N.B.:
a) Chiamando il menù, la testa orientabile si porta in
posizione verticale (90°).
b) Se con un punto del menù aperto non si preme
nessun tasto nel giro di 10 secondi, il menù si
spegne.
c) Con il tasto ESC (11) si può uscire da un punto
del menù. In questo caso, un valore impostato
ma non confermato con il tasto ENTER (12)
viene ignorato e si vede nuovamente il valore
precedente.
Fig. 7 Struttura del menù
1) Test Yes Dopo la pressione del tasto ENTER si svolge un programma
di test. Per terminarlo premere due volte il tasto ESC.
2) Lamp OFF La lampada a scarica elettrica, dopo lo spegnimento non
può essere accesa subito mentre è ancora calda. La nuova accensione
può essere ritardata di alcuni minuti.
3) Reset Yes Premendo il tasto ENTER si ottiene il reset: la testa orien-
tabile si porta brevemente in posizione di partenza e il fascio di luce
viene mascherato. Successivamente, l’apparecchio ritorna nel funzio-
namento DMX.
6.4 Impostazione dei valori correttivi
(modalità Offset)
Per la regolazione fine della posizione della testa
orientabile, delle ruota gobo, delle ruote colori, del
prisma e del fuoco si possono effettuare, se neces-
sario, delle impostazioni correttive. Se si devono
comandare in sincronia più TWIST-1200 tramite i
medesimi canali DMX, si possono minimizzare, per
esempio, delle differenze nelle direzioni dei fasci.
1) Premere una volta brevemente il tasto ENTER
(12). Quindi tener premuto il tasto ENTER per
3 secondi ca. finché il display non passi da
DMX Address
xxx
a
Adjust Focus
xxx
2) Con la manopola (10) scegliere il punto del menù
e confermarlo con il tasto ENTER.
3) Impostare il valore di correzione con la manopola
e confermare con il tasto ENTER. Quindi si può
scegliere il punto successivo del menù con la
manopola.
4) Se si deve uscire da un punto del menù senza
memorizzare una correzione fatta, premere il
tasto ESC (11). Premendo due volte il tasto ESC
si esce dal menù e si ritorna nella modalità DMX.
N.B.: Se viene chiamato il menù, la testa orientabile
si porta sempre nella posizione verticale (90°). Se
tale direzione della proiezione oppure il fuoco
attuale non sono adatte per le impostazioni corret-
tive volute, chiamare dapprima il punto Adjust
Focus e scegliere un’altra direzione per la proie-
zione oppure cambiare la distanza focale.
L’ordine qui rappresentato è quello del punti del
menù:
Adjust Focus Impostazione del fuoco
0 … 255 Per girare la testa orientabile in
una delle quattro direzioni princi-
pali con direzione quasi orizzon-
tale del fascio, azionare (più
16
I
F
B
CH
Lamp Termperature
Test No
Yes
Inverse Pan Normal
Inverse
Channel Mode 22 Cannel
16 Channel
DMX Address 1
512
Inverse Tilt Normal
Inverse
Lamp Hours
Reset
Yes
No
Lampe ON/OFF
Yes
No
Adresse DMX
Mode 22 canaux
Mode 16 canaux
Sens rotation normal
Aucun autotest
Sens rotation
opposé
Sens inclinaison
normal
Sens inclinaison
opposé
Autotest1)
Température ambiante de la lampe
Compteur d’heures de fonctionnement
de la lampe
Lampe éteinte2)
Lampe allumée
Aucune réinitialisation
Réinitialisation3)
MENU
Lamp Termperature
Test No
Yes
Inverse Pan Normal
Inverse
Channel Mode 22 Cannel
16 Channel
DMX Address 1
512
Inverse Tilt Normal
Inverse
Lamp Hours
Reset
Yes
No
Lampe ON/OFF
Yes
No
Indirizzo di start DMX
Modalità 22 canali
Modalità 16 canali
Senso di rotazione normale
nessun autotest
Senso di rotazione
opposta
Senso di orientamento
normale
Senso di orientamento
opposto
Autotest1)
Temperatura ambiente della lampada
Contaore della lampada
Lampada off2)
Lampada on
nessun reset
Reset3)
MENU
de la direction de projection envi-
sagée, le focus peut être réglé
avec la molette pour le mode
Offset.
Le réglage effectué ici ne sert
que pour une meilleure facilité de
réglage des autres paramètres
en mode Offset. Pour le mode
DMX, il n’a pas d’importance.
Pan Offset Correction précise pour la position
0 … 1024 horizontale de la tête pour la
valeur DMX “0” (faisceau lumi-
neux vers l’avant)
Tilt Offset Correction précise pour la position
0 … 640 verticale de la tête pour la valeur
DMX “127” (faisceau lumineux
vertical)
Color 1 Offset Correction angle rotation pour la
-
127 … 127 roue de couleurs 1
Color 2 Offset Correction angle rotation pour la
-
127 … 127 roue de couleurs 2
Gobo 1 Offset Correction angle rotation pour la
-
127 … 127 roue de gobos 1
R_Gobo 1 Offset Correction angle rotation pour
-
127 … 127 les gobos de la roue de gobos 1
Gobo 2 Offset Correction angle rotation pour la
-
127 … 127 roue de gobos 2
R_Gobo 2 Offset Correction angle rotation pour
-
127 … 127 les gobos de la roue de gobos 2
Focus Offset Correction précise pour le focus
0 … 255
Prism Offset Correction précise pour la réparti-
0 … 255 tion de la luminosité dans le
prisme
R-Prism Offset Correction angle rotation pour le
0 … 255 prisme
volte) il tasto ENTER. Nella posi-
zione che si avvicina di più alla
direzione prevista per la proie-
zione, il fuoco per la modalità off-
set può essere regolato con la
manopola.
L’aggiustamento effettuato qui
serve solo per facilitare l’im-
postazione degli altri parametri
nella modalità offset. È senza
importanza per la modalità DMX.
Pan Offset Correzione fine per la posizione
0 … 1024 orizzontale della testa orientabile
con il valore DMX “0” (fascio di
luce in avanti)
Tilt Offset Correzione fine per la posizione
0 … 640 verticale della testa orientabile
con il valore DMX “127” (fascio di
luce verticale)
Color 1 Offset Correzione dell’angolo di rota-
-
127 … 127 zione per la ruota colori 1
Color 2 Offset Correzione dell’angolo di rota-
-
127 … 127 zione per la ruota colori 2
Gobo 1 Offset Correzione dell’angolo di rota-
-
127 … 127 zione per la ruota gobo 1
R_Gobo 1 Offset Correzione dell’angolo di rota-
-
127 … 127 zione dei gobo della ruota gobo 1
Gobo 2 Offset Correzione dell’angolo di rota-
-
127 … 127 zione per la ruota gobo 2
R_Gobo 2 Offset Correzione dell’angolo di rota-
-
127 … 127 zione dei gobo della ruota gobo 2
Focus Offset Correzione fine per il fuoco
0 … 255
Prism Offset Correzione fine per la distribu-
0 … 255 zione della luminosità nel prisma
R-Prism Offset Correzione dell’angolo di rota-
0 … 255 zione per il prisma
17
I
F
B
CH
7Nettoyage de l’optique
Il est recommandé de nettoyer régulièrement les
lentilles et les filtres, des impuretés causées par la
poussière, la fumée ou toute autre particule. C’est à
cette seule condition que la lumière peut rayonner
avec une luminosité maximale. Avant l’ouverture de
l’appareil, débranchez-le du secteur et laissez-le
refroidir pendant 15 minutes.
Pour le nettoyage, utilisez un chiffon doux et pro-
pre et des produits usuels de nettoyage de verre ;
ensuite, essuyez avec précaution les éléments.
8Remplacement des gobos
Les gobos rotatifs sur les deux roues peuvent être
changés et remplacés p.ex. par les vôtres :
1) Débranchez la prise du secteur et laissez refroi-
dir l’appareil pendant 15 minutes.
2) Tournez la tête (3) de telle sorte que la charnière
(2) pour le couvercle du compartiment lampe soit
dirigée vers le haut.
3) Desserrez les cinq vis (1) et retirez le cache
supérieur du boîtier de la tête.
4) Tournez la roue de gobo de telle sorte que le
gobo à changer soit accessible.
5) Retirez l’anneau de fixation sur le gobo avec un
outil approprié et enlevez le gobo. Ne desserrez
jamais les vis sur le support de gobo car elles
maintiennent le roulement à billes !
6) Placez le nouveau gobo sur le support, fixez
avec l’anneau de fixation. Si le gobo a une face
plus sombre ou plus matte, elle doit pointer dans
la direction opposée à la lampe.
7) Refermez le boîtier de la tête et revissez avec les
cinq vis.
9Transport
Pour éviter tout dommage lors du transport, la tête
(3) et le bras (5) doivent être verrouillés avant de
transporter l’appareil.
1) Mettez la tête manuellement à l’horizontale ou à
la verticale. Appuyez sur le bouton rouge (4) sur
le bras.
2) Mettez le bras parallèle aux poignées (7). Il ne
peut être verrouillé que dans cette position. Met-
tez le levier (6) sur le bras dans la position LOCK.
10 Caractéristiques techniques
Alimentation : . . . . . . . . . . . . 230V~/50Hz
Consommation : . . . . . . . . . . 1900VA
Lampe : . . . . . . . . . . . . . . . . lampe à décharge
type HMI 1200W/S
avec culot SFc10-4
Angle rayonnement : . . . . . . 17°
Angle/vitesserotation
axe vertical (Pan) : . . . . . . 540° en 2,8s
axe horizontal (Tilt) : . . . . . 270° en 1,6s
Diamètre Gobos
Gobos métalliques : . . . . . 51,8mm extérieur
45,0mm gobo
Gobos verre : . . . . . . . . . . 49,8mm extérieur
45,0mm gobo
Température fonc. : . . . . . . . 0–40°C
Dimensions : . . . . . . . . . . . . 700 x 520 x 510mm
Poids : . . . . . . . . . . . . . . . . . 47kg
Tout droit de modification réservé.
Notice d’utilisation protégée par le copyright de MONACOR®INTERNATIONAL GmbH & Co. KG. Toute
reproduction même partielle à des fins commerciales est interdite.
7Pulizia del sistema ottico
Si dovrebbe procedere, ad intervalli regolari, alla
pulizia delle lenti e dei filtri per asportare polvere,
fumo e altre particelle. Solo così, la luce può essere
irradiata con la luminosità massima. Prima di aprire
l’apparecchio staccare la spina dalla presa di rete e
fare raffreddare l’apparecchio per 15 minuti circa.
Per la pulizia usare un panno morbido, pulito e un
detergente per vetri come si trovano in commercio.
Quindi asciugare le parti delicatamente.
8Sostituzione dei gobo
I gobo roteanti sulle due ruote possono essere cam-
biati e sostituiti, per esempio, con propri gobo:
1) Staccare la spina dalla presa di rete e fare raf-
freddare l’apparecchio per 15 minuti circa.
2) Girare la testa orientabile (3) in modo tale che la
cerniera (2) per la copertura della lampada sia
rivolta verso l’alto.
3) Allentare le cinque viti (1) e sfilare la parte supe-
riore del contenitore della testa.
4) Girare la ruota in modo che il gobo da sostituire
sia accessibile.
5) Togliere l’anello di sicurezza sul gobo con un
utensile adatto e prelevare il gobo. Mai allentare
le viti sul portagobo perché tengono insieme il
cuscinetto a sfere!
6) Inserire il nuovo gobo nel portagobo e fissarlo
con l’anello di sicurezza. Se il gobo ha un lato più
scuro o più opaco, tale lato devo essere orientato
in senso opposto alla lampada.
7) Chiudere il contenitore della testa orientabile
nuovamente con le cinque viti.
9Trasporto
Per escludere danni durante il trasporto, prima del
trasporto occorre bloccare la testa orientabile (3) e il
braccio girevole (5).
1) Con la mano girare la testa in una posizione oriz-
zontale o verticale. Premere il pulsante rosso (4)
sul braccio girevole.
2) Mettere il braccio girevole parallelo alle maniglie
(7). Solo in questa posizione può essere bloc-
cato. Girare la leva (6) sul braccio in posizione
LOCK.
10 Dati tecnici
Alimentazione: . . . . . . . . . . . 230 V~/50 Hz
Potenza assorbita: . . . . . . . . 1900 VA
Lampada: . . . . . . . . . . . . . . . lampada a scarica
elettrica tipo HMI
1200 W/S
con zoccolo SFc10-4
Angolo di irradiazione: . . . . . 17°
Angolo/velocità di rotazione
asse verticale (Pan): . . . . . 540° in 2,8 s
asse orizzontale (Tilt): . . . 270° in 1,6 s
Diametro gobo
gobo metallici: . . . . . . . . . 51,8 mm esterno
45,0 mm disegno
gobo di vetro: . . . . . . . . . . 49,8 mm esterno
45,0 mm disegno
Temperatura d’impiego: . . . . 0 – 40°C
Dimensioni: . . . . . . . . . . . . . 700 x 520 x 510 mm
Peso: . . . . . . . . . . . . . . . . . . 47 kg
Con riserva di modifiche tecniche.
La MONACOR®INTERNATIONAL GmbH & Co. KG si riserva ogni diritto di elaborazione in qualsiasi forma
delle presenti istruzioni per l’uso. La riproduzione – anche parziale – per propri scopi commerciali è vietata.
Contenidos
1Elementos operativos y conexiones . . . 18
2Notas de seguridad . . . . . . . . . . . . . . . . . 18
3Aplicaciones . . . . . . . . . . . . . . . . . . . . . . . 18
4Instalación de la lámpara . . . . . . . . . . . . . 18
5Montaje . . . . . . . . . . . . . . . . . . . . . . . . . . . 19
6Funcionamiento . . . . . . . . . . . . . . . . . . . . 19
6.1 Encendido/apagado . . . . . . . . . . . . . . . . . . 19
6.2 Funcionamiento mediante
controlador de luz . . . . . . . . . . . . . . . . . . . . 19
6.2.1 Conexión . . . . . . . . . . . . . . . . . . . . . . . . . 19
6.2.2 Ajuste de la dirección de inicio . . . . . . . . 19
Configuración de los canales DMX
en el modo de 16 canales . . . . . . . . . . . . 19
Configuración de los canales DMX
en el modo de 22 canales . . . . . . . . . . . . 20
6.3 Cambio de los parámetros
de funcionamiento . . . . . . . . . . . . . . . . . . . 20
6.4 Ajuste de los valores de corrección
(modo offset) . . . . . . . . . . . . . . . . . . . . . . . . 20
7Limpieza del sistema óptico . . . . . . . . . . 21
8Recambio de los gobos . . . . . . . . . . . . . . 21
9Transporte . . . . . . . . . . . . . . . . . . . . . . . . . 21
10 Características técnicas . . . . . . . . . . . . . 21
Abra la página 3 de este manual de manera que
pueda visualizar los elementos operativos y las
conexiones descritas.
1Elementos operativos y conexiones
1Tornillos (x5) para abrir la cabeza móvil
2Bisagra para la tapa de la lámpara
3Cabeza móvil
4Botones para bloquear* (rojo) y desbloquear
(verde) la cabeza móvil
5Brazo rotativo
6Palanca para bloquear* y desbloquear el brazo
rotativo
7Asas de transporte
8Pantalla alfanumérica
9LED indicador DMX: se ilumina con una señal de
control DMX en la entrada DMX IN (16)
10 Rueda rotativa para seleccionar un punto del
menú y para ajustar una función
11 Botón ESC para salir de un punto del menú o del
menú
12 Botón ENTER para seleccionar o memorizar un
ajuste de menú
13 Puerta corredera, protege los elementos de fun-
cionamiento de desajustes ocasionales
14 Salidas de señal DMX
(jacks XLR, 3 polos y 5 polos);
1 = masa, 2 = DMX
-
, 3 = DMX+
15 Entradas de señal DMX
(tomas chasis XLR, 3 polos y 5 polos);
1 = masa, 2 = DMX
-
, 3 = DMX+
16 Recortes automáticos de seguridad; si un
recorte automático ha sido soltado, presione el
botón correspondiente de nuevo para encender
la unidad
17 Interruptor de encendido
18 Cable de red para conectar a una toma de red
(230V~/50Hz)
19 Tornillos estriados para abrir el compartimiento
de la lámpara (sólo visible con la parte superior
de la cabeza móvil retirada)
20 Tuercas estriadas para fijar la lámpara
2Notas de seguridad
Esta unidad corresponde a todas las Directivas
requeridas por la UE y por ello está marcada con .
Por favor, tenga en cuenta los puntos siguientes en
todo caso:
●La unidad solo está indicada para el uso en inte-
rior. Protéjala contra proyecciones de agua y salpi-
caduras, humedad elevada del aire, y calor (rango
de temperatura ambiente admisible 0–40°C).
●La cabeza móvil (3) se calienta mucho durante el
funcionamiento. Para prevenir quemaduras, no
toque nunca la cabeza durante el funcionamiento;
déjela enfriarse durante algunos minutos tras
haberla apagado antes de tocarla.
●No coloque ningún recipiente con líquido sobre la
unidad, por ejemplo un vaso de bebida.
ADVERTENCIA La unidad está alimentada por
una tensión peligrosa (230V~).
Deje su reparación sólo en
manos de personal especia-
lizado. No haga ninguna modifi-
cación en la unidad que no esté
descrita en este manual de
instrucciones y no introduzca
nada en las aberturas de ventila-
ción, de otro modo usted se
arriesga a sufrir una descarga
eléctrica.
●No haga funcionar la unidad o desconecte inme-
diatamente el enchufe de red de la toma
1. si se aprecian daños visibles en la unidad, p.ej.
en la carcasa, las lentes, el filtro UV, o el cable
de red,
2. en caso de posible daño tras una caída de la
unidad o un accidente similar,
3. si aparecen disfunciones.
En cualquier caso la unidad debe ser reparada
por personal especializado.
●No tire nunca del cable de red para desconectar el
enchufede la tomade red, tiresiempre del enchufe.
●Un cable de red dañado sólo debe ser remplazado
por el fabricante o por personal especializado.
●Cuando transporte la unidad, cójala sólo por las
asas de transporte (7). No coja nunca la unidad
por la cabeza móvil (3) o por el brazo rotativo (5).
●Para la limpiar la carcasa, use sólo un paño seco
y suave, no use nunca productos químicos o
agua. Para las partes ópticas, también puede
usarse un limpia cristales común.
●No se asumirá ninguna garantía para la unidad ni
responsabilidad alguna en caso de daños patri-
moniales o personales si la unidad es usada para
otros fines distintos a aquellos para los que se
fabricó, si no es montada de manera segura, si no
es correctamente utilizada, o si no es reparada de
manera experta.
3Aplicaciones
La cabeza móvil TWIST-1200 está especialmente
indicada para usos profesionales en escenario y dis-
cotecas.Gracias a susnumerosas características con
dos ruedas de gobos, dos ruedas de colores, prisma,
control foco, iris, dimmer, efectos estroboscópicos,
efectos de temblor, y efectos de rotación, es capaz de
proyectar múltiples modelos de luz. La resolución de
16 bits para el movimiento de la cabeza permite un
posicionamiento muy preciso del haz de luz. Gracias
a una característica reposición automática, la cabeza
siempre recupera su posición incluso si ha sido des-
plazada por influencias externas.
Para controlar la unidad se requiere un controla-
dor de luz DMX (por ejemblo el DMX-1440 o el
DMX-510USB de “img Stage Line”).
4Instalación de la lámpara
La unidad de efecto de luz se entrega sin lámpara.
Se necesita una lámpara de descarga del tipo
HMI 1200 W/S con base SFc10-4.
¡No use nunca lámparas de diferente tipo!
De la gama de productos de “img Stage Line”,
puede usarse la lámpara siguiente:
¡No toque nunca el tubo de cristal de la lámpara con
los dedos! Las marcas de los dedos se quemarán y
reducirán la potencia luminosa.
1) Presione el botón verde (4) para desbloquear la
cabeza móvil y gire la cabeza de manera que la
bisagra (2) para la tapa de lámpara apuntará
hacia arriba.
2) Suelte los cinco tornillos (1) y saque la carcasa
de alojamiento superior de la cabeza móvil.
3) Suelte los dos tornillos estriados (19) a la
derecha y la izquierda del disipador térmico para
abrir la tapa de la lámpara. El portalámpara es
visible.
4) Para remplazar la lámpara, suelte las dos tuer-
cas estriadas (20) de la lámpara vieja y saque la
lámpara de su portalámpara.
5) Coja la lámpara nueva por los dos extremos (sin
tocar el cuerpo de cristal) y colóquela en el por-
talámpara (vea fig. 4). Apriete las dos tuercas
estriadas (20) de la lámpara.
6) Vuelva a colocar la tapa de la lámpara y la car-
casa de alojamiento y vuelva a apretar los torni-
llos.
●La lámpara mencionada más arriba contiene una
ligera cantidad de substancias dañinas (por
ejemplo mercurio) que pueden afectar al medio
ambiente y por eso requiere una disposición
como residuo especial en Europa. En otros paí-
ses deben consultarse las regulaciones naciona-
les correspondientes.
●Vuelva a remplazar la lámpara como muy tarde
después del 125% de su duración media, porque
con un aumento de la duración de vida el riesgo
de explosión de la lámpara aumentará conside-
rablemente debido a la transformación estructu-
ral del cristal de cuarzo.
La unidad está provista de un contador de
horas de funcionamiento que puede ser usado
para determinar las horas de iluminación de la
lámpara. Cuando cambie la lámpara, fíjese en la
indicación del contador – vea capítulo 6.3 “Cam-
bio de los parámetros de funcionamiento”, punto
del menú “Lamp Hours”.
●Tras una explosión de lámpara durante el funcio-
namiento, todos deberían abandonar los alrede-
ADVERTENCIA
¡Desconecte siempre el enchufe
de red antes de insertar o sacar
la lámpara!
●Como la lámpara se calienta mucho durante el
funcionamiento, deje que la carcasa y la lámpara
se enfríen tras el funcionamiento (deje enfriar
durante 15 minutos como mínimo) antes de
reemplazar la lámpara.
●No mire nunca directamente a la lámpara de
descarga encendida cuando la unidad está
abierta; el elevado brillo y la radiación UV de la
lámpara pueden causar daños en la vista.
Si la unidad debe ser retirada del funcio-
namiento definitivamente, llévela a una
planta de reciclaje local para su disposi-
ción no perjudicial para el medio
ambiente.
18
E
*Para prevenir daños durante el transporte, bloquee la cabeza móvil y el
brazo rotativo antes de transportar la unidad.
Artículo Núm. pedido. Duración media
HMI-1200W 05.9290 750h
Table of contents
Other IMG STAGE LINE Light Fixture manuals


Popular Light Fixture manuals by other brands

Fulham
Fulham Thoroled TKT120013RD 01 Series installation instructions

Cooper Lighting
Cooper Lighting Ametrix ADY071481 installation instructions

Philips
Philips SpotOn Ultra 69141/14/PH brochure

Martin
Martin CYCLO 04 DMX user manual

Larson Electronics
Larson Electronics LEDWP-600E-E2E-10C quick start guide

Ares
Ares Arcadia Assembly instructions

JONATHAN Y
JONATHAN Y JYL6001A Installation sheet

Clas Ohlson
Clas Ohlson XY-4.5ELED-160SB1 UK instruction manual

Williams
Williams LP Series installation instructions

Home Accents Holiday
Home Accents Holiday TY523-2014 Assembly instructions

Utilitech
Utilitech 38970 manual

Ametrix
Ametrix Ametrix C-Scroll installation instructions


