Imperial 2699W User manual

Imperial
Side-by-Side Refrigerator
Owner'sManual

2
Electrical Requirements
Recognize this symbol
as a safety precaution.
To avoid electrical shock which can cause severe
personal injury or death do not cut or remove the
round grounding prong from the plug. Refrigerator
must be grounded at all times. Do not remove
warning tag from power cord.
Do not use a two-prong adapter. Do not use an
extension cord.
Electrical GroundingInstructions—Thisrefrigeratoris
equippedwithathree-prong (grounding)plug for
protection against possible shock hazards. If you
encounteratwo–prong receptacle,contacta qualified
electricianandhave thetwo-prongwall receptacle
replacedwith aproperly groundedthree-prong wall
receptacle in accordance with the National Electrical
Code.
Refrigeratorisdesignedto operate onaseparate 103 to
126 volt, 15 amp., 60 cycle line.
Model Identification
Thankyou forpurchasingthisImperial®refrigerator.
Pleasereadthis Owner'sManual thoroughly. Thismanual
providesproper maintenanceinformation.
WhencontactingBroich Enterprises,Inc.,provide product
information.Productinformation is onthe serial plate,
locatedon(upper leftcorner, ceiling) ofFresh Food
section.Recordthefollowinginformation:
ModelNumber:
ManufacturingNumber:
S/NorSerial Number:
Dateofpurchase:
Dealer’snameandaddress:
Contents
ElectricalRequirements .............................................. 2
ModelIdentification ..................................................... 2
Service ........................................................................ 3
ProperDisposal ofyour Refrigerator ............................ 3
InstallationInstructions................................................ 3
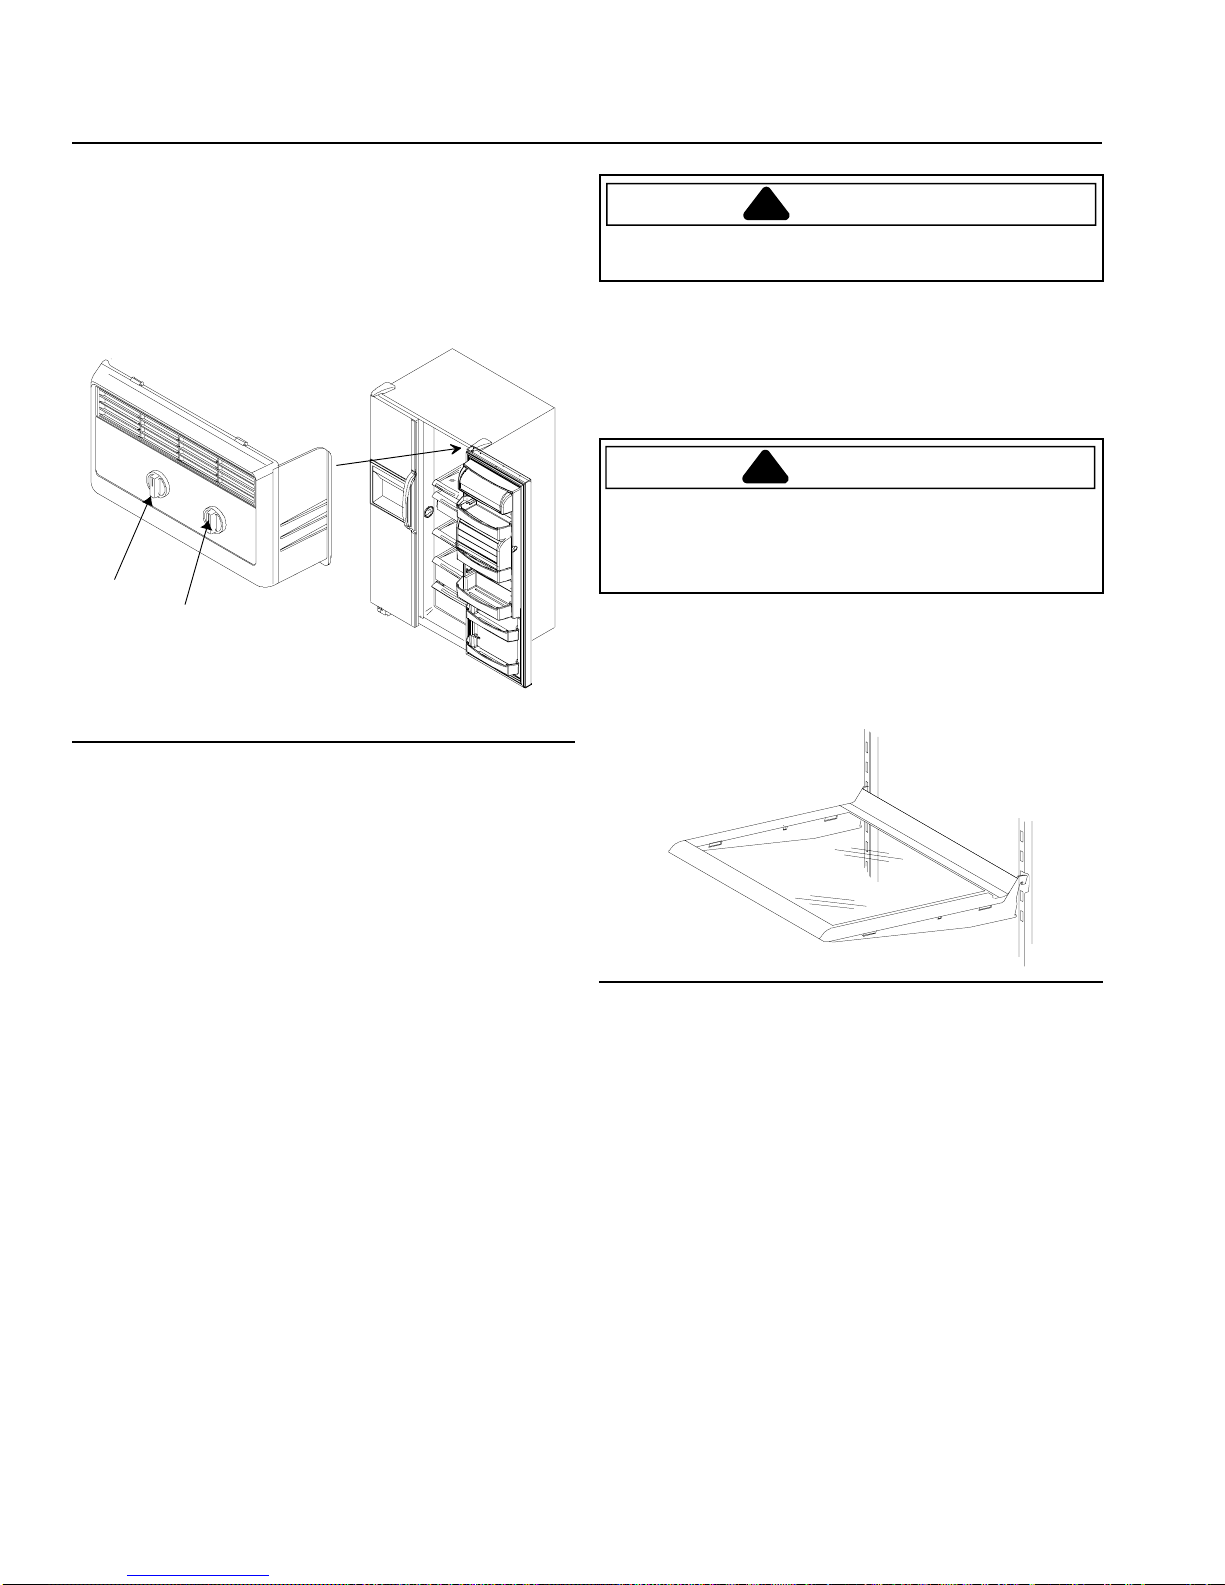
Refrigeratorand FreezerControls ................................ 6
SettingControls .......................................................... 6
RefrigeratorFeatures................................................... 6
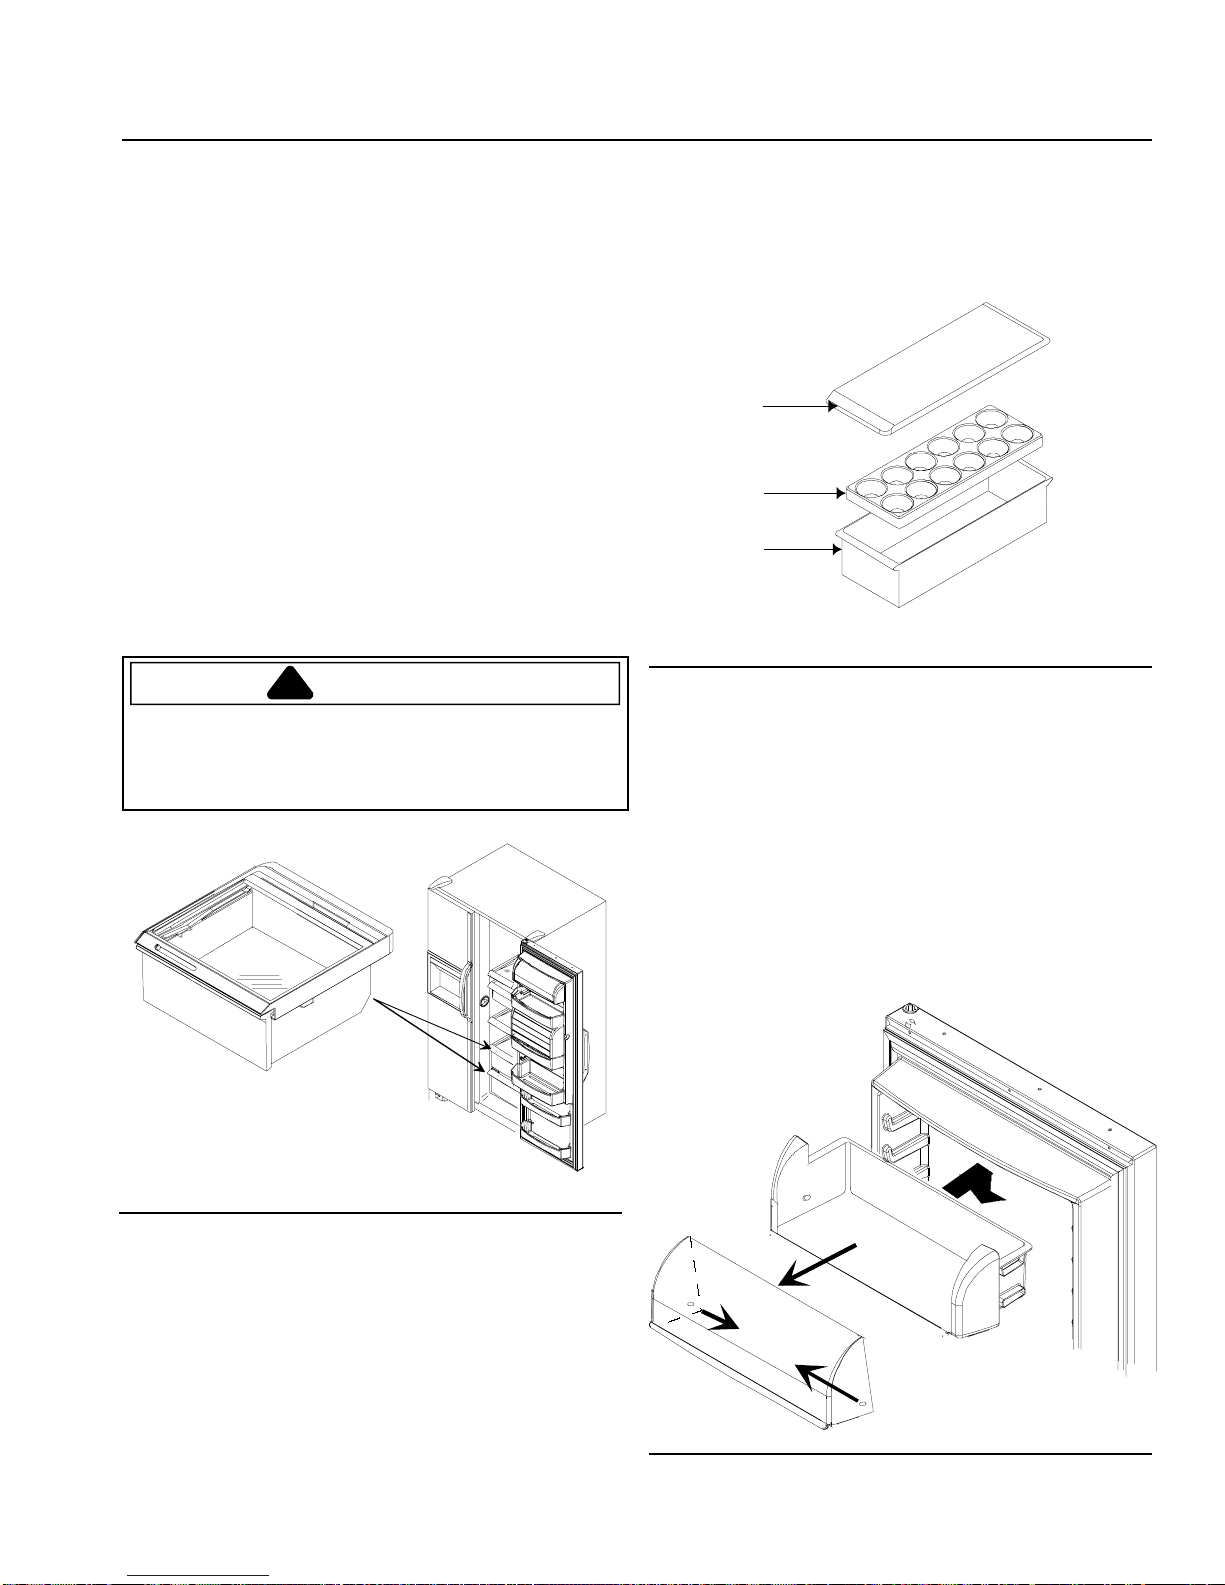
RefrigeratorShelves .............................................. 6
DeliFresh Drawer ................................................. 7
CrisperDrawers .................................................... 7
CoveredStorage Bucket ....................................... 7
DairyCenter ......................................................... 7
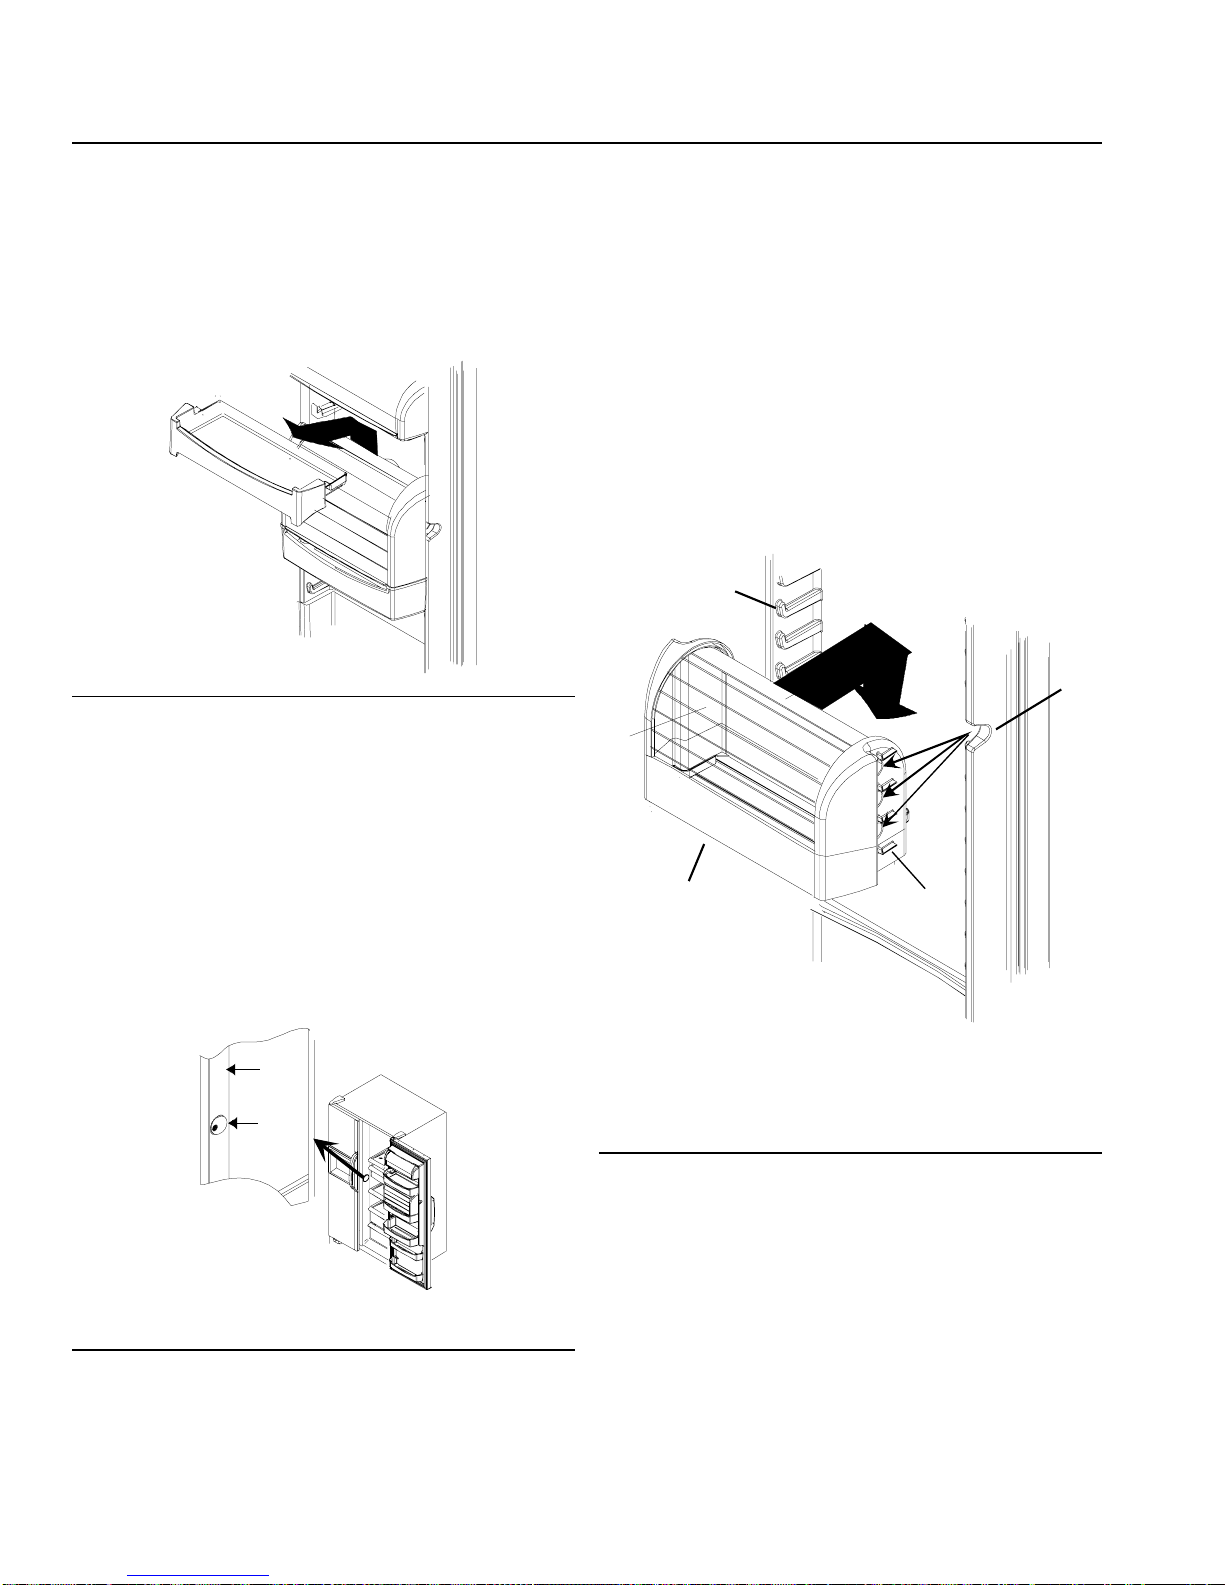
SnackShelf .......................................................... 8
BeverageChillerCompartment.............................. 8
DoorBucketsand Shelves.................................... 8
TallPackageRetainer ........................................... 9
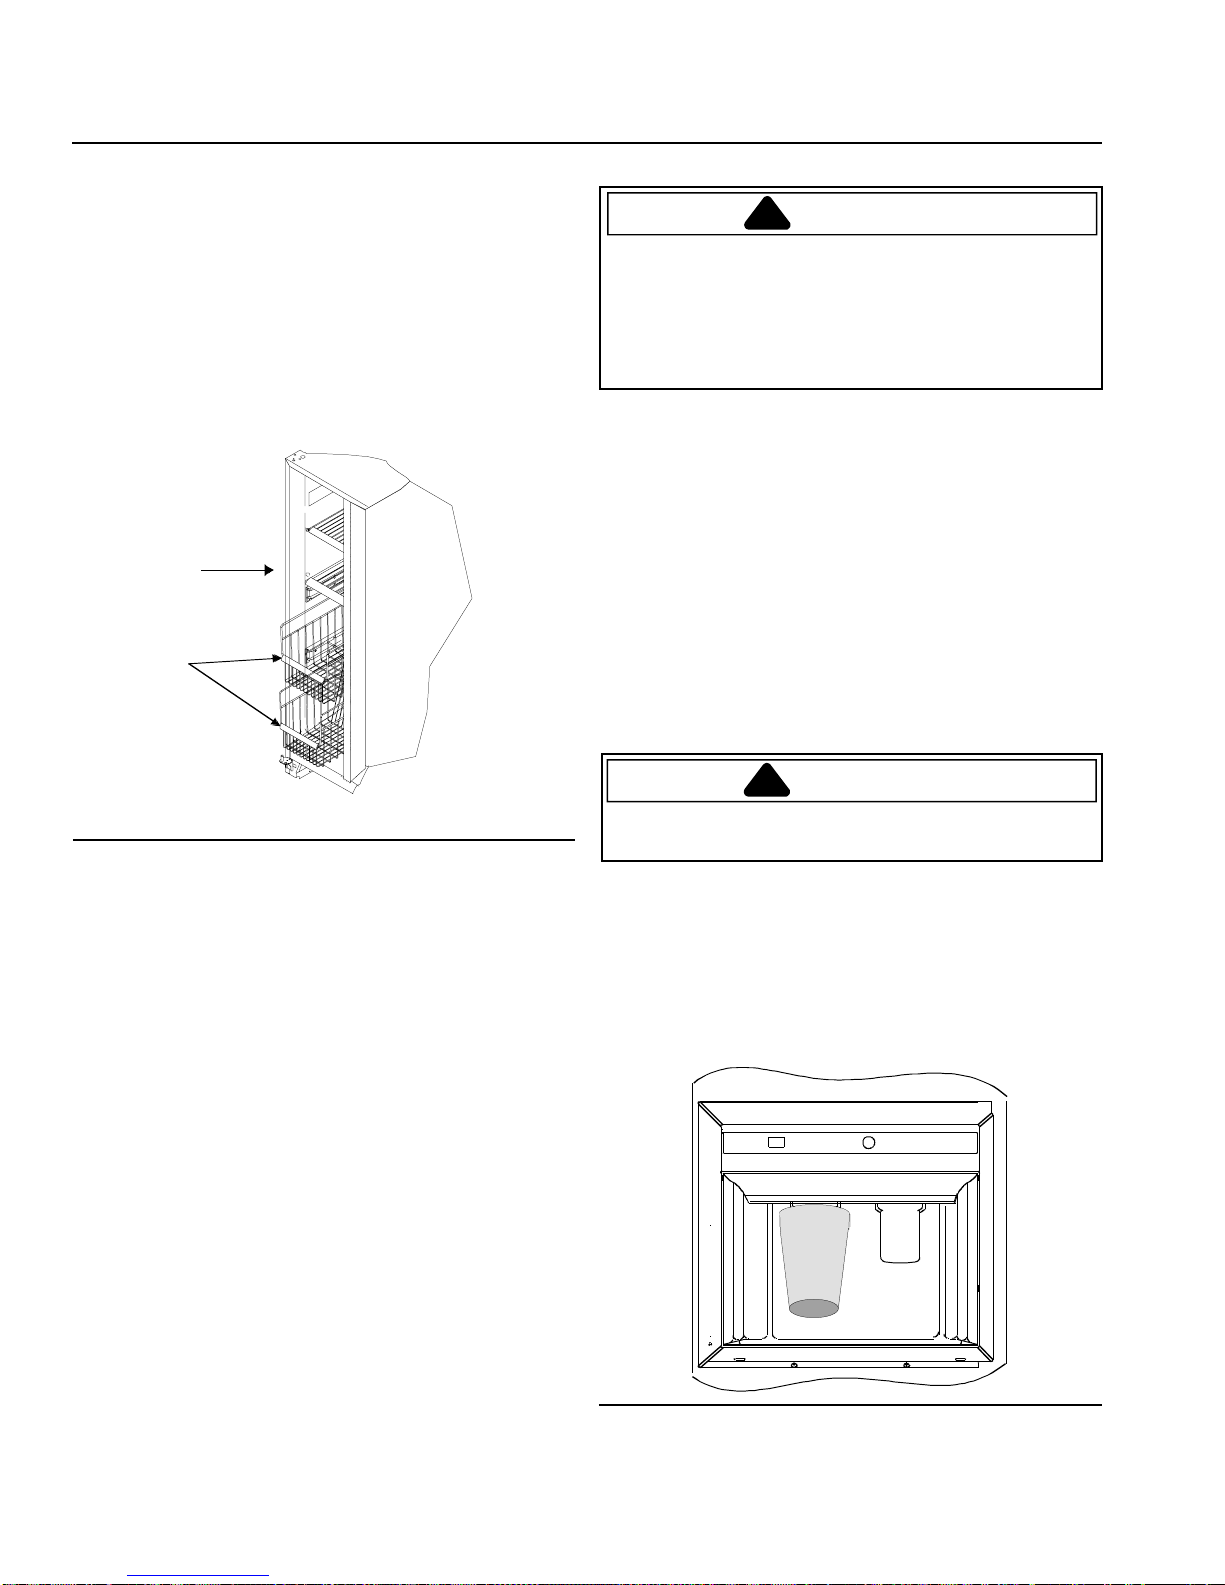
FreezerFeatures......................................................... 9
Automatic Ice Maker............................................. 9
FreezerShelves.................................................. 10
IceandWaterDispenser ..................................... 10
WaterDispenser Operation................................. 10
IceDispenser Operation ..................................... 10
RemovingIce Bucket .......................................... 11
DispenserLight................................................... 11
Tasteand Odor ................................................... 11
CareandCleaning..................................................... 12
General............................................................... 12
OdorRemoval ..................................................... 12
Adhesives ........................................................... 12
DoorGaskets ..................................................... 12
CondenserCoils ................................................. 12
GlassShelves .................................................... 12
Light Bulbs ......................................................... 13
NormalOperating Sounds ......................................... 14
BeforeCalling ForService ......................................... 15
EnergyTips............................................................... 16
VacationTips ............................................................ 16
Warranty ................................................................... 17
InstallationChecklist ................................................. 18
WARNING
!
!

3
Installation Instructions
Properinstallationwill ensurethis refrigeratoroperates
most efficiently. Broich Enterprises, Inc. cannot be
responsibleforimproperinstallation.
1. Remove doors if necessary.
To avoidelectricalshock whichcancause severe
personalinjuryor death, disconnectpower to
refrigeratorbefore removingdoors.Afterreplacing
doors,connectpower.
a. Removetoegrille.
b. DispenserModels
Loosen water tube clamp screw. Loosen plastic
watertubeunion nut. Pullwatertube away from
unionnutand throughtubeclamp.
A
B
C
A. Plastic water tube union nut
B. Water tube clamp screw
C. Water tube
Front water line disconnect
c. Removetophingecovers.(Abelow)
To avoidelectricalshock whichcancause severe
personalinjuryor death,green ground wiremust
remainattachedto hinge.
Service
Keep a copy of sales receipt for future reference or in
case warranty service is required. Any questions or to
locateanauthorizedservicer, call612-941-2270 Monday
through Friday, 8:30 AM through 4:30 PM CST. Warranty
servicemustbeperformedby anauthorized servicer.
Broich Enterprises, Inc., also recommends contacting an
authorizedservicerifserviceis requiredafter warranty
expires.
DANGER
!
Proper Disposal of Your
Refrigerator
IMPORTANT: Child entrapmentandsuffocation
arenotproblems of the past. Junkedorabandoned
refrigeratorsare stilldangerous--
even if they will sit for "just a few days." If you
discardanold refrigerator, pleasefollow the
instructions below to help prevent accidents.
BEFORE YOU THROW AWAY YOUR OLD
REFRIGERATOR OR FREEZER:
• Take off the doors.
• Leave the shelves in place so that children may
not easily climb inside.
WARNING
!
WARNING
!

4
Toavoidpropertydamage,observethefollowing:
• Confirmwater pressuretowatervalveis between20
and100pounds persquareinch.
• Ifwaterfilter will beinstalled,water pressure towater
valvemustbe aminimumof 35poundsper square
inch.
• Tightennutby hand toavoid cross threading.Finish
tightening nuts with pliers and wrenches. Do not
overtighten.
• Check for water leaks and correct if necessary
beforereturning refrigeratortonormallocationand 24
hoursafterconnecting.
Important
• Beforeconnectingwatersupply, contactaplumber to
connectcoppertubing tohouseholdplumbing in
compliancewithlocal codes andordinances.
• A self–piercingor 3/16"(4.8mm) saddle valveisnot
recommended.Bothreducewaterflow, become
clogged with time and may cause leaks if repair is
attempted.Thecorrect typeof shutoffvalve requires
a 1/4" (6 mm) hole to be drilled in water supply pipe
priortovalveattachment.The manufactureris not
responsibleforpropertydamagecaused byimproper
waterconnection.
Materials Required
1/4"(6mm) flexiblecoppertubing. Length ofcoppertubing
must reach from water supply connection plus an
additional8' (2m)forserviceloop behindrefrigerator.
Procedure
1. Removeplasticcap fromwater valve inletport. Place
brassnutand brass sleeveon copper tubing.Insert
coppertubinginto watervalve inletport.Connect
brassnuton copper tubingto water valveinletport.
Confirmcoppertubing is secureby pulling oncopper
tubing.
A. “P” clamp B. Copper tubing
C. Brass nut D. Brass sleeve
E. Water valve inlet connection
Water supply line connection
d. DispenserModels
Unplugtophinge wireconnectors. Donotremove
greenground wirefromhinge.Carefullyliftandremove
top hinges. Do not disturb position of hinge shims. (B)
AB
C
D
E
F
G
C. Hinge cover F. Wire connectors
D. Door hinge screws G. Green ground wire
E. Top hinge
Top hinge removal
e. Removedoors.
Toavoidproperty damage,protectsoft vinylor other
flooringwithcardboard,rugs,or otherprotective
materialwhenmovingrefrigerator.
f. Slideappliancecartunder sideofrefrigerator.Wrap
refrigeratorwithblanket orpad. Threadcartstrap
aroundrefrigerator andtighten. Donot overtighten
strap.Moverefrigeratorinfront offinal location.
g. Rehangdoorsby reversingstepsa–g. Use adimeat
top of doors to space doors 3/4" (18 mm) from cabinet.
2. Install Water Filtration Cartridge
a. Removebypasscartridge fromwater filterheadin rear
rightcornerof refrigeratorsection. Twist cartridge
counterclockwise1/4turnand pull downto remove.
Save bypass for use at a later date.
b. See
Water Filtration System Installation and
OperatingInstructions
providedwithwaterfilter
cartridgeforfilter installationand operation.
3. Connecting Water Supply
To avoidelectricalshock whichcancause severe
personalinjuryor death, disconnectpower to
refrigeratorbefore connectingwatersupply. After
connectingwatersupply,connect power.
CAUTION
!
WARNING
!
CAUTION
!
"P" clamp
Copper
tubin
g
Brass nut
Brass sleeve
Water valve
inlet connection

5
2. Turnonwater supplyto refrigerator andcheck for
leaks. Correct any leaks.
3. Createserviceloop usingextreme caretoavoid
kinks. Secure copper tubing to refrigerator
cabinet with a “P” clamp.
4. Plug in power cord.
5. Move refrigerator into final location.
6. Stabilize refrigerator and align doors.
Ifrefrigeratorrocks orisnot stableonfloor perform
thefollowing:
• Determinewhichrear cornerisrocking.
• Remove toe grille to gain access to roller
adjustmentscrews.
• Turnrearroller adjustment screwclockwiseto raise
corner that is rocking.
A
B
C
A. Rear roller adjustment screw
B. Door hinge screws
C. Front roller adjustment screw
Stabilizing refrigerator
• Checkalignmentof topofdoors. Ifdoorsare level
replacetoegrille.
Iftopsof doorsare notlevelperform thefollowing
steps:
• Determinewhichdoor must beraised (if toegrille
hasnotbeen removed,removeat thistime).
• Turnfrontroller adjustment screwclockwise to
raisefrontcorner of doorthatneeds to beraised.
Rolleradjustmentscrew should beturned until
doorsare level.
• Replacetoegrille.
A
B
A. Turn roller adjustment screw clockwise to raise door.
B. Continue to turn screw clockwise until doors are level.
Leveling doors
7. Review “Installation Checklist” at back
of manual.

6
Refrigerator Features
To avoidpropertydamage, confirmshelfis secure
beforeplacingitems on shelf.
Refrigerator Shelves
Modelfeaturesglass shelves.Shelvesadjust upordown
tomeetindividual storageneeds. Shelveshold simple
spillsforeasier cleaning.
Toavoidpersonalinjuryor propertydamage, handle
temperedglassshelves carefully. Shelvesmay break
suddenly if nicked, scratched, or exposed to sudden
temperaturechange.
• Removeshelvesby lifting front,releasing hooks
from metal track then pulling out.
• Replace shelves by inserting hooks into metal track
andlowering front.
Shelves
Controls
Thisrefrigeratoris designedto operate atnormal
householdtemperaturesof 55°to 110°F (13°to43°C).
Refrigerator and Freezer Controls
Refrigeratorand freezercontrolsarelocatedon upperrear
wallofrefrigeratorsection.
A
B
A. Freezer control
B. Refrigerator control
Controls
Whenfreezercontrol is setto
off
,neitherrefrigerator nor
freezer sections will cool. Initially, set both controls to
4
.
Wait24hours forrefrigeratorand freezersectionsto
reach desired temperatures. 1 is warmest setting and 7 is
coldest.
Setting Controls
Set controls with a household thermometer that includes
temperaturesbetween -5°–50°F(-21°–10°C).
Putthermometersnugly betweenfrozenpackages in
freezersection.Wait 5–8 hours.If freezer temperatureis
not0°–2°F(-17°– -16°C), adjustcontrol, 1 numberata
time.Checkagain after 5–8hours.
Put thermometer in a glass of water in middle of
refrigeratorsection.Wait5–8hours. Ifrefrigerator
temperatureisnot 38°–40°F(3°–4°C),adjust control,1
number at a time. Check again after 5–8 hours.
CAUTION
!
CAUTION
!

7
Deli Fresh Drawer
• Removedrawerby liftingand pulling out.Remove shelf
by lifting front, releasing hooks from metal track then
pullingout.
• Replace shelf by inserting hooks into metal track and
loweringfront.Replace drawer byslidingin.
Crisper Drawers
Crisperdrawerskeepproducefresh longer. Wrapproduce
tightly. Do not wash produce before placing in crispers.
Excess moisture could cause produce to spoil
prematurely. Donotline crispers withpapertowels. Paper
towels will retain moisture.
Crisperdrawercontrol islocatedbelow frontshelftrim.
Control adjusts humidity in crispers. Slide control to
high
for produce with leaves such as lettuce, spinach or
cabbage. Slide control to
low
for produce with skins such
ascauliflower, cornortomatoes.
Toavoidpersonal injuryor propertydamage, handle
temperedglassshelves carefully. Shelvesmaybreak
suddenly if nicked, scratched, or exposed to sudden
temperaturechange.
Crisper Drawer
Removecrispersby completingthefollowing steps.
1. Removecrisperdrawer bypulling outthenlifting front
upward.
2. Removecrispershelf bylifting front ofshelf while
supportingunderneaththenpullingout.
3. Replacecrispersand shelfbyreversing steps1–2.
CAUTION
!
Covered Storage Bucket
Storage bucket has a lid and removable egg tray. When
tray is removed, bucket will accept items such as a
standard egg carton, ice, etc.
A
B
C
A. Lid B. Egg tray
C. Storage bucket
Storage Bucket
Dairy Center
Dairycenterprovides convenientstorage foritemssuch
as butter, cheese, etc.
DairyCenteris adjustable toaccommodate storage
needs.DairyCenter mayalsobe removedforcleaning. To
removeDairy Centerperformthefollowingsteps:
• RemoveDairyCenter coverby openingcover. Push
coverinwardat pivot points andpullcover out. LiftDairy
Centerupand pull out toremove.
• ReplaceDairyCenter byreversing procedure.
Dairy Center

8
BeverageChillerCompartment positionis adjustableto
accommodatestorageneeds. Itmayalso beremovedfor
cleaning.ToremoveBeverageChillerCompartment
performthefollowingsteps:
• Grasp Compartment by sides lift up and pull out to
remove.
• To replace,slideCompartment betweendesiredshelf
rails in door liner and push down into place.
• If door track is cleaned, door track must be lubricated
withpetroleumjelly for properoperationof chiller door.
Important
Forproper operationofBeverageChiller
Compartment, one of the 3 cold air intake holes must
line up with notch in right door dike.
A
B
C
D
E
A. Door liner shelf rail
B. Notch in door dike must line up with one of Beverage Chiller
Compartment cold air intake holes.
C. Flange
D. Beverage Chiller Compartment
E. Beverage Chiller Door tract
Beverage Chiller Compartment
Door Buckets and Shelves
Doorbucketsadjust to meetindividual storage needs.
• Removedoorbucketsby pushing bucketupand pulling
out.
• Replace door buckets by sliding bucket in between
shelf rails and pushing door bucket down into place.
Snack Shelf
Snackshelfprovides convenientstoragefor smallitems
and snacks.
To remove snack shelf lift up and pull out. Replace snack
shelfbysliding inabovedesired supportrailand pushing
downintoplace.
Snack Shelf
Beverage Chiller Compartment
BeverageChiller Compartmentkeepsbeveragesupto5°F
(3°C)colderthan refrigerator section.Air inlet allowsair
from freezer section to pass to beverage chiller. Air inlet is
locatedoninteriorwallof refrigeratordoor.
Thecompartmentcontrol is locatedonleft front wallof
refrigeratorsection.Control adjustsamount of air
circulatinginbeverage chiller.Turncontrol to
cold*
for
normalrefrigerator temperatureandto
colder**
for colder
temperature.
A
B
A. Refrigerator section left front wall
B. Temperature control
Beverage Chiller Compartment control

9
Door Buckets
Tall Package Retainer
Tall package retainer keeps tall items secure. Retainer fits
inanydoor bucket.Tallpackage retainersinrefrigerator
doorshelvesareadjustablefor twodifferent heights.
To install, insert tall package retainer in holes in each side
ofdoorbucket or shelffront.
• Install tall package retainer with knobs on retainer
facingoutwardfortall setting.
• For lower setting, install tall package retainer with
knobs on retainer facing inward. Knobs slide into slots
in retainer holes on inside front of bucket.
A
A. Tall package retainer
Tall package retainer installation
CAUTION
!
CAUTION
!
Freezer Features
To avoidpropertydamage, confirmshelf issecure
beforereplacingitems onshelf.
Automatic Ice Maker
• Confirm ice bucket is in place and ice maker arm is
down.
A
B
A. Off position B. On position
Ice maker operation
• Afterfreezersection reaches normaltemperature,ice
maker fills with water and begins operating. Allow
24–48hoursafter installation beforefirstharvest of ice.
Ice maker produces 7– 9 harvests of ice in a 24-hour
periodunderideal conditions.
• After ice is formed, ice maker drops ice cubes into
ice storage bucket. During ice production, ice maker
arm raises and lowers. When ice storage bucket is full,
ice maker arm turns ice maker off. Discard first 3
harvestsofice after initially connectingrefrigeratorto
householdwatersupply and afterextended periods of
nonuse.
• Stop ice production by raising ice maker arm. A
definite click is heard when proper position is
reached. Ice maker arm will remain in
off
position until
pusheddown.
To avoiddamagetoicemaker,observe thefollowing:
• Do not force ice maker arm down or up.
• Do not place or store anything in ice storage bucket.

10
Ice and Water Dispenser
Toavoidpersonalinjuryorpropertydamage, observe
followinginstructions:
• Donotoperatedispenserwith freezerdoor open.
• Do not put fingers, hands, or any foreign object into
dispenseropening.
• Do not use sharp objects to break ice.
Water Dispenser Operation
It takes approximately 1 minute after initially pressing
dispenserbarbefore waterdispenses afterinitial
connectionofwater supply. Discardfirst10–14 containers
ofwaterafter initiallyconnecting refrigeratortohousehold
watersupplyand afterextended periods ofnonuse.
• Dispense water by pressing sturdy wide mouthed
containeragainstwater dispenser bar.
• Stop water dispensing by releasing pressure on bar. A
small amount of water may continue to fall. Spill shelf
is not self-draining. Large spills should be wiped dry.
Ice Dispenser Operation
To avoidpropertydamage, donotdispense ice directly
into thin glass, fine china, or delicate crystal.
• Select cubed or crushed mode by sliding lever on
dispenser panel. Dispense ice by pressing wide
mouthedcontaineragainst ice dispenser bar.
Important
Reduce spraying of crushed ice by holding wide
mouthed container directly under ice chute and as
high as possible in dispenser area.
Cup placement in dispenser
• Stop ice dispensing by releasing pressure on bar
before container is full. Some ice will continue to fall.
Do not remove container until last of ice falls.
Freezer Shelves
Wire baskets slide out for easy access of items in back
andwireshelves (somemodels) canberearranged to
meetindividual storageneeds.
• Removebasketsbypulling out andlifting.Replace
baskets by placing baskets on side rails, slide baskets
right and back until round knob is behind stop on rail.
• Remove shelf by lifting right side of shelf out of clips
andpullingout of left sidemountingholes. Reverse
proceduretoreinstall shelf.
A
B
A. Wire shelves B. Wire baskets
Freezer baskets and shelf
CAUTION
!
CAUTION
!

11
If dispensing ice continuously, dispenser motor is
designed to shut off after 3 to 5 minutes. Motor resets
after3minutes and dispensingcancontinue.
A slight delay occurs when switching between cubed and
crushed modes. Pieces of crushed ice will vary in size
and shape. "Snow" may form on door and ice chute when
repeatedly dispensing crushed ice. Allow "snow" to
evaporateor wipedry.
Dispenseroperatesonly with cubesof proper sizeand
crescent shape. Do not add purchased ice cubes or other
shaped cubes to ice bucket.
Removing Ice Bucket
• Remove ice bucket by lifting bucket and pulling out.
• Replace ice bucket by sliding in until bucket locks in
place. Ice bucket must be locked in place for proper
ice dispensing. If freezer door does not close, bucket is
notinproper location.
Dispenser Light
A light is activated when dispensing ice or water.
Taste and Odor
Observethefollowing tominimizetaste andodor
difficulties:
• Wrap foods in tightly sealed containers or moisture
proofbags.
• Contact local water treatment company for
specialized help if difficulties persist.
• See
Water Filtration System Installation and Operating
Instructions
forreplacement procedure.

12
Glass Shelves
Toavoidpersonal injuryor propertydamage,handle
temperedglassshelves carefully. Shelvesmaybreak
suddenly if nicked, scratched, or exposed to sudden
temperaturechange.
Removeshelfby liftingfront,releasing hooksfrommetal
track then pulling out. Place shelf on a towel. Allow shelf
toadjustto roomtemperaturebefore cleaning.
Cleancrevicesby completing thefollowing steps:
1. Dilutemilddetergent andbrushsolution intocrevices
using a plastic bristle brush. Let set for 5 minutes.
2. Spraywarmwater into crevicesusing faucet spray
attachment.
3. Dryshelfthoroughly andreplaceshelf byinserting
hooks into metal track and lowering front.
Care and Cleaning
To avoidelectricalshock whichcancause severe
personalinjuryor death, disconnectpower to
refrigeratorbefore cleaning.Aftercleaning,connect
power.
Toavoidpersonal injuryor propertydamage, readand
followallcleaningproductmanufacturer's directions.
General
1. Wash surfaces with 4 tablespoons baking soda
dissolvedin1quart warm wateranda soft, clean
cloth.
2. Rinsesurfaceswith warm water.Drysurfaces with a
soft, clean cloth.
• Do not use the following items:
- abrasiveorharshcleaners,ammonia, chlorine
bleach, etc.
- concentrateddetergentsorsolvents
- metalscouringpads
These items can scratch, crack and discolor
surfaces.
• Do not place buckets, shelves, etc. in dishwasher.
Odor Removal
1. Removeall foodanddisconnectpowertorefrigerator.
2. Cleanallinterior surfacesincludingceiling, floor,and
walls according to “General” instructions. Pay special
attentiontocorners, crevices,andgrooves. Includeall
drawers,shelves,and gaskets.
3. Connectpower torefrigeratorandreturnfood to
refrigerator. Washand dry allbottles,containers and
jars. Wrap foods in tightly sealed containers to
preventfurtherodor. After24 hours,checkif odorwas
eliminated.
Completethefollowing steps ifodorwas not eliminated.
4. Completesteps1–2.
5. Placecrisperdrawers ontop shelf ofrefrigerator
section.Packrefrigerator andfreezersections
including doors with crumpled sheets of black and
whitenewspaper.
6. Placecharcoalbriquettes randomlythroughout
newspaper.
7. Closedoorsand letstand24–48 hours.
8. Removecharcoal briquettesand newspapers.
9. Completesteps2–3.
If odor was still not eliminated, contact dealer.
Adhesives
1. Removeglueresiduebyrubbing toothpasteinto
adhesivewith fingersuntiladhesiveloosens.
2. Rinsesurfacewith warm water.Dry surface witha
soft, clean cloth.
Door Gaskets
1. Keep gaskets clean at all times. Clean door gaskets
thoroughlyevery3monthsaccording to“General”
instructions.
2. Apply a light film of petroleum jelly to hinge side of
door gasket to keep gaskets pliable.
Condenser Coils
Cleancondensercoil every 3months to ensuremaximum
performanceofrefrigerator. Accumulated dustandlint
maycausethe following:
• reducedcooling performance
• increasedenergy usage
• prematurecompressor failure
1. Removetoegrillebyholding endsand pullingforward.
2. Cleanfrontsurface ofcondenser coil witha vacuum
cleanerhosenozzle.
3. Replace toe grille by inserting clips in holes and
snappingin.
To avoidpropertydamage, protectsoft vinylorother
flooringwithcardboard,rugs,or otherprotective
material.
4. Pullrefrigeratorawayfromwall. Runa vacuum
brush across condenser fan outlet grille on back
ofrefrigerator.
WARNING
!
CAUTION
!
CAUTION
!
CAUTION
!

13
Light Bulbs
To avoidelectricalshock whichcancause severe
personalinjuryor death, disconnectpower to
refrigeratorbefore replacinglightbulb.Afterreplacing
lightbulb,connect power.
Toavoidpersonalinjuryorpropertydamage, observe
thefollowing:
• Allow light bulb to cool.
• Weargloveswhen replacinglight bulb.
Refrigerator section
• Removelightbulb cover byremoving¼" (6 mm)hex
nutscrews.Replacebulb with 40-wattappliancebulb.
• Replace light bulb cover by replacing ¼" (6 mm) hex
nut screws.
A
B
A. Light bulb cover B. Light bulb
Refrigerator light bulb removal
Freezer section
1. Remove ice bucket by lifting bucket and pulling out.
2. Removelight bulbcoverbyremovingscrew.Replace
bulbwith40-watt appliancebulb.
3. Replacelightbulbcoverby holdingcover inplaceover
light bulb. Insert and tighten screw.
4. Replace ice bucket by sliding in until bucket locks in
place.
A
B
A. Light bulb cover B. Light bulb
Freezer section light bulb removal
Ice and Waterdispenser
Lightbulbis located between dispenserarms.
• Removelightbulb by unscrewinglightbulb. Replace
light bulb with a 6-watt, 120-volt bulb.
• Replace light bulb by inserting and tightening bulb.
Dispenser light bulb replacement
CAUTION
!
WARNING
!

14
Normal Operating Sounds
Thisnewrefrigeratormaybe replacinga differently
designed,lessefficientorsmaller refrigerator.Today’s
refrigeratorshave newfeatures andare moreenergy
efficient. As a result, certain sounds may be unfamiliar.
Thesesoundsare normalandwill soonbecomefamiliar.
Thesesoundsalso indicaterefrigerator isoperatingand
performingas designed.
1. Freezer control clicks when starting or stopping
compressor.
2. Freezer fan air rushes and whirs.
3. Sealed system (evaporator andheat exchanger)
refrigerantflowgurgles, popsor sounds likeboiling
water.
4. Defrost heater sizzles, hisses or pops.
5. Condenser fan air rushes and whirs.
6. Compressor hasahigh pitchedhumor pulsating
sound.
7. Ice cubes from ice maker (some models) drop into
ice bucket.
8. Defrost heater sizzles, hisses or pops.
Ice auger (Ice ‘N’ Water™Dispenser models) hums
as auger agitates ice during dispensing. Ice auger is
locatedinfreezer door.(notshown)
Ice maker water valve hookup buzzes when ice
maker fills with water. This occurs whether or not
refrigeratorisconnected towater supply. Ifrefrigerator
is not connected to water supply, stop sound by
raisingicemaker arm tooff position. Watervalve
hook up is located in back, bottom, left hand corner.
(notshown)
Foaminsulationis veryenergyefficient andhas
excellentinsulatingcapabilities.However, foam
insulation is not as sound absorbent as previously
usedfiberglassinsulation. (notshown)
71
2
3
4
5
6
8
Sound location

15
Before Calling For Service
Refrigeratordoes notoperate.
• Confirmfreezercontrol is on.
• Confirmrefrigeratoris pluggedin.
• Check fuse or circuit breaker. Plug in another item at
that wall outlet.
• Wait 40 minutes to see if refrigerator restarts. If
freezer control is on, lights work but 2 fans and
compressorarenot operating, refrigeratormaybe in
defrost cycle.
Refrigeratorstillwon’toperate.
• Unplugrefrigerator. Transfer foodto anotherunit
or place dry ice in freezer section to preserve food.
Warranty does not cover food loss. Check warranty
certificateforspecific coverage.
• Call612-941-2270 tolocate an authorized servicer.
Foodtemperature appearstoowarm.
• Seeabovesections.
• Allow time for recently added warm food to reach
refrigeratoror freezertemperature.
• Check gaskets for proper seal.
• Cleancondensercoils.
• Adjustrefrigeratorand/or freezercontrol.
• Confirm rear air grille is not blocked. Rear air grille is
locatedbehindgarden freshcrisper.
Food temperature is too cold.
• Cleancondensercoils.
• Adjustrefrigeratorcontrol.
• Adjust freezer control to warmer setting. Allow several
hoursfortemperature to adjust.
• One of 3 cold air intake holes in beverage chiller
component is not aligned with notch in right side door
dike.
Refrigeratorruns toofrequently.
• It may be normal to maintain constant temperature.
• Doorsmayhave beenopenedfrequently orforan
extendedperiodof time.
• Allow time for recently added warm food to reach
refrigeratoror freezertemperature.
• Cleancondensercoils.
• Adjustfreezercontrol.
• Check gaskets for proper seal.
Water dropletsform oninsideof refrigerator.
• It is normal during high humidity periods or if doors
havebeen openedfrequently.
Water dropletsform onoutsideof refrigerator.
• Checkdoorgasketsfor proper seal.
Crisperdrawersdo notclosefreely.
• Checkfora package whichmay prevent drawer from
closingproperly.
• Confirmdraweris in properposition.
• Cleandrawerchannels with warm,soapywater. Rinse
anddrythoroughly.
• Apply a thin layer of petroleum jelly to drawer
channels.
• Confirmrefrigerator islevel.
Refrigeratorhas anodor.
• See“OdorRemoval” instructionsin “Care andCleaning”
section.
Refrigeratororice makermake unfamiliarsoundsor
seems too loud.
• Itmaybe normal. See “NormalOperatingSounds”
section.
Ice maker is not producing ice.
• Confirm ice maker arm is down.
• Confirmhouseholdwater supply isreaching water
valve.
• Confirm ice maker wiring harness is completely
insertedintoproper holes.
• Check for kinks in copper or plastic tubing.
Removekinksor replace tubing.
• Checkelectricalconnectionsto water valvecoiland
connectorblockon refrigerator cabinet.
• Confirmfreezersection is operatingatproper
temperature.
Icecubeshaveanodor.
• See“OdorRemoval” instructionsin “Care andCleaning”
section.
• Discard ice and clean ice bucket or trays more
frequently. Ice cubesareporous and absorbodors
easily.
Ice cubes stick together or ‘shrink’.
• Empty ice cube bucket or trays more frequently.
If used infrequently, ice cubes may stick together or
shrink.
Ice forms in inlet tube to ice maker.
• Checkwaterpressure. Low water pressurewill
causevalveto leak.Self-piercingvalves causelow
water pressure. Manufacturer recommends using
copper tubing to connect household plumbing to
refrigerator. Do not use self-piercing valve.
Manufacturer is not responsible for property
damage due to improper installation or water
connection.

16
Energy Tips
Thisrefrigeratoris designed tobeone of themost energy
efficientrefrigeratorsavailable.Reduceenergy useby
observingthe following.
• Operateinnormal household temperatures of
55°–110°F(13°–43°C)away fromheatsources and
direct sunlight.
• Setrefrigeratorand freezer controlsnocolder than
necessary.
• Keep freezer section full.
• Keep door gaskets clean and pliable. Replace gaskets
ifworn.
• Keep condenser coils clean.
Vacation Tips
Completethefollowing stepsforshort vacations.
1. Remove perishable foods. Warranty does not cover
food loss. Check warrantycertificate for specific
coverage.
2. If an ice maker is installed, move ice maker arm up,
tooffposition.
Completethefollowing stepsfor longvacations.
1. Emptyrefrigeratorand freezersections.
2. Unplugrefrigerator.
3. Cleanrefrigeratoranddoorgaskets accordingto
“General”instructionsin“Careand Cleaning”section.
4. Prop doors open, so air can circulate inside.
5. If an ice maker is installed, turn water supply to
refrigeratoroffand moveicemaker armup,to
off
position.

17
Warranty
Refrigerator
Full One Year Warranty
Full Five Year Warranty on Sealed System Components
and Food Compartment Liner
First Year
BroichEnterprisesInc. will repair orreplace,free of charge,anypart which is defectivedueto
workmanshipormaterials.
Second through Fifth Year
BroichEnterprisesInc. will replace, freeofcharge, any sealedsystemcomponent (compressor,
condenser, evaporator,and interconnectingtubing)andrepairany foodcompartment liner
(exclusiveofdoor liner)whichis defectivedueto workmanship ormaterials.
Warranty Limitations
• Beginsatdate of originalpurchase.
• Applies to product used within the United
Statesorin Canadaifproduct hasappropriate
agencylistingswhen shipped from thefactory.
• Servicemustbe performedby anauthorized
Imperial®servicer.
Warranty Is Void If
• Serialplateis defaced.
• Product is used on a commercial, rental, or
leased basis.
• Producthasdefect or damagedueto product
alteration,connectionto animproper
electricalsupply, shippingandhandling,
accident,fire,flood, lightning, orother
conditionsbeyondthe control ofBroich
EnterprisesInc.
• Product is improperly installed or used.
Owner'sResponsibilities
• Provideproof ofpurchase(sales receipt).
• Providenormal careandmaintenance.
Replaceowner replaceableitemswhere
directionsappearinowner'smanual.
• Makeproductreasonably accessiblefor
service.
• Paypremiumservice costs forservice outside
servicer'snormalbusinesshours.
• Pay for service calls related to product
installation.
In no event shall Broich Enterprises, Inc. be
liable for incidental or consequential damages
including food loss.*
*Thiswarrantygives you specificlegalrights and you
may have others which vary from state to state. For
example, some states do not allow the exclusion or
limitationofincidental or consequentialdamages so
this exclusion may not apply to you.
Anyquestionsregarding the aboveor to locateanauthorized servicer,contact:
BroichEnterprises,Inc.
6440 City West Parkway
EdenPrairie,MN55344
612-941-2270
Mondaythrough Friday
8:30 a.m. through 4:30 p.m.
Centraltime

18
Installation Checklist
Consumer Installer
Doors
Doorsarealigned withtopand sideedgesof refrigeratorcabinet.
Doorssealcompletely torefrigeratorcabinet.
Handles are solidly attached to doors.
Ice and Water Dispenser Models
Ifdoorswere removedto installrefrigerator, tophinge wireconnectorsare
reconnected.
Leveling
Refrigeratorislevel sidetoside.
Toegrilleis properlyattachedto refrigerator.
Ice Maker
Watersupplyto refrigerator isturnedon.
Water leaks are not present at the following connections:
• Householdwater supply
•Ice and Water Dispenser Models
Bottomoffreezerdoorif doorswere removedtoinstall refirgerator
(After24hours, consumer should checkconnectionsfor water leaks.)
Ice maker arm is in on position for ice production. (It may take up to 24 hours for first
harvestof ice.)
Product Literature
Owner'smanual isreviewedincludingthefollowinginformation:
• Refrigeratorand Freezercontrols
• CrispersDrawers
• NormalOperating Sounds
Notes
Consumer's Signature Installer's Signature Installer's Company Name/Phone Number Date

19

20
Part No. 10602203 Printed in U.S.A. - 2/99
This manual suits for next models
1
Table of contents
Other Imperial Refrigerator manuals