impress IM-753B Installation instructions

READ AND SAVE THIS USE AND CARE BOOK
CONSERVER CE GUIDE D’ENTRETIEN ET D’UTILISATION
POR FAVOR LEA ESTE INSTRUCTIVO ANTES DE USAR EL PRODUCTO
MODEL NO IM-753B
CERAMIC HEATER WITH THERMOSTAT
RADIATEUR ELECTRIQUE SOUFFLANT
CALENTADOR DE ABANICO
®
Caution: This appliance should always be placed on a flat stable surface.

IMPORTANT SAFEGUARDS
1. Read all instructions before using this appliance.
2. The heater is hot when in use. To avoid burns,
do not let bare skin touch hot surfaces. If pro-
vided, use handles when moving this appliance.
Keep combustible materials, such as furniture,
pillows, bedding, papers, clothes, and curtains
at least 3 feet from the front of the appliance
and keep them away from the sides and rear.
3. Extreme caution is necessary when any heater is
used near children or individuals and whenever
the heater is left operating.
4. Always unplug heater when not in use, before
putting or taking off parts and cleaning.
5. Allow to cool before handling.
6. Do not operate the appliance with damaged
cord or plug. When dropped or damaged, return
appliance to authorized service facility for
examination, electrical or mechanical adjust-
ment or repair.
7. Do not use outdoors or for commercial
purposes.
8. This appliance is not intended for use in
bathrooms, laundry areas and similar indoor
locations.
9. Never place the appliance where it may fall into
a bathtub or other water container.
10. Do not run cord under carpet. Do not cover
cord with throw rugs, runners, or similar cov-
HULQJV$UUDQJHFRUGDZD\IURPWUDI¿FDUHDand where it will not be tripped over.
11. To disconnect the appliance, turn switch to off,
then remove plug from outlet.
2 English
WARNING
POLARIZED PLUG
This appliance has a polarized plug (one blade is wider than the other.) As a safety feature, this plug
¿WVLQWRDSRODUL]HGRXWOHWRQO\RQHZD\,IWKHSOXJGRHVQRW¿WLQWRWKHRXWOHWUHYHUVHWKHSOXJDQGWU\DJDLQ,ILWVWLOOGRHVQRW¿WWU\DGLIIHUHQWRXWOHW2WKHUZLVH\RXPD\QHHGWRFRQWDFWDTXDOL¿HGHOHFWUL-
cian to install compatible outlets.
POWER CORD
A short power supply cord is provided to reduce the risk of becoming entangled or snagged. Extension
cords may be used if care is exercised in their use. If an extension cord is used, the marked electri-
cal rating of the extension cord should be at least as great as the electrical rating of the appliance. The
extension cord should be arranged so that it will not hang over the countertop or tabletop where it can be
pulled on by children or pets, or tripped over.
12. Check if the electrical voltage of the main sup-
ply and the load of the socket match the rated
voltage and power marked on the rating label
of the appliance.
13. Do not insert or allow foreign objects to enter
any ventilation or exhaust opening as this may
FDXVHDQHOHFWULFVKRFN¿UHRUPD\GDPDJHthe heater.
7RSUHYHQWSRVVLEOH¿UHGRQRWEORFNDLUintakes or exhaust. Do not use on soft surfaces,
like a bed,where openings may become
blocked.
15. The appliance has hot parts inside. Do not use
LWLQDUHDVZKHUHJDVROLQHSDLQWRUÀDPPDEOHOLTXLGVDUHXVHGRUVWRUHG16. Use the appliance only as described in
thismanual. Any other use not recommended
E\WKHPDQXIDFWXUHUPD\FDXVH¿UHHOHFWULFshock, or injury to persons.
17. Avoid the use of an extension cord because the
extension cord may overheat and cause a risk
RI¿UH+RZHYHULI\RXKDYHWRXVHDQH[WHQ-
sion cord, it should have a minimun size of 14
AWG and rated not less than 1875 watts.
18. To protect against risk of electrical shock, do
not put the appliance, cord, plug, or the heat-
LQJHOHPHQWLQZDWHURURWKHUOLTXLG7KLVPD\cause personal injury and/or damage to the
product.
19. Using accessory attachments that are not
recommended by the appliance manufacturer
WKLVPD\UHVXOWLQ¿UHHOHFWULFVKRFNRULQMXU\to persons.
English 3
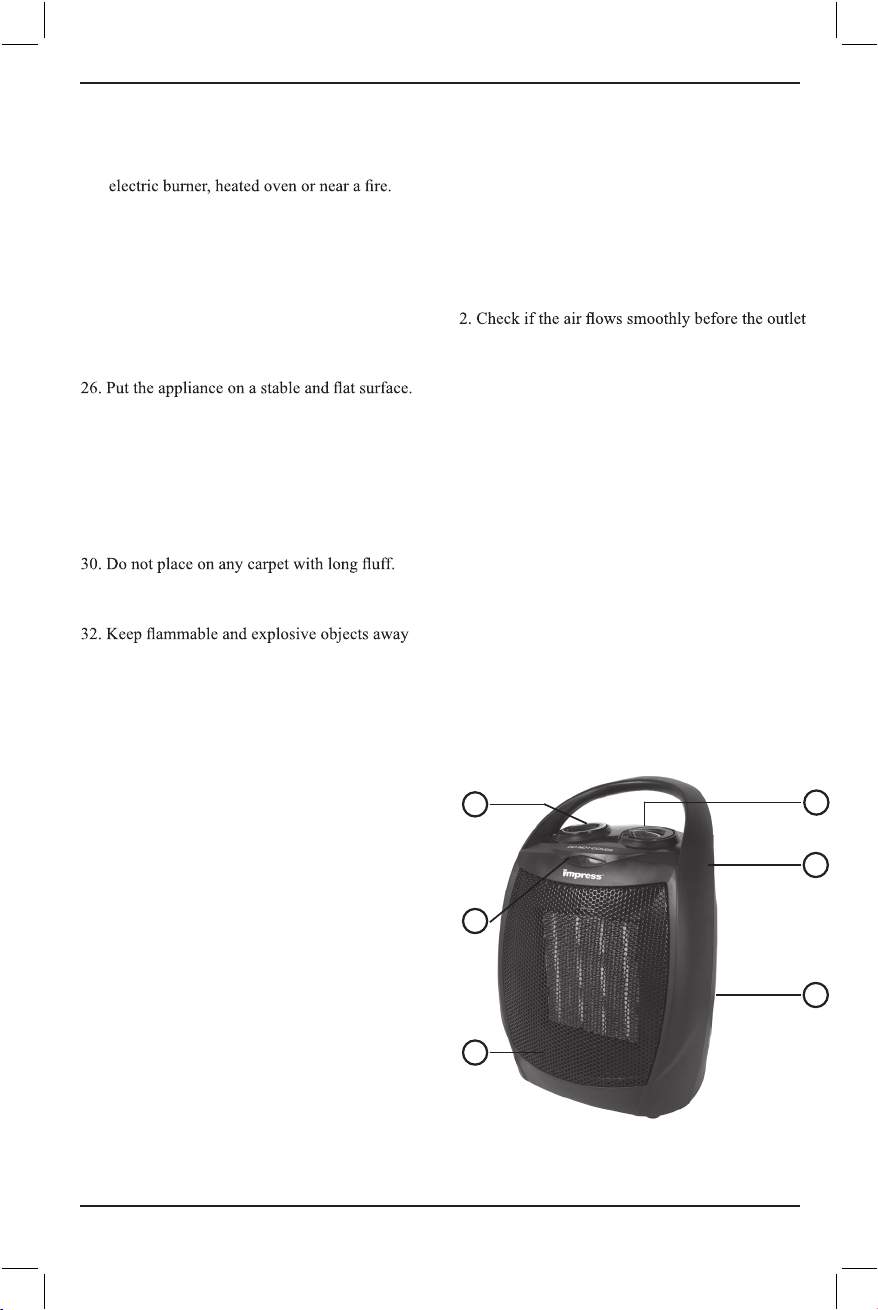
PARTS
1. Thermostat
2. Heat/ Fan select switch
3. Indicator light
4. Handle
5. Air outlet (always faces front)
6. Air inlet
20. Do not let cord hang over edge of table or
counter, or touch hot surfaces, including the
stove.
21. Do not place the appliance on or near hot gas,
22. Do not use the appliance for other than its
intended use.
23. Do not use the device with wet or moist hands
24. Always attach plug to appliance and check that
the switch is on “0” before plugging cord into
wall outlet.
25. Check if the socket and the plug are not dam-
aged and put the plug well in the socket.
27. Be sure that there is enough space for the
fan heater while operating, at least 24 inches
around the appliance, and 4 feet in front of the
air outlet.
28. Don’t cover the fan heater at any time when
operating.
29. Do not hang on the wall.
31. Do not put the appliance below an electrical
socket.
from the heater.
33. In case of malfunction or abnormal operation,
don’t attempt to open or repair the appliance at
home, take the heater to an appointed service
agent for inspection and repair.
OVERHEAT SECURITY SYSTEM
To avoid risk to individuals or damage to internal
components, the fan heater has a security
system. If overheating occurs:
1. Turn the Heat/Fan Select switch to “O” position,
and the Thermostat Switch to minimal position.
Remove the plug from the socket.
and inlet, and if the appliance is placed in the
right position.
3. Let the fan heater cool down for 8 to 10 minutes
before switching it on again.
4. Plug in the appliance and switch it on. If the
appliance can’t operate normally, remove the
plug immediately from the socket and have
the fan heater serviced by an appointed service
technician only.
This unit employs a safety tip-over protection circuit.
If for any reason the heater falls over or is knocked
over, a pressure-sensitive switch at the bottom of the
unit will activate and cut off power to the heater.
Once the heater is repositioned in an upright
position on a flat surface, the tip-over switch will
be de-activated and the unit will begin to function
again.
TIP OVER PROTECTION CIRCUIT
SAVE THESE
INSTRUCTIONS
HOUSEHOLD
USE ONLY
1
3
5
6
4
2

4 English
TO USE
PREPARATION BEFORE USE
•Check if the electrical voltage of the main
supply and the load of the socket match the
rated voltage and power marked on the rating
label of the appliance.
•Check if the socket and the plug are undam-
aged, and put the plug well in the socket.
•
•Be sure that there is enough space for the
fan heater while operating, at least 24 inches
around the appliance, and right before the air
outlet, the distance should be at least 4 feet.
1. Turn the Thermostat Switch to the minimal
value, at the same time turn the Heat/Fan Select
Switch to the “O” position.
2. Plug in the appliance, and turn the Thermostat
Switch to the maximum position. Then turn
the Heat/Fan Select Switch to choose from Air,
Warm Air. While running, the indicator light
will be on.
2.1 Turn the Heat/Fan Select switch to “ “
position, and the heater will blow cool air.
2.2 Turn the Heat/Fan Select switch to “I”
position, and the heater will blow warm air,
working at 750W.
2.3 Turn the Heat/Fan Select switch to “II”
postion, and the heater will blow warm air,
working at 1500W.
2.4 Turn the Heat/Fan Select switch to “O” posi-
tion, and the heater will stop working. The
indicator light will switch off too.
3. Adjust the Thermostat Switch to a suitable posi-
tion for desired temperature setting.
3.1 Check if the Thermostat Switch is on the
maximum position.
3.2 When you feel the room temperature
comfortable, turn the Thermostat Switch
counter-clockwise slowly to the minimal
position until the appliance stops running.
The Thermostat Switch will keep the room at your
desired temperature automatically. You can also
turn the Thermostat Swith counter-clockwise to
the minimum position to the lower temperature.
If turned clockwise to maximum position, the
temperature will be higher.
CLEANING &
MAINTENANCE
1. Before you turn off the appliance, turn the Heat/
Fan Select Switch to the “ “ position for 1 to
2 minutes to lower the internal temperature of
the heater, then turn the Heat/Fan Select switch
to “O” position to switch it “off”.
2. Before you clean the appliance, turn off the
and wait until the appliance cools down
3. Clean the air inlet and outlet of the appliance
regularly (at least twice a year normally).
4. Use a dry cloth to clean the heater’s surface and
dry the appliance before using or storing.
NOTE: There may be a slight smell of smoke
during first use. This is due to possible
cardboard dust on the element. The odor
should stop after a couple of minutes of use.

Length of Warranty
1 year from date of purchase
Within 1 year from date of purchase,
1) Return product to place of purchase (if
your dealer allows)
OR
2) Send product postage pre-paid to:
I.E.A.C.
3030 East Vernon Avenue
Vernon, California, USA 90058
Please include original dated receipt, explana-
tion of defect and return name and address as
well as a contact phone number.
We will, within 10 days of receiving your
product, return a new or refurbished (at our
We will also return your receipt. If product
is found to be in working condition, we will
return product postage collect.
We will not be responsible for damages in-
curred as a result of improper packing.
Or contact us via e-mail at
English 5

6 Français
AVERTISSEMENT
&216,*1(6'¶87,/,6$7,21(7'¶(175(7,(1/LUHWRXWHVOHVLQVWUXFWLRQVDYDQWG¶XWLOLVHUFHWappareil.
/RUVTX¶LOHVWHQPDUFKHOHVVXUIDFHVGHl’appareil sont chaudes. Pour éviter les brûlures,
empêcher tout contact entre la peau nue et
les surfaces chaudes. S’il y en a, se servir
des poignées pour déplacer l’appareil. Tenir
à une distance d’au moins 90 cm / 3 pieds du
devant et à distance des côtés et de l’arrière de
O¶DSSDUHLOWRXWPDWpULDXFRPEXVWLEOHWHOVTXHdes meubles, des oreillers, de la literie, des
papiers, des vêtements et des voilages.
,OIDXWUHGRXEOHUGHSUpFDXWLRQVORUVTX¶XQUDGLD-
teur est utilisé par ou à proximité d’enfants ou
GHSHUVRQQHVKDQGLFDSpHVHWTXDQGLOIRQFWLRQQHsans surveillance.
7RXMRXUVGpEUDQFKHUOHUDGLDWHXUTXDQGLOQHVHUWpas, avant d’y ajouter ou d’y enlever des pièces
et avant de le nettoyer.
/DLVVHUUHIURLGLUDYDQWGHOHPDQLSXOHU6. Ne pas utiliser l’appareil si le câble
G¶DOLPHQWDWLRQRXOD¿FKHVRQWHQGRPPDJpVRXsi l’appareil a mal fonctionné, est tombé ou a
été endommagé d’une manière ou d’une autre.
Rapporter l’appareil à un service clientèle agréé
SRXU\VXELUXQHYpUL¿FDWLRQXQHPLVHDXSRLQWpOHFWULTXHRXPpFDQLTXHRXXQHUpSDUDWLRQ1HSDVXWLOLVHUjO¶H[WpULHXURXjGHV¿QVFRP-
merciales.
8. Cet appareil n’est pas conçu pour être utilisé
dans des salles de bain, dans des buanderies
ni dans d’autres endroits semblables situés à
l’intérieur des habitations.
9. Ne jamais placer le radiateur à un endroit d’où
il peut tomber dans une baignoire ou dans tout
autre récipient pouvant contenir de l’eau.
10. Éviter de placer le cordon sous un tapis et de le
couvrir de tapis ni de tout autre objet similaire.
eORLJQHUOHFRUGRQGXSDVVDJHRLOULVTXHUDLWGHSURYRTXHUGHVFKXWHV11. Pour débrancher l’appareil, mettre la com-
mande sur la position «arrêt / off » avant
G¶HQOHYHUOD¿FKHGHODSULVH6¶DVVXUHUTXHODWHQVLRQVHFWHXUHWODFKDUJHGHla prise sont compatibles avec la tension et le
FRXUDQWPHQWLRQQpVVXUODSODTXHVLJQDOpWLTXHde l’appareil.
13. Ne pas insérer ou laisser tomber de corps
pWUDQJHUVGDQVOHVSULVHVG¶DLURXOHVRUL¿FHVG¶pYDFXDWLRQFHTXLSRXUUDLWSURYRTXHUXQFKRFpOHFWULTXHRXXQLQFHQGLHRXHQGRPPDJHUle radiateur.
3RXUSUpYHQLUWRXWULVTXHG¶LQFHQGLHQHSDVobstruer les entrées et les sorties d’air. Ne pas
utiliser sur des surfaces souples, comme un lit,
où les ouvertures pourraient être obstruées.
/¶DSSDUHLOFRPSRUWHGHVFRPSRVDQWVFKDXGVjl’intérieur et pouvant produire des arcs élec-
WULTXHVRXGHVpWLQFHOOHV1HSDVO¶XWLOLVHUGDQVdes zones d’usage ou de stockage d’essence,
GHSHLQWXUHRXGHOLTXLGHVLQÀDPPDEOHV1¶XWLOLVHUO¶DSSDUHLOTX¶DX[¿QVGpFULWHVGDQVce manuel. Tout autre usage non recommandé
par le fabricant pourrait causer un incendie, un
FKRFpOHFWULTXHRXGHVOpVLRQVFRUSRUHOOHVFICHE POLARISEÉ
/¶DSSDUHLOHVWPXQLG¶XQH¿FKHSRODULVpHXQHODPHSOXVODUJHTXHO¶DXWUH$¿QGHUpGXLUHOHVULVTXHVDGHVHFRXVVHVpOHFWULTXHVFHJHQUHGH¿FKHQ¶HQWUHTXHG¶XQHIDoRQGDQVXQHSULVHSRODULVpHSDUPHVXUHGHVpFXULWp/RUVTX¶RQQHSHXWLQVpUHUOD¿FKHjIRQGGDQVODSULVHLOIDXWWHQWHUGHODIDLUHDSUpVDYRLULQYHUVpOHVODPHVGHF{Wp6LOD¿FKHQ¶HQWUHWRXMRXUVSDVGDQVODSULVHLOIDXWFRPPXQLTXHUDYHFXQpOHFWULFLHQFHUWL¿p,OQHIDXWSDVQHXWUDOLVHUFHGLVSRVLWLIGHVpFXULWpCORDON
/DORQJXHUGXFRUGRQGHO¶DSSDUHLODpWpFKRLVLHDILQG¶HYLWHUOHVULVTXHVG¶HQFKHYrWUHPHQWHWGHWUpEX-
FKHPHQWTXHSUpVHQWHXQORQJFRUGRQ7RXWFRUGRQGHUDOORQJHG¶DXPRLQVDPSqUHVSHXWVHUYLUDXEHVRLQ/RUVTX¶RQXWLOLVHXQFRUGRQGHUDOORQJHV¶DVVXUHUTX¶LOQHWUDYHUVHSDVODVXUIDFHGHWUDYDLOQLTX¶LOSHQGGHIDoRQTX¶RQSXLVVHWUpEXFKHUGHVVXVSDULQDGYHUWDQFH0DQLSXOHUOHFRUGRQDYHFVRLQDILQd’en prolonger la durée; éviter de tirer dessus et de le soumettre à des contraintes près des prises ou des
connexions de l’appareil.
Français 7
33. En cas de dysfonctionnement ou de fonc-
tionnement anormal, ne pas essayer d’ouvrir
ou de réparer l’appareil à la maison, rapporter
le radiateur au service clientèle agréé pour y
CONSERVER CES
INSTRUCCIONES
POUR UNE UTILISATION
DOMESTIQUE
17. Éviter d’utiliser une rallonge à cause du
risque de surchauffe qui pourrait provoquer
un incendie. Cependant, si vous devez utiliser
une rallonge, la grosseur du câble doit être
au moins égale au calibre No 14 AWG et sa
puissance nominale ne doit pas être inférieure
à 1875 watts.
18. Pour éviter tout risque de choc électrique, ne
l’élément de chauffage dans l’eau ou tout autre
liquide, ce qui pourrait provoquer des lésions
corporelles et / ou des dommages matériels au
produit.
19. L’utilisation d’accessoires non recommandés
par le fabricant de l’appareil peut causer un
incendie, un choc électrique ou des lésions
corporelles.
20. Ne pas laisser le câble d’alimentation pendre
d’une table ou d’un plan de travail ni toucher
des surfaces chaudes, y compris le plan de
cuisson.
21. Ne pas placer l’appareil sur ou près d’un
brûleur d’une cuisinière à gaz ou électrique ou
dans un four chaud ou près d’un feu.
22. Ne pas utiliser l’appareil pour toute autre
utilisation non prévue.
23. Ne pas utiliser l’appareil avec les mains mouil-
lées ou humides.
24. Si possible, toujours brancher le cordon
d’alimentation à la machine d’abord et
s’assurer que la commande est sur position “0”
avant de brancher le câble d’alimentation dans
la prise murale.
la prise.
d’éviter tout risque de chute.
27. S’assurer qu’il y a assez d’espace pour le bon
moins 50 cm autour de l’appareil et que, juste
devant la sortie d’air, il y a un espace d’au
moins 120 cm.
-
dant son fonctionnement.
29. Ne pas l’accrocher au mur.
30. Ne pas l’utiliser sur un tapis à poils longs.
31. Ne pas placer l’appareil directement sous une
prise électrique.
distance du radiateur.
SYSTÈME DE SÉCURITÉ
Pour éviter tout risque de dommage corporel ou
système de sécurité qui éteindra automatiquement
l’appareil si la chaleur atteint les limites de sécu-
rité. En cas de surchauffe:
1. Tourner le bouton de sélection de température
en position “O”, tourner le bouton du thermostat
d’alimentation de la prise.
2. S’assurer que l’air circule normalement devant
la sortie et l’entrée et que l’appareil est bien
positionné. Sinon, remettre tout en ordre avant
de remettre l’appareil en marche.
à 10 minutes avant de le remettre en marche.
4. Brancher l’appareil et remettre en marche. Si
l’appareil ne fonctionne pas normalement, -
médiatement de la prise et reporter le radiateur
d’un service clientèle agréé.
PROTECTION ANTI-BASCULEMENT
Cet appareil utilise un circuit de protection anti-
basculement. Si pour quelque raison ce radiateur
tombe ou est renversé, un interrupteur sensible à la
pression en bas de l'appareil s'activera et coupera
son alimentation électrique. Aussitôt que l'appareil
est repositionné en position verticale sur une surface
plate, la protection anti-basculement sera désactivé
et l'unité recommencera à fonctionner à nouveau.
8 Français
UTILISATION
PRÉPARATION AVANT LA MISE
EN MARCHE
•S’assurer que la tension secteur et la charge
de la prise sont compatibles avec la tension et
le courant mentionnés sur la plaque signalé-
tique de l’appareil.
•
la prise.
•d’éviter tout risque de chute.
•S’assurer qu’il y a assez d’espace pour le bon
moins 50 cm autour de l’appareil et que, juste
devant la sortie d’air, il y a un espace d’au
moins 120 cm.
1. Positionner le bouton du thermostat en position
minimale, en même temps tourner le bouton de
sélection de température en position “O” (voir
2. Brancher l’appareil et tourner le bouton du
thermostat en position maximale. Puis tourner le
bouton de sélection de température pour choisir
air froid ou air chaud et la température de l’air
chaud comme indiqué ci-dessous. Pendant le
fonctionnement, le voyant lumineux sera allumé
2.1 Tourner le bouton de sélection de tempéra-
l’air froid.
2.2 Tourner le bouton de sélection de tempéra-
l’air chaud et fonctionne à 750W.
2.3 Tourner le bouton de sélection de tempéra-
warm air, fonctionne à 1500W.
2.4 Tourner le bouton de sélection de tempéra-
ture en position “O”, le radiateur s’arrête, le
voyant lumineux s’éteindra.
3. Régler le bouton du thermostat à la bonne posi-
tion pour la température voulue.
3.1 S’assurer que le bouton du thermostat est en
position maximale.
3.2 Une fois atteint le niveau de confort voulu,
tourner le bouton du thermostat dans le sens
contraire aux aiguilles d’une montre lente-
ment jusqu’à la position minimale jusqu’à ce
que l’appareil s’arrête de fonctionner.
3.3 Puis le bouton du thermostat maintiendra
automatiquement la pièce à la température
voulue.
3.4 Vous pouvez également tourner le bouton
du thermostat dans le sens contraire aux
aiguilles d’une montre jusqu’à la position
minimale ou tourner le bouton du thermo-
stat dans le sens des aiguilles d’une montre
jusqu’à la position maximale pour baisser ou
augmenter la température.
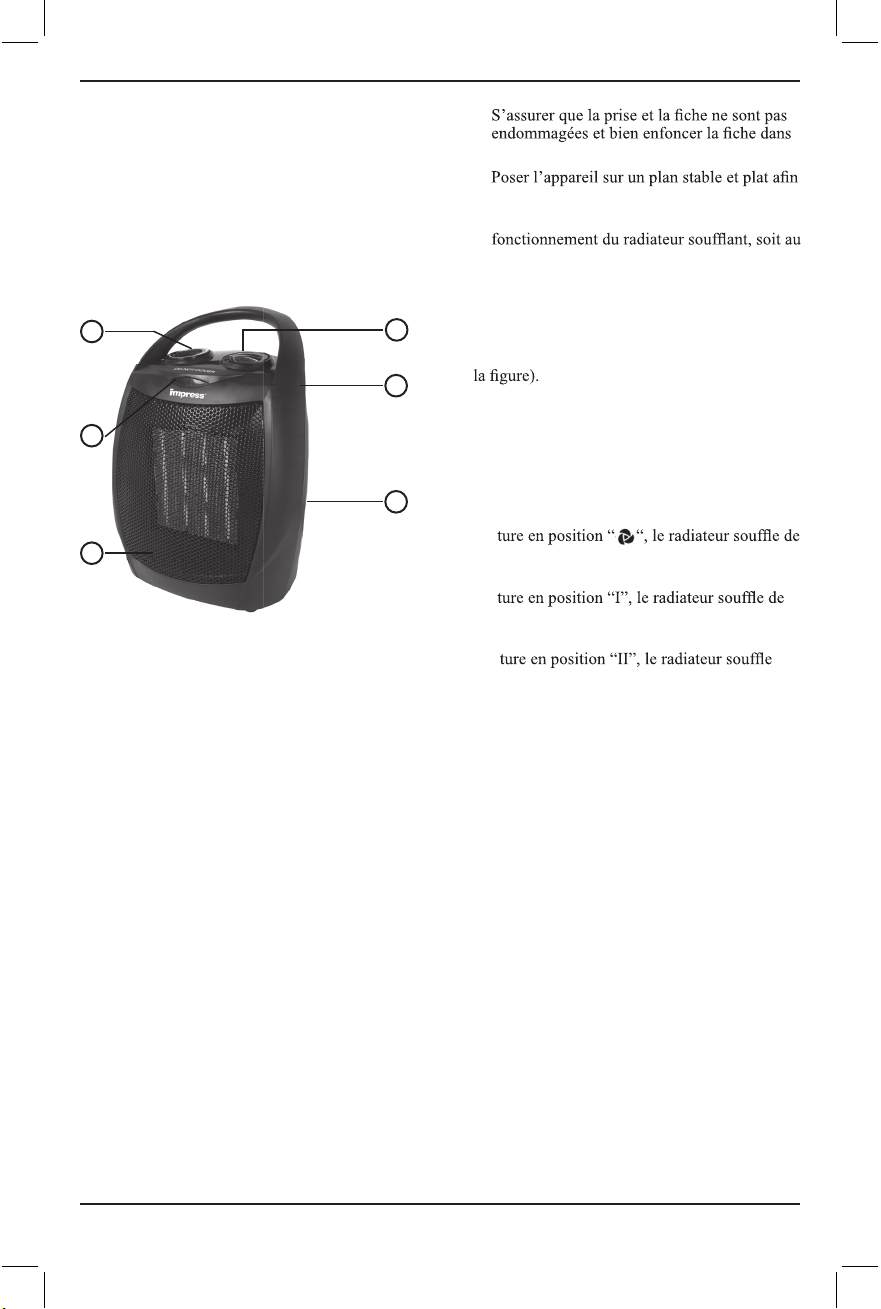
PIÈCES
1. Thermostat
2. Bouton de sélection de température
3. Voyant lumineux
4. Poignée
5. Sortie d’air
6. Entrée d’air
1
3
5
6
4
2
NOTE: Il peut y avoir une légère odeur de fumée
lors de la première utilisation. Ceci est possiblement
dû a de la poussière de carton sur l'élément. L'odeur
doit s'arrêter après quelques minutes d'utilisation.
Français 9
OPTIONS DE
Durée de la Garantie
Une année depuis la date d’achat pendant une
(1) année
(1) Depuis la date d’achat,
1) Retournez le produit au lieu d’achat (si
votre agent commercial le permit)
OU
2) Envoyez le port du produit préalablement
payé à:
I.E.A.C.
3030 East Vernon Avenue
Vernon, California, USA 90058
l’exposition de l’imperfection et dévolution,
contacte.
Dans dix (10) jours à la réception du produit,
on retourne un produit nouveau ou réparé (à
produit est en bon état, on retournerait le port
payable du produit.
Nous ne sommes pas responsables sur dom-
ET ENTRETIEN
1. Avant d’éteindre l’appareil, tourner le bouton
de sélection de température en position “ “.
Après l’avoir fait marcher pendant 3 à 5 minutes
pour baisser la température interne de l’appareil,
tourner le bouton de sélection de température en
position “O”.
2. Nettoyer l’entrée et la sortie d’air de l’appareil
régulièrement (au moins deux fois par an nor-
malement).
3. Avant de nettoyer l’appareil, éteindre d’abord
4. Utiliser un chiffon sec pour nettoyer la surface
de l’appareil et sécher l’appareil avant de
l’utiliser ou de le ranger.
Ou contacter nous par courriel à

10 Español
,16758&&,21(63$5$(/862<&8,'$'2PRECAUCION
ENCHUFE POLARIZADO
(VWDXQLGDGWLHQHXQHQFKXIHSRODUL]DGRHQHOTXHXQFRQWDFWRHVPiVDQFKRTXHHORWUR&RPRPHGLGDde seguridad, el enchufe puede introducirse en la toma de corriente polarizada solamente en un sentido.
6LHOHQFKXIHQRHQWUDHQHOFRQWDFWRLQYLpUWDOR6LD~QDVLQRVHDMXVWDEXVTXHODD\XGDGHXQHOHFWUL-
cista. Por ningún punto trate de alterar esta medida de seguridad.
EL CABLE ELECTRICO
(OFDEOHGHHVWDXQLGDGIXHVHOHFFLRQDGRFRQHOILQGHHYLWDUODSRVLELOLGDGGHTXHDOJXLHQVHHQUHGHRVHWURSLHFHHQXQRPiVODUJR'HVHUQHFHVDULDXQDH[WHQVLyQXVHXQFDEOHGHH[WHQVLyQHQOLVWDGRSR8/8QGHUZULWHUV/DERUDWRULHV120RXQRDSUREDGRSRUXQDDJHQFLDDSURSULDGD&XDQGRXVHXQFDEOHGHH[WHQVLyQQRSHUPLWDTXHFXHOJXHVREUHHOiUHDGHWUDEDMRSDUDHYLWDUTXHDOJXLHQVHWURSLFHHQHOODaccidentalmente.
/HDWRGDVODVLQVWUXFFLRQHVDQWHVGHXVDUHOaparato.
2. El aparato se calienta cuando esta siendo usado.
3DUDHYLWDUTXHPDGXUDVQRSHUPLWDTXHODSLHOWRTXHODVVXSHU¿FLHVFDOLHQWHV6LVRQSURYHt-
das, use las manillas cuando mueva el aparato.
Mantenga materiales combustibles, por ejemplo
muebles, almohadas, papel, ropa, ropa de cama,
y cortinas por lo menos 3 pies lejos de la parte
de enfrente del aparato y manténgalo lejos de
los lados y de las partes posteriores.
(VQHFHVDULRTXHWHQJDH[WUHPDGDPHQWHFXLGDGRcuando el calentador esta siendo usado cerca de
QLxRVRLQYiOLGRV\FXDQGRHOFDOHQWDGRUVHGHMDprendido y desatendido.
4. Siempre desenchufe el calentador cuando no
HVWDVLHQGRXVDGRDQWHVGHSRQHURTXLWDUSDU-
tes, y antes de limpiarlo.
3HUPLWDTXHVHHQIUtHDQWHVGHWRFDUOR6. No use el aparato cuando tenga la cuerda o el
HQFKXIHGDxDGRRGHVSXpVTXHHODSDUDWRWHQJDPDODVIXQFLRQHVVHKDLJDFDtGRRGDxDGRHQFXDOTXLHUPRGR5HJUHVHHODSDUDWRDODIDFLOL-
dad autorizada del servicio para la examinacion,
HOpFWULFRRDMXVWHRUHSDUDFLyQPHFiQLFR1RORXWLOLFHDODLUHOLEUHRSDUDSURSyVLWRFRP-
ercial.
8. Este aparato no ha sido echo para uso en baños,
iUHDVGHODYDQGHUtDRORFDOL]DFLRQHVGHLQWHULRUsimilares.
9. Nunca ponga el aparato donde pueda caerse
GHQWURGHXQDWLQDROXJDUHVTXHFRQWHQJDQagua.
10.No cubra la cuerda con tapetes de tiro,
corredores, ni con cubiertas similares. Arregle
la cuerda donde no pase gente y donde nadie se
pueda tropezar.
11.Para desconectar el aparato, apague todos
controles, y después desconecte el enchufe de
enchufe de la pared.
9HUL¿TXHTXHHOYROWDMHHOpFWULFRGHOSULQFLSDOsuministro y la carga del enchufe empareja el
YROWDMH\HOSRGHUYDORUDGRPDUFDGRHQODHWLTX-
HWDGHFDOL¿FDFLyQGHODSDUDWR1RPHWDRQRSHUPLWDTXHREMHWRVH[WUDQMHURVHQWUHQSRUQLQJXQDYHQWLODFLyQRDJRWHODDEHU-
WXUDFRPRHVWRSXHGHFDXVDUFKRTXHHOpFWULFRRincendio, o dañar el calentador.
3DUDSUHYHQLUXQSRVLEOHLQFHQGLRQREORTXHHWRPDVGHDLUHQLDJRWHGHFXDOTXLHUPRGR1RXVHVXSHU¿FLHVVXDYHVSRUHMHPSORXQDFDPDGRQGHODVDEHUWXUDVSXHGHQVHUEORTXHDGDV(ODSDUDWRFRQWLHQHSDUWHV\IRUPDFLyQGHDUFRVFDOLHQWHVSRUGHQWUR1RORXWLOLFHHQiUHDVGRQGHJDVROLQDSLQWXUDROtTXLGRVLQÀDPDEOHVsean usados o guardados.
16.Use el aparato como solamente como de-
VFULEHHOPDQXDO&XDOTXLHURWURXVRTXHQRes recomendable por la manufactura puede
FDXVDULQFHQGLRVFKRTXHVHOpFWULFRVRSHUVRQDVlesionadas.
(YLWHHOXVRGHXQDH[WHQVLyQSRUTXHODH[WHQ-
VLyQSXHGHVREUHFDOHQWDUVH\FDXVDULQFHQGLRV6LQHPEDUJRVLXVWHGWLHQHTXHXVDUXQDH[WHQ-
VLyQODFXHUGDGHEHVHUGHPHGLGD1R$:*

Español 11
CONSERVE ESTAS
INSTRUCIONES
SOLAMENTE PARA
USO DOMÉSTICO
y debe de tener más o menos 1875 vatios.
18. Para protegerse del riesgo de choques eléc-
tricos, no ponga el aparato, cuerda, enchufe,
o el elemento que se calienta dentro del agua
u otros líquidos. Esto puede causar lesiones
personales y/o dañar el producto.
19. El uso de los accesorios no recomendado por
la manufactura puede causar incendio, choques
eléctricos o personas con lesiones.
20. No permita que la cuerda cuelgue en la orilla
-
cies calientes, incluyendo estufas.
21. No ponga el aparato en/o cerca de gases cali-
entes o quemador eléctrico o un horno caliente
o cerca de fuego.
22. No use el aparato para otro uso que no sea el
intentado.
23. No use el aparato con las manos mojadas o
húmedas.
24. Si es aplicable, siempre conecte el tapón al
aparato y asegúrese que el control este en “0”
antes de enchufar la cuerda al enchufe de la
pared.
25. Asegúrese que el enchufe y la cuerda no estén
dañadas y conecte el enchufe bien en la pared.
plana que no haiga riesgo de que se caiga.
que opere el calentador de abanico, por lo
menos 50 cm de espacio alrededor del aparato,
y antes del enchufe de aire, la distancia debe
ser por lo menos 120 cm.
28. No cubra el calentador de abanico a ninguna
hora mientras esté siendo usado.
29. No lo cuelgues a la pared.
30. No lo use en la carpeta con pelusa larga.
31. No ponga el aparato inmediatamente debajo de
un enchufe eléctrico.
lejos del calentador.
33. En caso de mal función o operaciones anormal,
no trate de abrir o reparar el aparato en casa,
mande el calentador a un agente designado del
servicio para le inspección y la reparación.
SISTEMA DE SEGURIDAD
Para evitar riesgos hacia la persona o daños a el
componente: El calentador contiene Circuito de
protección de volcamiento y un sistema de
apagado automatico de sobrecalentamiento.
Circuito de protección de volcamiento: Esta
unidad cuenta con un circuito de protección de
volcamiento. Si por algún motivo el calentador se
cae o es derribado, un interruptor sensible a la
presión en el fondo de la unidad se activará y
cortar el suministro eléctrico de la calefacción.
Una vez que el calentador es reposicionado en
posición vertical sobre una superficie plana, el
interruptor de inclinación será desactivara y la
unidad comenzará a funcionar.
Sistema de apagado automatico de sobrecalen-
tamiento: si el aparato alcanza la temperatura
límite de seguridad y si sobrecalentamiento
ocurre:
1. Gire el interruptor de selección de calor/
ventilador en posición "O" y el interruptor del
termostato a la posición mínima. Desconecte el
enchufe del tomacorriente de pared.
2. Compruebe si el aire fluye suavemente por la
salida y la entrada, y si el aparato se coloca en
la posición correcta.
3. Deje que el termoventilador enfríe durante 8 a
10 minutos antes de encenderlo otra vez.
4. Conecte el aparato y encenderlo, si el aparato
no funciona normalmente, retire inmediata-
mente el enchufe de la toma y llevelo con un
técnico de servicio designados solamente.
12 Español
PREPARACIÓN ANTES DE USAR
•
suministro y la carga del enchufe empareja
el voltaje y el poder valorado marcado en la
•
dañadas, y enchufe bien el enchufe en la
pared.
•
plana para que no vaya a ver riesgo de que
se caiga.
•
que opere el calentador de abanico, por
lo menos 50 cm de espacio alrededor del
aparato, y antes del enchufe de aire, la distan-
cia debe ser por lo menos 120 cm.
1. Voltee el botón del termostato a la mínima velo-
cidad, al mismo tiempo gire el interruptor para
seleccionar lo caliente a la posición “O” (vea la
foto).
2. Enchufe el aparato, y gire el botón del ter-
mostato a la posición máxima. Luego gire al
interruptor selecto del calor a elija el aire o aire
caliente y la temperatura del aire caliente como
abajo. Mientras funcione la luz de indicación
estará prendida.
2.1 Gire el interruptor selecto del calor “ “a la
posición, los soplos del calentador refrescan
el aire.
2.2 Gire el interruptor a la posición “I”, el
calentador soplara aire tibio, trabajando a
750W.
2.3 Gire el interruptor a la posición “II”, el
calentador sopla aire tibio, trabajando a
1500W.
2.4 Gire el interruptor a la posición “O”. el
calentador parara de funcionar la luz de
apagara.
3. Ajuste el interruptor del termostato a la posición
conveniente para el ajuste de temperatura de-
seado.
3.1 Chequee que el interruptor del termostato
este en la posición máxima.
3.2 Cuando usted sienta la temperatura del cuar-
to comido, gire el interruptor del termostato
hacia la izquierda despacio a la posición
mínima hasta que el aparato se apague.
Después el interruptor del termostato mantendrá
la temperatura del cuarto como usted lo desea
automáticamente. Usted también puede girar el
interruptor del termostato hacia la izquierda hacia
la mínima posición o gire el interruptor del termos-
tato hacia la derecha para que la posición de la
temperatura este en lo máximo para hacer la tem-
peratura baja o alta.
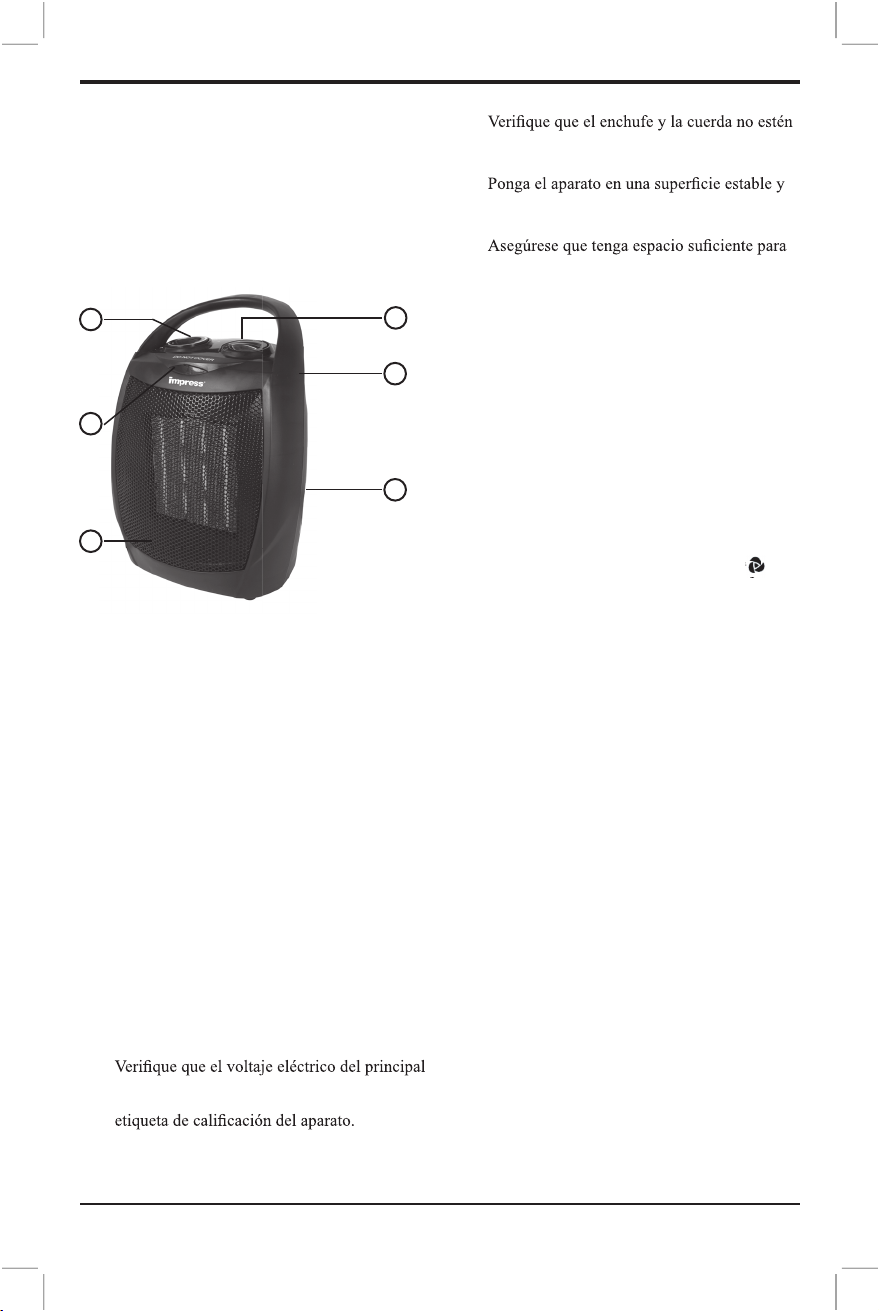
COMO USAR
PARTES
1. Termostato
2. Interruptor de calentador
3. Indicador de luz
4. Manilla
5. Ventanilla de aire
6. Entrada de aire
1
3
5
6
4
2
NOTA: Puede haber un ligero olor a humo durante
el primer uso. Esto se debe a un posible polvo de
cartón sobre el elemento. El olor debe detenerse
después de un par de minutos de uso.

Duración de Garantía:
1 año desde la fecha de compra
En un (1) año desde la fecha de compra,
1) Retorne el producto al lugar de compra (si
su agente lo permite)
O
cancelado a:
I.E.A.C.
3030 East Vernon Avenue
Vernon, California, USA 90058
Adjunte el recibo fechado original, la expli-
contacto.
su producto, devolveremos un producto
nuevo o restaurado (a su criterio) sin CARGO
Asimismo le devolveremos su recibo. Si el
producto se encuentra en buenas condiciones,
devolveremos el porte a pagar del producto.
No nos haremos responsables de los daños
inadecuado.
O contactenos por correo electrónico al
OPCIONES DE
GARANTÍA
MANTENIMIENTO
1. Antes de apagar el aparato, gire el interruptor
3 a 5 minutos para disminuir la temperatura
internal del aparato, después gire el interruptor
veces al año normalmente).
3. Antes de limpiar el aparato, apague el calenta-
dor primero, después remueva el enchufe de la
guardar.
Español 13
Table of contents
Languages:
Other impress Heater manuals


Popular Heater manuals by other brands


Desa
Desa H.S.I. Series owner's manual

Master
Master B 18 EPR owner's manual

Generac Power Systems
Generac Power Systems G0071031 instruction sheet

DeLonghi
DeLonghi FAN HEATER instructions

Vaillant
Vaillant ecoTEC pro Installation and maintenance instructions

EINHELL
EINHELL GS 4600 Installation and operating instructions


