in2digi D-JV-2 User manual

NOTE:
Antenna placement, cable routing and grounding is critical in any DAB
installation.
Please ensure you carefully read all installation documentation and
referenced instructions (stored at www.in2digi.com website).
Step 4
The DAB module needs to be added into the Infotainment fibre optic ring.
All required joiner parts are supplied with the product.
Please refer to documentation “DAB Module Ring Optics” for details.
Step 1
If the installation of the in2digi module is as a replacement to
upgrade the vehicle from an OEM fitted DAB to DAB+ functionality
then no further vehicle configuration update is required.
For a new installation then a vehicle configuration update is required
– see Appendix 1.
This process usually needs to be completed by a JLR dealer.
Finalisation:
Ensure that the correct module firmware version is loaded for the target vehicle
application.
With steps 1 to 4 complete then the system is ready to be run.
If required, please refer to document “Clearing the DAB Station List (for non UK
markets)” for details.
It is always advisable to check that the module has the latest firmware version loaded.
Please refer to document “D-JV-2 Firmware Version Read Process” for details on how
to check the version
Step 2
Install the antenna as directed by the manufacturer’s instructions.
**The in2digi installation documentation offers guidance for positioning.
Final vehicle placement rests with the fitter and should support optimal
reception performance.
Route the antenna cable to the DAB module ensuring that it does not
obstruct any potential air bag deployment.
Stow any excess cable carefully ensuring that any cable bend has at
least a 10mm radius.
Installation Instructions for
in2digi D-JV-2 Series
Di
g
ital Radio
Product Information
DAB Module
in2digi D-JV series
MOST
Head Unit
(IAM)
Rest of the
MOST network
ring
Step 3
The DAB module fitment positioning (suggested solutions for differing
vehicle platforms follows) has an associated dependency for power
selection.
Please refer to document “JLR DAB Module Power” for details.
Antenna

DAB UNIT
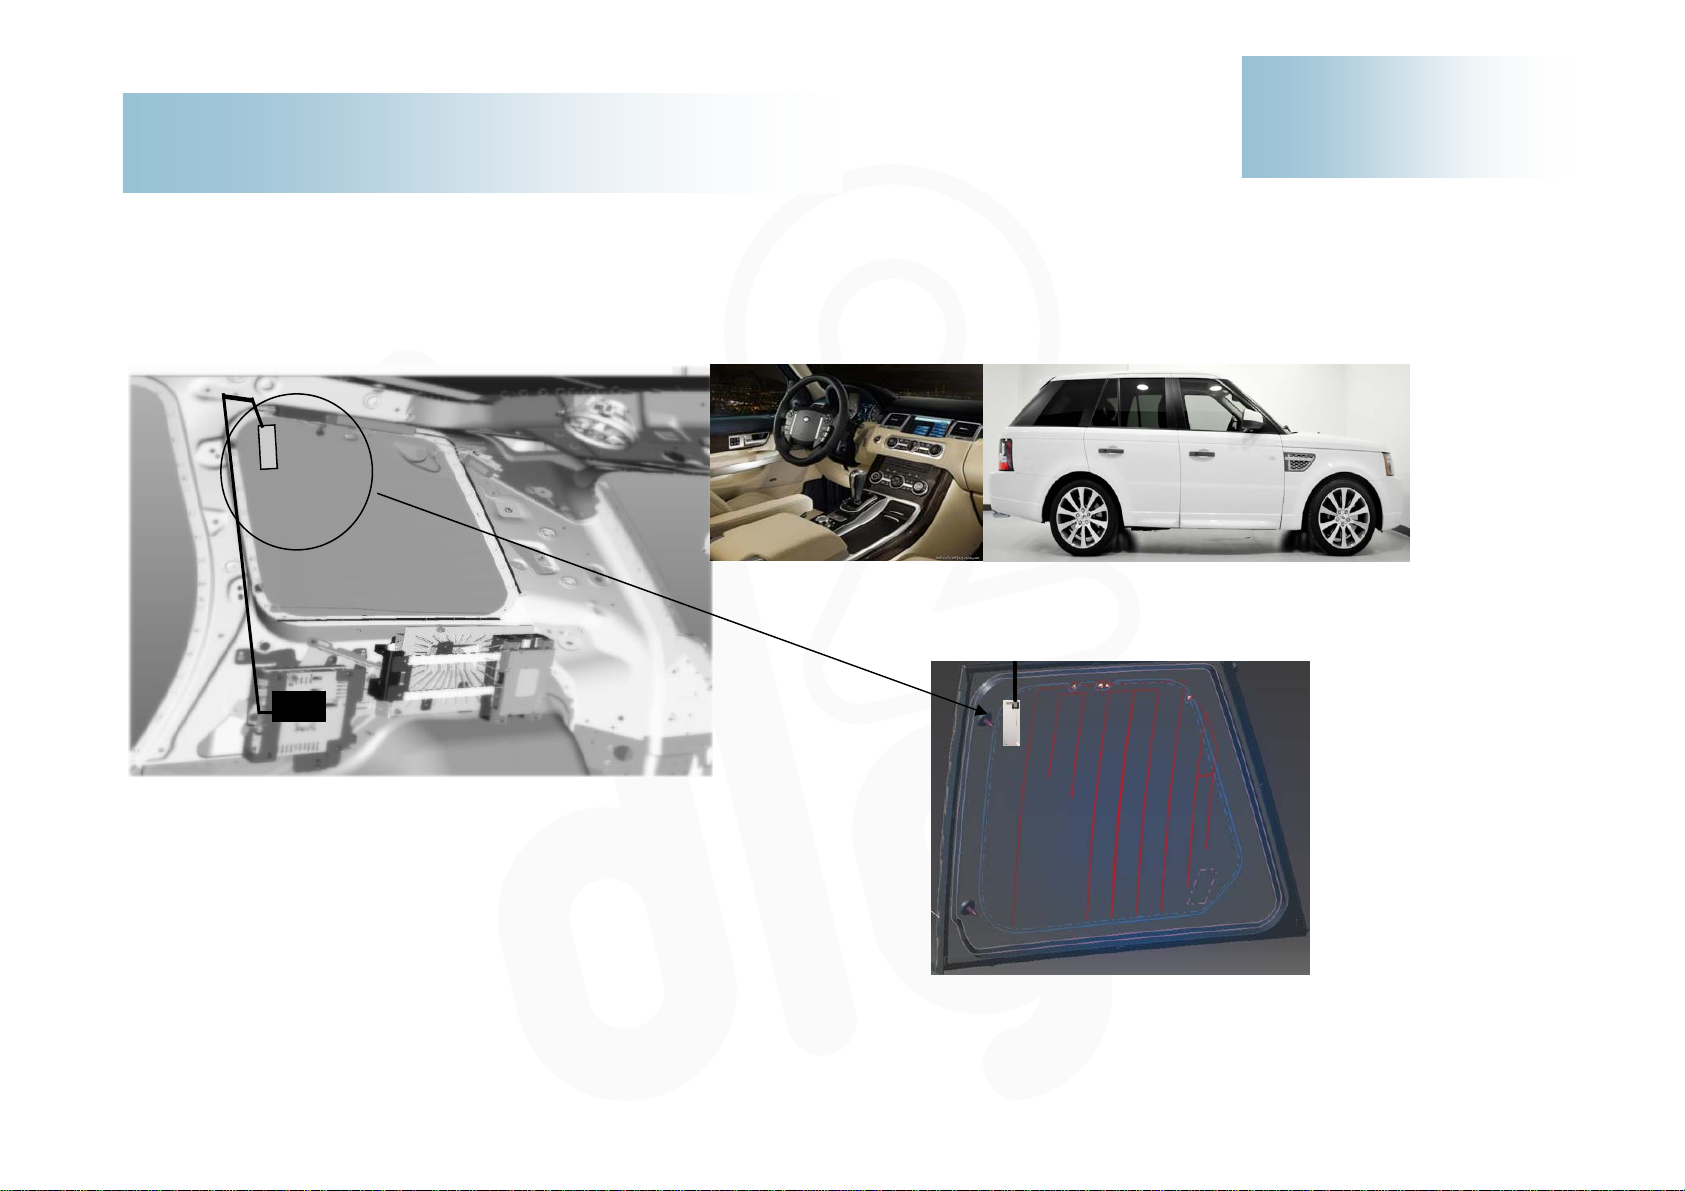
Product Information
Installation of in2digi D-JV-2 Series Unit and Antenna
Range Rover Model Year (2010 to 2012)
NOTE:
This vehicle platform utilises Gen1 firmware. Confirmation of system is gained with reference to document “in2digi - JLR Vehicle Data”
Disclaimer – in2digi accept no liability for non optimal system performance resulting from any installation
Advised fitment location for the DAB unit and antenna
* Ensure that antenna placement does not interfere with the reception of other
radio bands or TV (if fitted)
** If the windscreen is selected for antenna placement then ensure that it does
not have a heating element. With a fitted heating element then the antenna
must be fully contained within the element free area adjacent to the A-pillar
– care must be applied for such placement.

1
Product Information
Installation of in2digi D-JV-2 Series Unit and Antenna
Range Rover Model Year (2013 to 2016)
NOTE:
This vehicle platform utilises Gen2.1 firmware. Confirmation of system is gained with reference to document “in2digi - JLR Vehicle Data”
This refreshed vehicle platform may not have an available optical ring connection in the rear luggage space
Disclaimer – in2digi accept no liability for non optimal system performance resulting from any installation
Gen2.1 S
y
stem
Advised fitment location for the DAB unit and antenna
1. Easiest location is in the front footwell / windscreen
2. Alternative location is rear RHS luggage space /
quarter glass
* Ensure that antenna placement does not interfere with the
reception of other radio bands or TV (if fitted)
** If the windscreen is selected for antenna placement then
ensure that it does not have a heating element. With a
fitted heating element then the antenna must be fully
contained within the element free area adjacent to the
A-pillar – care must be applied for such placement.
22
11
DAB UNIT
NOTE:
This vehicle platform utilises Gen1 firmware. Confirmation of system is gained with reference to document “in2digi - JLR Vehicle Data”
Disclaimer – in2digi accept no liability for non optimal system performance resulting from any installation
Advised fitment location for the DAB unit and antenna
* Ensure that antenna placement does not interfere with the reception of other
radio bands or TV (if fitted)
** If the windscreen is selected for antenna placement then ensure that it does
not have a heating element. With a fitted heating element then the antenna
must be fully contained within the element free area adjacent to the A-pillar
– care must be applied for such placement.
Product Information
Installation of in2digi D-JV-2 Series Unit and Antenna
Range Rover Sport Model Year (2010 to 2012)

Product Information
Installation of in2digi D-JV-2 Series Unit and Antenna
Range Rover Sport Model Year (2013 to 2016)
NOTE:
This vehicle platform utilises Gen2.1 firmware. Confirmation of system is gained with reference to document “in2digi - JLR Vehicle Data”
This refreshed vehicle platform may not have an available optical ring connection in the rear luggage space
Disclaimer – in2digi accept no liability for non optimal system performance resulting from any installation
Gen2.1 S
y
stem
Advised fitment location for the DAB unit and antenna
1. Easiest location is in the front footwell / windscreen
2. Alternative location is rear RHS luggage space /
quarter glass
* Ensure that antenna placement does not interfere with the
reception of other radio bands or TV (if fitted)
** If the windscreen is selected for antenna placement then
ensure that it does not have a heating element. With a
fitted heating element then the antenna must be fully
contained within the element free area adjacent to the
A-pillar – care must be applied for such placement.
11
2

DAB UNIT
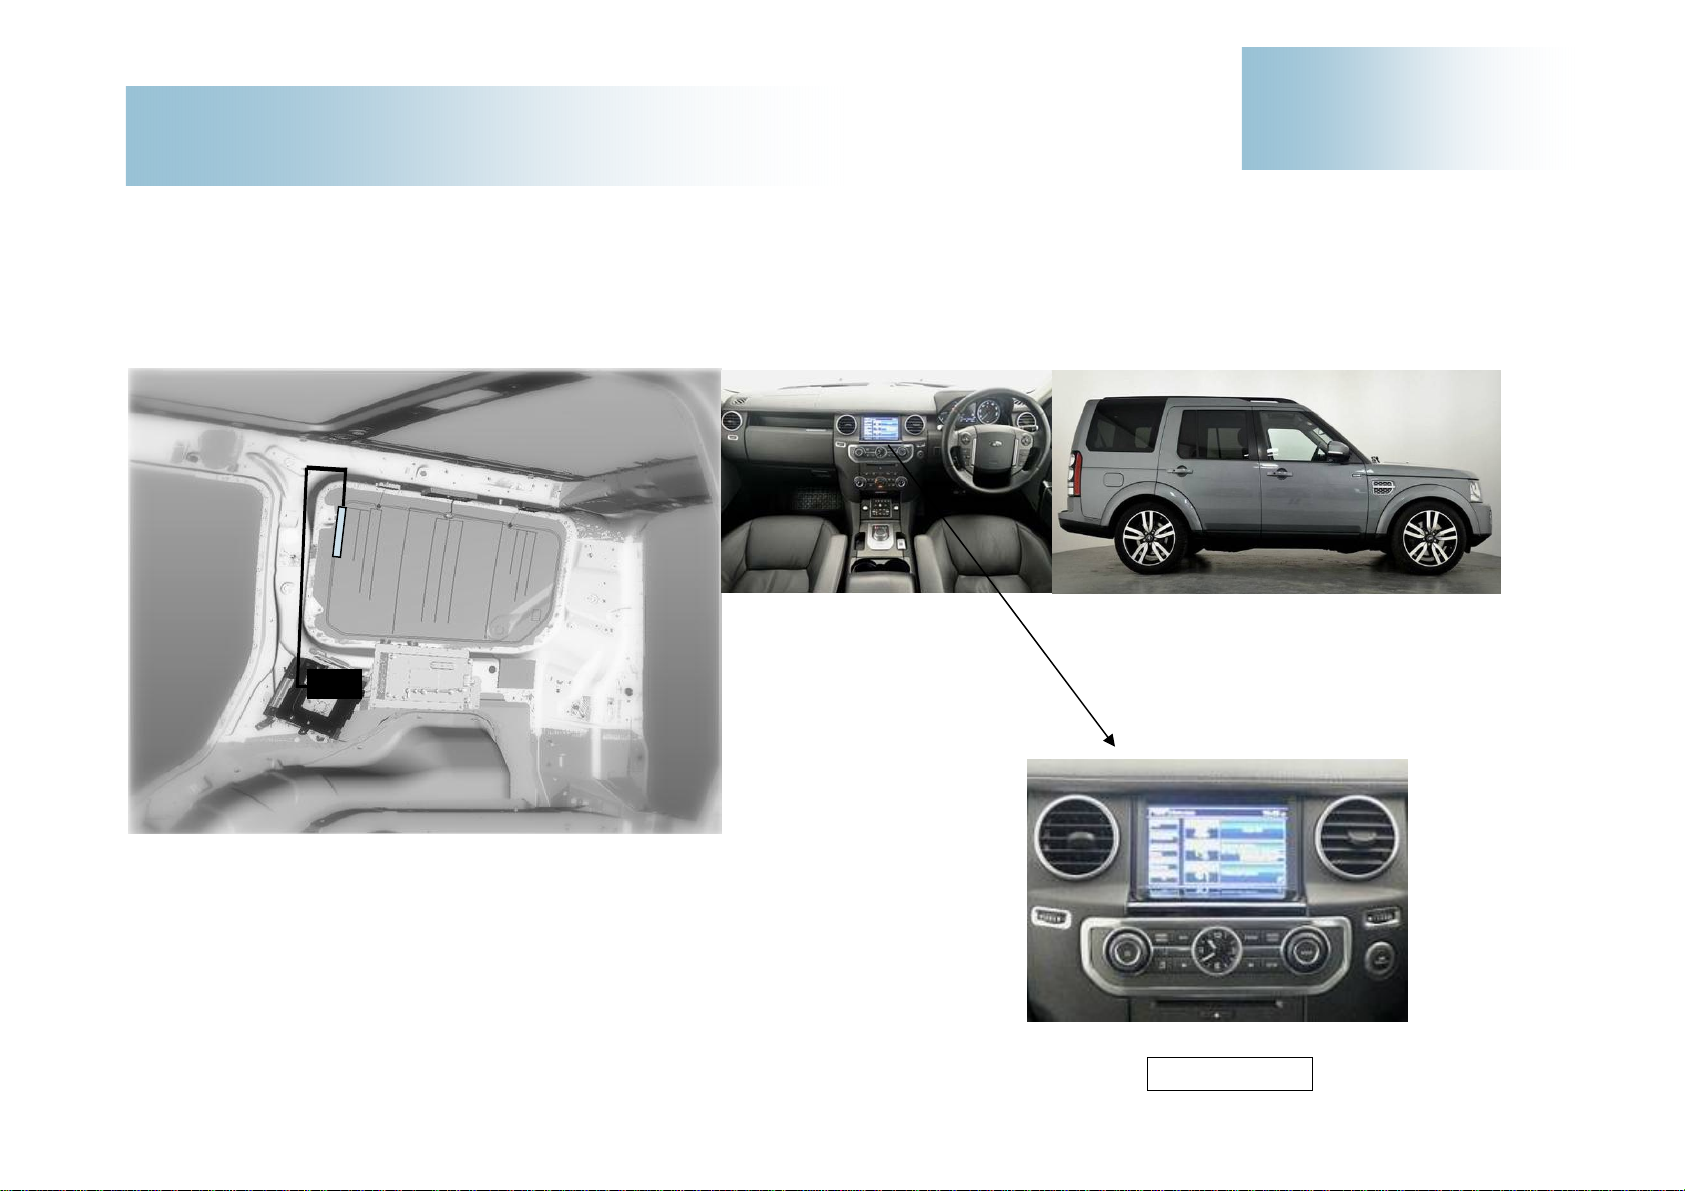
Product Information
Installation of in2digi D-JV-2 Series Unit and Antenna
Land Rover Discovery Model Year (2010 to 2012)
NOTE:
This vehicle platform utilises Gen1 firmware. Confirmation of system is gained with reference to document “in2digi - JLR Vehicle Data”
Disclaimer – in2digi accept no liability for non optimal system performance resulting from any installation
Advised fitment location for the DAB unit and antenna
* Ensure that antenna placement does not interfere with the reception of other
radio bands or TV (if fitted)
** If the windscreen is selected for antenna placement then ensure that it does
not have a heating element. With a fitted heating element then the antenna
must be fully contained within the element free area adjacent to the A-pillar
– care must be applied for such placement.
Product Information
Installation of in2digi D-JV-2 Series Unit and Antenna
Land Rover Discovery Model Year (2013 to 2015)
NOTE:
This vehicle platform utilises Gen2.1 firmware. Confirmation of system is gained with reference to document “in2digi - JLR Vehicle Data”
Disclaimer – in2digi accept no liability for non optimal system performance resulting from any installation
DAB UNIT
Advised fitment location for the DAB unit and antenna
* Ensure that antenna placement does not interfere with the reception of other
radio bands or TV (if fitted)
** If the windscreen is selected for antenna placement then ensure that it does
not have a heating element. With a fitted heating element then the antenna
must be fully contained within the element free area adjacent to the A-pillar
– care must be applied for such placement. Gen2.1 S
y
stem

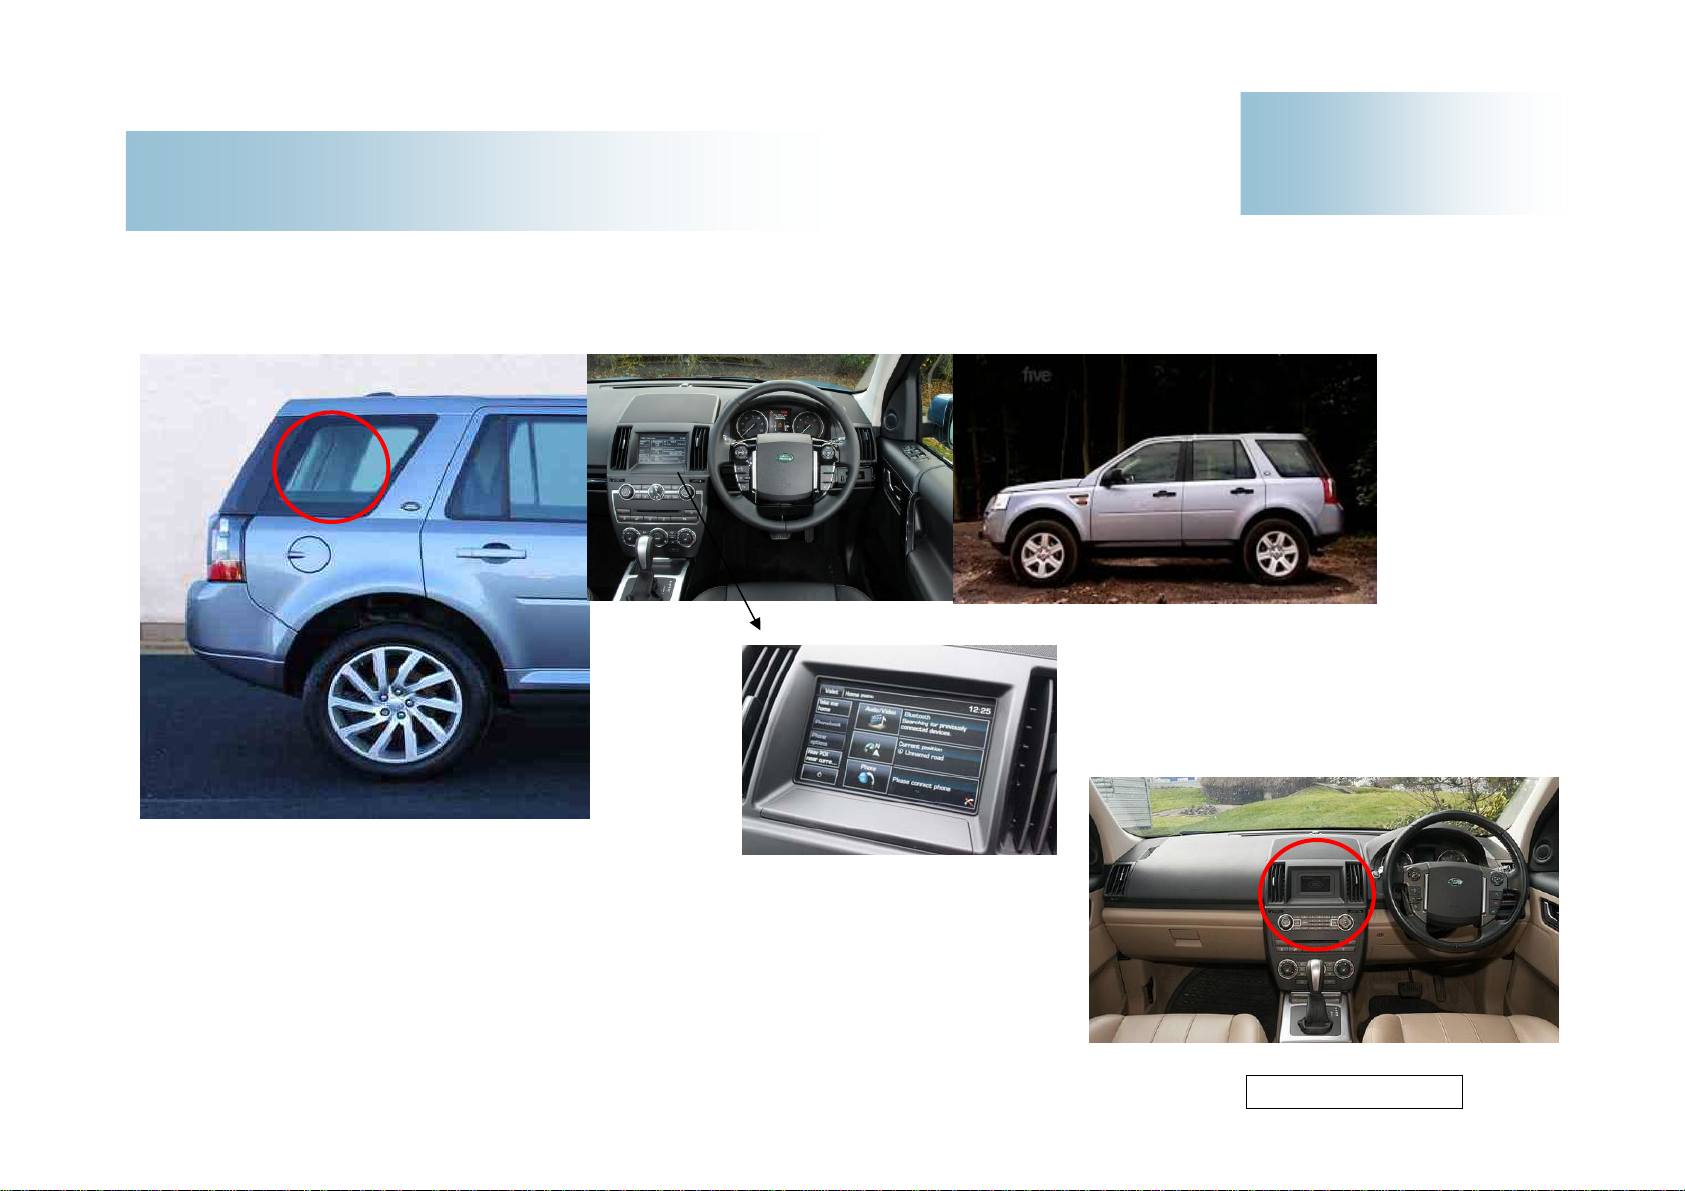
Product Information
Installation of in2digi D-JV-2 Series Unit and Antenna
Land Rover Freelander 2 Model Year (2009 to 2012)
NOTE:
This vehicle platform utilises Gen2 firmware.
Disclaimer – in2digi accept no liability for non optimal system performance resulting from any installation
Advised fitment location for the DAB unit and antenna
- Rear Quarter Glass
* Ensure that antenna placement does not interfere with the reception of other
radio bands or TV (if fitted)
** If the windscreen is selected for antenna placement then ensure that it does
not have a heating element. With a fitted heating element then the antenna
must be fully contained within the element free area adjacent to the A-pillar
– care must be applied for such placement.
FM
DIGITAL
Head Unit MUST have this button identification
for applicability to upgrade to DAB
Product Information
Installation of in2digi D-JV-2 Series Unit and Antenna
Land Rover Freelander 2 Model Year (2013 to 2015)
NOTE:
This vehicle platform utilises Gen2.1 firmware.
Disclaimer – in2digi accept no liability for non optimal system performance resulting from any installation
Advised fitment location for the DAB unit and antenna
- Rear Quarter Glass
* Ensure that antenna placement does not interfere with the reception of other
radio bands or TV (if fitted)
** If the windscreen is selected for antenna placement then ensure that it does
not have a heating element. With a fitted heating element then the antenna
must be fully contained within the element free area adjacent to the A-pillar
– care must be applied for such placement. Low Line S
y
stem
(
GS
)
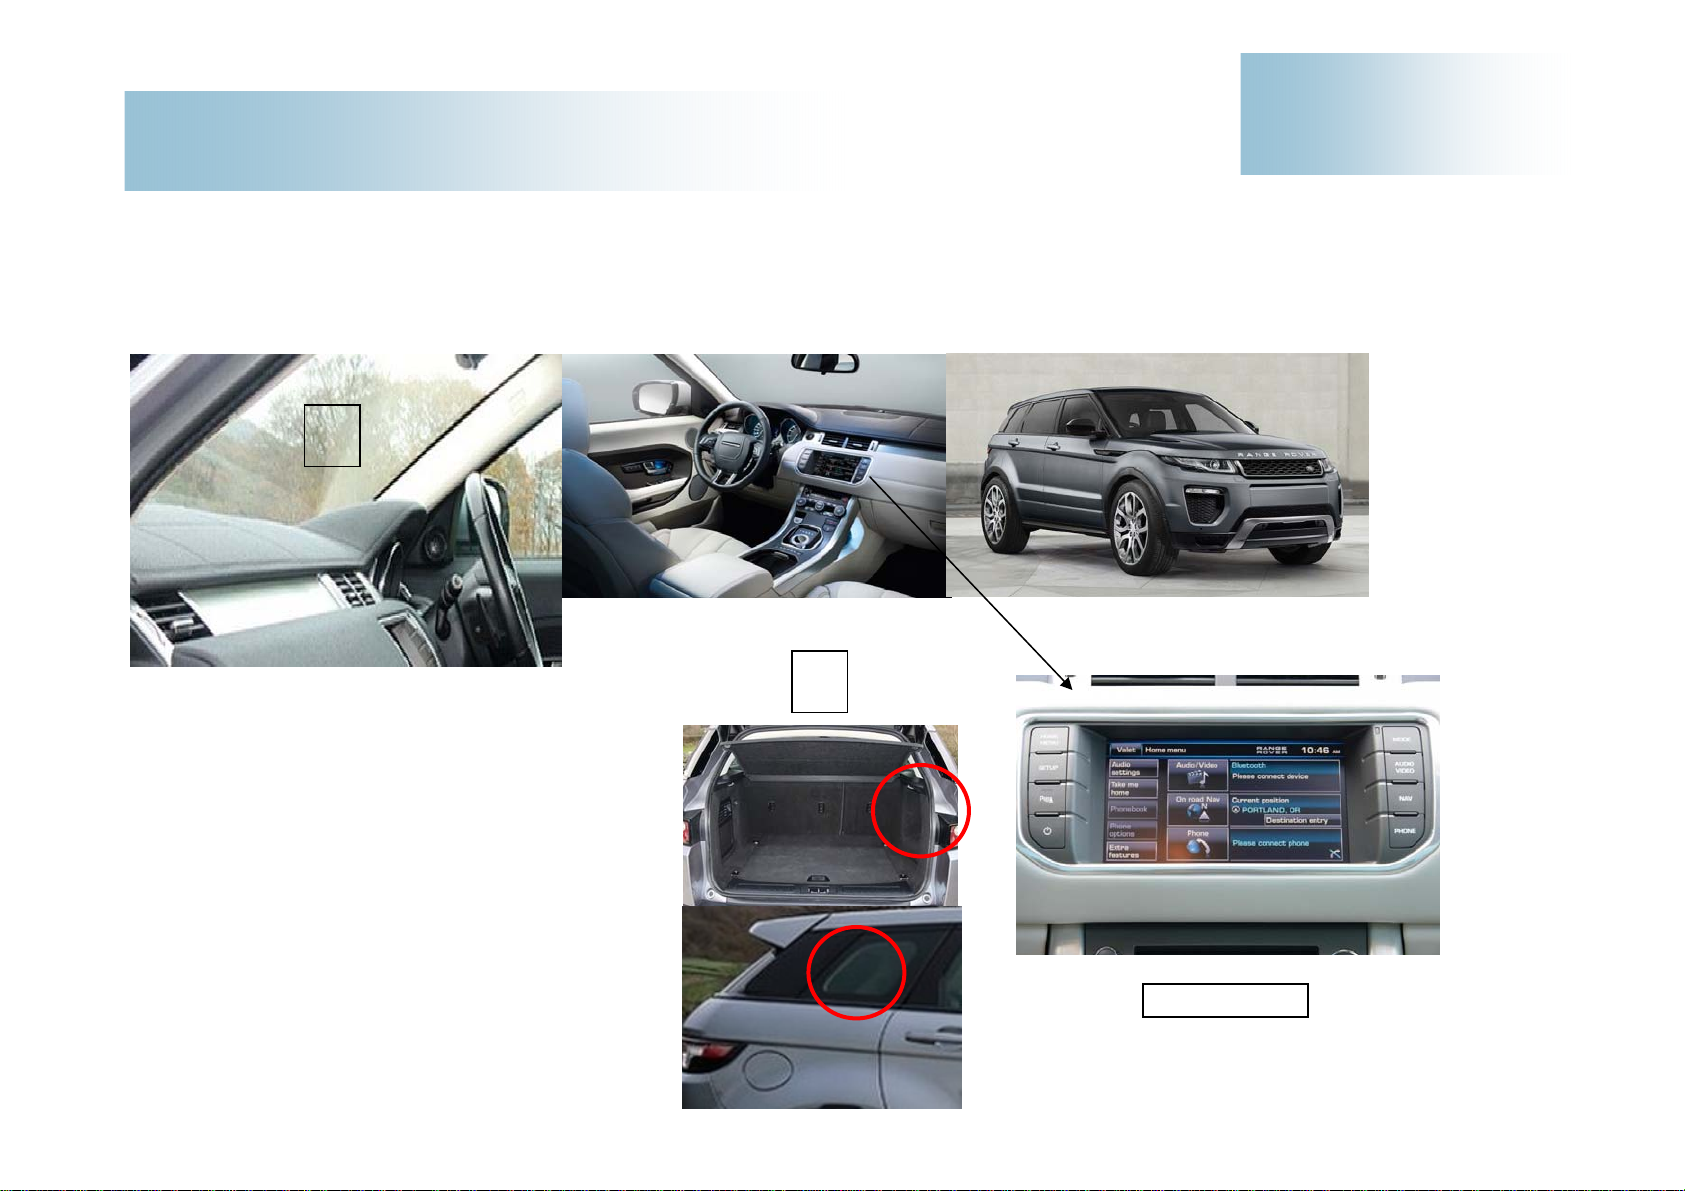
Product Information
Installation of in2digi D-JV-2 Series Unit and Antenna
Range Rover Evoque Model Year (2012 to 2015)
NOTE:
This vehicle platform utilises Gen2.1 firmware. Confirmation of system is gained with reference to document “in2digi - JLR Vehicle Data”
Disclaimer – in2digi accept no liability for non optimal system performance resulting from any installation
Advised fitment location for the DAB unit and antenna
1. Easiest location is in the front footwell / windscreen
2. Alternative location is rear RHS luggage space /
quarter glass
* Ensure that antenna placement does not interfere with the
reception of other radio bands or TV (if fitted)
** If the windscreen is selected for antenna placement then
ensure that it does not have a heating element. With a
fitted heating element then the antenna must be fully
contained within the element free area adjacent to the
A-pillar – care must be applied for such placement.
1
2
Gen2.1 S
y
stem
DAB UNIT
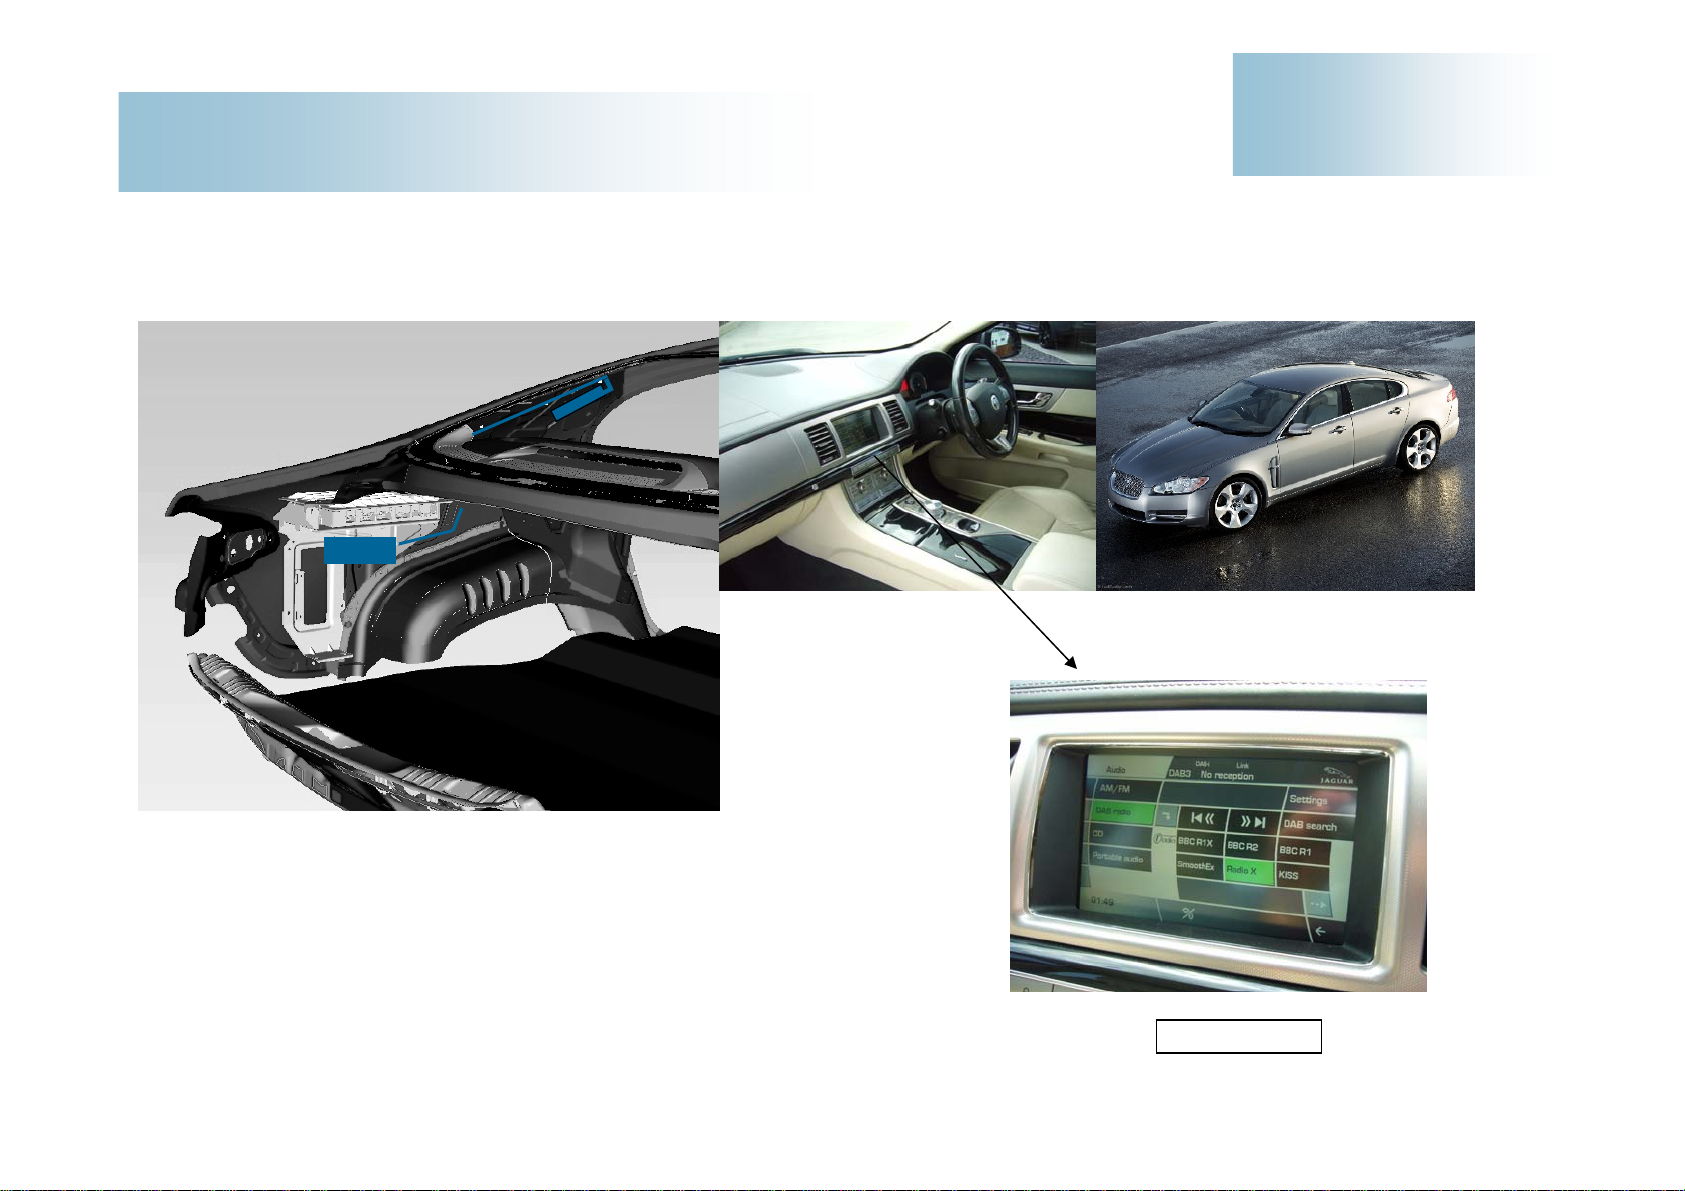
Product Information
Installation of in2digi D-JV-2 Series Unit and Antenna
Jaguar XF Model Year (2008 to 2011)
NOTE:
This vehicle platform utilises Gen2 firmware. Confirmation of system is gained with reference to document “in2digi - JLR Vehicle Data”
Disclaimer – in2digi accept no liability for non optimal system performance resulting from any installation
Advised fitment location for the DAB unit and antenna
* Ensure that antenna placement does not interfere with the reception of other
radio bands or TV (if fitted)
Check also that there is no interference from the heated rear screen
** If the windscreen is selected for antenna placement then ensure that it does
not have a heating element. With a fitted heating element then the antenna
must be full
y
contained within the element free area ad
j
acent to the
A
-
p
illar
Gen2 S
y
stem
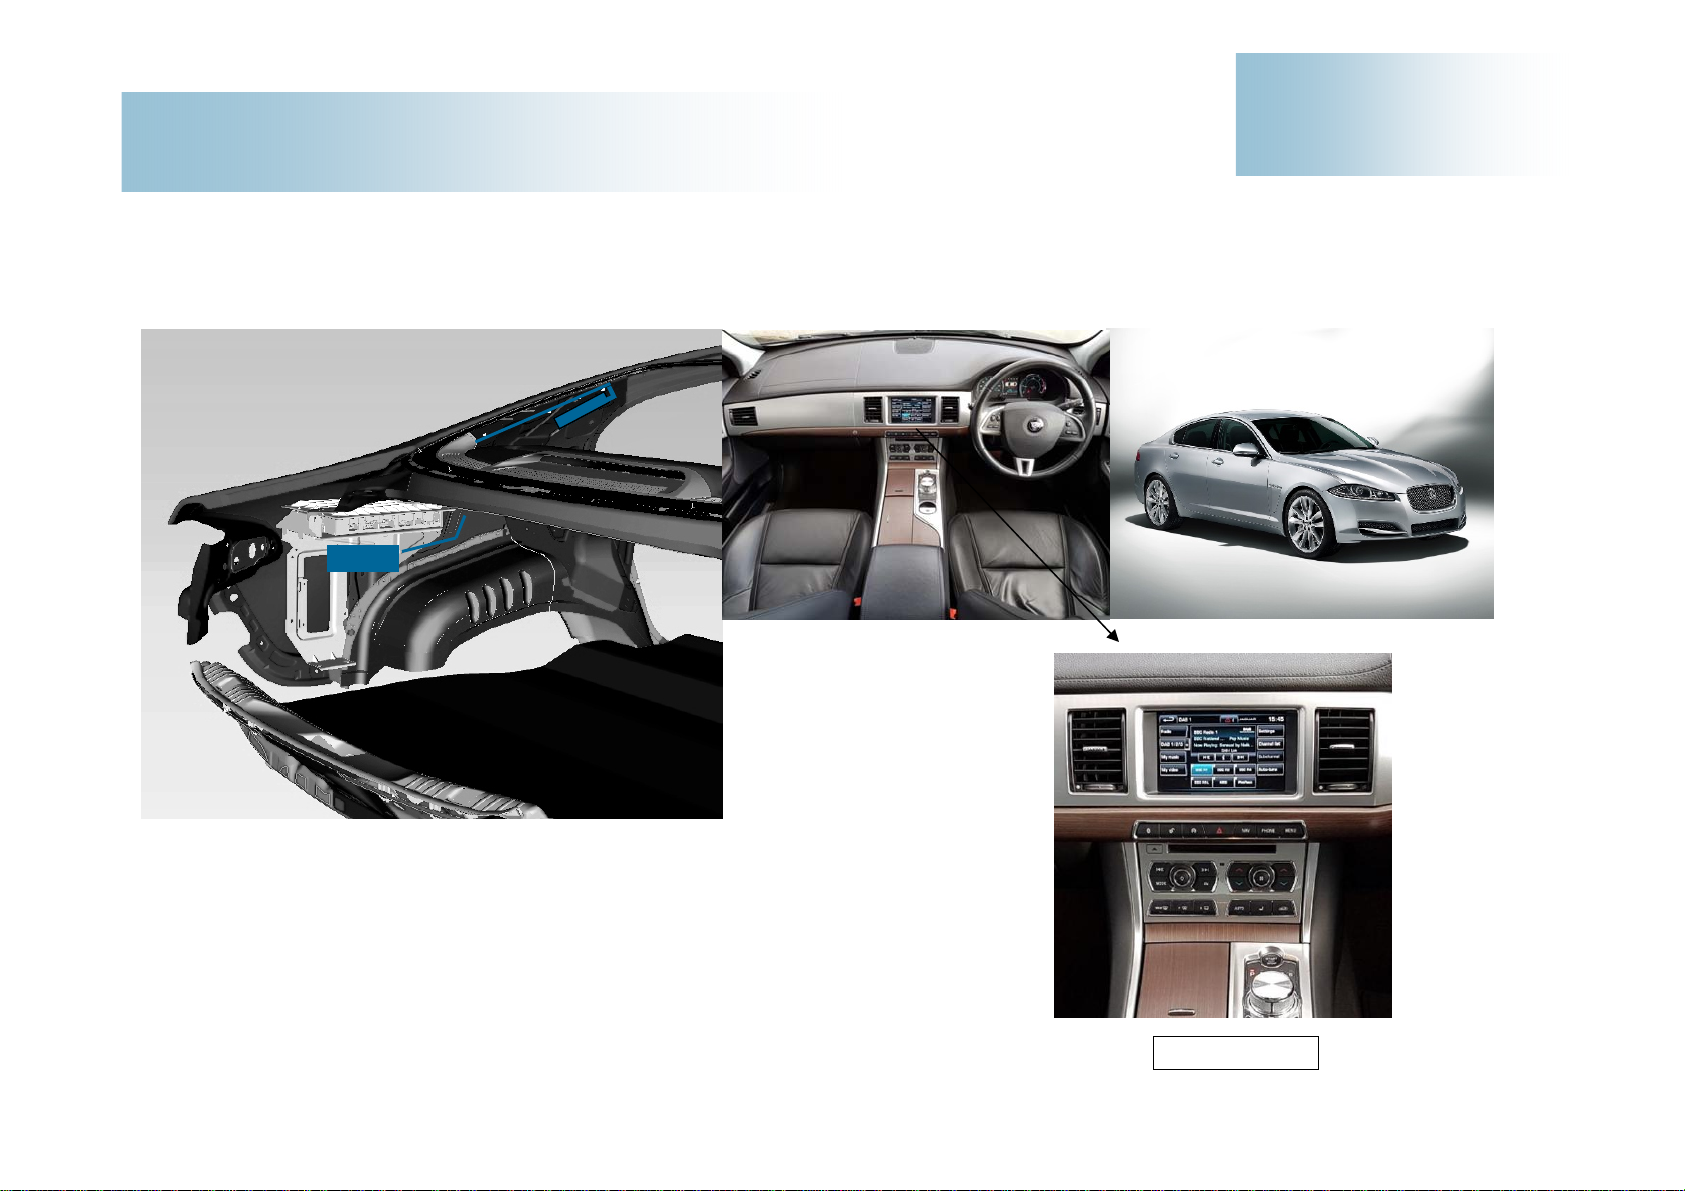
Product Information
Installation of in2digi D-JV-2 Series Unit and Antenna
Jaguar XF Model Year (2012 to 2015)
NOTE:
This vehicle platform utilises Gen2.1 firmware. Confirmation of system is gained with reference to document “in2digi - JLR Vehicle Data”
Disclaimer – in2digi accept no liability for non optimal system performance resulting from any installation
DAB UNIT
Advised fitment location for the DAB unit and antenna
* Ensure that antenna placement does not interfere with the reception of other
radio bands or TV (if fitted)
Check also that there is no interference from the heated rear screen
** If the windscreen is selected for antenna placement then ensure that it does
not have a heating element. With a fitted heating element then the antenna
must be full
y
contained within the element free area ad
j
acent to the
A
-
p
illar
Gen2.1 S
y
stem
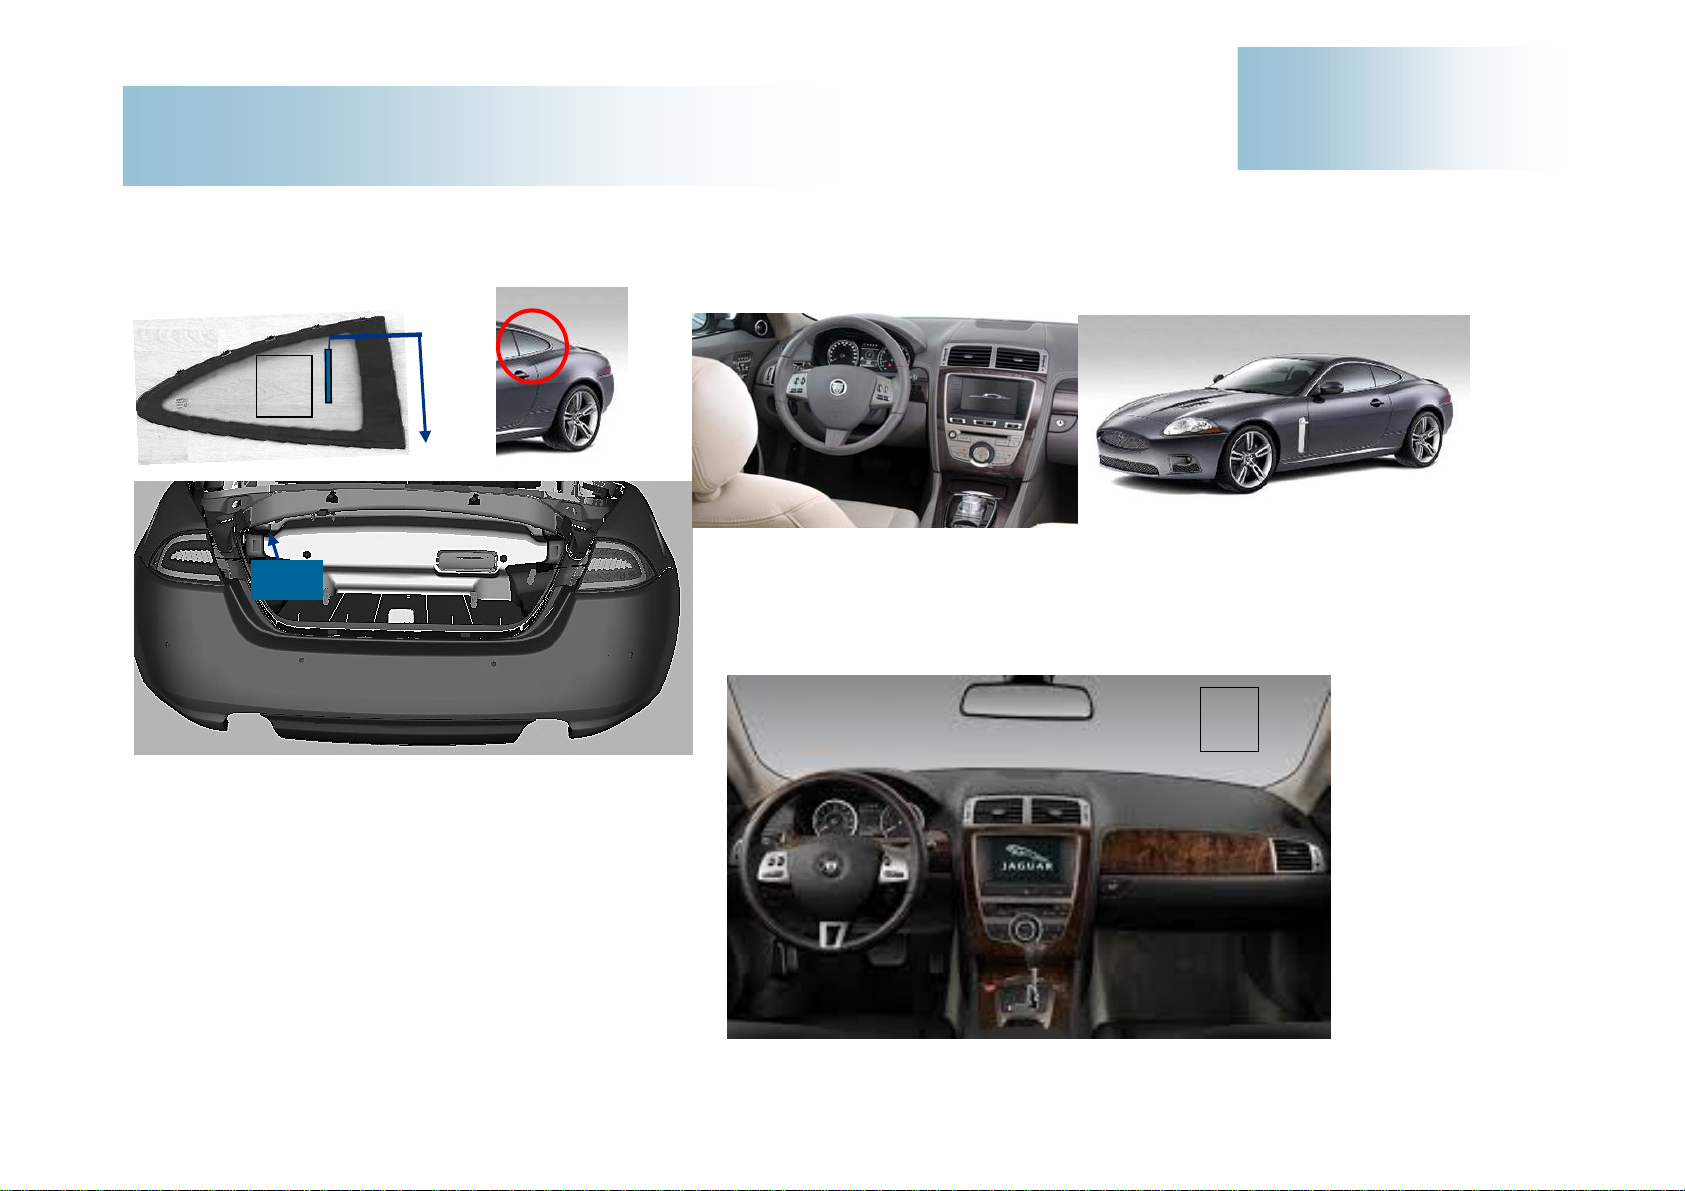
Product Information
Installation of in2digi D-JV-2 Series Unit and Antenna
Jaguar XK Coupe Model Year (2008 to 2015)
NOTE:
This vehicle platform utilises Gen2 firmware. Confirmation of system is gained with reference to document “in2digi - JLR Vehicle Data”
Disclaimer – in2digi accept no liability for non optimal system performance resulting from any installation
Advised fitment location for the DAB unit and antenna
1. Location is rear LHS trunk space / quarter glass
2. Alternative location is in the front footwell / windscreen
* If the windscreen is selected for antenna placement then
ensure that it does not have a heating element. With a fitted
heating element then the antenna must be fully contained
within the element free area adjacent to the A-pillar
– care must be applied for such placement.
DAB UNIT
1
2
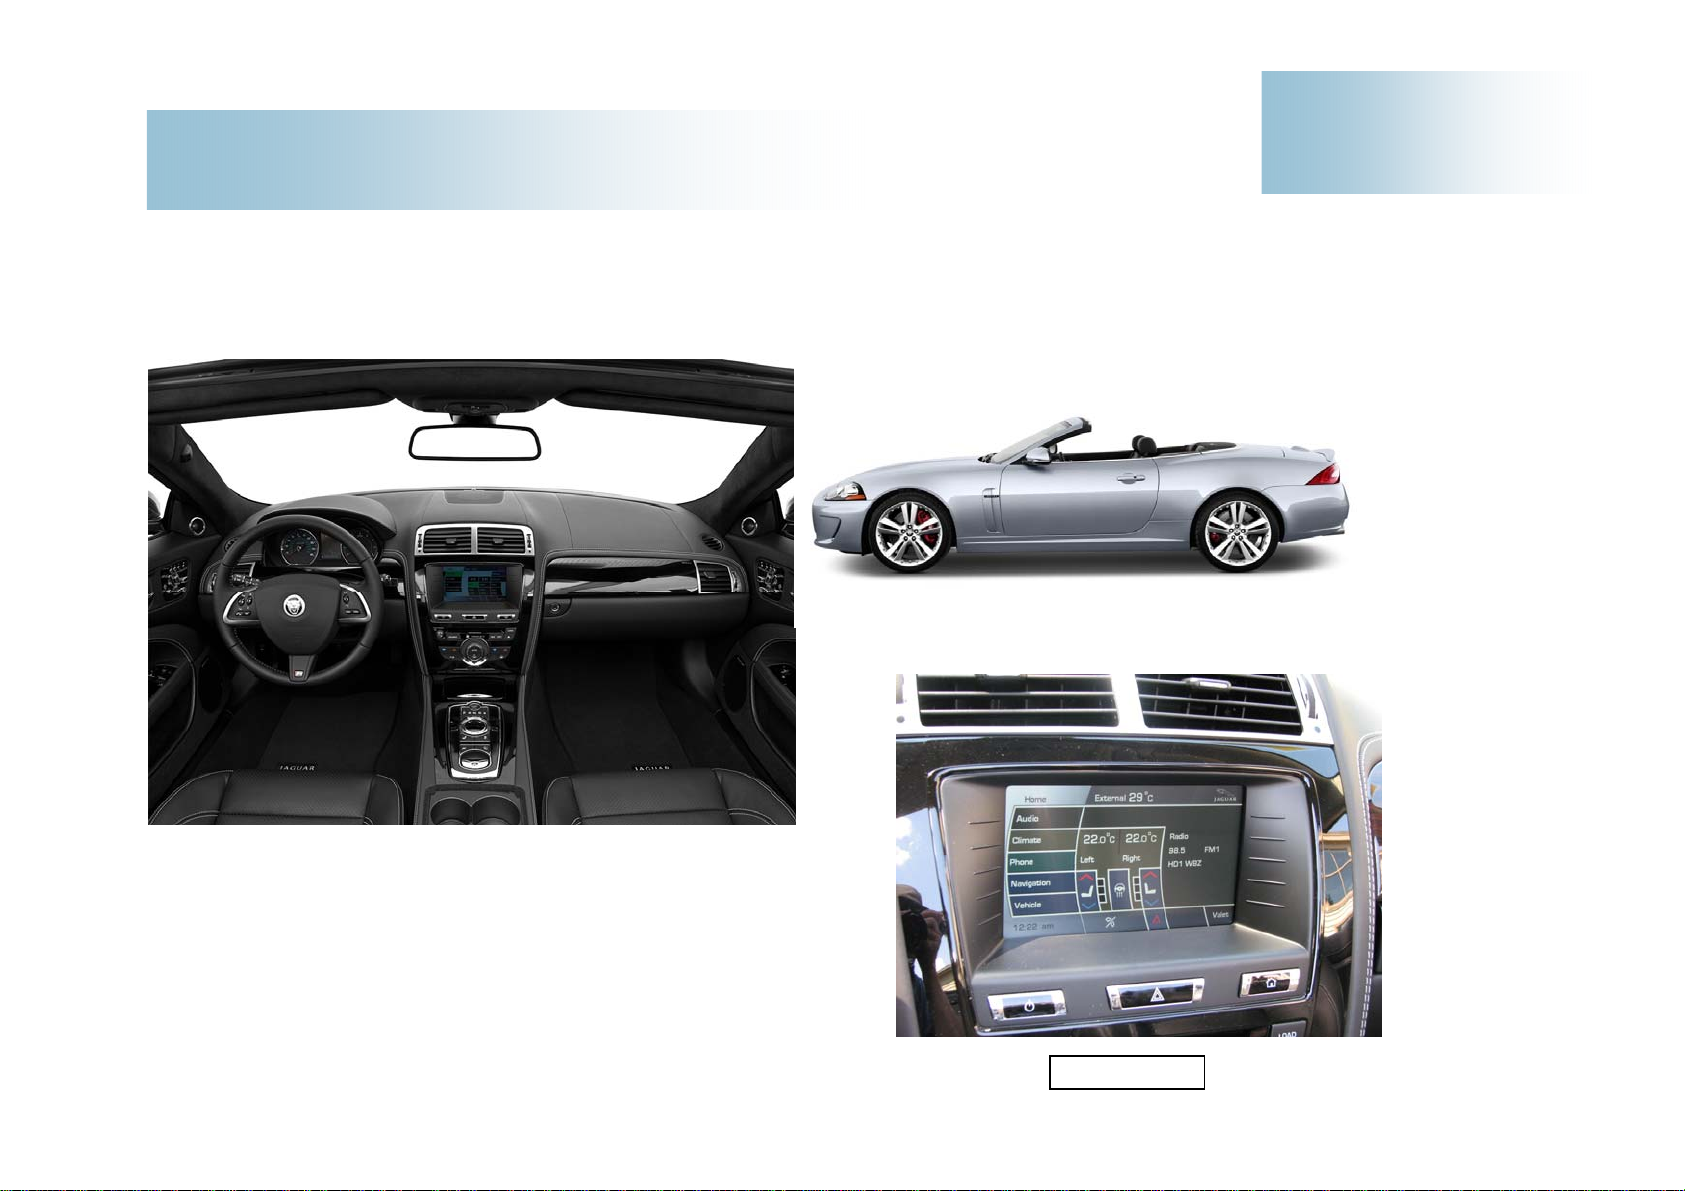
Product Information
Installation of in2digi D-JV-2 Series Unit and Antenna
Jaguar XK Convertible Model Year (2008 to 2013 / 2014)
NOTE:
This vehicle platform utilises Gen2 firmware. Confirmation of system is gained with reference to document “in2digi - JLR Vehicle Data”
Disclaimer – in2digi accept no liability for non optimal system performance resulting from any installation
Advised fitment location for the DAB unit and antenna
- Front footwell / windscreen
* If the windscreen is selected for antenna placement then
ensure that it does not have a heating element. With a fitted
heating element then the antenna must be fully contained
within the element free area adjacent to the A-pillar
– care must be applied for such placement.
Gen2 S
y
stem

DAB UNIT
Product Information
Installation of in2digi D-JV-2 Series Unit and Antenna
Jaguar XJ Model Year (2010 to 2015)
NOTE:
This vehicle platform utilises Gen2.1 firmware. Confirmation of system is gained with reference to document “in2digi - JLR Vehicle Data”
Disclaimer – in2digi accept no liability for non optimal system performance resulting from any installation
Gen2.1 S
y
stem
Advised fitment location for the DAB unit and antenna
* Ensure that antenna placement does not interfere with the reception of other
radio bands or TV (if fitted)
Check also that there is no interference from the heated rear screen
** If the windscreen is selected for antenna placement then ensure that it does
not have a heating element. With a fitted heating element then the antenna
must be full
y
contained within the element free area ad
j
acent to the
A
-
p
illar

in2digi D-JV-2
Series
USB Host Interface
DAB A
ntenna connector
JLR introduced a new SDD application to allow the
installation of the in2digi DAB / DAB+ module
“Add/Remove Digital Broadcasting (DAB) Accessory”
The ‘in2digi D-JV-2 series’ module is now
available as an optional fit accessory in
Europe, S. Korea and Australia
Fibre Optic Connector
Power
Appendix 1: Instructions for Jaguar Land Rover service tool to enable in2digi DAB

in2digi D-JV-2
Series
ii l di
Upgrading Software:
1. The latest software is downloadable from
www.in2digi.com/support/D-JV-2/
2. The filename is “DAB_UPDA.BIN”
3. Save the file to a host computer and (! IMPORTANT!) make sure that
the extension “.BIN” is not changed by any default setting
4. Ensure that the USB stick to be used is formatted as FAT / FAT32
5. Ideally, delete existing files on the USB stick
6. Copy the upgrade file to the USB stick (this is a one-shot process)
7. Use the Windows or MacOS facility to safely eject the USB stick, thus
ensuring the file was correctly stored on the USB stick.
Module update:
8. Ensure that the power of the D-JV-2 module is disconnected.
9. Insert the USB stick into the USB slot.
10. Re-fit the module power connector - on power up, the module checks
for a USB connection.
(If the USB stick has a light then there is a particularly noticeable light
sequence where the light will flash for a few seconds and then pause
but will then flash again for a few more seconds. If this sequence is
observed then the upload would usually be successful).
11. After 30 seconds power down the module, remove the USB stick and
check at the host computer that the file has been renamed to
“DAB_UPDA.YES”
12. Delete the renamed file from the USB stick
13. For the upgraded system then a new Auto-tune is required
USB Interface
Appendix 2: Upgrading Software for in2digi D-JV-2 Series Digital Radio
Upgrading Configuration:
For specific internal configuration parameter changes (if needed)
- upload “CFG_UPDA.CFG”
Follow the same process as for a firmware update
A successful upload is indicated by the update of the filename
- “CFG_UPDA.YES”
* A reference video is available on the website: www.in2digi.com/support/
(the process principle is the same for this product series)
** Ideally a USB stick with 4GB or less capacity should be used
(tip – if an 8GB stick is used then it may require two consecutive upload cycles to achieve a
successful update)
Other manuals for D-JV-2
2
Table of contents


