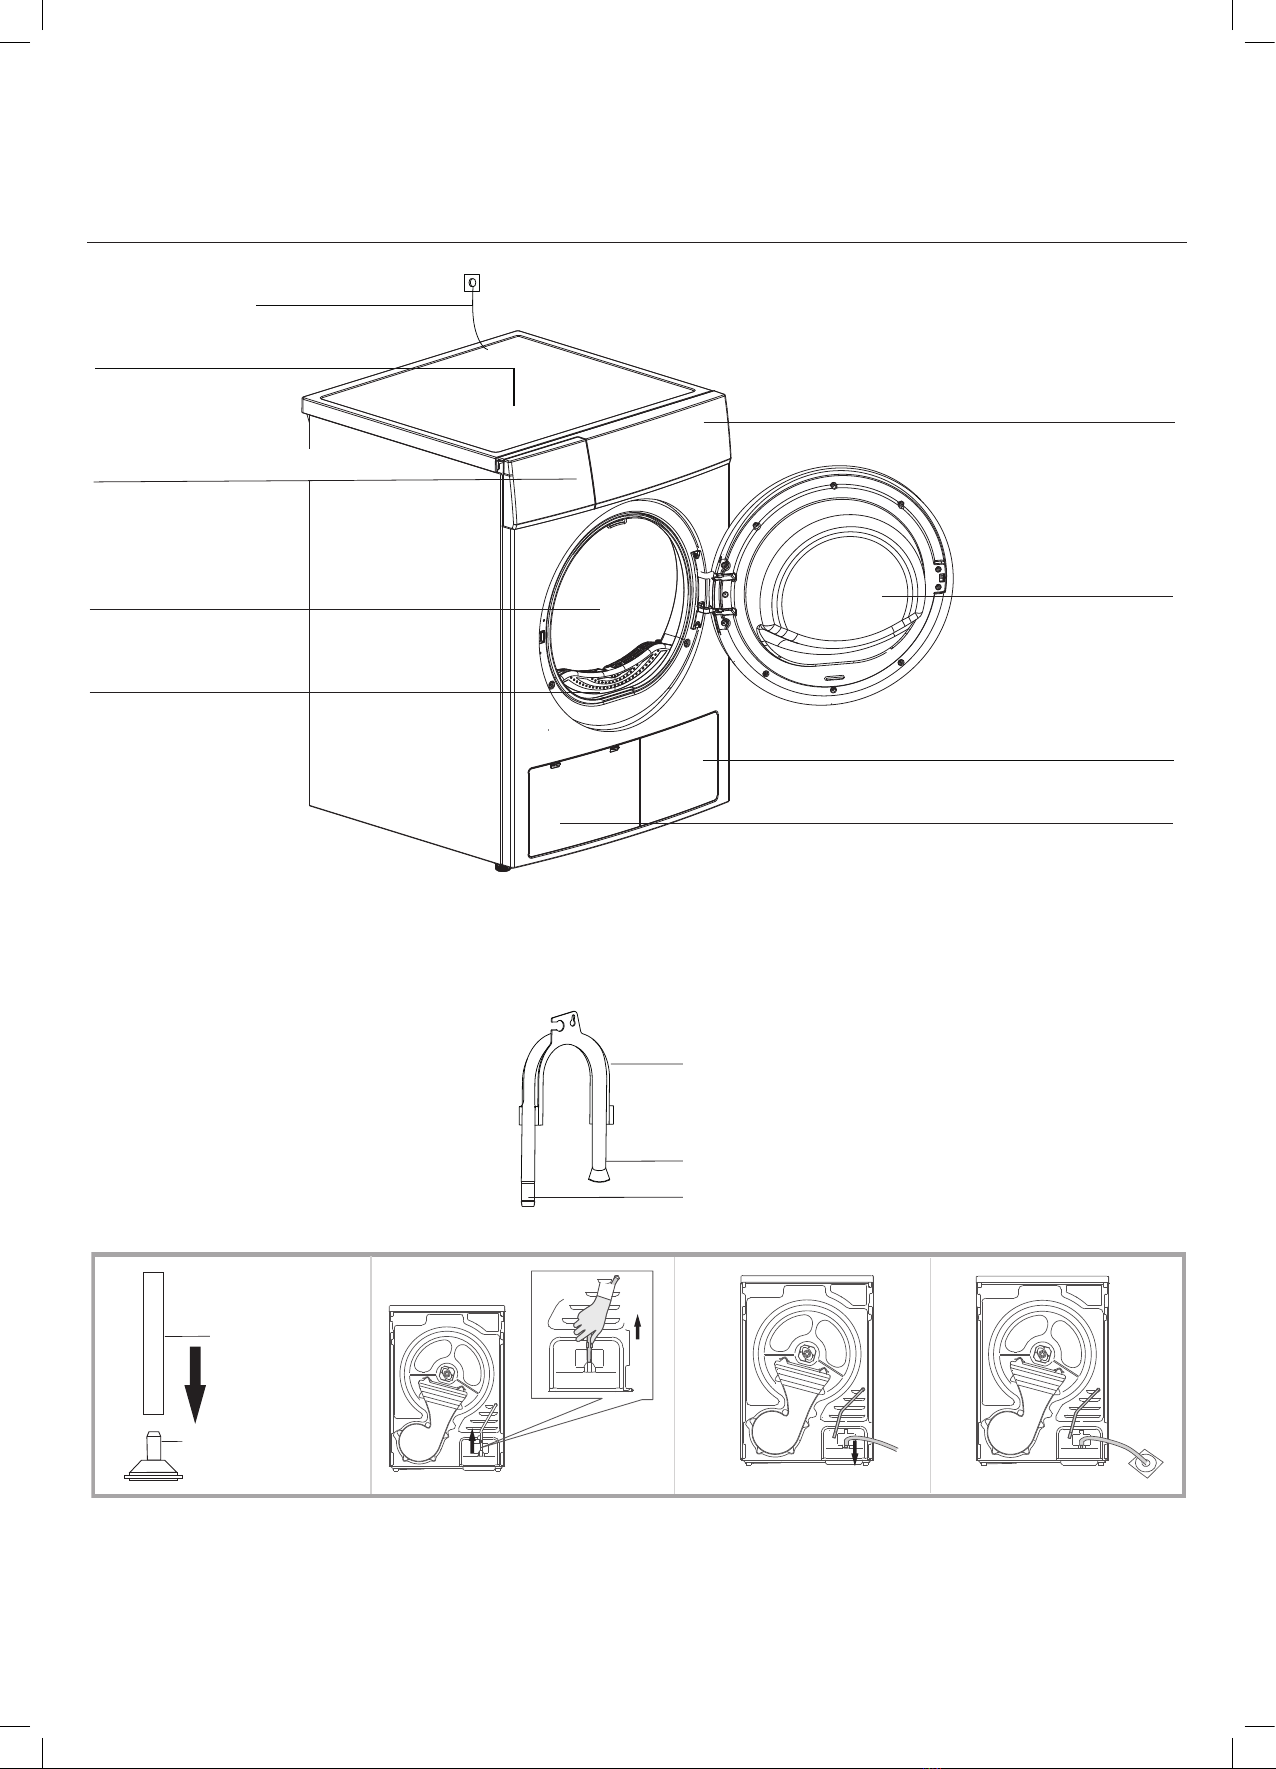
Inalto IHPD80 User manual

MODEL CODE/S
IHPD80
8kg Heat Pump
Dryer
V 1.0 | 0222
USER MANUAL INALTO.HOUSE
FOR ALL AUSTRALIAN HOMES

2
Residentia Group Pty Ltd
ACN. 600 546 656
165 Barkly Avenue
Burnley, Victoria 3121
Australia
—
Applico Ltd
635 Great South Road
Penrose, Auckland 1061
New Zealand
—
InAlto
www.inalto.house
/ inalto.house
/ inalto.house
Congratulations on purchasing
your new InAlto Heat Pump Dryer!
The InAlto brand is proudly distributed within
Australia by Residentia Group Pty Ltd and within
New Zealand by Applico Ltd.
Please refer to the warranty card at the rear of this
manual for information regarding your product’s parts
and labour warranty, or visit online at:
→ www.residentia.group
→ www.applico.co.nz
→ www.inalto.house
Both Residentia Group & Applico are customer obsessed
and our Support Teams are there to ensure you get the
most out of your appliance. Should you want to learn
more about recommended usage, the various features of
your appliance, and importantly taking care of the unit
when cleaning, our Support Teams are here to help.
Telephone Contacts:
→AU: 1300 11 4357
→ NZ: 0800 763 448
It is important that you read through the following use
and care manual thoroughly to familiarise yourself with
the installation and operation requirements of your
appliance to ensure optimum performance.
Again, thank you for choosing an InAlto appliance and
we look forward to being of service to you.
Welcome
Scan to Register your InAlto Appliance or go to:
→ AU: www.inalto.house/registration
→ NZ: www.inalto.house/nz/registration
By registering your product, you will receive advanced
support, stay updated with the latest from InAlto
and find out about new products and promotions.

3
InAlto recommends the use of original spare parts. When contacting our customer
service team on 1300 11 4357, please ensure that you have the following information
at hand (which can be found on your appliances’ rating plate).
• Model Number
• Serial Number
Customer Care
2 Welcome
4 Safety Instructions
6 Your Dryer
7 Installation
8 Control Panel
9 Operating Instructions
13 Cleaning & Maintenance
15 Technical Specifications
16 Troubleshooting
18 Purchase Details
19 Your Receipt
20 Warranty Information
Contents

4
DRYER CARE SYMBOLS
Please pay attention to use the drying machine if the
materials of your clothes can not be dried by it or contain
the symbols as follows:
IMPORTANT!
CAUTION: RISK OF FIRE!
To prevent any damages to your and others’ life or
property, you have to follow the safety notes.
• This product belongs to the category of electrical
appliances, and only for drying textiles which have
been washed with water in the household.
Please pay attention to the safety of power use
during the operation!
• The power source with reliable earthing must be
used. Its earth wire must be buried under the ground
and shall not be connected with the public utilities
such as city water pipe or gas pipe etc. The earth wire
and null wire shall be distinguished and shall not be
connected together.
• The maximum mass of dry textile material is 8
kilograms to be used in the appliance.
• That the tumble dryer is not to be used if industrial
chemicals have been used for cleaning.
• Do not dry unwashed items in the tumble dryer.
• Adequate ventilation has to be provided to avoid the
back flow of gases into the room from appliance
burning other fuels, including open fires
• WARNING: never stop a tumble dryer before
the end of the drying cycle unless all items are
quickly removed and spread out so that the heat is
dissipated.
• The exhaust air must not be discharged into a flue
which is used for exhausting fumes from appliance
burning gas or other fuels.
• The appliance must not be install behind a lockable
door, a sliding door or a door with a hinge on the
opposite side to that of the tumble dryer. In such a
way that a full opening of the tumble dryer door is
restricted.
• Keep pets away from this appliance.
• Oil-aected items can ignite spontaneously,
especially when exposed to heat sources such as in
a tumble dryer. The items become warm, causing an
oxidation reaction in the oil. Oxidation creates heat.
If the heat cannot escape, the items can become hot
enough to catch fire. Piling, stacking or storing oil-
aected items can prevent heat from escaping and
so create a fire hazard.
• If it is unavoidable that fabrics that contain
vegetable or cooking oil or have been contaminated
by hair care products be placed in a tumble dryer
they should first be washed in hot water with extra
detergent-this will reduce, but not eliminate, the
hazard.
• The appliance should not be overturned during
normal use or maintenance.
• If the power cable is damaged, it must be replaced
by the manufacturer, its service agent or similarly
qualified persons in order to avoid a hazard.
• This appliance is for indoor use only.
• The openings must not be obstructed by a carpet.
• Children of less than 3 years should be kept away
unless continuously supervised.
• If the appliance appear high temperature abnormally,
please draw the main plug immediately.
• The appliance is not intended for use by persons
(including children) with reduced physical, sensory
or mental capabilities, or lack of experience and
knowledge, unless they have been given supervision
or instruction concerning use of the appliance by a
person responsible for their safety. Children should be
supervised to ensure that they do not play with
the appliance.
• To ensure your and your family’s safety, please
make improvement immediately if any power use
at your home does not meet the above-mentioned
requirement.
ELECTRIC SHOCK HAZARD
1. Do not draw the power cord forcefully to pull out
the mains plug.
2. Please do not plug/draw the mains plug with wet
hands.
3. Do not damage the power cord and the power plug.
INJURY DANGER
1. Do not disassemble and install the dryer under no
instruction or supervision.
2. Do not stack this dryer on washing machine without
stacking kits.(if want stacking on washing machine,
please purchase the Independent parts and it must
be installed by the manufacturer, its service agent
or similarly qualified persons in order to avoid a
hazard.)
3. Do not lean on the opened door of the dryer.
4. Do not put any objects on the dryer, such as a candle
or electric cooker.
Safety Instructions

5
EXPLOSION & FIRE DANGER
• Please do not dry the clothes with some flammable
substances such as coal, oil, alcohol or there will be
an explosion.
• The appliance contains an environmentally friendly
but flammable R290 refrigerant. Keep away from
open flame And other sources of ignition.
• The tumble dryer is not to be used if industrial
chemicals have been used for cleaning.
• Do not dry unwashed items in the tumble dryer.
• Items that have been soiled with substances such
as cooking oil, acetone, alcohol, petrol, kerosene,
spot removers, turpentine, waxes and wax removers
should be washed in hot water with an extra amount
of detergent before being dried in the tumble dryer.
• Items such as foam rubber (latex foam), shower
caps, waterproof textiles, rubber backed articles
and clothes or pillows fitted with foam rubber pads
should not be dried in the tumble dryer.
• Fabric softeners, or similar products, should be used
as specified by the fabric softener instructions.
• Oil-aected items can ignite spontaneously,
especially when exposed to heat sources such as in a
tumble dryer.
• The items become warm, causing an oxidation
reaction in the oil. Oxidation creates heat. If the heat
cannot escape, the items can become hot enough
to catch fire. Piling, stacking or storing oil-aected
items can prevent heat from escaping and so create
a fire hazard.
• Remove all objects from pockets such as lighters
and matches.
• If it is unavoidable that fabrics that contain
vegetable or cooking oil or have been contaminated
by hair care products be placed in a tumble dryer
they should first be washed in hot water with extra
detergent. This will reduce, but not eliminate, the
hazard.
• WARNING: Never stop a tumble dryer before
the end of the drying cycle unless all items are
quickly removed and spread out so that the heat is
dissipated.
• Openings must not be obstructed.
• The lint trap has to be cleaned frequently.
• Lint must not be allowed to accumulate around
the dryer.
DAMAGE DANGER
1. Do not dry over the rated capacity.
2. Do not operate the dryer without the filter door and
filter base.
3. Do not dry the clothes before being spun.
4. Do not expose the dryer directly under the sun, and
indoor use only.
5. Do not install the dryer in a humid or damp
environment.
6. When performing cleaning and maintenance, please
do remember to pull out the power plug and do not
directly wash the dryer with water.
DISPOSAL OF PACKAGING
• The packaging is designed to protect the appliance
from damage during transportation. The packaging
materials are environmentally friendly and should be
recycled. Recycling the packaging can reduce the use
of raw materials in the manufacturing process and
the amount of waste in landfill sites.

6
NOTE!
The images in this user manual are for reference only. Your appliance may appear dierently.
ACCESSORIES
The following parts are necessary
if you wish to use the drain hose to
drain the water externally. Please
follow the instructions below to do this.
Your Dryer
INSTALLATION
9
Accessories
Product Description
Note: The actual model you purchased might differ. Please see the product you purchased in kind prevail.
Installation
Connector
Hose holder
Drain hose joint
Pull up the drain
hose joint
Pull up the upper drain hose Connect the external
drain hose to the water
pump
Put the external drain hose
into the floor drain
(be careful not to bend the
external drain hose)
Power cord
Door filter
Water container
Door
Control panel
Air inlet
Maintenance cover
Drum
Top board
The following parts are necessary for this model to avoid the question of the housing drawer
is easy to fill full.
Please wear gloves to install them as per the instruction below.
Power Cord
Top Panel
Water Container
Drying Drum
Door Filter
Maintenance Cover
Air Inlet
Door
Control Panel
INSTALLATION
9
Accessories
Product Description
Note: The actual model you purchased might differ. Please see the product you purchased in kind prevail.
Installation
Connector
Hose holder
Drain hose joint
Pull up the drain
hose joint
Pull up the upper drain hose Connect the external
drain hose to the water
pump
Put the external drain hose
into the floor drain
(be careful not to bend the
external drain hose)
Power cord
Door filter
Water container
Door
Control panel
Air inlet
Maintenance cover
Drum
Top board
The following parts are necessary for this model to avoid the question of the housing drawer
is easy to fill full.
Please wear gloves to install them as per the instruction below.
Hose Holder
Condensing Drain Hose
Connector
1. Pull up the drain
hose joint
2. Pull up the upper
drain hose
3. Connect the external
drain hose into the
water pump
4. Put the external drain
hose into the floor drain
(be careful not to bend
the external drain hose)

7
Installation
IMPORTANT!
If the power cord is damaged, it must be replaced by Residentia Group or one of it’s authorised service
representatives. Please contact 1300 11 HELP (4357) and ensure the appliance is completely disconnected from the
power supply.
TRANSPORT
Move cautiously. Do not grasp any salient parts of machine. The machine door cannot be used as the handle for
transport.
If the dryer can't be transported upright the dryer can be tilted at an angle no less than 30°.
Risk of injury and damage! Improper handling of the appliance may result in injury.
• The appliance is very heavy. Never transport or carry the appliance alone; always with the assistance of another
person.
• Remove all obstacles on the transport route and from the installation location, e.g. open doors and clear away
objects lying on the floor.
• Do not use the open door as a handhold.
• Remove all package material before using the appliance.
• Before setting up the tumble dryer, check it for any externally visible damage.
Do not install or use a damaged tumble dryer.
• Do not install the tumble dryer in a room where there is a risk of frost occurring. At temperatures around freezing
point the tumble dryer may not be able to operate properly. There is a risk of damage if the condensed water is
allowed to freeze in the pump and hoses.
INSTALLATION POSITIONING
• Children can become entangled in the packaging film or swallow small parts and suocate. Do not allow children
to play with the packaging.
• The appliance must not be installed behind a lockable door, a sliding door or a door with a hinge on the opposite
side to that of the tumble dryer, in such a way that a full opening of the tumble dryer door is restricted.
• Do not restrict the floor clearance through deep pile carpets, strips of wood or similar. This might cause heat
built-up which would interfere with the operation of the appliance.
1. It is recommended that, for your convenience, the machine is positioned close to your washing machine.
2. Do not stack this dryer on washing machine without stacking kits. (If you want to stack this dryer on a washing
machine, please purchase the independent parts. Installation shall be done by the manufacturer, its service
agent or similarly qualified persons to avoid any hazards.)
3. The tumble dryer must be installed in a clean place, where dirt does not accumulate. Air must be able to circulate
freely around the appliance. Do not obstruct the front air inlet or the air intake grilles at the back of the machine.
4. To keep vibration and noise to minimum level when the dryer is in use, place it on a firm and level surface.
5. The feet must never be removed.
LEVEL ADJUSTING
Once in its permanent operating position, check that
the dryer is absolutely level with the aid of a spirit level.
If it is not, adjust the feet by hand or using a tool.
POWER SUPPLY CONNECTION
1. Make sure that the voltage of the power supply is the same as the electric specification.
2. Do not connect the dryer with the power connection board, a universal plug or socket, do not use multi-plug
adapters and extension cables.
11
INSTALLATION
Level Adjusting
Once in its permanent operating position, check that
the dryer is absolutely level with the aid of a spirit level.
If it is not, adjust the feet by hand or using a tool.
Power Supply Connection
4. To keep vibration and noise within minimum level when the dryer is in use, it must
be placed on a firm and level surface.
5. The feet must never be removed.
1.Make sure that the voltage of the power supply is the same as the electric specification.
2.Do not connect the dryer with the power connection board, a universal plug or socket,
do not use multi-plug adapters and extension cables.

8
YOUR CONTROL PANEL
1. On/O
2. Start/Pause
3. Additional Function Buttons
4. LED Display Screen
5. Program control dial
DISPLAY SCREEN SYMBOLS
18
OPERATION
Child lock
Remaining Time indicator/Error message
Clean filters (warning)
Intensity
My Cycle
Display
Delay
Anti-crease
Control Panel
4
Delay
Child Lock
Time Remaining Indicator /Error Message
Clean Filters Warning
Anti-crease
Intensity
My Dry
1
2
3
5

9
Operating Instructions
BEFORE FIRST USE
Leave it to stand for 2 hours after transporting.
Before first use, please use some soft fabric to clean the inside drum.
1. Put some clean rags into the drum
2. Plug the power, press On/O
3. Select the Refresh Program, press Start/Pause button
4. After finishing this program, please refer to the “Maintenance and Cleaning” section to clean the filter
door.
Note: During drying, the compressor and the water will generate some noise which is completely normal.
BEFORE DRYING
1. Before drying, thoroughly spin the laundry in washing machine. High spin speed shortens the drying time
and saves energy.
2. For uniform drying result, sort the laundry according to fabric type and select the appropriate drying
program.
3. Before drying, please close zips, hooks and eyelets, button, tie fabric belts, etc.
4. Remove all objects from pockets such as lighters and matches.
5. Sew in or remove under wiring from bras.
6. Close duvet covers and pillow cases to prevent small items from being rolled up inside them.
7. Leave jackets open and undo any long zips so that textiles dry evenly.
8. Do not over dry the clothes, because over dried clothes can easily get creases.
9. Do not dry the articles containing rubber or similar elastic materials.
10. Keep the area around the tumble dryer clean. Coal dust or flour may cause an explosion.
11. The door shall be opened only after the program of the tumble dryer is finished to avoid being scalded by
hot steam or over heated drying machine.
12. Clean the lint filter and empty water container after each use to avoid extension of drying time and
increase of energy consumption.
13. Do not dry clothes after dry-clean process.
APPROXIMATE WEIGHTS OF DRY CLOTHES
Note: Do not put more clothing in the dryer than the rated capacity.
Do not dry dripping wet laundry, it may damage the laundry.
14
OPERATION
Do not put more load than rated.
• Do not dry dripping wet laundry. The dryer might get damaged
•
Note!
The reference weight of dry clothes (weight per item)
Sweater
(mixed 800g)
Jacket
( 800g ) cotton
Jeans
(800g)
Bath Towel
( 900g )cotton
Single bedsheet
( 600g )cotton
T-Shirt
( 180g )cotton
Work clothes
( 1120g)
Underwear
( 70g )cotton
Pyjamas
( 200g)
Socks
( 50g )mixed-weave
Shirt
( 300g )cotton
Only dry laundry suitable for tumble drying. Regard the laundry care labels:
Suitable for tumble drying
Normal drying process: Drying in the tumbler is possible under normal load and
temperature 80°.
Mild drying process: Caution is appropriate when tumble drying. Select mild
process with reduced thermal action.
Do not tumble dry: Articles unsuitable for drying in the tumbler.

10
QUICK START
CAUTION!
• Prior to using the dryer, ensure that it is correctly installed.
AFTER WASHING
The appliance will sound an alert and the display with show "00:00" after the drying cycle is complete.
NOTE!
The images in this user manual are for reference only. Your appliance may appear dierently.
DRYING START
The drum will rotate after the program starts. The cycle phase LED in the display will light up and the
remaining program time will be displayed.
DRYING END
1. The drum will stop rotating after the program ends. The display will show "0:00", also the cycle phase
LED showing "End" and related LED will illuminate. The dryer will start Anti-Crease function if user doesn't
remove the load.
2. Please press On/O button after unloading the tumble dryer to cut o power and pull out the plug.
OPERATION
12
After Drying
Drying
Buzzer beep and " :00"on display.0
1 2 3 4 5
open the door and
take out laundry
pull out the
container
pour out
condensate water
clean the filter power off
Quick Start
Before using, make sure the tumble dryer is installed correctly.
Note!
1
plug in
2
load
3
close the door
start
on select program select function
or default
• If the socket with a switch is used, please press the switch to turn off the power
directly.
Note!
Before Drying
Plug in Load laundry Close the
door
OPERATION
12
After Drying
Drying
Buzzer beep and " :00"on display.0
1 2 3 4 5
open the door and
take out laundry
pull out the
container
pour out
condensate water
clean the filter power off
Quick Start
Before using, make sure the tumble dryer is installed correctly.
Note!
1
plug in
2
load
3
close the door
start
on select program select function
or default
• If the socket with a switch is used, please press the switch to turn off the power
directly.
Note!
Before Drying
Press On Select desired
program Select any
desired additional
programs
Press Start
OPERATION
12
After Drying
Drying
Buzzer beep and " :00"on display.0
1 2 3 4 5
open the door and
take out laundry
pull out the
container
pour out
condensate water
clean the filter power off
Quick Start
Before using, make sure the tumble dryer is installed correctly.
Note!
1
plug in
2
load
3
close the door
start
on select program select function
or default
• If the socket with a switch is used, please press the switch to turn off the power
directly.
Note!
Before Drying
Open the door
and take out
the laundry
Pull out the
container Pour out the
condensate
water
Clean the
filter Power o
OPERATION
12
After Drying
Drying
Buzzer beep and " :00"on display.0
1 2 3 4 5
open the door and
take out laundry
pull out the
container
pour out
condensate water
clean the filter power off
Quick Start
Before using, make sure the tumble dryer is installed correctly.
Note!
1
plug in
2
load
3
close the door
start
on select program select function
or default
• If the socket with a switch is used, please press the switch to turn off the power
directly.
Note!
Before Drying
Operating Instructions (Cont.)

11
USING THE ADDITIONAL FUNCTIONS
DELAY FUNCTION
This function is used for delaying the start of the drying program up to 24 hours. When the delayed program
starts, the time starts to countdown on the display and the delay icon blinks.
1. Load your laundry and make sure the machine door is closed.
2. Press the On/O button, then use the program selector knob to select the desired program.
3. You can additionally select the Anti-Crease or Signal functions according to your need.
4. Press the Delay button.
5. Repeatedly to press the Delay button to select the desired delay time.
6. Then press the Start/Pause button and the dryer will be in standby and the delay time will start counting
down.
The drying procedure will be automatically performed when the delay time is over.
7. If you press the Start/Pause button again, the delay function will be paused.
8. If you want to cancel the “Delay” function, please press the On/O button.
TIME
When the Time program is selected, the Time button can be used to adjust the drying time in 10 minute
increments.
ANTICREASE FUNCTION
At the end of the drying cycle, the anti-crease operation time is automatically set to 30 minutes or 120 minutes
if you select it. Press the Anti-crease button to select the time. If you do not want to use this function simply
remove your laundry at the end of the cycle.
This function prevents the laundry from creases. The laundry can be removed during the anti-crease phase.
Except Cool, Wool and Refresh, all the other programs have this function.
INTENSITY
You can adjust the dryness level of the laundry by pressing the Intensity button.
1. The intensity function can be activated only before the program starts.
2. Except the Cotton Iron, Delicate, Wool and Time program, all the other programs can be adjusted with the
Intensity function.
MY DRY
Used to define and save your favourite program, so you can use it frequently with the press of a button.
1. Select the desired program and other drying functions.
2. Press and hold the Time for 3 seconds until the beep sounds and the desired program settings have been
saved.
3. Next time you dry, turn the program selector to the My Dry position, then you can start your favourite
program. If you want to change the My Dry settings, repeat the steps (1) and (2).
CHILD LOCK
This machine incorporates a special child safety lock, which can prevent children from carelessly pressing
buttons and doing damage to themselves or the appliance.
1. When the drying cycle is running, press the Anti-Crease button at the same time for 3 seconds to start
the child lock function.
2. When child lock function is set, the display will show Child lock icon and all button are deactivated,
except the On/O button.
3. To deactivate the child lock function, the Anti-Crease button shall be pressed at the same time for
3 seconds.

12
DRYING PROGRAMS TABLE
PROGRAM MAX LOAD RECOMMENDED USE/ PROPERTIES DELAY TIME
Cotton
Extra
8.0kg
For single or multi layered cotton laundry to be dried
completely for immediate storage.
Y N
Standard
Iron For single layered cotton laundry to remain damp
for ironing.
Delicate - 1.0kg For delicate laundry that is suitable for drying or laundry
advised to be hand washed at a low temperature. Y N
Mix - 3.5kg For mixed fabrics from cotton and synthetics. Y N
Synthetics
Extra
3.5kg
For thick or multi-layer synthetic fabrics to be
dried completely Y N
Standard To dry thin synthetic textiles, which are not ironed, such as
easy care shirts, baby cloths or socks.
Wool - 1.0kg To refresh you wool items and make them more
fresh and fluy. Y N
Special
Jeans 4.0kg To dry jeans or denim clothes that are spun at high speed
in the dryer.
Y N
Bed Linen 4.0kg To dry bed linen, bed sheets or other large items.
Sports 3.0kg To dry sportswear and thin fabrics from polyester,
which are not ironed.
Shirts 1.0kg
For easy care laundry such as shirts and blouses equipped
with anti-crease functionality to minimise the ironing
eort. Place clothes loosely in the dryer. Once dried,
remove quicklyand hang it on a clothes hanger.
My Dry - - Define and save your favourite program settings. Y -
Time
Warm -
To dry individual items or complete the drying process
of multi-layer fabrics with dierent drying behaviour,
such as jackets, pillows or voluminous items.
Min. 10 minutes — Max. 120 minutes.
Y Y
Cool - To air items without heating.
Min. 10 minutes — Max. 120 minutes.
Refresh 1.0kg
To refresh clothes kept at closed environment for a long
timeor to remove odors. Min. 10 minutes — Max. 120
minutes.
Operating Instructions (Cont.)

13
Cleaning & Maintenance
CLEANING AND CARE
EMPTYING THE WATER CONTAINER
WARNING!
Empty the water container after each use. Once the water container is filled completely, the program
will be paused and the " " icon will light. After the container is emptied, the dryer can be restarted by
pressing Start/Pause button.
• Do not drink the condensate water.
• Do not use the dryer without the water container.
CLEANING THE FILTERS
This dryer has a primary door lint filter and a base filter in front of the heat exchanger for additional
protection. Make sure you clean the door filter after each cycle. The base filter need to be cleaned after
each fifth drying program.
CLEANING THE DOOR FILTER
1. Open the door.
2. Take out the door filter.
3. Open the filter and remove the flu on the filter.
You can use running water to help clean it.
4. Dry the filter door thoroughly before reinstalling it.
Note: Take notice of the correct orientation
of the filter before inserting it back.
WARNING!
• The flu accumulated on the filter will block the air
circulation. Not cleaning the filter regularly will increase
drying time and energy consumption.
• Disconnect the power cord before cleaning!
• Do not operate the dryer without the filter!
CLEANING THE HEAT EXCHANGER
WARNING! Do not touch the heat exchanger with your hand as it may cause injury.
As necessary, approx. once every 6 months, remove the flu from the heat exchanger using a vacuum
cleaner with a dusting brush attached. Clean the heat exchanger without applying any pressure. Otherwise
the heat exchanger could be damaged. The dryer will not dry if the cooling fins are damaged or bent.
MAINTENANCE
21
Empty the water container
Clean the filter door
1. Pull out and hold the water container
with two hands.
2. Tilt the water container, pour out the
condensate water into the basin.
3. Install the
water container.
Clean the filters
Cleaning and Care
This dryer has a primary door lint filter and a base filter in front of the heat exchanger
for additional protection. Make sure you clean the door filter after each cycle.
The base filter need to be cleaned after each fifth drying programme.
1. Open the door.
2. Take out the filter.
3. Open the filter and remove the fluff on
the filter, You can clean it in water.
4. Dry the filter thoroughly before
installing it back.
door
running
door
• Take notice of the correct orientation
before to insert the door filter.
Note!
Door Filter
• Empty the water container after each use. Once the water container is filled
completely, the programme will be paused and the " " icon will light. After
the container is emptied, the dryer can be restarted by pressing
【Start/Pause】button.
• Do not drink the condensate water.
• Do not use the dryer without the water container.
Warning!
!!
Pull out the water
container and keep
level with two hands.
Tilt the water container
to pour out condensate
into the basin.
MAINTENANCE
21
Empty the water container
Clean the filter door
1. Pull out and hold the water container
with two hands.
2. Tilt the water container, pour out the
condensate water into the basin.
3. Install the
water container.
Clean the filters
Cleaning and Care
This dryer has a primary door lint filter and a base filter in front of the heat exchanger
for additional protection. Make sure you clean the door filter after each cycle.
The base filter need to be cleaned after each fifth drying programme.
1. Open the door.
2. Take out the filter.
3. Open the filter and remove the fluff on
the filter, You can clean it in water.
4. Dry the filter thoroughly before
installing it back.
door
running
door
• Take notice of the correct orientation
before to insert the door filter.
Note!
Door Filter
• Empty the water container after each use. Once the water container is filled
completely, the programme will be paused and the " " icon will light. After
the container is emptied, the dryer can be restarted by pressing
【Start/Pause】button.
• Do not drink the condensate water.
• Do not use the dryer without the water container.
Warning!
!!
Reinstall the water
container once
empty.
MAINTENANCE
21
Empty the water container
Clean the filter door
1. Pull out and hold the water container
with two hands.
2. Tilt the water container, pour out the
condensate water into the basin.
3. Install the
water container.
Clean the filters
Cleaning and Care
This dryer has a primary door lint filter and a base filter in front of the heat exchanger
for additional protection. Make sure you clean the door filter after each cycle.
The base filter need to be cleaned after each fifth drying programme.
1. Open the door.
2. Take out the filter.
3. Open the filter and remove the fluff on
the filter, You can clean it in water.
4. Dry the filter thoroughly before
installing it back.
door
running
door
• Take notice of the correct orientation
before to insert the door filter.
Note!
Door Filter
• Empty the water container after each use. Once the water container is filled
completely, the programme will be paused and the " " icon will light. After
the container is emptied, the dryer can be restarted by pressing
【Start/Pause】button.
• Do not drink the condensate water.
• Do not use the dryer without the water container.
Warning!
!!
Removing the
door filter.
MAINTENANCE
22
regularly will increase drying time and energy consumption.
• Disconnect the power cord before cleaning!
• Do not operate the dryer without the filter!
• The fluff accumulated on the filter will block the air circulation. Not cleaning the filter
Note!
As necessary, approx. once every 6 months, remove the fluff from the heat
exchanger using a vacuum cleaner with a dusting brush attached.
Clean the heat exchanger without applying any pressure. Otherwise the heat
exchanger could be damaged. The dryer will not dry
if the cooling fins are damaged or bent.
•
•
Clean the heat exchanger
Warning!
!!
Do not touch the heat exchanger with your hand,
which may cause an injury.

14
MAINTENANCE
WARNING!
• Disconnect the power cord before cleaning.
• Clean the dryer with a clean damp cloth only.
• Do not use solvents, abrasive cleaners, glass cleaners or all-purpose cleaners.
These could damage plastic surfaces and other parts.
• Please wear gloves when cleaning.
CLEANING YOUR DRYER
• Prepare a clean damp cloth using clean water.
• Clean the door, especially the inside window.
• Clean the sealing around the door opening.
• Clean the humidity sensor inside the drum.
• Take out all the filters, clean the sealing and air flow openings.
• Before starting the dryer, dry all parts with a soft cloth.
Cleaning & Maintenance (Cont.)

15
Cleaning & Maintenance (Cont.)
Technical Specifications
Below outlines the technical specifications for your InAlto Heat Pump Dryer.
Model IHPD80
Size 595W 650D 845H (mm)
Net Weight 49kg
Rated Input Power 800W
Refrigerant/Amount R290/150g
Rated Capacity 8.0kg
Rated Voltage 220–240V~
Rated Frequency 50Hz
Note: The rated capacity is the maximum capacity to be dried at
one time. Make sure that the dry clothes which are loaded into the
appliance do not exceed the rated capacity.

16
Troubleshooting
OPERATION IN CASE OF EMERGENCY
In the event of an emergency you should:
• Switch o all controls.
• Switch the dryer o at the power point or at the fuse box.
• Call the Residentia Support Team on 1300 11 HELP (4357).
Some minor faults can be fixed by referring to the instructions given in the Troubleshooting section
below. There is also a self-help section online at https://support.residentiagroup.com.au/
DESCRIPTION SOLUTION
Display is not on
• Check if the power supply works.
• Check if the mains plug is inserted.
• Check the selected program.
• Press the On/O button.
"FUL" Displays
• Check the water container. If it's full, please pour out the condensate
water and restart the dryer.
• If the container is not full, please restart the dryer.
• If the “FUL“ icon is still lit after you have finished the first two steps,
please contact the after sales service team.
" " Displays • Clean the lint filter.
Dyer does not start
• Connect the dryer to the mains.
• Turn on the tumble dryer.
• Check the door is closed.
• Check the program is set.
• Press the Start/Pause button.
Degree of dryness was not
reached or drying time too
long
• Clean lint filter and .
• Empty the water container.
• Check the drain hose.
• Check installation place is appropriate.
• Keep the air inlet clean.
• Use higher drying intensity level program or time program.
There are humming noises • The compressor is operating. These noises are quite normal and do not
indicate a fault.
The dryer switches o at the
end of the program
• This is normal operation. The dryer will switch o automatically for
energy saving
18
OPERATION
Child lock
Remaining Time indicator/Error message
Clean filters (warning)
Intensity
My Cycle
Display
Delay
Anti-crease

17
ERROR MESSAGES AND SOLUTIONS
WARNING! Never dismantle the dryer.
INDICATION REASON SOLUTION
"E32" displays Humidity sensor error.
Please contact the Residentia Group support
term on 1300 11 HELP (4357).
"E33" displays Temperature sensor error.
"E82" displays PCB communication error.
"FUL" displays
Water pump failure or water
level sensor failure.
Water Container is full. Empty the water container.
WARNING!
• Only authorised technicians can carry out repairs.
• If the LED displays other prompt and the dryer does not work, please call the Residentia Group support team.

18
Purchase Details
For future reference, please record the following information which can be found
on the rating plate and the date of purchase which can be found on your sales invoice.
STORE DETAILS
STORE NAME
ADDRESS
TELEPHONE
PURCHASE DATE
PRODUCT DETAILS
MODEL NO.
SERIAL NO.*

19
Attach your receipt to this page

20
Warranty Information
AUSTRALIAN WARRANTY TERMS & CONDITIONS
LAUNDRY APPLIANCES
This document sets out the terms and conditions of the
product warranties for Residentia Group Appliances.
It is an important document. Please keep it with your
proof of purchase documents in a safe place for future
reference should you require service for your Appliance.
1. IN THIS WARRANTY
(a) ‘acceptable quality’ as referred to in clause 10 of
this warranty has the same meaning referred to in
the ACL;
(b) ‘ACL’ means Trade Practices Amendment
(Australian Consumer Law) Act (No.2) 2010;
(c) ‘Appliance’ means any Residentia Group product
purchased by you accompanied by this document;
(d) ‘ASR’ means Residentia Group authorised service
representative;
(e) ‘Residentia Group’ means Residentia Group Pty Ltd
of 165 Barkly Avenue Burnley VIC, ACN 600 546 656
in respect of Appliances purchased in Australia;
(f ) ‘major failure’ as referred to in clause 10 of this
warranty has the same meaning referred to
in the ACL and includes a situation when an
Appliance cannot be repaired or it is uneconomic
for Residentia Group, at its discretion, to repair an
Appliance during the Warranty Period;
(g) ‘Warranty Period’ means:
(i) where the Appliance is used for personal,
domestic or household use (i.e. normal single
family use) as set out in the instruction
manual, the Appliance is warranted against
manufacturing defects for 24 months (or
36 months where a valid extended warranty
registration has occurred), following the date
of original purchase of the Appliance;
(h) ‘you’ means the purchaser of the Appliance not
having purchased the Appliance for re-sale, and
‘your’ has a corresponding meaning.
2. This warranty only applies to Appliances purchased
and used in Australia and is in addition to (and does
not exclude, restrict, or modify in any way) any
non-excludable statutory warranties in Australia.
3. During the Warranty Period Residentia Group or
its ASR will, at no extra charge if your Appliance
is readily accessible for service, without special
equipment and subject to these terms and
conditions, repair or replace any parts which it
considers to be defective. Residentia Group or its
ASR may use remanufactured parts to repair your
Appliance. You agree that any replaced Appliances
or parts become the property of Residentia Group.
This warranty does not apply to light globes,
batteries, filters or similar perishable parts.
4. Parts and Appliances not supplied by Residentia
Group are not covered by this warranty.
5. You will bear the cost of transportation, travel and
delivery of the Appliance to and from Residentia
Group or its ASR. If you reside outside of the service
area, you will bear the cost of:
(a) travel of an authorised representative;
(b) transportation and delivery of the Appliance to and
from Residentia Group or its ASR, in all instances,
unless the Appliance is transported by Residentia
Group or its ASR, the Appliance is transported at
the owner’s cost and risk while in transit to and
from Residentia Group or its ASR.
6. Proof of purchase is required before you can make a
claim under this warranty.
7. You may not make a claim under this warranty
unless the defect claimed is due to faulty or
defective parts or workmanship. Residentia Group
is not liable in the following situations (which are
not exhaustive):
Other manuals for IHPD80
1
Table of contents
Other Inalto Dryer manuals
Popular Dryer manuals by other brands

Dryflow
Dryflow JetForce Pro user manual

Malloca
Malloca MTD-T1510HP user manual

Samsung
Samsung DV9 T 2 Series user manual

Mitsubishi Electric
Mitsubishi Electric Jet Towel JT-MC106G-W-NA instruction manual

Siemens
Siemens WT46G4000W Installation and operating instructions

Asko
Asko T884XL operating instructions