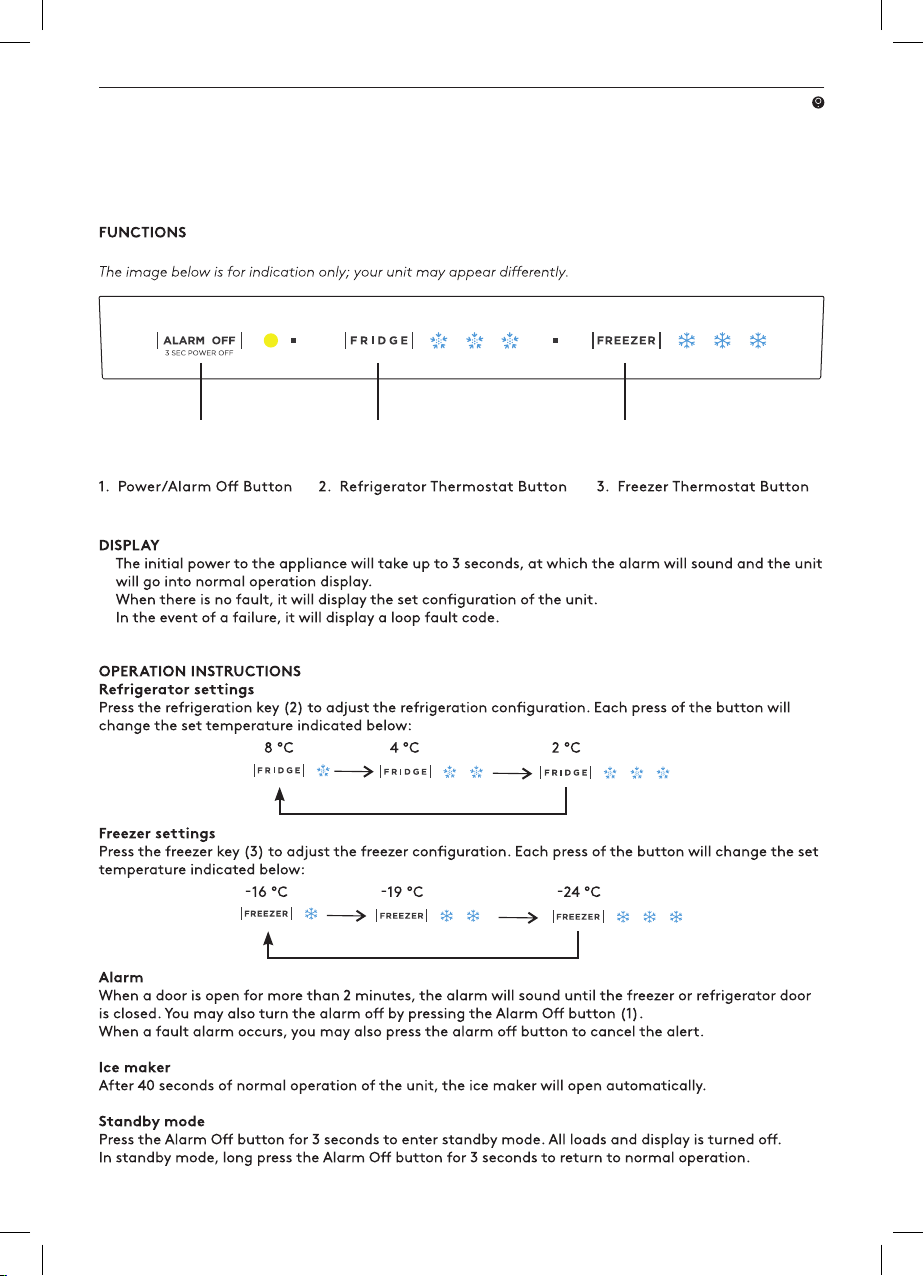
Inalto IBM529X User manual

MODEL CODE/S
IBM529X
529L
Bottom Mount
Refrigerator
—
USER MANUAL INALTO.HOUSE
A HIGHER LEVEL OF REFRIGERATION

PAGE 2
Congratulations on purchasing your new appliance!
The InAlto brand is proudly distributed within Australia by
Residentia Group Pty Ltd and within New Zealand by Applico Ltd.
Please refer to the warranty card at the rear of this manual for
information regarding your product’s parts and labour warranty,
or visit online at:
www.residentia.group
www.applico.co.nz
www.inalto.house
Both Residentia Group & Applico are customer obsessed and our
Support Teams are there to ensure you get the most out of your
appliance. Should you want to learn more about recommended
usage, the various features of your appliance, and importantly
taking care of the unit when cleaning, our Support Teams are
here to help.
Telephone Contacts:
AU: 1300 11 4357
NZ: 0800 763 448
It is important that you read through the following use and care
manual thoroughly to familiarise yourself with the installation and
operation requirements of your appliance to ensure
optimum performance.
Again, thank you for choosing an InAlto appliance and we look
forward to being of service to you.
Residentia Group Pty Ltd
ACN. 600 546 656
165 Barkly Avenue
Burnley, Victoria
Australia 3121
—
Applico Ltd
635 Great South Road
Penrose, Auckland 1061
New Zealand
A RESIDENTIA
GROUP INITIATIVE
Welcome
INALTO.HOUSE
PAGE 3
Customer Care
InAlto recommends the use of original spare parts. When contacting our customer service
team, please ensure that you have the following information at hand (which can be found on your
appliances’ rating plate).
— Model Number
— Serial Number
AU: 1300 11 4357 | NZ: 0800 763 448
General Safety Instructions 4
Installation Instructions 8
Product Overview 16
Care and Maintenance 20
Troubleshooting 22
Technical Information 23
Warranty Information 24
Contents

PAGE 4
IMPORTANT SAFETY INSTRUCTIONS
READ CAREFULLY AND KEEP FOR FUTURE
REFERENCE
Read this manual thoroughly before first use,
even if you are familiar with this type of product.
The safety precautions enclosed herein reduce
the risk of fire, electric shock and injury when
correctly adhered to. Make sure you understand all
instructions and warnings.
Keep the manual in a safe place for future
reference, along with the completed warranty
card and purchase receipt. If you sell or transfer
ownership of this product, pass on these
instructions to the new owner.
Always follow basic safety precautions and
accident prevention measures when using an
electrical appliance.
The appliance has to be unplugged after use and
before carrying out user maintenance on the
appliance.
WARNING:
• Keep ventilation openings, in the appliance
enclosure or in the built-in structure, clear of
obstruction.
• Do not use mechanical devices or other means
to accelerate the defrosting process, other than
those recommended by the manufacturer.
• Do not damage the refrigerant circuit.
• Do not use electrical appliances inside the food
storage compartments of the appliance, unless
they are of the type recommended by the
manufacturer.
• Please abandon the refrigerator according to
local regulators for it use flammable blowing
gas and refrigerant.
• When positioning the appliance, ensure the
supply cord is not trapped or damaged.
• Do not locate multiple portable socket-outlets
or portable power supplies at the rear of the
appliance.
• Do not use extension cords or ungrounded
(two prong) adapters.
DANGER:
Risk of child entrapment. Before you throw away
your old refrigerator or freezer:
• Take o the doors.
• Leave the shelves in place so that children may
not easily climb inside.
General Safety Instructions

INALTO.HOUSE
PAGE 5
USAGE CONDITIONS AND RESTRICTIONS
• This appliance can be used by children aged
from 8 years and above and persons with
reduced physical sensory or mental capabilities
or lack of experience and knowledge if they
have been given supervision or instruction
concerning use of the appliance in a safe way
and understand the hazards involved. Children
shall not play with the appliance. Cleaning and
user maintenance shall not be made by children
without supervision. Children aged 3 to 8 years
are allowed to load and unload refrigerating
appliances.
• The space between the refrigerator doors and
refrigerator body are small. Be careful not to
jam your finger in the small openings.
• Please be gentle when closing the refrigerator
door to avoid falling objects.
• To avoid injury, do not place heavy objects at
the top of the refrigerator as they may fall when
the refrigerator door is opened or closed.
• Refrigerating appliances might not operate
consistently (possibly of defrosting of
contents or temperature becoming too warm
in the frozen food compartment) when sat
for an extended period of time below cold
temperatures that this refrigerator is
designed for.
• Do not modify: Do not attempt to alter or
modify this appliance in any way.
• Repair: Do not attempt to repair or replace any
part of your appliance unless it is specifically
recommended in this manual. All other
servicing should be referred to a qualified
technician. Contact our Customer Service Team
for advice.
• Children: Supervise young children to ensure
they do not play with the appliance.
Never allow children to operate, play with or
crawl inside the appliance.
• Explosive or flammable substances: Do not
store explosive substances such as aerosol cans
with a flammable propellant in this appliance.
Do not store or use petrol or any other
flammable vapours and liquids in the vicinity
of this or any other appliance. Do not use such
substances for cleaning the appliance. The
fumes can create a fire hazard or an explosion.
To avoid contamination of food, please respect
the following instructions:
• Opening the door for long periods can cause a
significant increase in the temperature in the
compartments of the appliance.
• Let hot foods cool to room temperature before
placing in the unit. Overloading the appliance
forces the compressor to run longer causing
your food to cool slowly which may result in
your food spoiling or losing quality.
• Clean regularly surfaces that can come in
contact with food and accessible drainage
systems.
• Clean water tanks if they have not been used
for 48 h; flush the water system connected to
a water supply if water has not been drawn for
5 days.†
• Store raw meat and fish in suitable containers
in the refrigerator, so that it is not in contact
with or drip onto other food.
• Two-star (**) frozen food compartments are
suitable for storing pre-frozen food, storing or
making ice cream and making ice cubes.†
• One (*), two (**) and three-star (***)
compartments are not suitable for the freezing
of fresh food.†
• If the refrigerating appliance is left empty for
long periods, switch o, defrost, clean, dry,
and leave the door open to prevent mould from
developing within the appliance.
†Please confirm whether it is applicable according
to you product compartment type.
PAGE 6
ELECTRICAL SAFETY
Voltage:
• Before connecting and turning on the
appliance, ensure the electrical voltage and
circuit frequency correspond to that indicated
on the appliance rating label.
Earthing:
• This appliance should be properly earthed for
your safety. The power cord of this appliance
is equipped with a three-prong plug for use in
standard wall outlets to minimise the possibility
of electrical shock. Do not modify the cord
and/or plug provided with the appliance.
Improper use of the earthed plug can result in
the risk of electric shock.
Connection:
• This appliance requires a standard
220-240 V AC 50Hz electrical outlet.
• Do not overload the electrical circuit.
Power cord:
• Do not pull the power cord when removing the
power plug of the appliance. Please firmly grasp
the plug and pull it out from the socket directly.
• To ensure safe use, do not damage the power
cord or use the power cord if it is damaged
or worn.
• Do not kink or damage the power cord; do not
leave it exposed or dangling. Secure it at the
back of the appliance so no one steps on or
places anything on the cord or against it.
• Keep the cord out of reach of children.
• When moving the appliance, make sure not to
damage the power cord.
Auxiliary Items:
• Do not use an inverter, adaptor or extension
cord with this appliance. If the cord is too
short, have a qualified electrician install an
outlet near the appliance. Use of an extension
cord and an inverter can negatively aect the
performance of the unit.
Protect from moisture:
• To protect against the risk of electric shock, do
not immerse the unit, cord or plug in water or
spray it with any other liquid.
• Do not connect or disconnect the electric plug
when your hands are wet. Turn the power switch
o before removing the plug from the socket.
WARNING:
When disconnecting:
• To reduce the risk of fire, electric shock or
personal injury, always unplug the appliance
from the socket when not in use, when moving
and before cleaning or servicing.
• Never unplug the unit by pulling the power cord.
Always grip the plug firmly and pull straight out
from the power point.
Electrical work:
• Any electrical work required for the installation
of this appliance should be carried out by
a qualified electrician. Please contact our
Customer Service Team to arrange one for you.
CORRECT DISPOSAL OF THIS PRODUCT
• This marking indicates that this product
should not be disposed of with other household
wastes throughout the EU. To prevent possible
harm to the environment or human health
from uncontrolled waste disposal, recycle it
responsibly to promote the sustainable reuse of
material resources. To return your used device,
please use the return and collection systems
or contact the retailer where the product was
purchased. They can take this product for
environmentally safe recycling.
• For more information, please contact the local
authority or your retailer where you purchased
the product.
General Safety Instructions Continued
5

INALTO.HOUSE
PAGE 7
THIS PAGE IS INTENTIONALLY LEFT BLANK

PAGE 8
UNPACKING
Packaging materials:
• This appliance has been packaged to protect
it against transportation damage. Remove all
packaging materials from around and inside
the appliance and keep the original packaging
carton and materials in a safe place. It will help
prevent any damage if the product needs to be
transported in the future, and you can use it
to store the appliance when it is not in use. In
the event the carton is to be disposed of, please
recycle all packaging materials where possible.
• Suocation: Plastic wrapping can be a
suocation hazard for babies and young
children, so ensure all packaging materials are
out of their reach and disposed of safely.
• Power cord: Unwind the power cord to its
full length and inspect it for damage. Do not
use the appliance if it or its cord have been
damaged or are not working properly. In case
of damage, contact our after sales support line
for advice on examination, repair or return of
the damaged product.
• Read the manual: Read this manual to
familiarise yourself with the appliance. Pay
particular attention to the safety instructions
on the previous pages.
• Clean: To remove any dust from transit and
storage, wipe the interior and exterior surfaces
of the appliance with lukewarm water and
a soft cloth. Dry thoroughly.
• Do not spray or heavily wash the appliance as it
may aect the electrical insulation properties.
LOCATION
Precautions before installation:
• Before installing or adjusting the accessories
of your unit, ensure that the refrigerator is
disconnected from the power.
• Take precautions to prevent damaging the unit
or causing self harm.
• When selecting a position for your unit you
should make sure the floor is flat and firm, and
the room is well ventilated.
• Avoid locating your unit near a heat source, e.g.
cooker, boiler or radiator.
• Avoid locating your unit in damp or wet
conditions to prevent rust or performance.
• Avoid locating your unit in direct sunlight as it
may increase the electrical consumption.
• When installing the unit, ensure that 10 cm of
free space is left at both sides, 10 cm at the rear
and 30 cm at the top of the unit. This will allow
cold air to circulate around the refrigerator and
improve the eciency of the cooling process.
Installation Instructions

INALTO.HOUSE
PAGE 9
LEVELLING THE UNIT
• To level the unit, use the two levelling feet at the front of the unit.
• If the unit is not level, the door and magnetic seal alignments will not be covered properly.
• Make sure that the foot touches the ground before use.
• Turn the feet clockwise to raise the unit.
• Turn the feet counterclockwise to lower the unit.
• Adjust both feet using the procedures above to level the unit.
All images in this instruction manual are for indication only; your unit may appear dierently.
LOWER RAISE
PAGE 10
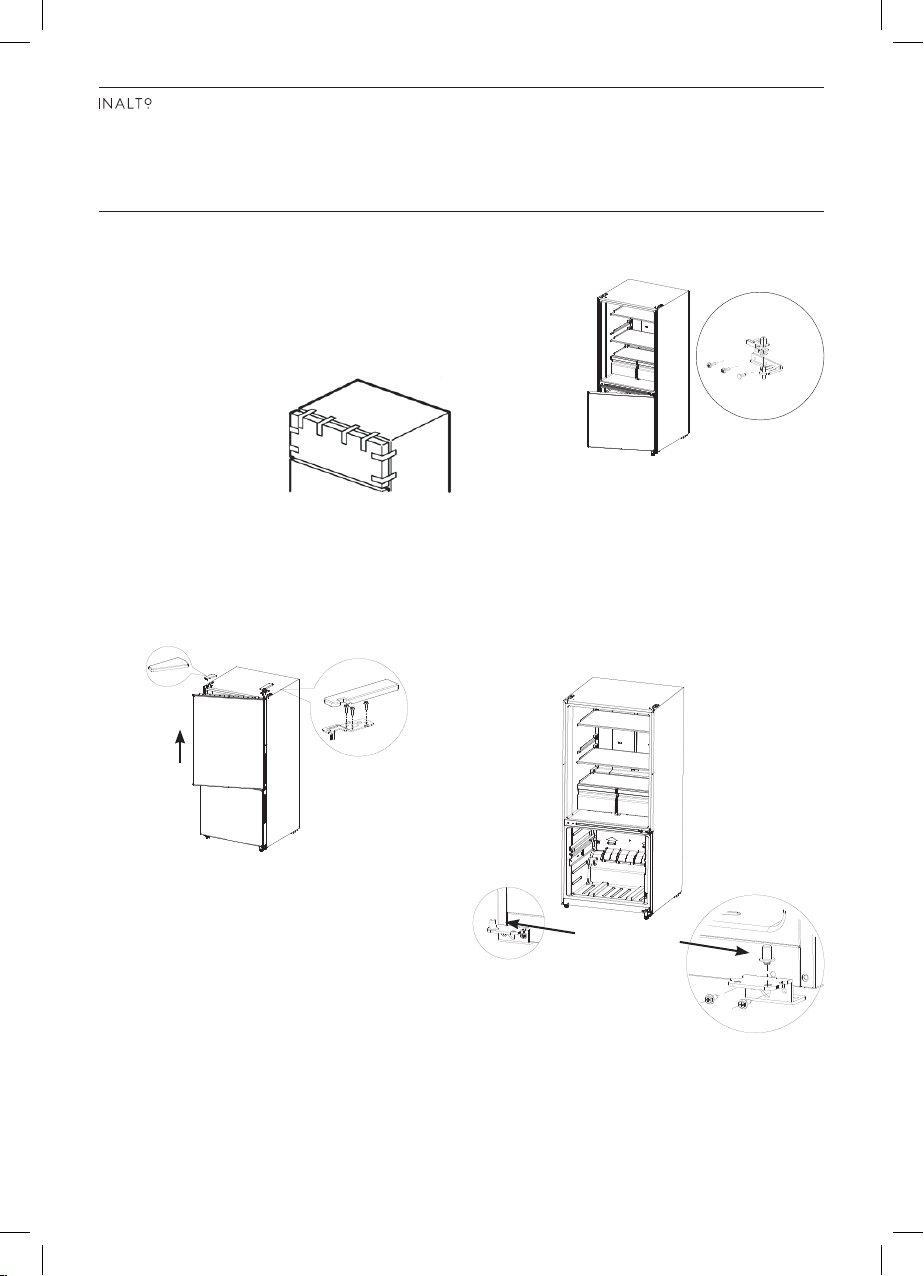
REVERSING THE DOOR SWING
To reverse the door swing to right-to-left, you will
need the following tools:
• Cross screwdriver
• Putty knife or a thin-blade screwdriver
• 5/16" socket wrench
• Masking tape
STEP 1
• Unplug your refrigerator
and remove all food
from the door shelves.
• Remove all food from
the inner door trays.
• Fix the door by tape.
STEP 2
• Remove the left cover plate and right top
hinge cover
• Unscrew the screws and remove the right
top hinge.
• Keep screws in a safe place for reuse.
STEP 3
Lift the refrigerator door up and away from the unit.
STEP 4
• Unscrew the screws from the middle hinge
• Remove the hinge
• Lift the freezer
door up and
away from
the unit.
• Keep screws
in a safe
place for
reuse.
STEP 5
• Unscrew the screws from the bottom hinge
• Remove the bottom hinge from the bottom right
side of the unit.
STEP 6
• Unscrew the hinge shaft from the right side of
the bottom hinge and move it to the left side
• Secure the bottom hinge to the bottom
left side of the unit, using the screws you
removed previously.
Installation Instructions Continued
LEFT COVER PLATE
REMOVE THE
BOTTOM HINGE
REATTACH THE
BOTTOM HINGE
HINGE PIN
CENTER
HINGE
All images in this instruction manual are for indication only; your unit may appear dierently.

INALTO.HOUSE
PAGE 11
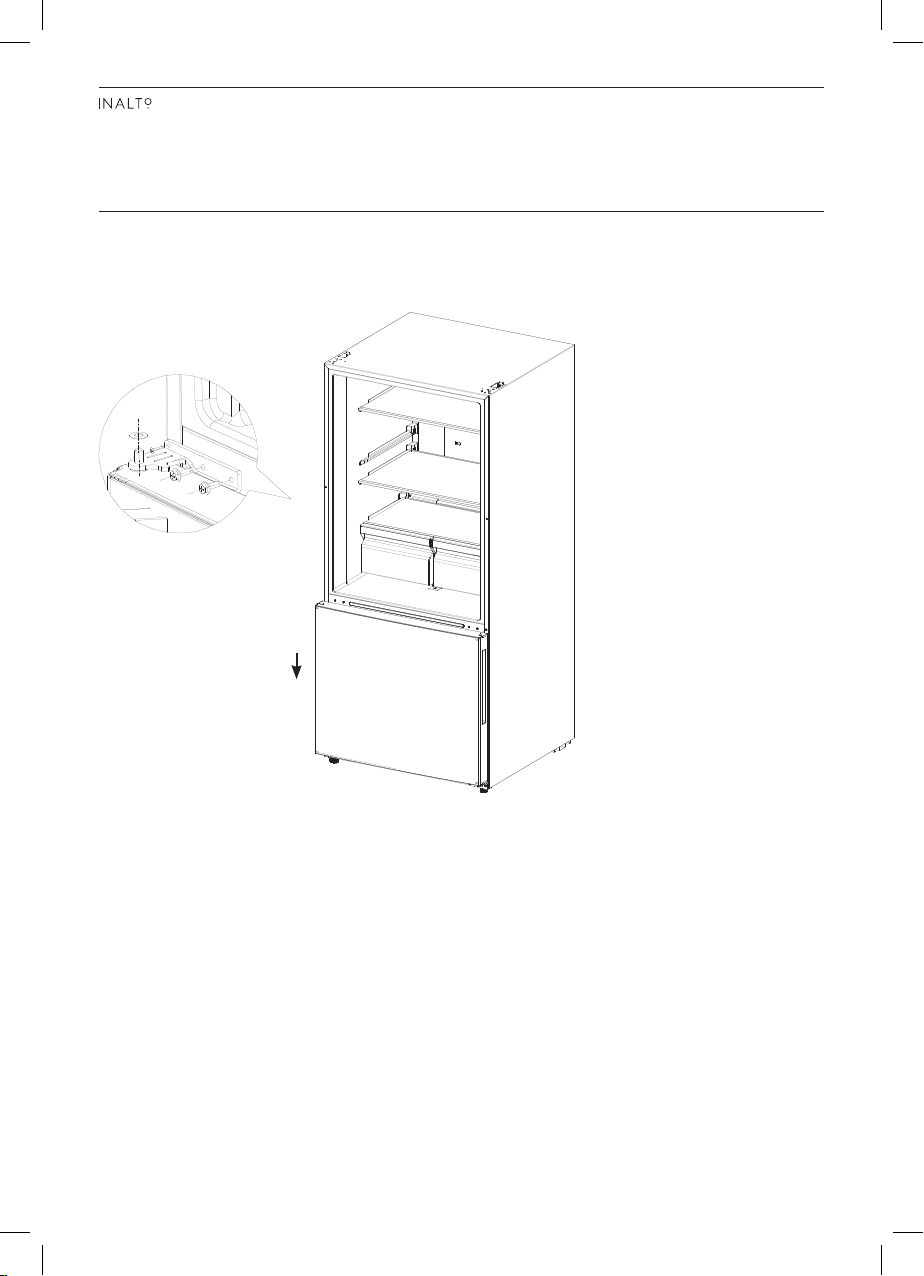
STEP 7
Dismantle the sleeves from the top right of doors and hole cap from the top left of
doors and assemble them on their alternative sides.
STEP 8
• Remove the refrigerator door stopper and install it on the other side of the door.
• Remove the freezer door self-locking block and stopper, save them to reuse.
• Take out the left self-locking block and stopper from the accessory bag in the
refrigerator and install on the left of the door.
SELFLOCKING
STOPPER
HOLE CAP SLEEVES
STOPPER
SLEEVES
All images in this instruction manual are for indication only; your unit may appear dierently.
PAGE 12
Installation Instructions Continued
STEP 9
• Lower the refrigerator door bottom hinge vertically
• Take out the middle hinge of the other side from the accessory bag and then assemble the middle
hinge on.
ATTACH THE LEFT
CENTER HINGE
All images in this instruction manual are for indication only; your unit may appear dierently.

INALTO.HOUSE
PAGE 13
STEP 10
• Put down the freezer door on the middle hinge vertically
• Take out the top hinge and cover of the opposite side from the accessory bag
• Assemble the top hinge, hinge cover and hole cover.
TOP HINGE HOLE COVER
All images in this instruction manual are for indication only; your unit may appear dierently.

PAGE 14
Installation Instructions Continued
CHANGING THE LIGHT
Any replacement or maintenance of the LED lights are intended to be made by the manufacturer, its
service agents or a similar qualified person. Please contact our Customer Service Team for advice.
BEFORE USING YOUR UNIT
• This product is household refrigerators and shall be only suitable for the storage of foods.
• According to national standards, household refrigerators shall not be used for other purposes, such as
storage of blood, drugs or biological products.
• Do not place items such as bottled or sealed container of fluid such as bottled beers and beverages in
the freezer to prevent bursts and other losses.
• Before turning the refrigerator on, make sure that it has been still for at least half an hour before
connecting it to a power supply.
• Before placing any food in your unit, turn it on and wait between 2–3 hours (or more than 4 hours
when ambient temperatures are high) to make sure it is working properly and to allow it time to fall to
the correct temperature.
• Your unit should not be overfilled.
• Allow enough space around your unit for maximum use of the door and drawer openings.
750MM
1275MM
135°
785MM
1350MM

INALTO.HOUSE
PAGE 15
THIS PAGE IS INTENTIONALLY LEFT BLANK

PAGE 16
INALTO.HOUSE
PAGE 17
PAGE 18
Product Overview Continued
OPERATION INSTRUCTIONS CONTINUED
When the freezer frozen food humidification
padding is adjusted to the far right, quick-freezing
mode closed, the freezer tray can store vegetables,
fruits and other items in it.
When the freezer frozen food humidification
padding is adjusted to the far left, quick-freezing
mode opened, the freezer tray should not
store vegetables, fruits, drinks and other
easy-to-freeze items.

INALTO.HOUSE
PAGE 19
THIS PAGE IS INTENTIONALLY LEFT BLANK

PAGE 20
Care and Maintenance
GENERAL CLEANING
• Dust behind the refrigerator and on the ground
shall be timely cleaned to improve the cooling
eect and energy saving.
• Check the door gasket regularly to make sure
there is no debris. Clean the door gasket with
a soft cloth dampened with soapy water or
diluted detergent.
• The interior of the refrigerator should be
cleaned regularly to avoid odour.
• Please turn o the power before cleaning
the interior, remove all foods, drinks, shelves,
drawers, etc.
• Use a soft cloth or sponge to clean the inside of
the refrigerator, with two tablespoons of baking
soda and a quart of warm water. Then rinse
with water and wipe clean. After cleaning, open
the door and let it dry naturally before turning
on the power.
• For areas that are dicult to clean in the
refrigerator (such as narrow sandwiches,
gaps or corners), it is recommended to wipe
them regularly with a soft rag, soft brush, etc.
and when necessary, combined with some
auxiliary tools (such as thin sticks) to ensure
no contaminants or bacteria accumulation in
these areas.
• Do not use soap, detergent, scrub powder, spray
cleaner, etc., as these may cause odours in the
interior of the refrigerator or contaminated
food.
• Clean the bottle frame, shelves and drawers
with a soft cloth dampened with soapy water
or diluted detergent. Dry with a soft cloth or dry
naturally.
• Wipe the outer surface of the refrigerator
with a soft cloth dampened with soapy water,
detergent, etc., and then wipe dry.
• Do not use hard brushes, clean steel balls,
wire brushes, abrasives (such as toothpaste),
organic solvents (such as alcohol, acetone,
banana oil, etc.), boiling water, acid or alkaline
items, which may damage the fridge surface
and interior. Boiling water and organic solvents
such as benzene may deform or damage plastic
parts.
• Do not rinse directly with water or other liquids
during cleaning to avoid short circuits or aect
electrical insulation after immersion.
WARNING:
Please unplug the unit for defrost and cleaning.
CLEANING THE DOOR TRAYS
• Follow the direction arrows in the figure below:
• Use both hands to squeeze the tray, and with
an upward motion push, you can take it out.
• After the tray has been washed, you can adjust
its position height to your storage requirements.
The image above is for indication only; your unit may
appear dierently.
CLEANING THE GLASS SHELVES
• Since the shelves sit in a groove, you must first
lift the shelf up before pulling it outwards.
Table of contents
Other Inalto Refrigerator manuals

Inalto
Inalto CLASSIQUE IUL237S User manual

Inalto
Inalto IUL237W User manual

Inalto
Inalto IIUL316 User manual

Inalto
Inalto IIF241 User manual

Inalto
Inalto 545L User manual

Inalto
Inalto IIF241 User manual

Inalto
Inalto IBF95BG User manual

Inalto
Inalto IBF91S User manual

Inalto
Inalto CLASSIQUE ITM207W User manual

Inalto
Inalto IBF95BG User manual

Inalto
Inalto IBF95BG User manual

Inalto
Inalto IBF46W User manual

Inalto
Inalto IIUL316 User manual

Inalto
Inalto IBF46W User manual

Inalto
Inalto IIFF338 User manual

Inalto
Inalto IBF95W User manual

Inalto
Inalto Classique IBM323W User manual

Inalto
Inalto IBF129S User manual

Inalto
Inalto Classique IBF112S User manual

Inalto
Inalto IIUL316 User manual


