Inalto IIF241 User manual

MODEL CODES
IIF241
248L
Integrated
Refrigerator
V3.1 | 0921
USER MANUAL INALTO.HOUSE
FOR ALL AUSTRALIAN HOMES

2
Residentia Group
Pty Ltd
ACN. 600 546 656
165 Barkly Avenue
Burnley, Victoria 3121
Australia
—
Applico Ltd
635 Great South Road
Penrose, Auckland 1061
New Zealand
—
InAlto
www.inalto.house
/inalto.house
/inalto.house
Congratulations on purchasing
your new Integrated Refrigerator!
The InAlto brand is proudly distributed within
Australia by Residentia Group Pty Ltd and within
New Zealand by Applico Ltd.
Please refer to the warranty card at the rear of this manual
for information regarding your product’s parts and labour
warranty, or visit online at:
→ www.residentia.group
→ www.applico.co.nz
→ www.inalto.house
Both Residentia Group & Applico are customer obsessed and
our Support Teams are there to ensure you get the most out
of your appliance. Should you want to learn more about
recommended usage, the various features of your appliance,
and importantly taking care of the unit when cleaning, our
Support Teams are here to help.
Telephone Contacts:
→AU: 1300 11 4357
→ NZ: 0800 763 448
It is important that you read through the following use and
care manual thoroughly to familiarise yourself with the
installation and operation requirements of your appliance to
ensure optimum performance.
Again, thank you for choosing an InAlto appliance and we
look forward to being of service to you.
Welcome

InAlto recommends the use of original spare parts. When contacting our customer
service team, please ensure that you have the following information at hand
(which can be found on your appliances’ rating plate).
• Model Number
• Serial Number
Customer Care
2 Welcome
4 Safety Warnings
8 Getting Started
9 Product Overview
9 Operation Instructions
11 Usage Tips
11 Energy Saving Tips
12 Installation
22 Reversing the Door
24 Maintenance & Cleaning
26 Troubleshooting
29 Product Specifications
30 Your Receipt
31 Purchase Details
32 Warranty Information
Contents
4
IMPORTANT SAFETY INSTRUCTIONS
READ CAREFULLY AND KEEP FOR FUTURE REFERENCE
Read this manual thoroughly before first use, even if you are familiar with this type of product.
The safety precautions enclosed herein reduce the risk of fire, electric shock and injury when correctly
adhered to.
Make sure you understand all instructions and warnings.
Keep the manual in a safe place for future reference, along with the completed warranty card
and purchase receipt. If you sell or transfer ownership of this product, pass on these instructions to
the new owner.
Always follow basic safety precautions and accident prevention measures when using an electrical
appliance, including the following:
IMPORTANT: Pay particular attention to messages that contain the words DANGER, WARNING
or CAUTION. These words are used to alert you to a potential hazard that can seriously injure you and
others. The instructions will tell you how to reduce the chance of injury and let you know what can
happen if the instructions are not followed.
Safety Warnings
WARNING
RISK OF FIRE / FLAMMABLE MATERIALS
This symbol alerts you to take care as this appliance contains
a flammable refrigerant (isobutane) and insulation blowing
gas (cyclopentane). Do not expose it to high heat, sparks and
open flames.
The refrigerant isobutane (R600a) is contained within the refrigerant
circuit of the appliance, a gas with a high level of environmental
compatibility, which is nevertheless flammable. During
transportation and installation of the appliance, ensure that none
of the components of the refrigerant circuit become damaged.
WARNINGDo not damage the refrigerant circuit! Never use an appliance with a damaged
refrigerant circuit! If the refrigerant circuit becomes damaged, avoid proximity to open fires and all
types of heat and ignition sources. Thoroughly ventilate the room in which the appliance is located.
DANGER: It is hazardous for anyone other than an authorised service person to service this appliance.
In Queensland, the authorised service person MUST hold a Gas Work Authorisation for hydrocarbon
refrigerants to carry out servicing or repairs which involve the removal of covers.
Usage Conditions and Restrictions
• Domestic use only: This appliance is intended for indoor household use only. It is not intended for
commercial, industrial or outdoor use. It is not intended for use in a recreational vehicle.
• Purpose: Do not use this appliance for anything other than its intended purpose. Other uses are not
recommended and may cause fire, electric shock or personal injury.
• Attachments: The use of attachments is not recommended by the appliance manufacturer and
distributor as they may be hazardous.
• Improper use: Damage due to improper use, or repairs made by unqualified personnel will void your
warranty. We assume no liability for any eventual damages caused by misuse of the product or
noncompliance with these instructions.

5
• WARNING Do not use mechanical devices or other means to accelerate the defrosting
process, other than those recommended by the manufacturer.
• Usage restriction: This appliance is not intended for use by persons (including children) with
reduced physical, sensory or mental capabilities, or lack of experience and knowledge, unless they
have been given supervision or instructions concerning use of the appliance by a person responsible
for their safety.
• Children: Supervise young children to ensure they do not play with the appliance. Never allow
children to operate, play with or crawl inside or on top of the appliance.
• WARNING Do not use electrical appliances on top or inside the appliance, unless they are of
the type recommended by the manufacturer.
• Explosive or flammable substances: Do not store explosive substances such as aerosol cans with a
flammable propellant in this appliance. Do not store or use petrol or any other flammable vapours
and liquids in the vicinity of this or any other appliance. Do not use such substances for cleaning the
appliance. The fumes can create a fire hazard or an explosion.
• Damage: Do not use the appliance if the power cord, plug or the appliance itself is damaged. If
the cord is damaged, contact the after sales support line and have the cord replaced by qualified
personnel in order to avoid a hazard.
• WARNING Do not damage the refrigerant circuit.
• Do not modify: Do not attempt to alter or modify this appliance in any way.
• Repair: Do not attempt to repair or replace any part of this appliance unless it is specifically
recommended in this manual. All other servicing should be referred to a qualified technician.
Contact the after sales support line for advice.
• Using: The gaps between refrigerator doors and between doors and refrigerator body are small.
Do not put your hand in these areas. Please be gentle when closing the refrigerator door to avoid
falling articles.
Do not pick up frozen items with wet hands in the freezing chamber when the refrigerator is running,
especially metal containers in order to avoid skin abrasions.
• Storage: This product is household refrigerator/freezer and shall be only suitable for the storage of
foods. According to national standards, household freezer shall not be used for other purposes, such
as storage of blood, drugs or biological products.
• WARNING Do not locate multiple portable socket-outlets or portable power supplies at
the rear of the appliance.

6
Electrical Safety
• Voltage: Before connecting and turning on the appliance, ensure the electrical voltage and circuit
frequency correspond to that indicated on the appliance rating label.
• Earthing: This appliance should be properly earthed for your safety. The power cord of this appliance
is equipped with a three-prong plug for use in standard wall outlets to minimise the possibility of
electrical shock. Do not modify the cord and/or plug provided with the appliance. Improper use of
the earthed plug can result in the risk of electric shock.
• Connection: This appliance requires a standard 220-240 V AC 50Hz electrical outlet. Do not overload
the electrical circuit.
• Power socket: Please use a dedicated power socket and do not share the power socket with any
other electrical appliances. The power plug should be firmly connected to the socket or else fires
might be caused.
• Power cord: Do not kink or damage the power cord; do not leave it exposed or dangling. Secure it at
the back of the appliance so no one steps on or places anything on the cord or against it. Keep the
cord out of reach of children. When moving the appliance, make sure not to damage the power cord.
Do not pull the power chord when pulling out the plug, firmly grasp and pull it out from the socket
directly.
• WARNING When positioning the appliance, ensure the supply cord is not trapped or
damaged.
• Power Failure: Please pull out the plug if there is a power failure. Do not connect the refrigerator
back to the power supply for the next five minutes to prevent damages to the compressor due to
successive starts.
• Auxiliary Items: Do not use an inverter, adaptor or extension cord with this appliance. If the cord is
too short, have a qualified electrician install an outlet near the appliance. Use of an extension cord
and an inverter can negatively aect the performance of the unit.
• Protect from moisture: To protect against the risk of electric shock, do not immerse the unit, cord or
plug in water or spray it with any other liquid. Do not connect or disconnect the electric plug when
your hands are wet. Turn the power switch o before removing the plug from the socket.
• WARNING Disconnect! To reduce the risk of fire, electric shock or personal injury, always
unplug the appliance from the socket when not in use, when moving and before cleaning or
servicing. Never unplug the unit by pulling the power cord. Always grip the plug firmly and pull
straight out from the power point.
• Electrical work: Any electrical work required for the installation of this appliance should be carried
out by a qualified electrician.
Never use this appliance with a damaged refrigerant circuit! If the coolant circuit becomes damaged,
avoid proximity to open fires and all types of heat sources. The room in which the appliance is located
should be ventilated by opening all the doors and windows in case of leakage of flammable gases.
Do not unplug the refrigerator and other electrical appliances as the spark may cause a fire.
Installation
Heavy: This appliance is heavy, take care when moving it. To avoid back or other injury, consider a two
person lift or mechanical aid when installing it. Failure to do so can result in back or other injury.
Damage: When unpacking, check the appliance carefully for damage. If it is damaged, do not install
the appliance and you must report it within 7 days if you wish to claim for damage/ marks under the
manufacturer’s warranty. This does not aect your statutory rights. Contact our after sales support
centre for advice on examination or return of the damaged appliance.
Protect from moisture: Install the appliance in an indoor area protected from wind, rain, water spray
or drips.
Protect from heat: Do not install the appliance next to an oven, grill or other source of high heat, or
where it will be exposed to direct sunlight for prolonged periods of time.
Safety Warnings (Continued)
7
WARNING Ventilation: To ensure proper ventilation, keep any ventilation openings, in the
appliance enclosure or in the built-in structure, clear of obstructions. Ensure adequate air circulation
around the appliance to prevent overheating.
Level: Install the appliance level in order to ensure proper operation.
Cleaning and Maintenance
Disconnect: Unplug the appliance before cleaning or servicing. Failure to do so can result in electric
shock, injury or death. Do not connect or disconnect the plug when your hands are wet.
Flames: Do not let open flames or ignition sources enter the appliance.
Flammable/explosive substances: Never clean this appliance with flammable fluids. Do not store or
use volatile, flammable or explosive propellants or liquids in or close to this or any other appliance. The
fumes can create a fire hazard or explosion.
Solvents: Do not use solvent based cleaning agents or abrasives on the interior as these may damage
or discolour the surfaces of the appliances.
WARNING! Do not use mechanical devices or other means to accelerate the defrosting process.
Never use a sharp or metal instrument to remove frost or clean the appliance. Use a plastic scraper, if
necessary.
Service: Do not attempt to repair, modify or replace any part of the appliance unless specifically
recommended in this manual. Refer all other servicing to a qualified technician, or contact the after
sales support line for advice on examination or repair of the appliance.
Responsible disposal
Note: At the end of its working life, do not throw this appliance out with your household rubbish.
Electrical and electronic products contain substances that can have a detrimental eect on the
environment and human health if disposed of inappropriately. Observe any local regulations regarding
the disposal of electrical consumer goods and dispose of it appropriately for recycling and recovery of
the refrigerant and blowing agent. Contact your municipal authorities for advice on recycling facilities
in your area.
When the appliance is scrapped, disassemble the door and take out the shelves to prevent climbing or
entrapment of any children.
WARNING! This refrigeration appliance contains flammable refrigerants and insulation
blowing gases, which must be removed before disposal. Contact your municipal authorities for any
codes or regulations concerning the disposal of such materials.
Disposal
Do not dispose this product as unsorted municipal waste. Collection of such waste
separately for special treatment is necessary. This marking indicates that this product
should not be disposed with other household wastes throughout the EU. To prevent
possible harm to the environment or human health from uncontrolled waste disposal,
recycle it responsibly to promote the sustainable reuse of material resources. To return
your used device, please use the return and collection systems or contact the retailer
where the product was purchased. They can take this product for environmental safe
recycling. For more detailed information about treatment, recovery and recycling of this
product, please contact your local city oce, your household waste disposal service or
the shop where you purchased the product.

8
Unpacking Your Fridge
• Packaging materials: This appliance has been packaged to protect it against transportation
damage. Remove all packaging materials, bottom cushions, foam pads and tapes from around and
inside the appliance, tear o the protective film on the doors and refrigerator. Keep the original
packaging carton and materials in a safe place. It will help prevent any damage if the product needs
to be transported in the future, and you can use it to store the appliance when it is not in use. In the
event the carton is to be disposed of, please recycle all packaging materials where possible.
• WARNING! Suocation: Plastic wrapping can be a suocation hazard for babies and
young children, so ensure all packaging materials are out of their reach and disposed of safely.
• Power cord: Unwind the power cord to its full length and inspect it for damage. Do not use
the appliance if it or its cord have been damaged or are not working properly. In case of damage,
contact our after sales support line for advice on examination, repair or return of the
damaged product.
• Read the manual: Read this manual to familiarise yourself with the appliance. Pay particular
attention to the safety instructions on the previous pages.
• Clean: To remove any dust from transit and storage, clean the interior and exterior surfaces of the
appliance with lukewarm water and a soft cloth. Dry thoroughly. Important: do not use harsh or
abrasive detergents or powders as these will damage the finish.
Getting Started

9
Your InAlto Integrated Refrigerator
Product Overview
2 × Freezer
storage drawers
4 × Glass shelves
LED Lighting
Sliding
freezer box
Fruit & vegetable
crisper drawer
Temperature
control panel
3 × Door trays
Refrigerator Compartment
This compartment helps keep for food for short-term storage and is suitable for storing a variety of
fruits, vegetables, beverages and other food items ideally between 3 to 5 days.
Freezer Compartment
This low temperature helps keep food for long-term storage and is suitable for frozen food and ice.
Storage tips:
• Wait until hot food has cooled to room temperature before placing into the refrigerator.
• For food safety, we recommend sealing up any food before placing into the refrigerator.
• For quicker freezing and easy access, divide your meat and large items into smaller pieces before
placing into the freezer compartment.
• The glass shelves can be repositioned up or down to suit your storage requirements.
Note:
• The diagrams in this user manual are for reference only. Your appliance may appear dierently.
• Storage of too many items during operation after the initial connection of your appliance to power
may adversely aect the freezing eect of the refrigerator.
• Do not block the air outlet or the freezing eect of the refrigerator will also be adversely aected.

10
The temperature control panel is located on the inside of your fridge on the right side.
Display
• Once initially powered on, the display screen will display in full for 3 seconds.
The refrigerator will than default running according to setting 3.
• If there are no faults, your refrigerator’s temperature will be display the actual temperature setting.
• In case of a failure, your refrigerator will display a fault indication with corresponding LED blinks.
Refer to the Fault Indication section within the Troubleshooting section if you are experiencing
a fault.
Temperature setting
Each time the Set Key button is pressed, the temperature setting will change one time.
After the temperature setting has been completed, the refrigerator will run according to the set value
after 30 seconds. The shift regulation is: Setting 1 → Setting 2 → Setting 3 → Setting 4 → Repeat.
Lock/ Unlock
When the temperature control panel is in lock state, you are required to long press temperature setting
key for 3 seconds to unlock the panel. All LEDs will blink for 2 second when panel is unlocked. When the
temperature control panel is in the unlock state and there is no operation on control panel within
30 seconds, it will enter into lock state automatically.
Power o function
Entry mode
• In the unlocking state, press the Set Key for 10 seconds. When the display and control of the
refrigerator are all o, the Set Key button will take eect when the key is released.
After 30 seconds, the refrigerator will enter the power o function mode, all loads are turned o,
and the display and control of the refrigerator will be all o in the power o mode.
Exit method
• In power o mode, press the Set Key to exit the power o mode and the refrigerator will return to
normal control.
Intelligent auto-temperature control
Your freezer’s temperature is automatically set between the -16 – -24° C range.
Setting 1
Setting 3
Setting 2
Setting 4
Set Key
Operation Instructions
3. 2 Functions
8
5
y
2
@
Q
A
3sec-Unlock
(lOsecoff)
A
°
41
15
Functions
• Set Key: Press this button to
select the desired temperature
setting of your refrigerator.
• Setting 1: 8° C
• Setting 2: 6° C
• Setting 3: 4° C
• Setting 4: 2° C
This image is for reference only.
Your appliance may appear dierently.

11
• Do not store food uncovered in the fridge. Always use good quality, fridge-proof packaging to
maintain food quality. Remove air from packages of solid food and seal bags tightly before freezing.
• Keep portions small to ensure they are frozen (and subsequently defrosted) rapidly.
• Make sure that fresh, unfrozen food packages do not touch food that is already frozen, thus avoiding
a temperature rise in the frozen food.
• When freezing food, do not push food together too much, leave some space for air to circulate
around each item. Do not place packages directly against the back wall.
• When buying frozen food, only buy quantities that you can store straight away; use an insulated
container for your shopping and when you get home, place the food in the chilling compartment
immediately.
• When storing pre-packed, commercially frozen food, follow the food manufacturer’s
instructions for storing the food in a home fridge or freezer. Do not exceed any storage times listed
on the packaging.
• Once you have opened a packet of frozen food, re-wrap it airtight to prevent surface evaporation
which causes drying or freezer burn.
• Do not place carbonated liquids such as bottles of fizzy drink in the freezer compartment as the
container could explode under pressure and damage the chiller.
• Do not refreeze food once it has been defrosted.
• Frozen food which has thawed accidentally should either be used immediately or thrown away.
Alternatively, if the food is uncooked and has not been completely defrosted, it may be cooked and
then refrozen.
• CAUTION: Do not remove items from the freezer compartment if your hands are damp or wet as this
could cause skin abrasions.
• The gaps between refrigerator doors and refrigerator body are small, be careful not to jam your
fingers in these areas.
• Close the refrigerator door gently to avoid falling articles.
• To avoid frostbite, do not pick foods or containers with wet hands in the freezer when the refrigerator
is running, especially metal containers.
• Do not place heavy objects on top of the refrigerator to prevent injuries of falling articles.
• The appliance should be placed in the coolest area of the room, away from heat producing
appliances or heating ducts. Please avoid placement in direct sunlight.
• Let hot foods cool to room temperature before placing them in the appliance.
• Do not overload the appliance with unfrozen food as this may cause it to freeze slowly and
risk food spoilage.
• Be sure to wrap foods properly and wipe containers dry before placing them in the appliance.
This cuts down on frost building up inside in the unit.
• Please do not wrap items in aluminium foil, wax paper or paper towel. This materials interfere with
cold air circulation, making the appliance less ecient.
• Organise and label food to reduce door openings and extended searches. Remove as many items
as needed at one time, ensuring the unit is opened as few times as possible.
Usage Tips
Energy Saving Tips

12
Installation
Placement
• Transport: Use a padded trolley to protect the refrigerator during moving.
• Packaging materials: Remove all packaging materials and bottom pad of the refrigerator and carry
them indoors.
• Two person installation: Use two or more people to move and install the appliance.
Failure to do so can result in back or other injury.
• Floor surface: This appliance must be properly positioned on a dry, sturdy, level surface that is strong
enough to support it when it is fully loaded.
• Ventilation: To ensure proper ventilation, keep any ventilation openings, in the appliance enclosure
or in the built-in structure, clear of obstructions. Ensure adequate air circulation around the
appliance to prevent overheating.
• Clearances: Ensure that air can circulate freely around the back of the cabinet, which is necessary
to cool the compressor and condenser. Refer to the diagrams for cabinet installation requirements
within this section.
• Keep the refrigerator still for half an hour before connecting it to a power supply.
• Run the refrigerator between 2-3 hours (or above 4 hours in summer when the temperature is
higher) before placing fresh or frozen food into the appliance.
DO NOT install/use the appliance in the following locations/situations:
• In moist areas or areas of high humidity.
• In a recreational vehicle, or for use with an inverter.
• In direct sunlight, near heat sources, next to an open flame, cooking or heating appliance, or near
any other source of high heat.
• Direct sunlight may increase the unit’s power consumption. For best energy eciency install the
appliance in the coolest area of the room.
• In an area with extreme cold ambient temperatures.
• In an area with excessive moisture and high humidity. Make sure it is protected from elements such
as wind, rain, water spray or drips.
• In an area where petrol or other explosive and/or flammable liquids or fumes are used or stored.
The fumes can create a fire hazard or explosion.
Refrigerator dimensions
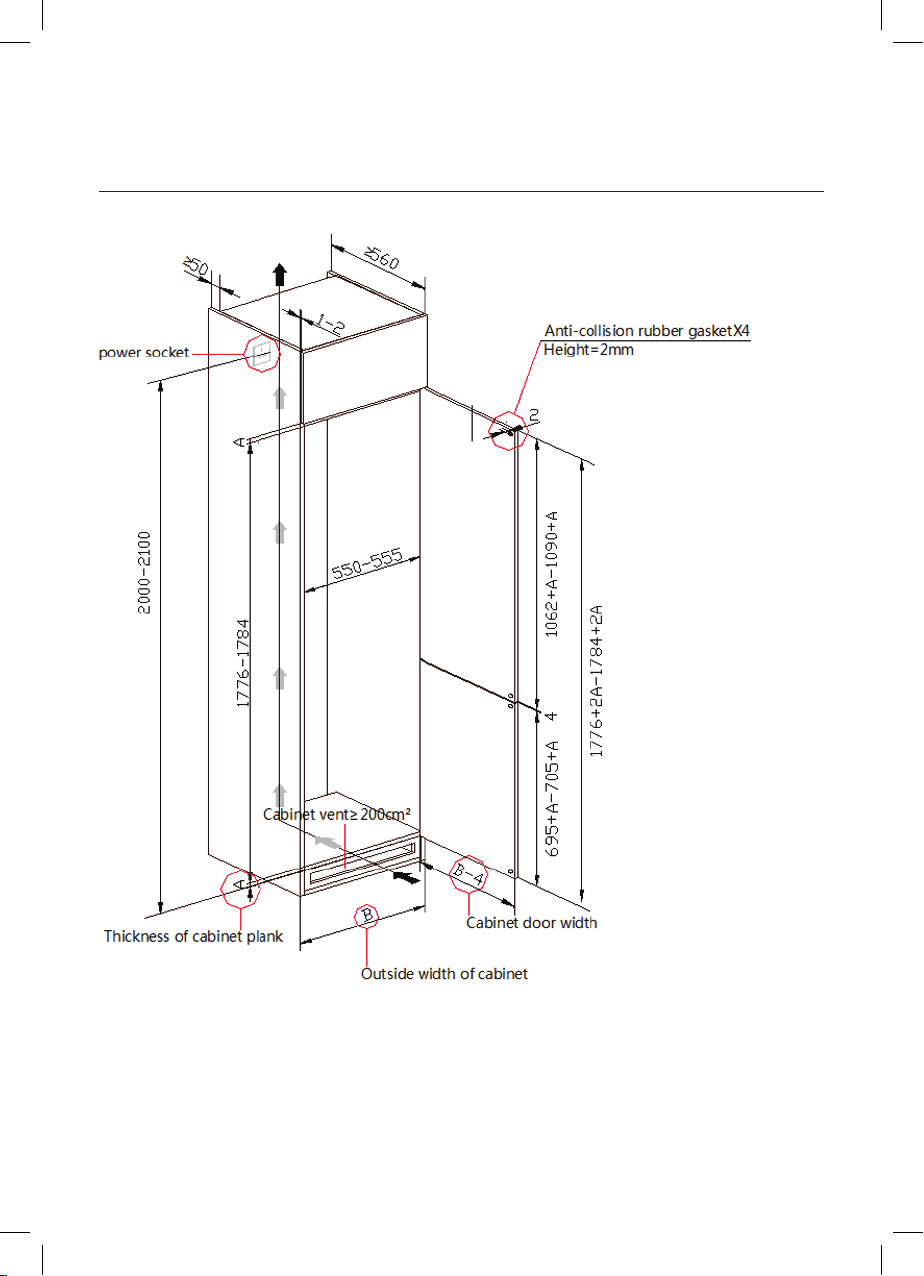
13
Cabinetry dimensions
A: Thickness of cabinet plank
B: Outside width of cabinet
14
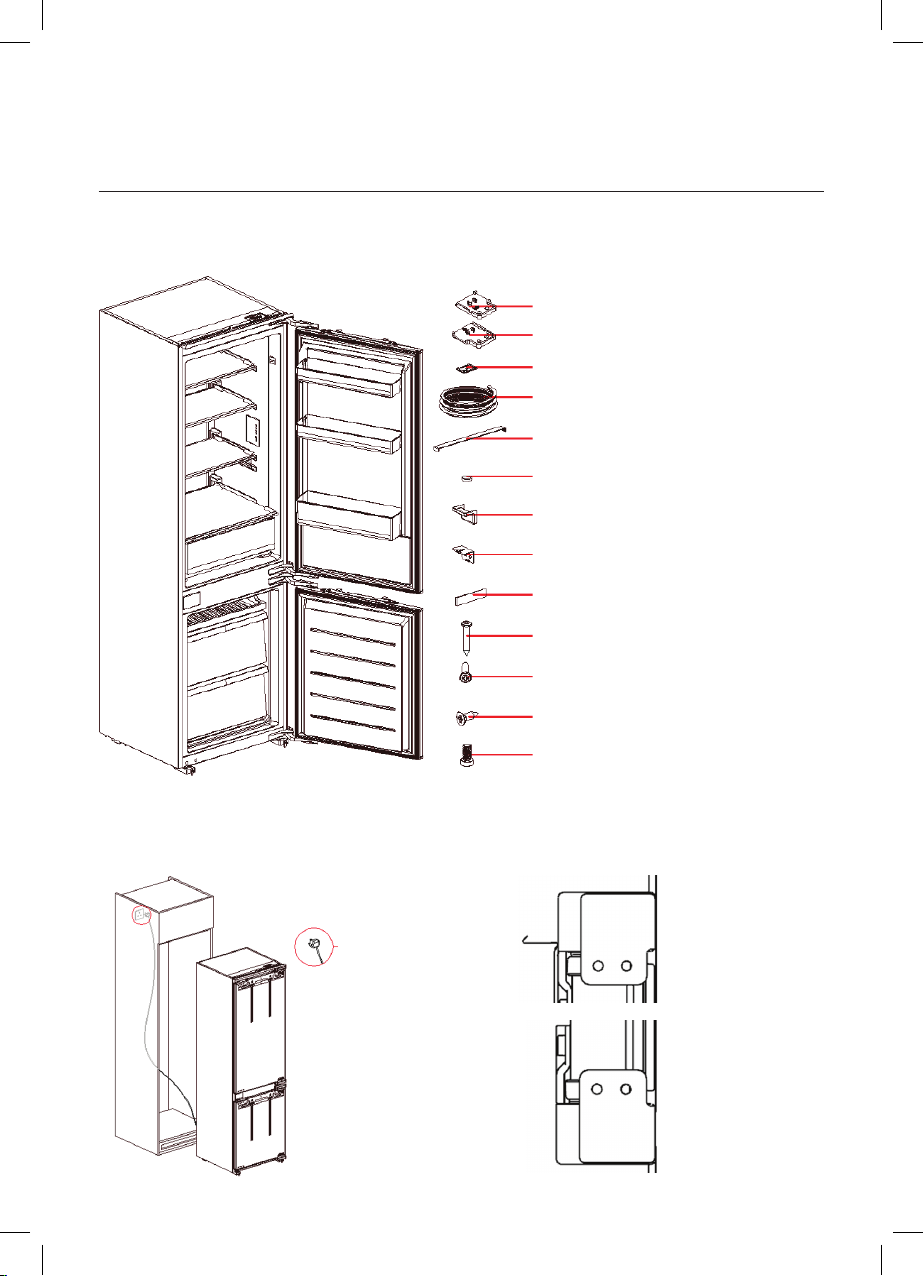
Placing refrigerator inside the cabinetry
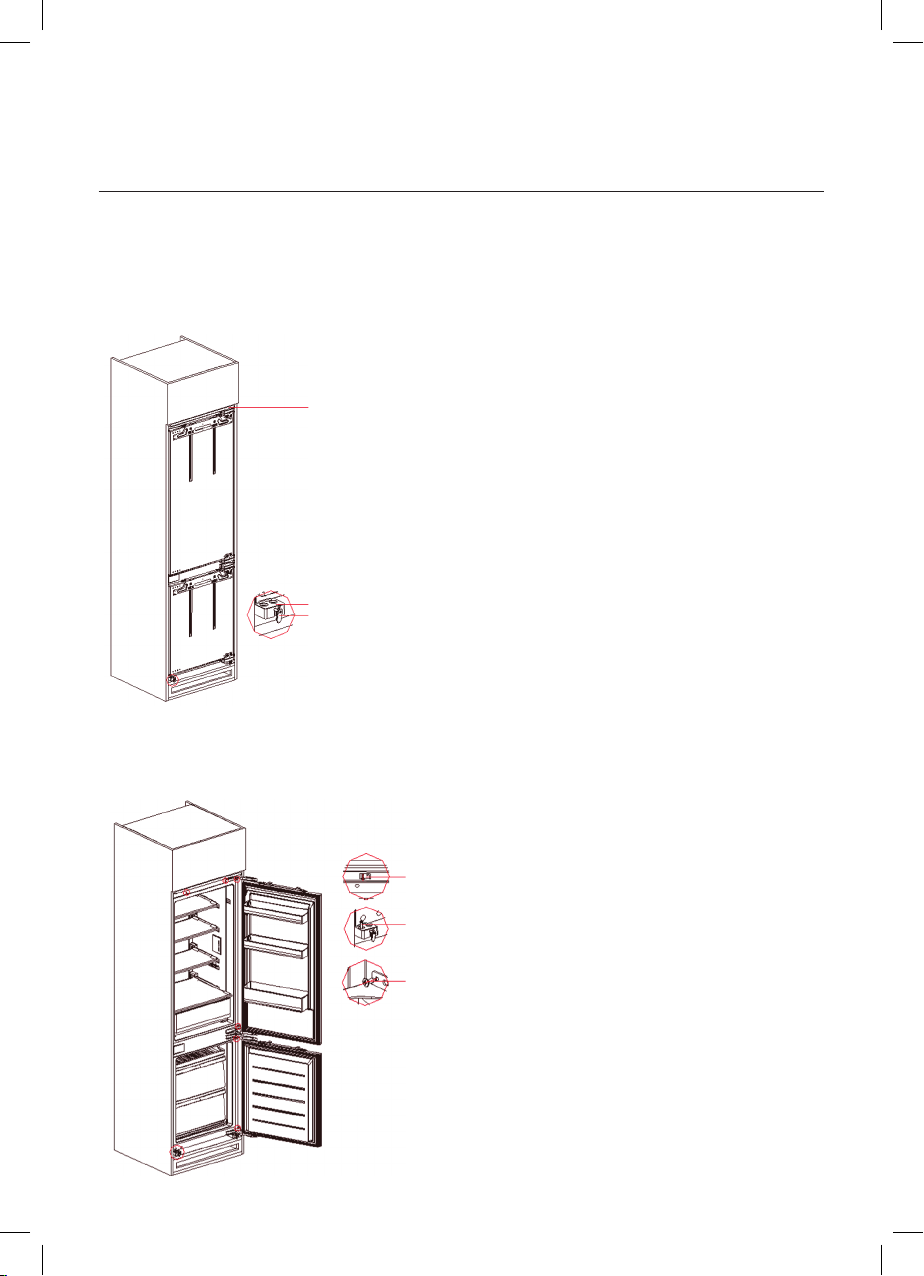
1. Remove the refrigerator packing carton and take out the installation accessories inside the door.
2. Close the door. Take out the power cord and insert it into the socket or through the opening of the
cabinet power cord. Then install the upper and lower hinge decorative cover on the side of the hinge
respectively, as shown in the figure below.
Installation (Continued)
2 × Lower hinge decorative cover
Upper hinge
Lower hinge
2 × Upper hinge decorative cover
2 × Top bae cover cap
1 × Sealing strip
1 × Decorative door cover
4 × Bottom supportive cover cap
4 × Under door decorative cover
4 × Under door support
Power cord plug
4 × Middle hinge decorative cover
4 × Cross groove countersunk head
tapping screw
4 × Cross groove flat round head
tapping screw
4 × Cross groove countersunk head
tapping screw
24 × Cross groove countersunk head
tapping screw
15
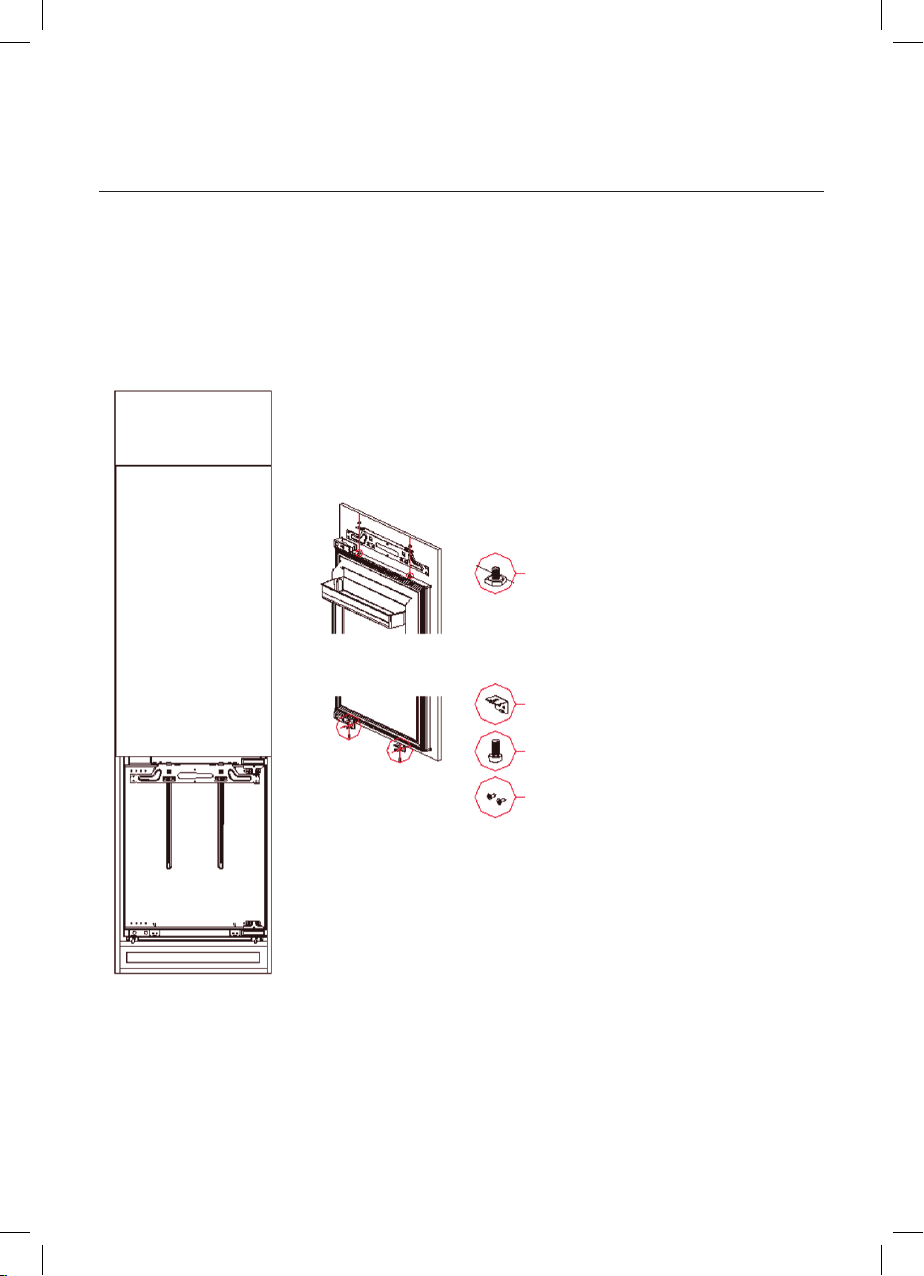
3. Move the refrigerator into the cabinet slightly, then open the limit hook at the lower of the
refrigerator. Adjust the position of the refrigerator to make it cling to the cabinet on one side of the
refrigerator hinge, and make the flanging of top bae cling to the edge of the cabinet. Hook the
bottom edge of the cabinet by support limit hook.
Note: Do not kink or damage the power cord. A broken power cord may cause a fire.
4. Fix the bottom support (use cross groove countersunk head tapping screw) and the top bae
(use cross groove flat round head tapping screw) of the refrigerator. Then open two doors and lock
the hinge (use cross groove countersunk head tapping screw). Keep the refrigerator level and make
sure there is no tilting during the fixing process.
Top bae
Bottom support
Limit hook
Cross groove flat round head tapping screw
Cross groove countersunk head tapping screw
Cross groove pan head tapping screw

16
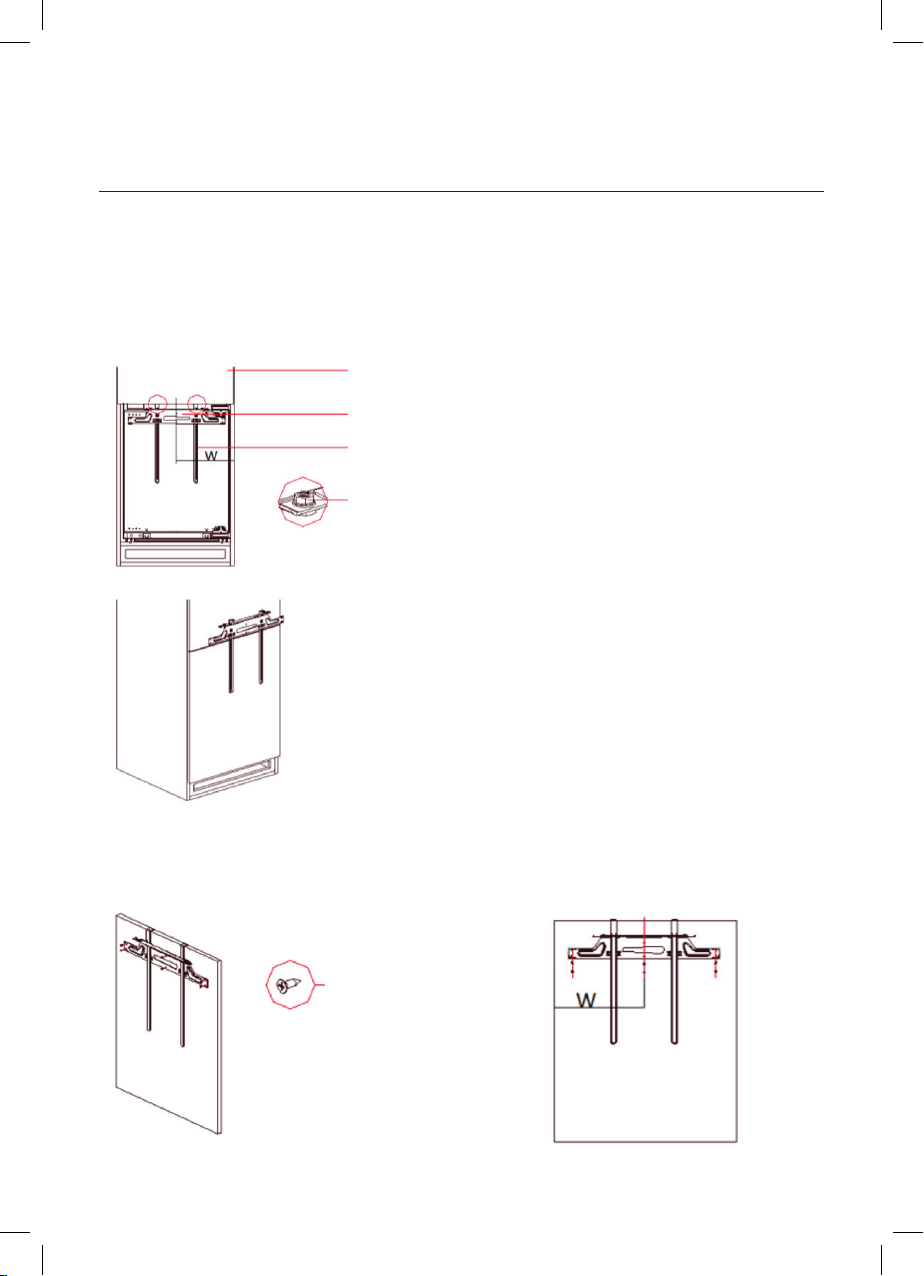
Installation of the upper door
1. Close the upper door of the refrigerator. Take out the positioning card on the door of the refrigerator
and place it in the positioning hole of the upper door fixing plate. Fit it with the upper end of the
cabinet. Adjust the fixing plate component to the center and measure the distance W between the
center of the middle fixing hole and the side edge of the cabinet. Keep the position of the positioning
card unchanged, and loosen the flange nut of the fixing plate component. Remove the fixing plate
component and positioning card strip.
2. Turn over the upper door of the cabinet and make the positioning card strip cling to the upper end
of the upper door. Fix the plate component and make the distance between the center line and the
side edge of wooden door as W (shown below). Lock the plate component with screw and remove
the positioning card strip after installation.
Installation (Continued)
Hinge
Fixing plate
Positioning card strip
Flange nut
Cross groove pan head tapping screw
17
3. Place the assembled door on the double-headed stud of the refrigerator door body after installation,
then close the door. Check the matching of wooden door and cabinet. Confirm the closing eect
and fasten it with flange nut. Then install the support under the door. Lock the refrigerator door
body and cabinet with cross groove countersunk head tapping screw and cross groove pan head
tapping screw.
Refer to the Adjusting the cabinetry door section for instructions and method of adjusting the
cabinetry door body.
Double-headed stud
Under door support
Cross groove countersunk head
tapping screw
Cross groove pan head tapping screw
18
Installation of the lower door
1. Close the lower door of the refrigerator, and take out the positioning card strip on the lower door
of the refrigerator. Place it in the positioning hole of the lower door fixing plate, and fit it with the
lower end face of the cabinet door. Adjust the fixing plate component to the center and measure
the distance W (shown below) between the center of the middle fixing hole and the side edge of
the cabinet. Keep the position of positioning card strip unchanged and loosen the flange nut of the
fixing plate component. Remove the fixing plate component and positioning card strip.
Installation (Continued)
2. Turn over the upper door of the cabinet and make the positioning card strip cling to the upper end
of the wooden door. Fix the plate component and make the distance between the center line and
the side edge of wooden door as W (shown below). Lock the plate component with screw and remove
the positioning card after installation.
Fixing plate
Upper door of the cabinet
Positioning card strip
Flange nut
Cross groove pan
head tapping screw

19
3. Place the assembled door on the double-headed stud of the refrigerator door body after installation,
then close the door. Check the matching of wooden door and cabinet. Confirm the closing eect
and fasten it with flange nut. Then install the support under the door. Lock the refrigerator door
body and cabinet with cross groove countersunk head tapping screw and cross groove pan head
tapping screw.
Refer to the Adjusting the cabinetry door section for instructions and method of adjusting the
cabinetry door body.
Double-headed stud
Under door support
Cross groove countersunk head tapping screw
Cross groove pan head tapping screw

20
Adjusting the cabinetry door
Adjustment of upper end of the cabinet door:
1. Adjust the adjustable height (Z) (about 5mm) of double nut with wrench.
2. Slightly loosen the ange nut, then move the door left and right to the adjustable left and right position (X)
(about 5 mm). Tighten the ange nut after adjusting the door to the appropriate position.
3. Slightly loosen the cross groove pit hexagonal head screw, then move the door front and back to the
adjustable front and back position (Y) (about 5 mm). Tighten the cross groove pit hexagonal head screw
after adjusting the door to the appropriate position.
Adjustment of lower end of the cabinet door:
1. Slightly loosen the cross groove countersunk tapping screw, then move the door front and back to the
adjustable front and back position (Y) (about 5 mm). Lock the cross groove countersunk head tapping
screw after adjusting the door to the appropriate position which clings to the door of the cabinet.
2. The adjustment and installation of the door body is completed after locking the cross groove pan head
tapping screw to lock the door body.
Installation (Continued)
Cross groove recessed hexagonal head screw
Under door support
Flange nut
Cross groove countersunk head tapping screw
Double-headed stud
Cross groove pan head tapping screw
Other manuals for IIF241
1
Table of contents
Other Inalto Refrigerator manuals

Inalto
Inalto IIUL316 User manual

Inalto
Inalto IBF95BG User manual

Inalto
Inalto Classique IBF112S User manual

Inalto
Inalto IBF129S User manual

Inalto
Inalto IBF46W User manual

Inalto
Inalto IBF95BG User manual

Inalto
Inalto IBF91S User manual

Inalto
Inalto IIFF338 User manual

Inalto
Inalto Classique IBM323W User manual

Inalto
Inalto IBF95W User manual

Inalto
Inalto IBM529X User manual

Inalto
Inalto IBF46W User manual

Inalto
Inalto CLASSIQUE ITM207W User manual

Inalto
Inalto IBF95BG User manual

Inalto
Inalto IIF241 User manual

Inalto
Inalto 545L User manual

Inalto
Inalto IUL237W User manual

Inalto
Inalto IIUL316 User manual

Inalto
Inalto IIUL316 User manual

Inalto
Inalto CLASSIQUE IUL237S User manual


