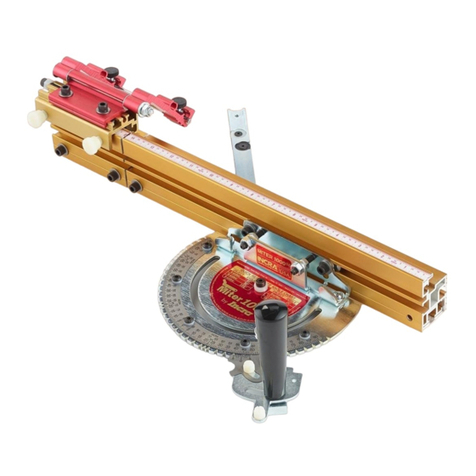
Incra Miter 3000 User manual

Taylor Design Group, Inc.
warrants this product for one
year from date of purchase. We
will repair any defects due to
faulty material or workmanship,
or at our option, replace the
product free of charge. Please
return the failing component
only, postage prepaid, along
with a description of the
problem to the address on the
back. This warranty does not
apply to parts which have been
subjected to improper use,
alteration, or abuse.
OWNER’S MANUAL
Warranty
Please read this ownerʼs
manual before use and keep
it at hand for reference.
Safety
Important safety instructions for using the INCRA Miter3000
■
Before using the INCRA Miter3000, read and follow all of the instructions and
safety information in this owner's manual.
■
When using the INCRA Miter3000 in conjunction with any other tool, first read and
follow all instructions and safety information in that tool's owner's manual.
■
Never let the saw blade come in contact with the aluminum or steel components of
the INCRA Miter3000.
■
When using the INCRA Miter3000, always keep your hands clear of the saw blade
and the line of cut.
■
Always turn off the power and make sure that the saw blade comes to a complete
stop before changing the setting of any part of the INCRA Miter 3000.
■
Always securely tighten the large black clamping knob before starting any cut.
■
Wear safety glasses, hearing protection, and follow all normal shop safety
practices.
■
After making any adjustments to the miter angle or fence position of your INCRA
Miter3000, always verify safe clearance between the blade and fence before
turning on the saw.
■
After making any adjustments to the fence position on the INCRA Miter 3000,
always make sure that the two socket head screws are securely tightened.
■
When using the INCRA Flip Shop Stop to position a piece for a cut, always hold or
otherwise clamp the board between the stop and the blade.
®

2
Remove the hex bolt that secures the protractor head
and replace with the large threaded knob included in the
hardware pack. The washer on the hex bolt must be
used with the threaded knob, Fig. 1.
FIG. 1
Assembly
Squaring the fence to
your table saw top
The method used to join the fence mounting bracket to
the protractor head makes it easy to fine-tune the fence
perfectly perpendicular to your tabletop. To adjust,
loosen the (3) #10-24 socket head screws that secure
the bracket and slide a paper or plastic shim between
the bracket and the protractor head. Placing the shim
behind the screws will decrease the angle. Placing the
shim in front of the screws will increase the angle.
Place the INCRA Miter3000 in the left-hand miter slot
of your table saw. Loosen the (2)
1
⁄
4
-20 socket head
screws that secure the fence to the fence mounting
bracket and slide the fence to a position that leaves safe
clearance between the end of the fence and the blade. Tighten
the (2)
1
⁄
4
-20 fasteners, Fig. 3.
If the miter slot in your table saw has a T-slot, attach the T-clip to
the end of the miter bar as shown in Fig. 2.
FIG. 2
FIG. 3
12
Threaded
knob
1/4-20 socket head
screws
Position fence for safe clearance
between fence and blade
Miter bar
#10-24 x 1/4"
phillips flat
head screw
T-clip
Remove
hex bolt
Washer
Placing shim
in back of
screws will
decrease
the angle

Now pivot the rear actuator to engage the right-hand tooth with
the notch marked "CAL" on the rear scale, Fig. 9. If adjusted
properly, it will pivot perfectly into the notch. To adjust, loosen the
(3) socket head
screws that
secure the tooth
and fine-tune
the position to
align with the
"CAL" notch.
Pivot back and
forth between
the two "CAL"
notches to
verify the
calibration.
Adjust Fence Mounting Bracket 90° to Saw Blade
Loosen the large clamping knob and make sure that the
rear actuator left-hand tooth is engaged firmly with the 0°
notch on the
1
⁄
2
° adjustment plate. Engage the front
actuator tooth
with the 0°
notch located
on the
protractor
head, Fig. 6.
Tighten the
front actuator
thumbscrew
then tighten
the large
clamping knob.
Calibrating the 1/2° Indexing Tooth
The
1
⁄
2
° indexing tooth located on the rear actuator is
factory calibrated and should require no further
adjustment. Follow the instructions below should you wish to
check the calibration or re-calibrate.
Loosen the large clamping knob and the rear actuator
thumbscrew.
Engage the
left-hand tooth
of the rear
actuator firmly
with the notch
marked "CAL"
on the rear
scale and hold
while you
tighten the large
clamping knob,
Fig. 8.
Using the supplied
5
⁄
32
" hex key, loosen the (3) socket head
screws that secure the fence mounting bracket to the protractor
head. Unplug your table saw, then use a reliable machinist
square to set
the fence at
90° to the
saw blade,
Fig. 7.
Tighten the
(3) socket
head screws.
3
Adjust the Miter Bar
Adjust the miter bar at each of the (8) expansion
mechanism locations for a good fit in your table saw's
miter slot. Turning the screw clockwise expands the
mechanism. You'll find (3) of the expansion locations in front of
the fence and (1) underneath the fence. (You'll need to remove
the fence for access.) Adjust these (4) front expansion points
first, expanding a little at each of the locations until the bar slides
smoothly, Fig. 4.
This one-time calibration prepares your INCRA Miter3000 for
work in either miter slot. Just remember that the accuracy of the
INCRA Miter3000 at any subsequent setting is dependent upon
the accuracy of your initial 90° calibration. Verify this important
calibration with a test cut and fine tune as necessary.
1
2
FIG. 4
Remove the large clamping knob and disengage the rear actuator
tooth from the
1
⁄
2
° adjustment plate. Pivot the protractor head to
gain access to (3) of the rear expansion points. To gain access to
the final rear expansion point, remove the rear actuator
thumbscrew and pivot the actuator, Fig. 5. After adjustment,
replace the rear actuator thumbscrew, re-engage the rear actuator
tooth to the 0° notch on the
1
⁄
2
° adjustment plate, then replace
the large clamping knob, washer and fence.
FIG. 5
3
FIG. 8
Calibration
FIG. 6
FIG. 9
FIG. 7
Fence removed for
access
Adjust (4) front
expansion points
Remove large
clamping knob
and washer
Rear
actuator
Protractor head
pivoted for access
Adjust (4) rear
expansion points
Nylon washer
(fits under rear actuator)
Rear
actuator
thumbscrew
1/2°
adjustment
plate
Rear actuator
Left hand
tooth
Front
actuator
tooth
Pivot rear actuator
to make sure
right-hand
tooth
engages
smoothly
into “CAL”
notch
Loosen (3)
socket head
screws to adjust,
if necessary
Engage left-hand
tooth of rear actuator
with “CAL” notch
Square
fence to
blade
Loosen (3) socket
head screws

4
The dual actuator design of the INCRA Miter3000 provides two
levels of adjustment. The front actuator is used for coarse
adjustments (5°), while the rear actuator is used for fine
adjustments (
1
⁄
2
°). For most mitering work, you'll have the
left-hand tooth of the rear actuator engaged at 0°, while you
make angle changes using only the front actuator. When using
the rear actuator for fine adjustments, you are simply adding or
subtracting from the coarse adjustment setting.
Rotate the protractor head to the desired angle, then
firmly engage the tooth on the front actuator with the
corresponding notch on the protractor head. The actuator
tooth should point directly to the desired angle on the scale.
Tighten the large clamping knob, then tighten the front actuator
thumbscrew, Fig. 11.
Operation – Changing Angle Settings
2
FIG. 10
FIG. 11
Five-degree Indexing
(including 22.5° and 67.5° settings)
Loosen the large clamping knob and make sure that the
rear actuator left hand tooth is engaged in the 0° notch on
the
1
⁄
2
° adjustment plate. Loosen the front actuator
thumbscrew and pivot the actuator tooth away from the notches
located on the protractor head, Fig. 10.
FIG. 12
FIG. 13
Made in America by: Taylor Design Group, Inc.
P.O. Box 810262, Dallas, Texas 75381, 972-418-4811, www.incra.com
Printed in the U.S.A. © 2000, Taylor Design Group, Inc.
INCRA is a registered trademark of Taylor Design Group, Inc.
09-2000
Caution:
After making any
adjustments to the miter angle of your
INCRA Miter3000, always verify safe
clearance between the fence and the blade
before turning on the saw.
1
/
2
° Indexing
Loosen the large clamping knob. Loosen the front
actuator thumbscrew and pivot the actuator tooth away
from the notches located on the protractor head. Rotate
the protractor head and engage the front actuator tooth at the 5°
notch closest to the angle you want. Tighten the front actuator
thumbscrew, Fig. 12.
1
Loosen the rear actuator thumbscrew. Use the left-hand
tooth to add or subtract from the coarse adjustment setting
in 1° intervals. Use the right-hand tooth to add or subtract
from the coarse adjustment setting in
1
⁄
2
° increments. Engage
the tooth firmly in the selected notch, then tighten the large
clamping knob and the rear actuator thumbscrew, Fig. 13.
Important: After completing your cut, don't forget to return the
rear actuator setting to the 0° notch.
Continuous Adjustments
For angle settings finer than the
1
⁄
2
° settings, first use the
1
⁄
2
°
indexing instructions above to locate the protractor head as close
as possible to the desired angle. With the large clamping knob
loosened, pivot the rear actuator tooth slightly away from the
notch on the
1
⁄
2
° adjustment plate. Rotate the protractor head in
the direction of required adjustment and tighten the large
clamping knob. Do not tighten the rear actuator thumbscrew. As
with any mitering tool, odd angle adjustments may require a little
trial and error.
2
1
1st: Loosen large
clamping knob
2nd: Loosen front
actuator thumb-
screw and pivot
tooth away from
protractor head
Left-hand tooth
engaged with “0” notch
2nd: Engage
front actuator
tooth with notch
at desired angle
Front
actuator
tooth
1st: Rotate
protractor head to
desired angle
3rd: Tighten
large clamping
knob, then
front actuator
thumbscrew
1st: Loosen rear
actuator thumbscrew
2nd: Engage right
or left hand tooth
to add or
subtract 1/2°
increments
3rd: Tighten
large clamping
knob and rear
actuator thumbscrew
1st: Loosen large
clamping knob
2nd: Loosen
front actuator
thumbscrew and
engage tooth with 5° notch
closest to your desired angle.
3rd: Tighten
thumbscrew
Made in America by: Taylor Design Group, Inc.
P.O. Box 810262, Dallas, Texas 75381 P: 972-242-9975 www.incra.com
Printed in the U.S.A.
© 2019 Taylor Design Group, Inc.
INCRA is a registered trademark of Taylor Design Group, Inc.
Other Incra Saw manuals
