Workzone 50450 User manual

USA 1800 505 8311 acs@americancustomerservice.com
PRODUCT CODE: 50450 06/2016
2
AFTER SALES SUPPORT • SERVICIO POSVENTA
DISTRIBUTED BY • DISTRIBUIDO POR:
ALDI INC.
BATAVIA, IL 60510
www.aldi.us
User Guide
Manual
del usuario
YEAR WARRANTY
AÑOS DE GARANTÍA
English... Page 2
Español... Página 13
13AMP 7-1/4IN. CIRCULAR SAW
SIERRA CIRCULAR DE 7 1/4 PULG. Y 13 A

Contents
Overview ....................................................................................... 3
General Specication ............................................................ 3
Pack Content ........................................................................ 3
Operation& Electrical Safety ........................................................ 4
Changing Blade .................................................................... 4
Adjusting The Bevel Angle .................................................... 5
Using The Parallel Fence ...................................................... 6
Using The Laser Guide ......................................................... 6
Power Tool Use & Care ................................................................ 7-8
Making A Cut ....................................................................... 7
Kickback .............................................................................. 7-8
Safety Warning .................................................................... 8-13
Additional Safety Instructions ............................................... 13
Symbols & Warning ...................................................................... 14
Symbols ............................................................................... 14
Warning ............................................................................... 15
Warranty ....................................................................................... 15
Explosive View & part list ..........................................................16-17
Warranty Card ............................................................................ 34
Warranty Conditions .................................................................. 35

Overview & Pack Content/ Specification
3
AFTER SALES SUPPORT
USA
USA
13Amp 7-1/4in. Circular Saw
Overview
Motor housing
Angle adjustment lever
Lower blade guard
Blade bolt
Baseplate
Connection for dust extractior
Housing blade
1
2
3
4
5
6
7
Parallel fence
Saw blade wrench
Laser
Laser on / off switch
Head handle
Pull switch
The second handle
8
9
10
11
12
13
14
General Specification
Voltage: 120V/60Hz
Power: 13A
No load speed: 5500 /min
Blade diameter: 7-1/4”
Depth of cut at 90°: (2-1/2”) Depth of cut at 45°:(1-3/4”)
The sound intensity level for the operator may exceed 85dB(A) and sound protection
measures are necessary.
Set includes these parts:
1 Circular Saw
1 7-1/4in. tungsten carbide tipped blade(tted)
1 Parallel Fence
Pack contents / General Specication
1 Saw Blade Wrench
1 Instruction manual
1 Warranty card

WARNING
4
AFTER SALES SUPPORT
USA
USA
13Amp 7-1/4in. Circular Saw Operation& Electrical Safety
Always ensure that the saw is switched off and unpluged from
the power supply before making any adjustment.
WARNING
The direction in which the blade rotates has to be the same
as the direction of the arrow marked on the housing. Ensure
that spindle lock button is released.
Before using the saw again, check that the safety devices are in good
working order.
IMPORTANT. After replacing the saw blade, make sure that the saw
blade runs freely by tuming the blade by hand. Plug the machine into a
power socket and run the saw under no load to check that it runs
smoothly before using it to cut any material.
CHANGING THE BLADE CAUTION
• Place saw on its side on a at surface
• Rotate the saw blade by hand whilst depressing spindle lock button until
the blade locks
• Whilst depressing spindle lock button,turn the blade bolt anti-clockwise
using wrench
• Remove the outer blade ange and the blade bolt
• Raise the lower blade guard(3) using lever
• Remove the saw blade from the inner ange and pull out the blade
NOTE
Clean the saw blade ange thoroughly before mounting the new saw
blade. Wipe a drop of oil onto the inner and outer ange where they will
touch the blade.
Mount the new saw blade onto the spindle and against the inner ange
Replace the outer ange and tighten the blade bolt.
Spindle buttonBlade bolt
Flange

Operation& Electrical Safety
5
AFTER SALES SUPPORT
USA
USA
13Amp 7-1/4in. Circular Saw
WARNING
Check carefully that there are no cracks or other damage to
the saw blade.
Replace any cracked blades immediately.
CHANGING THE BLADE CAUTION
• Place saw on its side on a at surface
• Rotate the saw blade by hand whilst depressing spindle lock button until
the blade locks
• Whilst depressing spindle lock button,turn the blade bolt anti-clockwise
using wrench
• Remove the outer blade ange and the blade bolt
• Raise the lower blade guard(3) using lever
• Remove the saw blade from the inner ange and pull out the blade
CAUTION. Always ensure that the saw is switched off and unplugged
from the power supply before making any adjustments.
• Loosen lever
• Lift the body of the saw until the blade is at the right depth - as shown
on depth adjustment scale
• Tighten lever
NOTE
Always use the correct blade depth setting. The correct blade depth
setting for all cuts should not be more than 6.35mm (1/4”) below the
material being cut. Allowing more depth will increase the chance
of kickback and result in a rough cut.
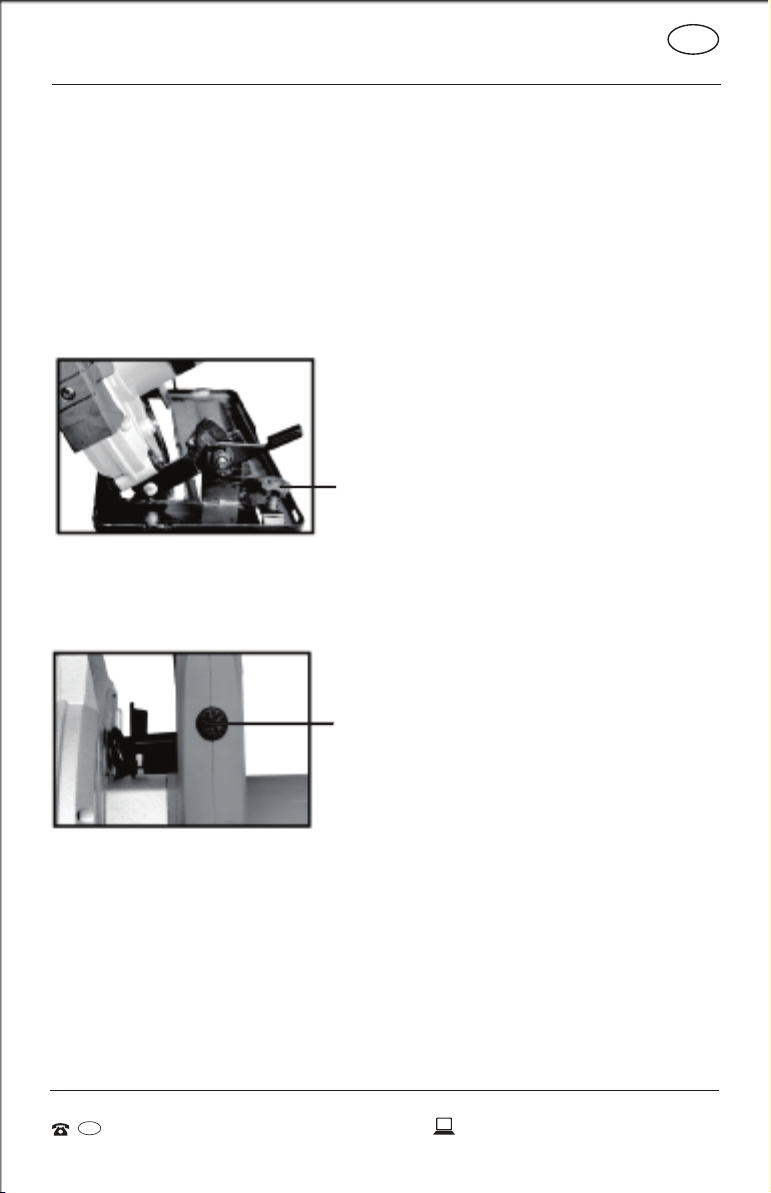
ADJUSTING THE BEVEL ANGLE
Loosen knob and tilt the body of the saw until the required angle is
reached using scale as a guide.
Tighten knob NOTE. Always make a trial cut in a scrap piece of material
along a guideline to check the position of the blade relative to the guide-
line and the angle of cut.
Depth adjust
Angle lock knob

AFTER SALES SUPPORT
USA
USA
13Amp 7-1/4in. Circular Saw
Operation& Electrical Safety
6
• Loosen lever
• Lift the body of the saw until the blade is at the right depth - as shown
on depth adjustment scale
• Tighten lever
NOTE
Ensure that the parallel fence rests against the wood along its entire length
to give a consistent parallel cut.
USING THE PARALLEL FENCE
The parallel fence (8) allows you to make parallel cuts in a sheet of wood, all
at the same width.
Loosen wing screw. Slide the parallel fence (8) through the slots in the base
plate (5). Adjust the parallel fence to the required width and secure it in
position with wing screw.
Do not stare directly at the laser beam.
Never aim the beam at any person or an object other than the workpiece.
Do not deliberately aim the beam at personnel and ensure that it is not
directed towards the eye of a person for longer than 0.25s.
Always ensure the laser beam is aimed at a sturdy workpiece without
reective surfaces. I.e. wood or rough coated surfaces ard acceptable.
Bright shiny reective sheet steel or the like is not suitable for laser use as
the reective surface could direct the beam back at the operator.
Only turn laser beam on when tool is on workpicec.
USING THE LASER GUIDE
Press the laser on button according to your requirements,or you can switch
off the button when it is not neccessary.
Wing screw
Laser on/off button

AFTER SALES SUPPORT
USA
USA
13Amp 7-1/4in. Circular Saw
Power Tool Use & Care
7
NOTE
After completing your cut, release the switch (13) and allow the blade to
come to a complete stop.
Do not remove the saw from the workpiece while the blade is moving.
NOTE
When making a cut always use steady,even presure. Forcing the saw
causes rough cuts and could shorten the life of the saw or cause
kickback.Allow the blade and the saw to do the work.
MAKING A CUT
Mark the line of cutting on the workpiece and align with the corret notch
Rest the front edge of the base on the workpiece Start the motor and let the
blade reach full speed (approximately 2 seconds.Slowly push the saw
forward using both hands)
KICKBACK
• Kickback is a sudden reaction to a pinched, bound or misaligned saw
blade, causing the saw to lift up out of the work area towards the
operator.
• When the blade is pinched or bound tightly by the kerf (a kerf is a cut
which has been made by the saw) closing down, the blade stalls and the
motors reaction drives the unit rapidly back towards the operator
causing kickback.
• If the blade becomes twisted or misaligned in the cut, the teeth at the
back edge of the blade can dig nto the top surface of the wood causing
the blade to climb out of the kerf and jump back towards the operator
causing kickback.
Kickback is the result of saw misuse and/or incorrect operating procedures
or conditions and can be avoided by taking proper precautions as given
below.
• Mark the line of the cut on the workpiece.
• Adjust the depth of cut and bevel angle as required.
• Rest the front edge of the base plate (5) on the workpiece.
• Switch on the laser beam using button (11).
• Align the beam with the line on the workpiece.
• Start the motor, let the blade reach full speed and slowly push the saw
forward using both hands, keeping the red laser light beam on the line of cut.

AFTER SALES SUPPORT
USA
USA
13Amp 7-1/4in. Circular Saw
Power Tool Use & Care
8
WARNING
Read all safety warnings and instructions. Failure to follow the
warnings and instructions may result in electric shock, re
and/or serious injury.
Save all warnings and instructions for future reference.
The term “power tool” in the warnings refers to your mains-battery-operated
(cordless) power tool.
1) Work area safety
a) Keep work area clean and well lit. Cluttered or dark areas invite
accidents.
a. Arms to resist kickback forces. Position your body to either side of the
blade, but not in line with the blade.
Kickback could cause the saw to jump backwards, but kickback forces
can be controlled by the operator, if proper precautions are taken.
b. When blade is binding, or when interrupting a cut for any reason, release
the trigger and hold the saw motionless in the material until the blade
comes to a complete stop. Never attempt to remove the saw from the
work or pull the saw backward while the blade is in motion or kickback
may occur.
Investigate and take corrective actions to eliminate the cause of blade
binding.
c. When restarting a saw in the workpiece, centre the saw blade in the kerf
and check that saw teeth are not engaged into the material. If saw blade
is binding, it may walk up or kickback from the workpiece as the saw is
restarted.
d. Support large panels to minimize the risk of blade pinching and kickback.
Large panels tend to sag under their own weight. Supports must be
placed under the panel on both sides, near the line of cut and near the
edge of the panel.
e. Do not use dull or damaged blades. Unsharpened or improperly set
blades produce narrow kerf causing excessive friction, blade binding and
kickback.
f. Blade depth and bevel adjusting locking levers must be tight and secure
before making cut. If blade adjustment shifts while cutting, it may cause
binding and kickback.
g. Use extra caution when making a “plunge cut” into existing walls or other
blind areas. The protruding blade may cut objects that can cause
kickback.
General Power Tool Safety Warnings

AFTER SALES SUPPORT
USA
USA
13Amp 7-1/4in. Circular Saw
Power Tool Use & Care
9
b) Do not operate power tools in explosive atmospheres, such as in the
presence of ammable liquids, gases or dust. Power tools create sparks
which may ignite the dust or fumes.
c) Keep children and bystanders away while operating a power tool.
Distractions can cause you to lose control.
2) Electrical safety
a) Power tool plugs must match the outlet. Never modify the plug in any
way. Do not use any adapter plugs with earthed (grounded) power tools.
Unmodied plugs and matching outlets will reduce risk of electric shock.
b) Avoid body contact with earthed or grounded surfaces such as pipes,
radiators, ranges and refrigerators. There is an increased risk of electric
shock if your body is earthed or grounded.
c) Do not expose power tools to rain or wet conditions. Water entering a
power tool will increase the risk of electric shock.
d) Do not abuse the cord. Never use the cord for carrying, pulling or unplug
ging the power tool. Keep cord away from heat, oil, sharp edges or
moving parts.
Damaged or entangled cords increase the risk of electric shock.
e) When operating a power tool outdoors, use an extension cord suitable for
outdoor use. Use of a cord suitable for outdoor use reduces the risk of
electric shock.
f) If operating a power tool in a damp location is unavoidable, use a residual
current device (RCD) protected supply. Use of an RCD reduces the risk
of electric shock.
NOTE The term “residual current device (RCD)” may be replaced by the
term “ground fault circuit interrupter (GFCI)” or “earth leakage circuit
breaker (ELCB)”.
3) Personal safety
a) Stay alert, watch what you are doing and use common sense when
operating a power tool. Do not use a power tool while you are tired or
under the inuence of drugs, alcohol or medication. A moment of inatten
tion while operating power tools may result in serious personal injury.
b) Use personal protective equipment. Always wear eye protection. Protec
tive equipment such as dust mask, non-skid safety shoes, hard hat, or
hearing protection used for appropriate conditions will reduce personal
injuries.
c) Prevent unintentional starting. Ensure the switch is in the off-position

10
AFTER SALES SUPPORT
USA
USA
13Amp 7-1/4in. Circular Saw
Power Tool Use & Care
before connecting to power source and/or battery pack, picking up or
carrying the tool.
Carrying power tools with your nger on the switch or energizing power
tools that have the switch on invites accidents.
d) Remove any adjusting key or wrench before turning the power tool on. A
wrench or a key left attached to a rotating part of the power tool may
result in personal injury.
e) Do not overreach. Keep proper footing and balance at all times. This
enables better control of the power tool in unexpected situations.
f) Dress properly. Do not wear loose clothing or jewellery. Keep your hair,
clothing and gloves away from moving parts. Loose clothes, jewellery or
long hair can be caught in moving parts.
g) If devices are provided for the connection of dust extraction and collec
tion facilities, ensure these are connected and properly used. Use of dust
collection can reduce dust-related hazards.
4) Power tool use and care
a) Do not force the power tool. Use the correct power tool for your application.
The correct power tool will do the job better and safer at the rate for
which it was designed.
b) Do not use the power tool if the switch does not turn it on and off. Any
power tool that cannot be controlled with the switch is dangerous and
must be repaired.
c) Disconnect the plug from the power source and/or the battery pack from
the power tool before making any adjustments, changing accessories, or
storing power tools. Such preventive safety measures reduce the risk of
starting the power tool accidentally.
d) Store idle power tools out of the reach of children and do not allow
persons unfamiliar with the power tool or these instructions to operate
the power tool.
Power tools are dangerous in the hands of untrained users.
e) Maintain power tools. Check for misalignment or binding of moving parts,
breakage of parts and any other condition that may affect the power
tool’s operation. If damaged, have the power tool repaired before use.
Many accidents are caused by poorly maintained power tools.
f) Keep cutting tools sharp and clean. Properly maintained cutting tools with
sharp cutting edges are less likely to bind and are easier to control.
g) Use the power tool, accessories and tool bits etc. in accordance with
these instructions, taking into account the working conditions and the
work to be performed. Use of the power tool for operations different from
those intended could result in a hazardous situation.

AFTER SALES SUPPORT
USA
USA
13Amp 7-1/4in. Circular Saw
Power Tool Use & Care
11
5) Service
a) Have your power tool serviced by a qualied repair person using only
identical replacement parts. This will ensure that the safety of the power
tool is maintained.
Safety instructions for circular saws
a) DANGER: Keep hands away from cutting area and the blade. Keep your
second hand on auxiliary handle, or motor housing. If both hands are
holding the saw, they cannot be cut by the blade.
b) Do not reach underneath the workpiece. The guard cannot protect you
from the blade below the workpiece.
c) Adjust the cutting depth to the thickness of the workpiece. Less than a
full tooth of the blade teeth should be visible below the workpiece.
d) Never hold piece being cut in your hands or across your leg. Secure the
workpiece to a stable platform. It is important to support the work
properly to minimize body exposure, blade binding, or loss of control.
e) Hold power tool by insulated gripping surfaces when performing an
operation where the cutting tool may contact hidden wiring or its own
cord. Contact with a "live" wire will also make exposed metal parts of the
power tool "live" and shock the operator.
f) When ripping always use a rip fence or straight edge guide. This improves
the accuracy of cut and reduces the chance of blade binding.
g) Always use blades with correct size and shape (diamond versus round) of
arbour holes. Blades that do not match the mounting hardware of the
saw will run eccentrically, causing loss of control.
h) Never use damaged or incorrect blade washers or bolt. The blade wash
ers and bolt were specially designed for your saw, for optimum perfor
mance and safety of operation.
Further safety instructions for circular saws
• kickback is a sudden reaction to a pinched, bound or misaligned saw
blade, causing an uncontrolled saw to lift up and out of the workpiece
toward the operator;
• when the blade is pinched or bound tightly by the kerf closing down, the
blade stalls and the motor reaction drives the unit rapidly back toward the
operator.
• if the blade becomes twisted or misaligned in the cut, the teeth at the
back edge of the blade can dig into the top surface of the wood causing
the blade to climb out of the kerf and jump back toward the operator.

12
AFTER SALES SUPPORT
USA
USA
13Amp 7-1/4in. Circular Saw
Power Tool Use & Care
Kickback is the result of saw misuse and/or incorrect operating procedures
or conditions and can be avoided by taking proper precautions as given
below.
a) Maintain a rm grip with both hands on the saw and position your arms to
resist kickback forces. Position your body to either side of the blade, but
not in line with the blade. Kickback could cause the saw to jump back
wards, but kickback forces can be controlled by the operator, if proper
precautions are taken.
b) When blade is binding, or when interrupting a cut for any reason, release
the trigger and hold the saw motionless in the material until the blade
comes to a complete stop. Never attempt to remove the saw from the
work or pull the saw backward while the blade is in motion or kickback
may occur. Investigate and take corrective actions to eliminate the cause
of blade binding.
c) When restarting a saw in the workpiece, centre the saw blade in the kerf
and check that saw teeth are not engaged into the material. If saw blade
is binding, it may walk up or kickback from the workpiece as the saw is
restarted.
d) Support large panels to minimise the risk of blade pinching and
kickback. Large panels tend to sag under their own weight. Supports
must be placed under the panel on both sides, near the line of cut and
near the edge of the panel.
e) Do not use dull or damaged blades. Unsharpened or improperly set
blades produce narrow kerf causing excessive friction, blade binding and
kickback.
f) Blade depth and bevel adjusting locking levers must be tight and secure
before making cut. If blade adjustment shifts while cutting, it may cause
binding and kickback.
g) Use extra caution when making a "plunge cut" into existing walls or other
blind areas. The protruding blade may cut objects that can cause kickback.
Safety instructions for circular saws with inner pendulum guard
a) Check lower guard for proper closing before each use. Do not operate the
saw if lower guard does not move freely and close instantly. Never clamp or tie
the lower guard into the open position. If saw is accidentally dropped, lower
guard may be bent. Raise the lower guard with the retracting handle and
make sure it moves freely and does not touch the blade or any other part, in
all angles and depths of cut.
b) Check the operation of the lower guard spring. If the guard and the spring
are not operating properly, they must be serviced before use. Lower guard

AFTER SALES SUPPORT
USA
USA
13Amp 7-1/4in. Circular Saw
Power Tool Use & Care
13
may operate sluggishly due to damaged parts, gummy deposits, or a
build-up of debris.
c) Lower guard may be retracted manually only for special cuts such as "plunge
cuts" and "compound cuts." Raise lower guard by retracting handle and as
soon as blade enters the material, the lower guard must be released. For all
other sawing, the lower guard should operate automatically.
d) Always observe that the lower guard is covering the blade before placing
saw down on bench or oor. An unprotected, coasting blade will cause the
saw to walk backwards, cutting whatever is in its path. Be aware of the time
it takes for the blade to stop after switch is released.
Additional safety instructions
1) Do not use any abrasive wheels.
2) Wear a dust mask, if the work causes dust.
3) Use saw blades recommended by manufacture.
4) Wear ear protectors when using the tool for extended periods.
5) Be sure to inspect material. Avoid cutting other different material.
6) Be careful not to drop the tool.
7) Never swing the tool.
8) Never cover the ventilation slots, and keep them free from dust or other material.
9) Do not clamp the tool in a vise. Never cut with the tool held upside down in a
vise. This is extremely dangerous and can lead to serious accidents.
10) Never wear knitted gloves.
11) Be sure no one is below when using the tool in high locations.
12) Do not touch the blade immediately after operation. It may be hot and could
burn your skin.
13) Do not touch material after it has been cut. Cut material may be very hot.
14) Do not use cutting oil. This use of cutting oil may cause a re.
15) Do not cut workpieces covered or stained with gas, oil, solvents, thinners, etc.
Exposure to these materials may damage the transparent guard.
16) Do not remove the transparent and lower guards. If the transparent and
lower guards is damaged or missing, return tool to authorized service center
for replacement.
17) Do not start the blade when in contact with workpiece. Wait for blade to
reach full speed before beginning cut.
SPECIFIC SAFETY RULES
• Hold tool by insulated gripping surfaces when performing an operation
where the cutting tool may contact hidden wiring. Contact with a “live”
wire will also make exposed metal parts of the tool “live” and shock the
operator.

USA
13Amp 7-1/4in. Circular Saw
14
AFTER SALES SUPPORT
Symbols & Warning
WARNING
Always ensure that the tool is switched off and the plug is
removed from the power point before making any adjustments
or maintenance procedures.
Always we ar sturdy gloves when handling or changing blades as they can
be very sharp.
Keep the tool’s air vents unclogged and clean at all times.
Regularly check to see if any dust or foreign matter has entered the grills
near the motor and around the trigger switch. Use a soft brush to remove
any accumulated dust. Wear safety glasses to protect your eyes whilst
cleaning.
Re-lubricate all moving parts at regular intervals.
If the body of the saw needs cleaning, wipe it with a soft damp cloth.
A mild detergent can be used but nothing like alcohol, petrol or other
leaning agent.
Never use caustic agents to clean plastic parts.
The label on your tool may include the following symbols:
LASER RADIATION DO NOT
STARE INTO BEAM
CLASS 2 LASER PRODUCT
Waste electrical products should not be disposed of with household
waste. Please recycle where facilities exist. Check with your local
authority or retailer for recycling advice.
LASER RADIATION
DO NOT STARE INTO BEAM
Maximum output < 1 mW, Wavelength: 650 nm/<1mW
CLASS II LASER PRODUCT
CAUTION/ATTENTION
To reduce the risk of injury, user must read and understand
instruction manual.

USA
13Amp 7-1/4in. Circular Saw Warranty
FULL TWO YEAR HOME USE WARRANTY
WORKZONE warrants this product for two year against defects in materials
and assembly.
This LIMITED WARRANTY does not cover products that are improperly
used, abused, altered or repaired by unauthorized personnel.
This warranty does not apply to accessories.
This warranty gives you specic legal rights and you may have other legal
rights which vary from state to state or province to province.
For warranty questions, replacement, or repair, call American Customer
Service at 1-800-505-8311.
This product is not intended for commercial use.
AFTER SALES SUPPORT
USA 1800 505 8311[email protected]
15
NOTE
This equipment has been tested to be ETL Approved.
Conforms to UL STD No.60745-1
and 60745-2-2 Certied to CAN/CSA STD C22.2
No.60745-1 and 60745-2-2
3114052
DB5711B
WARNING
Some dust created by power sanding, sawing, grinding, drilling
and other construction activities contains chemicals know to the
state of California to cause cancer, birth defects or other
reproductive harm. Some examples of these chemical are:
• Lead from lead-based paints
• Crystalline silica from bricks and cement and other masonry products
• Arsenic and chromium from chemically-treated lumber.
Your risk from these exposures varies, depending on how often you do
this type of work. To reduce your exposure to these chemical: work in a
well ventilated area, and work with approved safety equipment, such as
those dust masks that are specially designed to lter out microscopic
particles.

USA
13Amp 7-1/4in. Circular Saw Explosive View & part list
AFTER SALES SUPPORT
USA 1800 505 8311 [email protected]
16

USA
13Amp 7-1/4in. Circular Saw Explosive View & part list
AFTER SALES SUPPORT
USA 1800 505 8311[email protected]
17
61X6MwercsnogaxehrennI1
2 Flat washer Ф18XФ2X6
talfretuo3
4 Saw blade
(
Φ185XΦ16X24T
)
( )
talflanretni5
6Cross recessed countersunk head
screw M4X10
dnalg7
01X4Mwercs8
9
elastic washer Ф4
9
elastic
washer
Ф4
10 Flat washer Ф4
11 movable shield handle
12 movable protecting cover
13 movable shield spring
14 bearin
g
SR-1006
bea g 600 S
revoctnorf51
tfahstuptuo61
01X3yekffurdooW71
eveelselxA81
19
Big gear wheel
19
Big
gear
wheel
rehsawgnirpseednu02
21 Shaft ringФ21
8080KHgniraebrelloreldeeN22
revocxobraeg32
21X4Mwercs42
xobraeg52
61X6Mwercs62
nmulocgnitimiL72
02X6Mstlobkcenerauqsdaehtalf82
gnirpsgnikcolfleS92
etalpgnikcolfleS03
SR-0006gniraeb13
F-02X9.3TSwercs23
33 Flat washer Ф12XФ6X1
34 Six angle groove nut M6
35
lock spanner
35
l
oc
k
spanner
9gnirgninepo63
erutamrA73
Z2-806gniraeb83
R-55X9.3TSwercs93
40 Wind rin
g
40
Wind
ring
rotats14
gnirpsgarD24
gnisuoh34
redlohhsurB44
hsurbnobraC54
revochsurB64
47 Angle Bracket(assembling with
aluminium baseboard )
niplacirdnilyccitsale84 Ф6X40
9x5tevirwollohflahdaehtalF94
50
aluminum baseboard
50
aluminum
baseboard
15 depth indicator(assembling with
l i i b b d )
52 Flat head half hollow rivet 5 x17
53 flat head square neck bolts M6X20
54 aluminium angle ruler
tunkcolrelurediuG55
55
Gu de u e oc u
bonkdorediuggnirpS65
bonkkcol75
85 cross recessed countersunk head
screw M5x12
eldnahthgir95
60
Laser switch button
60
Laser
switch
button
revoceldnahyrailixuA16
hctiwS26
F-41X9.3TSwercs36
etalpenilgnisserP46
htaehselbac56
GWA61elbac66
F-61X9.3TSwercs76
eldnahtfel86
thgilresaL96
lanimretresal07
remrofsnartresaL17
)nwod(doreriwresaL27
)pu(doreriwresaL37
74 Laser transparent cover
75 O-rings Ф8 x Ф5.1
76
Laser plate
76
L
aser p
l
a
t
e
F-21X9.2TSwercs77
)nwod(xobresaL87
)pu(xobresaL97
01x4Mwercsdaehnapssecerssorc08
81
g
relurediu
81
guide
ruler
hcnerwnogaxehrennImm528

Contenido
Descripción general...................................................................... 19
Especicaciones generales .................................................. 19
Contenidos .......................................................................... 19
Funcionamiento y seguridad eléctrica......................................... 20
Cambio de la hoja ................................................................ 20
Ajuste del ángulo de corte .................................................... 21
Uso de la guía paralela ......................................................... 22
Uso de la guía láser .............................................................. 22
Uso y cuidado de la herramienta eléctrica.............................. 23-29
Realizar un corte .................................................................. 23
Contragolpe ..................................................................... 23-24
Advertencias de seguridad ...............................................24-29
Instrucciones adicionales de seguridad ........................... 29
Símbolos y advertencia ............................................................... 30
Símbolos ............................................................................ 30
Advertencias ....................................................................... 30
Garantía ........................................................................................ 31
Vista desglosada y lista de piezas ........................................... 32-33
Tarjeta de garantía ...................................................................... 36
Condiciones de la garantía ......................................................... 37

Descripción general y
contenidos / Especificación
19
SERVICIO POSVENTA
USA
USA
Sierra circular de 7 1/4 pulg. y 13 A
Descripción general
Carcasa del motor
Palanca de ajuste de ángulo
Resguardo inferior de la hoja
Perno de la hoja
Placa de base
Conexión para el extractor
de polvo
Carcasa de la hoja
1
2
3
4
5
6
7
Guía paralela
Llave de la hoja de sierra
Láser
Interruptor de encendido /
apagado del láser
Mango del cabezal
Interruptor de halar
Segundo mango
8
9
10
11
12
13
14
Especificaciones generales
Tensión: 120 V/60 Hz
Intensidad: 13 A
Velocidad sin carga: 5500 /min
Diámetro de la hoja: 7-1/4”
Profundidad de corte a 90°: (2-1/2”) Profundidad de corte a 45°: (1-3/4”)
El nivel de intensidad del sonido para el operador puede exceder los 85 dB(A) y son
necesarias medidas de protección acústica.
El conjunto incluye las siguientes piezas:
1 Sierra circular
1 Hoja de carburo de wolframio de 7-1/4 pulg. (instalada)
1 Guía paralela
Contenidos / Especicaciones generales
1 Llave de la hoja de sierra
1 Manual de instrucciones
1 Tarjeta de garantía

20
SERVICIO POSVENTA
USA
USA
Sierra circular de 7 1/4 pulg. y 13 A Funcionamiento y
seguridad eléctrica
Cersiórese siempre de que la sierra esté apagada y
desconectada de la fuente de alimentación antes de
realizar ajustes.
La dirección en la que gira la hoja debe ser igual a la direc-
ción de la echa que se encuentra en la carcasa. Cersiórese
de que el botón de cierre del eje esté liberado.
Antes de usar la sierra de nuevo, verique que los dispositivos de
seguridad funcionan correctamente.
IMPORTANTE. Después de reemplazar la hoja de sierra, asegúrese de
que esta se deslice libremente haciéndola girar con la mano. Conecte la
máquina a un tomacorriente y encienda la sierra sin carga para vericar
que se mueva con uidez antes de usarla para cortar materiales.
PRECAUCIÓN AL CAMBIAR LA HOJA
• Coloque la hoja de lado sobre una supercie plana
• Gire la hoja de sierra a mano mientras presiona el botón de cierre del eje
hasta que la hoja se trabe
• Mientras presiona el botón de cierre del eje, gire el perno de la hoja en
sentido antihorario con la llave
• Quite el reborde exterior de la hoja y el perno de la hoja
• Eleve el resguardo inferior de la hoja (3) con la palanca
• Quite la hoja de sierra del reborde interior y jale la hoja
NOTA
Limpie el reborde de la hoja de sierra en detalle antes de montar la nueva
hoja de sierra. Esparza una gota de aceite en el reborde interior y exterior
donde tocan la hoja.
Monte la nueva hoja de sierra en el eje y contra el reborde interior. Vuelva
a colocar el reborde exterior y ajuste el perno de la hoja.
Botón del ejePerno de la hoja
Hoja
ADVERTENCIA
ADVERTENCIA
Table of contents
Languages:
Other Workzone Saw manuals

Workzone
Workzone CDY190FLA2 User manual

Workzone
Workzone WZTS 1700 User manual

Workzone
Workzone WZTS 1701 User manual

Workzone
Workzone Titanium CS20V User manual

Workzone
Workzone SD1600V User manual

Workzone
Workzone M1Y-DU10-190 User manual

Workzone
Workzone WZTS 1702 User manual

Workzone
Workzone 55903 User manual

Workzone
Workzone WWPBS-18 User manual