Independence paragliding STRIKER User manual

Date: 10.03.2010
Revision: 0
Manual
Striker
Page: 1 of 17
Fly market Gm H & Co. KG ● Am Schöne ach 3 ● 87637 Eisen erg ● Germany
Manual
Paraglider STRIKER
LTF 2-3 / EN D
Fly market GmbH & Co. KG
AmSchönebach3
D-87637 Eisenberg
Tel.:+49 (0) 8364 9833-0
Fax: +49 (0) 8364 9833-33
Email: info@independence-world.com

Date: 10.03.2010
Revision: 0
Manual
Striker
Page: 2 of 17
Fly market Gm H & Co. KG ● Am Schöne ach 3 ● 87637 Eisen erg ● Germany
Congratulations first: Now you are the happy owner of an
independence STRIKER!
Please read this manual very carefully!
This manual contains important information a out flying and handling your new Striker. It
has een compiled carefully y us and it’s not allowed to start with this wing without
reading the manual.
We will not accept any responsi ility for the consequences of not adequate handling!
This glider is a high performance paraglider and uilt according to the terms of the
European norm EN D.
New gliders have to e flown y the dealer. This first flight has to e approved on the
documents and on the name plate of the wing with date and signature.
Every unauthorized change on the paraglider causes the termination of the type approval!
The pilot is responsi le for the airworthiness of his aircraft and for the compliance with all
legal regulations and terms.
The skills of the user have to fit the requirements of the paraglider!
Using the paraglider is on your own risk. Neither manufacturer nor dealer will accept any
responsi ility!

Date: 10.03.2010
Revision: 0
Manual
Striker
Page: 3 of 17
Fly market Gm H & Co. KG ● Am Schöne ach 3 ● 87637 Eisen erg ● Germany
Ta le of Content:
1. Overview .............................................................................................................. 4
2. Technical Description ............................................................................................. 5
2.1. Construction of the Glider .................................................................................... 5
2.2 Line Suspension ................................................................................................... 5
2.3 Acceleration System ............................................................................................. 5
2.3.1 Function and Handling ....................................................................................... 6
3. Overview Riser ...................................................................................................... 6
4. Technical Data ....................................................................................................... 6
5. Line Plans ............................................................................................................. 7
6. Measurement ........................................................................................................ 8
7. Harness .............................................................................................................. 10
8. Check ................................................................................................................. 10
9. Adjusting the Brake / Steering Lines ...................................................................... 10
10. In-flight ............................................................................................................ 10
10.1 Take off Preparation ......................................................................................... 10
10.2 Checklist ......................................................................................................... 11
10.2.1 Paraglider ..................................................................................................... 11
10.2.2 Harness........................................................................................................ 11
10.2.3 Before Take-Off ............................................................................................. 11
11.1. Take-Off ........................................................................................................ 11
11.2. Accelerated Flight ............................................................................................ 12
11.3. Turning .......................................................................................................... 12
11.4. Active Flying ................................................................................................... 12
11.5. Landing .......................................................................................................... 12
12. Winch-Launching (Towing) .................................................................................. 12
13. Using a Motor .................................................................................................... 13
14. Extreme Flight Maneuvers ................................................................................... 13
14.1. Asymmetric (lateral) collapse ............................................................................ 13
14.2. Cravats .......................................................................................................... 13
14.3. Symmetric or Front Tuck (Frontals) ................................................................... 13
14.4. Parachutal Stalls ............................................................................................. 14
14.5. Full Stall ........................................................................................................ 14
14.6. Negative Spin ................................................................................................. 14
14.7. Wingover ....................................................................................................... 15
14.8. Emergency Steering ........................................................................................ 15
15. Descending Maneuvers ....................................................................................... 15
15.1. Spiraling ........................................................................................................ 15
15.2. Big Ears ......................................................................................................... 15
15.3. B-Line Stall .................................................................................................... 15
16. Care, Storage, Repairs and Disposal ..................................................................... 16
16.1. Care .............................................................................................................. 16
16.2. Storage .......................................................................................................... 16
16.3. Repair ............................................................................................................ 16
16.4. Disposal ......................................................................................................... 17
17. Nature and Environment ..................................................................................... 17

Date: 10.03.2010
Revision: 0
Manual
Striker
Page: 4 of 17
Fly market Gm H & Co. KG ● Am Schöne ach 3 ● 87637 Eisen erg ● Germany
1. Overview

Date: 10.03.2010
Revision: 0
Manual
Striker
Page: 5 of 17
Fly market Gm H & Co. KG ● Am Schöne ach 3 ● 87637 Eisen erg ● Germany
2. Te hni al Des ription
2.1. Constru tion of the Glider
The material of the upper sail is made of 20 D ZOPO at the front and 20 D (WR) on the ack
side. The lower sail consists of 20 D (WR).The main profiles are from 30 D hard finish and
the profiles etween from 20 D (WR). In this synthetic material is an additional net weaving
that stops rips and enhances the tensile strength of the seams. A special coating makes the
wing water-repellent, UV resistant and airtight.
The STRIKER consists of 68 cells. The end of the wing (sta ilizer) is ent down and
seamlessly integrated in the rest.
The aeration works through openings on the lower side of the profile nose and the precise
dimensioned overtopping openings in the profile ri s (Cross Ports). Every earing profile ri
is fixed on 4/5 line attachments which are reinforced in the profile. Between the main line
groups are sewed in tightening straps that set the tension of the sail. On the profile nose,
too, are enhancements which ring a out a high contour accuracy and sta ility. We have
also fixed a reel with minimal strain on the flow-against- and the flow-off-edge of the wing
that equalizes the tension over the glider. This tension distri ution has een calculated
sophistically y our construction software.
2.2 Line Suspension
The lines of the Striker consist either of polyester coated HMA-Aramide or of polyester
coated or non-coated PES / Dyneema. The material and the tensile strength of the lines
depend on their specific place of installation.
The lines are differed in top lines (on top of the glider), intermediate lines (in the middle),
and main lines (at the riser), sta ilizer lines (on the end of the wing), rake lines (up at the
rear edge) and main raking lines (on the rake handle). The classification of the lines is:
A-, B-, C-, D-and E- level and rakes.
The line of each level are coloured separately for a etter differentiation.
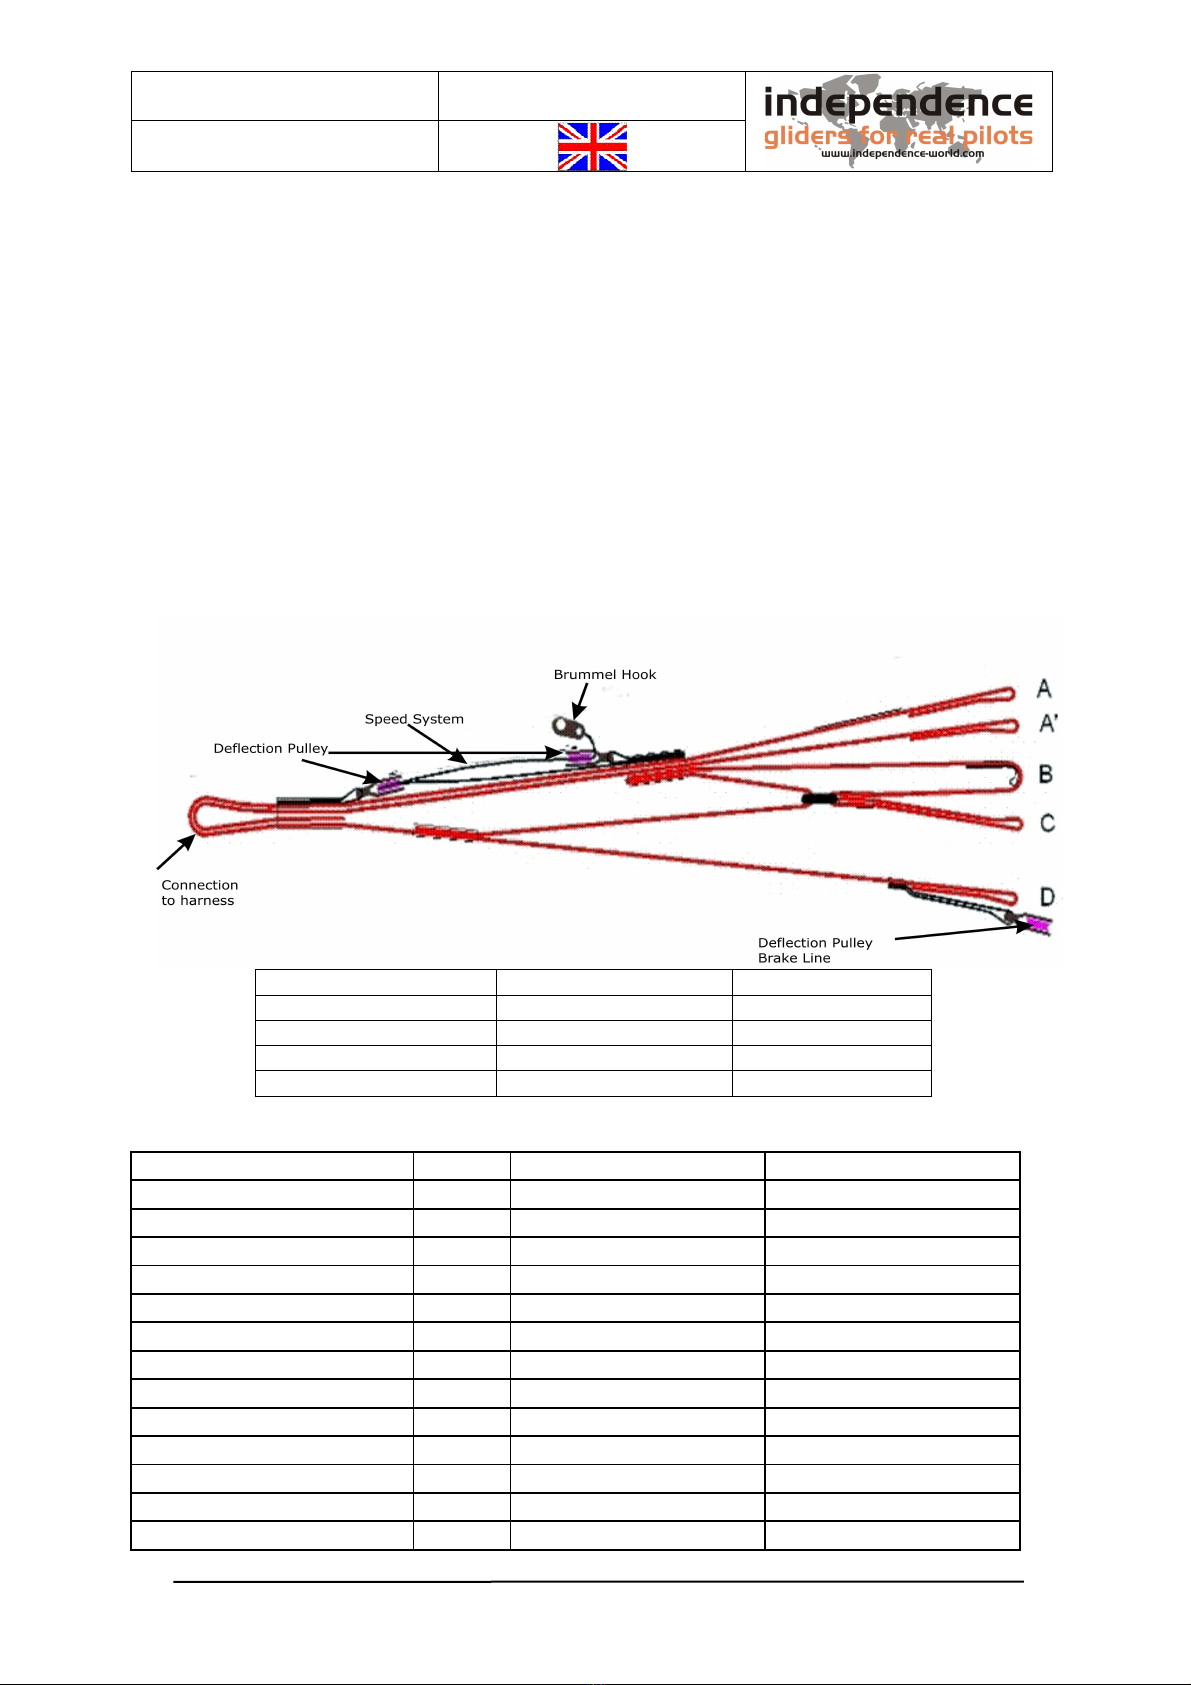
The main riser of the Striker has 5 risers on every side.
The A-riser is separated in a main (A) - and a y-riser (A’). 2 main lines are hooked in the
A-riser, one in the A’-riser.
To the B-riser are fitted 3 B main lines and one sta ilizer line each.
To the C-riser are fitted 3 C main lines each.
To the D-riser are fitted 2 D main lines each.
The main rake line is lead to the rake handle trough a deflection pulley.
The line shackles are made of stainless steel and protected against unintentional opening y
a plastic insert.
For line arrangement see line plan on page
2.3 A eleration System
The STRIKER has an acceleration system, which automatically returns to ase position after
use. The riser does not have a locka le trimmer.
Use of the acceleration system shortens the A, B and C risers and the angle of attack will e
reduced.
In normal flight all risers have the same length (52 cm without line shackles).
Date: 10.03.2010
Revision: 0
Manual
Striker
Page: 6 of 17
Fly market Gm H & Co. KG ● Am Schöne ach 3 ● 87637 Eisen erg ● Germany
2.3.1 Fun tion and Handling
Before the start the rummel-hooks of the foot-acceleration system of the harness have to
e hooked to the rummel-hook of the acceleration system of the glider. It’s important to
make sure, that the line runs free and is not tangled up around the riser!
Before first use the length of the foot-acceleration system has to e adjusted correctly. This
has to e done est in a simulator. The length is correct, if the acceleration line has a little
play and is not under tension when the accelerator is not in use.
Normally all risers have the same length.
Using the foot-accelerator shortens the A and A’ risers for 11 cm, the B riser for 8.5 cm and
the C riser for 5.5 cm.
3. Overview Riser
Normal (cm) Accelerated (cm)
A A’ 52 41
B 52 43.5
C 52 46.5
D 52 52
4. Te hni al Data
Size Stiker S/M M/L
Homologation EAPR 7310/10 7311/10
Surface area flat m² 25.50 27.50
Surface area proj. m² 21.80 23.58
Wingspan flat m 12.89 13.39
Wing Depth (middle) cm 247 256
Aspect ratio flat A/R 6.6 6.6
Aspect ratio projected A/R 4.8 4.8
Cells Nr. 68 68
Glider weight kg 5.4 5.8
Takeoff weight min. kg 65 90
Takeoff weight max. kg 92 110
Sinkrate min m/sec 1.0 1.0
V-Trimm
Km/h 38 38
Date: 10.03.2010
Revision: 0
Manual
Striker
Page: 7 of 17
Fly market Gm H & Co. KG ● Am Schöne ach 3 ● 87637 Eisen erg ● Germany
V-max. Km/h 58 58
EN/LTF Cat. D D
5. Ageing of Lines and Trimming Possibilities
Until now elief was that lines expand during use. Concerning the middle A and B lines –
which carry most of the urden – it is still true.
During usage lines ( oth Kevlar- and Dyneema-lines) get microscopic fine drafts and
macerate in some kind. The C and D lines in the ack and the outer A, B, C and D lines are
loaded with some grams only during the flight. This minimum load leads to su tle
shortening ecause the lines aren’t stretched y weight. At today’s state of the art this
development is inevita le. Therefore the ALBATROS is y default delivered with a faster trim
(+5 mm on C and D) to compensate the shortening.
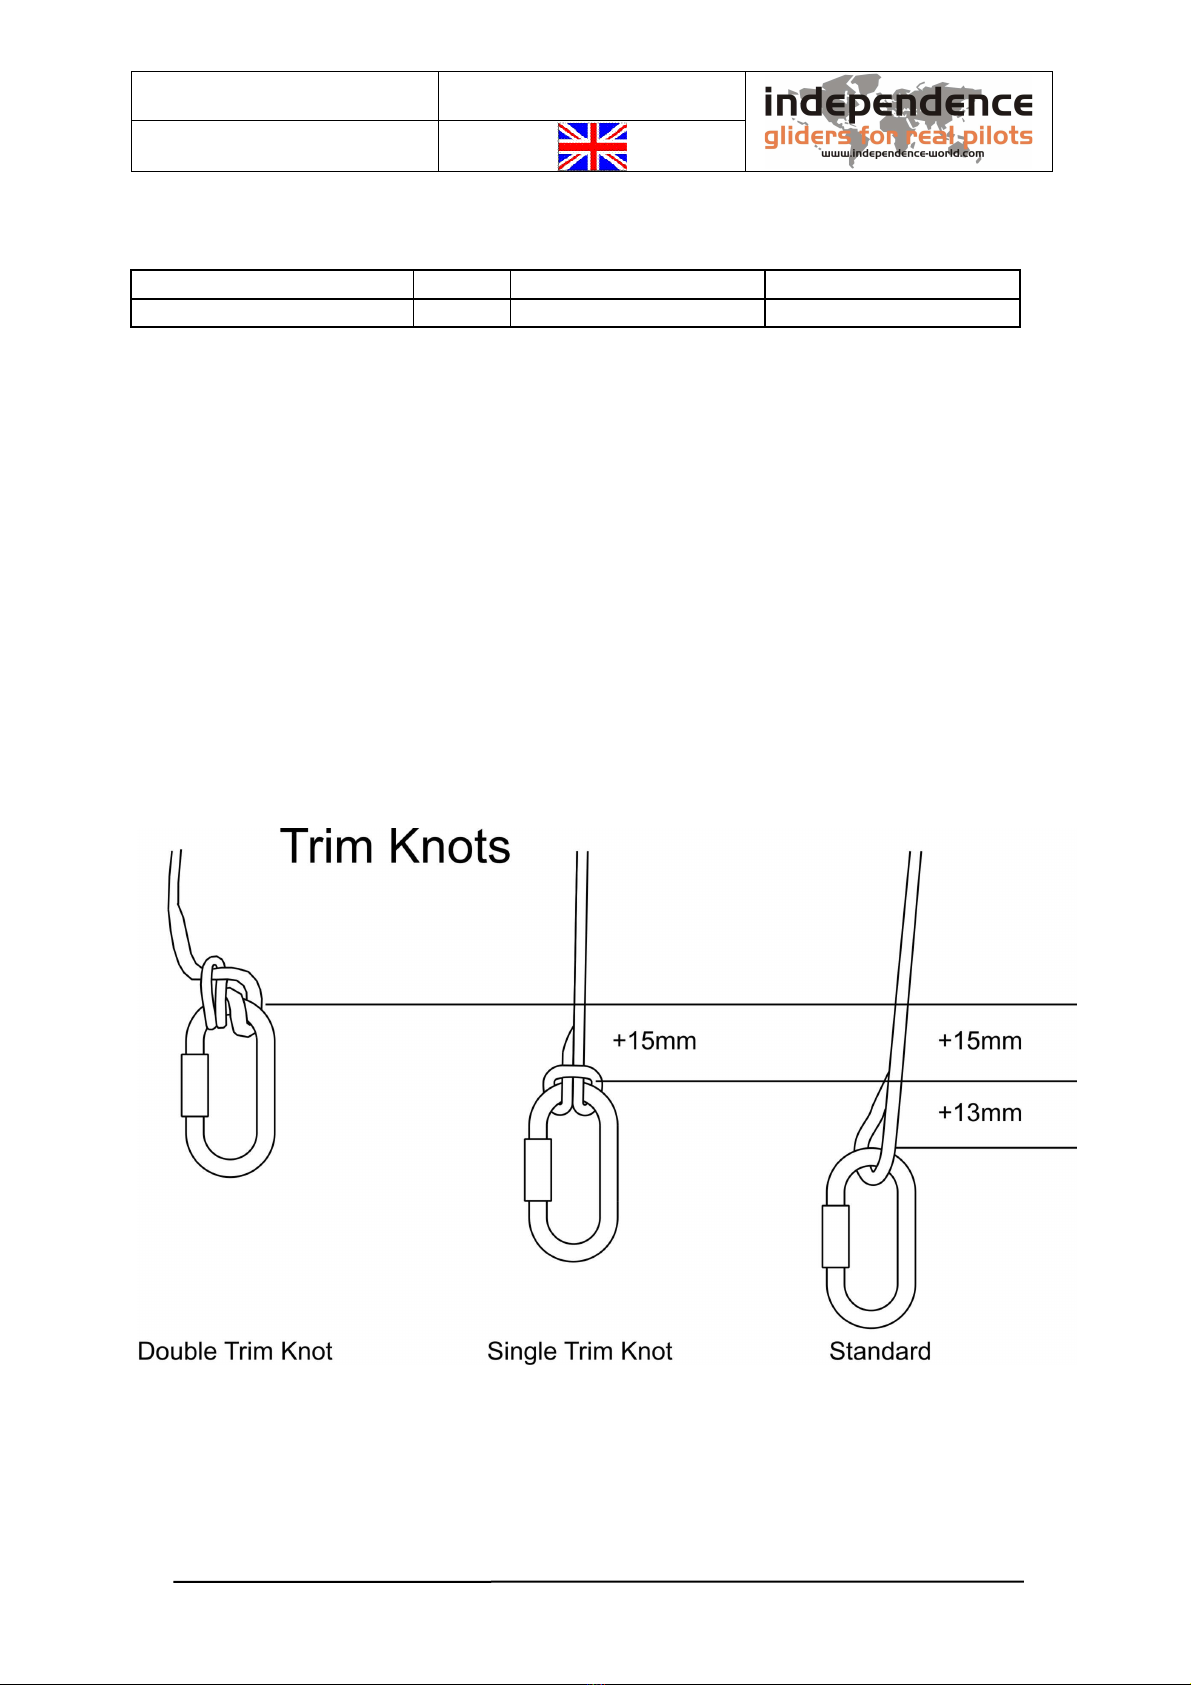
We also deliver the less loaded lines like AR3, BR3, CR1, CR2, DR1 und DR2 with a dou le
trim knot. So you can change the trim in two steps and prolongate the lines.
Dou le trim knot: Removal of the first trim knot = + 15 mm of line.
Single trim knot: Removal of the second trim knot = + 13 mm of line

Date: 10.03.2010
Revision: 0
Manual
Striker
Page: 8 of 17
Fly market Gm H & Co. KG ● Am Schöne ach 3 ● 87637 Eisen erg ● Germany
5. Line Plans
99.5
102
108.5
115
112
113
116.5
57.5
127
125.5
126
128
50
51.5
135
133.5
135
138
58
147.5
145.5
148
152
52.5
62
159
156.5
160
164.5
106
123.5
120.5
124
131.5
103.5
124
121
125
132.5
105.5
112
129.5
126.5
130.5
137
143.5
90
137
133.5
138
145.5
83.5
143.5
140
145
150.5
157
98
143
139.5
144
151.5
110
125
148
145
149.5
156
162.5
152.5
156
153
158
165.5
AR2-436
194
194
AR1-436
194
194
AR3-391
194
194
BR3-391
194
194
BR2-436
194
194
BR1-436
194
194
BR4-581
99.599.5
CR2-439.5
194
194
CR1-439.5
194
194
CR3-391
194
194
194
194
DR1-439.5
194
194
DR2-439.5
194
194
342+25
242
97
97
242
145.5
145.5
237.5
144.5
144.5
27.04.2010 - Ref 2
AR1,AR2
BR1,BR2,BR4 AR3,BR3
CR1,CR2,CR3
Standard Double Trim Knot
DR1,DR2
A Riser
A' R is er
B Riser
C R iser
D R iser
AR1
AR2 AR3
BR1BR2
BR3
BR4
CR1 CR2
CR3
DR1
DR2
12345678
9
10
11
12
13
14e
1 2 345678910 11 12 13 14 15 16
7
103.5
106
113
119.5
116.5
117.5
121.5
60
132.5
132
132.5
135.5
54.5
57
140.5
140
142
146
62.5
154
152.5
156
160
57.5
65.5
166
164
167.5
173
112
129
126
130
138
108.5
129
126
130.5
138.5
111
117.5
135
132
137
143.5
148.5
96
142.5
139.5
144.5
152
87
149
146
151
157
162.5
101.5
148.5
145.5
150.5
158.5
115
130.5
154
151
156.5
163
169
158
162
159
164.5
172.5
AR2-454
202
202
AR1-454
202
202
AR3-407
202
202
BR3-407
202
202
BR2-454
202
202
BR1-454
202
202
BR4-605.5
103.5103.5
CR2-457.5
202
202
CR1-457.5
202
202
CR3-407.5
200.5
201
202
202
DR1-457.5
202
202
DR2-457.5
202
202
358+25
252
101
101
252
151.5
151.5
249
150
150
1 2 345678
9
10
11
12
13
14e
12345678910 11 12 13 14 15 16
AR1,AR2
BR1,BR2,BR4 AR3,BR3
CR1,CR2,CR3
Standard Double Trim Knot
DR1,DR2
27.04.2010 - Ref 3
A Riser
A' R iser
B Riser
C Riser
D Riser
AR1
AR2 AR3
BR1BR2
BR3
BR4
CR1 CR2
CR3
DR1
DR2
After each 20 hours of flying the line length have to e checked. Non loaded lines often
shrink. (AR3,BR3,BR4,CR1,CR2,CR3,DR1,DR2 and relevant upper lines)
For adjusting shrunk lines the trim knot can e removed
For trimming see special chapter in the hand ook.
Striker S/M
Striker M/L

Date: 10.03.2010
Revision: 0
Manual
Striker
Page: 9 of 17
Fly market Gm H & Co. KG ● Am Schöne ach 3 ● 87637 Eisen erg ● Germany
6. Measurement
STRIKER S/M
mm A B C D E BR
Value
without
Riser
Value
without
Riser
Value
without
Riser
Value
without
Riser
Value
without
Riser
Value
without
Riser
1 7870 7840 7890 7965 7935 8820
2 7790 7760 7805 7870 7880 8545
3 7740 7705 7750 7825 7745 8395
4 7745 7710 7760 7815 8275
5 7680 7645 7690 7765 8130
6 7605 7575 7615 7680 8195
7 7550 7520 7560 7635 7930
8 7545 7515 7550 7625 7865
9 7415 7390 7425 7470 7845
10 7300 7280 7305 7345 7870
11 7175 7160 7175 7205 7860
12 7095 7080 7085 7105 7765
13 6975 6945 6955 6990 7820
14 6820 6845 6910 7755
15 7740
16 7815
STRIKER M/L
mm A B C D E BR
Value
without
Riser
Value
without
Riser
Value
without
Riser
Value
without
Riser
Value
without
Riser
Value without
Riser
1 8190 8160 8215 8295 8260 9195
2 8110 8080 8135 8200 8195 8920
3 8055 8025 8075 8155 8055 8765
4 8060 8030 8080 8140 8630
5 7995 7965 8015 8090 8485
6 7920 7890 7940 8005 8575
7 7860 7830 7875 7955 8285
8 7860 7830 7870 7950 8220
9 7725 7705 7745 7790 8195
10 7605 7590 7630 7660 8230
11 7470 7465 7490 7515 8225
12 7390 7385 7395 7410 8145
13 7265 7235 7245 7285 8195
14 7105 7130 7200 8140
15 8115
16 8170

Date: 10.03.2010
Revision: 0
Manual
Striker
Page: 10 of 17
Fly market Gm H & Co. KG ● Am Schöne ach 3 ● 87637 Eisen erg ● Germany
7. Harness
The STRIKER has een developed and authorized with harnesses according to the LTF type
“GH”. Nearly all harnesses recently produced are type GH harnesses and suita le for the
STRIKER. They differ from the GX harness due to their low suspension and not very
effective (if at all included) cross straps. Cross straps have not proven themselves in
com ination with modern paragliders.
8. Che k
Every paraglider delivered is tested and measured y us. Nevertheless we advise you to
check your paraglider for the following criteria. You should also follow these instructions
after a long intensive flight, hard maneuvers or an accident on landing, e.g.: tree landing.
Check: The seams where the lines attach, at the risers and at the canopy for any damage?
That all the lines have een sewn correctly and are free of damage? That all the line locks
have een screwed up properly and the plastic inlets are tight? That all width of cloth, the
ri s and V-attachments are free of rips? Every fault - no matter how small - must e
checked and repaired y a professional? A damaged paraglider is not air-worthy!
9. Adjusting the Brake / Steering Lines
The two main steering/ rake lines lead up to a line cascade which is fixed to the trailing
edge. On the risers the steering lines run through a pulley and are connected to a handle.
These handles are fixed to the risers with a magnetic clip when not in use. The length of the
steering lines is set correctly at the factory. They have to have at least 5 cm of free play
and must only e adjusted y a qualified flying instructor or the dealer. The improper
adjustment of the steering lines can cause severe changes to in-flight ehavior.
10. In-flight
The following pages are not intended to descri e how to fly a paraglider. Rather we want to
show you the STRIKER specialties and give you important information regarding in-flight
ehavior.
10.1 Take off Preparation
Before every take-off you have to do an accurate pre-flight check. You have to check the
risers, lines and the canopy is not damaged in any way. Also you have to make sure that
the line locks (cara iners) are closed firmly and are fixed against turning y its plastic
inlays.
The harness has to e put on with a maximum of attention. After you have put your harness
on you have to check again if all uckles are closed correctly. Also you have to make sure
that the rescue-container is closed correctly and the release-handle of the rescue-system is
placed correctly (see in the manual of the harness).If there is any defect, you are definitely
not allowed to take-off!
The easiest way to take off with the STRIKER is to lay it out in an arc. You have to lay it out
against the wind.
The line-levels as well as the rake-lines have to e sorted accurately; also the risers have
to e sorted. All lines have to run free without any twisting or knots. No lines are allowed to
lie under the canopy.
When all preparations are done the main cara iners of the harness are connected to the
risers. You have to take care that the cara iners are closed correctly. If you are using a
speed- ar, also the rummel-hooks of the speed ar’s line are connected to the rummel-
hooks of the speed-system on the risers. You have to take care that the speed-system is
running free.

Date: 10.03.2010
Revision: 0
Manual
Striker
Page: 11 of 17
Fly market Gm H & Co. KG ● Am Schöne ach 3 ● 87637 Eisen erg ● Germany
10.2 Che klist
1.1.1
10.2.1 Paraglider
Canopy free of damages?
Risers free of damages?
Line locks closed tightly and fixed against twisting y its plastic inlays?
Lines free of damages?
All lines including rake-lines free running and without any twists?
1.1.2
10.2.2 Harness
Rescue-container closed?
Release-handle of the rescue-system attached correctly?
All uckles closed correctly?
Main cara iners closed correctly?
1.1.3
10.2.3 Before Take-Off
Risers mounted correctly? Without twists?
Speed-system mounted correctly? Without twists?
Brake-handle and the correct level of riser taken in hand?
Pilot in the middle of the canopy, that all lines are stretched symmetrically?
Wind direction o.k.?
O stacles on the ground?
Airspace free?
11.1. Take-Off
The take-off with the STRIKER is quite easy. Generally we recommend using oth A-risers
(A and A´) for starting the STRIKER. Depending on the starting-technique, the wind-
situation and the terrain you can alternatively use only the inner A-risers (A) for lifting up
the glider. For a etter orientation the different risers are marked with different colors.
The pilot, who is ready for take-off, holds the A-risers and the rake-handles of each side in
his hands. The A-lines are already stretched a little it. On flat take-off areas or at low-wind
conditions you can also go one step ackwards to the canopy, to lift up the glider with more
impulse. During the take-off run the arms of the pilot are first stretched sideways
ackwards in elongation of the A-risers. When the glider then lifts up, the arms are moving
upwards. The most important thing during the take-off is, like at all other gliders too, not
the force ut the constancy of the pull. Because the STRIKER is very easy to lift up, you
have to rake it a little it on steep takeoff areas or in strong wind conditions, to avoid that
the glider is overtaking you.
If you are starting the glider ackwards (face the glider while lifting it up) in strong wind
conditions, you can avoid a too early take-off if you simply go along with the glider. The
est way to train for taking off in strong wind conditions is y regular ground handling
practice.

Date: 10.03.2010
Revision: 0
Manual
Striker
Page: 12 of 17
Fly market Gm H & Co. KG ● Am Schöne ach 3 ● 87637 Eisen erg ● Germany
11.2. A elerated Flight
When using the speed system with your feet, the angle of attack is reduced and the
STRIKER flies up to 12 km/h faster. Due to the increased speed the reaction of the canopy
is more dynamic in collapses. For your own safety you should only accelerate in calm wind
conditions with ample ground clearance. Never let loose the rake handles while flying
accelerated. If you are flying in tur ulent air, immediately release the speed-system! Sharp
reactions during accelerated flight must e avoided, as the low angle of attack increases the
chance of a collapse.
If the glider collapses you have to release the speed-system immediately, then you use the
rake-lines to sta ilize the glider first and reopen it.
11.3. Turning
The STRIKER has ecause of its steering-characteristics a very high agility: It reacts very
directly and without delays on rake-line inputs.
By weight-shift (pilot leaning on the curve’s inner side) it’s possi le to fly very flat turns
with a very little loss of height. Weight-shift and pulling the rake on the curve’s inner side
ena les the pilot to fly sharp turns. For flying in thermals we recommend a com ination of
weight-shift, raking the curve’s inner side and sta ilization of the curve’s outer side y
raking the outer side a little it as well.
By varying the rake line pulls and the weight-shift (active flying), the pilot can change the
radius and the ank, what is optimizing the centering in the thermals.
Attention: If the rake lines are pulled too fast or too far the glider will e stalled. A one-
sided stall is signalized clearly y: The curve’s inner side of the wing is getting soft, and
nearly stops. In this case you have to release the rake-line.
11.4. A tive Flying
By flying actively you can avoid most collapses efore they occur!
Active flying means that you fly the paraglider as sta ile and as effective as possi le y
correct weight-shift and rake-line inputs. In tur ulent air and rough thermals the canopy
should e kept vertically a ove the pilot as good as possi le. Therefore the pilot is using
well dosed rake-line inputs.
If you fly into strong thermals (upwind) the glider’s angle of attack increases. If you release
the rake-line while flying into the thermals the canopy can accelerate and the glider stays
more or less vertically a ove the pilot.
The opposite if you fly in downwashes (down winds): Here you pull the rake-lines dosed.
11.5. Landing
The STRIKER is easy to land. At the end of the flight against the wind let it glide out while
softly raking. A out 1 m a ove the ground you should increase the angle of attack y
using the rake stronger. Full raking should concur with the landing.
If you have strong headwind, use the rake softly to avoid a stall!
We strongly recommend not using the ad ha it of “pumping” down from greater heights!
Also don’t land out of steep turns or spiraling.
Take care that the nose of your glider doesn’t fall to the ground after the landing. This could
destroy the profiles and damage the material in that area!
12. Win h-Laun hing (Towing)
The STRIKER is certified for tow launches. You should however discuss the requirements of

Date: 10.03.2010
Revision: 0
Manual
Striker
Page: 13 of 17
Fly market Gm H & Co. KG ● Am Schöne ach 3 ● 87637 Eisen erg ● Germany
towing with a flying instructor or the person in charge of the winch. Towing is only
permitted when the person in charge of the winch has a valid winch license.
The equipment needed for the tow must also e certified.
For est performance and easiest take off we recommend a pre-acceleration system!
13. Using a Motor
At the moment the STRIKER is not yet certified for flying with a paramotor. But several
manufacturers of paramotors are planning to do this certification. The current status of the
certification can e inquired from the paramotor manufacturer or directly from us.
14. Extreme Flight Maneuvers
14.1. Asymmetri (lateral) ollapse
An asymmetric or lateral collapse is most pro a ly the most common accident which can
occur while flying a paraglider. If the STRIKER collapses laterally in tur ulent air, this
usually happens only on the wing’s outer side. To keep the flying direction during this
incident, you have to rake the opposing open part of the wing.
If the collapsed part of the canopy is very ig, you have to rake the open side very dosed
(not too much!) to avoid a stall. After you have stopped the turning of the collapsed glider
y raking the open side, you can open the collapsed side y pumping with the rake-line
on the collapsed side. If you do not react actively on the asymmetric collapse y raking the
open side, the STRIKER mostly opens automatically within a half turn or less. If the glider
does not open again - ecause of strong tur ulences or other influences (e.g. cravats) - the
glider will get into a steep-spiral.
14.2. Cravats
Very ig collapses or other extreme flight situations can cause on every paraglider so called
cravats. The collapsed cells get caught up in the lines. Without a reaction of the pilot the
glider is getting in a steep-spiral. If this happens you have to stop the rotation y dosed
opposite raking. If the rotation is increasing despite reaking you have to release the
rescue-parachute immediately, especially if you are already flying in low altitude.
If you have enough altitude you can try to correct the cravat y the following possi ilities:
-Well dosed opposite reaking (to slow down the rotation) and very fast, deep and resolute
pumping of the steering-line on the collapsed side to try to get the cravat loose.
-Pulling down the sta ilizer-line.
If these oth tips do not work, you can try to release the cravat y doing a full stall, if you
have enough height!
Attention:
The flying maneuvers mentioned a ove are very difficult and could waste a lot of height! If
the pilot is overextended or has not enough height the rescue-parachute has to e thrown
immediately!
14.3. Symmetri or Front Tu k (Frontals)
A collapse of the complete frontal edge (leading edge) mostly happens y too deep pulling
of the A-risers or during accelerated flying or y suddenly appearing strong downwashes
(down winds). A fold of the complete leading edge might look spectacular however it is not
really dangerous, as far as the collapsed part is not too ig. Normally no rotations occur
during a frontal collapse and the paraglider quickly reopens unassisted, to return to normal
flight again. Braking evenly on oth sides will speed up the opening of the leading edge.

Date: 10.03.2010
Revision: 0
Manual
Striker
Page: 14 of 17
Fly market Gm H & Co. KG ● Am Schöne ach 3 ● 87637 Eisen erg ● Germany
Early recognizing of the situation and a fast reaction y evenly dosed reaking of oth sides
helps you to keep the loss of height very small and avoids an escalation of this flying
incident.
14.4. Para hutal Stalls
During a stall a paraglider has no forward movement anymore ut very ig sink rates.
Letting go of the B-risers too slowly exiting a B-stall with old porous material, damaged
lines or ri s, pulling the C or D-riser or incorrect takeoff weight can result in the glider
falling vertically ut still holding its shape. The tendency for a stall is also increasing if the
canopy is wet or the air-temperature is very low. You can tell whether or not your
paraglider is parachutal, as the flying noise can hardly e heard even though the rakes are
free and you are sitting in your unusual position under the canopy. Normally, letting up on
the steering lines will allow the glider to resume normal flight. If the canopy and the lines
are in good condition, the STRIKER will speed up again automatically after 2-3 seconds. If
this does not happen you must push the A-risers forward or use the speed-system of the
glider. Does the glider stay in a repetitively parachutal stall without any noticea le reason
(e.g.: wet canopy, wrong take-off weight), the glider has to e checked efore the next
flight y your dealer or y the manufacturer. Attention: Never pull the rake-lines during a
parachutal stall, ecause the glider would go into a full stall immediately. Near the ground a
parachutal stall should not e released ecause of possi le pendulum movements. Instead
the pilot should prepare for a hard touchdown.
14.5. Full Stall
You can only induce a full stall if the oth rake lines are completely pulled through and
remaining in this position for more than one second. When stall speed is reached the
canopy will empty itself at once, the pilot is hurled forward and the impression is given that
the canopy falls ackwards.
It is vital to keep the rakes pulled down until the empty canopy is a ove the pilot again
(this will take 3-6 seconds). If you let go of the steering lines with the paraglider still ehind
you, the glider will shoot forward and dive in front. Not until the glider is a ove the pilot
again the steering lines can e released moderately quick and symmetrically. The perfect
ending to a full stall should take place in two steps:
1.slow refilling of canopy (slow loosening of rakes, approx. up to the shoulder) until the
canopy is reopened completely, then
2.releasing the rakes altogether
If you release this maneuver too fast or asymmetrically, the glider can collapse frontally or
asymmetrically. Attention: A wrong, too early, asymmetrically or too fast released full stall
can cause an extreme forward movement of the canopy. In an extreme case the canopy will
shoot and dive under the pilot.
14.6. Negative Spin
Pulling down hard on one rake can cause the air stream to reak away on that half of the
wing. A reversion of the air-stream direction can occur. The slowed half flies in the opposite
direction. The paraglider then turns around its vertical axis. For negative spins there can e
two reasons:
-one rake-line is pulled too fast and too far. (E.g. while entering a deep spiral)
-during slow flying one side is raked too much (e.g. while flying circles in thermals)
If an unintentional negative spin is released immediately during its eginning, the glider
normally goes ack into normal flight without losing lots of height. But if the negative spin is
kept for a longer time and the glider can accelerate in this negative spin the release of the
spin can cause the canopy to move extremely asymmetrically in front of the pilot. Big
collapses and cravats can e the result!

Date: 10.03.2010
Revision: 0
Manual
Striker
Page: 15 of 17
Fly market Gm H & Co. KG ● Am Schöne ach 3 ● 87637 Eisen erg ● Germany
14.7. Wingover
Narrow turns to the left and to the right are flown alternately. During that moves the ank
is increasing more and more. If there is too much dynamic and ank the wing’s outer side
can lose pressure. If the ank is increased further and the pilot reacts wrong (timing!) a ig
part of the glider can collapse impulsively!
Full stall, Negative Spins and Wingover (over 90 degrees) are prohi ited aero atic (acro-)
moves!!! Doing these maneuvers wrong or a wrong reaction of the pilot can generally e
very dangerous and life-endangering with all paragliders!
14.8. Emergen y Steering
In the event of losing control of the steering lines, the STRIKER can e flown easily with the
rear risers (D lines). A stall happens quicker when steering with the rear risers, as if steered
with the rake lines. The way of steering with the rear risers is at approx. 20cm with the
STRIKER. Light turns can e flown using the sta ilizer lines or y shifting your weight.
15. Des ending Maneuvers
15.1. Spiraling
Spiraling is the most efficient way to descend quickly. However, this causes a lot of strain
for the paraglider as well as the pilot. Please e aware that, according to your fitness,
outside temperature (cold) and descent rate, you could lose consciousness. Many pilots
lower their reathing rate or start hyper ventilating, oth of which heighten the risk of
losing control.
With the first signs of sickness, weariness or lurred eye sight you must stop spiraling
immediately.
15.2. Big Ears
The so called “Big Ears” is a simple yet not very effective way to get down, while the
forwarding speed is higher than the sinking speed. It’s more effective to reduce the gliding
rate and avoid a danger horizontally than to get down fast.
For Big Ears oth outer wings are folded down symmetrically y pulling the outer A- risers
(A’).
Too strong folding y pulling the next two A main line risers decreases the velocity and can
lead to a stall in an extreme case. Therefore just only use the outer A riser to make Big
Ears. This maneuver can increase the sinking speed to 5 m/sec and half the gliding power.
Using the foot accelerating system can increase sinking and forward velocity remarka le.
To end the Big Ears it’s sufficient to let the outer main risers loose. The glider will open
automatically. To support this, the pilot may rake slightly.
Attention: Never fly a steep spiral with Big Ears for this would strain the middle A Lines
over their limits.
15.3. B-Line Stall
The B-Stall with the STRIKER is easy to enter. Both B-risers are pulled down slowly and
symmetrically up to 20cm. The glider stalls and gets into a vertical descent flight. To end
the B-stall you simply release the risers within one second.
If the glider starts to turn during the B-stall or the wing-tips are moving forward you have
to release the B-stall immediately. Possi le reasons for turning or moving of the wing-tips
could e:
Turning: asymmetrical pulling of the B-riser, or one B- and one C-riser are pulled down.
Frontal moving of the wing-tips (horseshoe): the B-risers are pulled down too far.

Date: 10.03.2010
Revision: 0
Manual
Striker
Page: 16 of 17
Fly market Gm H & Co. KG ● Am Schöne ach 3 ● 87637 Eisen erg ● Germany
All descending maneuvers should e practiced in calm air with enough safety height, so that
you are a le to control it perfectly in cases of emergency!
For all extreme flight and fast descending maneuvers it’s important that you:
-Train it first under instruction of a flying instructor or during a safety course.
-Make sure that the air space under you is free efore and while you are doing the flying
maneuver.
-Have a look on the canopy during the maneuver and also look on the distance to the
ground.
16. Care, Storage, Repairs and Disposal
Your safety in the air depends on the condition of your paraglider. A maintained and
properly used paraglider will last a long time. In order to maintain your STRIKER’s condition
for a long time we would like to give you the following advice:
16.1. Care
In time the UV rays will damage the material of the paraglider. Therefore don’t leave the
STRIKER out in the sun unnecessarily. Take care that the paraglider will not get dirty while
laying it out. The dirt particles can damage the material.
The line length should e checked after landing in a tree or in water.
Don’t pull around your glider while it is lying on the ground. This could damage the coating
of the fa ric.
Wetness damages the coating of the fa ric and can reduce its lifespan.
If the lines draggle on the ground while staring the glider, they can e stretched or can tear
off.
Don’t step on the lines!
Put the cloth ag that comes with the glider underneath it when folding it up to ensure that
the material of the glider is not damaged.
Curl up the lines as little as possi le with no sharp wrinkles.
If the glider gets contact with salt water clean it immediately with fresh water!
Insects in the cells should e removed alive, not just only for animal care reasons, ut the
insect secretion is acid and can damage the fa ric.
Clean your paraglider only with clean water and do not use rushes or hard ru ing. Chemi-
cal detergents will damage the fa ric and the lines.
16.2. Storage
The glider must always e stored in dry condition. If the glider should have got wet, you
have to spread it out to dry it as soon as possi le. (But do not lay it in the direct sunlight).
Do not store your paraglide near chemical fumes of gases.
Avoid unnecessary high temperatures during storage or during transport (especially in
cars).
16.3. Repair
Small cuts in the material, if they are not along the seams, can e mended provisionally
with special self-sticky repair-tape which you get at paragliding specialized stores.
All other kinds of damages, like large cuts, cuts along the seam, ripped line loops, torn or
damaged lines must only e repaired y an authorized dealer or the manufacturer. Use only
original spare-parts!
Every alteration of the glider, unless authorized y the manufacturer, causes the
termination of the glider’s authorization.
Attention: The inspection and maintenance is done according to our hand ook of
01.03.2010 Revision 0.

Date: 10.03.2010
Revision: 0
Manual
Striker
Page: 17 of 17
Fly market Gm H & Co. KG ● Am Schöne ach 3 ● 87637 Eisen erg ● Germany
16.4. Disposal
The materials of which a paraglider is made require a special disposal. So please send
disused gliders ack to us. We will care a out a professional disposal.
17. Nature and Environment
Actually it’s self-evident, ut nevertheless mentioned particularly: Please practice our
nature-near sport in a way which does not stress nature and environment! Please do not
walk eside the marked ways, don’t leave your litter, don’t make unnecessary loud noises
and respect the sensitive alance in the mountains. Especially at the take-off we have to
take care for the nature!
Table of contents
Other Independence paragliding Aircraft manuals

Popular Aircraft manuals by other brands


Reely
Reely Speedy operating instructions

Learjet
Learjet 20 Series Pilot training manual

Grob
Grob Acro II Rigging instructions

Strong Enterprises
Strong Enterprises DHT SET-400 with Canopy owner's manual

ACA
ACA Citabria Explorer 7ECA Flight operations manual

Advance acoustic
Advance acoustic PI 2 Getting started