Indurama NA2675 Instruction manual

NA2675
Instruction Manual for use
and installation
WARNING: If the information in this manual is not followed
exactly, a fire or explosion may result causing property damage,
personal injury or death.
• Do not store or use gasoline or other flammable vapours and liquids in the
vicinity of this or any other appliance.
•WHAT TO DO IF YOU SMELL GAS.
- Do not try to light any appliance.
- Do not touch any electrical switch; do not use any telephone in your
building.
- Immediately call your gas supplier from a neighbour’s telephone. Follow
the supplier’s instructions.
- If you cannot reach your gas supplier, call the fire department.
• Installation and service must be performed by a qualified installer, service
agency or the gas supplier.
www.indurama.com

Congratulations ...
How to use the instruction manual?
This instruction manual is common for several models with different functions and
consists of three parts:
a) The "Installer's Manual, which contains necessary information for a safe and proper
installation of your stove.
b) The "conversion to different gases” section is only applicable when it is pretending
to use a different gas type from that of manufacturer or factory calibration.
c) The "User's Manual”, which contains the operating and safety instructions and also
practical recommendations for a proper use as well as the instructions for using each
one of the functions of your stove.
NOTE: For a better understanding of the texts, consider that in some countries the
gas appliance as we use here, is called “stove” and “grill” is called “broiler.”
• THIS GAS STOVE SHOULD BE INSTALLED AND / OR ADJUSTED BY QUALIFIED STAFF
ONLY AND THE INSTALLATION MUST CONFORM WITH THE APPLICABLE LOCAL CODES.
• Read technical instructions before installing this gas stove.
• Read instructions before turning on the gas stove.
• Change to a different type of gas should also be done by an installer, the gas
company or a representative of our authorized service provider.
• Review the information regarding to this model on the label or identification plate
attached to this manual or located in the back of the stove.
IMPORTANT:
• Keep this manual within reach for future reference.
• Complete the Warranty Sheet and save it.
PRELIMINARY WARNINGS
As the manufacturer of your new stove, we would like to thank you for choosing one of
our appliances; they are produced with the most advanced technology and meet the
highest quality standards.
We have constantly heard suggestions from our customers by introducing the largest
number of functional enhancements possible, which allows us to differentiate this
stove with its equivalent, ensuring comfort and satisfaction.
Our costumer service is always ready to help with a quick and effective solution, if you
need parts, repair or warranty.
There is a risk that you may lose your
life or cause serious damage if the
instructions are not followed
immediately.
DANGER
This is the safety alert symbol.
This symbol will alert you of situations that may endanger
life or cause serious injuries to you and / or to third parties.
All safety messages mention what the potential risk is, how to reduce the
probabilities of injuries or what may happen if instructions were not followed.
The following information is very important for your own
an others safety important:
SAFETY ITEMS
• Use two or more people to move and install your product. Failure to do that can
cause damage to your spine (backbone) or wounds.
• Always use pipes and pressure regulators according to local regulations. Verify
pipes and pressure regulators functionality first and replace them if it is necessary.
•Properly tighten all gas connections during installation. Install your stove according
to the specifications described in the instructions manual. Failure to follow these
instructions could cause a explosion, fire or damage people’s physical integrity.
• Do not use extension cords. Do not use the product without grounding. Do not use
T's plug adapters. Unplug the power supply before performing any maintenance on
the product. Replace all disassembled components before plugging the product.
• Make sure the feed hose does not cross or come in contact with the back of your
stove. If it this is unavoidable, install the flanges which are the accesories included in
some models of stoves (check page 6) or use another available device that fullfillis
the same function. The use of the oven generates hot gases that can damage the
hose and presenting serious risks.
• The exterior surfaces of the appliance can reach high temperatures during its
operation. Keep away from children and avoid direct contact with the parts that can
not be manipulated.
• In case of damage, do not try to solve it by your own. Always proceed to consult an
authorized Service Centre or authorized installer.
• Check that the gas burners valves are turned off when you are not using them.
There is a risk that you may lose your
life or cause a serious damage if
the instructions are not followed.
WARNING
This manual and its product have many important safety messages. Always read and
follow the safety messages.
WARNING
• All Ranges can tip.
• Injury to persons could result.
• Install Anti-Tip devices Packed with Range.
• See Installation Instructions.

c
Installation and setup
Remove all plastic
protectors and foams
that only serve while the
appliance is being
transported.
To lift or move your stove,
open the oven door, hold
from the interior and the
section located on the back.
Never use the oven handle to
lift your appliance.
Do not install your
stove next to the
refrigerator due to
heat will decrease the
performance of the
appliance.
IMPORTANT: Do not allow children to play with covers or plastic
sheeting.
INSTALLER MANUAL
IMPORTANT:
• Manufacturers are not responsible for accidents that may result if the installation
and operating instructions are not followed. Also; the guarantee does not cover
damage caused by errors in the installation and / or improper operation of your
appliance.
• Locate the stove in a room large enough (at least 1.33 m per MJ / h of declared
rated power of each device installed in the room).
• Make sure the place is ventilated but without strong air currents.
• Keep natural open spaces for air circulation.
• This appliance should not be installed in bathrooms or bedrooms.
Instructions Manual
PAG 2
ab
WARNING
Use two or more people to move and install the product.
Failure to do so can cause damage to your back or wounds.
OVERWEIGHT RISK
OF INJURY
NOTE: If you need to move your stove to any direction, pui it on a uniform sheet of
plywood which would serve to make the handling. By doing that, you avoid
distortions or permanent damage in the stove.
3
INDEX AND CONTENTS
INSTALLER MANUAL
Installation
General diagram of Parts and
Components
Gas supply
Flexible pipe gas connection
Rigid pipe gas connection
Power supply
CONVERSION TO DIFFERENT GASES
Change of nozzles
Primary oxygen regulation
Reduced power setting
Safety Tests
USER MANUAL
Burner covers
Gas burners lighting
Triple Crown Burner
Recommendations for using gas
burners
Using the iron fryer
Mechanical timer
Touch Pad System
Digital Timer
Clock
Alarm
Digital thermometer
2
4
5
6
6
7
9
11
11
12
12
13
14
14
14
15
15
16
17
17
18
18
18
20
PAG
20
20
21
22
22
24
25
25
25
26
27
27
28
29
29
30
31
32
33
34
35
36
Oven
Turning on the oven
Security valve and thermostat
Short Timer Gas
How to program an automatic
shutdown in the oven
Triple crown burner
Turbo System
Turning on the oven light
How to operate the electric top
Recommendations for using the
oven
Parrilla Autodeslizable en el horno
Turning on the BBQ grill
Using the rotisserie
Hotplate
Precautions
What to do when you smell gas?
Avoiding accidents
Instructions against the incorrect
use of your appliance.
Cleaning and maintenance
Cleaning function in the touch pad
panel
PROBLEMS, POSSIBLE CAUSES AND
SOLUTIONS
GENERAL EQUIVALENTS TABLE
PAG
PAG 1
Instructions Manual

Installation:
The gas supply pressure for this stove are:
Under these conditions, the operation will be the correct one.
Ecuador
Other Countries
27.5 mbar = 2.75 kPa ( For liquefied petroleum gas LPG use )
28 mbar = 2.8 kPa ( For liquefied petroleum gas LPG use)
20 mbar = 2.0 kPa ( For natural gas GN use)
GENERAL CONDITIONS
- The installation must be carried out by qualified personnel.
- Read all the technical instructions before installing.
- Before installation, be sure local distribution conditions (Nature and pressure of the
gas) and gas appliance adjustment are compatible.
- Setting conditions for the gas appliance are located on the back identification label
or identification plate:
• Category I 3, stoves that work only on LPG.
• Category II 2-3, stoves that can run on LPG or NG.
- This gas appliance is not designed to be connected to a device evacuation
combustion products. Its installation and connection should be performed in
accordance with the installation standards. Pay special attention to the provisions
concerning to ventilation (Reference to Chile: Gas Installations Act No. 66).
- The area where you will install the appliance should include ventilation conditions, as
required in the last upgrade Standard NTC 3631 . (Reference for Colombia).
- This device is set to be installed from 0 to 4000 meters above sea level; therefore you
do not need to modify it to different local atmospheric pressure conditions and room
temperature.
- When installing the stove, it is necessary to comply with the provisions according to
NTC NTC 2505 and 3632 Standards (Reference for Colombia)
- Burners output ratings data are founded on the general characteristics sheet
attached to this manual.
- In case of adjustments, repair or maintenance of the stove, see the diagram which
indicates the general description of the parts and components that must be
removed.
- If you need to change the type of gas that will operate the appliance, follow the
setting instructions given in the section "Converting to different gases." (It applies only
to stove models in the Category II2-3).
- The manufacturer is not responsible for faulty installation that may cause accidents.
INSTALLER MANUAL
Installation and setup
Instructions Manual
PAG 4
max 2 cm.
(1”)
If your appliance has a top closure, comply
with the maximum size shown in this picture
according to working adjacent surfaces.
When you install your appliance; be sure
not to block the furnance gases exit from
the chimney or gills.
If the stove is going to be installed next to
a wooden wall; the appliance must be
placed between a fire-resistant material
and the wall. With dimensions of width
and height which exceed in 4 cm. (≈1.6’’)
to the stove.
e
not to block the chimney
f
g
INSTALLER MANUAL
Installation and setup
PAG 3
Instructions Manual
To prevent lodging, the
appliance should be
anchored to the wall through
the fixing system located in
the back.
DRILLING ON
WALL
DRILL 5mm (3/16”)
FISCHER PLUG
EYEBOLT
CHAIN
DIMENSIONS FOR DRILLING THE WALL
1) 770 mm (≈30.3”) STOVES 32” 2) 840 mm (≈33”)
570 mm ( ≈22.5”) STOVES 24”
487 mm (≈19.2”) STOVES 20”
NOTE: If your stove has a fixed system or take within fixed accessories, follow the instructions
below to avoid accidents with rollovers in your appliances.
Follow the minimum or maximum
dimensions shown in this image.
d
min. 60 cm. mín. 10 cm.
( ≈4’’ )
mín. 15 cm.
( ≈6’’ ) ( ≈1’’ ) ( ≈1’’ )
mín. 2 cm. mín. 2 cm.
mín. 65cm.
( ≈24’’ )
( ≈26’’ )
max. 33 cm.
( ≈13’’ )
Gas supply
Connection to the gas supply with a exible pipe
RISK OF FIRE
WARNING
Always use tubing and pressure regulators according to
local regulations.
The appliance must be disconnected from the gas supply
piping system during any pressure testing of that system.
Check the validity of hoses and pressure regulators and
replace them if it is necessary.
Properly tighten all gas connections during installation.
Install the stove according to specifications described.
Failure to follow these instructions can cause explosion, fire
or damage to people’ s physical integrity.
INSTALLER MANUAL
Installation and setup
Instructions Manual
PAG 6
If your stoye does not have gas outlet:
Ask an Authorized Technical Service
to provide the respective connector or
gas outlet according to the
distribution pipe thread (thread
3/8” BSPT or 1/2” ISO 228 ).
If your stove has gas outlet: The connection of
the flexible hose depends on the gas inlet tube
and distribution tube andi t must be executed
by qualified personnel.
Note: Some stoves have accesories included
within the gas inlet, the connection must be
done by qualified personnel.
ab
IMPORTANT:
•The gas supply must be placed on the same side of the crimp connector (gas outlet) of
your stove.
•The gas supply must be made with a flexible suitable gas hose of 8 mm (5/16’’) or 13 mm
(1/2’’) internal diameter (depending on the gas supply of your stove) and 1.5 to 2 meters
length, which carry out the requirements of flexibility, duration and minumun thermal
resistance of 70ºC (158ºF) (Reference for Colombia: NTC 3561. Reference for Ecuador: NTE
INEN 885 ), 60ºC (140ºF) ( Reference for Peru: NTP 300.065.)
•Some countries do not allow the connection to a flexible hose. See respective technical
provisions.
•The use of oven generates hot gas evacuation and heats backwards surface which can
damage the hose causing serious risks.
•Depending of use conditions of your stove, some zones eventually may reach a
temperature of 135ºC (275ºF.) Use a proper connector tube according to the
corresponding national installation requirements in force.
•Be sure service cord contacts the back of the stove (hot oven.)
•Be sure supply hose does not cross or contact the
back of the stove, if this is unavoidable, install flanges
which are included in the accessories of some models
of stoves or use another device for accomplishing the
same function. Check the chart for a correcto
installation of flanges, which are the guiding for the
hose, the use of oven generates hot gas discharge that
can damage the hose causing serious risks.
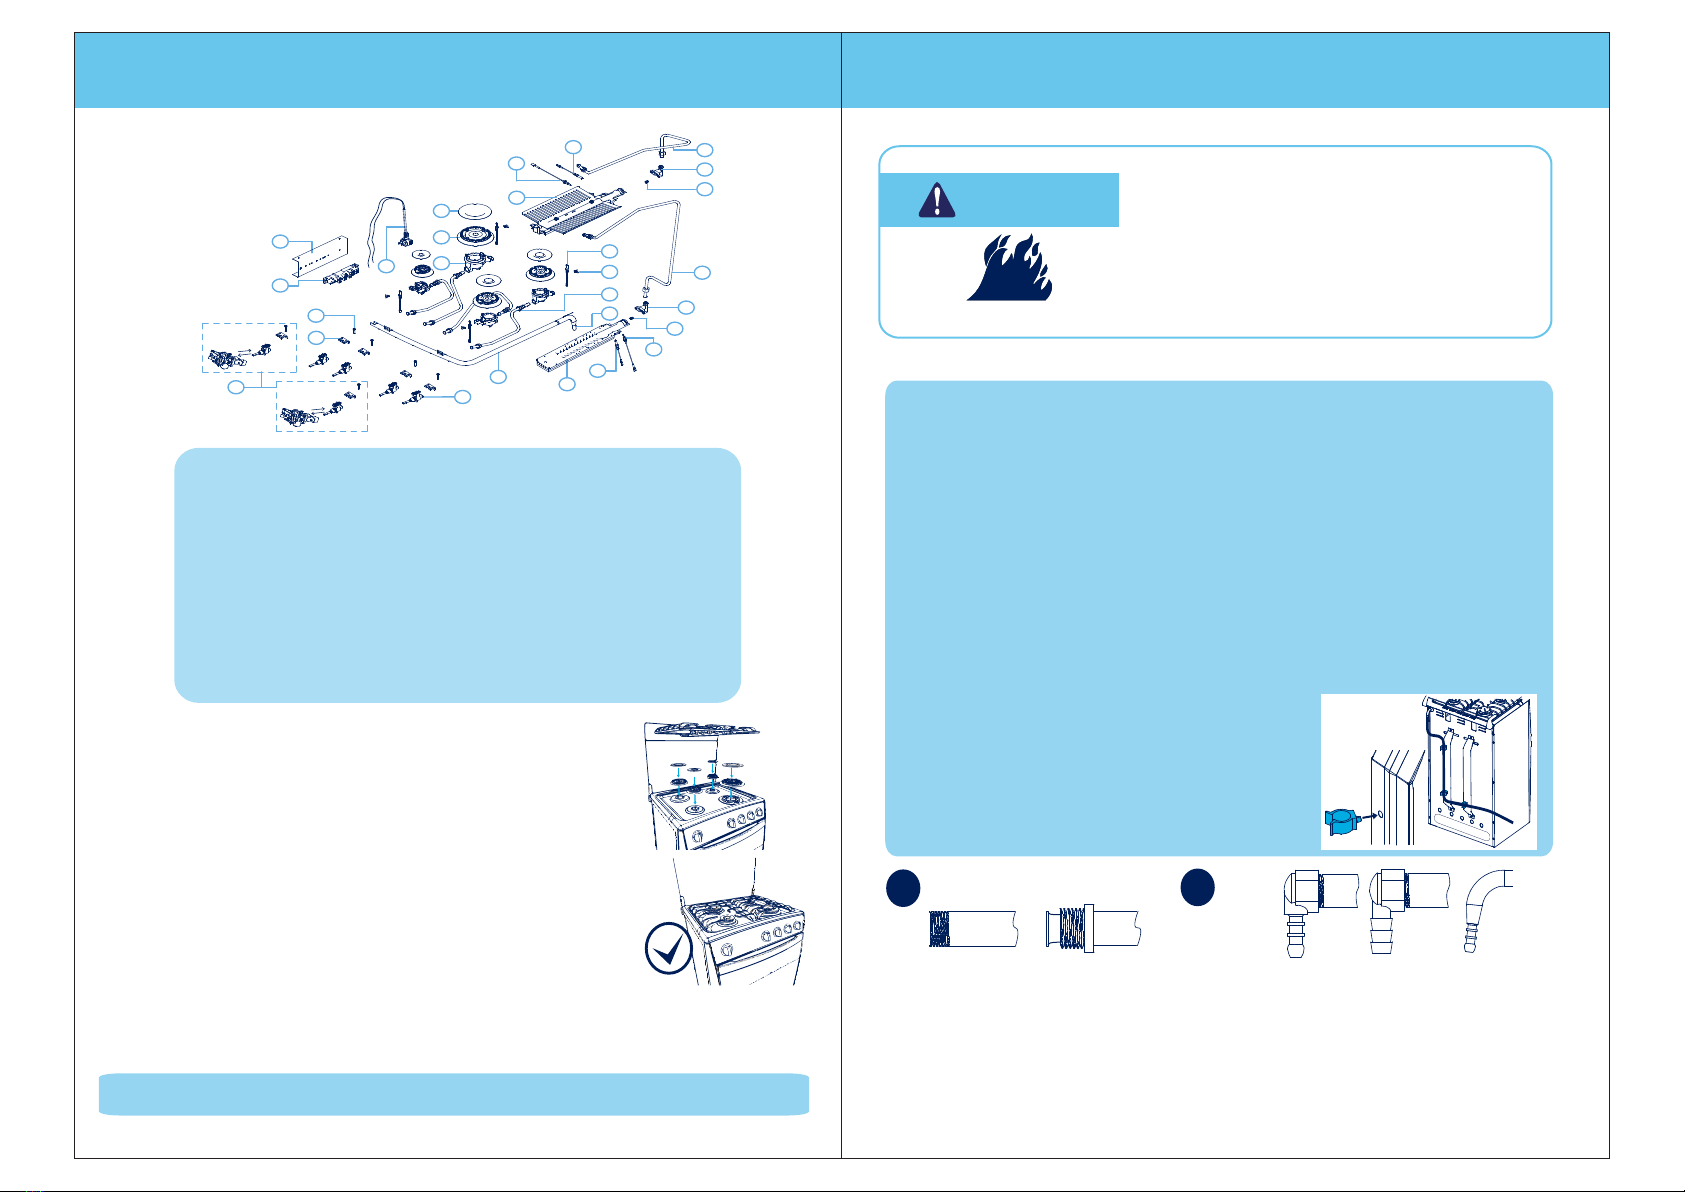
General diagram of parts and components.
INSTALLER MANUAL
Installation and setup
PAG 5
Instructions Manual
1.-Lateral generator support
2.-115 - 220 V transformer
3.- Fixing screw valves and thermostat
4.- Flange valves setting and
thermostat
5.- Thermostat / Oven valve
6.- Burner valve panel
7.- Tub ramp distribution
8.- Floor burner
9.- Floor burner stew
10.- Floor burner thermocouple
11.- Floor burner injector
12.- Floor burner portaciclor
13.- Floor burner pipe
14.- Gas supply
15.-Mixer pipe panel
16.- Fixation stew clasp
17.- Board stew
18.- Grill burner inyector
19.- Grill burner portaciclor
20.- Grill burner pipe
21.- Grill burner stew
22.- Griil buerner thermocouple
23.- Grill burner
24.- Burning board caps
25.- Burning board panel
26.- Mixer board cup
27.- Stove harness
1
17
18
19
20
23
22
24
25
21
16
15
14
13
2
11
9
10
3
4
5
6
8
12
7
26
27
Left position
Quartz line
Other lines central position
•Remove all accessories that packaged in the oven.
•Check the “ General diagram of parts and components” to know the names of
the components of the device and its location.
•Check burner sizes and select appropriate sizes of bases and end caps.
•Place the burner bases, end caps and grills so that they are firmly seated,
without balancing and whit proper coupling between the parties, as the items
listed below:
- Make sure the burner base is correctly placed, centered, fixed and the
corresponding burner.
- If your stove has triple crown burner check that yht inner end cap is the same
size of the central ring.
- Check that the end caps are centered and fully seated in the burner, without
leaving raised on one side.
If the placement of the accessories listed is incorrect, there is a risk of accidents or damage to the appliance.
IMPORTANT:
- Check the correct settlement moving the end caps slightly from side to side on the burner base until
you hear the lock in a fixed position.
- Check the assembly of components, nothing that when you turn the burner flames are blue, well
defined and no strange noises.
INSTALLATION INSTRUCTIONS FOR COVER ACCESSORIES.

IMPORTANT:
- The connection should be performed by qualified personnel.
- After you have installed the gas; verify there are no gas leaks, using soapy
water around the connection areas.
- Never use flame to verify the presence of gas leaks; it may cause fire.
- The hose must not be bent, tight or close to heat sources.
- In case of problems call to the authorized technical service.
Gas supply connection with rigid pipe
ATTENTION:
We recommend to use a new gas installation, observing compliance with
standards NTC 3561, NTC NTC3632 and 2505 (Reference for Colombia).
Verify the validity of the pressure regulator and connecting tubes.
NOTE: It is advisable to place the gas cylinder next to the stove.
Depending on the distribution pipe thread, dock the
threaded end of a female fitting 3/8” BSPT or 1/2” ISO 228
and connect it to the cooper tube to the gas supply. Use
sealant products on the device bords, ensuring the
application does not obstruct the system.
We recommend using clamps on all
connections to tighten the hose.
Connect the other end of the hose to
the gas cylinder valve or to the gas
outlet.
Connect one end of the hose to the
gas outlet located at the back of the
stove.
Soften the hose edges with hot water.
Important: All installer manual operations must be performed by qualified personnel.
PAG 7
Instructions Manual
INSTALLER MANUAL
Installation and setup
cd
ef
Instructions Manual
PAG 8
INSTALLER MANUAL
Installation and setup
IMPORTANT:
LPG gas cylinders must be installed in places with good ventilation and should
not be exposed to heat, electrical sparks, abrupt movements, or spaces where
people transit.
Connection the natural gas network.
The installation of the products that operate with gas supply network must have
the following elements:
1. Distribution Network.
2. Measurement center (measurer and regulator).
3. Service line (pipeline).
4. Valve.
5. Pipeline connection.
6. Artifact.
•Check natural gas supply is closed.
Remove the cap from 1/2” wich is in the gas.
•Remove and clean sealant particles AVERAGE FORCE that are in the strands of
the sttoper thread, so that when installing the device they do not obstruct the gas
inlet tube.
•Check that the threads of the hose connectors are in good condition.
•Apply the connectors, medium strength sealant for use in gas appliances.
•Perform the coupling between the threads of the gas supply and connecting
hose.
•Make the connection between the gas supply hose and the engine. Verify that
each of the connectors have its respective packaging.
•Open the gas supply valve and check for leaks using a leak detector, if you not
have this device, use soapy water. Do not use matches or lighters for this purpose.
•In the event of leakages, immediately close the valve and check for possible fuel
leaks.
12 3 4 5
6
IMPORTANT:
Use in the installation, hoses that comply with the material specified in this manual
to avoid accidents.

PAG 9
Instructions Manual
INSTALLER MANUAL
Installation and setup
NOTE: The warranty does not cover problems caused by equipment or defective changes
that are not performed by qualified personnel
Instructions Manual
PAG 10
INSTALLER MANUAL
Installation and setup
MODEL TIPE
COLOR
V Hz Nominal Power Category
Nominal Pressure Nominal Thermal Use
Power supply:
For your safety, when installed the
appliance, must be electrically grounded
in accordance with local codes. This
connection should be performed by a
qualified electrician.
Check on the identification plate which is
located in the back of your stove to see the
appropriate voltage and power supply for
your installation.
Be sure the outlet is energized by plugging
in a lamp and turning it on.
Plug the service cord of your stove to the
outlet.
All operations in the installer manual must be carried out by
qualified personnel.
ab
d
c
e
ELECTRIC SHOCK
RISK
WARNING
• Do not use extension cords.
• Do not use the product without grounding.
• Do not use adapters or T's.
• Disconnect power before servicing.
• Replace all parts and panels before operating.
• Do not remove the grounding terminal.
• Connect the terminal to an effective ground connection.
• If the power cord is damaged, it must be replaced by the
manufacturer, after-sales service, or by a similar qualified
personnel to prevent accidents.
• Failure to follow these instructions can bring
life-threatening, fire or electric shock accidents.
Be sure service cord never goes near of heat sources
and located at the same side of the power supply. In
particular consider doors and external surfaces
temperature of the appliance may be high when it is
operating.
Electrical installation.
If the appliance has electrical elements, follow the instructions below for
installation.
Connectors for wood (In reference).
•For some models cooking, take the cable from the
back of the appliance and connect it to the
grounding installation.
•Make sure the voltage of the outlet connection of
the electrical installation is in accordance with the
rated voltage of the appliance.
•In the control box of the electric power house,
identify the breakers that control the appliance,
mark with the name and eventually connect it to
the outlet.
IMPORTANT:
If the geometry of the appliance plug does not match the outlet of the
installation, change one of them so that both match, ensuring that the plug or
receptacle meets the electrical specifications of the engine.
The function of the grounding cable is to evacuate
the small leakage currents in electrical devices and
provide user protection against over voltage short
circuit, for kitchens is very important prior connection,
which should be the connection circuit to earth on
the electrical system of the building or alternatively to
a metal water pipe, metal underground structure or
local system. Appliances have recessed grounding
wire built into current input and require no additional
connection.
ELECTRIC SHOCK
RISK
ATTENTION
APPLIANCE
Flat connector straight
(110V)
Three wire connector
(110V/220V/240V)
Locked leg type connector
(208V/220V/240V)
Connector type C
(220V) Valid for Peru

PRIMARY OXYGEN REGULATION:
ADJUSTMENT OF REDUCED CONSUMPTION
The cover burners do not require calibration of primary oxygen.
The calibration of primary oxygen of the burners is done as follows:
1. Burner Tube:
Turn the calibration bolt clockwise to
reduce the amount of oxygen.
Counterclockwise to increase the
amount of oxygen supplied to the
combustion.
2. Burner designs:
Move the hood forward to increase or
backward to decrease the amount of
oxygen combustion.
NOTE: The burner grill does not require
adjustment of primary oxygen
Proper calibration is given when the flames are stable and have a deep blue
color, indicating combustion is complete.
Turn the calibration screw inside until you obtain
the proper flame, be sure the burner does not
turn off when making the respective safety tests.
Remove the knob and insert a thin screwdriver into the valve stem. (In the
case of ovens with a thermostat, the regulation screw is located in the lower
part of the stem thermostat.)
Turn the burner and place the chosen command knob burner in position
of reduced power (minimum).
Burners and oven floor deck
12
Important: All operations of the installer manual
must be carried out by qualified personnel.
Instructions Manual
PAG 12
CONVERSION TO DIFFERENT GASES
a
b
c
a
b
c
CHANGE INJECTORS:
According to the type of gas being used, identify on the attached nozzle kit, the
diameter for each burner, as indicated in the technical data table burners. (See
data sheet)
Place the selected nozzles. Do not use thread sealing materials in the
injectors.
Burners and oven cover
For stoves with a injector system, use a
wrench or a 7 mm die (9 / 32 of an
inch) and remove the nozzle on each
burner.
IIMPORTANT:
• OPERATIONS TO ADAPT YOUR STOVE TO ANOTHER TYPE OF GAS OR OTHER SUPPLY
PRESSURE MUST BE CARRIED OUT BY A QUALIFIED INSTALLER,THE GAS COMPANY OR
A MANUFACTURER'S REPRESENTATIVE
• For technical and safety reasons, parts for adaptation to another gas family,
another group, another subgroup and / or other supply pressure, will be provided
by the manufacturer.
• Instructions to "conversion to different gases" applies only to Category II 2-3
stoves (see nameplate), whose factory setting is not appropriate for the gas you
When it is required to convert or adapt to other types of cooking gas, follow the
instructions bellow:
Verify there is no leakage using soapy water at joints.
Important: All installation and
manual operations must be carried
out by a qualified personnel.
PAG 11
Instructions Manual
CONVERSION TO DIFFERENT GASES
a
b
c
d

IMPORTANT:
Read all instructions before starting to use the appliance.
Refer to the features and functions sheet to identify the ones that belong to the
model purchased.Then follow the instructions.
NOTE: It is normal when you operate the
electric power, a continuous sparking in
all burners.
BURNER COVER
Lighting gas burners
Choose the burner knob you want to turn on, press and turn counterclockwise to the
maximum position ( )
If your stove does not have electronic
ignition or in case of blackouts, hold a lit
match or lighter to the burner.
Instructions Manual
PAG 14
USERS MANUAL
a
b
If your stove has electronic ignition from the knobs,
press and turn the knob anti-clockwise to the
position indicated with the symbol ( ), press
the knob until you see the burners sparkling and
the burner will it.
If your stove has electronic ignition, press
the switch boton and hold it until the
burner lights.
SAFETY TESTS:
Verifying performance
IMPORTANT:
The following tests should be performed on both cold and hot (after 10 minutes
of lighted the oven), and with the specified pressures for each case.
PAG 13
Instructions Manual
CONVERSION TO DIFFERENT GASES
IMPORTANT: After performing the operations for gas change, a self-adhesive plate
included in the kit which indicates cyclores and the new setting conditions to
which the device has been adapted should be placed. It is recommended to
place the plate over the old one so that the information is invalid.
To verify burners mimimum calibration performance, test the
operation with maximum and mimimum presssures as is shown
in TABLE 1.
With the burner in mimimum consumption position, verify it will
not fade with moderate airflow waving with an open palm on
the burner. Also verify with quickly movements of the valve from
maximum to minimum, if the burner does not turn off or
backlash the flame.
To verify primary oxygen calibration, test the operation of the
burners with the maximum and minimum pressures as is shown
in TABLE 1.
Verify ignition is easily performed following the instructions in
this manual and flames do not show detachment of the burner
body and yellow tips, these are signs of a incomplete
combustion.
To verify oven burner minimum calibration, test operation with
minimum gas pressures as is shown in TABLE 1.
Check in the stop position with the oven door closed only with
the tension of the hinge, if the burner does not turn off.Also verify
with quickly movements from maximum to minimum if the
burner does not turn off or backlash the flame.
TABLE 1
a
c
b
Ecuador
LPG (Liquefied Petroleum Gas) NG (Natural Gas) LPG (Liquefied Petroleum Gas)
Maximum pressure 33 mbar = 3.3 kPa 25 mbar = 2.5 kPa 35 mbar = 3.5 kPa
Minimun pressure 22 mbar = 2.2 kPa 17 mbar = 1.7 kPa 25 mbar = 2.5 kPa
Other countries

ATTENTION:
Your stove has tempered glass lid, you should never close it while burners are in use or
the oven is being used. Never place hot pots on the glass.
ATTENTION:
In case you accidentally extinguish the flame of a burner, shut off the burner control,
ventilate the room and do not attempt to switch it on for at least 1 minute.
Recommendations for use of gas burners
Triple Crown Burner (Ultra Fast)
Choose in the knob between MAX ( )
or MIN ( ) according to what you are
going to cook.
Choose the burner according to the size of
container which is going to be used.
We recommend the following minimum
diameters:
Small Burner - 12cm (4.8’’) containers
Medium Burner - 14 cm (5.6’’) containers
Large Burner - 18 cm (7.1’’)containers
Triple Crown-burner - 20 cm (7.9’’) container
Use this option when you need more power burner flame for faster
cooking.
CAUTION: For a proper function; maintain the burner slots and
holes always clean.
USERS MANUAL
PAG 15
Instructions Manual
cd
b
Flame should not extend to the bottom of
the pot, pan, etc.
In this appliance do not use convex base
vessels, except if your stove is equipped with
the appropriate accessories for it.
c
a
Off
Screenprint in the frontScreenprint on the
knob base
OFF
Off
OFF
To turn off place the corresponding
knob in the position off, which can be
represented by OFF or ( ).
Screenprint on the
knob base Screenprint in the front
Place the plate over the grills; verifying that
it is embedded in the slots in the back of
the iron, so it will not slide excessively on
the grill.
Turn the front and back burners where you
are going to use the iron fryer and set them
at a minimum position.
Use of iron fryer
CAUTION:
• Do not leave empty containers on the burner when it is on, or keep the burner on when not in
use.
• Do not handle burners immediately after use, they retain heat for several minutes after switching
it off.
• The glass lids can explode when it is heated.Turn off all burners before closing the lid.
IMPORTANT:
The iron should be used in preference over burners of the same size; in any case it should
always operate in a low position. (Reduced consumption)
RECOMMENDATIONS:
• When using the grill, it should be preheated over burners in the minimum position and then
smear it with an absorbent cloth soaked in oil or another fat.
• If you use the grill for meat it must be continuously spread with oil while turning around the
food to avoid that the liquid from staining iron surface.
• Never introduce the iron into a water stream while it is still hot.
• Do not use abrasive pads or sharp objects for cleaning; this can cause damage to the teflon.
Instructions Manual
PAG 16
USERS MANUAL
ATTENTION:
During use and cleaning of the burners avoid food or garbage from
entering into them; it could cause a blockage of gas injectors.
Remember the correct operation of your appliance depends on the
care you give to it.
ab
Remove the surface burner grate and
replace it with the griddle, then turn on
the front and back burners under the
griddle.
Make sure the griddle is placed correctly
before using.
ab
Iron fryer with docking board.
Iron fryer with coupling grill burners.

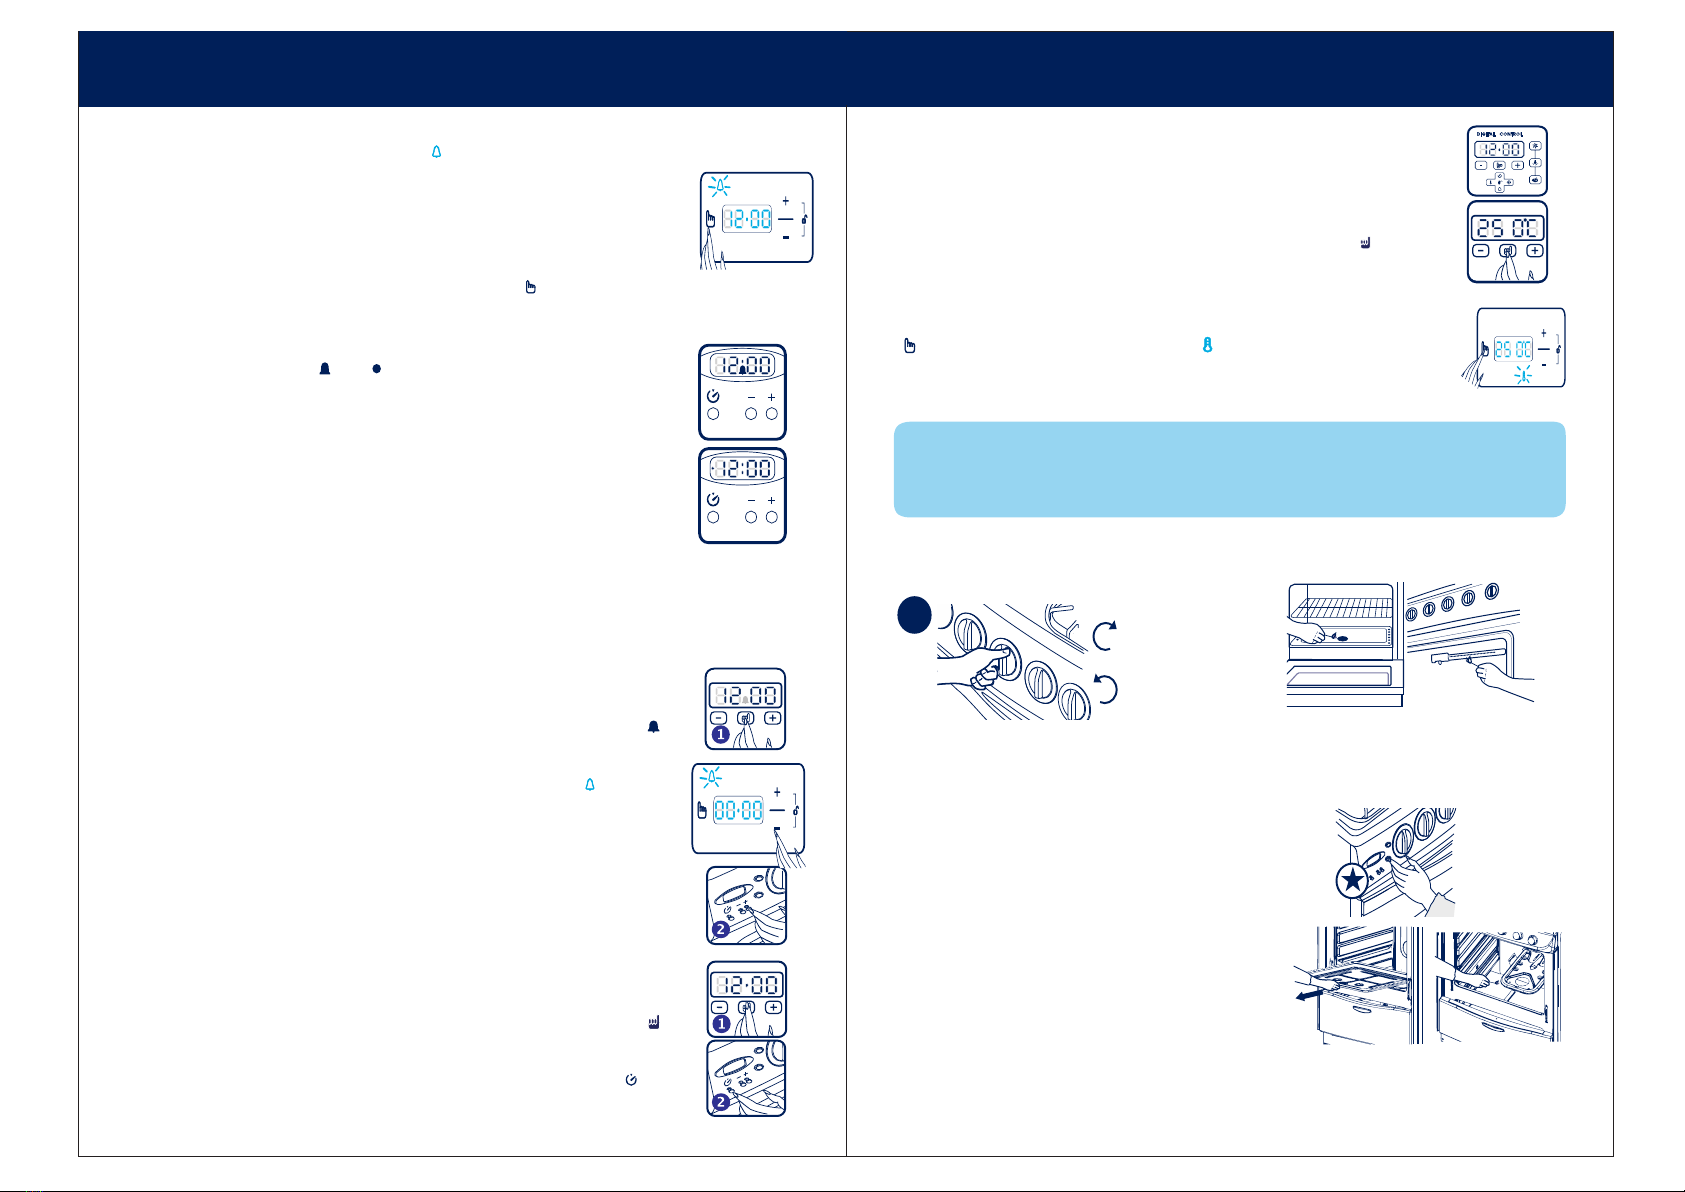
Clock
Alarm
Pulsed System (short gas system clock)
If your stove has a short gas system, simultaneously press (+) and (-)
buttons until you observe intermittency at the point that separates
hours from minutes.Then set it by pressing (+) to move upward and (-)
to move downward. The setting will be saved after 7 seconds of the
lasted press of the key.
Touch Pad System
In this system to set the time, take several long pulses (3 seconds)
in the control menu ( ) until you notice flashing at the point that
divides hours from minutes, then set it by pressing the controls (+) to
go upward and (-) to go downward.
Pulsed System
To set the time, press once the first button on the left ( ), then press
the button corresponding to the symbol (+) to move upward, and the
button that corresponds to symbol (-) to move downward.
Touch Pad System
Press and hold (3 seconds) the menu control until you see a bell ( ) blinking
in the bottom of the screen.
Press (+) or (-) controls to set the time the alarm will sound, starting from 10
seconds to 10 hours (after 99 minutes display changes to hours). Consider that
the advance of time change in intervals of 10 seconds. After 5 seconds the
time countdown will automatically start on the clock display, minute by minute.
At end of the scheduled time the alarm will sound every 15 seconds for 5 times.
Instructions Manual
PAG 18
USERS MANUAL
IMPORTANT:
- Keep always clean and dry the system control panel and the front of the stove in
general. The correct operation of the appliance depends on this, while avoiding
damage to your stove misuse.
- The liquid spill on the control panel or cleaning with wet pads can activate the Touch
Pad. In this case, wipe the panel, review the functions and activation and reprogram it if
is necessary.To clean, follow the instructions shown on page 30. For a light cleaning, the
use of a dry paper towel is recommended.
- Before any programming clock, the control lock must be removed.
- Time programming,alarm or gascuts is recorded and automatically locks in 5
seconds if any other impulse is not done.
Turn the knob clockwise until you reach
the time required (up to 60 minutes).
When time reaches the alarm will sound,
indicating that the food is ready.
MECHANICAL TIMER
TOUCH PAD SYSTEM
DIGITAL TIMER
R
I
N
G
.
.
.
The following instructions describe the use of various types of clock (digital timer ) which
have different stove models. Identify the one belonging to your appliance and follow the
instructions.
Clock Turbo
System
o
Electric sky
Oven
Light
Rotisserie
Menu
The touch pad system is a modern digital system that allows you to program the functions of
your stove by touching the controls without pulsating mechanics.
The system has a security lock to prevent inadvertently changing the clock setting or
accidentally programming or activating other functions.
In this system,lock is automatically activated when the controls
have not been touched for more than 5 seconds.
To unlock you have to activate the controls hold one of them for 2
seconds, then a simple touch will be enough for their use.
Pulsed System
When connecting your stove you will notice flashes of characters
on the clock screen until any programming is done.
USERS MANUAL
PAG 17
Instructions Manual
ab
NOTE:
These icons indicates the characteristics of the TouchPach
which are not pulsated for operation or programation.
Screenprint in the front
Screenprint on the
knob base
In this system, the lock is actived by pressing the menu control ( )
to the note that the lock icon is lit in blue ( ), press control ( + )
appears on your screen and the words “ Lock On ” and the icon
changes to red color.
To remove the lock, hold pressing controls ( + ) and ( - ) together,
until you see on your screen the words “ Lock OFF ” and the icon
changes to blue
If your kitchen has this system to match the time, press the menu control
( ) to see that the clock icon ( ) ligths up in blue and appear on your
screen the words “ clock – SEt clock”, then even pressing controls ( + ) to
go ascending and ( - ) to go in descending order, the icon will turn red.
Finally press the menu control again until no icon does not light
Instructions Manual
PAG 20
USERS MANUAL
USERS MANUAL
PAG 19
Instructions Manual
In the absence of Electricity:
Remove the burner tray cover (lift slightly the front of
the tray and pull it out), light a match and keep it
close to the oven burner holes, finally open the gas
flow from the corresponding knob. After verifying the
right placement, check on the tray again to make
sure it is fully seated and reaches the back of the
oven.
4 . If your oven has safety valve or thermostat (Oven Safe), follow the instructions given
on page 21.
OVEN
Turning on the oven
GRILL
FLOOR
OVEN
1. Stand in front of the oven control knob ,
press and turn it counterclockwise to the
maximum temperature position to turn on
the oven burner, or clockwise to the grill
position (if you have this function), as you
need.
2. If your stove does not have electric
ignition, hold a lit match near the oven
burner duct (bottom front) or directly to
the burner grill, as you need.
3. If your oven has electronic ignition, press the switch
and hold until the burner lights.
a
Turnning o the alarm
1.- Touch Pad System
To deactivate the alarm hold up controll menu until you see bell imagen ( )
turns off.
To desactive the alarm press the menu control to observe a bell ( ) going on
in front of your kitchen and appears in the word “ ALAr ” screen, then use the
control ( - ) down to 0 minutes.
2.- Pulsating System
To deactivate the alarm press boton corresponding to the symbol (+).
How to visualize the time?
1.- Touch Pad System
To visualize temporarily time while alarm is actived, press contol menu ( )
without removing lock.
2.- Pulsantion System
To visualize time when alarm is actived, press once boton from left side ( ).
Digital Thermometer
This function is only applicable for some types of stoves with Touch Pad system,
it allows visualize food cooking temperature inside of teh oven.
How to visualize temperature?
To visualize temperature inside teh oven , press control menu ( ) without
removing the lock., this function deactives automatically after of de 5 seconds.
IMPORTANT:
If your stove has digital thermometer the temperature showed in the display is not used as
reference when you are using grill, because this function is only applicable for baking.
Pulsed System (gascuts system clock)
If your stove has gascuts system, the alarm is linked to short gas timer
to program it follow the instructions given on page 19.
Pulsed System
Press directly the button corresponding to (+) symbol and a light will be
displayed on the screen ( ) or ( ).
Set the alarm by pressing the button which corresponds to the sign (+) to
move in ascending
order and the button that corresponds to the sign (-) to go downward.
Select the required time starting from 10 seconds to 99 minutes. You will
automatically see the countdown time on the display second by second. At
the end of the scheduled time the alarm will sound.
IMPORTANT:
Before setting the alarm, you must ensure that buttons were not touched at
least one minute before.
Press de menu control to observe a bell ( ) blue lighting on the front of your
kitchen and appears on the display the word “ ALAr ”. Press the controls ( + ) or
( - ), the icon will change color to red to set the time the alarm sounds, from 1
minute to 24 hours. Consider the progression of time that program changes in 1
minute. After 5 seconds automatically start the countdown time clock display,
minute by minute. At the end or the programmed time the alarm will sound for
10 minutes, after this time the flash icon appear on your screen and the
word “ ALAr ”until you turn it off by pressing the control menu ( ).
In this system, to display the temperature inside the oven, press the menu control
( ) until the icon temperature turns blue ( ), the temperature in ºC appear
on your screen , if you want to switch to ºF press the control ( - ) there of are
displayed on a scale of 5º. This turns off automatically after 10 seconds.

2.-In models with a security thermostat, the electronic ignition is
done directly from the knobs, so you must hold down the knob for
at least 10 seconds until the sensor detects the presence of flame
in the oven and the burner will remain on.
3.-On models with safety valve and electronic ignition, after
ignition, press the knob for at least 10 seconds until the sensor
detects the presence of flame in the oven, this way the burner will
remain on.
In the absence of electricity, remove the cover-burner tray (slightly
lift the front of the tray and pull it out), light a match and keep it
close to the burner holes, finally open the gas flow and hold down
the knob as indicated above. After verifying the right ignition,
make sure the tray is completely seated and that reaches the
back of the oven
USERS MANUAL
PAG 21
Instructions Manual
IMPORTANT:
Before using the oven or the triple crown with short gas timer, set the digital clock
according to the instructions given on page 18.
Note for models with "Timer Gascuts"
If the event of an electric shutdown, the triple crown burners will shut down
automatically closing the gas flow although the knob is in any position of the
thermostat or security valve . You can relight the burner if required even though
electricity is not available, then you need to use a match as shown on page 20 for
oven and page 24 for triple crown.
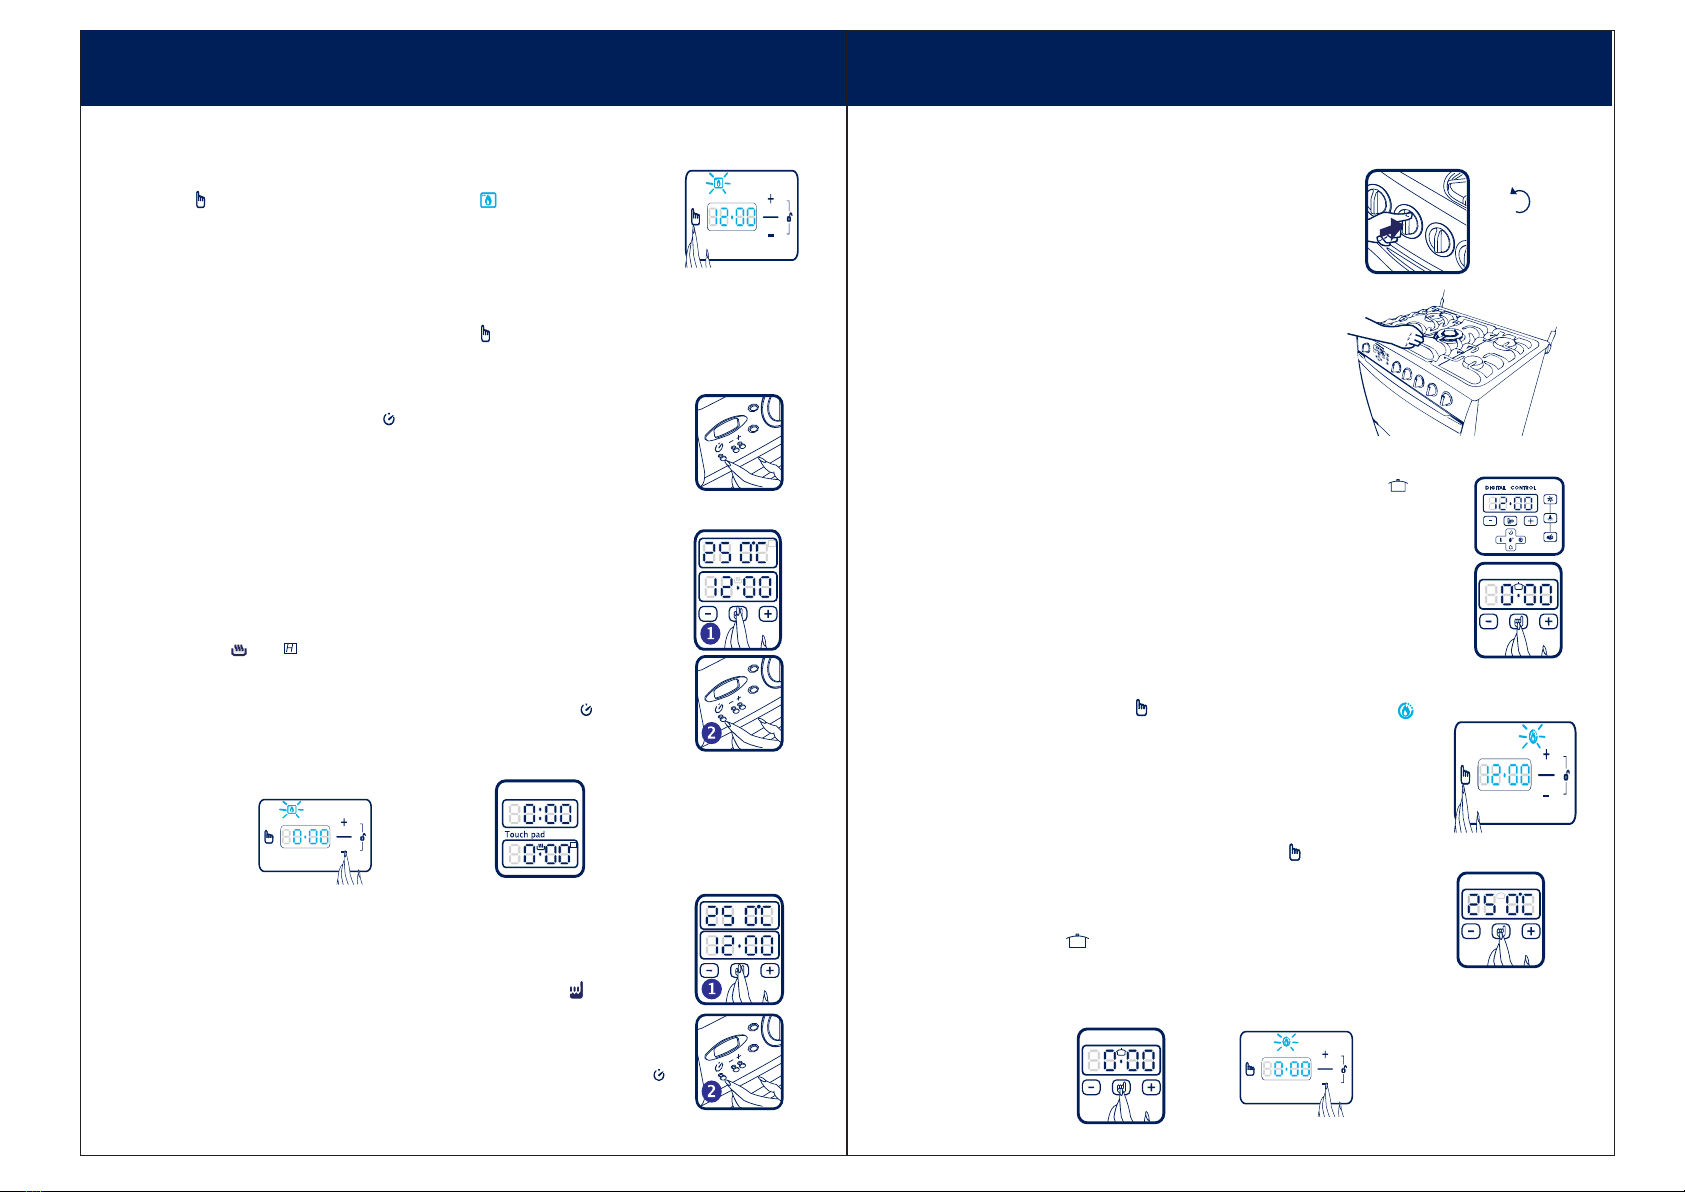
Short Timer Gas
It is a system which automatically shuts off the burners and grill of the oven floor and
Triple Crown in certain models of stoves after the time seted by the user, allowing
prepare food without risk of burning.
RISK OF FIRE
WARNING
Do not activate the ignition over 15 seconds to
avoid gas accumulation. If after this time the
burner does not light, the operation must be
stopped and the oven door opened; waiting for
at least 1 minute before attempting to relight the
burner.
Instructions Manual
PAG 22
USERS MANUAL
H
How to schedule automatic shutdown in the oven
Touch Pad System
Once the oven is turned on (check thermostat safety), make several long
pulses (3 seconds) in the menu control until you see the ( ) or ( )
symbols at the top of the screen.
Press the controls (+) or (-) to set the time required for the automatic
shutdown of the oven, from 10 seconds to 10 hours (after 99 minutes the
display changes to hours). Consider that the advance of time in the
program changes in 10 seconds intervals. After 5 seconds it will
automatically start the countdown minute by minute.
At the end of time, the oven will shut off and the alarm will sound at
intervals of 15 seconds for 5 times.
H
IMPORTANT
The electronic ignition is common for burners and oven cover, therefore it is normal to
see sparks in the burners when turning on the oven.
RISK OF FIRE
WARNING Make sure the oven burner is lit, looking through
the holes found on the bottom plate of the oven
burner covers.
We recommend opening the oven door to verify
this point.
IMPORTANT:
When using the oven for first time, keep it on for several minutes to remove odors
and gases which are normally produced.
In the case of accidental extinction of the flames from the burner, close knob and
do not restart after at least 1 minute.
ATTENTION:
Accessible parts such as doors or exterior fixture surfaces can reach high
temperatures when the appliance is in use, especially when using the oven or grill.
Keep away from
children and avoid direct contact with the parts that are not manipulated.
b
c
RISK OF FIRE
WARNING
Make sure the gas valves from the burners and
especially from the oven are closed when not in
use, as gas can accumulate and cause
explosion and when activating the electronic
ignition.
Close the door softly to bake. For better results when browning,
preheat oven for 20 minutes or more on the MAXIMUM
temperature position before baking.
Select on the oven temperature knob according to what you are
going to bake.
Off
Screenprint on the front
Screenprint on the
knob base
OFF
To turn off place the knob in the off position,
which can be represented as OFF ( ).
Security valve and thermostat (Safe Oven)
This mechanism prevents accidental release of fuel gas in the oven (floor and grill),
avoiding risks during its use.
GRILL
FLOOR
OVEN
Turning on the Oven Safely
1 .- Stand in front of the oven control knob, press and turn it
counterclockwise to the maximum temperature position to turn on
the oven burner, or clockwise to the grill position in the case of
thermostat, as you need.
USERS MANUAL
PAG 23
Instructions Manual
Turning the Triple Crown burner safely
1 .- Stand in front of the oven control knob , push and turn
clockwise until you reach maximum temperature position.
2 .- On models with a safety valve on the triple crown burner ,
the electric ignition is direct from the knobs, therefore you must
hold down the knob for at least 10 seconds until the sensor
detects the presence of flame, this is the only way the burner
will stay on.
In the absence of electricity, light a match and keep it close to
the triple crown burner holes, open the gas flow and hold
down the knob as indicated above.
Triple Crown burner Security (Security Valve)
Once the triple crown is on, press the menu button until the symbol ( )
is shown at the top of the screen.
Press the controls (+) or (-) to set the time required for automatic shutdown
of the burner, from 10 seconds to 10 hours (after 99 minutes the display
changes to hours). Consider that time advance changes every 10 seconds.
After 5 seconds, countdown will start automatically minute by minute.
At the end of scheduled time,Triple Crown burner will turn off and the alarm
will sound in intervals of 15 seconds for 5 times.
How to program the automatic shutdown of the Triple Crown burner Safely
How to Cut o gas alarm.
To deactivate the alarm or to restart the triple crown burner, press the
menu control until the ( ) symbol disappears from the screen.
How to deprogram.
To turn off the alarm system and gas cut off from the Triple Crown burner, reduce the time
until you reach to zero.
COUNTERCLOCKWISE
USERS MANUAL
Instructions Manual
PAG 24
H
Pulsed System
H
How to deprogram?
To turn off the alarm system and the automatic gas cut off, reduce the
time scheduled until you reach zero.
Pulsed System
Once the oven is turned on (check instructions on the Safety Valve) press
the button corresponding to the ( ) symbol and the word (AUTO) will be
displayed on the left side of the screen.
Set the sleep time by pressing the button corresponding to the (+) symbol
to move upward and the button for (-) symbol to move downward. Select
required time starting 1 minute to 10 hours. Countdown will automatically
start minute by minute.
At the end of time, the oven will shut off and alarm will sound.
How to shut down the gas alarm.
1 .- Touch Pad System.
To deactivate the alarm or restart the oven press the menu control until
the symbols ( ) o ( ) disappear from the screen.
2 .- Pulsating System.
To turn off the alarm press the button corresponding to the ( ) symbol.
H
How to display the time or temperature in the oven.
1 .- Touch Pad System
Depending on the type of touch pad your stove has, you can
temporarily display the time or temperature while the gascut
programming is activated, press the menu control ( ) without
removing the block.
2 .- Pulsating System.
During the scheduled time, time will be displayed. If you wish to
visualize or change the remaining time until shut down, press the ( )
button.
At the end of the scheduled time the oven will turn off and the alarm will sound intermittently
for 10 minutes until you press the menu control ( ). Furthermore, if the focus oven functions
and BBQ were burning engine, they too will go.
Touch Pad System.
After turning on the oven ( I revise safety thermostat ), press the menu
control ( ) repeatedly to see that the symbol ( ) lights blue and display
“ OVEn ” on the front of your kitchen. Press the controls ( + ) or ( - ) and the
icon will turn red, to schedule the time required for the automatic shutdown
of the furnace, from 1 minute to 10 hours. Consider the progression of time
that program changes in 1 minute. After 5 seconds automatically start the
countdown time.
For this control touch pad, once on the triple crown ( I check valve safety
instructions ), press the menu control ( ) several to see that the symbol ( )
blue lights and displays the words “ TrIPLE Cr bUrnEr ” in the front of your kitchen.
Press the control ( + ) or ( - ) and the icon will turn red, to schedule the time
required for the automatic shutdown of the burner, from 1 minute to 10 hours.
Consider the progression of time that program changes in 1 minute. After 5
seconds, automatically start the countdown time.
At the end of the scheduled time the burner will turn off and the alarm will sound
intermittently for 10 minutes until you press the menu control ( ).

PAG 25
Instructions Manual
USERS MANUAL
Recommendations when using the oven
The cooking time will depend on the food you are
baking, the amount and the temperature selected;
recipe books can be taken as reference.
ATTENTION:
When baking on the grill, remember to remove the middle tray from the oven.
Food should not be baked directly over tray, or without it.
The height of the tray or the grill, as well as the use of the
accessories and functions of the oven depends on the
food to be baked, but we recommend:
a
c
Always preheat your oven at the MAXIMUM position for 20
minutes or more. This is important to achieve a fast and
uniform cooking.
3 ) If your stove model has not electric sky or grill, use the third slide (from the bottom above)
for browing the baked food.
4 ) Follow the recipe instruction properly.
5 ) To bake bread, cakes, arepas, cookies, pizzas or similar food, we recommend use a baking
plate on the grill.
6 ) Do not place on the grill or oven trays above the recommended weight:
Stove 20” = 20 pounds (9 kg)
Stove 24” = 22 pounds (10 kg)
Stove 32” = 30 pounds (14 kg)
7 ) For greater uniformity in baking use the turbo system (models with this function.)
1) Use the grid on the third slide (from the bottom above) for
baking bread, cakes, etc.
2) For cooking meat use the third slide (from the bottom above),
whether you use the oven burner or grill to brown.
1
2
3
b
USERS MANUAL
Instructions Manual
PAG 26
Turning on the oven light
How to operate the electric sky
Locate the corresponding switch and activate it to turn on
or off bulb from inside the oven.
Locate the corresponding switch to turn on
or off the electric sky found in the top oven.
The electric sky and the grill / BBQ should
not be used at the same time.
IMPORTANT:
When placing food, avoid gluing to the bottom of the oven so not to block
recirculation air holes that are facing the fan.
The turbo system is designed to use only with the floor burner of your stove, do not use the
grill burner.
It is recommended to preheat the oven before turning on the turbo.
This system allows you to bake 2 grids simultaneously.
How to use
Turbo system
This system allows a better cook in the oven by applying a forced circulation of hot air, obtaining
a uniform baking and subsequent an increase in heat.
Locate and press the corresponding switch to turn on or off the turbo system fan that is
located at the bottom of the oven.
IMPORTANT:
We recommend using the electric sky with floor burner to obtain an even cooking and
better browning of food.
Models Quarzo Models Avant Models Spazio
a b
For this system touch pad, press the menu control ( ), until the turbo
icon ( ) ligths up in blue and display “ turb ”, press control ( + ) icon will
turn red and turn the turbo, to turn it off press control ( - ).
For this system touch pad, press the menu control ( ) until focus icon
( ) lights up in blue and display the words “ OVEn LiGht ” press control
( + ) icon will turn red and turn the oven light, to turn it off press control
( - ).
For this system touch pad, press the menu control ( ), until the electric
sky icon ( ) lights in blue, press control ( + ) icon will turn red and turn
the electric sky, to turn it off press contol ( - ).

PAG 27
Instructions Manual
USERS MANUAL
Remove the grill and place the tray oven.
Using the rotisserie (Spiedo)
a b
USERS MANUAL
Turning on the BBQ grill
NOTE: If you require roasting or grilling after baking all kinds of meats use the grill /
broiler.
ATTENTION:
The electronic ignition is common for burners and oven cover, therefore it is normal
to see sparks in the burners when turning on the GRILL.
Close the door gently when roasting or
browning.
ATTENTION:
We recommend opening the oven door to verify
the GRILL has turned on in both
the front and back burner.
ATTENTION:
Accessible parts may become hot when using the oven or grill. Keep away from
children and avoid direct contact with the parts that are not manipulated.
a
b
c
RISK OF FIRE
WARNING
Make sure the gas valves from the burners and
especially from the oven are closed when not in
use, as gas can accumulate and cause
explosion and when activating the electronic
ignition.
Stand in front of the grill control knob (oven) and
turn on following the instructions given on page 20
“Turning on the Oven”.
If your stove has a safety thermostat follow the
instructins on page 21 “Safe Oven.”
Off
Printscreen on the front
Printscreen on the
knob base
OFF
To turn off place the knob in the off position,
which can be represented as OFF ( ).
Lift mechanisms simultaneously and remove the
oven rack.
Lift and turn mechanism
for removal
To reassemble firts place mechanisms from the right
side and place them into the ove, then enter the grid
and simultaneously coupling mechanisms.
For cookers 4 burners, 20” and 24”, hitch mechanisms
in the central rod of the grid. For cookers 5 or 6 burners,
32” hitch mechanisms rod on the back of the grid.
For stoves of
20” and 24”
For stoves of
32”
1
2
3
aa
a
b
c
Individual mechanisms.
ab
c
IMPORTANT:
If your stove has autoslide grill, it only operates on the second slide, if you need to
place the grill to another level remove the facility as indicated:
Autodeslizable grill in the oven
c
Mechanism with central rod.
Press the edge inward.
Lift the grill mechanism and remove.
To reset the latching mechanism on the
grill first and then insert in the oven door.
1
2
3
a
b
a
b
a
b
PAG 28
Instructions Manual

USERS MANUAL
Instructions Manual
PAG 30
PAG 29
Instructions Manual
USERS MANUAL
e
Open and / or reconnect
the gas connection.
Check the possible causes and solutions
described on page 35.
f
Oil and grease used in the
manufacturing of your stove
It is normal when using
the stove for the first time
Strong odors
Expansion of metals due to
heat It is normal
Noise
POSIBLE CAUSE SOLUTION
Drilling pipe or hose
connection.
Incorrect position of the burners
A burner turned off accidentally
while still in use
Pressure regultor installed
incorrectly
Change the installation
Place them in the
correct position.
Call technical service
Install it correctly
Smell Gas
PROBLEM
What do you do if you smell gas?
ATTENTION:
The use of a gas cooking appliance produces heat and humidity in the room
where it is installed. A good ventilation should be assured in the kitchen;
maintaining natural ventilation, or installing a mechanical ventilation device
(extractor hood).
The intense and prolonged use may require a ventilation unit, for example, opening
a window, or more effective ventilation for example, increasing the power of
mechanical ventilation, if any.
Close and / or disconnect the gas
connection on your appliance.
Never turn on any type of housing switch
on the kitchen.
Do not use matches, lighters or any other
object that generates combustion.
Open doors and windows to get air
circulation.
ab
cd
Off
Screenprint on the front
Screenprint on the
knob base
OFF
Place all knobs in off position, which can
be represented by OFF or ( ).
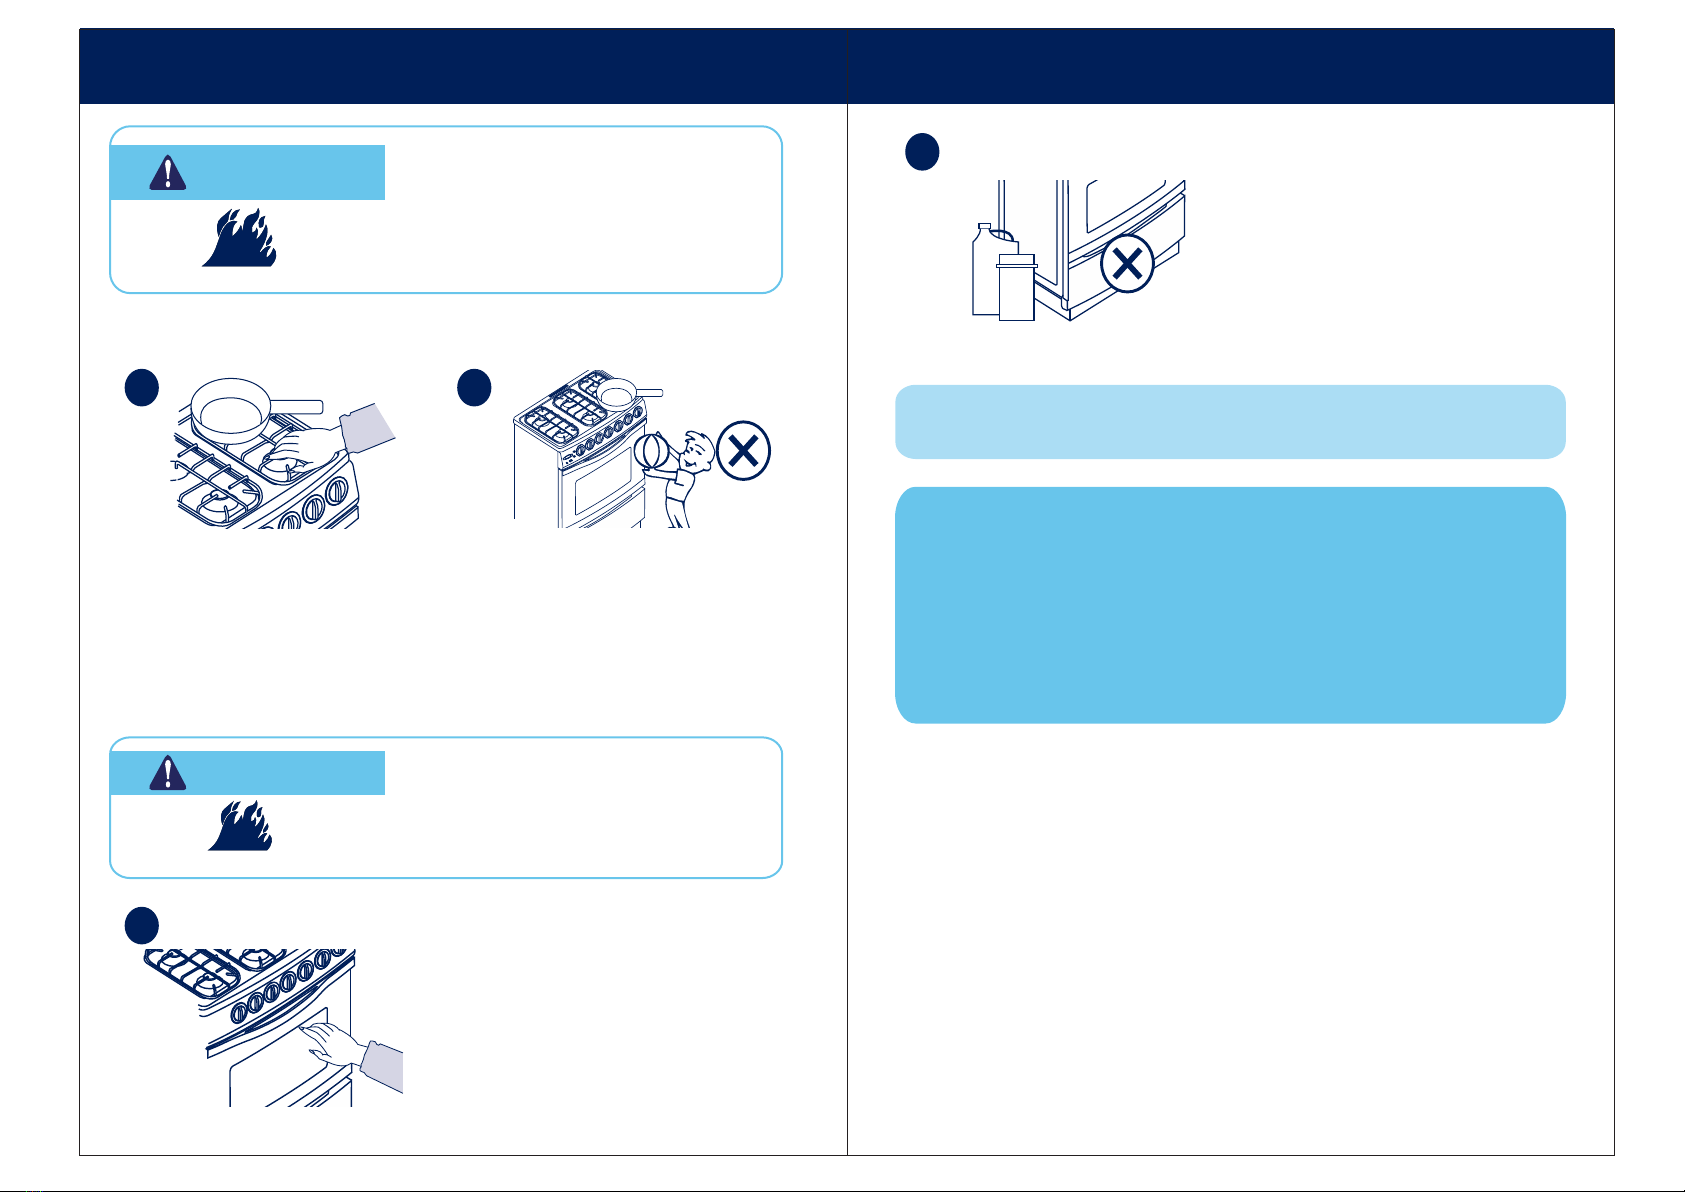
PRECAUTIONS
RISK OF FIRE
WARNING
Do not use this appliance as a heating element and
high temperatures generated in the components
that can cause burns to you or your loved ones.
Do not use this appliance as a storage area as heat
storage materials can generate liquids or gases that
originate combustion
Do not stand or lean on the oven doors and / or hot
dishes as it may cause, tipping of the stove,
permanent damage to the components thereof or
burns from heat generated during operation.
Locate and press the BBQ switch, which
also turns on the oven light.
Close the door gently to roast.
When using the oven, you can use the
hot plates to keep food hot, for grilling or
preheating dishes before serving.
Turn on the broiler / grill as indicated
on page 21
HOT DISHES
Place the chicken on grill and secure the
rod using the fork, then install the rod
inside the oven, introducing first the left
end and then the right one.
c
de
For this system touch pad, press the menu control ( ), until
the BBQ icon ( ) lights up in blue and display the
words “ roAStEr ”. Press the control ( + ) icon will turn red and
turn the BBQ, to turn it off press control ( - ).
PAG 31
Instructions Manual
USERS MANUAL USERS MANUAL
Instructions Manual
PAG 32
Avoiding accidents
¡ BE CAREFUL WITH CHILDREN !
Avoid the following situations from
occurring:
• The entry of children into the kitchen
while cooking.
• Outgoing handles from pots and pans.
• Children being close to kitchen utensils
(pots, hot springs, etc.).
While cooking with cover burners, avoid
touching the racks, burners bases and
end caps, wait a reasonable period of
time for cooling.
RISK OF FIRE
WARNING If the gas smell persists, close and / or
disconnect the gas connection and call
authorized technical services.
Failure to follow these instructions can cause
explosion, fire or damage to
physical integrity of persons.
b
a
RISK OF FIRE
WARNING
Make sure the gas valves from the burners and
especially from the oven are closed when not in
use, as gas can accumulate and cause
explosion and when activating the electronic
ignition.
While using the oven, avoid touching the
glass, internal peripherals and wait a
reasonable period of time for cooling
and handling.
c
Instructions against misuse of your stove
NOTE: When using the oven, it is advisable to use gloves when handling
food containers that are baking.
IMPORTANT: Be careful with the oil and frying fats which are inflammable
products. In case a fire presents due to this reason, turn off the burner
and control flame by placing a large pot lid over it or covering the fire
with a wet cloth. Never throw water directly as the flame grows and can
cause fire or burns.
If grease fire occurs in the oven, turn off the burner and keep the oven
door closed until the flame is extinguished on its own.
Prevent these problems by removing excess fat and avoid from it being
close to the oven burner.
• Make sure the kitchen is well ventilated and maintain natural open
spaces for ventilation.
• This device should not be installed in bathrooms or bedrooms.
• Install the device according to the instructions in this manual .
• The use of this appliance is domestic, do not use it for any other activities.
• Follow the instructions in this manual to operate each function on the
appliance.
• In case of damage, do not try to solve on your own. Always go to an
authorized technical service.
• Do not use any protection on the board (foil), this could cause blockages
in the gas outlet nozzle or a bad coupling of the burner parts.
Do not store gasoline or other similar
product near your stove.
d

CLEANING AND MAINTENANCE FOR THE USER
WARNING: Damage caused by the lack of these instructions is not covered by the
warranty.
IMPORTANT: Clean regularly your stove components to avoid permanent stains or
chemical attack due to food waste, especially on the stainless steel surfaces.
PAG 33
Instructions Manual
USERS MANUAL
IMPORTANT: When placing burners and
end caps after cleaning them, make sure
they were in the correct position and
completely dry.
- Do not use detergents, aerosols, corrosives or
harsh abrasives products which can
deteriorate the stove finishes.
- Do not use chlorine or chlorinated products
in the surfaces of stainless steel to prevent
corrosion by etching.
For removeingcharred food residues, you
can use lemon juice.
- For cleaning all surfaces use a soft pad with
soapy hot water and bicarbonate (2 spoons in
a liter of water.)
- To clean the burner cap and burners base
use a plastic brush with soft bristles for not
damaging teh stove finishes.
IMPORTANT: When you clean the board or
burners should be careful not to introduce
food waste in the crown, or worst in the
injectors.
ab
c
d
e
g
f
- Do not use corrosives or hard abrasive
products which can deteriorate finishes and
shine.
-To prevent smudging do not leave residues
of cleaning agents in the surfaces and dry
them thoroughly.
- In stainless steel surfaces make cleaning in
the same direction of the surfaces finishes.
- To clean glass fronts and system control
panel touch pad is suggested to use a dry
paper towel.
- To prevent smearing mustard do not leave
residues in the chrome surfaces, or satin
nickel.
- Keep the electronic ignition slides clean
and dry.
CLEANING ROLE IN TOUCH PAD PANEL.
IMPORTANT:
This service allows you to clean the touch pad panel of your stove without
activating the functions involuntarily (update time, timer, wake light, etc.).
IMPORTANT:
Note that when activating the cleaning mode, all functions of the stove
commanded from the touch pad panel are blocked, even if they were in use.
Cleaning is recommended doing when not using the digital command functions
of your stove. The system reactivates automatically after 5 minutes, which are
assigned for cleaning, enabling once again all features.
You can repeat the cleaning operation as many times as necessary.
ACTIVATION:
Simultaneously press the signs (+) y (-) of the clock and
maintain the contact for more than 5 seconds until to
note the word “ASEO” (Clean in Spanish) appears
intermittentitly, then press menu to activate the function
with the word aseo remaining fixed in the screen. In this
way you make the stove cleaning for a period of 5
minutes without activating the various functions run from
the touch pad panel.
USERS MANUAL
Instructions Manual
PAG 34
To cleaning, in touch pad system, use lock function by
following the instructions on page 17 of this manual.

PROBLEMS, POSSIBLE CAUSES
AND SOLUTIONS
Stove off
Outlet not energized
Connect the power cord
Check plugging in a lamp
to see if outlet is energized
Electrical components
do not work
It is not possible turn them
both at the same time
Floor and grill do not
work at the same time
Gas almost over
The burners position is not correct
Change gas cylinder
Place burners in the right position.
Yellow flame
makes soot
Injectors blocked by food
waste
Clean the nozzles using plastic
bristle brush without excessive
pressure on
nozzle walls
Keep the knob press down for 10
seconds while the device is
powered (electronic or matches)
Decreased flame
intensity on the burner
cover
This is normal
When turning on the
light, the bbq rod works
Read the instruction
manual
Oil and grease used in the
manufacturing of your stove
It is normal when using
the stove for the first time
Strong odors
Expansion of metals due to
heat It is normal
Noise
POSIBLE CAUSE SOLUTION
Drilling pipe or hose
connection.
Incorrect position of the burners
A burner turned off accidentally
while still in use
Pressure regultor intalled
incorrectly
Change the installation
Place them in the
correct position
Call technical service
Install it correctly
Smell Gas
PROBLEM
IMPORTANT: If after reviewing the possible causes and solutions the problem
persists, call an authorized service agent.
The floor and grill
burners and the Triple
crown remain on. (Just
stoves with thermostat
and / or Safety valve)
The flame sensor does not detect
the presence of it. The presence
of it.The action time is not
enough.
PAG 35
Instructions Manual
8 tablespoons
1 cup
1 cup
2 cups
3 cups
4 cups
½ cup
8 liq. Ounces
1/4 Liter
1/2 Liter
1 bottle = 750 c.c.
1 Liter = 1.000 c.c.
1 pinch
3 teaspoons
2 teaspoons
4 teaspoons
8 teaspoons
12 teaspoons
16 teaspoons
less ¼ teaspoon
1 tablespoon
30 gr = 1 ounce
1/4 cup
1/2 cup
3/4 cup
1 cup
Common Measures Liquid Measures
TABLE OF GENERAL EQUIVALENTS
TECHNICAL SERVICE
If you have a problem you can not solve with the help of this manual; visit or call an
authorized service agent. Skilled technicians will teach you everything you need to
know to correctly use your stove and in case your appliance malfunctions, they will
solve your problem.
122° F =
130
150
175
200
225
50° C
54
66
79
93
107
250° F =
275
300
325
350
375
121° C
135
149
163
177
191
400° F =
425
450
475
500
204° C
218
232
246
260
EQUIVALENT OF FAHRENHEIT DEGREES IN CELSIUS DEGREES
TABLE OF GENERAL EQUIVALENTS
Instructions Manual
PAG 36
Table of contents


