Industrial Music Electronics PISTON HONDA MARK III Installation manual

PISTON HONDA MARK III
OSC A
OSC B
FM/EXT IN
AC10VPP
1V/OCT
0-8V
X Y Z
MODE
MODE
SELECT
LINK
SELECT
FREQUENCY
FREQUENCY
AMIX B
CV
+/-8V
CV +/-8V
SYNC
0-5V
DUAL WAVETABLE OSCILLATOR
PISTON HONDA
THREE-AXIS MORPHING WITH NONLINEAR WAVESHAPERS
CV
+/-8V
1V/OCT
0-8V
MICRO SD
CV
+/-8V
SYNC
0-5V
WAVEFORM SELECTION
OUTPUTS
INDUSTRIAL MUSIC ELECTRONICS MODEL 1991 MARK III
PRESET/EDIT
The Piston Honda operates much like any voltage-controlled oscillator module, meant to be the main tone
generator in a modular synthesizer patch. The difference in principle is the “wavetable”, the means by which the
waveforms are generated A wavetable oscillator is special because instead of generating a “classic” waveform like a
sawtooth or square, it generates an arbitrary waveform by reading digital data from memory. The sounds generated
by this method are quite different from typical analog waveforms. They are more harmonically complex, and less
dependent on ltering action to achieve interesting sounds. They respond very well to chorus and unison effects. Piston
Honda puts all of this wavetable synthesis control into a convenient package, with a large library of waveforms that may
be “morphed' into one another. This module contains two complete oscillators and a preset controller, suitable for small
and large systems. Suggested uses for the module's various features are given in this manual, but we encourage you
to develop your own individual style. Our suggested applications are just that... suggestions! Heavy experimentation is
encouraged.
When the coarse tune is set to its minimum position and the ne tune is set to the middle position, the generated
frequency will be 16.35hz (note C0) with no external voltages applied. Patching a 1 volt per octave tuned sequencer,
quantizer, or keyboard voltage into this jack (such as the STILLSON HAMMER or ARGOS BLEAK) will change the
oscillator’s frequency to the desired note. If the control voltage is set so that C0 is equivalent to a value of 0 volts, then
the note names shown on the Piston Honda’s display (and the generated frequency) will match the input voltage.
The Piston Honda's display is an OLED. It is set to a brightness to provide the best balance between visibility and
long life. To preserve the life of the OLED, it will turn off if a button or encoder is not used for 10 minutes. To turn it back
on, press a button or turn the encoder.
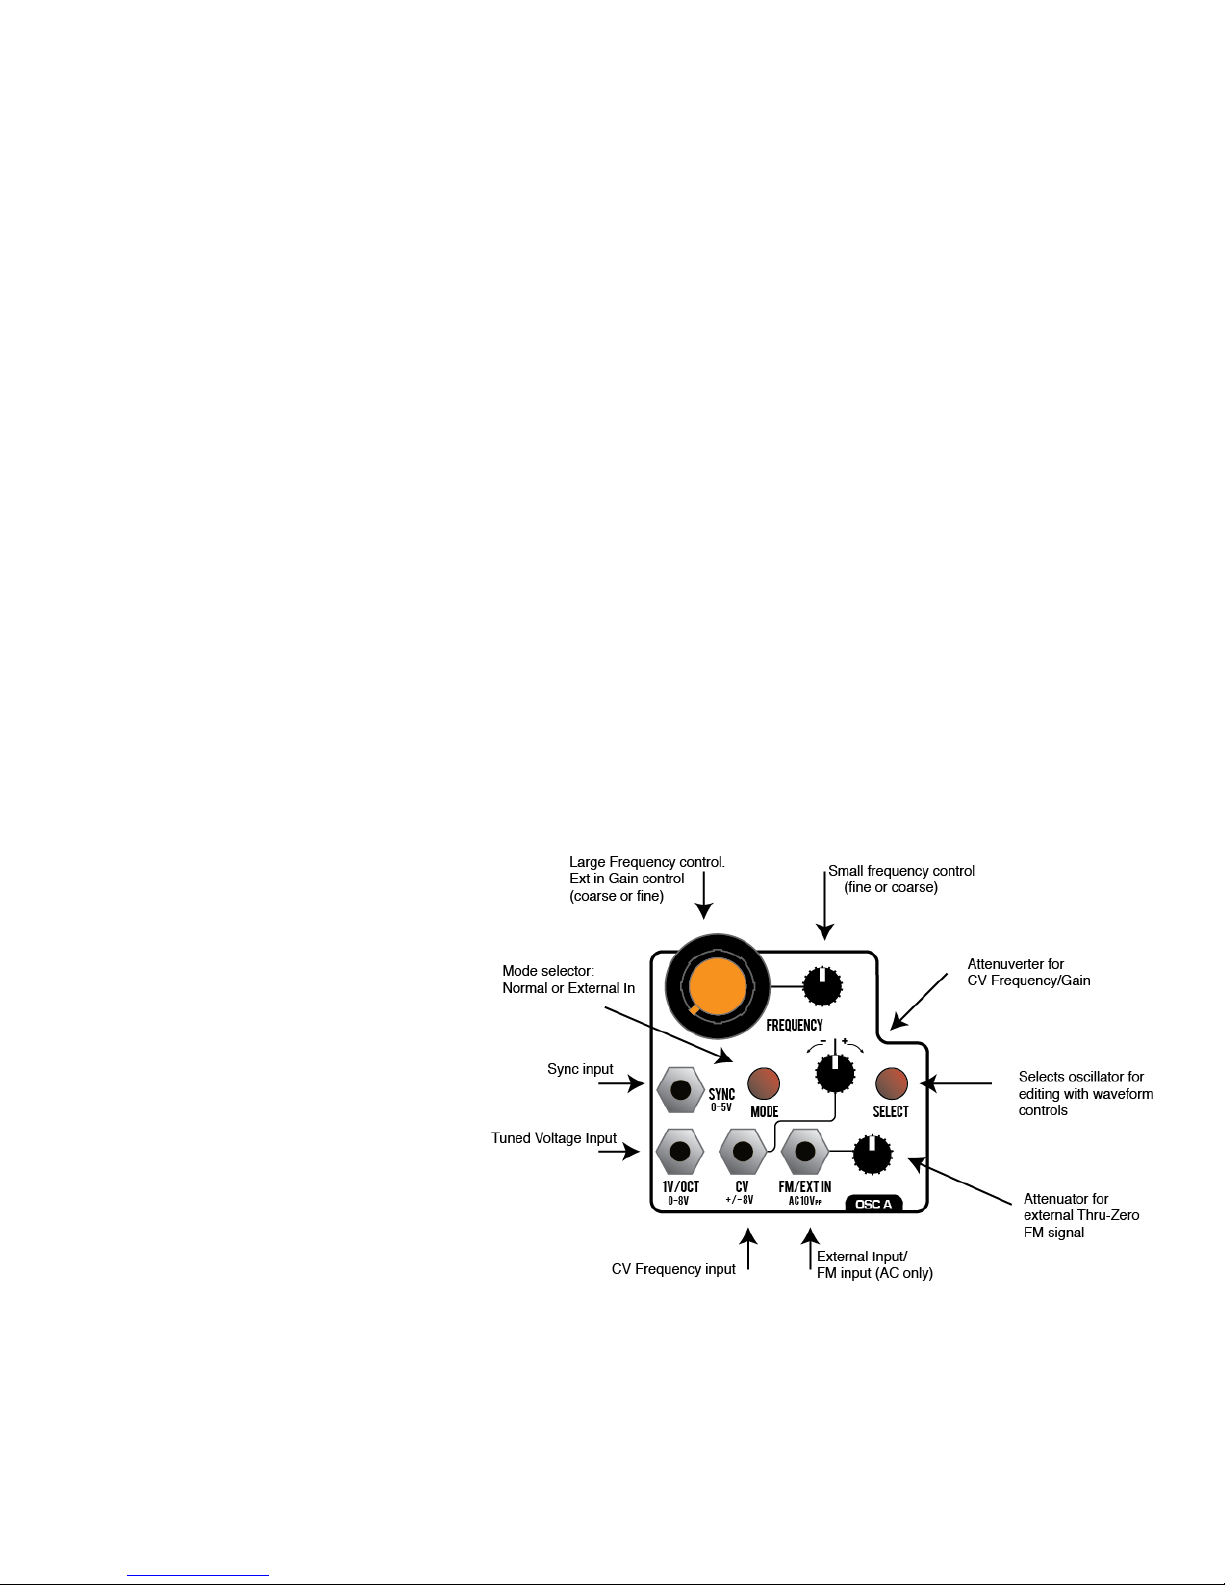
OSCILLATOR OPERATION
The two frequency controls set the
coarse and ne tuning frequencies of the
oscillator. Their specic functions may be
reversed in the MAIN “GLOBAL” OPTIONS
menu by pressing the Encoder and Link
button, scroll down to the “Freq Knob Mode”
item. “Normal” assigns the large orange
knob to Coarse Tune and the small knob to
Fine Tune. “Reverse” assigns the large knob
to Fine Tune and the small knob to Coarse
Tune.
The frequency of the oscillator is set
as a combination of the coarse and ne
manual tuning controls, the voltage present
at the “1V/Oct” and “CV” jacks, the OCTAVE
SHIFT parameter, and the loaded preset
data (if ALL PARAMS is enabled.) The “CV”
jack accepts a bipolar control voltage, such
as a vibrato LFO. It is attenuated by the
nearby “attenuverter” knob.
The “FM” input provides audio-rate, thru-zero frequency modulation of the oscillator signal. It only accepts audio-
rate signals. When the OSC MODE button is pressed the Piston Honda enters External In mode, this input provides
the signal to be dynamically waveshaped through the selected wavetable (instead of using the internal oscillator) When
active, “Ext” will be visible over the waveform display.
Most CV inputs on the Piston Honda accept full-scale, bipolar control voltages with a range of +/-10v. The
response of the various inputs are scaled to provide a musically useful range of motion within the typical range of +/-
5V, with additional reactivity far outside of this range. The attenuverters use a nonlinear curve to allow a typical control
voltage to subtly modulate a small range of the parameter, or full-swing travel without the use of external amplication.
Oscillator B has a “Link” button. It allows one-touch linking of Oscillator A’s frequency to Oscillator B, for easy
“following” behavior without the use of patch cables. In this mode, the coarse tune parameter on oscillator B will be
disabled. Oscillator B will copy the frequency from oscillator A, with the added inuence of Oscillator B’s Fine Tune and
CV controls. If oscillator A has FM applied, it will not inuence the follow frequency that is given to Osc B. Set oscillator
B’s ne tune control to the center position for easy unison effects while listening to the “Mix” output. Adding unison from
each oscillator will result in massive 4-oscillator sounds, with two different morphing wavetables if you prefer.
SHORTCUTS
It is not necessary to use the menu system for accessing all features. Many sound parameters not related to the
preset manager can be changed with shortcuts.
To increment an oscillator’s UNISON parameter without using the menu, hold down the encoder button and press
the oscillator’s SELECT button.
To change an oscillator’s OCTAVE setting without using the menu, hold down the oscillator’s SELECT button and
turn the rotary encoder.
The waveform selection is shared by both oscillators though
each can be tuned to their own waveform. The two SELECT
buttons near the waveform sliders determine which oscillators
will be updated by motions of the slider and attenuator controls. If
the button is illuminated, its associated oscillator will receive the
control motion in choosing a respective waveform. The display will
update to show the vital parameters of the selected oscillator, or
both. It is not possible to deselect both oscillators. When only one
oscillator is selected, more detailed information will be shown such
as the frequency of the oscillator, and a graphic tuning bar showing
the deviation from the standard pitch.
In the display, if the colon (:) is missing from the waveform
X, Y, or Z axis label, it means that morphing is disabled on that
oscillator’s axis.
The Piston Honda contains 512 waveforms, organized into a
“cube” of 8x8x8 with the axis labeled X, Y, and Z. Each axis has a manual control slider and a dedicated CV input with
attenuverter, which adds or subtracts from the initial value set by the slider.
Turn
COUNTER-
CLOCKWISE
to SUBTRACT
Turn CLOCKWISE to ADD CV to parameter
“Attenuverter”
CV Input
X Y Z
CV
+/-8V
WAVEFORM SELECTION
Manual control (Slider)
CV Attenuverter
CV Input

The shared waveform controls exhibit “locking” behavior to prevent accidental editing of the wrong oscillator. The
sliders and attenuverters are locked when the SELECT buttons are pressed, or when a new preset is loaded. To
unlock a slider, simply move it from its current position. It will edit the parameter only for the currently selected
oscillator, while the unselected oscillator’s parameters remain locked. The waveform axis CV attenuverters also have
this shared locking behavior.
Each oscillator’s wavetable generator can accept an external audio signal, instead of the internal oscillator. To
change to this mode, press the “MODE” button on the desired oscillator. “EXT” will appear in the display. Patch an
external audio signal to the oscillator’s FM input (or leave it unpatched to process the output of the other oscillator.)
Turn up the large tune knob. In this mode, the large knob functions as the manual GAIN control. The oscillator’s CV
input and attenuverter will provide voltage control of the gain. For the “classic” nonlinear dynamic waveshaping sound,
set the input signal to a sine wave, select the wavetable as desired, and put an envelope into the oscillator’s CV input.
NOTE: Setting both oscillators to External Input whilst using the normaled input signals (no signals patched into either
FM jack) will result in an unpleasant feedback signal of limited musical utility.
The Piston Honda’s menu system can be accessed by holding down the black encoder button and pressing one of the
buttons on the module.
You may scroll through the menu by turning the rotary encoder. To access the selected menu option, press the
encoder button. To change the selected option, turn the encoder to change the highlighted data. When nished, press
the encoder button again to program your edited value. To exit the menu, press any other button on the module.
OSCILLATOR OPTIONS MENU
UNISON:
Enables a second oscillator to run alongside the main oscillator, with all parameters identical other than a slight
difference in the frequency. The number indicates the frequency deviation. The +OCT and -OCT options set the unison
to increase or decrease one octave, respectively. This parameter can be changed without accessing the menu by
holding down the rotary encoder button and pressing the desired OSC MODE button.
Changes the main oscillator pitch across a +/- 2 octave range. The oscillator will become silent if you exceed the
Piston Honda’s minimum range of about 14 hz.
The wave morphing behavior of the X, Y, and Z axis of the oscillator’s waveform selection may be individually
disabled. An axis with disabled morphing makes hard transitions between the eight waveforms instead of a smooth
interpolation, for a more “glitchy” effect rather than a smooth morph. It also allows you to hear a selection with no
content from the neighbor waveforms mixed in. For example, the 8 items on the Z axis represent 8 les that are loaded
into the module. With Z axis morphing turned on, you would hear a mix of two Z axis waveforms as you moved the
slider. To hear waveforms that are only contained within a single le, disable morphing on the Z axis.

Because the waveform selection CV inputs are shared between the two oscillators, you may wish to disable the
response for one of the oscillators (such as when you are using the Piston Honda as two independent oscillators).
Setting Waveform CV to “Off” will cause that particular oscillator to ignore incoming Waveform CV on the X, Y, and Z
controls.
TONE
The tone menu offers several different types of subtle distortion to be applied. It is most audible with sinusoidal or
additive waveforms at low frequencies, where you may hear quiet foldover of high frequency aliases of the distortion
products. The “Orthodox” setting is not distorted and presents the full resolution of the 16 bit waveform set. The other
settings introduce different avors of quantization noise, enjoyable by enthusiasts of previous generations of the Piston
Honda. To best hear the effects of the different tone selections, select a sine wave (X Y and Z set to 1 with the default
factory waveforms) , set the oscillator to a low frequency, and listen to the different Tone options while moving the tune
controls.
You can make your own wavetables for use on Piston Honda. The free, open-source “WaveEdit” program by the
Synthesis Technology company allows convenient creation, editing, and sharing of les that may be loaded directly
into Piston Honda. We recommend this program as a rst solution to creating custom waveform data, but any means
of generating samples in WAV format properly aligned to the 256-sample boundary will work (see FILE FORMAT
DESCRIPTION)
1-channel .WAV le, 16 bits, 32Kbytes (256 2-byte samples per waveform. 64 waveforms per le total). One le
occupies one of the eight slots available on the Z axis slider. Eight les must be present on the SD card for a successful
load operation.
All eight waveform slots on Piston Honda must be written at once. You must collect 8 properly formatted WAV les
onto a SD card (formatted with the FAT le system). The lenames MUST be “1.wav”, “2.wav”, “3.wav”, and so on up
to “8.wav”. Copy these les to the root directory of the SD card, then properly eject the card from your computer and
insert it into the Piston Honda. Go to the Global options menu and scroll down to the second page. Select the “Load
Waves from SD” option and the loading process will begin.
The module will display the progress of checking the format of each le and the subsequent loading of the data.
If the le is not correctly named or if the card is corrupt, the loading will fail. If the loading is successful, the new wave
data will be written to memory and the module will restart. You may now remove the SD card until the next time you’d
like to update the waves. It is safe to remove and re-insert the SD card while the module is turned on, but not while the
le load operation is running.
If you have created only a small number of WAV les and need more data to ll the SD card’s 8 les, you can
download the original factory wave set from http://www.industrialmusicelectronics.com/
If you'd like to restart your Piston Honda without turning off your entire system, go to the Global Options menu (hold
down encoder button and press LINK), and scroll down to the "Reboot" option. Selecting this with the encoder button
will cause the module to restart.

PRESET MANAGER
The Preset Manager provides an easy way to manage the
entire state of the control panel and menu system from a single
set of controls. Eight presets are available and they may be stored
to nonvolatile memory in the Piston Honda (not on the SD card).
To enable the Preset Manager, push the PRESET button to the
immediate left of the display. It will light up red and the display will
change to say “PRESET” followed by the currently selected preset
number. Managed controls will be locked and set to the values
stored in that preset slot. To change the preset, rotate the encoder.
The settings will change according to the stored data in memory.
The “Preset scope” setting in the GLOBAL OPTIONS menu will
determine if all panel settings are affected by the preset change, or just the waveform selection controls. The CV input
and attenuator knob just below the display also changes the active preset. The behavior of the CV and knob is dened
in the GLOBAL OPTIONS menu with the CTL option.
To write your own data into the preset slot, press the rotary encoder button while the preset manager is active.
The EDITING indicator will appear on the screen. Any controls that you move while the editing indicator is active will
be written into that preset slot. Any changes you make to the oscillator menu will be written to the preset whether the
EDITING indicator is present or not. To exit EDITING mode, press the rotary encoder again. IMPORTANT: You must
choose “Save Presets” from the PRESET menu to write your changes to memory. They will not be stored permanently
unless you do this. The “Save to Preset” command will also commit the edited data to memory.
PRESET MORPH
When in PRESET mode, press the preset button again to enter MORPH mode. All controls under the scope of the
preset manager are locked and unable to move (the CV inputs will still respond). Set the “base” preset for the morph by
turning the rotary encoder to select. The base preset will determine the state of unison, octave and other button/menu
settings that cannot be smoothly morphed. When the base preset is changed,these menu-based settings may change
depending on the preset data. . Next, apply a CV to the preset CV input. The presets will smoothly morph from one to
another.
PRESET SCOPE:
This parameter controls which elements (or functions) are managed by the preset manager. “Waves Only” will
only change the waveform sliders, CV/FM/XYZ attenuverters, and the unison/octave settings when the preset is
changed. “All Params” will additionally change the coarse and ne controls so that the basic oscillator frequency is also
under the control of the preset manager. This is useful if you wish to use the preset slots to create a sequence of notes,
or a strictly dened basic pitch for each segment of a live performance. It is less useful in Preset Morph mode if you
are using this feature to constrain the oscillator settings to musically identiable pitches, as the morph will destroy that
illusion by smoothly gliding through all of the intermediate frequencies between presets.
CTL:
This parameter determines the behavior of the Preset CV input and attenuator.
Allows the CV input to directly cycle through the bank of 8 presets. The attenuator knob will act as a manual
offset. This is useful if you need a manual control to smoothly morph the preset data in Morph mode.
Works like CV+Offset, but the knob becomes an attenuator for the incoming CV. This mode is useful for changing
presets within a strictly controlled range, or subtly morphing within a narrow range of preset data.
Preset/Morph selector
Rotary encoder
(with button)
CV Input
CV attenuator
(not Attenuverter)
OLED Display
CV +/-8V
PRESET/EDIT

Treats the CV input as a trigger input instead. When a trigger or gate event is received, it will advance the preset
number by one. The attenuator knob will manually scan through the presets.
Randomizes all parameters subject to Preset Scope when a trigger event is received at the CV input. Note that
random patch results must be written to memory using the PRESET menu’s “Save Presets” command for permanent
storage of these changes.
STARTUP:
This menu item allows you to enable the preset manager when the modular system is powered on. You may
choose to leave PRESET OFF or select either PRESET or MORPH mode ON. This parameter is used when you have
several Mark III modules in a live performance setup, to avoid setting the preset state on each one at startup.
PRESET MENU:
When selected, the random preset generator will create a new sound setting. The parameters to be changed
are subject to the “Preset Scope” setting. This function works even if Preset Mode is not active. NOTE: Randomized
presets are NOT automatically saved to memory. You must use the “Save Presets” or “Save to Preset” menu command
to write the data to memory.
If you are designing a sound and modulation setup and want to save it to the preset memory, choose this menu
option. You must select the preset slot number to activate the save. This feature also works if the preset manager isn’t
active. The preset will automatically be stored in nonvolatile memory.
This option writes the current state of all preset slots to nonvolatile memory. Presets are stored on an EEPROM
inside the module, not the SD card.
This option reloads the saved memory contents of the Preset Manager to active memory. Use this if you have
mistakenly initialized or randomized saved data that you would like to keep. Note: You cannot reload presets after
initiating “Save Presets.”
INIT ALL PRESETS
Initializes all preset slots and replaces the data with a simple sound. This function does not automatically clear the
saved data in memory. You must use the “Save Presets” command to make your changes permanent.
Init Current: Initializes the currently playing sound and replaces it with a simple sound This function works even if the
Preset Manager is not active.

You will need an inexpensive “Pickit3” programmer device and a computer with a USB connection to install any
available upgrades for this module. You may download new rmware and detailed upgrade instructions from http://
www.industrialmusicelectronics.com on the relevant product page. Note that upgrading the rmware will reset the
internal waveforms to the factory conguration. Your presets and user settings will not be disturbed.
Your oscillator comes from the factory with a fresh calibration job. It may need periodic adjustment, especiaally when
placed into a permanent conguration with other oscillators and CV sources - calibrate your module so it is in tune with
the rest of your setup.
1. Prepare two control voltages measuring exactly 1V and 7V. Select a single oscillator so you can see the frequency
and tuning controls on the display.
2. Turn the coarse tune on that oscillator to the minimum position, and turn the ne tune control to center position.
3. Insert the 1V voltage into the Tuned CV input (1v/oct), and adjust the oscillator's ne tune until the tuning display is
entered on note C1.
4. Replace the 1V input voltage with 7V. Adjust the trimmer on the rear of the module for that oscillator (labeled
OSC1SCALE or OSC2SCALE) until the display is centered on note C7.
Repeat steps 3 and 4 until no further adjustment is needed.
To perform a factory reset, make sure that NO patch cables are plugged into the module. Turn the module on
while holding the Preset Mode button. The menu settings, CV input calibrations, and preset data will be reset.
Find the latest rmware, waveforms, and other information:
Need more help?
Table of contents
Other Industrial Music Electronics Music Equipment manuals

Popular Music Equipment manuals by other brands


Two-Rock
Two-Rock Sensor 22 owner's manual

Voxx
Voxx Singtrix user guide

Stereoping
Stereoping synth programmer Owner's handbook

Tubbutec
Tubbutec OrganDonor Siel Orchestra 1 installation manual

Applied Research and Technology
Applied Research and Technology TransY user manual

iHome
iHome iHome Beauty LUX ICVBT7N quick start guide