influencer INVRGB14K User manual

INVRGB14K
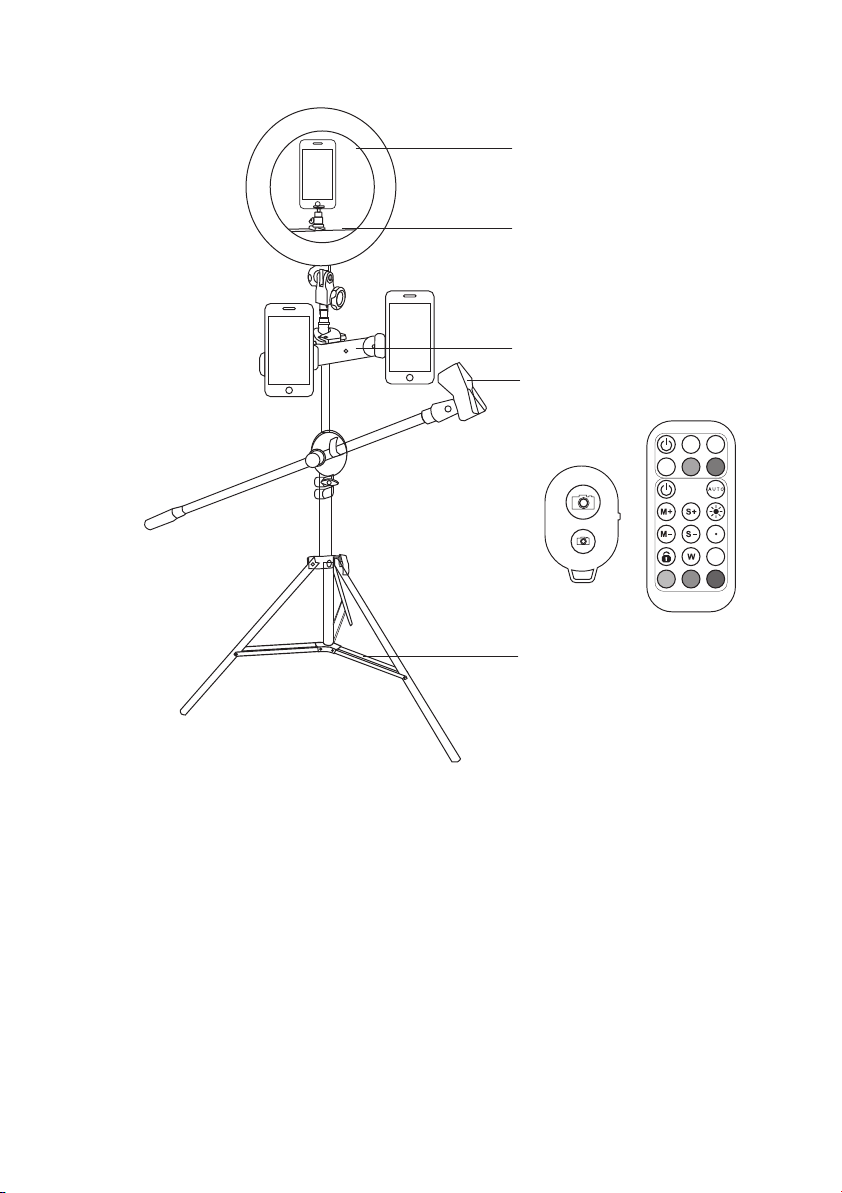
FEATURES
• Tripod 73cm-210cm
• LED Ring Light
• Single and Double Phone Mount
• Microphone Arm
• Wireless Selfie Remote
• Lighting Remote Control
• Cold shoe adaptor
Welcome to the #influencer
14 Inch RGBW Ring Light Kit.
Let’s get you up to speed so
you can start creating great
content!
*Ring light is 14 inch high as measured from
mounting point to top of the ring.
14 INCH RGBW
RING LIGHT KIT
WITH TRIPOD
ASSEMBLY
Assembly of the 14 Inch RGBW Ring Light Kit is broken down into 5 sections:
tripod, ring light, phone mount, microphone mount and camera mount.
SECTION 1: TRIPOD
1. Take the folded tripod out of the packaging (Fig. 1).
2. Loosen the base adjustment screw (Fig. 2).
3. Use your hands to gently pull the legs outwards from the centre shaft
(Fig. 3 & 4).
4. Adjust the legs until stabilising bars are parallel with the ground. Then
tighten the base adjustment screw.
5. Loosen the pole screws to extend to your desired height. Then tighten
once height is confirmed (Fig. 5 & 6).
INCLUDED
1 x 8 Inch ring light
1 x Camera mount
1 x Phone mount
1 x Microphone mount
1 x Dual phone bracket
Stabilising bars
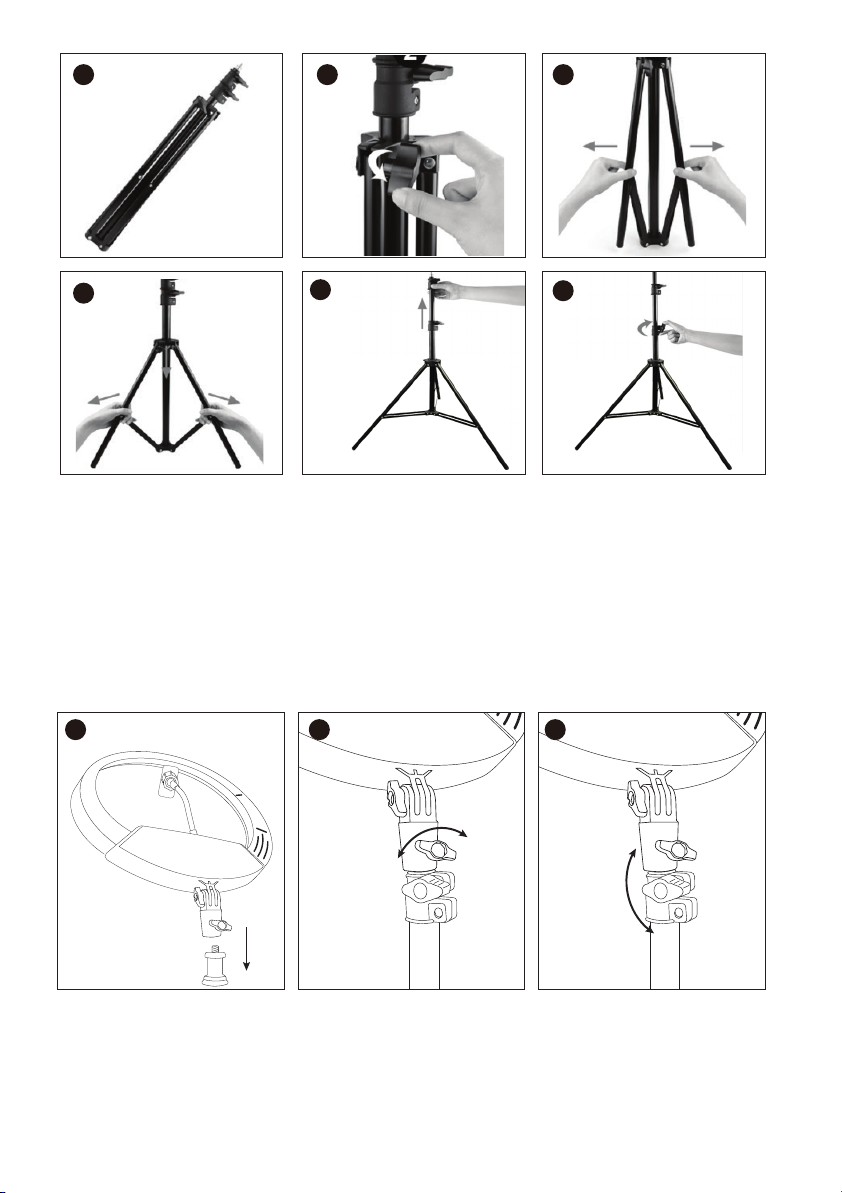
SECTION 2: RING LIGHT
1. Remove the assembled ring light from packaging.
2. Pull down the base mount of ring light so that one of the adjustment screws
is lower than the other (Fig. 1).
3. You can tilt the ring light by loosening the top adjustment screw and then
tightening once the ring light is in the desired position (Fig. 3).
6
1 2 3
1 2 3
45

B. Dual phone mounting:
1. Attach the plastic clamp to the tripod by loosening the adjustment screw (rotate
anti-clockwise) and place around the tripod pole. Once in place, tighten the clamp
by rotating the adjustment screw clockwise.
2. Attach the phone mounts to the bracket by screwing the two adjustment screws
into the phone mounts.
3. To insert your smart phones into the mounts, pull the spring-loaded side on each
mount. You may need to remove your phone case for secure insertion into the
phone mount.
SECTION 3: PHONE MOUNT
There are multiple phone mounting options in this kit.
A. Centre ring mounting:
1. Insert the phone metal mount onto the ring light and tighten the base adjustment
ring clockwise to secure (Fig. 1).
1 2

SECTION 4: MICROPHONE MOUNT
1. Unscrew and pull out bottom adjustment screw, then attach mount to top of
tripod. Re-insert adjustment screw and tighten with adjustment ring until
mount is secure (Fig. 2).
2. Unscrew bottom adjustment screw, then attach mount to top of tripod.
Re-insert adjustment screw and tighten with adjustment ring until mount is
secure (Fig. 2).
3. Attach the microphone arm to the thinnest part of the tripod (Fig. 4 & 5).
4. The microphone arm can be moved up and down by loosening and tightening this
screw (Fig. 6).
5. The microphone arm can be adjusted on the tripod by loosening and tightening this
bolt (Fig. 7).
6. To attach the microphone mount to the microphone arm remove cap from end of
microphone arm, then attach microphone mount and screw clockwise until secure
(Fig. 8A & 8B).
7. Squeeze the microphone mount clamp to open and then attach your microphone
(Fig. 9). A cable management clip is included for your microphone if required.
1A 1B 2
3A 3B
4 5
Microphone
mounts to
skinniest part
of tripod
Table of contents
Other influencer Camera Accessories manuals


Popular Camera Accessories manuals by other brands


Trojan
Trojan GC2 48V quick start guide

Calumet
Calumet 7100 Series CK7114 operating instructions

Ropox
Ropox 4Single Series User manual and installation instructions

Cambo
Cambo Wide DS Digital Series Main operating instructions

Samsung
Samsung SHG-120 Specification sheet

Ryobi
Ryobi BPL-1820 Owner's operating manual