Influx Technology Rebel Dash User manual

Rebel Dash: Product Manual

Rebel Dash: Product Manual
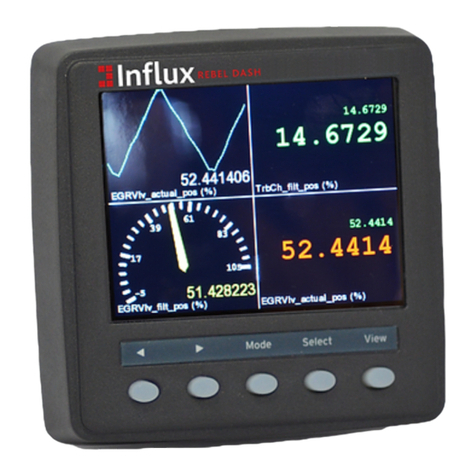
The Rebel Dash is a compact, highly flexible, rugged CAN bus display. It is extremely bright, making it ideal for
vehicle development tasks, where engineers must rapidly configure it to display information for various testing
tasks.
The Rebel Dash is designed to be integrated with all the Rebel range of data loggers and the K-Box
instrumentation but can also be used as a standalone CAN display, and it can even be used to view RAW can
messages:
It can be used to display variables from a Rebel Data Logger. The items that should be available in the
display can be added to an output signal in the Data Logger Configuration. When this is sent to the Data
Logger, the Dash is automatically configured, and items can be selected within the display via the displays
buttons.
It can be used to display variables from a K-Box, load the DBC description file into the configuration utility,
select the items that should be available for display and configure the Dash via USB or a supported Kvaser
device. Items can then be selected within the display via the display buttons.
It can be used to display variables broadcast on a vehicle CAN bus. Load the DBC description file into the
configuration utility, select the items that should be available for display and configure the Dash via USB or a
supported Kvaser device; items can then be selected within the display via the displays buttons.
No configuration is required To use it as a CAN Message viewer. The CAN viewer is accessed via the Main
Menu.

Rebel Dash device

Twist-activated suction cup with an arm type mounting system
The Rebel Dash is configurable from DiaLog or its configuration tool. With the straightforward mounting system
or the optional windscreen mounting system, you can monitor vehicle data graphically within minutes.
The Rebel Dash exemplifies a product that is easy to install and use.
It can be plugged straight into the OBD2 to 9-way Sub D cable and directly into a vehicle's diagnostics CAN Bus.
The supplied cable is also directly compatible with the Influx Technology multi-connect cable available for the
Rebel CT and LT data Loggers; connect it to the AUX output on the multi-connect cable. The simple cable
options with standard CiA® 102 pinout allow for rapid connection and configuration, whether used in a
configuration with a Rebel CT or LT Logger, standalone in a vehicle or when used with other tools.
When connected to the LT or CT data loggers through the multi-connect cable, the display is automatically
switched on or off by the data logger when in sleep mode, so no user intervention is required.
The Rebel Dash display is a high-brightness QVGA (320x240 pixels) colour display that is viewable in full
sunlight on a 3.5-inch colour display with integrated input and output features.
The Display is electrically and environmentally rugged. The new Rebel Dash display is ready to provide rugged,
flexible and maintenance-free instrumentation in the harshest environments.
Display features:
A list of the parameters
Dials and digital LEDs
A graphing mode
A CAN trace viewer mode

What is included in the box?
Rebel Dash device
Standard display cable Deutsch to 9-pin D Sub
Mounting System – The Dash can be fixed to the vehicle via the fixed mounting bracket or mounted on the
windscreen via a twist-activated suction cup with an arm utilising five ball joints allowing for multi-directional
adjustments (both included).
Optional Extras Available
OBDII (type A) to 9-way D-sub
OBDII (type B) to 9-way D-sub
Multi-connect cable to link to a current Influx Technology CT or LT Logger

Connecting the Rebel Dash to a CT or LT Logger
The Rebel Dash can be connected to a Rebel Logger using the supplied cable and an Influx Technology Multi
Connect Cable. The picture below shows the Rebel Logger powered via an OBD II to 9-pin D Sub cable.

Technical Specifications

Installing the Rebel Dash Config Software
To begin the software installation, double-click the Rebel Dash Config setup icon to proceed.
A pop-up will appear for the verification of installing the software. Click 'Run' to confirm the installation of the
software.
Wait till the installation is finished.

Configuring the Rebel Dash using the Rebel Dash
Software
The Rebel Dash software makes it easy for the user to configure the Rebel Dash device. Follow the simple steps
below, and the device will be ready to collect the data. This is used when configuring the Dash to display data
from a vehicle's CAN Bus or the K-Box instrumentation (or both). It could also be used to display data from any
device that broadcasts simple CAN Messages on a CAN bus, e.g. sensors.
Ready to send to the Rebel DashCreating a Configuration
the Kvaser DriversInstalling
Sending the Configuration via the CAN bus through a Kvaser Device
Sending the Configuration via USB Stick
How to configure rebel dash using .rebel dash software

Creating a Configuration Ready to send to the
Rebel Dash
A DBC file (containing the description of the messages broadcast on the CAN bus) can be loaded to configure
the Rebel Dash.
Click on the Open icon on the toolbar.
Locate the DBC file using the window browser.
Select the Open option to import it.
A list of messages from the DBC file will then appear on the "Messages" panel.

The user can select the signal or identifier to be imported into the configuration setup. In this case, follow steps 5-
8; alternatively, all items may be added by pressing the button.
To choose the signal(s) to be logged onto the Rebel Dash, click on an identifier to select it, and a list of available
signal(s) will appear under the 'Signal' panel.
The user can choose the available signal(s) by clicking on the signal's name.
The user can then click on the ' ' button to add the signal to the configuration or the ' ' button to undo
the process.
Repeat Steps 5 to 8 until all the signals that are desired in the configuration have been added.


Installing the Kvaser Drivers
(Only required to configure the Rebel Dash through a Kvaser Device)
Download the Kavaser Drivers for Windows from the link below:
https://www.kvaser.com/downloads/
Run kvaser_drivers_setup.exe.
Click "Next" to start the installation.
Click "Next" after viewing the 'Display Release Notes' (optional).

Select the item(s) you wish to install. Drivers will be installed automatically.

Choose or confirm the location where you wish to install the drivers.

Click "Close" once the process is complete and the Drivers are installed.


Sending the Configuration via the CAN bus
through a Kvaser Device
Once the configuration is ready, it can be uploaded to the Rebel Dash via the CAN bus.
If the PC and the Rebel Dash are connected to the same CAN Bus via a Kvaser device, the user can send the
configuration directly onto the Rebel Dash from the PC. The Kvaser drivers must be installed if you wish to use
this method to configure the Rebel Dash. Installing the Kvaser drivers is explained in section 2.2.2. Alternatively,
the Rebel dash can be configured via USB, as explained in section 2.2.4.
Connect a Kvaser interface device from the PC to the Rebel Dash.
Ensure the CAN Bus is correctly terminated.
Click on the 'Devices' icon. Click on the box next to the name of the interface device to expand to select the
Channel.
Click the + button to expand your Kvaser device, and click on the Channel you wish to use.
Select the baud rate by pressing the down arrow button on the baud rate option.
The baud rate needs to be adjusted to be the same as the baud rate used by the Rebel Dash device for the
interface to work.
Click 'OK' to close the pop-up window.
Check the Status message at the bottom of the screen to ensure that the Kvaser device can communicate with
the Rebel Dash.
Troubleshooting
Other manuals for Rebel Dash
1
Table of contents
Other Influx Technology Monitor manuals


