Ingenico group AXIUM EX6000 User manual

WWW.ingenico.com
28-32,Boulevard de Grenelle, 75015 PARIS - FRANCE/ (T)+33(0)1 58 01 80 00 / (F)+33 (0)1 58 01 91 35
Ingenico-SA au capital de 47 656 332 / 317 218 758 RCS Nanterre
User Guide
Model:AXIUM EX6000

2/ 25
Contents
1. Introduction ..................................................................................................................... 3
2. Presentation..................................................................................................................... 4
2.1 Content of the box.................................................................................................... 4
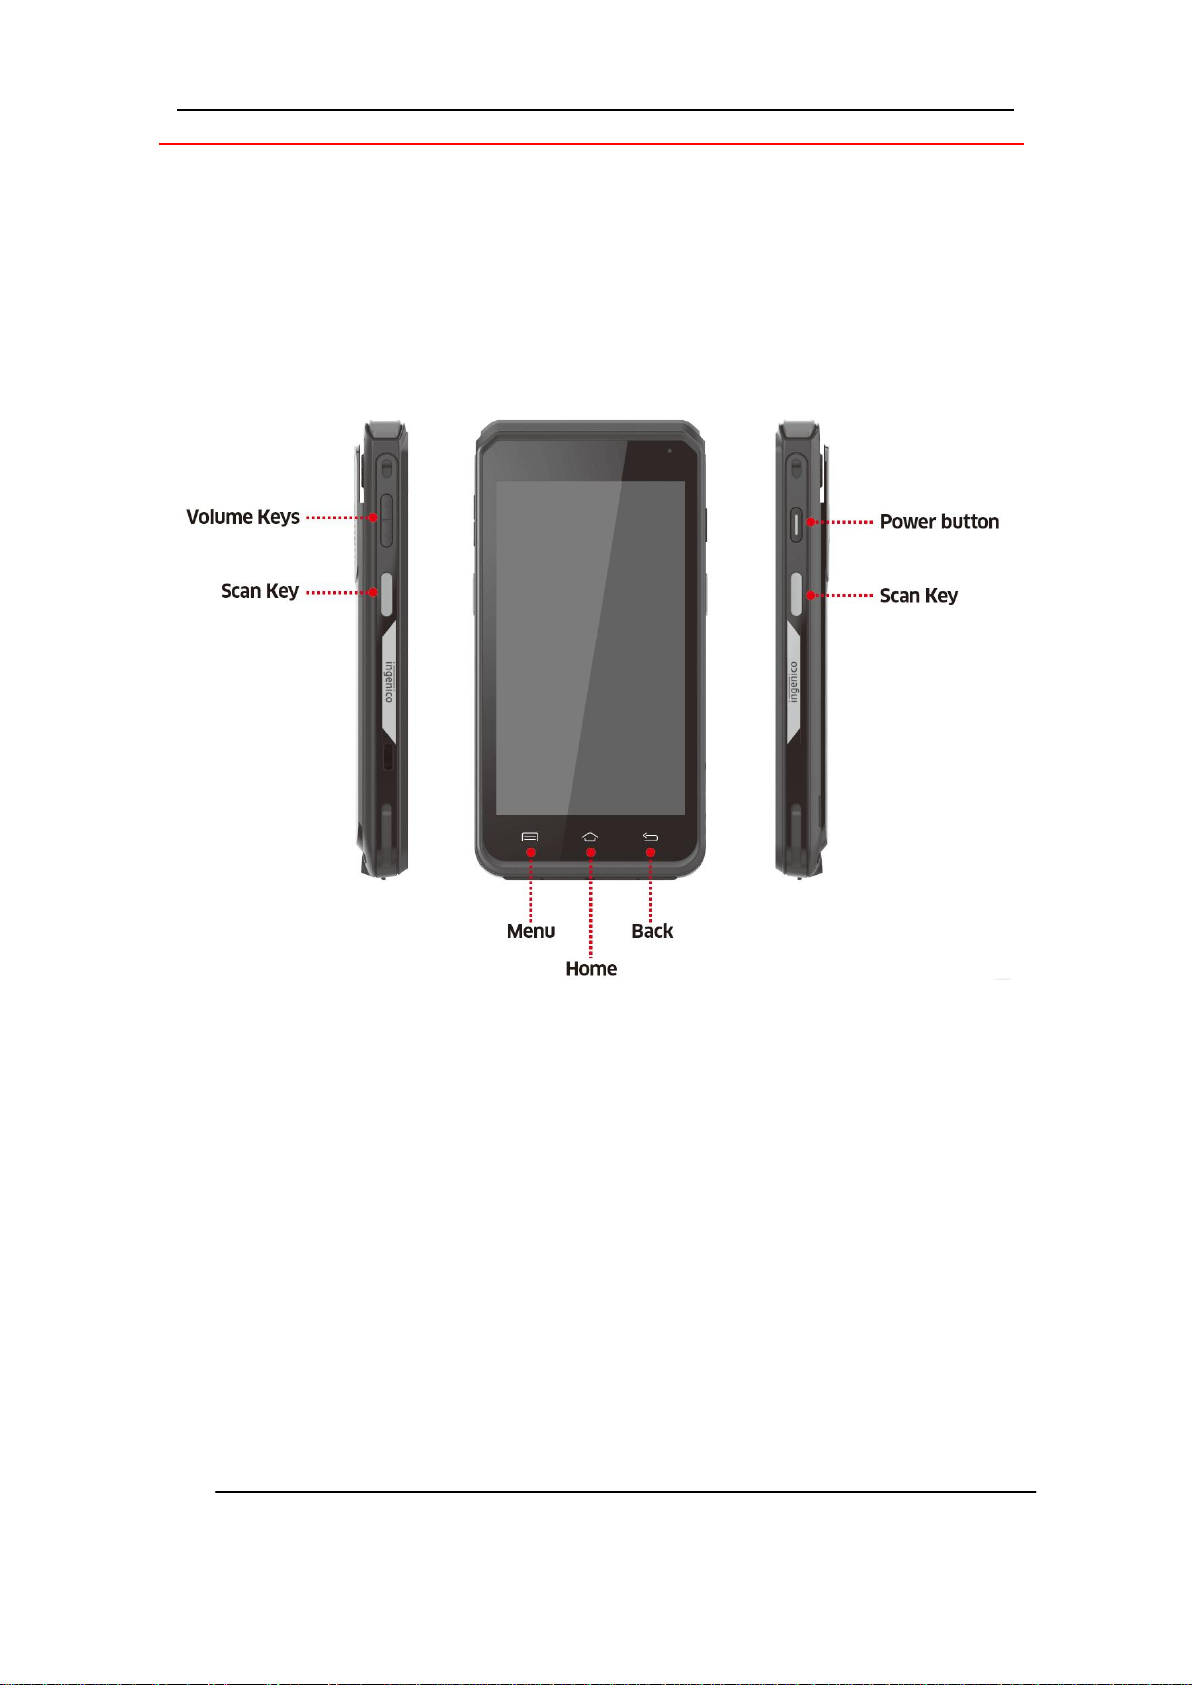
2.2 Overview of AXIUM EX6000..................................................................................... 5
2.3 Keypad Functions...................................................................................................... 7
2.4 Touch Panel ............................................................................................................... 7
3. Use of the terminal .......................................................................................................... 7
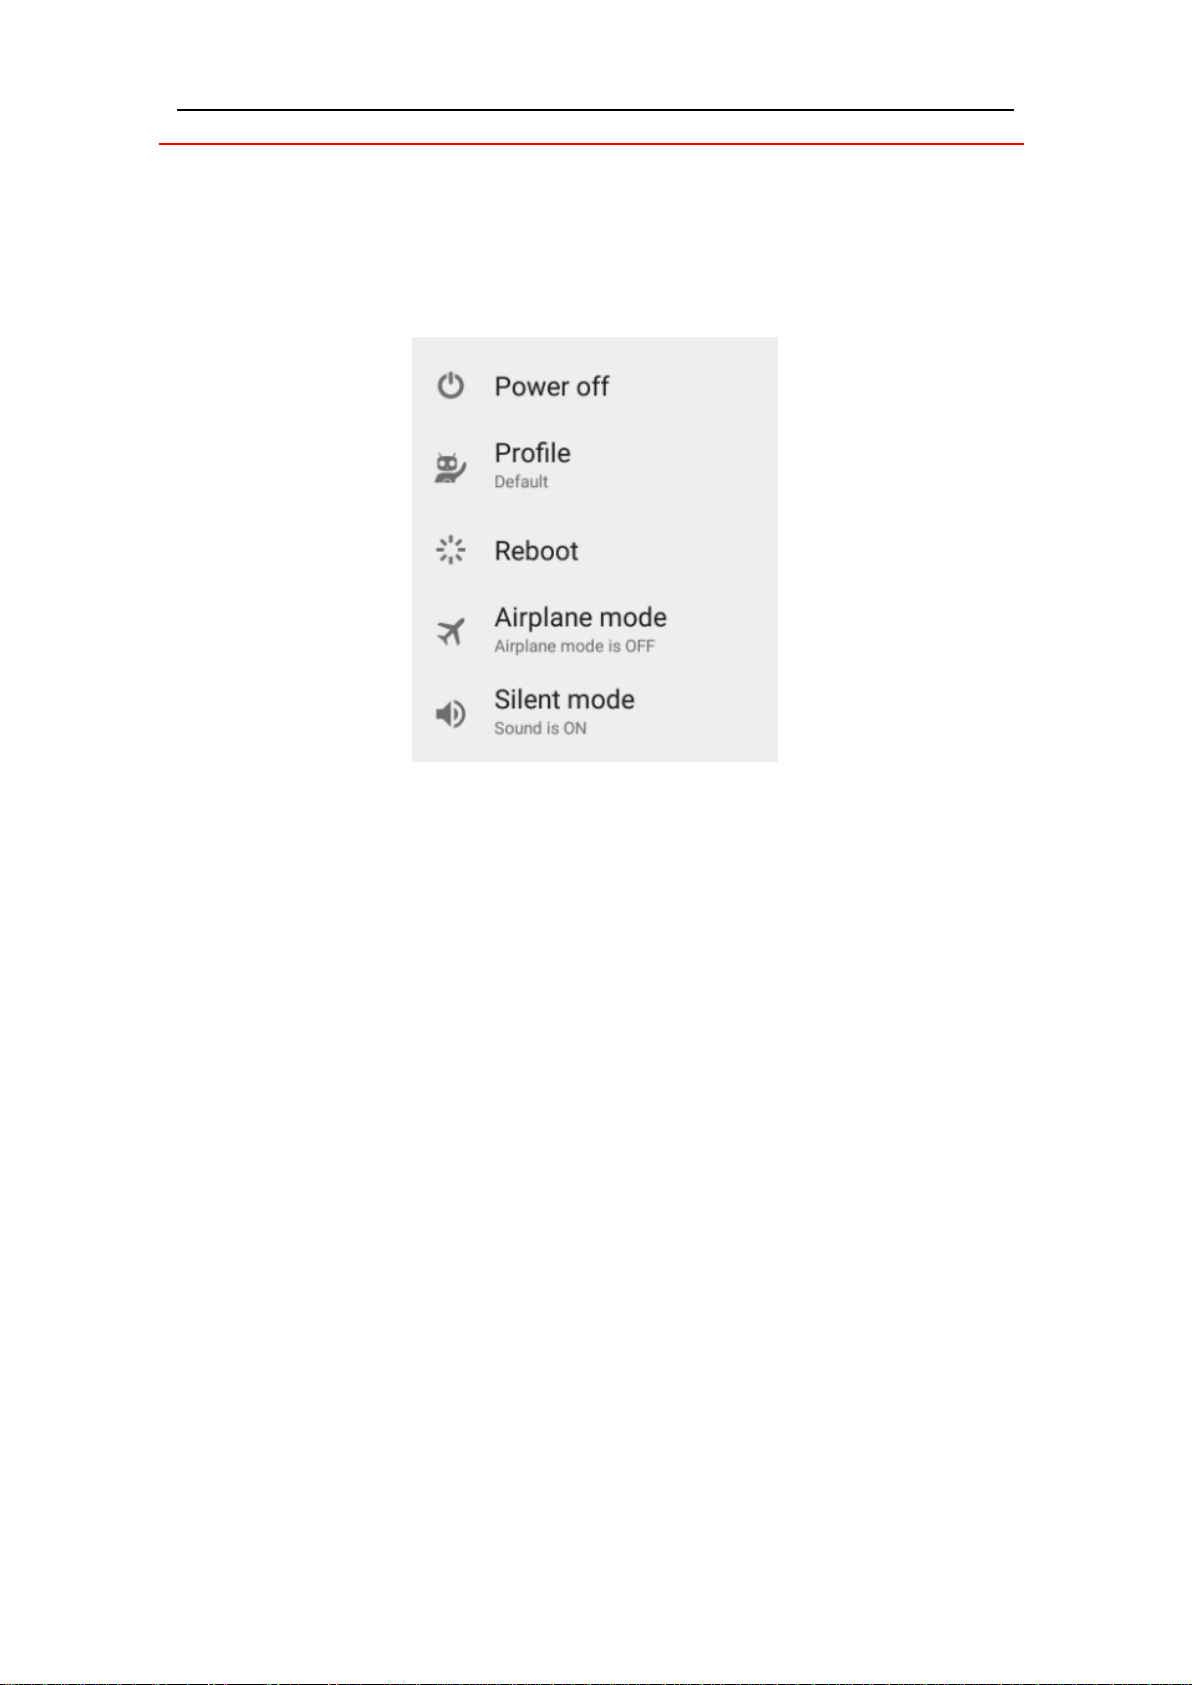
3.1 Power on/Power off the terminal ............................................................................ 8
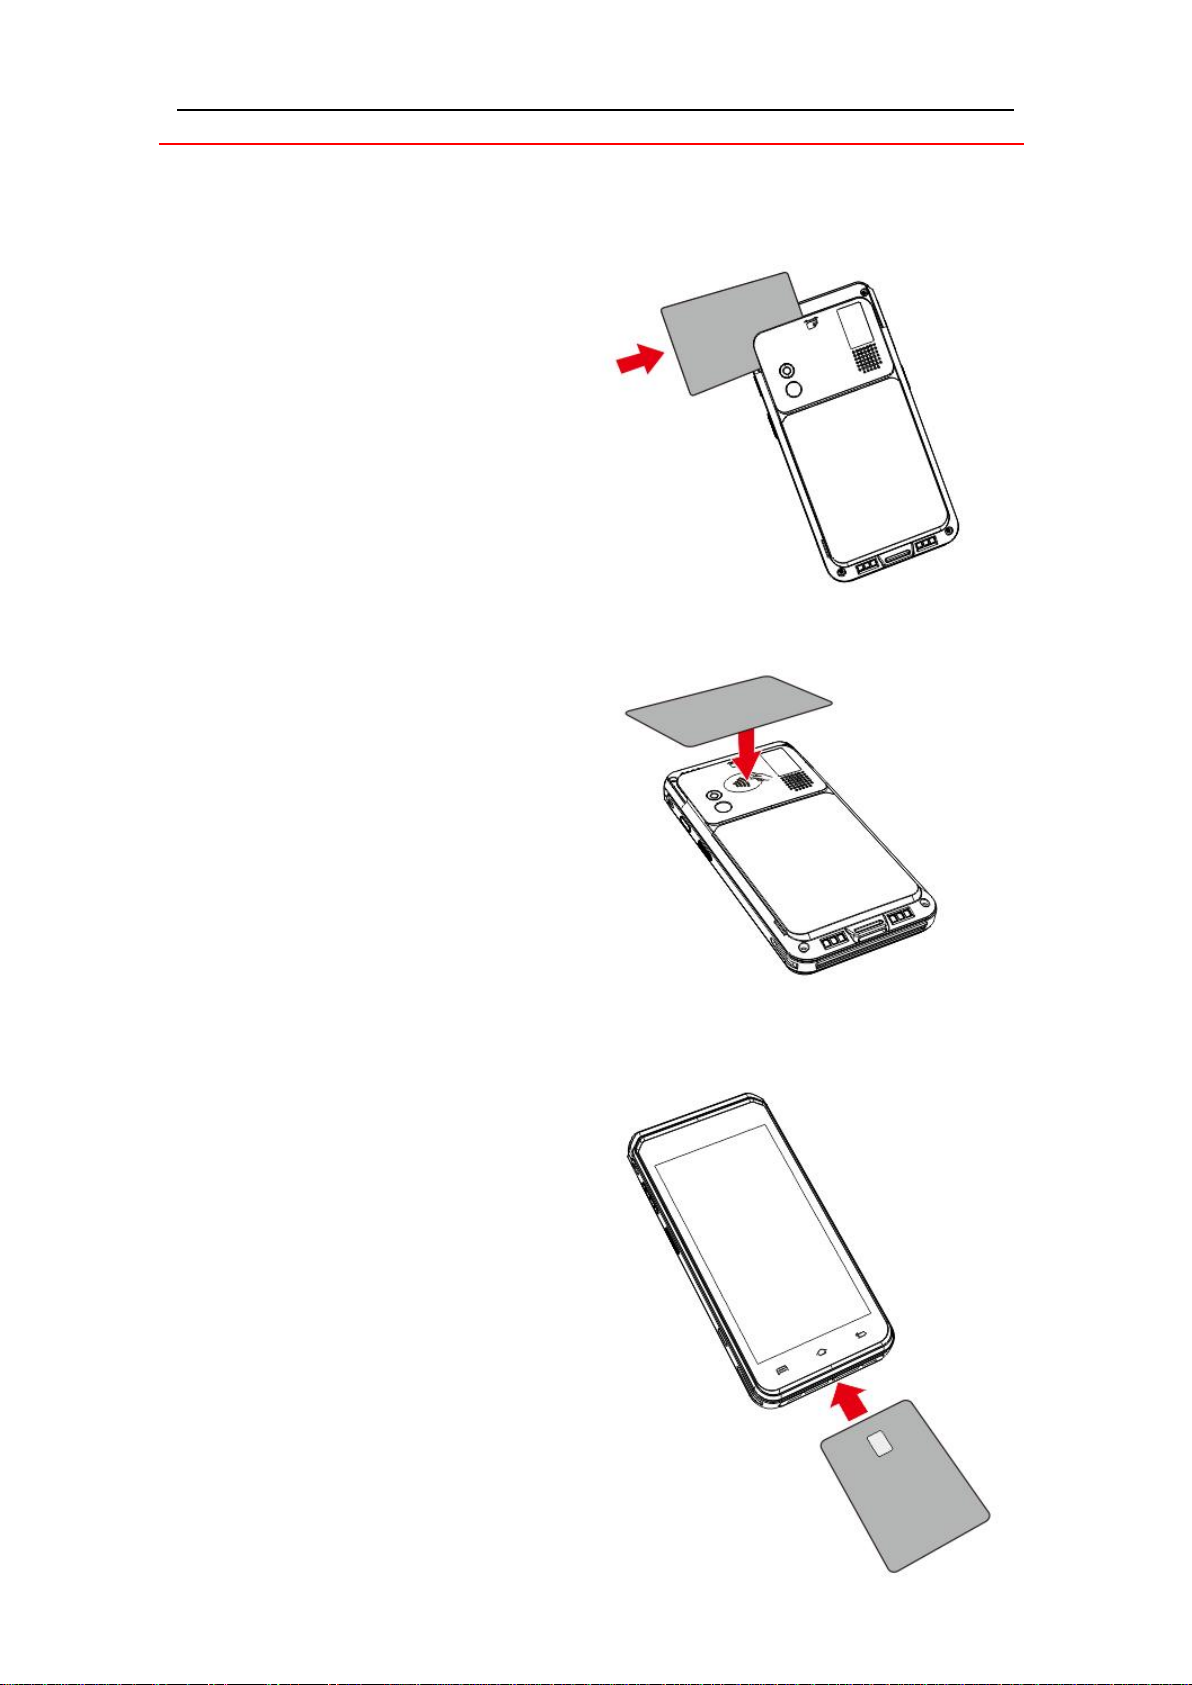
3.2Reading cards............................................................................................................ 9
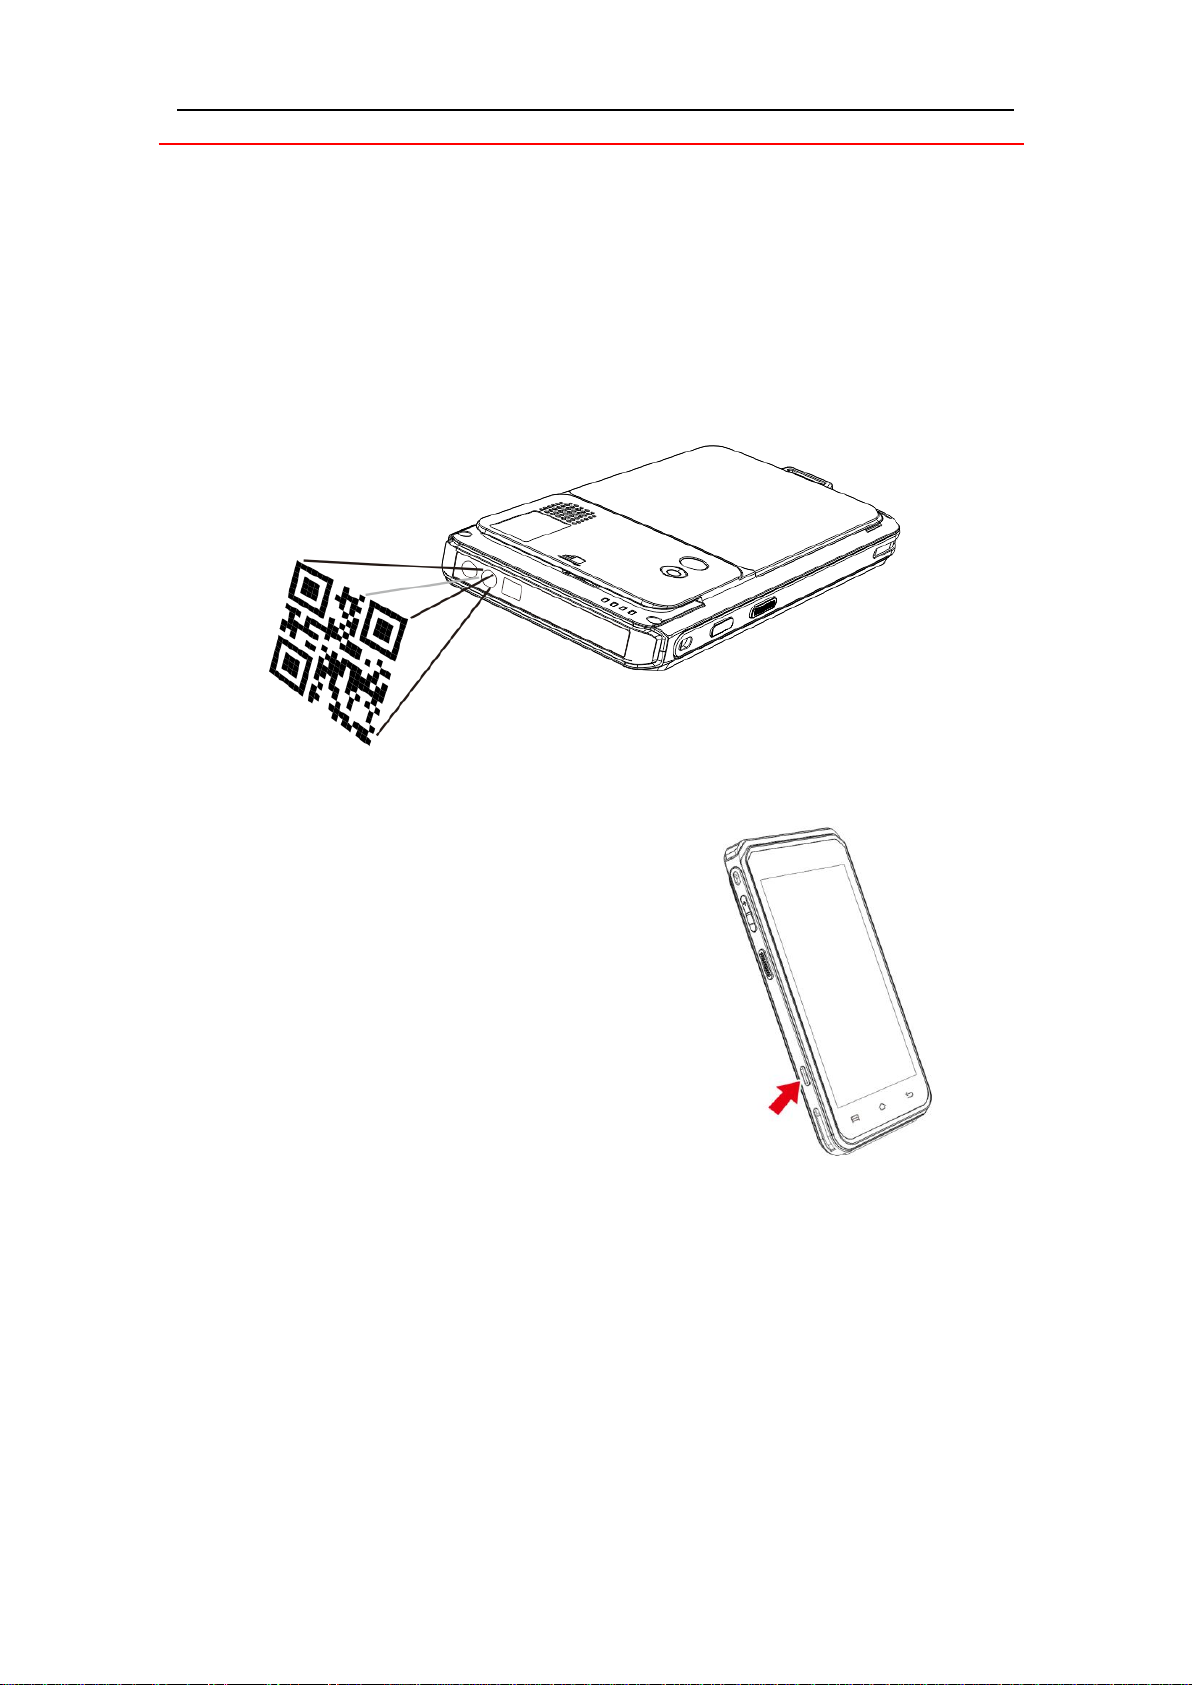
3.3 Usage of Front scanner........................................................................................... 10
3.4 USB type-C............................................................................................................... 10
4. Installation...................................................................................................................... 11
4.1 Recommendations.................................................................................................. 11
4.2 Installing modules ................................................................................................... 11
4.3 Battery ..................................................................................................................... 13
4.4 Visual Impaired Accessory ...................................................................................... 14
5. Recommendations......................................................................................................... 15
5.1 Safety....................................................................................................................... 15
5.2 Security of your terminal ........................................................................................ 18
5.3 Fixed installation ..................................................................................................... 19
5.4 Cleaning the terminal.............................................................................................. 20
5.5 Transport and storage ............................................................................................ 20
6. Standard ......................................................................................................................... 21
7. Troubleshooting............................................................................................................. 24

3/ 25
1. Introduction
We hope that you will be fully satisfied with your new AXIUM EX6000 terminal.
Read thisguide to understand and make the best use of your terminal. It presents you the
necessary information about use,installation,maintenance,safety and security
recommendations.
WARRANTY/SECURITY/GARANTIE/SÉCURITÉ
Use only the power supply included with the product to ensure best performance and
safety.Maintenance should only be provided by Ingenico authorized technician.
Failure to comply with these instructions will void the manufacturer’s responsibility.
Afin d’assurer les meilleures performances et votre sécurité, utiliser seulement le bloc
d’alimentation livré par le fabricant avec le produit. La maintenance doit être réalisée
seulement par un technicien agréé et autorisé par Ingenico.
Le non-respect de ces instructions dégage la responsabilité du fabricant.
This symbol indicates an important Warning.
Ce symbole indique un avertissement important.
This symbol indicates a piece of advice.

4/ 25
2. Presentation
2.1 Content of the box
AXIUM EX6000 terminal
Power adapter
Abattery pack
This user guide
WARNING/ATTENTION
The power supply unit provided with your equipment is specially designed for
ingenicoAXIUM EX6000 terminal. Do not use any other power supply.The use of a power
supply with apparently similar voltage/current characteristics may damage your terminal.
Le bloc d’alimentation fournit avec votre équipement est spécialement conçu pour les
terminaux de paiment Ingenico. Ne pas utiliser d’autres sources d’alimentation.
L’utilisation d’une alimentation électrique ayant des tensions et courant similaires peut
endommager votre équipement.
ADVICE
Keep the package. It must be re-used whenever the terminal is shipped.

5/ 25
2.2Overview of AXIUM EX6000
1. Volume Keys
2. Scan Key
3. LCD and touch screen
4.USB Type-C connector
5.Smart card reader
6. Indicate LED of front
scanner
7. Front scanner
8. Illuminate lamp of front
scanner
9.Magnetic card reader
10.Contactless landing zone
11.Power Key
12. Scan Key

6/ 25
13. LEDs for Contactless Card 14. Speaker
15. SAM card slot16. Micro SD slot
17. Battery socket18. Base Charging interface-
19. Flash20. Rear camera
21. SIM 1 card slot22.SIM 2 card slot
23.Battery compartment24.Lanyard hole
25. Base Charging interface+
Weight
261g (including battery)
Dimension (L x W x H)
152.2 X 77.1 X 17.5mm
Electrical mains network
100-240VAC/50-60Hz Class II

7/ 25
2.3Keypad Functions
The terminal has three physical keys on the left side of the terminal, a power button and
two volume keys.
The terminal has a 5.0 inchscreen,there are three capacitive keys at the bottom of the
screen,Menu,Homeand Back keys.
2.4Touch Panel
The AXIUM EX6000 is equipped with touch panel that allows you capture functions and
menus by your finger or use a stylus.
3. Use of the terminal

8/ 25
3.1 Power on/Power off the terminal
To power on: Make sure the terminal battery is correctly installed and Press <Power>
button for about 1s until the display is turned up.
To power off: Press <Power> button for more than 2s until the display show the following
figure, then press <Power off>.
If the battery is empty, the terminal automatically shuts off.
Abnormal power off:
When the device works abnormally, for example, it is crashed and no actions menu
popped out while pressing the power button, pleaselong-press the power button for 8s,
the device will be automatically powered off.
Screen saver mode:
Short-press the power button for about 0.5s, the terminal display will be turned on or off.

9/ 25
3.2Reading cards
Magnetic stripe card
The card can be read bi-directionally, with
the stripe facing the terminal.
Use a regular movement in order to
ensure a reliable card reading.
Contactless card
Bring the card firmly up to the active
zone. Keep the card close to
the reader during the transaction.
On the back ,LEDs are displayed to
indicate transaction processing.
Smart card
Insert the card horizontally with the
metal chip facing upward
and leave in position throughout the
transaction.

10 / 25
3.3Usage of Front scanner
Press the scan button to start scanning.
After starting the barcode scanning, a red laser beam will be emitted from the
window in front of the terminal.
Align the red light beam with the bar code you want to scan
When the scan is successful, the terminal will automatically turn off the beam and
sound a beep.
3.4USB type-C
There is a USB type-C connector on the left side of the
terminal.
The connector manages Host and Slave connections.
The connector integrates Audio Jack solution.

11 / 25
4. Installation
4.1 Recommendations
Operating conditions
(*)Excluding battery charging
Battery charging conditions
Storage conditions
4.2Installing modules
4.2.1 SAM/SIM1/SIM2
WARNING/ATTENTION
Switch off the terminal before opening the trapdoor.
Mettre hors tension le terminal avant d’ouvrir la trappe.
The SAM/SIM connectors are located inside the terminal, in a closed compartment.
Turn the terminal and remove the trapdoor.
Ambient temperature*
From -10℃to +50℃
Max relative humidity
From 10%to 90%, Non-condensing
Ambient temperature
From 0℃to +40℃
Ambient temperature
From -20℃to +70℃
Max relative humidity
From 5% to 90%, Non-condensing

12 / 25
SAM and SIM1,SIM2 are identified by the engraved marks on the lower housing.
When introducing a SAM/SIM in its slot, be sure to put the cut corner as indicated on
the picture.
Close the trapdoor.
ADVICE
SIM and SAM cards share the same form factor , please do be careful to the SIM card
socket position.

13 / 25
4.2.2 MicroSD Memory Card
WARNING/ATTENTION
Switch off the terminal before opening the trapdoor.
Mettre hors tension le terminal avant d’ouvrir la trappe.
MicroSD connector is located inside the terminal, in a
closed compartment.
Turn the terminal and remove the trapdoor.
MicroSD are identified by the engraved marks on the
lower housing.
When introducing a MicroSD in its slot, be sure to put
the cut corner as indicated on the picture.
Close the trapdoor.
The terminal supports MicroSD up to 32GB.
4.3Battery
4.3.1 Charging the battery
When does the battery need to be charged?
When used daily, the terminal charges its battery each time the power adapter is
connected. Charging starts automatically.
How can the battery be charged?
Using the power adapter
Connect the power adapter to the terminal USB type-C connector located on the left
side of the terminal.
Connect the power adapter to the power supply mains network.
Check the charging status on the top of the screen(it means battery charging).
4.3.2 Installing the battery
WARNING/ATTENTION
Check that the terminal is not connected to the main electric network.
Vérifier que le terminal n’est pas connecté au secteur.
Turn the terminal and remove the trapdoor.

14 / 25
Take the battery pack included in the box.
Locate the battery pack connector beside the battery compartment.
Plug the battery pack connector according to the connector locating system.
Place the battery pack in its compartment.
Close the battery trapdoor.
4.4 Visual Impaired Accessory
Install the VI accessory on the screen.

15 / 25
Take out the VI accessory.
5. Recommendations
5.1 Safety
Powering down the AXIUM EX6000
Disconnect the AXIUM EX6000 power supply block adapter from the electrical
mainsnetwork.
Lithium cell
The AXIUM EX6000 is fitted with an internal lithium cell which should only be accessed by
a qualified technician.
Battery
AXIUM EX6000 is fitted with battery specially designed for this terminal.
Only use the appropriate chargers and batteries listed in theingenico’s catalogue.
Do not short-circuit the battery.
Do not attempt to open the battery container.
Used batteries must be disposed of at the appropriated sites.
The lifespan of battery depends on:
Features used.
Number of charge and discharge cycles.
Use temperature.

16 / 25
CAUTION/ATTENTION
RISK OF EXPLOSION BATTERY IS REPLACED BY AN INCORRECT TYPE.
DISPOSE OF USED BATTERIES ACCORDING TO THE INSTRUCTIONS.
RISQUE D'EXPLOSION LA BATTERIE EST REMPLACÉE PAR UN TYPE INCORRECT.
ÉLIMINEZ LES PILES UTILISÉES CONFORMÉMENT AUX INSTRUCTIONS.
Electrical power supply network
The electrical outlet must meet the following criteria:
Must be installed near the equipment and easily accessible
Do not short-circuit the battery.
Do not attempt to open the battery container.
The power supply label contains seventeen symbols:
CCC (China Comoulsory Certificate) Mark
The RegulatoryCompliance Mark(RCM)
International Efficiency MarkingProtocol (Energy Star Level 6)
In door use only
“Conformite Europe enne” or CE Mark
Double insulation symbol
5 Years China RoHS symbol

17 / 25
10 Years China RoHS symbol
BSMI(Taiwan)
PSE Mark(Japan)
Recycle in accordance with the waste electronic & electrical equipment
directive
Underwriters Laboratories Inc (US Compliance)
Made from recyclable material
Low density version of Polyethylene (LDPE)
Chlorinated Polyethylene ( CPE)
Risk of explosion if the battery is incorrectly replaced or is placed in a
fire
Dispose of batteries at a hazardous waste collection site or recycling
facility

18 / 25
SAM/SIM1/SIM2Readers compartment
The trapdoor for battery, SAM/SIM1/SIM2, readers located underneath the terminal, must
be in place during the normal operation of the terminal.See sections “Installing modules”
and “Installing the battery”.
On airplanes
Your terminal must be switched off by removing the battery pack. Remove the battery
from the terminal when on an airplane.
Non-compliance with these safety rules may result in legal action and/or a ban on later
access to cellular network services.
Explosion areas
Some regulations restrict the use of radio equipment in chemical plants, fuel depots and
any site where blasting is carried out. You are urged to comply with these regulations.
The terminal shall be protected by a specially fitted and certified cover enabling use in
proximity to a fuel pump.
Thunderstormweather
According to some relevant reports, the mobile phone electromagnetic wave is good
conductor of lightning. It is much easier to suffer lightning strike when the damp
atmosphere form a magnetic conductivity, especially in open areas. Do not use wireless
terminals under thunderstorm weather.
Electronic health appliances
Your terminal is a radio transmitter which may interfere with health appliances, such as
hearing aids, pacemaker, hospital equipment, etc.
Your doctor or the equipment manufacturer will be able to provide you with appropriate
advice.
5.2Security of your terminal
Your device fulfills current applicable PCI PTS security requirements.
Upon receipt of your terminal you should check for signs of tampering of the equipment.
It is strongly advised that these checks are performed regularly after receipt. You should
check, for example: that the keypad is firmly in place; that there is no evidence of unusual
wires that have been connected to any ports on your terminal or associated equipment,
the chip card reader, or any other part of your terminal. Such checks would provide
warning of any unauthorized modifications to your terminal, and other suspicious
behavior of individuals that have access to your terminal. Your terminal detects any
“tampered state”. In this state the terminal will repeatedly flash the message “Warning
Detected”and further use of the terminal will not be possible. If you observe the
“Warning Detected”message, you should contact the terminal helpdesk immediately.

19 / 25
You are strongly advised to ensure that privileged access to your terminal is only granted
to staff that have been independently verified as being trustworthy.The terminal must
never be put in or left at a location where it could be stolen or replaced by another
device.
5.3Fixed installation
If the device is to be used in a situation where it is not possible for the cardholder to pick
up and shield their PIN entry themselves, the device may be used, but it must be installed
in the following manner:
The device must be angled at 45 or more, so that oversight of the PIN entry from the
rear of the device is not possible.
The device must either be fitted in a swivel stand - so that the customer can position
the device in the best angle to prevent oversight - or the device must be fixed in the
best possible position to prevent oversight if such a generic position exists in the
specific environment to which the device is installed.
The device environment must be accompanied with conspicuous notices and
educational material which informs the customer to shield their PIN during PIN entry.
The device must be deployed so that oversight from other customers, either in
different payment lanes, or in other areas of the shopping environment, is prevented.
This may be achieved through the placement of the lanes and device, so that the
customer is automatically positioned between the device keypad and other
customers. Alternatively, it may be achieved by the environment in which the device
is installed, so that the checkout itself shields the PIN entry process.
The terminal is exclusively made for indoor use.
ADVICE
Positioning of the terminal on check stand must be in such a way to make cardholder PIN
(Personal Identification Number) spying infeasible.
Installing device on an adjustable stand must be in such away that consumers can swivel
the terminal sideways and/or tilt it forwards/backwards to a position that makes visual
observation of the PIN-entry process difficult.
Positioningofin-storesecuritycamerassuchthatthePIN- entry keypad is not visible.
NEVER ask the customer to divulge their PIN Code. Customers should be advised to
ensure that they are not being overlooked when entering their PIN Code.

20 / 25
5.4Cleaning the terminal
Unplug all the wires from terminal.
Good rules for proper cleaning of the terminal are:
Use a soft cloth that is very slightly soaked with soapy water to clean the
outside of terminal.
Do not clean the electricalconnections.
Do not use in any case, solvents, detergents or abrasive products: Those
materials might damage the plastic or electrical contacts.
Avoid exposing the terminal to the direct rays of the sun.
Do not put anything into the slot of the smart card reader.
5.5Transport and storage
Adopt general transportation mode, and prevent the goods from sunlight, snow, shower
and mechanical impact. Transport the devices with care, do not throw it forcibly. Prevent
the packaging from extrusion during transportation, to avoid breakage.
The product should be stored in the original packing box. The warehouse is not allowed
to have all sorts of harmful gases, inflammable, explosive, corrosive chemical goods,
strong mechanical vibration and strong magnetic field. Packing box should be at least
15cm above the ground, and be away from heat, cold, window or air inlet source at least
50cm.
Table of contents