InHand 5G ODU 2000 Series User manual

I
InHandNetworks 5G ODU 2000 Series
User Manual
V1.1—2023.05

i
Declaration
Thank you for choosing our product. Before using this product, please read this manual carefully.
The contents of this manual cannot be copied or reproduced in any form without the written
permission of InHand.
Due to continuous updating, InHand cannot promise that the contents are consistent with the actual
product information, and does not assume any disputes caused by inconsistency of technical
parameters. The information in this document is subject to change without notice. InHand reserves the
right of final change and interpretation.
©2023 InHand Networks. All rights reserved.
Conventions
Symbol
Indication
11
Button name, for example, ‘click Save button’.
“”
Indicates a window name or menu name, for example, the pop-up window “New
User”.
>>
A multi-level menu is separated by the double brackets “>>”. For example, the
multi-level menu File >> New >> Folder indicates the menu item [Folder] under the
sub-menu [New], which is under the menu [File].
Cautions
Please be careful of the contens under Cautions, improper action may result in loss of
data or device damage.
Note
Note contain detailed descriptions and helpful suggestions.

I
CONTENTS
1 Overview........................................................................................................ 1
2 Hardware ....................................................................................................... 3
2.1 Indicator Description........................................................................................... 3
2.2 Restoring to Default Settings via the Reset Button.................................... 4
3 Default Settings ............................................................................................ 5
4 Login and Access to Internet ....................................................................... 6
4.1 Connect via Mobile Phone................................................................................. 6
4.2 Connect via PC ...................................................................................................... 8
5 Web Configuration ..................................................................................... 11
5.1 Dashboard............................................................................................................11
5.2 Status .....................................................................................................................12
5.2.1 Link Monitor .............................................................................................12
5.2.2 Cellular Signal ..........................................................................................12
5.2.3 Clients.........................................................................................................13
5.2.4 VPN .............................................................................................................13
5.2.5 Events .........................................................................................................13
5.2.6 Logs.............................................................................................................14
5.3 Internet..................................................................................................................14
5.3.1 Uplink Table..............................................................................................14
5.3.2 Uplink Setting...........................................................................................16
5.4 Local Network......................................................................................................18
5.5 Wi-Fi.......................................................................................................................19
5.6 VPN.........................................................................................................................20

II
5.6.1 IPSec VPN..................................................................................................20
5.6.2 L2TP VPN...................................................................................................22
5.7 Security..................................................................................................................25
5.7.1 Firewall.......................................................................................................25
5.7.2 Policy-Based Routing.............................................................................28
5.7.3 Traffic Shaping.........................................................................................29
5.8 Services..................................................................................................................32
5.8.1 DHCP server..............................................................................................32
5.8.2 DNS server ................................................................................................32
5.8.3 Fixed Address List ...................................................................................32
5.8.4 Static Routes.............................................................................................33
5.8.5 Passthrough Settings .............................................................................33
5.9 System ...................................................................................................................34
5.9.1 Change the Password ............................................................................34
5.9.2 Cloud Management................................................................................34
5.9.3 Remote Access Control .........................................................................35
5.9.4 System Clock ............................................................................................36
5.9.5 Device Options.........................................................................................36
5.9.6 Configuration Management ................................................................37
5.9.7 Device Alarms...........................................................................................37
5.9.8 Tools ...........................................................................................................38
5.9.9 Log Server .................................................................................................40
5.9.10 Other Settings........................................................................................40

1
1Overview
5G cellular greatly enhances the flexibility and convenience of the network
at any time and anywhere, which means enterprises can easily build a 5G
network in just a few minutes to improve the competitiveness of digital
business development. The cloud-managed 5G ODU 2000 series, combined
with InCloud Manager SaaS service, provides global customers with high-speed,
convenient, and secure 5G efficient networks.
5G ODU is a key part of the cellular gateway series launched by InHand for
WAN, which can instantly deploy ultra-high speed 5G network by having
gigabit cellular uplink without waiting on broadband; supporting dual SIM card
switch network; adapting to the harsh environment. 5G ODU can provide a
better and more stable network.
Combined with InCloud Manager, 5G ODU forms a cloud-managed
network solution, providing global customers with high-speed and secure
network access, and simple and convenient network management services to
empower your core business.

2
Fig. 1 Application case

3
2Hardware
2.1 Indicator Description
ODU2002 Indicator
Light
LED status and definition
System
Off --- Power off
Steady in red --- System starting
Blink in red --- System error
Steady in green --- System working
Blink in blue --- System upgrading
Cellular
Off --- Cellular disable
Steady in blue --- 4G dialed up
Steady in green --- 5G dialed up
Blink in red --- Connection error
Signal
Off --- Connection error
Steady in red --- Signal value ≤9
Steady in blue --- 10≤Signal level≤19
Steady in green --- Signal level ≥20,
LAN
Off --- Connection error
Steady in green --- LAN port connected
Blink in green --- LAN port data transmitting
WAN
Off --- Connection error
Steady in green --- WAN port connected
Blink in green --- WAN port data transmitting

4
2.2 Restoring to Default Settings via the
Reset Button
To restore to default settings by the reset button, please perform the following
steps:
1. When the unit power ON, press and hold the reset button for 5-10 seconds.
2. When System LED is steady on blue, release RESET button, system LED will
blink in blue, and press the RESET button again.
3. When System LED is steady on blue, release the RESET button. The unit has
been restored to default settings and will start up normally later.

5
3Default Settings
No.
Function
Default Settings
1
Cellular
−SIM1 enabled.
2
Wi-Fi
−Wi-Fi 2.4G AP mode enabled, SSID:
ODU2002-followed with the last 6 letters of the
MAC address.
−Auth Method is WPA2-PSK.
−Password is the last 8 letters of serial number.
3
Ethernet
−PoE LAN1 enabled, IP address: 192.168.1.1,
Netmask: 255.255.255.0. DHCP server enabled,
192.168.1.2~ 192.168.1.254.
−WAN/LAN2 enabled as WAN, DHCP client mode.
4
Management
Services
−HTTPS(443) enabled.
−Disable HTTPS/SSH/ping from cellular/WAN
interface.
5
Username and
password
−adm/123456

6
4Login and Access to
Internet
Before power on, please insert the SIM card and connect the 5G antenna to the
device. Or connect Ethernet cable to WAN/LAN2 interface.
4.1 Connect via Mobile Phone
Step 1: Install InCloud APP by scan following QR code in mobile phone.
Step 2: Click the "Device" directory below to enter the [Device] page, click the
menu button in the upper right corner, and select [Add Device]. Scan the QR
code on the ODU to add device.

7
Step 3: After scanning the code successfully, configure the name, serial number,
and description information of the device.
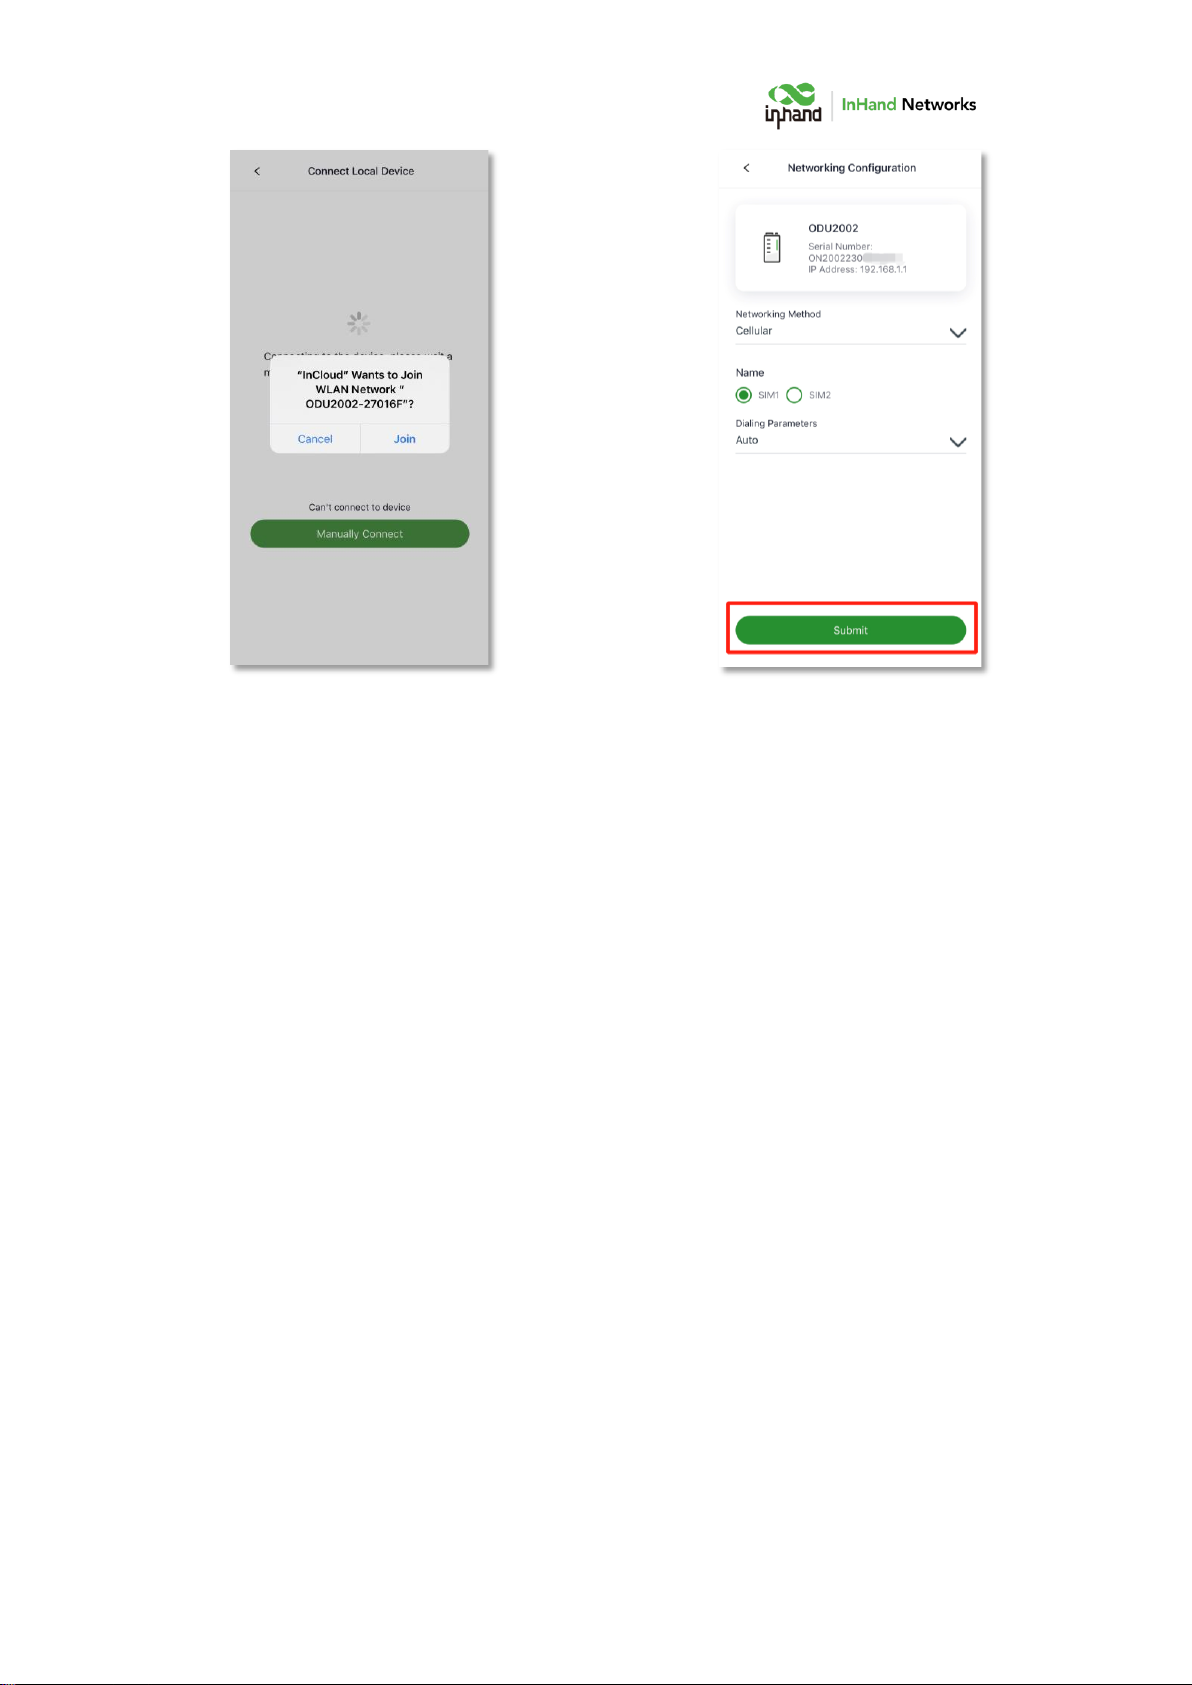
Step 4: If ODU cannot connect to Internet, click "Configure local device" in
[Device] page, scan the QR code on the device again and then configure the
device to connect to the Internet. Mobile phone will connect to ODU’s Wi-Fi
after scanning the QR code in "Configure local device".
8
4.2 Connect via PC
Step 1: Connect PoE LAN1 interface on ODU and PC with Ethernet cable.
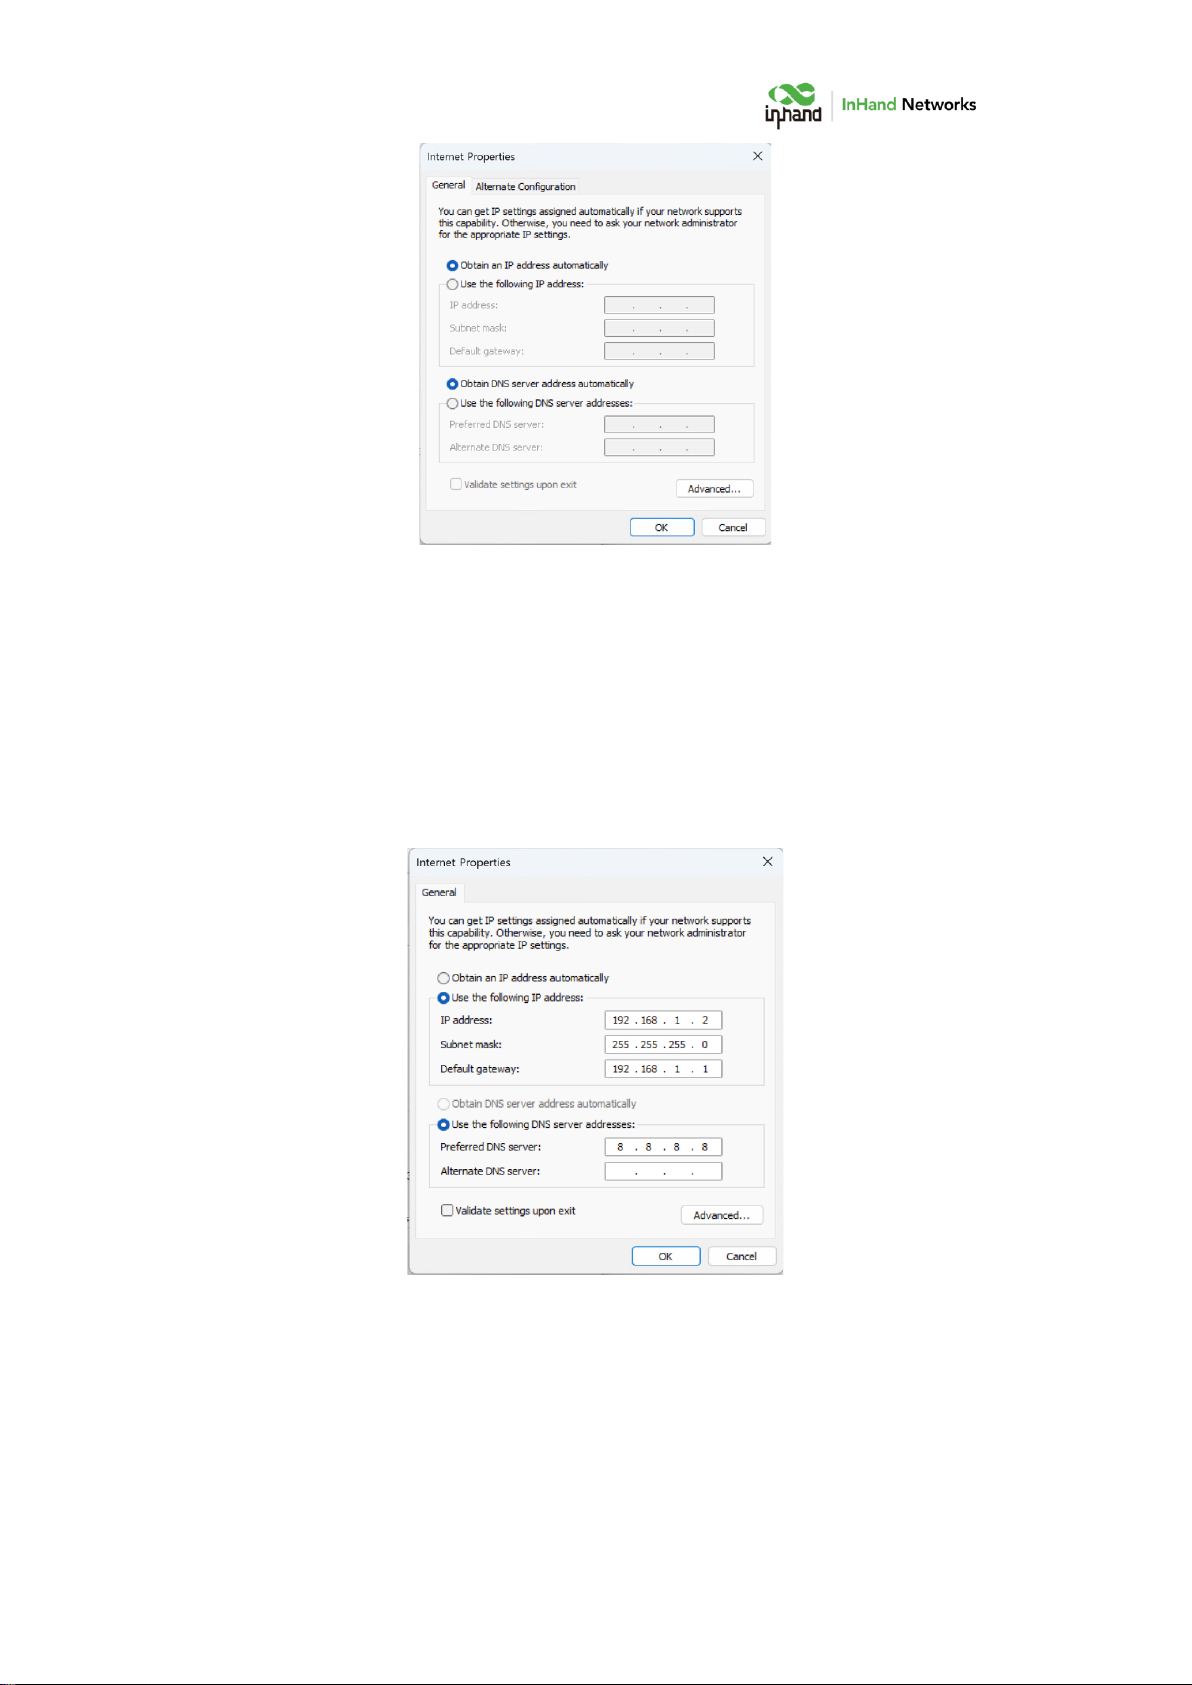
Step 2: Set the IP of the PC via DHCP or fixed IP address, the PC IP address and
ODU address should be in the same segment.
Use DHCP to obtain the address automatically (recommended). The DHCP
server function is enabled by default on the LAN port of ODU.
9
Use a fixed IP address, the PC and the device must be in the same segment. On
PC side, the IP address needs to be configured as any address in
192.168.1.2~192.168.1.254, the gateway should be 192.168.1.1, the subnet
mask should be 255.255.255.0, and the DNS server should be 8.8.8.8 or
operator DNS server address.
Step 3: Open a browser and enter the device's default address 192.168.1.1 in
the browser address bar. After entering the username and password (default:
adm/123456), enter the device's WEB management interface. If the page

10
prompts that the webpage is not secure, open the hidden or advanced options
and select "Proceed to website".
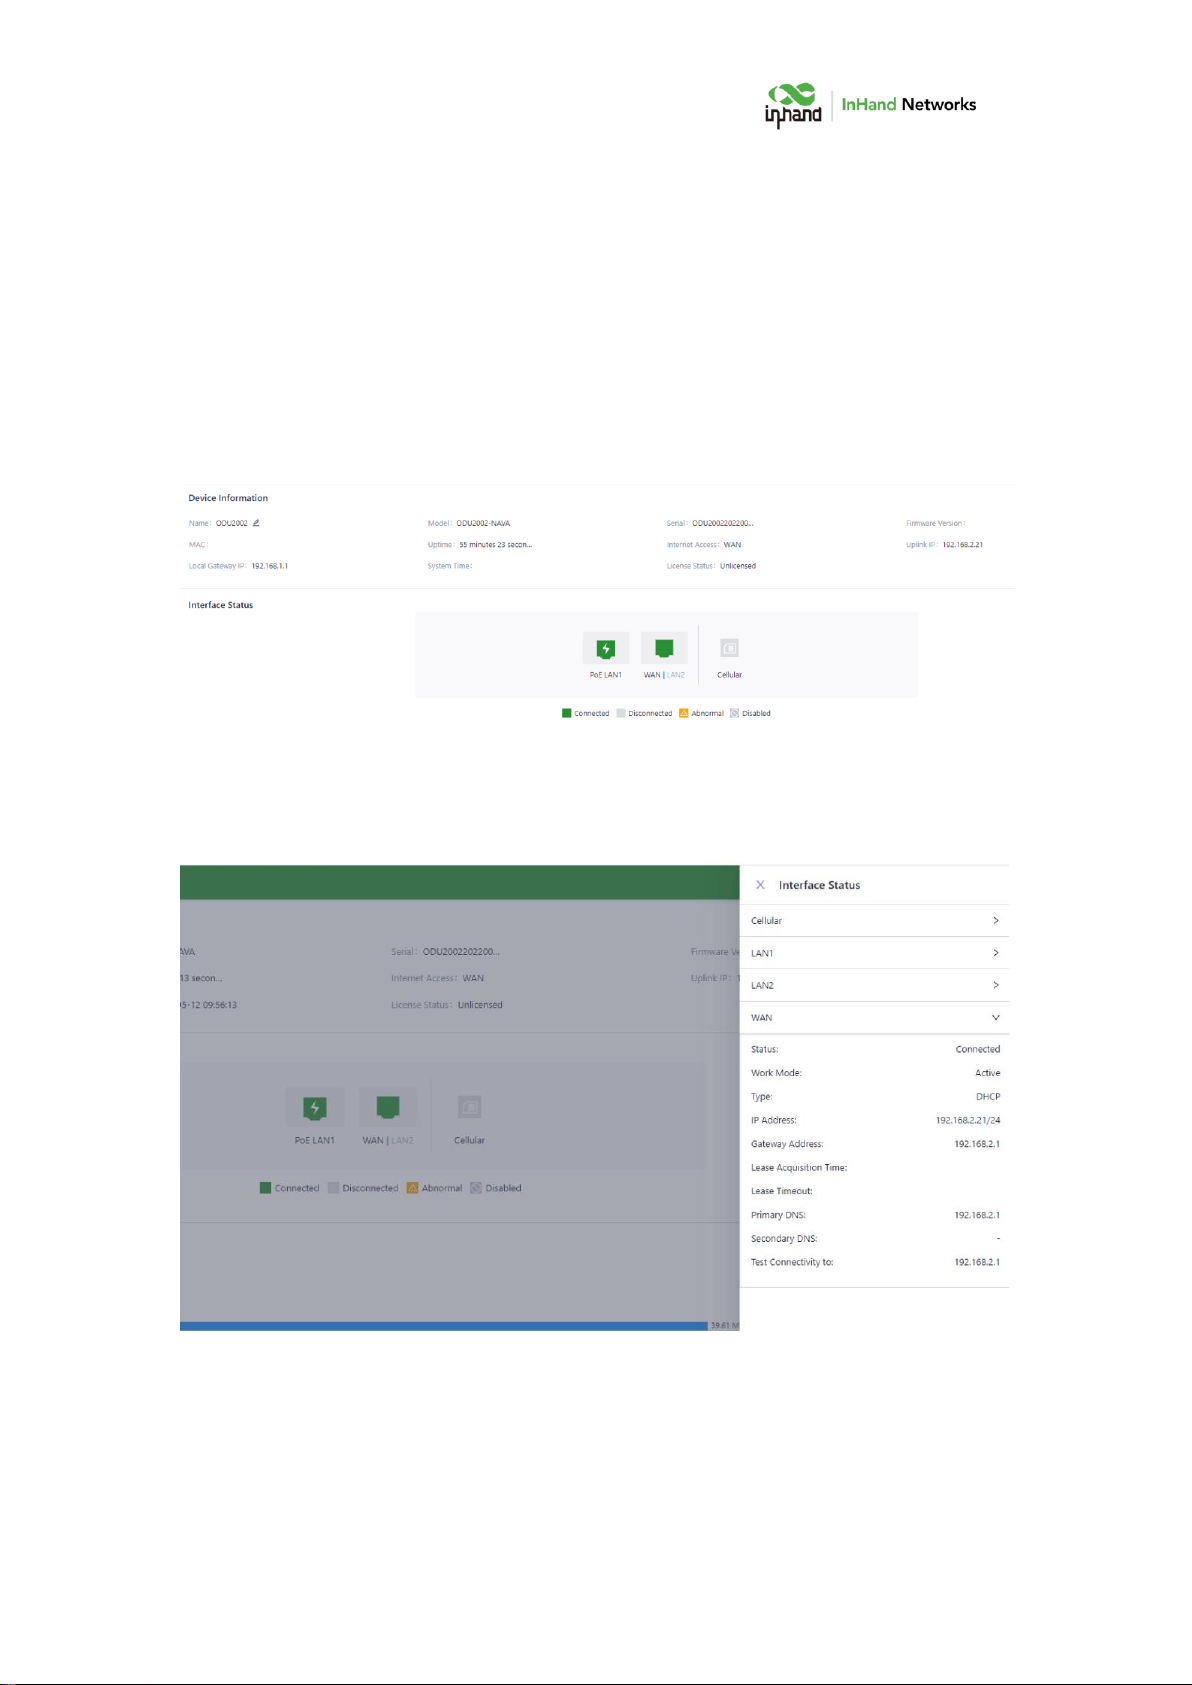
Step 4: Check the network status in the "Interface Status" in "Dashboard". The
device connects to the Internet successfully if the "Cellular" or “WAN” icon
turns green. Click corresponding icon to view interface information such as
signal strength, IP address, and traffic consumption.
Step 5: If ODU cannot connect to network, click "Internet" on the left navigation
bar, click the edit button behind the "Cellular" or “WAN” to set up network
parameters. The device enables the dial-up function and WAN by default,
please wait for a few minutes to go online, and re-enable the dial-up if it is not
dialed.
11
5Web Configuration
5.1 Dashboard
Click “Dashboard” in the left menu, and check Device Information,
Interface Status, Traffic Statistics and Wi-Fi information of the device.
Click interface icon in Interface Status, and check detailed information of
the interface in the right menu.

12
5.2 Status
Click “Status” in the left menu, check link status, signal, log and other
information of the device.
5.2.1 Link Monitor
The Link Monitor page displays the health of each uplink, as well as the
throughput, latency and packetloss rate on each uplink interface.
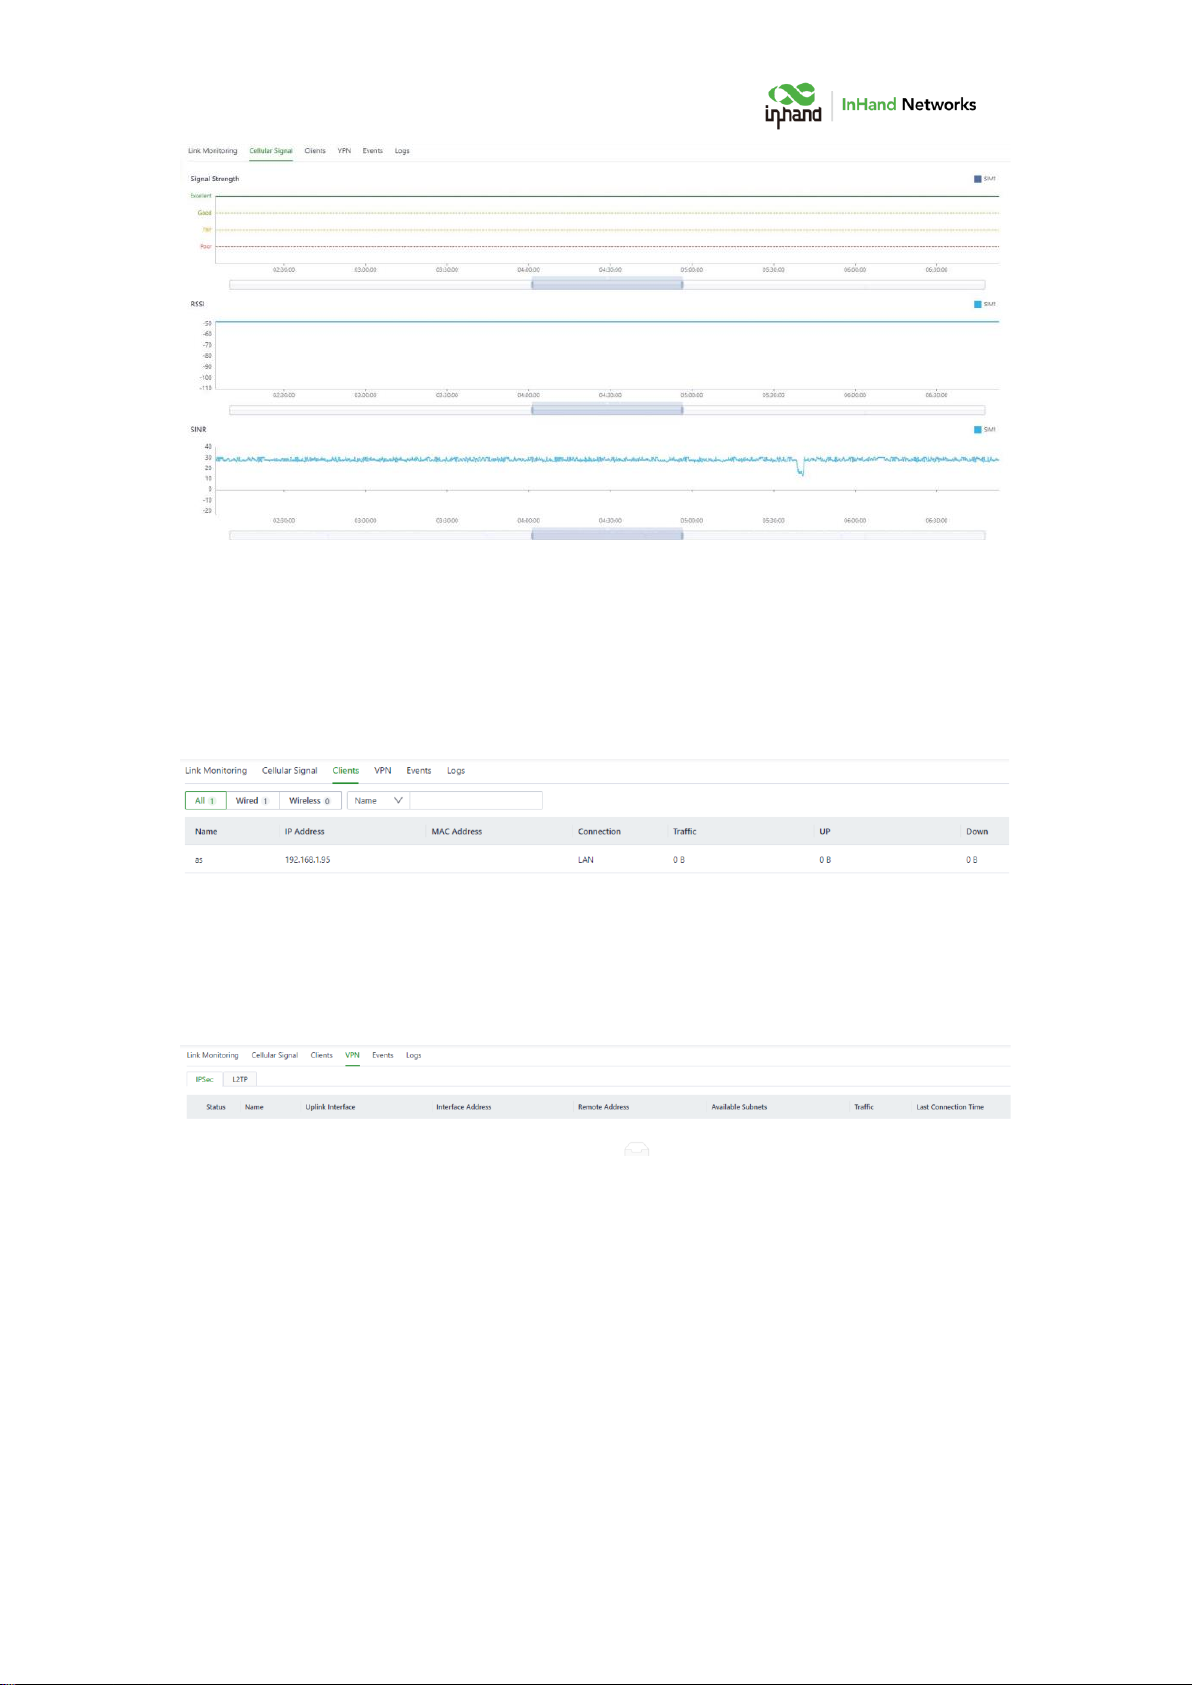
5.2.2 Cellular Signal
The Cellular Signal page displays the SIM card signal strength on the
cellular interface, as well as other parameters such as RSSI, SINR, and RSRP.
13
5.2.3 Clients
The Clients page displays details about each client connected to ODU, such
as device name, IP address, MAC address, traffic statistics, and online duration.
5.2.4 VPN
Check the status and the traffic consume of the VPN in ODU in VPN page.
5.2.5 Events
ODU will record event log like user login, configuration changed, link
changed, reboot and other events in Events page,
By selecting start data, end date and event type, narrow the scope of
retrieval and view a certain type of event.

14
5.2.6 Logs
Check the logs recorded during operation of the device, which can be used
for trouble shooting when the ODU can not work properly.
Clear Logs: clear current running logs.
Download Logs: download running logs.
Download Diagnostic Logs: download log information for trouble
shooting, it contains system running logs, device information, and device
configuration.
5.3 Internet
Click “Internet” in the left menu to check and configure the uplink
interfaces and multi-link work mode of ODU.
Please exercise caution when changing Internet settings and may cause
network interruption.
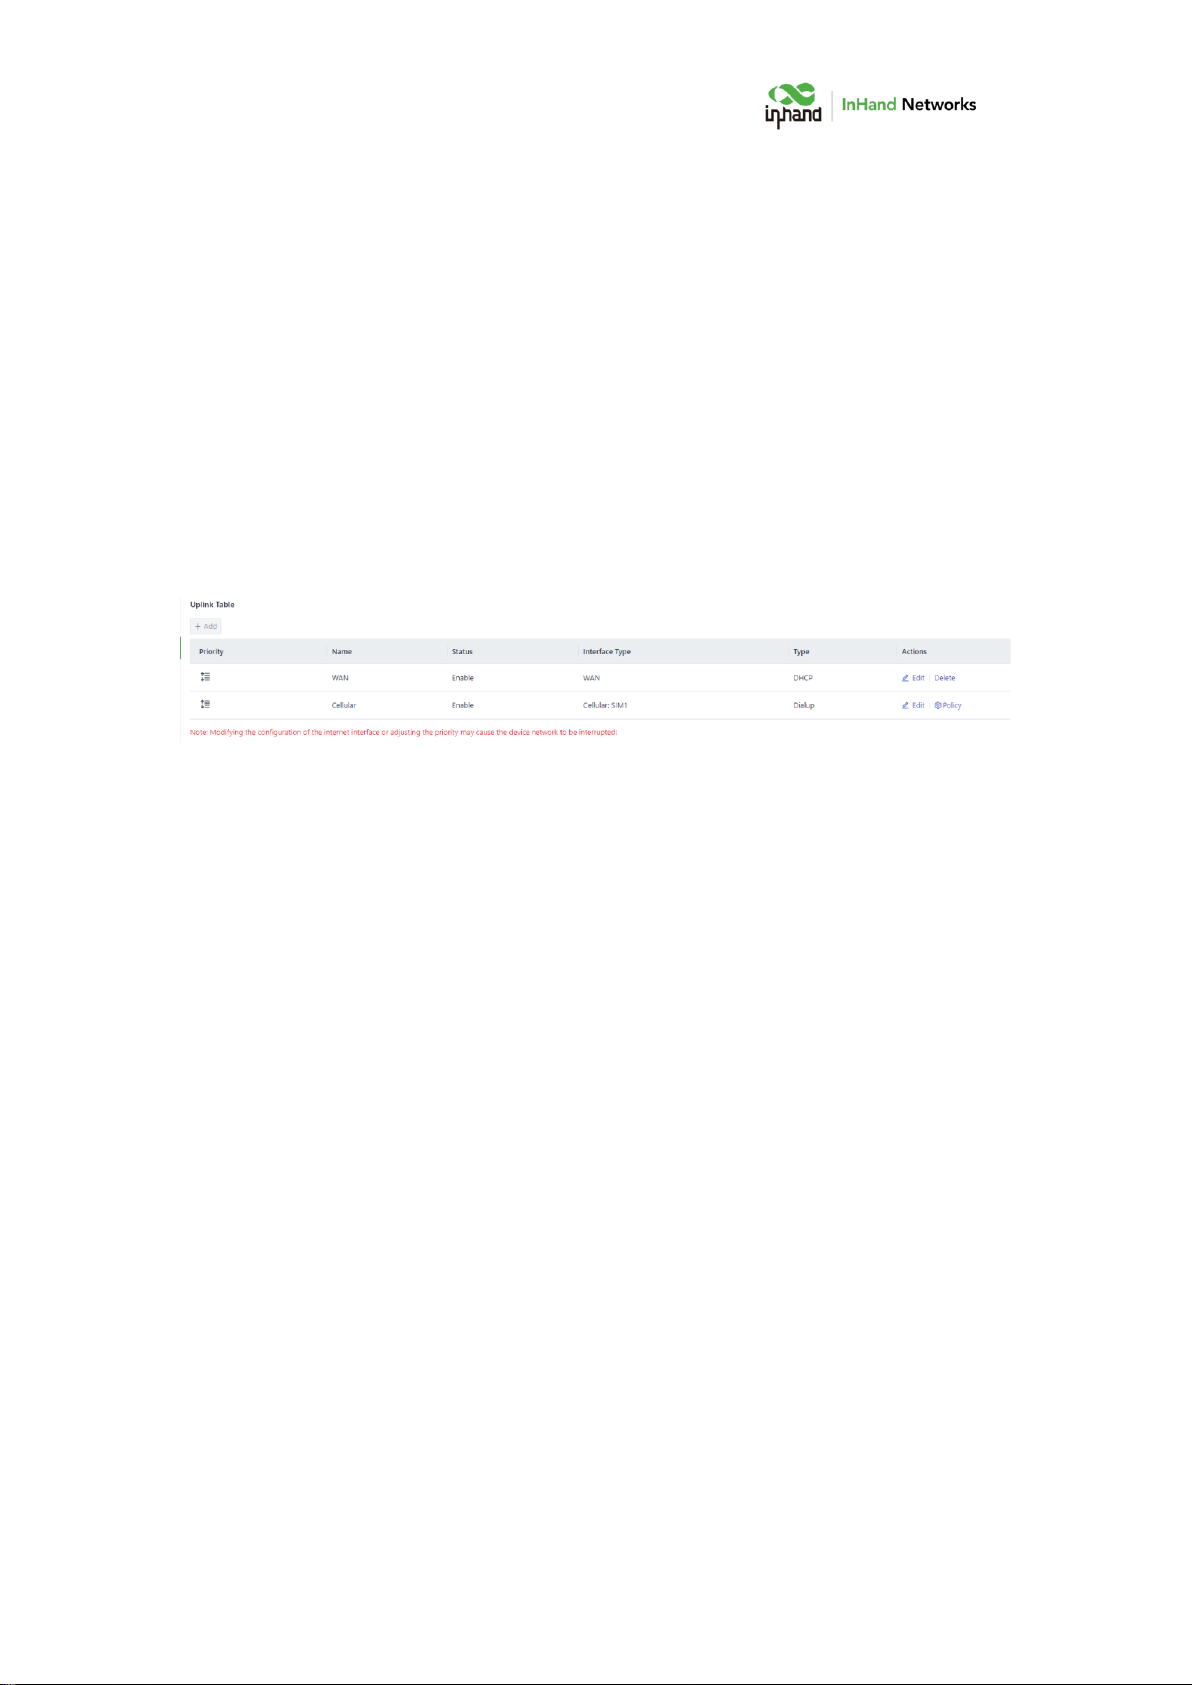
5.3.1 Uplink Table
15
Check and edit WAN and Cellular interface in Uplink Table. It supports to
edit cellular threshold policy in this page, and drag icons in the Priority column
to reprioritize the interfaces.
Notes:
If delete WAN interface in this page, WAN/LAN2 port will work as LAN.
WAN/LAN2 port will change back to WAN if add WAN interface again.
When delete WAN, all configuration on this interface like the static routes,
inbound and outbound rules, port forwarding etc. will be removed.
ODU supports three types of WAN interface:
DHCP: The DHCP service is enabled on the WAN interface by default.
Therefore, ODU can connect to the Internet immediately if connect WAN
interface to upstream network device which enables DHCP server.
Static IP: Manually assign an IP address obtained from the carrier or
upstream network device.
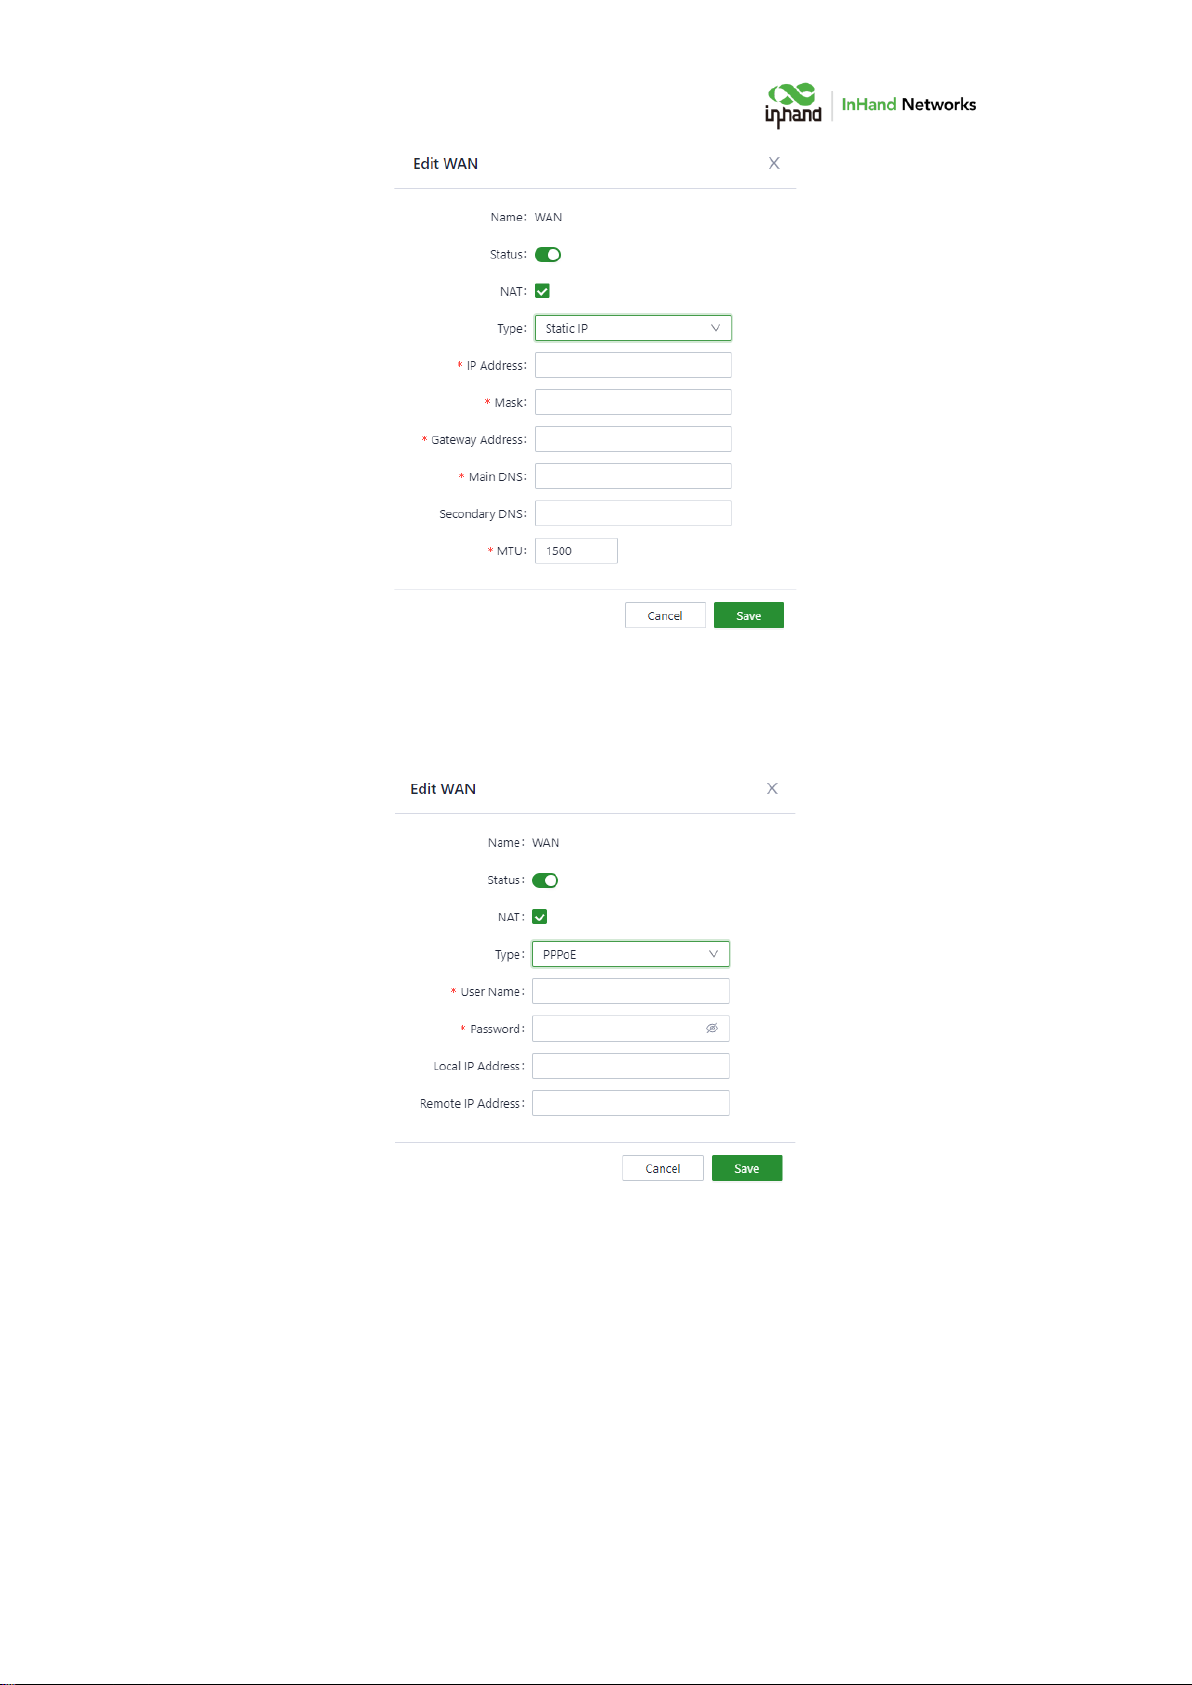
16
PPPoE: Set the PPPoE service on WAN so that ODU can dial up to the
Internet through the broadband service.
5.3.2 Uplink Setting
Configure link detection items and optimal forwarding mode for uplink
interfaces.
Table of contents
Popular Network Hardware manuals by other brands

Renkforce
Renkforce 2435414 operating instructions

Cabletron Systems
Cabletron Systems BRIM F6 BRIM-F6 user guide

Comet Labs
Comet Labs ND16000 Series user manual

Dell
Dell PowerEdge XR4000r Installation and service manual

Garland
Garland P10GSFPA user guide

Paradyne
Paradyne iMarc DSL 9720 CSU/DSU installation instructions


ADC
ADC WorldDSL UTU-702C Quick installation guide

FiberHome
FiberHome AN6000-17 Hardware description

Panasonic
Panasonic Circuit Protector Elements UNHZ203 Specification sheet

Renesas
Renesas RH850/U2A 144pin user manual

Intermec
Intermec MaxiScan 3010 installation guide

Versa Networks
Versa Networks CSG300 Series Hardware guide