Inokey system digibell BT 802 User manual
digibell
USER MANUAL
INSTRUCTIONS D’UTILISATION
BEDIENUNGSANLEITUNG
UPUTE ZA UPORABU
ISTRUZIONI PER L'USO
NAVODILA ZA UPORABO
Receiver for Remote Door Unlocking with an Integrated Doorbell
Récepteur de l'ouverture télécommandée de la porte avec sonnette intégrée
Empfänger für fernbedienteTürentriegelung mit integrierter Türklingel
Prijemnik za daljinsko otključavanje vrata s integriranim kućnim zvonom
Ricevente per apertura di porte a distanza, con il campanello di casa integrato
Sprejemnik za daljinsko odklepanje vrat z integriranim hišnim zvoncem


3
ENG
TECHNICAL DATA
• Supply voltage of the device 8–30V direct or alternating
• Consumption max. 150mA
• 2 separate relay exits
• 256-bit encrypted connection to the relay unit
• 2 remote controls with a 433MHz transmitter and a
rolling code
• A maximum of 60 remote controls
• Remote control range 10m
• Capacitive doorbell button
• Installation into a door wing
• Wireless doorbell with a range of maximum 60m
• Supply voltage of the doorbell 220V 50Hz, EU plug
integrated into the doorbell
INDEX
1. DEVICE COMPONENTS ................................................. 3
2. DESCRIPTION AND CORRECT USE OF THE DEVICE 4
3. REMOTE CONTROL AND UNLOCKING DOORS ..... 4
4. DOORBELL ........................................................................ 5
5. MAINTENANCE AND CLEANING OF THE DEVICE 5
6. MANUFACTURER’S WARRANTY ................................. 5
7. WARRANTY CERTIFICATE ............................................. 6
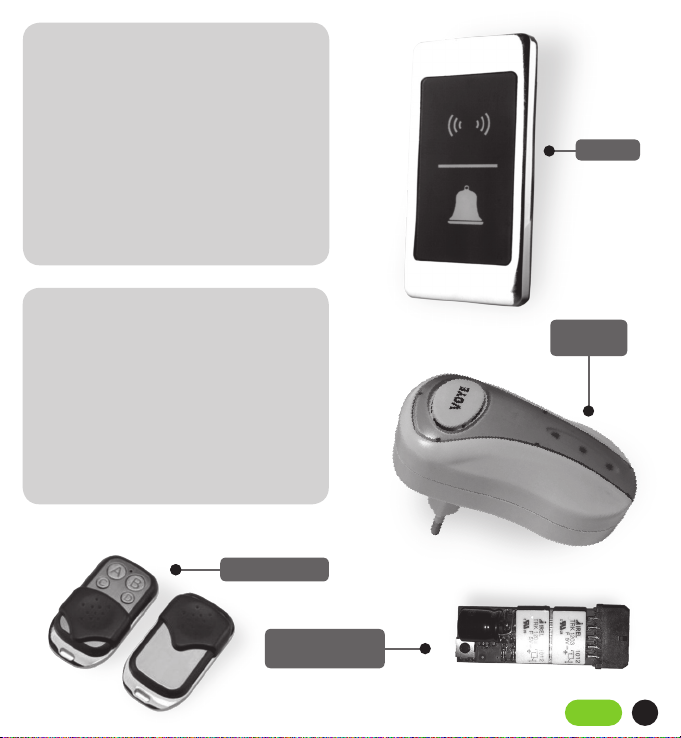
1. DEVICE COMPONENTS
Remote
control
Digibell
Relay unit with
the reset button
Wireless
dorbell

4digibell
2. DESCRIPTION AND CORRECT USE OF THE DEVICE
Digibell is an electronic device for door unlocking with the use
of a remote control, which combines a remote control receiver
and a doorbell key and a wireless doorbell.
The device is installed into a door wing with the receiving unit
with the doorbell key on the outer side of the door and the
relay unit with two relays within the door prole. A part of the
device is also a wireless doorbell, which can be plugged into
any socket (220V) in the house, and a transmitter for the do-
orbell, which is placed next to the power supply of the device
in the electric cabinet.
The device can be operated only with the original remote
controls, which can be purchased additionally from the distri-
butor of the device. The doorbell key is triggered by a gentle
press of a nger on the doorbell icon. It is not allowed to press
intensely or use objects that could damage the surface of the
device for its triggering.
The doorbell is attached to a standard 220V 50 Hz EU socket.
If the device is not energised, it will not work. The maximum
distance between the doorbell and the doorbell transmitter is
60m without obstacles.
3. REMOTE CONTROL AND UNLOCKING DOORS
The device is equipped with two remote controls. Both of
them are already paired with the device and you can unlock
doors with any of them. Both remote controls have four keys.
• Press the key A for 1s to trigger relay no 1, which is con-
nected to the electric lock in the door with the installed
Digibell. The door unlocks after 1s.
• Press the key B for 1s to trigger relay no 2. If another door or
device is connected to this relay, it will open after 1s.
• A green LED is turned on and a 1 x 1s beep is emitted.
• Press the key C or D to trigger the doorbell in the house.
The remote control’s range is 10m. The remote control is
supplied by a 12V battery, when the battery is dead, the remo-
te control stops working. When the battery is low, the range
of the remote control becomes a bit shorter or the key needs
to be pressed repeatedly for the receiver to detect the signal.
This is a sign that the battery should be replaced.
Changing the battery of the remote control:
The battery can be changed in any specialised store that sell
batteries or you can order it from the distributor of the device.
To change the battery unscrew the screws on the back side
of the remote control, open the remote control, then take the
old battery out and replace it with a new one. It is necessary
to make sure that the battery terminals (+ and -) are put to
the correct side. After that, close the remote control and screw
back the screws.
Rolling code:
The rolling code is a code, transmitted by the remote control.
When it is paired with the device, the remote control and the
transmitter exchange the key, upon which the code is chan-
ging. Every time you press any button on the remote control,
a signal containing the rolling code is transmitted, the code is
dierent every time.
If the receiver is out of range, when you press a remote control
button, the emitted signal is lost. This can happen up to 50
times. After that, the key is lost and the remote control is no
longer paired with the receiver. This is why it is necessary to
be careful not to press the remote control buttons, when
it is out of the range of the receiver!
Pairing a new remote control with the receiver:
When a new remote control needs to be paired or an existing
remote control needs to be paired again, this must be done by
following the next procedure:
• Unscrew the electric safety bolt of the door and pull out the
relay unit from the door prole.
• Press the button on the relay unit for 10s.
• After 10s the device emits a beep, after which you have 10s
time to pair the remote control. After each remote control
being paired the time is prolonged by 10s.
• Press any remote control button for 1s.
• The device emits a beep and the remote control is now
paired.
Note:
The device can be paired with up to 60 remote controls. If the
device is already paired with the maximum number of remote
controls or a remote control is lost and a new one needs to be
paired, you must erase the entire remote control base and pair

5
ENG
all existing remote controls again.The same procedure of era-
sing the entire remote control base and pairing the existing
remote controls again must be followed also in case a remote
control is lost and there is a risk that the nder of the remote
control might use it for unauthorised entering.
Erasing the remote control base:
If the remote control base needs to be erased, this must be
done by following the next procedure:
• Unscrew the electric safety bolt of the door and pull out the
relay unit from the door prole.
• Press the button on the relay unit for 30s.
• After 30s the device emits 5 beeps, after which the remote
control base is erased.
Note:
After the remote control base is erased, all existing remote
controls must be paired again.
4. DOORBELL
The device is equipped with a wireless doorbell. The doorbell
is powered by 220V alternating voltage. On the back side the
doorbell has a plug for standard EU sockets.
The maximum range of the doorbell is 60m in outdoor areas.
In indoor areas the range may be hindered by partitions, espe-
cially if they are made of reinforced concrete.
The doorbell can be connected to a 220V socket anywhere in
the house, when choosing the location of the doorbell you
need to consider the transmitter range.
Doorbell triggering:
The doorbell can be triggered in two ways.
• The rst way to trigger the doorbell is with the use of the
receiver unit key, which is installed in the outer side of the
door. The surface of the receiving unit is lit, so it is visible at
night, as well. The doorbell key is capacitive and it detects
a nger touching the plastic surface with the doorbell icon.
By pressing the doorbell icon gently you trigger the trans-
mitter and the doorbell rings.
• The second way to trigger the doorbell is with the use of
a remote control. By pressing the key B or C on the remote
control for 1s you trigger the transmitter and the doorbell
rings.
5. MAINTENANCE AND CLEANING OF THE DEVICE
The device does not require maintenance. Should the device
need cleaning, use a dry or slightly damp soft cloth. Do not
use aggressive detergents, solvents, lye or acids for cleaning.
Use of aggressive cleaning agents may damage the surface of
the device; in this case complaints are invalid.
6. MANUFACTURER’S WARRANTY
Warranty conditions:
The warranty period is 24 months from the day of hand on
of the product to the nal customer. With this statement, the
manufacturer of the product, NAVKOM d.o.o., guarantees that
in the warranty period the Inokey digibell (hereinafter: the
product) will operate faultlessly and that the materials it is
made of are faultless and undamaged. If the customer nds
a fault in the functioning of the product, they can enforce the
rights under the warranty on the seller or the manufacturer,
who shall issue a claim receipt. The manufacturer undertakes
that in the event of a justied complaint they shall eliminate
the malfunction no later than 45 days after the day of compla-
int. If the malfunction is impossible to repair, the customer will
receive a new product from the seller or the manufacturer no
later than 45 days after the day of complaint.
Notes concerning the warranty enforcement:
The customer assumes all risks and expenses incurred during
the transport of the product to the licensed seller or the licen-
sed service.
The warranty is only valid if the warranty certicate is comple-
tely lled in by Navkom d.o.o. or a licensed seller of the pro-
duct or if the circumstances of the purchase are satisfactorily
evidenced from other documents. Therefore, please ensure
that your name, the name of the seller, the serial number
of the product, the year, month and day of the purchase are
written in full in the original pro forma invoice or invoice; or
see to it that your purchase receipt showing the name of the
seller, the date of the purchase and type of product is attached
to the original warranty certicate. Navkom d.o.o. reserves the
right to refuse to provide repairs free of charge where the sub-
mitted warranty certicate is not completely lled in and the
above mentioned document (invoice, bill) is not enclosed, or
when the data on the warranty certicate are not completed
or are illegible. Keep the warranty certicate in a safe place
because we cannot issue a duplicate.
Warranty extension:
In the case that the customer enforced the warranty and the

6digibell
Serial number:
Purchase date:
Installation date:
Name of the customer:
Address of the customer:
Stamp and signature of the seller:
Inokey digibell was manufactured by:
Navkom d.o.o., Prijateljeva 24, 1000 Ljubljana, Slovenija
[email protected], www.navkom.si
Product type:
Access control device
licensed service found the complaint to be justied, the war-
ranty period is extended for the time the product was at ser-
vice. If the respective product has undergone a major service
intervention, or if the product was replaced, a new warranty is
issued to the customer for a 24 month period.
The warranty cannot be enforced in the case of:
1. Any defect caused by improper handling of the produ-
ct (e.g. the use of the product with the intentions and in a
manner not specied in the instructions for use, handling and
maintenance etc.).
2. Any defect caused during repair, adaptation, cleaning
or any other intervention in the product by any other party
except the services licensed by Navkom d.o.o.
3. Any defect caused because of transport, fall, hit etc. after
the purchase of the product.
4. Any defect caused by burning/re, earthquake, ood, li-
ghtning, other natural disasters, polluted environment and
improper voltage of the electrical supply.
5. Any defect caused by negligent handling or inappropriate
storage of the product (e.g. keeping it at high temperatures or
high humidity, in the vicinity of insecticides, e.g. naphthalene,
or medicines, poisons or chemicals which can cause damage),
inappropriate maintenance etc.
6. When the product which was sent to repair is not accompa-
nied by the warranty certicate.
7. Any changes of the warranty certicate concerning the
year, month and day of purchase, name of the customer or
seller and serial number.
8. When the warranty certicate is not accompanied by the
receipt for the item(s) purchased (invoice).
Limits of liability:
Navkom d.o.o. does not either represent or guarantee, expli-
citly or implicitly, anything on behalf of the suppliers or in
connection with the contents of written materials. It is in no
way liable to warrant the purchased material or its suitabili-
ty for certain purpose or any consequent injury, accidental
damage or immediate damage (including but not limited
to the damage or loss of business prots, the termination of
business operations and the loss of business information),
derived from the use or incapability of use of these printed
materials or device. Some countries do not allow limitations of
liability concerning consequential or accidental damage; the-
refore, it is possible that the above mentioned provision does
not apply. In the case that the customer sends the reclaimed
product via mail, it is advised to secure the consignment. The
seller and the manufacturer are not liable for damage caused
during transportation.
7
FR
LES CARACTÉRISTIQUES TECHNIQUES:
• Tension d'alimentation du dispositif 8-30 V continue ou
alternative
• Consommation maximale 150 mA
• 2 sorties de relais séparées
• Connexion encryptée avec l'unité de relais de 256-bit
• 2 télécommandes avec émetteur 433 MHz et un code
variable
• 60 télécommandes au maximum
• Portée d'une télécommande 60m
• Bouton tactile capacitif de sonnette
• Installation sur le battant de porte
• Sonnette sans l à portée maximale de 60m
• Tension d'alimentation de la sonnette 220V 50Hz, prise
UE intégrée dans la sonnette
TABLE DES MATIÈRES
1. LES PARTIES CONSTITUANTES DU DISPOSITIF ..... 7
2. LA DESCRIPTION ET L’UTILISATION CORRECTE
DU DISPOSITIF ................................................................. 8
3. LA TÉLÉCOMMANDE ET L’OUVERTURE
DE LA PORTE .................................................................... 8
4. LA SONNETTE .................................................................. 9
5. LE MAINTIEN ET LE NETTOYAGE DU DISPOSITIF 9
6. LA GARANTIE DU FABRICANT .................................... 9
7. LE CERTIFICAT DE GARANTIE ...................................... 10
1. LES PARTIES CONSTITUANTES DU DISPOSITIF
L'unité de relais avec
le bouton de reset
La sonnette
sans l
La télécommande
Digibell

8digibell
2. LA DESCRIPTION ET L‘UTILISATION CORRECTE
DU DISPOSITIF
Digibell est un dispositif électronique qui sert à ouvrir une
porte à l‘aide de la télécommande. Cette dernière contient un
récepteur des télécommandes, un bouton de sonnette et une
sonnette sans l.
Le dispositif doit être installé sur le battant de porte de façon
que l‘unité de récepteur avec le bouton de sonnette soit de face
extérieure de la porte, l‘unité de relais avec deux relais de face
intérieure. Une partie constituante du dispositif c‘est une son-
nette sans l qui doit être connectée à une prise électrique dans
la maison (220 V), l‘autre c‘est un émetteur de la sonnette qui
se trouve à côté de la source d‘alimentation du dispositif dans
le coret électrique.
Il ne faut piloter le dispositif qu‘ avec les télécommandes ori-
ginales disponibles chez le fournisseur. Le bouton de sonnette
se déclanche avec l‘appui léger sur l‘icône de la sonnette. Il est
interdit d‘appuyer fortement sur la touche ou utiliser des objets
qui pourraient endommager la surface du dispositif.
La sonnette doit être connectée à une prise électrique standard
UE à tension 220 V 50 Hz. Si la sonnette n‘est pas sous tension
électrique, elle ne marche pas. La distance maximale entre la
sonnette et l‘émetteur est de 60m sans obstacles.
3. LA TÉLÉCOMMANDE ET L‘OUVERTURE DE LA PORTE
Deux télécommandes sont jointes au dispositif. Elles sont déjà
synchronisées au dispositif et vous pouvez utiliser l‘une des
deux pour ouvrir la porte. Chaque télécommande possède
quatre touches.
• En appuyant sur la touche A pendant 1s, on déclenche le re-
lais 1 qui est connecté à la serrure électrique dans la porte où
Digibell est installé. La porte s‘ouvre après 1s.
• En appuyant sur la touche B pendant 1s, on déclenche le re-
lais 2. Si ce relais est connecté à une autre serrure ou dispositif,
il l‘ouvre après 1s.
• Une LED verte s‘allume et un son se produit 1 x 1s.
• En appuyant sur la touche C ou D la sonnette se déclenche.
La télécommande a la portée de 10m. Elle est alimentée par une
pile de 12V ; si cette dernière est vidée, la télécommande ne
marche plus. Avant le vidage complet de la pile, soit la portée de
la télécommande est un peu plus courte soit il faut appuyer sur
la touche plusieurs fois pour que le récepteur détecte le signal.
Cela avertit que la pile demande d’être remplacée.
Changer la pile de la télécommande:
Chaque magasin spécialisé de piles vous ore le changement
de la pile ou vous pouvez la commander chez le fournisseur du
dispositif. On change la pile de la façon suivante : desserrez les
vis du dessous de la télécommande. Quand elle s’ouvre, enlevez
la pile usée et inserez la neuve. Il faut faire attention à ce que
les deux pôles (+ et -) soient tournés dans le sens correct. Enn,
rassemblez la télécommande et serrez les vis.
Le code variable:
Le code variable est un code émis par la télécommande. Une
fois synchronisé avec le dispositif, la télécommande et le ré-
cepteur échangent la clé qui dénit le changement du code. À
chaque appui sur n’importe quelle touche de la télécommande
un signal est émis, celui qui inclut le code variable, chaque fois
diérent.
Si la touche de la télécommande est appuyée quand le récep-
teur n’est pas à sa portée, elle émet un signal dans le vide. Cela
peut arriver jusqu’à 50 fois. Après la clé est perdue et en consé-
quence, la télécommande n’est plus synchronisée avec le récep-
teur. Du coup, il est nécessaire de faire attention à ne pas
appuyer sur les touches de la télécommande si elle n’est pas
à la portée du récepteur !
La synchronisation d’une nouvelle télécommande
avec le récepteur:
S’il est nécessaire d’ajouter une télécommande ou synchroniser
encore une fois l’originale, il faut suivre la procédure suivante:
• Il faut dévisser le blocage électrique de la porte et enlever
l’unité de relais du prol de la porte.
• Il faut appuyer sur le bouton de l’unité de relais pendant 10s.
• Après 10s le dispositif produira des sons et alors vous avez 10
s pour synchroniser la télécommande. Chaque synchronisa-
tion vous rallonge le temps de 10s.
• Appuyez sur n’importe quelle touche de télécommande
pendant 1s.
• Le dispositif produira un son et la télécommande est syn-
chronisée.
Remarque:
Il est possible de synchroniser avec le dispositif jusqu’à 60 té-
lécommandes. Si le nombre maximal de télécommandes syn-
chronisées avec le dispositif est atteint et qu’une télécommande
est perdue ou il y a besoin d’ajouter une autre, il est nécessaire
d’eacer la base complète des télécommandes et synchroniser
les autres télécommandes encore une fois. Le même si une des
télécommandes est perdue et il y a un danger qu’un trouveur
ouvrira la porte non autorisé, il est essentiel d’eacer la base
complète des télécommandes et synchroniser les autres télé-
commandes encore une fois.

9
FR
Eacer la base complète des télécommandes:
S’il est nécessaire d’eacer la base complète des télécom-
mandes, il faut suivre la procédure suivante:
• Il faut dévisser le blocage éléctrique de la porte et enlever
l’unité de relais du prol de la porte.
• Il faut appuyer sur le bouton de l’unité de relais pendant 30s.
• Après 30s le dispositif produira des sons 5x et alors la base
complète des télécommandes est eacée.
Remarque:
Après avoir eacé la base complète de télécommandes, il faut
synchroniser toutes les télécommandes encore une fois.
4. LA SONNETTE
Une sonnette sans l est jointe au dispositif. Elle est alimentée
par la tension alternative de 220 V. Au dessous de la sonnette il y
a un boîtier pour une prise électrique standard UE.
La portée maximale de l’émetteur de sonnette est de 60m en
plein air. Dans des pièces fermées la portée peut être bloquée à
cause des cloisons, surtout faites de béton armé.
La sonnette doit être connectée à une prise électrique de 220
V dans un coin préféré dans la maison. En choisissant l’endroit, il
faut faire attention à la portée de l’émetteur.
Le déclenchement de la sonnette:
Il y a deux façons de déclencher la sonnette.
• La première façon de déclencher la sonnette est à l’aide
d’une touche dans l’unité de récepteur qui est installée sur
la face extérieure de la porte. La surface de l’unité de récep-
teur est illuminée de manière que le bouton de la sonnette
est visible aussi pendant la nuit. Le bouton de la sonnette est
tactile capacitif, alors il détecte le toucher du doigt sur la sur-
face plastique où l’icône de la sonnette se trouve. Avec l’appui
léger sur l’icône de la sonnette l’émetteur se déclenche et la
sonnette sonne.
• La seconde façon de déclencher la sonnette est à l’aide
d’une télécommande. En appuyant sur la touche B ou C de
la télécommande pendant 1s, l’émetteur se déclenche et la
sonnette sonne.
5. LE MAINTIEN ET LE NETTOYAGE DU DISPOSITIF
Le dispositif ne demande aucun maintien. Au cas où il faudrait
nettoyer lé récepteur, utilisez un chion délicat sec ou un peu
humide. Pour nettoyer il est interdit d’utiliser des détergents
agressifs, des dissolvants, des lessives ou des acides. En utili-
sant des détergents agressifs il y a un risque d’endommager la
surface du récepteur et dans ce cas la réclamation ne sera pas
acceptée.
6. GARANTIE
Conditions de garantie :
La garantie est valable pendant une période de 24 mois à
compter de la date à laquelle le produit a été remis au client -
nal. La présente déclaration du fabricant du produit, NAVKOM
d.o.o., atteste que, pendant la période de garantie, le produit
Inokey clavier(ci-après dénommé le produit) fonctionne par-
faitement, et que les matériaux à partir desquels il est fabriqué
sont sans défauts et endommagements. Si le client constate
une erreur dans le fonctionnement du produit, il a le droit de
mettre en œuvre ladite garantie auprès du vendeur ou du fab-
ricant qui délivre au client un accusé de réception concernant
la réclamation. Dans le cas d’une réclamation justiée, le fabri-
cant est tenu d’éliminer le défaut de fonctionnement dans un
délai de 45 jours minimum à compter de la date de la récla-
mation. Si le fabricant ne parvient pas à éliminer le défaut, le
client recevra un nouveau produit dans les 45 jours à compter
de la date de la réclamation.
Remarques concernant la mise en oeuvre de la garantie :
Le client assume tous les risques et les coûts survenus au cou-
rs du transport du produit jusqu’au vendeur agréé ou le cen-
tre de service agréé. La garantie est valable seulement dans
le cas où la feuille de garantie est dûment complétée par le
fabricant NAVKOM d.o.o. ou le vendeur agréé ou si d’autres
documents contiennent une preuve susante de l’achat.
Pour cette raison, nous vous prions de vous vous assurer que
la facture originale / la pro-forma originale contient votre
nom et prénom, le nom du vendeur, le numéro de série du
produit, la date complète d’achat ou vous vous assurez qu’une
facture, que vous recevez lors de l’achat contenant le nom du
vendeur, la date d’achat et le type de produit, est jointe à la
feuille de garantie originale. NAVKOM d.o.o. se réserve le droit
de refuser votre demande de réparation gratuite dans le cas
où la feuille de garantie n’est pas dûment complétée et si le
document susmentionné (facture, pro forma) n’est pas joint
à la garantie ou dans le cas où les coordonnées de la feuille
de garantie sont incomplètes ou illisibles. Veuillez garder la
feuille de garantie dans un endroit sûr, parce qu’un duplicata
vous ne fût pas émis !
Extension de garantie :
Dans le cas où le client a mis en oeuvre la garantie du produit
et que le centres de service agréé a conclu que la réclamation
est justiée, la période de garantie s’extend correspondant au
nombre des jours pendant lesquels le produit est en mainte-
nance. Si une plus grande intervention est faite sur le produit
défectueux sous la garantie ou s’il est remplacé par un nouve-
au produit, cela déclanche une nouvelle période de garantie
de 24 mois qui est fourni au client.

10 digibell
Numéro de série :
Date d’achat :
Date d’installation :
Nom et prénom du client :
Adresse du client :
Cachet et signature du vendeur :
Inokey digibell a été produit par la société :
Navkom d.o.o., Prijateljeva 24, 1000 Ljubljana, Slovenija
[email protected], www.navkom.si
Type du produit :
Le dispositif électronique pour ouvrir la porte
La garantie ne peut pas être exercée au cas où :
1.Tout défaut résultant d’un traitement inapproprié du pro-
duit (par exemple, une utilisation du produit pour des ns et
d’une manière non spéciées dans les instructions d’utilisati-
on, la manipulation et la maintenance, etc.).
2. Tout endommagement résultant d’une réparation, mo-
dication, nettoyage ou tout autre intervention du produit
par toute autre personne que le centre de service agréé par
NAVKOM d.o.o.
3. Tout endommagement résultant du transport, chute, choc,
etc. survenus après l’achat.
4. Tout endommagement causés par le feu / incendie, trem-
blement de terre, inondation, foudre, d’autres catastrophes
naturelles, pollution de l’environnement et alimentation
électrique inapproprié.
5. Tout endommagement résultant d’un traitement négligent
ou d’une conservation / stockage non-conforme du produit
(tel que le stockage à une haute température et à l’humidité,
à proximité d’insecticides tels que la naphtaline ou à proximité
des produits pharmaceutiques, toxines et produits chimiques
qui peuvent causer le dégat), d’un mauvais entretien, etc.
6. Si le produit transmis à un centre de service n’est pas
accompagné de feuille de garantie.
7. Toute modication de la feuille de garantie concernant
l’année, le mois et le jour d’achat, le nom du client ou le nom
du vendeur et le numéro de série.
8. Si ladite garantie n’est pas accompagnée d’une preuve
d’achat (facture).
Limitation de responsabilité :
NAVKOM d.o.o. n’est pas le représentant ni ne donne aucune
garantie expresse ou implicite au nom des fournisseurs ou en
matière du contenu des documents écrits, et dans aucun cas
n’est tenu de garantir le matériel acheté ou la convenance de
celui-ci utilisé pour des ns particulières ou tout endommage-
ment conséquent, accidentel ou direct (y compris, mais sans
s’y limiter, les dommages ou perte de prot, perte d’aaires,
arrêt du business, perte de données d’aaires) qui pourraient
résulter de l’utilisation ou de l’impossibilité d’utiliser ces im-
primés ou des dispositifs.
Certains états n’autorisent pas la limitation de responsabili-
té en matière des dommages encourus en conséquence ou
accidentellement, c’est pourquoi il est possible que la pro-
vision susmentionnée ne s’applique pas à vous. Dans le cas
de réclamation où le client transmit le produit par la poste,
il est recommandé de faire assurer l’envoi. Le vendeur ni le
fabricant ne seront responsables pour des dommages subis
pendant le transport.

11
DE
Digibell
Funkklingel
TECHNISHE DATEN
• Speisespannung des Geräts 8–30 V Gleich- oder
Wechselspannung
• Verbrauch maximal 150 mA
• 2 unterschiedliche Relais-Ausgänge
• 256-bit verschlüsselte Verbindung mit Relais-Einheit
• 2 Fernbedienungen mit 433 MHz Funksender mit
Rolling Code
• Bis zum 60 Fernbedienungen
• Reichweite der Fernbedienung 10 m
• Kapazitive Klingeltaste
• Einbau in den Türügel
• Funkklingel mit Reichweite von bis zum 60 m
• Speisespannung der Türklingel 220 V 50 Hz, EU-Stecker
eingebaut in die Türklingel
INHALTSVERZEICHNIS
1. BESTANDTEILE DES GERÄTS ........................................ 11
2. BESCHREIBUNG UND ZWECKSGEMÄSSE
VERWENDUNG DES GERÄTS ....................................... 12
3. FERNBEDIENUNG UND TÜRENTRIEGELUNG ......... 12
4. TÜRKLINGEL ..................................................................... 13
5. WARTUNG UND PFLEGE DES GERÄTS ..................... 13
6. GARANTIE .......................................................................... 13
7. GARANTIEBLATT ............................................................. 14
1. BESTANDTEILE DES GERÄTS
Fernbedienung
Relais-Einheit mit
dem Reset-Knopf

12 digibell
2. BESCHREIBUNG UND ZWECKSGEMÄSSE
VERWENDUNG DES GERÄTS
Digibell ist ein elektronisches Gerät für Türentriegelung per
Fernbedienung, in dem ein Fernbedienungsempfänger, eine
Klingeltaste und eine Funkklingel vereint werden.
Das Gerät wird in den Türügel eingebaut, mit der Empfän-
gereinheit mit der Klingeltaste an die Außenseite und der Re-
lais-Einheit mit 2 Relais in das Türprol. Ein Bestandteil des Ge-
räts ist auch eine Funkklingel, die an jede Steckdose (220 V) im
Haus angeschlossen werden kann, und ein Funksender für die
Türklingel, der sich neben dem Netzteil des Geräts im Elektrik-
kasten bendet.
Das Gerät kann man nur mit Originalfernbedienungen, die man
beim Verteiler des Geräts auch zukaufen kann, betätigen. Die
Klingeltaste wird durch sanfte Berührung des Klingel-Pikto-
gramms mit dem Finger ausgelöst. Es ist verboten die Fläche
heftig zu drücken oder für die Auslösung Gegenstände zu be-
nutzen, die die Fläche des Geräts beschädigen könnten.
Die Türklingel wird an eine normale EU-Steckdose mit der Span-
nung von 220 V 50 Hz angeschlossen. Wenn die Türklingel nicht
unter Spannung ist, wird sie nicht funktionieren. Die maximale
Entfernung zwischen der Türklingel und dem Funksender der
Türklingel soll 60 m ohne Hindernisse betragen.
3. FERNBEDIENUNG UND TÜRENTRIEGELUNG
Dem Gerät werden zwei Fernbedienungen beigelegt. Beide sind
schon mit dem Gerät gepaart und Sie können mit jeder von bei-
den die Tür entriegeln. Jede von beiden Fernbedienungen hat
vier Tasten.
• Mit einem Druck auf die Taste A wird Relais 1 ausgelöst, mit
dem das elektrische Schloss der Tür, in die Digibell eingebaut
ist, verbunden ist. Nach 1 s wird die Tür entriegelt.
• Mit einem Druck auf die Taste B wird Relais 2 ausgelöst. Wenn
mit diesem Relais ein anderes Schloss oder Gerät verbunden
ist, wird dieses nach 1 s ausgelöst.
• Das grüne LED beginnt zu leuchten und ein akustischer Sig-
nal 1 x 1 s wird ausgelöst.
• Mit einem Druck auf die Tasten C oder D wird die Türklingel
im Haus ausgelöst.
Die Reichweite der Fernbedienung beträgt 10 m. Die Fernbe-
dienung wird mit einer 12 V Batterie versorgt, falls diese leer ist,
funktioniert die Fernbedienung nicht mehr. Bevor die Batterie
völlig leer wird, wird die Reichweite der Fernbedienung etwas
geringer oder man muss die Taste mehrmals drücken, sodass
der Empfänger das Signal auängt. Das ist ein Zeichen dafür,
dass die Batterie gewechselt sein soll.
Batteriewechsel bei der Fernbedienung:
Das Batteriewechsel kann in jedem Spezialgeschäft, wo auch
Batterien verkauft werden, für Sie erledigt werden, oder Sie be-
stellen die neue Batterie bei dem Verteiler des Geräts. Um das
Batteriewechsel muss man die Schrauben an der Rückseite der
Fernbedienung abschrauben, die Fernbedienung önen, dann
wird die alte Batterie herausgenommen und mit der neuen
ersetzt. Dabei muss man darauf Acht geben, dass die positive
und negative Polarität der Batterie richtig angebracht werden.
Letztendlich wird die Fernbedienung wieder geschlossen und
die Schrauben wieder angeschraubt.
Rolling Code:
Rolling Code ist die Art von Verschlüsselung, die die Fernbedie-
nung absendet. Wenn sie mit dem Gerät gepaart wird, tauscht
die Fernbedienung mit dem Empfänger den Schlüssel aus, nach
dem sich dieser Kode dann ändert. Mit jedem Druck auf beliebi-
gen Knopf der Fernbedienung wird ein Signal gesandt, der auch
den Rolling Code enthält, dieses ist jedes Mal anders.
Wenn ein Knopf der Fernbedienung gedrückt wird, als der
Empfänger außer Reichweite liegt, sendet dieser sein Signal ins
Leere. Das darf nur bis zum 50-mal passieren. Nachdem geht
der Schlüssel verloren und die Fernbedienung ist nicht mehr
mit dem Empfänger gepaart. Deswegen muss man darauf
Acht geben, dass nicht auf die Knöpfe der Fernbedienung
gedrückt wird, wenn sich diese außer Reichweite des Emp-
fängers bendet!
Paarung einer neuen Fernbedienung mit dem Empfänger:
Wenn eine neue Fernbedienung gepaart werden muss oder
eine bestehende Fernbedienung erneut gepaart werden muss,
soll dabei Folgendes berücksichtigt werden:
• Der elektrische Sicherheitsbolzen der Tür muss abgeschraubt
und die Relais-Einheit aus dem Türprol herausgenommen
werden.
• Den Knopf an der Relais-Einheit 10 s lang drücken.
• Nach 10 s gibt das Gerät akustische Signale ab und danach
haben Sie 10 s Zeit, um die Fernbedienung zu paaren. Nach
jeder gepaarten Fernbedienung verlängert sich die Zeit um
10 s.
• Drücken Sie auf einen beliebigen Knopf der Fernbedienung
für 1 s.
• Das Gerät gibt ein akustisches Signal ab und die Fernbedie-
nung ist damit gepaart.
Anmerkung:
Es können bis zum 60 Fernbedienungen mit dem Gerät gepaart
werden. Falls schon die maximale Anzahl der Fernbedienungen
gepaart wurde und eine von den Fernbedienungen verloren

13
DE
geht und muss somit eine neue zugefügt werden, muss die
gesamte Fernbedienung-Basis gelöscht werden und alle beste-
hende Fernbedienungen müssen erneut mit dem Gerät gepaart
werden. Auch falls eine von den Fernbedienungen verloren
geht und es besteht Gefahr, dass der Finder die Fernbedienung
für nicht berechtigten Zutritt benutzen könnte, muss die gesam-
te Fernbedienung-Basis gelöscht werden und alle bestehende
Fernbedienungen müssen erneut mit dem Gerät gepaart wer-
den.
Fernbedienung-Basis löschen:
Falls die Fernbedienung-Basis gelöscht werden muss, soll dabei
Folgendes berücksichtigt werden:
• Der elektrische Sicherheitsbolzen der Tür muss abgeschraubt
und die Relais-Einheit aus dem Türprol herausgenommen
werden.
• Den Knopf an der Relais-Einheit 30 s lang drücken.
• Nach 30 s gibt das Gerät 5 akustische Signale ab und die Fern-
bedienung-Basis wird gelöscht.
Anmerkung:
Nachdem die gesamte Fernbedienung-Basis gelöscht wird,
müssen alle bestehende Fernbedienungen erneut mit dem Ge-
rät gepaart werden.
4.TÜRKLINGEL
Dem Gerät wird eine Türklingel beigelegt. Die Türklingel wird
mit Wechselspannung 220 V versorgt. An der Rückseite der
Türklingel bendet sich ein Stecker für normale EU-Steckdosen.
Die Reichweite der Türklingel beträgt bis zum 60 m in Freiä-
chen. In Innenräumen kann die Reichweite durch Wände ge-
stört werden, besonders wenn die Wände aus armierten Beton
bestehen.
Die Türklingel kann an eine beliebige 220 V Steckdose im Haus
angeschlossen werden, bei der Auswahl der Anbringung der
Türklingel muss die Reichweite des Funksenders berücksichtigt
werden.
Auslösung der Türklingel:
Es gibt zwei Möglichkeiten um die Türklingel auszulösen.
• Die erste Möglichkeit um die Türklingel auszulösen ist durch
die Taste an der Empfängereinheit, die an der Außenseite der
Tür eingebaut ist. Die Fläche der Empfängereinheit ist be-
leuchtet, sodass die Türklingel auch nachts sichtbar ist. Die
Klingeltaste is kapazitiv und erkennt den Druck des Fingers
an der plastischen Fläche, wo sich das Türklingel-Piktogramm
bendet. Mit einem sanftem Druck des Fingers auf das Tür-
klingel-Piktogramm wird der Funksender ausgelöst und die
Türklingel klingelt.
• Die zweite Möglichkeit um die Türklingel auszulösen ist
durch die Fernbedienung. Mit einem Druck auf die Tasten B
oder C der Fernbedienung für 1 s wird der Funksender ausge-
löst und die Türklingel klingelt.
5. WARTUNG UND PFLEGE DES GERÄTS
Keine Gerätewartung ist erforderlich. Wenn das Gerät gerei-
nigt werden muss, soll ein trockenes oder leicht befeuchtetes
Tuch verwendet werden. Keine aggressiven Reinigungsmittel,
Lösungsmittel, Laugen oder Säuren sollen verwendet werden.
Die aggressiven Reinigungsmittel können die Gerätoberäche
beschädigen und damit wird die Garantie ungültig.
6. GARANTIE
Garantiebedingungen:
Die Garantiezeit ist 24 Monate ab dem Tag, auf dem das Produkt
dem Letztkunden übergeben wird. Der Hersteller des Produkts,
NAVKOM d. o. o. garantiert mit dieser Erklärung, dass das Produkt
“INOKEY digibell“ (weiter das Produkt genannt) während der Ga-
rantiezeit tadellos funktionieren wird, dass das Material, aus dem
das Gerät gemacht wird, ohne Fehler und Schäden ist. Wenn vom
Kunden eine Betriebsstörung des Geräts festgestellt
wird, können die Rechte aus der Garantie beim Verkäufer oder Her-
steller geltend gemacht werden. Der Verkäufer bzw. der Hersteller
stellt Bestätigung der Reklamation aus.
Der Hersteller verpichtet sich dazu, die Betriebsstörung, falls die
Reklamation berechtigt ist, in spätestens 45 Tagen abzuschaen.
Wenn die Abhebung der Betriebsstörung nicht möglich ist, be-
kommt der Kunde vom Hersteller bzw. Verkäufer ein neues Produkt
in spätestens 45 Tagen ab dem Tag, auf dem die Garantie geltend
gemacht wurde.
Anmerkungen beim Geltendmachen der Garantie:
Der Kunde übernimmt die Haftung für das Risiko und die Kosten,
die beim Transport des Produkts bis zum autorisierten Verkäufer
oder oder zum autorisierten Service entstehen.
Die Garantie ist nur dann gültig, wenn das Garantie-Formular im
Ganzen von NAVKOM d. o. o. oder vom autorisierten Verkäufer
ausgefüllt wird bzw. wenn die Verkaufsumstände aus anderen Do-
kumenten evident sind. Deswegen bitten wir Sie darauf zu achten,
dass in der originalen Proformarechnung/Faktur, die folgenden
Angaben stehen: Ihr Name, Verkäufername, die Seriennummer des
Produkts, das Jahr, der Monat und der Tag des Einkaufs bzw. sorgen
Sie dafür, dass die Rechnung, die sie beim Einkauf erhalten, dem
Garantie-Formular hinzugefügt wird, auf dem der Verkäufername,
das Datum des Einkaufs und die Produktart stehen. NAVKOM d. o.
o. hält sich das Recht, die kostenlose Reparierung zurückzuweisen,
weder das ausgefüllte Garantie-Formular vorliegt noch ist das oben
genannte Dokument (Faktur, Rechnung) dem Garantie-Formular
hinzugefügt bzw. wenn die Angaben auf dem Garantie-Formular
unvollständig oder unleserlich sind. Das Garantie-Formular soll auf-

14 digibell
Seriennummer:
Einkaufsdatum:
Einbaudatum:
Kundenname:
Kundenadresse:
Stempel und Unterschrift des Verkäufers:
INOKEY digibell hergestellt von:
Navkom d.o.o., Prijateljeva 24, 1000 Ljubljana, Slovenija
[email protected], www.navkom.si
Produktart:
Elektronische Zugangskontrolle
bewahrt werden, die Zweitschrift lässt sich nicht machen!
Garantieverlängerung
Wenn der Kunde die Garantie geltend macht und wenn das auto-
risierte Service feststellt, die Reklamation ist berechtigt, dann ver-
längert sich die Garantiezeit für so lange, als das Produkt im Service
war. Wenn vom Service größere Schäden abgeschat werden muss-
ten, oder wenn das reklamierte Produkt mit einem neuen ersetzt
wurde, wird dem Kunden eine neue Garantie mit der Garantiezeit
von 24 Monaten ausgestellt.
Erlöschung der Garantie
Bei Schäden, die durch eine falsche Handhabung des Geräts ver-
ursacht werden (z. B. durch Nichtbeachtung der Bedienungsanlei-
tungen und durch Nichtbeachtung der Handhabung und Geräte-
pege, die in dieser Bedienungsanleitungen beschrieben werden
usw.). Bei Schäden, die durch Reparieren, Anpassungen, Reinigung
oder durch andere Eingrie ins Gerät, die von einer anderen Person
und nicht NAVKOM d. o. o. autorisierten Service verursacht werden.
Bei Schäden, die durch Transport, durch Fall, Stöße und Schläge des
Geräts nach dem Einkauf verursacht werden. Bei Schäden, die durch
Feuer, Erdbeben, Überschwemmung, Blitzeinschlag oder durch an-
dere Naturkatastrophen, Umweltverschmutzung und durch unan-
gemessene elektrische Spannung verursacht werden. Bei Schäden,
die durch nachlässige Handhabung oder durch unangemessene
Aufbewahrung/Lagerung des Geräts (z. B. Aufbewahrung beim
hohen Temperatur und bei der Feuchtigkeit, Aufbewahrung in der
Nähe von Insektiziden, wie z. B. Naphthalin oder in der Nähe von
Medikamenten, Giften oder Chemikalien, die die Schäden verursa-
chen können), durch unangemessene Gerätepege usw. verursacht
werden. Wenn für das Gerät, das zum Service geschickt wird, kein
Garantie-Formular vorgelegt wird. Wenn das Garantie-Formular
(Jahr, Monat und Tag des Einkaufs, Kunden- oder Verkäufername,
Seriennummer) verändert wurde. Wenn dem Garantie-Formular
kein Beleg über den Einkaufs des Geräts (Rechnung) beigelegt wird.
Haftungsbegrenzung:
NAVKOM d. o. o. vertritt nicht oder nimmt keine explizite oder impli-
zite Haftung im Name des Lieferbetriebs oder im Bezug auf Schrift-
material und nimmt in keinen Fall Haftung für das gekaufte Mate-
rial bzw. für die Angemessenheit des Materials für eine bestimmte
Absicht oder für irgendwelche zufällige Schäden, direkte Schäden
oder Folgeschäden (samt, aber nicht begrenzt mit den Protschä-
den oder mit dem Protverlust, der Geschäftsunterbrechung und
mit der Verlust von Geschäftinformationen), die aus der Verwen-
dung bzw. aus der Unfähigkeit der Verwendung dieser Schrift-
materialien oder dieses Geräts ausgehen würden. Einige Staaten
erlauben keine Haftungsbegrenzug im Bezug auf Folgeschäden
oder auf die zufällig entstandenen Schäden, deswegen ist es durch
aus möglich, dass die oben genannte Bestimmung sich nicht auf Sie
bezieht. Wenn der Kunde im Falle der Reklamation das Produkt per
Post schickt, ist es empfehlenswert, die Sendung angemessen zu
schützen. Der Verkäufer und der Hersteller nehmen keine Haftung
für die Schäden, die während des Transports entstehen.

15
HR
Remote
controll
Digibell
Bežično
zvono
TEHNIČKI PODACI
• Napon napajanja uređaja 8–30 V, istosmjerni ili
izmjenični
• Potrošnja maksimalno 150 mA
• 2 odvojena relejna izlaza
• 256-bitna enkriptirana veza s relejnom jedinicom
• 2 daljinska upravljača s odašiljačem od 433 MHz i
promjenjivim kodom
• Maksimalno 60 daljinskih upravljača
• Domet daljinskog upravljača 10 m
• Kapacitivna tipka za zvono
• Ugradnja u vratno krilo
• Bežično zvono s maksimalnim dometom od 60 m
• Napon napajanja zvona 220 V 50 Hz, dio zvona je i EU
utikač
SADRŽAJ
1. SASTAVNI DIJELOVI UREĐAJA .................................... 15
2. OPIS I PRAVILA UPORABE UREĐAJA ........................ 16
3. DALJINSKI UPRAVLJAČ I OTKLJUČAVANJE VRATA 16
4. ZVONO ............................................................................... 17
5. ODRŽAVANJE I ČIŠĆENJE UREĐAJA ......................... 17
6. JAMSTVO PROIZVOĐAČA ........................................... 17
7. JAMSTVENI LIST .............................................................. 18
1. SASTAVNI DIJELOVI UREĐAJA
Daljinski
upravljač
Relejna jedinica s
gumbom za uklanjanje
promjena (reset)

16 digibell
2. OPIS I PRAVILA UPORABE UREĐAJA
Digibell je elektronički uređaj za otključavanje vrata s pomoću
daljinskog upravljača koji spaja prijemnik daljinskih upravljača
i tipku za zvono te bežično kućno zvono.
Uređaj se ugrađuje u vratno krilo na način da je na vanjskoj
strani vrata prijemna jedinica s tipkom za zvono, a u unutra-
šnjosti prola vrata relejna jedinica s dvama relejima. Sastavni
dio naprave je i bežično kućno zvono koje se može uključiti u
bilo koju utičnicu (220 V) u kući te odašiljač za zvono, koji se
nalazi pored napajanja uređaja u elektroormariću.
Uređajem se može upravljati samo originalnim daljinskim
upravljačima koji se mogu dokupiti od dobavljača uređaja.
Tipku za zvono aktivira se laganim pritiskom prsta na ikonicu
zvona. Površinu uređaja ne smije se jako pritiskati ili za aktiva-
ciju koristiti predmete koji bi je mogli oštetiti.
Zvono se uključuje u standardnu EU utičnicu napona 220 V
50 Hz. Ako zvono nije pod naponom, neće raditi. Maksimalna
moguća udaljenost između zvona i odašiljača zvona je 60 m
bez prepreka.
3. DALJINSKI UPRAVLJAČ I OTKLJUČAVANJE VRATA
Uređaju su priložena dva daljinska upravljača. Oba su
upravljača već uparena s uređajem i bilo kojim od njih možete
otključavati vrata. Svaki daljinski upravljač ima četiri tipke.
• Pritiskom na tipku A na 1 s aktivirate relej br. 1, na koji je
vezana električna brava u vratima u koja je ugrađen Digibell.
Nakon 1 s vrata se otključaju.
• Pritiskom na tipku B na 1 s aktivirate relej br. 2. Ako je na
taj relej vezana druga brava ili uređaj, ona će se aktivirati
nakon 1 s.
• Upali se zeleno LED svjetlo i začuje se zvučni signal 1 x 1 s.
• Pritiskom na tipku C ili D aktivira se zvono u kući.
Daljinski upravljač ima domet 10 m. Daljinski upravljač napaja
baterija od 12 V i nakon što se ona isprazni, daljinski upravljač
više ne radi. Prije nego što se baterija isprazni, daljinskom je
upravljaču malo skraćen domet ili je tipku potrebno više puta
pritisnuti kako bi prijemnik prihvatio signal. To je znak da ba-
teriju treba zamijeniti.
Mijenjanje baterije u daljinskom upravljaču:
Baterije možete zamijeniti u svakoj specijaliziranoj trgovini
baterijama, a možete je naručiti i kod dobavljača uređaja. Ba-
terija se zamijeni na način da se odviju vijci na zadnjoj strani
upravljača, daljinski se upravljač otvori, ukloni se stara baterija
i umetne nova. Pri tome treba paziti da su polovi baterije (+ i
-) pravilno okrenuti. Na kraju se daljinski upravljač ponovno
sastavi i priviju se vijci.
Promjenjiv kod:
Promjenjiv kod je kod koji emitira daljinski upravljač. Nakon
što je daljinski upravljač uparen s uređajem, daljinski upravljač
i prijemnik razmijene ključ prema kojem se taj kod mijenja.
Svakim pritiskom na bilo koji gumb daljinskog upravljača
odaje se signal koji uključuje i promjenjivi kod koji je svaki put
drugačiji.
Ako se gumb daljinskog upravljača pritisne dok prijemnik nije
u dometu, signal se šalje u prazno. To se može dogoditi do 50
puta. Nakon toga ključ se izgubi i daljinski upravljač više nije
uparen s prijemnikom. Znači da treba paziti da se na daljin-
skom upravljaču ne pritišću gumbi dok on nije u dometu
prijemnika!
Uparivanje novog daljinskog upravljača s prijemnikom:
Kada je potrebno dodati novi daljinski upravljač ili ponovno
upariti postojeći, to se čini na sljedeći način:
• Potrebno je odviti električni poklopac vrata i iz prola vrata
izvući relejsku jedinicu.
• Gumb na relejskoj jedinici treba pritisnuti na 10 s.
• Nakon 10 s uređaj emitira zvučni signal i nakon toga imate
10 s da uparite daljinski upravljač. Nakon svakog uparenog
daljinskog upravljača vrijeme se produži za 10 s.
• Na daljinskom upravljaču pritisnete bilo koji gumb na 1 s.
• Uređaj emitira zvučni signal i daljinski je upravljač uparen.
Napomena:
S uređajem se može upariti do 60 daljinskih upravljača. Ako je
uređaj već uparen s maksimalnim brojem daljinskih upravlja-
ča, i ako se koji od daljinskih upravljača izgubi, te treba dodati
novi, potrebno je izbrisati cjelokupnu bazu daljinskih upravlja-
ča te ponovno upariti sve postojeće daljinske upravljače.

17
HR
Isto tako, ako se koji od daljinskih upravljača izgubi i postoji
opasnost da će pronalazač daljinskog upravljača neovlašteno
otključavati vrata, potrebno je izbrisati cjelokupnu bazu da-
ljinskih upravljača te ponovno upariti sve postojeće.
Brisanje baze daljinskih upravljača:
Ako treba izbrisati bazu daljinskih upravljača, to se čini na
sljedeći način:
• Potrebno je odviti električni poklopac vrata i iz prola vrata
izvući relejsku jedinicu.
• Gumb na relejskoj jedinici treba pritisnuti na 30 s.
• Nakon 30 s uređaj 5 puta emitira zvučni signal i nakon toga
baza je daljinskih upravljača izbrisana.
Napomena:
Nakon brisanja cjelokupne baze daljinskih upravljača, potreb-
no je ponovno upariti postojeće daljinske upravljače.
4. ZVONO
Uređaju je priloženo bežično kućno zvono. Zvono se uključuje
u izmjenični napon od 220 V. Na pozadini zvona nalazi se uti-
kač za standardnu EU utičnicu.
Domet odašiljača zvona je maksimalno 60 m na otvorenom. U
zatvorenim prostorima domet može biti ometan zbog pregra-
dnih zidova, posebno ako su zidovi od armiranog betona.
Zvono se uključi u električnu utičnicu od 220 V gdje god u
kući. Pri odabiru lokacije zvona treba paziti samo na domet
odašiljača.
Aktivacija zvona:
Zvono se aktivira na dva načina.
• Prvi način aktivacije zvona je tipkom na prijemnoj jedinici
koja je ugrađena u vanjsku stranu vrata. Površina prijemne
jedinice je osvijetljena, što omogućuje da se zvono vidi i
noću. Tipka za zvono je kapacitivna i osjeti dodir prsta na
plastičnoj površini gdje se nalazi ikonica zvona. Laganim
pritiskom prsta na ikonicu zvona aktivira se odašiljač i zvo-
no zazvoni.
• Drugi način aktivacije zvona je daljinskim upravljačem. Pri-
tiskom na tipke B ili C na daljinskom upravljaču na 1 s aktivi-
ra se odašiljač i zvono zazvoni.
5. ODRŽAVANJE I ČIŠĆENJE UREĐAJA
Uređaj nije potrebno održavati. U slučaju da je prijemnik
potrebno očistiti, koristite suhu i malo vlažnu meku krpu. Za
čišćenje se ne smiju koristiti agresivna sredstva za čišćenje,
otapala, lugovi ili kiseline. Uporabom agresivnih sredstava za
čišćenje može se oštetiti površina prijemnika i u tom se slučaju
reklamacija ne prihvaća.
6. JAMSTVO PROIZVOĐAČA
Jamstveni uvjeti:
Jamstvo važi za razdoblje od 24 mjeseca od dana predaje pro-
izvoda konačnom kupcu. Proizvođač proizvoda, NAVKOM d.
o. o., ovom izjavom jamči da će u jamstvenom razdoblju proi-
zvod Inokey digibell (u daljem tekstu: proizvod) djelovati bez
greške i da su materijali od kojih je napravljen bez grešaka i oš-
tećenja. Ukoliko kupac otkrije grešku u djelovanju proizvoda,
može se pozivati na jamstvo kod prodavača ili proizvođača,
koji kupcu izdaje potvrdu o prijemu reklamacije.
Proizvođač se obavezuje da će u slučaju opravdane reklama-
cije grešku u djelovanju otkloniti najkasnije u roku od 45 dana
od dana reklamacije. U slučaju da se greška ne može popravi-
ti, kupac će od proizvođača odnosno prodavača dobiti novi
proizvod najkasnije u roku od 45 dana od dana reklamacije.
Napomene u vezi uvažavanja reklamacije:
Stranka preuzima sav rizik i troškove koji nastanu transportom
proizvoda do ovlaštenog prodavača ili ovlaštene servisne
službe. Jamstvo važi samo, ako je jamstveni list u potpunosti
ispunjen od strane Navkom d. o. o. ili od strane ovlaštenog pro-
davača odnosno ako su s drugih dokumenata dovoljno razvi-
dne okolnosti kupnje. Zato vas molimo da se pobrinete da su
na originalnom predračunu/fakturi u cjelini ispisani: vaše ime,
ime prodavača, serijski broj proizvoda, godina, mjesec i dan
kupnje odnosno se pobrinite da je originalnom jamstvenom
računu priložen račun, koji primite nakon kupnje i na kom je
ispisano ime prodavača, datum kupnje i tip proizvoda. Nav-
kom d. o. o. zadržava si pravo na odbijanje besplatne popravke
u slučaju da nije priložen ili u potpunosti ispunjen jamstveni
list niti priložen gore napomenuti dokument (faktura, račun)
odnosno u slučaju da su podaci na jamstvenom listu nepo-
tpuni ili nečitki.
Jamstveni list pohranite na sigurnom mjestu, jer vam duplikat
nećemo izdati.
Produživanje jamstva:
U slučaju da je kupac uvažavao jamstvo na proizvod i od stra-
ne ovlaštenog servisa je ustanovljeno da je reklamacija oprav-

18 digibell
Serijski broj:
Datum kupnje:
Datum montaže:
Ime kupca:
Adresa kupca:
Štambilj i potpis prodavača:
Inokey digibell je proizvela tvrtka:
Navkom d.o.o. , Prijateljeva 24, 1000 Ljubljana, Slovenija
[email protected], www.navkom.si
Vrsta proizvoda:
elektronski uređaj za otvaranje vrata
dana, jamstveni rok se produžuje za vrijeme dok je proizvod
bio na servisu. Ukoliko je na reklamiranom proizvodu obavljen
veći servisni zahvat, odnosno je proizvod bio zamijenjen za
novi proizvod, jamstvo se produži za razdoblje od 24 mjeseca.
Jamstvo nije moguće uvažavati u slučaju:
1. Bilo kakvog kvara prouzrokovanog zbog nepravilnog ru-
kovanja proizvodom (kao na primjer: uporaba proizvoda za
namjene i način koji nisu navedeni u uputama za uporabu,
rukovanje i održavanje ...).
2. Bilo kakve kvarove, koji su prouzrokovani popravkom, čišće-
njem ili drugim zahvatima na proizvodu od treće strane, koja
nije serviser ovlašten od strane Navkom d. o. o.
3. Bilo kakvi kvarovi koji su nastali zbog transporta, pada,
udarca i sl. nakon kupnje proizvoda.
4. Bilo kakvog kvara, koji je nastao zbog vatre/požara, zem-
ljotresa, poplave, groma, drugih prirodnih nedaća, zagađene
okoline i nepravilnog električnog napona napajanja.
5. Bilo kakvi kvarovi prouzrokovani nemarnim rukovanjem
ili neprimjerenim pohranjivanjem/skladištenjem proizvoda
(npr. skladištenje na visokim temperaturama i velikoj vlazi,
pored insekticida kao što je naftalin ili pored lijekova, otrova,
kemikalija, koji mogu prouzrokovati oštećenja), nepravilnim
održavanjem i sl.
6. U slučaju da proizvodu nije priložen jamstveni list.
7. U slučaju bilo kakvih promjena jamstvenog lista u vezi go-
dine, mjeseca i dana kupnje, imenom kupca ili prodavača, te
serijskog broja.
8. Ukoliko jamstvenom listu nije priložena potvrda o kupnji
(račun).
Ograničenje odgovornosti:
Navkom d. o. o. ne zastupa ili ne jamči niti eksplicitno niti
implicitno ništa u ime dobavljača ili u vezi sadržaja pismenog
gradiva i ni u kom slučaju se ne obavezuje jamstvu za kupljeni
materijal odnosno primjerenost istog za određenu namjeru ili
za bilo koju posljedičnu, slučajnu ili neposrednu štetu (uključi-
vo, ali ne ograničeno, sa štetom ili gubitkom poslovne dobiti,
prestankom poslovanja i gubljenjem poslovnih informacija),
koje proizlaze iz uporabe odnosno nemogućnosti uporabe
ovih dokumenata ili uređaja.
Neke države ne dozvoljavaju ograničavanje odgovornosti u
vezi posljedične ili slučajno prouzrokovane štete, i postoji mo-
gućnost da se gornja odredba na vas ne odnosi. U slučaju da
kupac zbog reklamacije proizvod pošalje po pošti, savjetuje-
mo da se paket osigura. Prodavač i proizvođač ne odgovaraju
za štetu prouzrokovanu transportom.

19
ITA
Digibell
Campanello
senza li
CARATTERISTICHE TECNICHE:
• Tensione di alimentazione del dispositivo 8-30 V,
corrente continua o alternata
• Consumo massimo 150mA
• 2 uscite relè separate
• Connessione criptata con l’unità relè criptata a 256-bit
• 2 telecomandi con emittenti da 433 MHz e il codice
variabile
• Numero massimo di telecomandi: 60
• Portata del telecomando: 10 m
• Tasto capacitativo del campanello
• Installazione nell’anta della porta
• Campanello senza li con portata massima di 60 m
• Tensione di alimentazione del campanello 220 V 50 Hz;
presa EU integrata nel campanello.
INDICE
1. COMPONENTI DEL DISPOSITIVO ............................... 19
2. DESCRIZIONE E USO CORRETTO DEL
DISPOSITIVO ..................................................................... 20
3. TELECOMANDO E APERTURA DI PORTE ................. 20
4. CAMPANELLO .................................................................. 21
5. MANUTENZIONE E PULIZIA DEL DISPOSITIVO ..... 21
6. GARANZIA DEL PRODUTTORE ................................... 21
7. CERTIFICATO DI GARANZIA ........................................ 22
1. COMPONENTI DEL DISPOSITIVO
Telecomando
Unità relè con
il pulsante di reset

20 digibell
2. DESCRIZIONE E USO CORRETTO DEL DISPOSITIVO
Il dispositivo Digibell è un dispositivo elettronico per l’apertura
di porte tramite il telecomando, nel quale sono raggruppate le
funzionalità di un ricevente di telecomandi e tasto del campa-
nello e di un campanello di casa senza li.
Il campanello si installa nell’anta della porta in modo che sulla
parte esterna della porta venga posizionata l’unità ricevente
con il tasto del campanello e all’interno del telaio invece l’unità
relè con due relè. Tra le componenti del dispositivo si trovano
anche un campanello di casa del tipo senza li, da allacciare in
qualsiasi presa da 220 V nella casa, e l’emittente del campanello,
posizionato accanto all’alimentatore del dispositivo, nel quadro
elettrico.
Il dispositivo può essere amministrato soltanto con i teleco-
mandi originali, disponibili presso il fornitore del dispositivo. Il
tasto del campanello viene attivato con una leggera pressione
del dito sull’icona del campanello. La pressione eettuata sulla
supercie del tasto non deve essere esagerata. Per l’attivazione
del campanello non si devono usare oggetti che potrebbero
danneggiare la supercie del dispositivo.
Il campanello si allaccia alla presa EU standardizzata, dalla ten-
sione di 220 V 50 Hz. Se il campanello non si trova sotto tensione,
non funzionerà. La distanza massima tra il campanello e l’emit-
tente del campanello è 60 metri senza ostacoli.
3. TELECOMANDO E APERTURA DI PORTE
Il dispositivo è dotato di due telecomandi. Entrambi sono già
accoppiati al dispositivo. La porta si può aprire con qualsiasi dei
due telecomandi. Ogni telecomando è dotato di quattro tasti.
• Premendo il tasto A per 1 s si attiva il relè n. 1, al quale è
collegata la serratura elettrica della porta, nella quale è ssato
il dispositivo Digibell. La porta si apre dopo 1 s.
• Premendo il tasto B per 1 s si attiva il relè n. 2. Se il relè n. 2
è legato a un’altra serratura o a un altro dispositivo, esso si
attiverà dopo 1 s.
• Il diodo LED verde si accende, accompagnato dal segnale
acustico 1 x 1 s.
• Premendo il tasto C o D si attiva il campanello all’interno della
casa.
La portata del telecomando è 10 m. Il telecomando è alimentato
da una batteria di 12 V e smette di funzionare quando essa si
scarica. Prima della scarica totale della batteria è possibile nota-
re un lieve accorciamento della portata del telecomando oppure
la necessità di premere ripetutamente il tasto del dispositivo per
far percepire il segnale. Queste indicazioni avvertono che è ne-
cessario sostituire la batteria.
Sostituzione della batteria nel telecomando:
La batteria si può sostituire presso ogni negozio specializzato
oppure la si può ordinare anche presso il fornitore del dispositi-
vo. La sostituzione della batteria si eettua svitando le viti della
parte posteriore del telecomando. Si procede con l’apertura del
telecomando, estrazione della batteria esausta ed inserimento
di una batteria nuova. All’inserimento bisogna prestare atten-
zione al corretto orientamento dei poli della batteria (+ e -). Alla
ne si riassembla il telecomando e si riavvitano le viti.
Il codice variabile
Il codice variabile è il codice emesso dal telecomando. Quando
il telecomando è accoppiato al dispositivo, avviene tra di loro
lo scambio della chiave, secondo la quale il codice è cambiato.
In seguito a ogni pressione a qualsiasi dei pulsanti del teleco-
mando avviene l’emissione del segnale, il quale comprende an-
che il codice variabile. Ogni codice emesso è diverso dal codice
precedente.
Se la pressione del pulsante del telecomando avviene quando
il ricevente non si trova nella portata, il telecomando spedisce
il segnale nel vuoto. Detta manovra si può eettuare no a 50
volte.Trascorsi questi limiti la chiave variabile si perde e il teleco-
mando non sarà più pareggiato al ricevente. È dunque necessa-
rio prestare attenzione a non premere i tasti del telecoman-
do quando esso si trova fuori della portata del ricevente!
Accoppiamento di un telecomando nuovo al ricevente:
Quando è necessario aggiungere al sistema un telecomando
supplementare ovvero riaccoppiare il telecomando esistente,
bisogna seguire il seguente procedimento:
• Svitare la barriera elettrica della porta ed estrarre l’unità relè
dal prolo della porta.
• Premere il pulsante che si trova sull’unità relè per 10 s.
• Dopo 10 s il dispositivo inizierà ad emettere segnali acustici.
Accoppiare il telecomando nei prossimi 10 s. Dopo ogni tele-
comando accoppiato si hanno a disposizione ulteriori 10 s per
eettuare il seguente accoppiamento.
• Premere qualsiasi pulsante del telecomando per 1 s.
• Il dispositivo emette un segnale acustico e il telecomando è
accoppiato.
Nota:
È possibile accoppiare no a 60 telecomandi al dispositivo. Se
al dispositivo è già stato accoppiato il numero massimo di te-
lecomandi e uno di essi si è smarrito e bisogna aggiungere un
telecomando nuovo, è necessario cancellare l’intera base di
telecomandi accoppiati e rieettuare l’accoppiamento di tutti i
telecomandi esistenti. Lo stesso procedimento deve essere ef-
Table of contents
Languages:


