INOXRIV 03200 Programming manual

INOXRIV S.p.A. Via Bernocchi, 48 - 25069 Villa Carcina BS Italy
Tel. 0039 030 8931401 – Fax 0039 030 802628
www.inoxriv.it - e-mail: info@inoxriv.it
IT
ISTRUZIONI D’USO E MANUTENZIONE
PENTOLE A PRESSIONE A LEVA
MOD. 03200 – Capacità 3,5 – 5 – 7 – 9 lt.
MOD. 03200 INDUCTION Capacità 3,5 – 5 – 6 – 7 lt.
Azienda con sistema qualità certicato
UNI EN ISO 9001: 2008
DICHIARAZIONE CE DI CONFORMITA’
Inoxriv S.p.A. dichiara sotto la propria responsabilità che il prodotto:
Pentola a pressione modelli 03200 / 03200 Induction, capacità 3,5-5-6-7-9
litri è conforme a quanto previsto dai requisiti essenziali di sicurezza della
direttiva 97/23/ce in materia di attrezzature a pressione e alla norma UNI-
EN-12778. Ente noticato: Bureau Veritas Italia Spa n° 1370.
Procedura di valutazione conformità: Modulo B; categoria III.
Certicati n°
CE-1370-PED-B-INR001-13-ITA / CE-1370-PED-B-INR001-15-ITA

PRECAUZIONI IMPORTANTI
1) LEGGETE TUTTE LE ISTRUZIONI.
2) Assicuratevi che non si avvicinino bambini alla pentola durante il
funzionamento.
3) Non mettete la pentola a pressione in un forno riscaldato.
4) Maneggiate con la massima attenzione la pentola evitando il contatto con le
superci calde. Utilizzate sempre manici e pomoli. L’uso di presine è sempre
consigliato.
5) Non destinate mai la pentola ad usi diversi da quelli per cui è progettata ed
attenetevi rigorosamente alle istruzioni. Diversamente il produttore non si può
ritenere responsabile di eventuali danni per uso improprio.
6) Questo apparecchio cuoce sotto pressione: un uso improprio può provocare
scottature. Prima di riscaldare la pentola vericare che essa sia chiusa in modo
corretto.
7) Non forzate in nessun caso l’apertura della pentola. Assicuratevi che non sia
presente pressione all’interno della pentola. Vedere “istruzioni per l’uso”.
8) Non utilizzate mai la pentola senza acqua perché ciò potrebbe produrre gravi
danni.
9) Non riempite la pentola oltre i 2/3 della sua capacità: rispettate la tacca
di livello presente sulla pentola. Quando si cucinano alimenti soggetti ad
aumento di volume durante la cottura, quali riso o legumi secchi, non superate
1/3 della capacità della pentola.
10) Utilizzate esclusivamente le fonti di calore indicate sulla pentola e sulla
confezione. Quando utilizzate un fornello a gas assicuratevi che la amma non
oltrepassi la base della pentola. Quando si vuole utilizzare una piastra elettrica
bisogna sceglierne una con diametro uguale o inferiore a quello del fondo della
pentola.
11) Dopo la cottura di carni con la pelle (es. lingua di bovino) che possono
rigonarsi per eetto della pressione, non forate la carne mentre la pelle è rigona
per evitare ustioni.
12) Al termine della cottura di alimenti densi e prima dell’apertura del coperchio, è
necessario scuotere leggermente la pentola per evitare la fuoriuscita degli alimenti.
13) Non cuocete cibi avvolti in tela, carta o involucri di plastica.
14) Prima di ogni utilizzo vericate che la valvola di esercizio non sia ostruita e
che i dispositivi di sicurezza siano montati correttamente. Vedere le “Istruzioni
per l’uso”.
15) Non utilizzate mai la pentola per friggere sotto pressione con olio.
16) Non eseguite sui dispositivi di sicurezza interventi diversi da quelli indicati
nel presente libretto.
17) Utilizzate solo parti di ricambio Inoxriv, conformi al modello pertinente. Non
utilizzate corpi pentola con coperchi di modelli non indicati come compatibili.
18) CONSERVATE QUESTO LIBRETTO DI ISTRUZIONI.

CARATTERISTICHE
Capacità nominale (all'orlo) modelli disponibili: lt. 3,5 / 5 / 7 /6 / 9.
Pressione di funzionamento: 0,55 bar / 55 Kpa.
La pentola è dotata dei seguenti dispositivi:
- Valvola di esercizio del tipo a peso con funzionamento a una pressione (g. 2)
- Valvola di bloccaggio della leva (Pistone rosso) con la funzione di impedire
l’apertura della pentola a partire da valori minimi di pressione interna. Tale
dispositivo, ben visibile, svolge anche la funzione di indicatore di presenza
pressione (g. 1)
- Valvola di sicurezza (gommino) che in caso di cattivo funzionamento scarica la
pressione in eccesso garantendo la massima sicurezza d’uso (g. 3).
I materiali impiegati e le accurate lavorazioni di nitura garantiscono la massima
sicurezza dal punto di vista igienico conformemente alla direttiva 89/109/CEE.
ISTRUZIONI PER L’USO
OPERAZIONI PRELIMINARI / LAVAGGIO
Dopo aver tolto la pentola dall’imballaggio vericate che non sia stata danneggiata
durante il trasporto: in caso di dubbio non utilizzatela e rivolgetevi al venditore.
Prima di utilizzare la pentola per la prima volta lavatela accuratamente,
ricordandovi di non lavare il coperchio in lavastoviglie ma sotto acqua corrente.
Per lavare la valvola di esercizio svitate la parte mobile ruotandola in senso
antiorario e sollevandola no a staccarla dal proprio supporto ssato sul coperchio
(g. 2).
Utilizzate solo normali detersivi per stoviglie; osservate questa procedura di
lavaggio anche dopo ogni utilizzo della pentola.
APERTURA E CHIUSURA DELLA PENTOLA
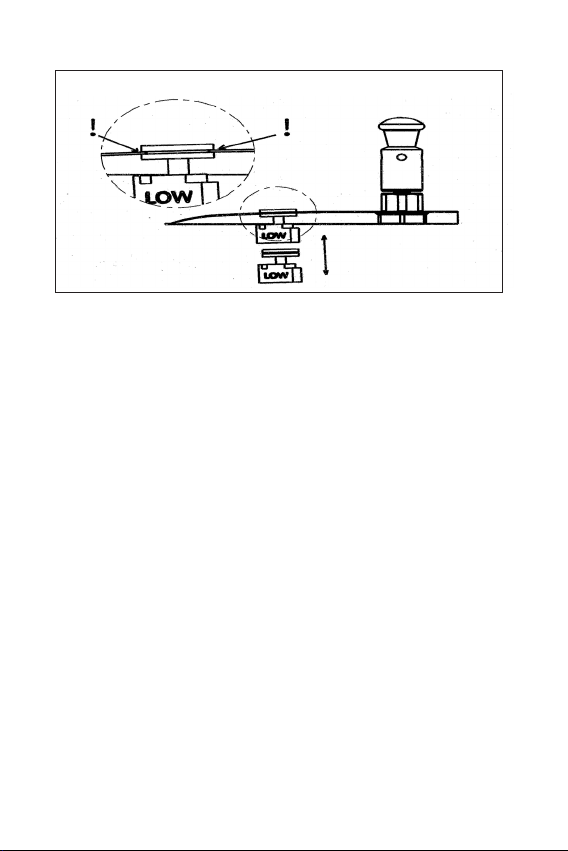
Prima di aprire la pentola vericate che il pistone rosso sia nella posizione
“basso” (g. 1).
Fig. 1
Pistone rosso nella posizione "basso"
APRIRE!
Pistone rosso nella posizione "alto"
NON APRIRE!
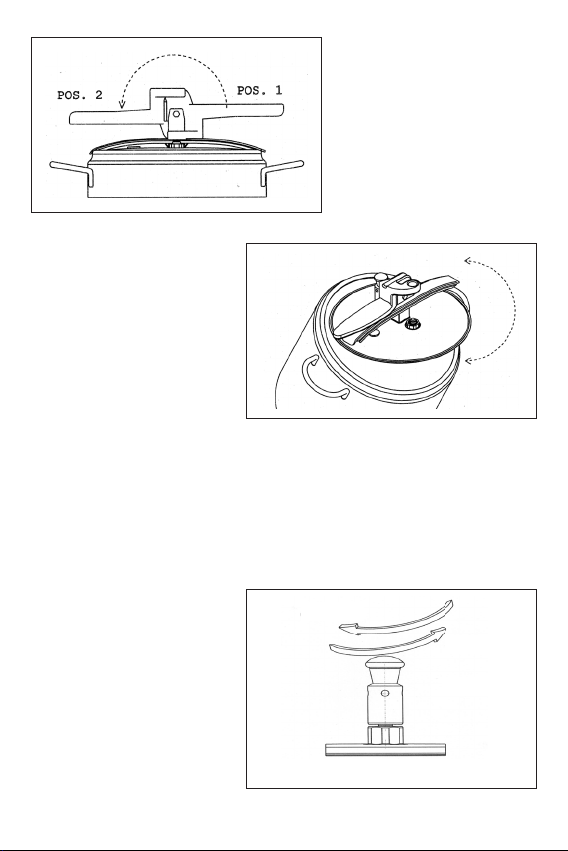
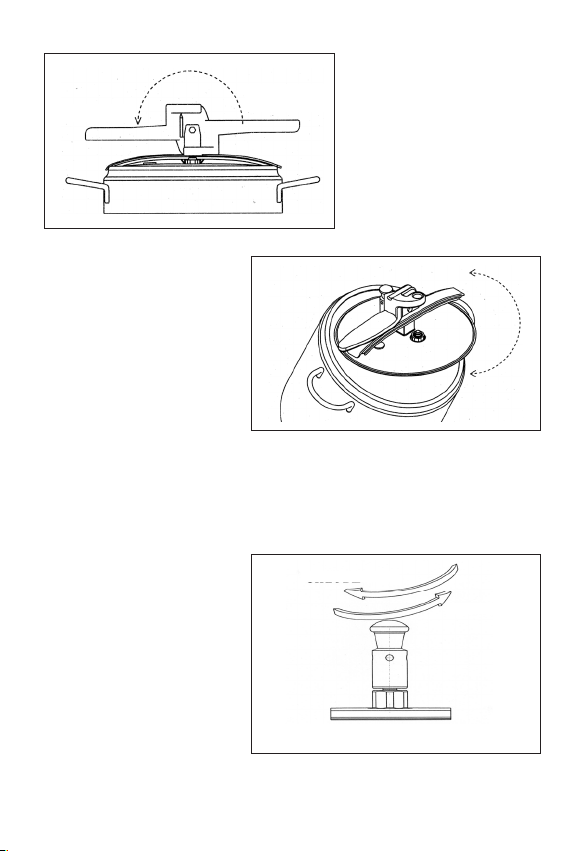
Sollevate il manico no a portarlo
dalla posizione 1alla posizione 2
allentando così completamente il
coperchio (gura a lato).
Inclinate su un lato il coperchio e
slatelo dal corpo pentola (gura a
lato).
Per chiudere la pentola mantenete il manico in posizione di apertura 2 ed introducete il
coperchio nella pentola tenendolo inclinato. A questo punto appoggiate la traversa sul
bordo pentola e ruotate il manico di 180° no alla la posizione 1.
APERTURA VALVOLA DI ESERCIZIO
APRE
CHIUDE
Per scaricare la pressione a
ne cottura togliete la pentola
dalla fonte di calore, lasciatela
rareddare e sollevate la parte
mobile della valvola e ruotatela
in senso antiorario no a quando
non rimane sollevata. Non tentate
di svitarla ulteriormente.
Toccate solo la parte in plastica per
evitare scottature (g.2).
Per smontare la valvola per il
lavaggio svitatela completamente.
Per il montaggio ripetete le
precedenti fasi in ordine inverso. Fig. 2
Correct assemble
Interno del coperchio
Assemblaggio corretto
VALVOLA DI SICUREZZA (GOMMINO)
Fig. 3
COTTURA
Non riempite la pentola oltre i 2/3 della sua capacità: rispettate la tacca di livello
presente sulla pentola. Quando si cucinano alimenti soggetti ad aumento di
volume durante la cottura, o che generano schiuma, o con foglie, quali riso,
legumi secchi, insalata, spinaci, non superate 1/3 della capacità della pentola.
Dopo aver vericato che la valvola di esercizio non abbia i fori otturati e che scorra
liberamente sul proprio supporto, chiudete il coperchio e posizionate la pentola a
pressione sulla fonte di calore, accertandovi che sia appoggiata in modo stabile.
Utilizzate solo una fonte di calore appropriata.
Controllate inoltre che il pistone rosso di bloccaggio del manico a leva sia
completamente abbassato (g. 1).
Iniziate la cottura a fuoco alto.
Quando nella pentola si crea pressione il pistone rosso di blocco del manico a
leva si alza e impedisce l’apertura accidentale del coperchio; il pistone rosso
è visibile e indica chiaramente la presenza di pressione. Per qualche istante, da
poco prima che il pistone inizi la sua corsa verso l’alto a quando esso raggiunge la
posizione di lavoro, dalla sua sede fuoriescono aria e acqua: questo non è indice
di malfunzionamento.
Al raggiungimento della pressione di funzionamento la valvola di esercizio si
apre scaricando il vapore in eccesso: a questo punto usate il fornello più piccolo
riducendo al minimo la amma, regolandola in modo da stabilizzare il più
possibile il funzionamento della valvola.
Il tempo di cottura va conteggiato dal primo intervento della valvola di esercizio.
Se durante il funzionamento dovesse intervenire la valvola di sicurezza
(gommino) sospendete immediatamente la cottura.
Al termine della cottura spegnete la fonte di calore o rimuovete da essa la pentola
a pressione nel caso stiate utilizzando una piastra elettrica.
Lasciate rareddare la pentola e scaricate totalmente il vapore aprendo la valvola
di esercizio (vedi g. 2).
ATTENZIONE

Per ottenere una decompressione più rapida è possibile rareddare il coperchio
con un leggero getto di acqua fredda. Non immergete completamente la pentola
in acqua fredda.
Il completo scarico della pressione è indicato dall’abbassamento del pistone
rosso di bloccaggio del manico a leva: a questo punto è possibile aprire senza
problemi il coperchio.
In caso di cattivo funzionamento della pentola è necessario vericare:
- che il coperchio sia chiuso correttamente;
- che la valvola di sicurezza (gommino) sia integra e montata correttamente
nell’apposita sede, in modo che l’incavo sia incastrato su tutta la circonferenza
nel foro del coperchio (vedi gura 3). Se la valvola di sicurezza entra in funzione
deve essere ripristinata nella posizione normale dopo aver rareddato la
pentola e averne vericato l’integrità;
- che il pistone rosso di bloccaggio del manico scorra liberamente nella sua
sede;
- che la guarnizione di tenuta montata sul corpo pentola sia integra ed in
buone condizioni;
- Che la valvola di esercizio non sia ostruita e che scorra liberamente sul
proprio supporto.
Qualora questi controlli non dovessero dimostrarsi sucienti rinunciate ad
utilizzare la pentola e rivolgetevi al SERVIZIO ASSISTENZA INOXRIV
Tel. 0039 030 8931401 - e-mail: info@inoxriv.it
PULIZIA, CONSERVAZIONE E MANUTENZIONE
Provvedete a lavare dopo ogni impiego la pentola a pressione. E’ consigliabile
asciugare subito e riporre con il coperchio aperto per evitare la formazione di
cattivi odori.
Si raccomanda la sostituzione periodica dei seguenti componenti:
- Dispositivo bloccaggio manico a leva ogni 5 anni circa;
- Valvola di sicurezza (gommino) ogni 2 anni.

TEMPI di COTTURA
Dopo il schio della valvola
La quantità degli alimenti deve essere ridotta secondo il livello Max di riempimento
di ciascuna pentola.
Per gli alimenti che aumentano di volume, o che generano schiuma durante la
cottura, o con foglie, come riso, legumi secchi, insalata, spinaci, etc., non superare
mai 1/3 della capacità della pentola.
GARANZIA
Questo prodotto è garantito per difetti di fabbricazione e dei materiali: Il corpo
della pentola per la durata di 10 anni dalla data di acquisto, le altre parti per 2 anni
dalla data di acquisto.
Non sono coperti da garanzia i difetti derivanti da un utilizzo non corrispondente
alla istruzioni fornite nel presente manuale, cosi come i difetti derivanti dall'uso
improprio, manomissioni, negligenza, utilizzo di ricambi non originali, usura
dovuta al normale utilizzo.
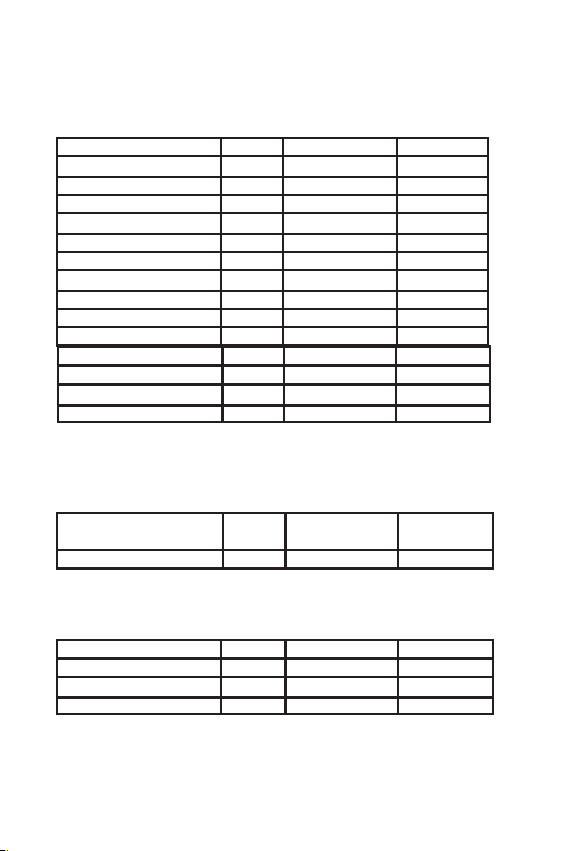
Bolliti Peso Acqua Tempo
Vitello ½Kg 1 litro 25-30 min.
Manzo ½Kg 1 litro 30-35 min.
Pollo ½Kg 1 litro 20-25 min.
Cotechino ½Kg 1 litro 30-35 min.
Stufati Peso Acqua Tempo
Pollo ½Kg 1 bicchiere 20-25 min.
Agnello ½Kg 2 bicchiere 20-25 min.
Vitello ½Kg 1 bicchiere 30-35 min.
Manzo ½Kg 2 bicchiere 40 min.

Minestre di verdura da 20 a 45 minuti seguendo il tempo di cottura della verdura
più lunga da cuocere
Legumi secchi già messi a bagno per 12 ore in acqua
Verdure fresche Peso Acqua Tempo
Asparagi 1 Kg 1 +1/2 bicchiere 4-5 min.
Barbabietole 1 Kg 1 +1/2 bicchiere 18-20 min.
Broccoli 1 Kg 1 bicchiere 10 min.
Carciofi 1 Kg 1 +1/2 bicchiere 13-15 min.
Carote 1 Kg 1 +1/2 bicchiere 10-12 min.
Cavolo 1 Kg 1 +1/2 bicchiere 10-12 min.
Cicoria 1 Kg 1 bicchiere 4-5 min.
Cipolle 1 Kg 1 +1/2 bicchiere 8-10 min.
Fagiolini 1 Kg 1 bicchiere 4/5 min.
Patate 1 Kg 1 +1/2 bicchiere 12/14 min.
Piselli verdi 1 Kg 1 bicchiere 3-4 min.
Pomodori 1 Kg 1/2 bicchiere 3-4 min.
Spinaci 1 Kg 1 bicchiere 3-4 min.
Zucca 1 Kg 1 +1/2 bicchiere 5-6 min.
Zucchine 1 Kg 1 bicchiere 3-4 min.
Frutta fresca
Albicocche ½Kg 1 bicchiere 3 min.
Pesche ½Kg 1/2 bicchiere 2 min.
Mele ½Kg 1 bicchiere 4-6 min.
Pere ½Kg 1/2 bicchiere 3-4 min.
Ceci, fagioli, fave ½Kg. 3 bicchieri 40-50 min.
Lenticchie 300gr. 3 bicchieri 20-30 min.

USAGE AND MAINTENANCE INSTRUCTIONS
FOR PRESSURE COOKERS WITH LEVER HANDLES
CE CONFORMITY DECLARATION
Inoxriv company states under its own responsibility that its pressure cooker mod.
03200 / 03200 INDUCTION, Capacity 3,5 – 5 – 6 - 7 – 9 litres conforms to the essential safety
requirements according to the European directive 97/23/CE related to pressure
equipments and to the norm UNI EN-12778.
Procedure of conformity evaluation: Form B; Category III.
Certicates N° CE-1370-PED-B-INR001-13-ITA
CE-1370-PED-B-INR001-15-ITA
Notied body: Bureau Veritas Italia spa n° 1370
Company with certied quality system
UNI EN ISO 9001: 2008
INOXRIV S.p.A. Via Bernocchi, 48 - 25069 Villa Carcina BS Italy
Tel. 0039 030 8931401 – Fax 0039 030 802628
www.inoxriv.it - e-mail: info@inoxriv.it
GB
MOD. 03200 – Capacity 3,5 – 5 – 7 – 9 lt.
MOD. 03200 INDUCTION Capacity 3,5 – 5 – 6 – 7 lt.

IMPORTANT PRECAUTIONS
1) CAREFULLY READ ALL THE INSTRUCTIONS.
2) Make sure that the children do not get close to the pot during its working.
3) is device cooks under pressure: an improper use can cause burns. Before
heating the pot check that it is correctly closed.
4) Never use the pot without water to avoid great damages; the minimum water
quantity is 25 cl.
5) Do not ll the pot more than 2/3 of its capacity: respect the marking level
printed on the pot. When you cook any food that is bound to increase its
volume or create scum during the cooking, or with leaves, like rice, dried
legumes, spinach, salad, etc., do not overpass 1/3 of the pot capacity.
6) Before any use, check that the functioning valve is not obstructed and that
the safety devices are correctly assembled. Read the “Usage instructions”.
7) Do not make any intervention on the safety devices, but those indicated in the
present leaet.
8) Use only Inoxriv spare parts, conform to each correct model. Do not use pot’s
bodies with lid’s models which are not listed as compatible.
9) Do not force in any possible way the opening of the pot. Make sure that there
is no pressure inside the pot.
10) Exclusively use the heating sources which are indicated on the pot and on the
box. When you use a gas stove, make sure that the re do not overpass the base
of the pot. In case you might need to use an electrical plate, do choose one with a
similar or smaller diameter with respect to the bottom of the pot.
11) Aer the cooking of meats with a skin (i.e. ox tongue) that can swell out
because of the pressure, do not pierce it while the skin is swollen to avoid burns.
12) At the cooking’s end of thick foods and before opening the lid, it is necessary
to slightly shake the lid to avoid the foods spill.
13) Do not cook foods wrapped up in cloth, paper or plastic envelopes.
14) Never use the pot to fry with oil under pressure.
15) Never destine the pot to dierent uses, but those for which it is made and do
carefully follow all the relative instructions. Otherwise the manufacturer cannot
consider himself responsible for any eventual damage arising from improper use.
16) Handle the pot with the maximum care avoiding to come in contact with any
heated surfaces. Do always use handles and knobs. e use of pot holders is
always advisable.
17) Do not put the pressure cooker inside a heated oven.
18) KEEP THIS INTRUCTIONS LEAFLET.

TECHNICAL CHARACTERISTICS
Nominal capacity (to the rim) available models: 3,5 / 5 / 6 / 7 / 9 lt.
Functioning pressure: 0,55 bar / 55 Kpa.
e pot is provided with the following devices:
- Functioning weight valve which is working under pressure (ill. 2)
- Lever locking valve (red piston) with the task of avoiding the opening of the pot
starting from a minimum value of internal pressure. is device, which is easily
visible, has also the role of pressure indicator (ill. 1)
- Safety valve (rubber washer) that in case of a wrong functioning drains the
surplus of pressure granting the maximum safeness (ill. 3).
e materials used and the accurate nishing manufactures grant the maximum
safeness from the hygienic point of view in accordance to the European directive
89/109/CEE.
USAGE INSTRUCTIONS
INTRODUCTORY OPERATIONS / WASHING
Aer having removed the pot from its packing check that it has not been damaged
during the transport: in case of any doubt do not use it and get in touch with the
dealer.
Before using the pot for its rst time, wash it accurately, remembering not to wash
the lid in the washing-machine, but under running water. To wash the functioning
valve unscrew the moving part turning it anticlockwise and raising it till it comes
out of its stand which is xed to the lid (ill. 2).
Use only standard dishwashing detergents; follow this washing procedure also
aer each single use of the pressure cooker.
OPENING AND CLOSING OF THE POT
Before opening the pot check that the red piston is in the “lower” position
(ill. 1).
ill. 1
Red piston in the lower
position
OPEN!
Red piston in the
higher position
DO NOT OPEN!
Bracket
Raise the lever in order to bring it
from position no. 1to position no. 2
thus completely easing o the lid
(see illustration on the side).
Lean the lid on one side and remove
it from the body of the pot (see
illustration on the side).
To close the pot, keep the lever in the opening position no. 2and insert the lid inside the
pot keeping it inclined. At this point put the bracket to the pot’s edge and turn the lever of
180° so as to reach position no. 1.
OPENING OF THE FUNCTIONING VALVE
OPEN
CLOSE
CLOSED VALVE
To drain the pressure at the end
of the cooking, remove the pot
from the heat source, let it get
colder and raise the moving part of
the valve turning it anticlockwise
until it remains completely raised.
Do not try to further turn it.
Do only touch the plastic part to
avoid any burns (Ill. 2).
To disassemble the valve for its
washing, unscrew it completely.
To assemble it, repeat the
previous procedures in the
opposite order. ill. 2
Correct assemble
Inner side of the lid
COOKING
Do not ll the pot more then 2/3 of its capacity: respect the marking level
printed on the pot. When you cook any food that is bound to increase its
volume or create scum during the cooking, or with leaves, like rice, dried
legumes, spinach, salad, etc., do not overpass 1/3 of the pot capacity.
Aer having checked that the functioning valve has no obstructed holes and that it
freely runs along its stand, close the lid and put the pressure cooker on the heating
source, making sure that it stands steady.
Use only a proper heating source.
Check then that the red locking piston of the lever is completely lowered (ill.1).
Start the cooking with a strong re.
When the pressure starts growing inside the pot the red locking piston of the lever
stands up and prevent the accidental opening of the lid; the red piston is visible
and it clearly shows the pressure presence. For a few seconds, from immediately
before the piston starts raising up until it reaches its functioning position, from
its stand some air and water may come out: this is not a sign of bad functioning.
As soon as the pressure overpass its functioning level, the functioning valve opens
to drain the surplus of steam: at this point reduce the re to the minimum, so as to
keep the functioning valve as steady as possible.
e cooking time is to be counted from the rst intervention on the functioning
valve.
If during the cooking the safety valve (rubber washer) should start working,
immediately stop the cooking.
SAFETY VALVE (RUBBER WASHER)
ill. 3

A the end of the cooking, turn o the re or remove the pot from it in case you are
using an electrical plate.
Let the pot to get cold and completely drain the steam opening the functioning
valve (see ill. 2).
To obtain a faster drainage it is possible to cool down the lid with a light jet of cold
water. Do not completely immerge the pot into cold water.
e complete drainage of the pressure is highlighted by the lowering of the red
locking piston of the lever: at this point it is possible to open the lid without
any problem.
In case of a bad functioning of the pot it is necessary to check:
- that the lid is correctly closed;
- that the safety valve (rubber washer) is integral and correctly assembled in
the proper place, so that the hollow is blocked along the whole circumference
of the hole in the lid (see ill. 3). If the safety valve do works, it must then be
repositioned in its correct place aer having cooled down the pot and having
checked its integrity;
- that the red locking piston of the lever runs freely in its place;
- that the seal assembled around the edge of the pots’ body is integral and in
good conditions;
- that the functioning valve is not obstructed and that it runs freely along its
stand.
In case those controls cannot proof themselves enough, do not use the pot and get
in touch with the CUSTOMER SERVICE INOXRIV
Tel. 0039 030 8931401 - e-mail: info@inoxriv.it
CLEANING, PRESERVATION AND MAINTENANCE
Do wash the pot aer each single usage. It is advisable to immediately dry it and to
replace it opened to prevent the formation of smells.
We recommend the periodic change of the following parts:
- Locking device of the lever: each 5 years approx.;
- Safety valve (rubber washer): each 2 years.

COOKING TIMES
Aer the valve whistling
e quantity of food must be reduced according to the max lling level of each
size of pot.
When you cook any food that is bound to increase its volume or create scum
during the cooking, or with leaves, like rice, dried legumes, spinach, salad, etc., do
not overpass 1/3 of the pot capacity.
Boiled Weight
Water
T
i
m
e
Veal 1/2kg
1 litre 25-30 min.
Beef 1/2kg
1 litre 30-35 min.
Chicken 1/2kg
1 litre 20-25 min.
Pork 1/2kg
1 litre 30-35 min.
Stews Weight
Water
T
i
m
e
Chicken 1/2kg
1 glass
20-25 min.
Lamb 1/2kg
2 glass
20-25 min.
Veal 1/2kg
1 glass
30-35 min.
Beef 1/2kg
2 glass
40 min.
WARRANTY
is product is guaranteed against manufacturing and materials’ defects: e body
of the pot for a period of 10 years from the date of purchase, the other parts for 2
years from the date of purchase.
Defects resulting from incorrect usage not corresponding to the instructions
provided in this manual are not covered by warranty, as well as defects resulting
from improper use, tampering, negligence, use of spare parts not original and
wear due to normal use.
Fresh
vegetables Weight
Water
T
i
m
e
Asparagus 1 kg
1+1/2 glass 4-5 min.
Beetroot 1 kg
1+1/2 glass
18-20 min.
Broccoli 1 kg
1 glass
10 min.
Artichokes 1 kg
1+1/2 glass
13-15 min.
Carrots1 kg
1+1/2glass 5-6 min.
Cabbage 1 kg
1+1/2 glass
10-12 min.
Chicory 1 kg
1 glass
4-5 min.
Onions 1 kg
1+1/2 glass
8-10 min.
French beans 1 kg
1 glass
4/5 min.
Potatoes 1 kg
1+1/2 glass
12/14 min.
Green peas 1 kg
1 glass
3-4 min.
Tomatoes
1 kg
1/2 glass
3-4 min.
Spinaches
1 kg
1 glass
3-4 min.
Pumpkin
1 kg
1+1/2 glass
5-6 min.
Small pumpkins
1 kg
1 glass
3-4 min.
Dried legumes already put into some water for 12 hours
Weight
Water
T
i
m
e
Chick-peas, Beans,
Broad beans
1/2 kg 3 glasses
40-50 min.
Lentils 300 gr.
3 glasses
20-30 min.
Fresh fruits
Weight
Water
T
i
m
e
Apricots ½kg 1 glass
3 min.
Peaches ½kg ½glass
2 min.
Apples ½kg 1 glass
4-6 min.
Pears ½kg ½glass
3-4 min.
Vegetable soups from 20 to 45 minutes depending on the cooking time of the
vegetable with the longer time

FR
CONSEILS D’ENTRETIEN ET D’UTILISATION
AUTOCUISEURS A LEVIER
MOD. 03200 – Capacité 3,5 – 5 – 7 – 9 lt.
MOD. 03200 INDUCTION Capacité 3,5 – 5 – 6 – 7 lt.
Société avec système de qualité certié
UNI EN ISO 9001: 2008
DECLARATION CE DE CONFORMITE
Inoxriv S.p.A. déclare sous sa seule responsabilité que le produit:
Autocuiseur modèle 03200 / 03200 INDUCTION , capacité 3,5-5-6-7-9 litre est
en conformité avec les dispositions des exigences essentielles de sécurité de la
directive 97/23/CE concernant les équipements sous pression et avec la norme
UNI-EN-12778. Organisme notié: Bureau Veritas Italia SpA n ° 1370.
Procédure d'évaluation conformité: Formulaire B, classe III.
Certicats n°
CE-1370-PED-B-INR001-13-ITA / CE-1370-PED-B-INR001-15-ITA
INOXRIV S.p.A. Via Bernocchi, 48 - 25069 Villa Carcina BS Italy
Tel. 0039 030 8931401 – Fax 0039 030 802628
www.inoxriv.it - e-mail: info@inoxriv.it

PRÉCAUTIONS IMPORTANTES
1 ) LIRE TOUTES LES INSTRUCTIONS.
2 ) S’assurer que les enfants ne soient pas près de la marmite pendant le
fonctionnement.
3 ) Ne pas mettre l’autocuiseur dans un four chaué.
4 ) Manipuler avec une extrême prudence l’autocuiseur et éviter le contact avec
des surfaces chaudes. Toujours utiliser les poignées et les boutons. L'utilisation de
gants de cuisine est toujours recommandé.
5 ) Ne jamais destiner l’autocuiseur à des ns autres que celles pour lesquelles
il est conçu, et respecter strictement les instructions. Sinon, le fabricant ne peut
être tenu pour responsable d’éventuels dommages dus à une mauvaise utilisation.
6 ) Cet ustensile cuit sous pression, une mauvaise utilisation peut provoquer des
brûlures. Avant de chauer la marmite vérier qu'elle est bien fermée.
7) Ne pas en aucun cas forcer l'ouverture de la marmite. S’assurer qu'il n'ya pas de
pression à l'intérieur de la marmite. Voir le "Mode d'emploi".
8 ) Ne jamais utiliser l’autocuiseur sans eau, car cela pourrait causer des dommages
graves.
9 ) Ne pas remplir la marmite de plus de 2/3 de sa capacité: respecter l’entaille
du niveau sur la marmite. Lorsque on fait cuire des aliments soumis à augmen-
ter de volume pendant la cuisson, comme le riz ou les légumes secs, ne pas
dépasser un tiers de la capacité de la marmite.
10) Utiliser uniquement une des sources de chaleur indiquées sur la marmite et
sur l'emballage. Lorsqu’on utilise une cuisinière à gaz, s’assurer que la amme
ne dépasse pas le fond de la marmite. Lorsqu’on souhaite utiliser une cuisinière
électrique il faut en choisir une avec un diamètre égal ou inférieur au fond de la
marmite.
11 ) Après la cuisson de viande avec la peau (par exemple, la langue de boeuf ), qui
peut se goner en raison de la pression, ne pas percer la viande tandis que la peau
est gonée pour éviter des brûlures.
12 ) A la n de la cuisson d’aliments denses et avant l'ouverture du couvercle, il faut
secouer doucement la marmite pour empêcher le déversement de la nourriture.
13 ) Ne pas cuire d'aliments enveloppés dans du tissu, du papier ou de la pellicule
de plastique.
14 ) Avant chaque utilisation, vérier que la soupape de fonctionnement n'est
pas bloquée et que les dispositifs de sécurité sont installés correctement. Voir
le "Mode d'emploi".
15 ) Ne jamais utiliser la marmite pour frire sous pression avec de l'huile.
16 ) Ne pas eectuer des actions sur les dispositifs de sécurité autres que celles
énumérées dans ce livret.
17 ) Utiliser uniquement des pièces de rechange Inoxriv, selon le modèle concerné.
Ne pas utiliser les marmites avec des modèles de couvercles non listés comme
compatibles.
18 ) CONSERVER CE LIVRET.

CARACTERISTIQUES
Capacité nominale (au bord) modèles disponibles: lt. 3,5 / 5 / 6 / 7 / 9.
Pression de fonctionnement : 0,55 bar / 55 Kpa.
L’autocuiseur est équipé avec les dispositifs les suivants:
- Soupape de fonctionnement du type à poids avec fonctionnement à pression
(Fig. 2)
- Valve de verrouillage du levier (Piston rouge) avec la fonction d'empêcher
l'ouverture de l’autocuiseur à partir de valeurs minimales de pression interne.
Ce dispositif, bien visible, exécute également la fonction d’indiquer la présence
de pression (Fig.1)
- Soupape de sécurité (en caoutchouc noir) qui en cas de dysfonctionnement
décharge l'excès de pression assurant une sécurité d'utilisation maximale (Fig. 3).
Les matériaux utilisés et les précis procédés de nition assurent la sécurité
maximale du point de vue de l'hygiène conformément à la directive 89/109/CEE.
MODE D'EMPLOI
MISE EN FONCTION / LAVAGE
Après avoir retiré l’autocuiseur de l'emballage vérier qu’il n'a pas été endommagé
pendant le transport: en cas de doute ne l'utiliser pas et contacter le vendeur.
Avant d'utiliser l’autocuiseur pour la première fois, le laver soigneusement,
se souvenant de ne pas laver le couvercle dans le lave-vaisselle, mais sous l'eau
courante. Pour laver la soupape de fonctionnement, dévisser sa partie mobile en la
tournant dans le sens antihoraire et en la soulevant pour la retirer de son support
xé sur le couvercle (Fig. 2).
Utiliser uniquement d’ordinaires savons à vaisselle, regarder cette procédure de
lavage après chaque utilisation de l’autocuiseur.
OUVERTURE ET FERMETURE DE L’AUTOCUISEUR
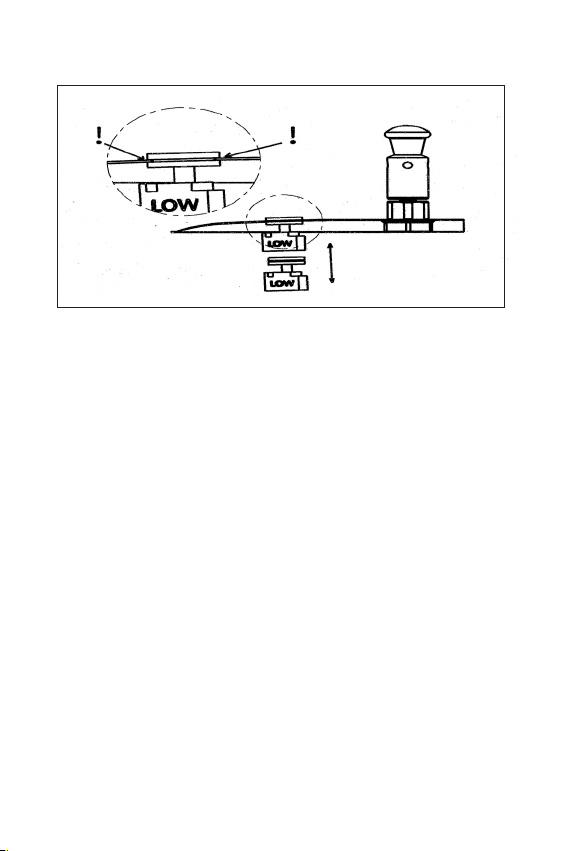
Avant d'ouvrir l’autocuiseur vérier que le piston rouge est dans la position
en «bas» (Fig. 1).
Piston en bas:
OUVRIR
Piston en haut:
NE PAS OUVRIR
Fig. 1
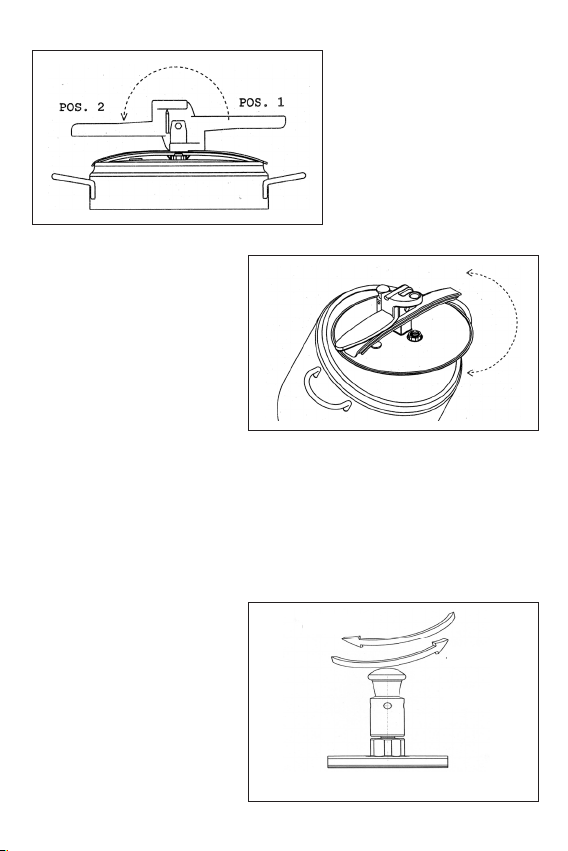
Soulever la poignée jusqu'à ce
qu'elle de la position 1passe à
la position 2, desserrant ainsi
complètement le couvercle
(gure à gauche).
Bracket
Pos. 2 Pos. 1
Incliner le couvercle d'un côté et le
retirer du corps de la marmite
(gure à droite).
Pour fermer la marmite garder la poignée en position ouverte 2et introduire le couvercle
d'un côté dans la marmite. A ce stade, reposer l’étrier sur le bord de la marmite et tourner
la poignée de 180 degrés jusqu’à la position 1.
OUVRE
FERME
Fig. 2
OUVERTURE SOUPAPE DE FONCTIONNEMENT
Pour décharger la pression à la n
de la cuisson, retirer la marmite du
feu, la laisser refroidir, soulever la
partie mobile de la soupape et la
tourner dans le sens antihoraire
jusqu'à ce qu'elle reste élevé.
Ne pas essayer de la dévisser
davantage.
Ne toucher que la partie en
plastique pour éviter des brûlures
(Fig. 2).
Pour démonter la soupape pour le lavage la dévisser complètement.
Pour l'installation, répéter les étapes cidessus dans l'ordre inverse.
Other manuals for 03200
1
This manual suits for next models
1
Table of contents
Languages:
Other INOXRIV Electric Pressure Cooker manuals

Popular Electric Pressure Cooker manuals by other brands


Fissler
Fissler souspreme multi pot user manual

Focus Electrics
Focus Electrics WestBend 82011 user manual

Paula Deen kitchen electrics
Paula Deen kitchen electrics PDIPL2 quick start guide

izzy
izzy Vita 8Lt instruction manual

TZS First AUSTRIA
TZS First AUSTRIA FA-5130-1 instruction manual

Fagor
Fagor DUO user manual