INS LifeGuard SmartWatch V2 User manual
INS LifeGuard
LifeGuard SmartWatch V2
User Guide
Tk r LfGur Alr t rvr g.

2(Rev. 06/09/21)
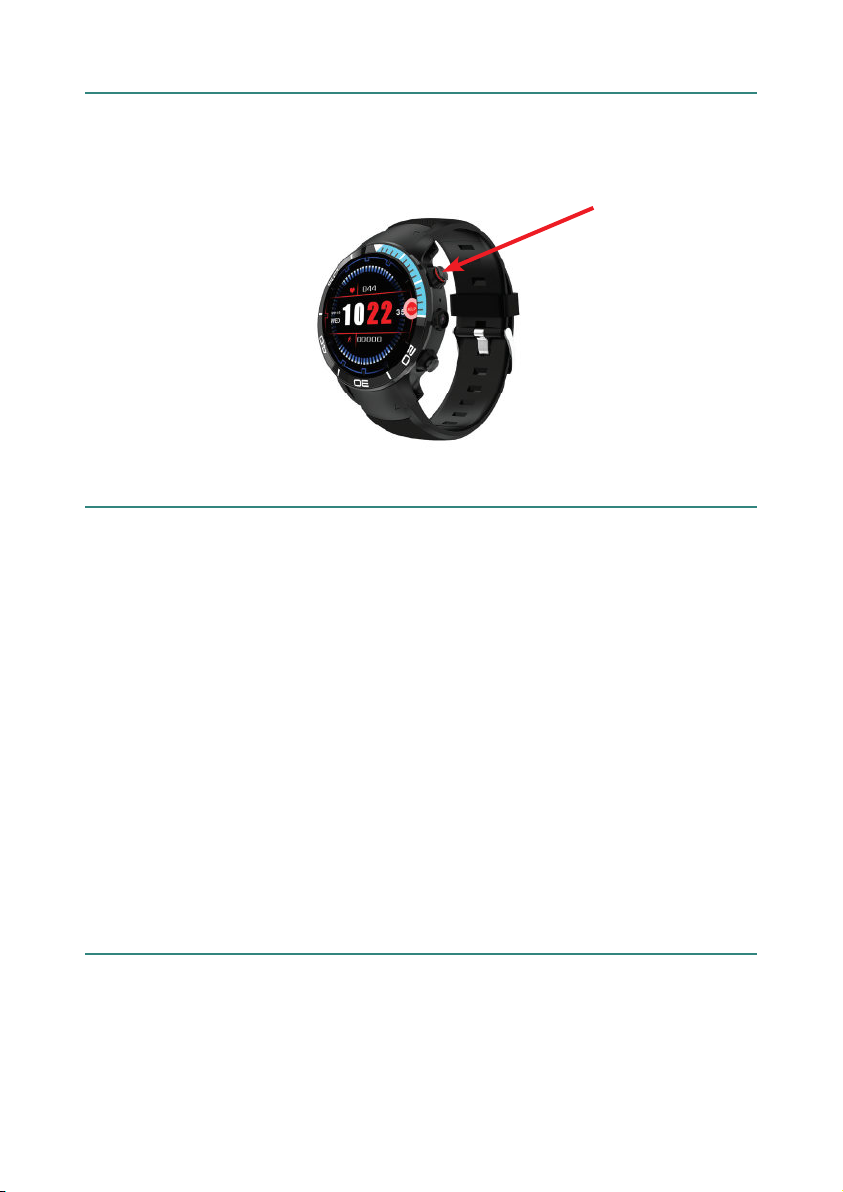
SmartWatch V2 Parts Diagram
1. Up / Power button
2. LifeGuard widget
3. Camera (disabled)
4. Touch screen
5. Down / HELP / Back button
6. Heart rate sensor
7. Magnetic USB port
8. SIM card cover
9. Microphone
10. Speaker
1
2
3
4
5
6
7
8
9
10

3
Contents
Welcome to the new LifeGuard SmartWatch . . . . . . . 4
Getting Started . . . . . . . . . . . . . . . . . . . . . . . . . . 5
Preparing for First Use . . . . . . . . . . . . . . . . . . . . . . . 6
If you need to insert the SIM . . . . . . . . . . . . . . . . . . . 6
Activating an Alarm. . . . . . . . . . . . . . . . . . . . . . . . 9
Battery Level, WiFi and Bluetooth . . . . . . . . . . . . . 11
The LifeGuard SmartWatch App . . . . . . . . . . . . . . . 12
Notifications. . . . . . . . . . . . . . . . . . . . . . . . . . . . . .12
My Contacts . . . . . . . . . . . . . . . . . . . . . . . . . . . . . .12
Geofence. . . . . . . . . . . . . . . . . . . . . . . . . . . . . . . .14
My Health . . . . . . . . . . . . . . . . . . . . . . . . . . . . . . .15
Pulse & Blood Oxygen. . . . . . . . . . . . . . . . . . . . . . . .17
To View Measurements Taken. . . . . . . . . . . . . . . . . . .17
My Concierge . . . . . . . . . . . . . . . . . . . . . . . . . . . . .18
Client Info . . . . . . . . . . . . . . . . . . . . . . . . . . . . . . .18
Device Info. . . . . . . . . . . . . . . . . . . . . . . . . . . . . . .19
Synchronise . . . . . . . . . . . . . . . . . . . . . . . . . . . . . .19
App Update . . . . . . . . . . . . . . . . . . . . . . . . . . . . . .19
Turning the SmartWatch Off . . . . . . . . . . . . . . . . . 20
The LifeGuard SmartCarer App . . . . . . . . . . . . . . . 20
Secure Client Portal . . . . . . . . . . . . . . . . . . . . . . 20
Warning for those with Pacemakers . . . . . . . . . . . . 21
Consumer Product Warranty . . . . . . . . . . . . . . . . . 22

4
Welcome to the new
LifeGuard SmartWatch
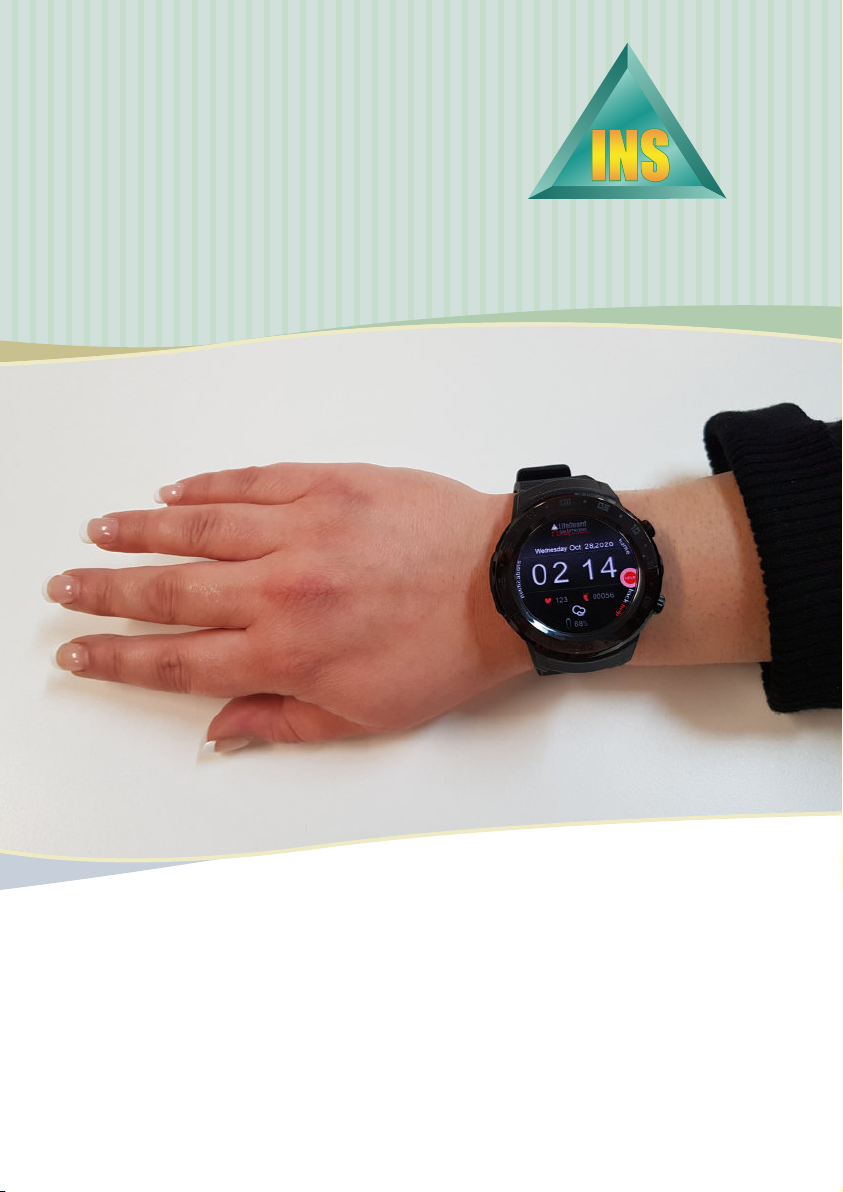
The LifeGuard SmartWatch is a fully featured mobile medical
alarm system. Just like pressing your standard pendant or
wrist transmitter, pressing the HELP button on the LifeGuard
SmartWatch sends an alarm to our 24/7 Emergency Response
Centre. But with the LifeGuard SmartWatch, you can take
your alarm with you wherever you go. So you can go about
your normal activities, remain independent and mobile
knowing that help is available at any time, wherever you are.
Because the LifeGuard SmartWatch has built-in GPS
functionality, in an emergency your location can be sent to
our emergency response centre so we can locate you and
share your location with your nominated contacts, and even
Emergency Services, if required.
This booklet will explain all the useful features and functions
of your new LifeGuard SmartWatch. Should you have any
questions or require further assistance, please call us at any
time on 1800 636 226.
It is our sincere hope that the LifeGuard SmartWatch allows
you to go about your normal daily activities with greater
independence and confidence.
Claude Rafin,
Managing Director
The INS Group
Claude Rafin,
Managing Director
The INS Group

5
Getting Started
Before use, please charge the SmartWatch with the 5V
magnetic USB cable provided. You’ll need to supply your own
USB plug to connect the cable to a power point.
Ensure the four posts on the magnetic charger make contact
with the four dots on the back of the watch and it should
attach automatically. When connected properly, the screen
will light up and indicate that the watch is charging.
To ensure the LifeGuard SmartWatch is ready when you need
it, always ensure it’s fully charged before leaving home. The
battery indicator is in the notification screen — simply swipe
down on the watch screen to view battery status.
6
Preparing for First Use
Your LifeGuard SmartWatch will arrive
programmed and ready to use. If the
SIM hasn’t already been inserted, please
follow the instructions below, then fully
charge the SmartWatch before use. Once
charged, press the Power Button on the
right side of the watch (see page 2) to
turn it on. The home screen will display.
If you need to insert the SIM
If the SIM is included separately in the package, you’ll first
need to insert the SIM before powering on the SmartWatch.
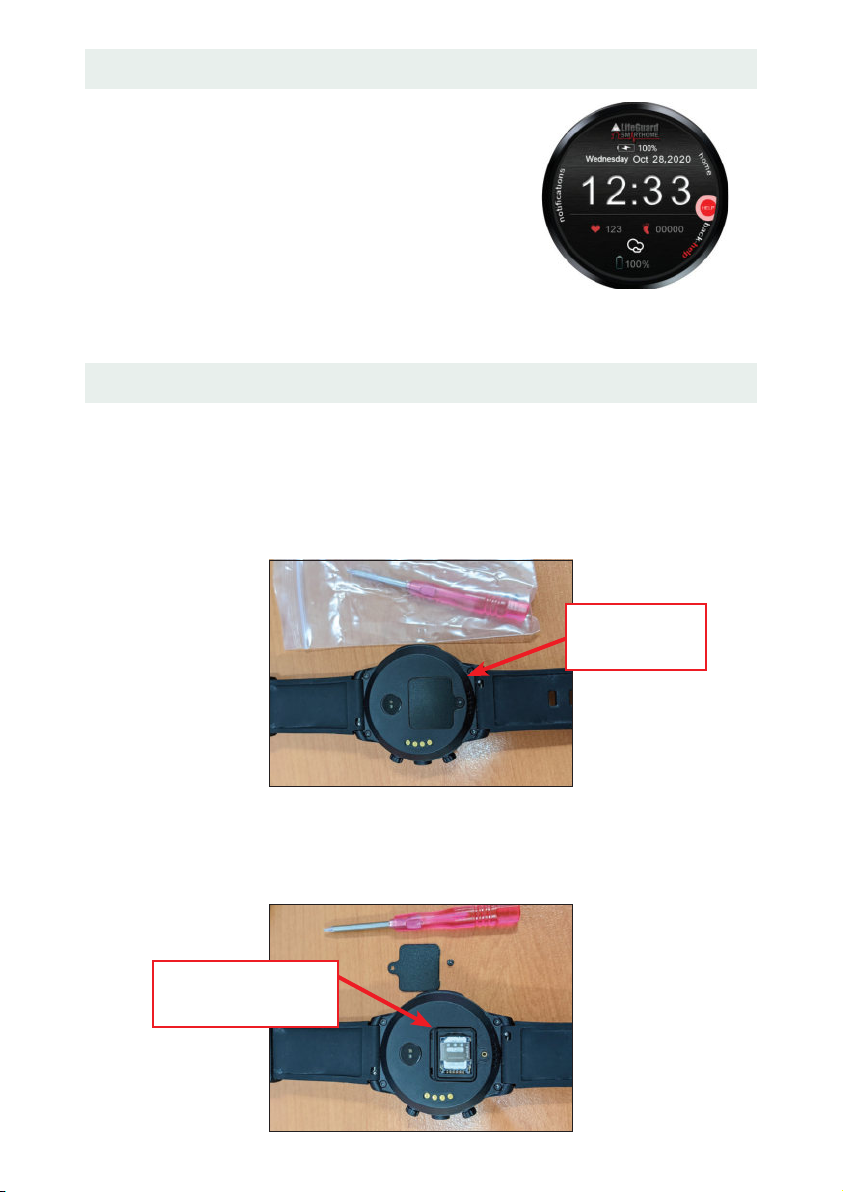
1. Use the small screwdriver that comes with the watch to
open the SIM card cover.
2. Slide open the shim that holds the SIM in place and insert
Nano-SIM, ensuring the notched corner is in the top left
when viewed as shown below.
Lift Shim and
insert SIM card
Open SIM
card cover
7
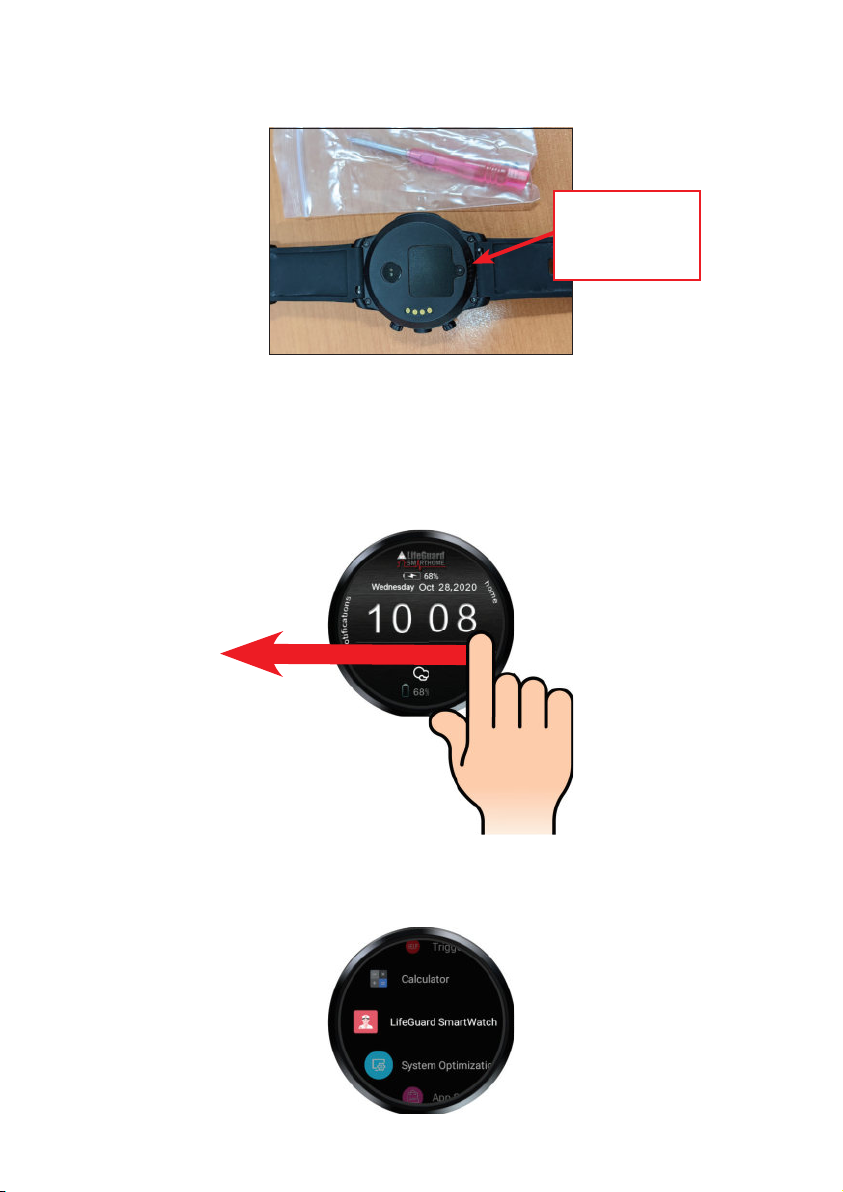
3. Lower the shim cover and slide back to lock in place, then
replace the SIM card cover and screw it back in place.
Once the SIM is installed, you can power on the SmartWatch
by pressing and holding the Power Button on the right side of
the watch for 5-10 seconds (see page 2).
Once powered up, the home screen appears.
Swipe left on the screen to see the app menu, and then scroll
until you see the LifeGuard SmartWatch app. Tap it to open.
Close cover
and replace
screw.

8
Tap the Login button to continue.
On the next screen you’ll need to enter the telephone
number for the SIM you have inserted, and press NEXT.
A code will be sent to the SmartWatch and appear on the
screen below. Once the code is there, press CONTINUE.
You’ll then be logged in and will see the home screen with
the widget showing.
This is the
Widget
9
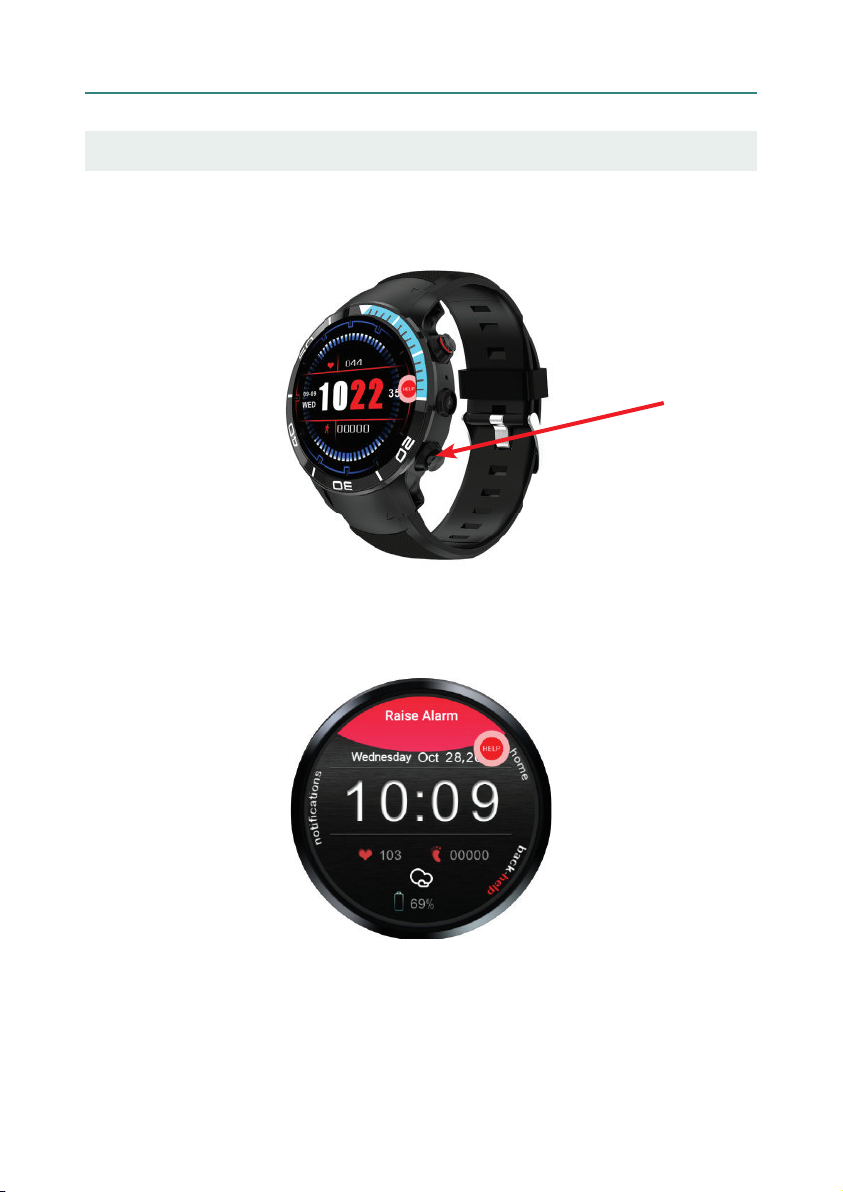
Activating an Alarm
There are two ways to trigger an alarm:
1. Press and hold the Down / HELP button for a few seconds.
2. Press on the Widget, drag it into the red area at the top
of the screen (Raise Alarm) and release.

10
With either method, you’ll see that the alarm is being
activated. You have 10 seconds to cancel the alarm in case it
was pressed by accident. You can press SEND NOW or CANCEL
ALARM at this stage.
If the alarm is not cancelled, it will come through to our
Emergency Response Centre, and you’ll see confirmation the
alarm has been received, and the bottom of the screen will
indicate that we will be calling to check on you.
The SmartWatch will auto answer our call so the nurse can
speak to you to determine what assistance you require.

11
Battery Level, WiFi and Bluetooth
The battery level is displayed on the bottom of the home
screen (as well as on top if the watch is plugged in and
charging).
You can also swipe down on the screen to reveal other
information, such as your 4G signal strength. Swipe left again
to reveal other settings, such as brightness, Bluetooth and
WiFi, which you can turn on or off by tapping.
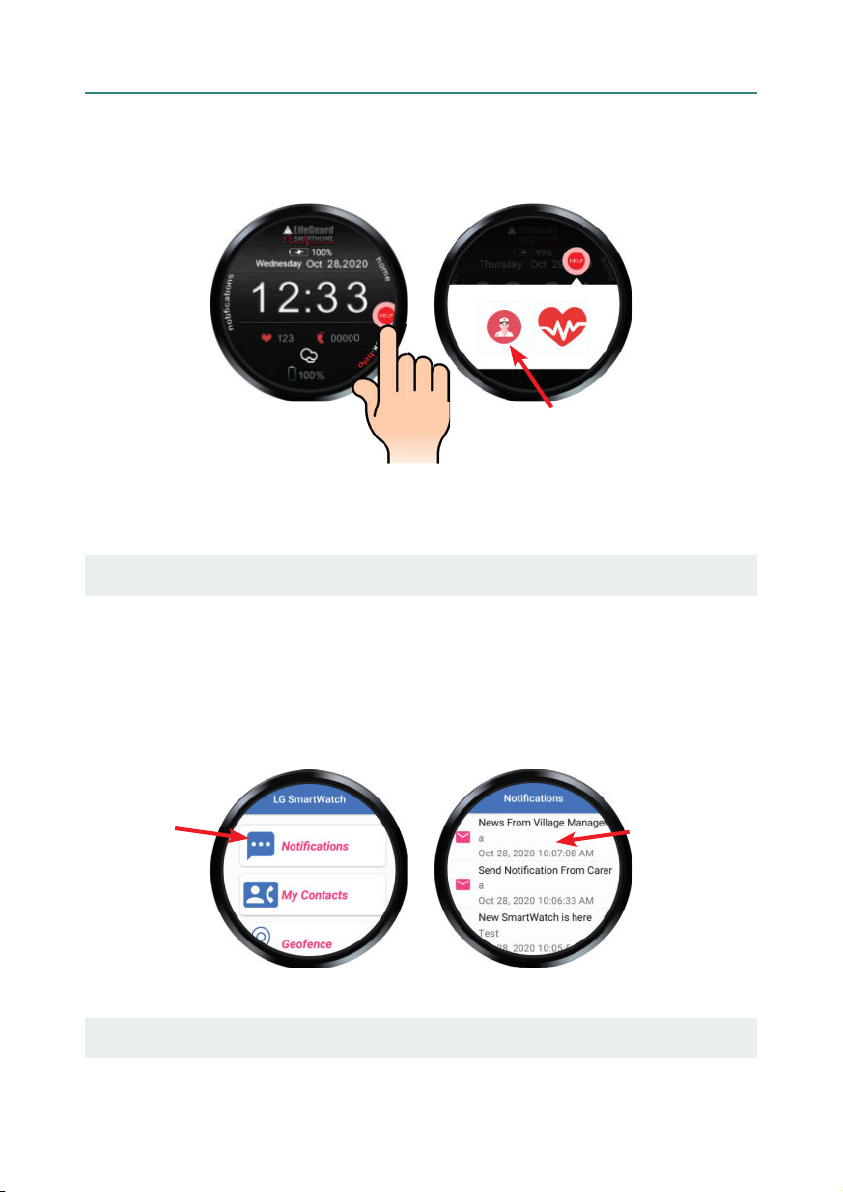
Notifications
Notifications will display on the watch as they are
received (below left). You can either tap OPEN to view the
notifications or tap DISMISS to ignore them. To view the
notifications at a later time, put your finger near the word
‘notifications’ on the home screen and swipe to the right.
12
The LifeGuard SmartWatch App
To quickly access the LifeGuard SmartWatch app, tap the
widget, then tap the nurse icon on the left. This will allow
you to access the functions outlined below.
To go back one screen at any time, simply press the down /
back button on the right side of the watch (see page 2).
Notifications
Any notifications in this area were sent directly to your
LifeGuard SmartWatch app, either from INS LifeGuard
or from Village Management, if you’re a village resident.
Tap Notifications to view a list of any notifications you have
received. Then tap an individual notification to read the full
message.
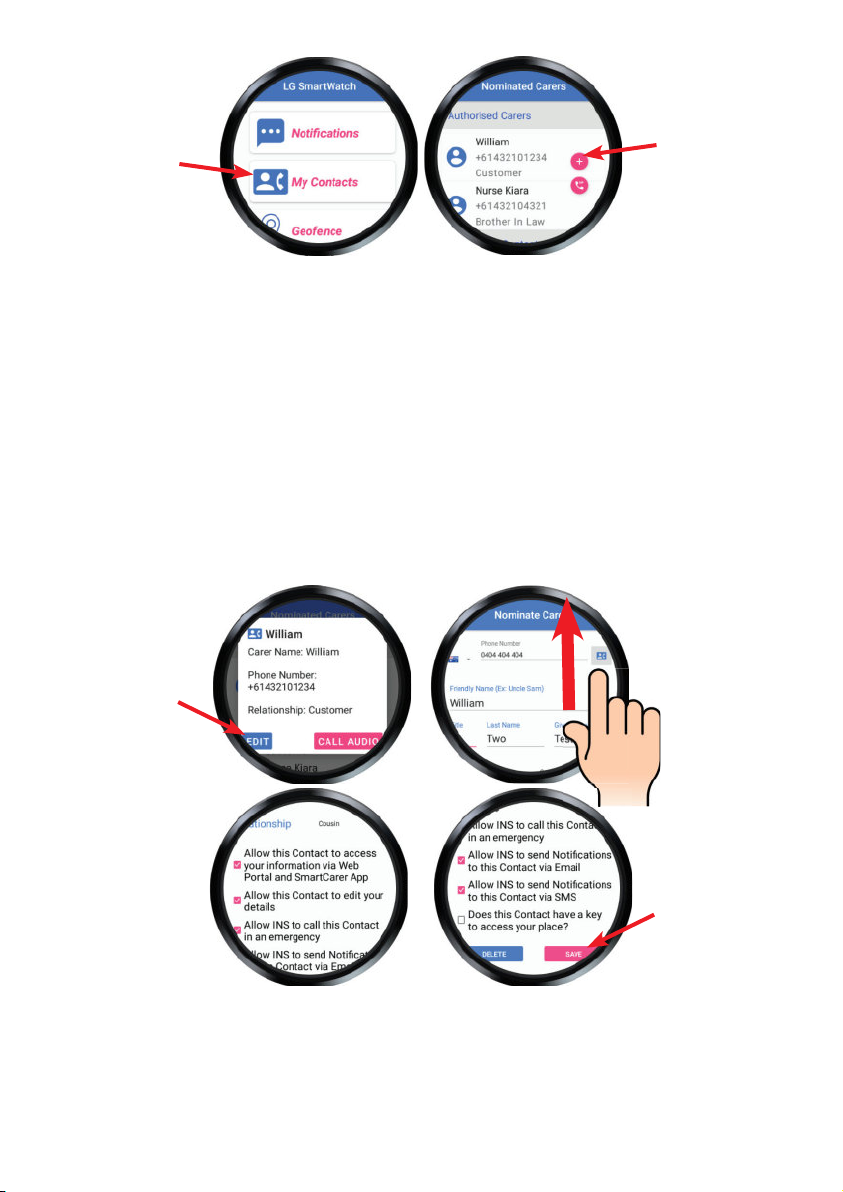
My Contacts
To view or change the details of your Emergency Contacts,
tap on My Contacts.
13
Tap the pink PLUS sign to add a new contact, or tap the name
of an existing contact to view or edit their information.
NOTE: the small pink phone button above will bring up the
phone dialler to call other numbers. This function is only
available if you have our optional Telephone Service. Call
1800 636 226 for more information.
If you have our Telephone Service, you can make a voice calls
by tapping CALL AUDIO. To edit their details, tap the EDIT
button, then scroll to view or change the information, or to
tick or untick any permission settings for this contact.
When finished, tap SAVE. To delete this contact, tap DELETE.
NOTE: You or your family/carer can also update emergency
contact information via either our free LifeGuard SmartCarer
App or our free, secure Client Portal (see page 20).

14
Geofence
Here you can view or create Geofence areas. This allows
emergency contacts to receive a notification if the
SmartWatch wearer enters or exits those pre-defined areas.
NOTE: family and carers can also set up these Geofence
notifications via the free LifeGuard Carer App or our free,
secure, web-based Client Portal (see page 20).
Tap Geofence from the LifeGuard SmartWatch app menu.
To jump to your current location, tap the target button [A].
Existing Geofence areas will be shown as circles on the map.
To create a new Geofence, tap the PLUS sign [B].
In the first screen above, you can move the map around using
your finger, and pinch to zoom in or out. Then tap to set the
area for the centre of the Geofence area. Press Continue.
In the second screen above, you’ll define the radius (how
far from that centre point the area will be). Slide the small
pink dot right to enlarge the area, or left to reduce it. Press
continue when you’re happy with it.
A
B

15
You can now enter a label to define this Geofence (e.g.
Home). Press continue, and you’ll then see your Geofence
displayed on the map.
To delete an existing Geofence, tap the circle on the map.
Then tap REMOVE to delete that Geofence area.
NOTE: You can only delete Geofence areas that you have set.
Those set by others can only be deleted by them.
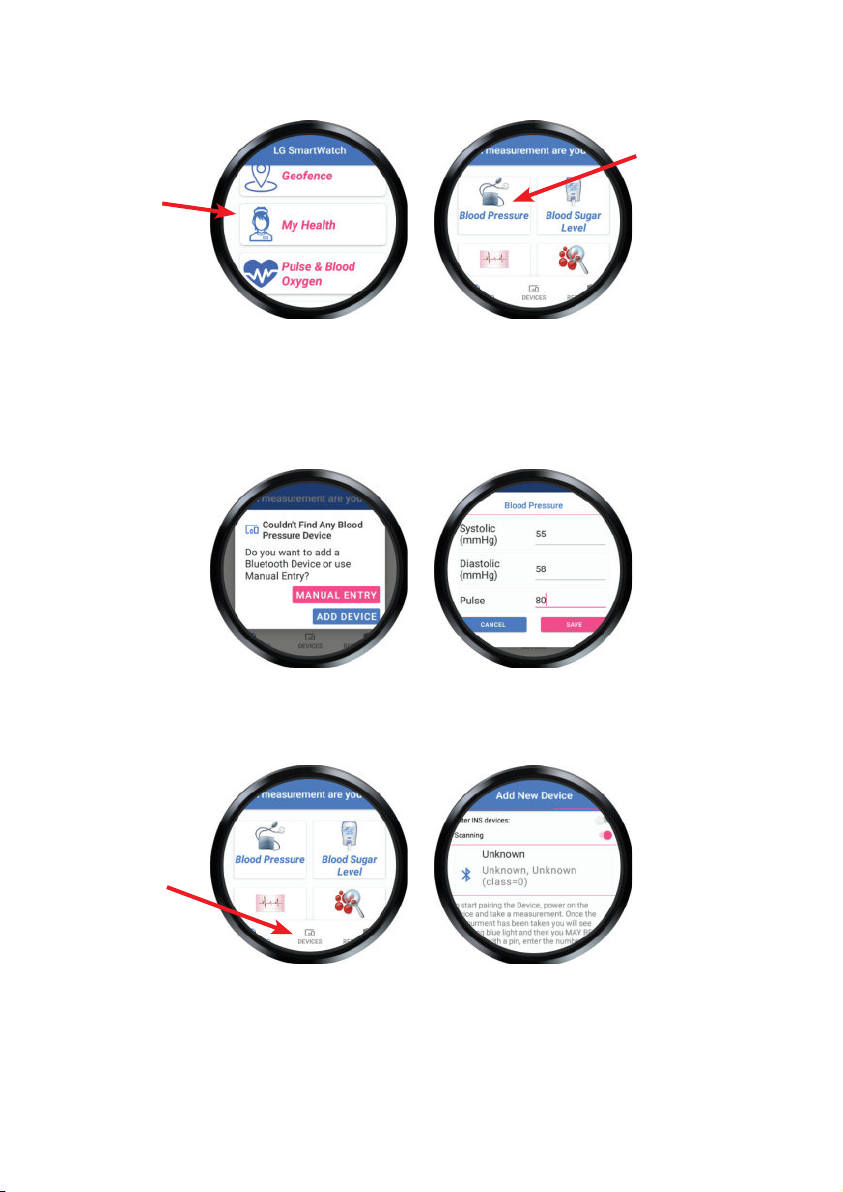
My Health
You can use this area to record vital signs that the
SmartWatch cannot measure directly. They can either be
entered manually after taking the measurements with your
existing devices, or they can be automatically collected from
compatible Bluetooth medical devices that have been paired
with the SmartWatch.
To see which Bluetooth devices INS LifeGuard can supply,
please visit: theinsgroup.com.au/products/telehealth-devices
16
Tap My Health and scroll to view available measurements,
then tap the icon for the measurement you wish to record.
If you’ve paired a Bluetooth device with the SmartWatch,
take the measurement now and it will automatically record
the results. Otherwise, tap Manual Entry to enter the results
yourself, or tap Add Device to add a new Bluetooth device.
You can also add a new device by tapping Devices at the
bottom of this screen.
Activate the device and the SmartWatch will attempt to pair
with it. If you require assistance pairing a device purchased
from INS LifeGuard, call 1800 636 226. If purchased
elsewhere, contact that manufacturer for assistance.
17
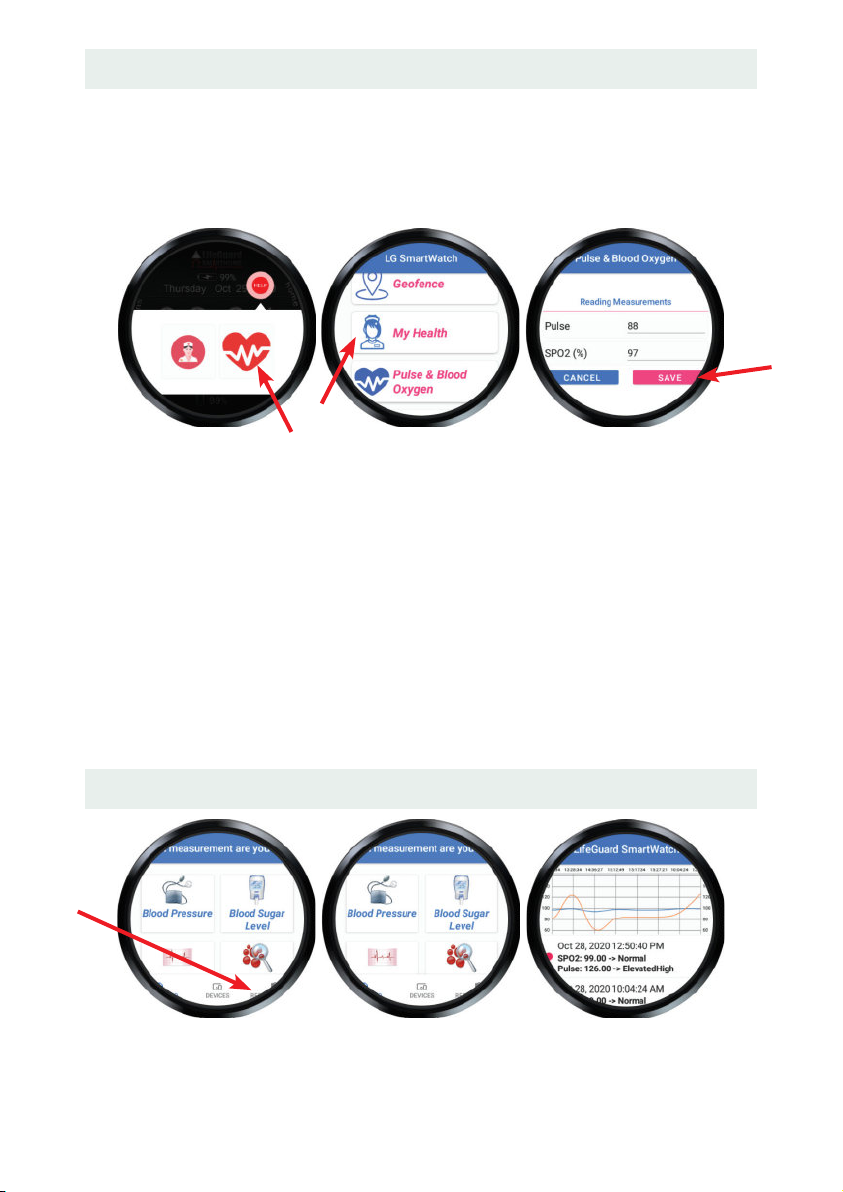
Pulse & Blood Oxygen
These measurements can be taken with the SmartWatch
directly. You must be wearing the watch for this function to
work. To start measuring, either tap the Widget and then the
heart icon OR tap Pulse & Blood Oxygen in the app.
The SmartWatch will display your pulse and SpO2
measurements on the screen. To save these results, press
SAVE, or press CANCEL if you don’t wish to save them.
To view past measurements, press HISTORY. The SmartWatch
will then display any previous records you have saved.
You can also view your history in the free Carer’s App and the
free, web-based Client Portal (see page 20) so the results can
be monitored, either by yourself, family members or your
carer. The history can also be shared with your GP.
To View Measurements Taken
Switch from Devices to Results by tapping Results on the
bottom right edge of the screen. Then tap the type of
measurement you wish to view and it will be displayed.
OR

18
My Concierge
If you’ve chosen our optional Concierge Service* or it’s
been provided through your village, you can use this area to
request assistance with everyday tasks.
Various types of assistance can be requested. Tap the type of
service you are interested in. You’ll be notified if the service
incurs a fee, and you can decide whether to proceed.
If this service is provided by your village, requests will be
sent to their nominated service providers and any charges
will be invoiced by the village.
If you’ve added our optional Concierge Service through INS
LifeGuard directly, your requests will be sent to the service
provider you nominated, or to one of our preferred providers,
and any fees will be added to your monthly invoice.
* Future planned, available soon.
Client Info
This will display the information we have on file for you. You
can choose to edit this information if necessary by tapping the
Edit button at the bottom of the screen.
19
NOTE: If you have a SmartHome IPD in-home medical alarm
system, you can also edit your information directly via the
IPD. Family and carers can edit your information (with your
permission) via our free LifeGuard SmartCarer App. And
either you or they can also do so via our free, secure, web-
based Client Portal (see page 20).
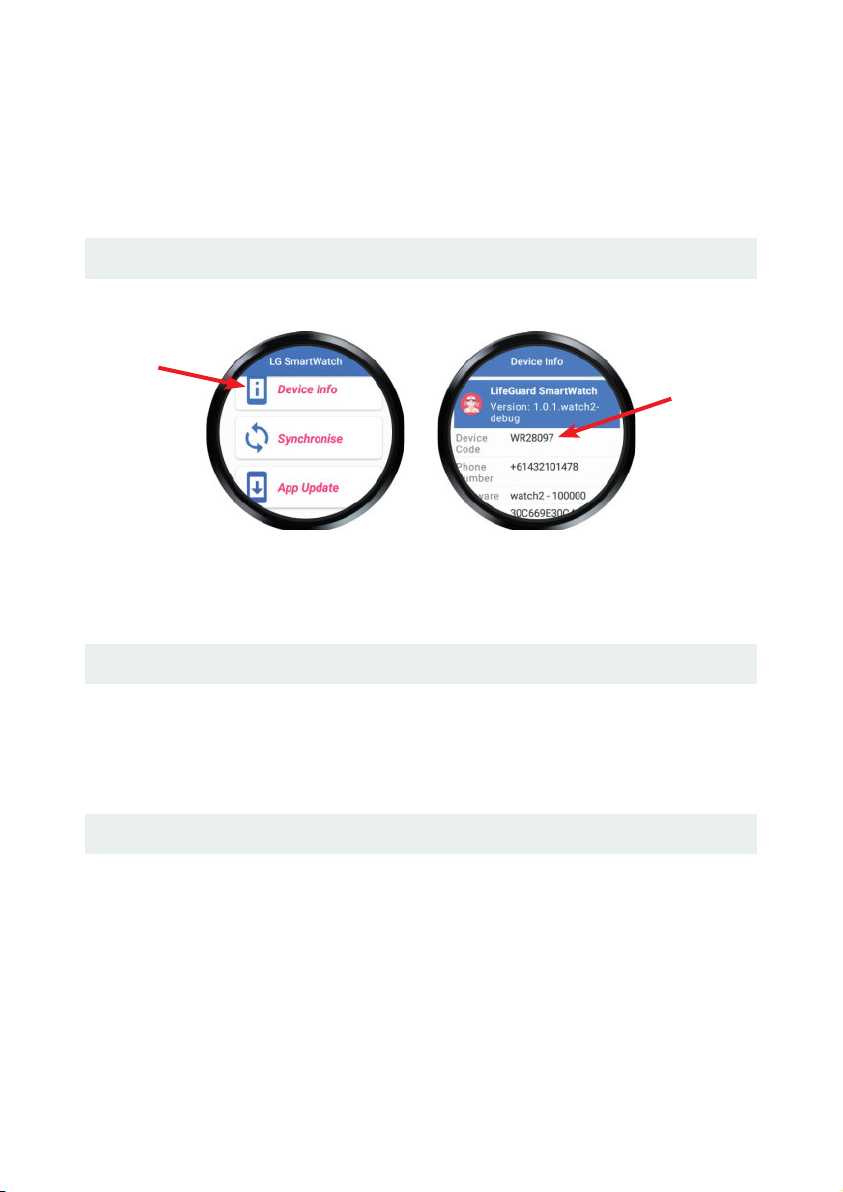
Device Info
This displays information about your LifeGuard SmartWatch.
If LifeGuard operators request your device code when
providing assistance, this is how you can locate that code.
Synchronise
This function is generally only used when programming the
device. But if you feel the information on your SmartWatch
isn’t up-to-date, you can press Synchronise to update it.
App Update
The SmartWatch should automatically update when new
versions of the app become available. To check for an update
at any time, simply press App Update.
20
Turning the SmartWatch Off
In the event you wish to turn the SmartWatch off, press
the Power Button (see page 2) and hold for 3 seconds, then
choose Power Off.
The LifeGuard SmartCarer App
INS LifeGuard has developed a special companion app called
LifeGuard SmartCarer. It allows family members and carers,
with your permission, to interact with your SmartHome (in-
home alarm system) and/or SmartWatch application, to
receive notifications and alerts, set-up tasks, send messages
to the SmartWatch, monitor the user’s activity and vital signs,
make audio or video calls* and much more.
It also lets you enter or edit information such as your GP
or Pharmacy, emergency contact details, and any Geofence
areas. For more information, please call 1800 636 226, or
visit: theinsgroup.com.au/smartcarer
* Future planned, however, SmartCarer app users can call your SmartWatch
.
Secure Client Portal
Alternatively, you can also enter this information via our
free Client Portal, which is a secure, web-based portal. For
more information, call 1800 636 226, or visit our website at
theinsgroup.com.au/products/client-portal
Contact INS LifeGuard to request access to the Client Portal.
Table of contents
Other INS Watch manuals


