Insignia D300a User manual

cover 8/10/04 1:13 PM Page 1

WELCOME
Congratulations on your purchase of a new Insignia
computer. We're confident you will enjoy the outstanding
power and reliability of your new computer, as well as
the opportunities it provides for education, work,
entertainment and more.
This guide is like a short course in setting up your computer
and connecting peripherals such as monitors, printers, cameras,
and home networks. It also provides some quick solutions for
common questions regarding the set up and operation of your
computer. Taking a few minutes to read this guide will help
ensure that you have the information necessary to operate your
computer safely and easily.
At Insignia, we are committed to constantly delivering the
best quality product and experience.
Thank you again for your purchase.
Insignia Products
Insignia User Manual
1
singlepages 8/10/04 1:38 PM Page 1

IMPORTANT SAFETY INSTRUCTIONS
1. Please read all warnings and instructions BEFORE operating your computer. Read and
follow these important instructions to avoid the risk of fire, electric shock, or injury.
2. Do not attempt to modify the supplied AC power cord.
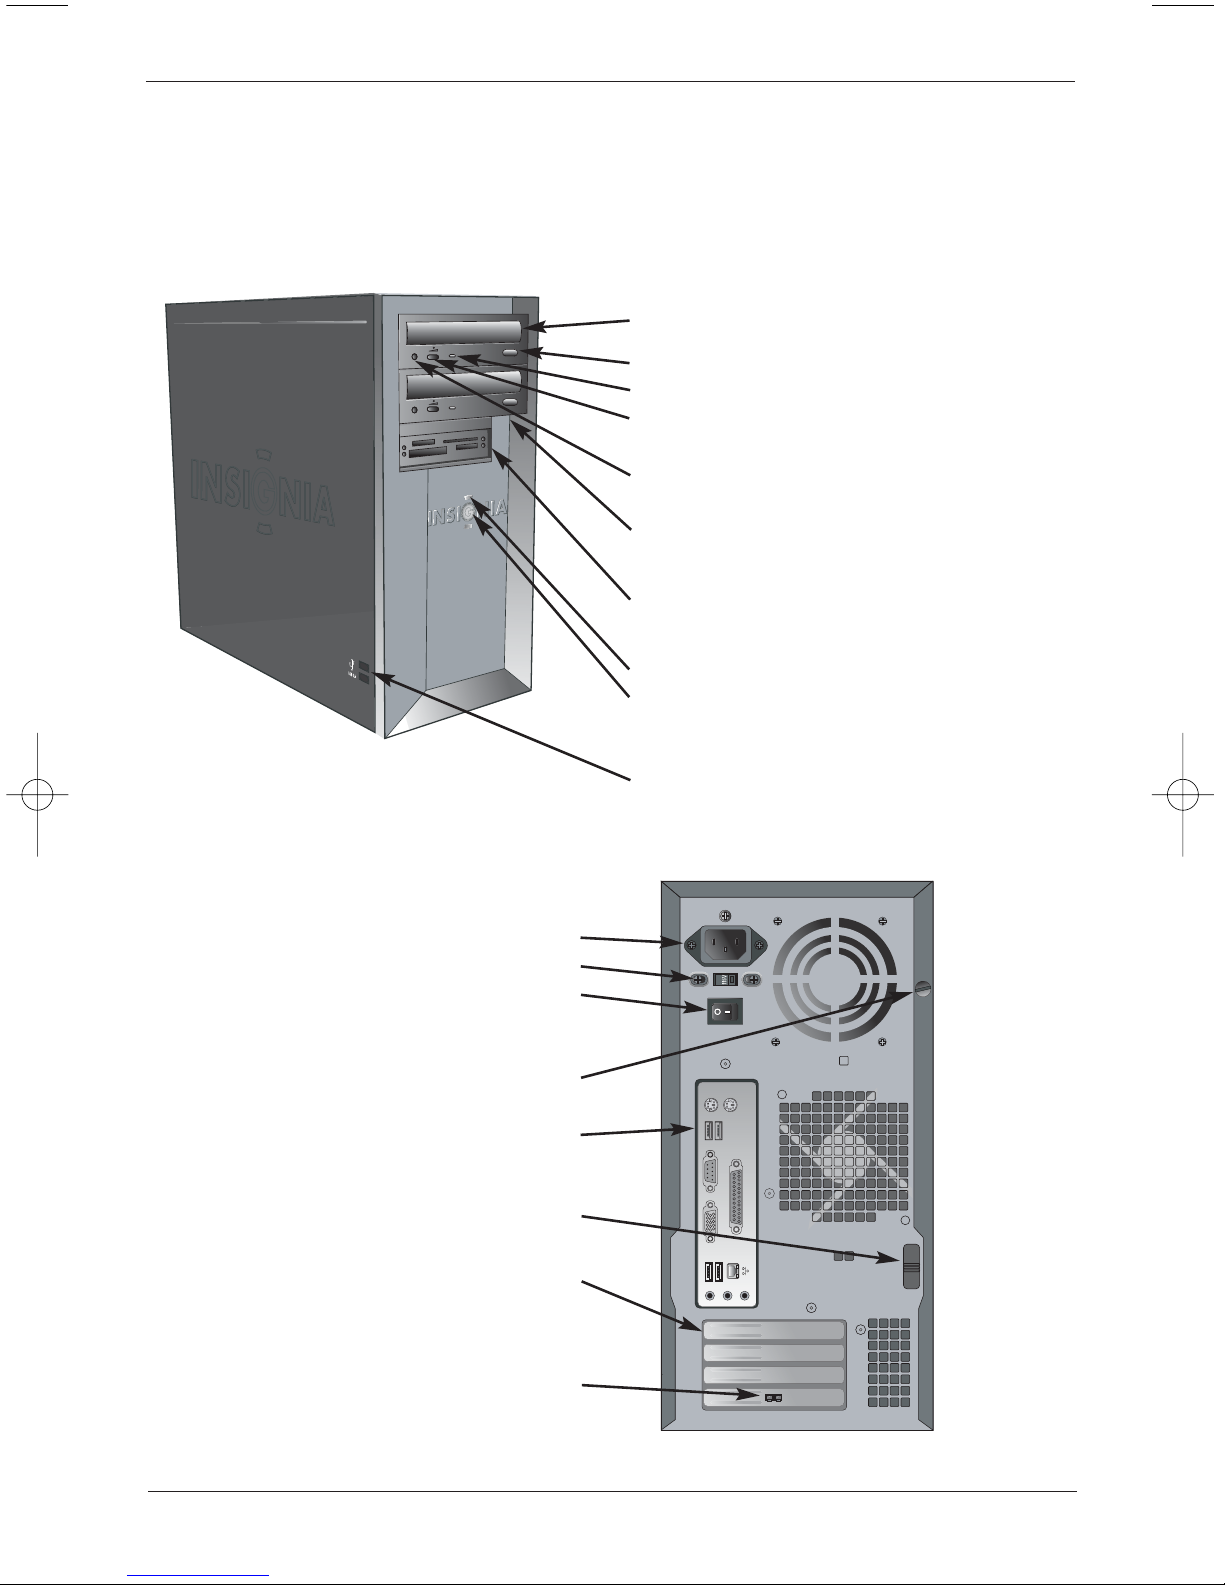
3. The power push-button on/off switch on the front of the computer does not turn off
system AC power. To remove AC power from the system, you must unplug the AC power
cord from the wall outlet or surge protector.
4. Read and follow the instructions and warnings found in this manual or marked on your
computer. Save this manual for later reference.
5. Place your computer on a strong, stable sur face, such as a desk. If you place your comput-
er on an unstable surface, like a box or cart, it could fall off and be seriously damaged.
6. Your computer needs good ventilation so it will run cool and fast. The openings on
the sides and back of your computer provide that ventilation. Don't block or cover these
openings. Don't use your computer in a bed or on furniture. Keep your computer away
from radiators and heat registers.
7. Don't use items such as screwdrivers or pens to poke through the ventilation openings
on the sides or back or your computer. You could come in contact with dangerous high-
voltage parts that could cause an electrical shock or short, which may damage your
computer or start a fire. Avoid spilling liquid on your computer or keyboard.
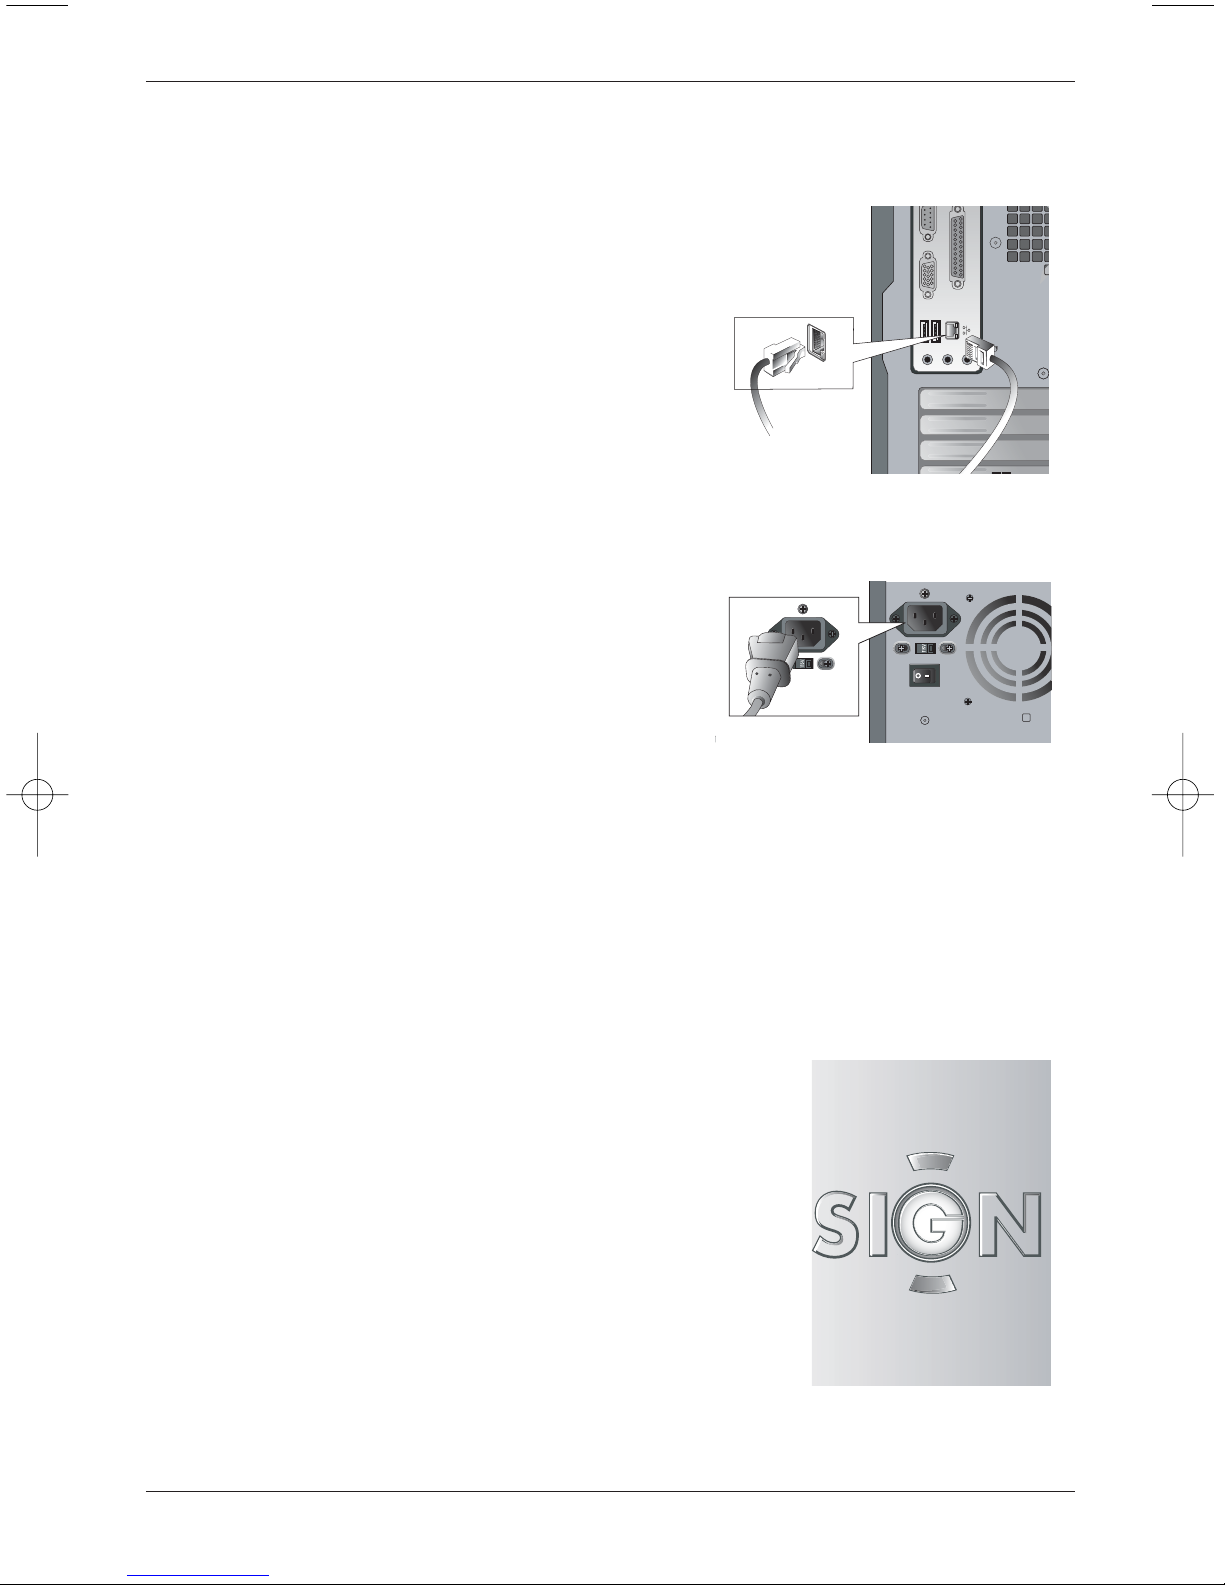
8. Make sure you plug your computer's power cord into an AC power source, such as a
wall outlet or surge protector. Be sure that the red voltage switch just below the AC port
on the back of your computer is set to 115V (US or Canada), or 230V in most other countries.
9. If you use an extension cord, make sure that the amperage rating is higher than the
total number of amps for your computer and all the equipment connected to it. Run
power or extension cords in safe places where people won't walk or trip on it. Don't put
anything, such as furniture, on top of the power cord.
10. You must connect your computer to an AC outlet designed for a 3-wire grounding plug
with three pins. This plug will only fit into a 3-wire grounding-type power outlet. Don't force
the plug into an outlet. If the outlet won't accept plugs with three pins, have it replaced
with a 3-wire grounding outlet by a qualified electrician.
11. Before opening or cleaning your computer, disconnect the AC power cord.
12. Don't use this computer near water, which could seriously damage it.
2
singlepages 8/10/04 1:38 PM Page 2

Make adjustments to your computer by following the guidelines found in this manual.
Bring your computer to your nearest Best Buy location for all other adjustments.
If you open your computer for maintenance or enhancement, first make sure the computer's
AC power supply cord is disconnected from the main AC outlet. Replace the cover and
secure it with the thumbscrew before connecting your computer to an AC outlet.
Only use the AC power cord that came with your Insignia computer. If you lose or dam-
age the AC power cord, replace it with a 125V, 10A cord if your computer uses 115 Volts AC
power.
TABLE OF CONTENTS
Insignia User Manual
3
Page
4..........What's What on your Insignia
Computer
6..........Getting Started
7..........Find a Place to Set Up Your
System
7..........Connect the Keyboard and
Mouse
8..........Connect the Monitor
8..........Connect the Speakers
8..........Connect the Modem
9..........Connect to a Network
9..........Setting Up Windows XP
9..........Starting Your Computer
10........Turning Off Your Computer
10........How to Use Your Insignia
Computer
10........Floppy Disk Drive (Insignia
D300 Only)
11........Media Card Reader (Insignia
D400 Only)
12........CD/DVD Drives
13........Adding Peripherals
13........Installing Parallel Printers
13........Connecting USB Peripherals
Page
14........About Expanding and
Updating Your Computer
14........Removing the Computer
Cover
15........Installing Additional Memory
15........Installing a PCI Expansion
Card
16........Adjusting Your Monitor
16........Adjusting Audio
16........About Viruses
17........How to Restore Your
Computer Using Windows XP
18........Restoring the Computer to an
Earlier Operating State
18........Using the Restore DVD-ROM
19........About Insignia Customer
Support
19........Frequently Asked Questions
23........Error Messages
24........Warnings !
25........Important Safety Instructions
26........FCC Declaration of
Conformity
27........Contact Information
singlepages 8/10/04 1:38 PM Page 3

WHAT’S WHAT ON YOUR INSIGNIA COMPUTER
4
DVD-ROM (D400 only)
DVD/CD-RW Combo Drive (D300 only)
Eject Button
Drive Activity Light
Headphone Volume Control
Headphone Jack
CD-RW Drive (D400 only)
Media Card Reader (D400 only)
Floppy Disk Drive (D300 only)
Power & Hard Drive Activity Lights
Power Button
USB Ports (2)
AC Power Cord Connector
AC 115V or 230V Selector Switch
Power On/Off Switch
Thumbscrew
Peripheral Connections Panel
(See Close-Up, Next Page)
Side Cover Latch
PCI Expansion Panels
(Slots Inside)
Modem Ports
singlepages 8/10/04 1:38 PM Page 4

You'll notice the "engineered by vpr Matrix" logo on the front of your new computer.
With the success of the vpr Matrix line of premium computers launched in 2002, the
vpr Matrix team has created Insignia PCs.
Like vpr Matrix, Insignia PCs are built on the enduring principles of value, performance
and reliability. For more information, visit our Website at www.Insignia-Products.com.
Insignia User Manual
5
Keyboard Connector (Purple)
Mouse Connector (Green)
USB Ports (2) (Black)
Serial Port (Teal)
Parallel Port (Burgundy)
VGA Video Port (Dark Blue)
USB Ports (2) (Black)
LAN Connector (Black)
Microphone In (Pink)
Audio Line Out (Lime Green)
Audio Line In (Light Blue)
singlepages 8/10/04 1:38 PM Page 5

GETTING STARTED
Setting up your new Insignia computer is a simple process that should take just a few
minutes. Take time to read this guide to ensure that you complete all the steps for a
fast and successful setup. Please keep all documentation and software for your computer
in a safe and convenient place. This will make it easier for you to access useful
resources and provide the necessary information in the event you require technical sup-
port.
Begin by unpacking the Insignia box. Unfold the set-up guide in a convenient spot near
where you'll set up your computer. Unpack your separate monitor, accessories, peripherals,
AC power cords, and cables. For example, if you plan to connect a printer, you'll need
either a parallel port printer cable or USB cable, and an AC power cord.
NOTE: These cords and cables are not included with your computer, and are often not
included with peripherals and accessories. Be sure to get the right cords and cables for
each accessory or peripheral you add to your system.
We recommend that you use a surge protector to connect all AC Cables. A surge protector
is not included with your computer. Your local Best Buy store stocks peripheral cables
and cords, as well as surge protectors.
6
Insignia Box Contents
•Set-up Guide
•Insignia Computer
•Keyboard and Mouse
•Speakers
•AC Power Cord
•Phone Cord
•User Manual
•Microsoft XP Manual
•Restore DVD
singlepages 8/10/04 1:38 PM Page 6

FIND A PLACE TO SET UP YOUR NEW SYSTEM
It's important that you:
•Choose a good location to set up your computer so that both you and your new
computer are safe. Make sure your working position is comfortable and promotes
good posture while you're at your computer.
•Place you computer on a sturdy desk or table, one strong enough to support the
weight of your computer system and all peripherals.
•Flat and hard sur faces are best; soft surfaces like fabric or carpet can encourage
static electricity, which can damage the electrical circuits in your computer.
•Make sure that air can freely flow around your computer and monitor. Restricted
airflow can cause overheating.
•Keep your computer away from direct sunlight, extreme heat or cold, and moisture.
•Always use a grounded 3-hole outlet to prevent electrical shorts or fires.
•Do not operate your computer with any side, front, or back cover(s) removed.
•Check the voltage selector on the back of the computer just below the AC power port.
The selector should be set to the correct local AC power supply. In the United States,
it must be set to “115V”.
CONNECT THE KEYBOARD AND MOUSE TO YOUR COMPUTER
The keyboard cable has a purple plug that
matches the purple keyboard port on the back
of your computer, and the mouse has a green
plug that matches the green mouse port.
Connect both of these cables, taking care to
align the raised section on each of the plugs
with the notches on the ports.
Insignia User Manual
7
singlepages 8/10/04 1:38 PM Page 7

CONNECT THE MONITOR
Unpack the Insignia CRT monitor, or another
monitor you plan to use with your Insignia
computer. Read and follow the monitor
manufacturer's instructions. If software came
with your monitor, please follow the procedures
outlined in the manufacturer's documentation
to install the appropriate drivers.
NOTE: Often monitor manufacturers will offer updated drivers for their monitors. It's a
good idea to visit the manufacturer's website to see if updated drivers are available for your
monitor.
Begin by placing your monitor on a sturdy sur face. You should be comfortably seated in
a chair to work with your computer. The top of your monitor should be at or slightly below
eye level to reduce eyestrain and fatigue. Plug the monitor AC power cord into a wall
outlet or surge protector. Then plug the monitor cable into the VGA video port on the
back of your computer.
CONNECT THE SPEAKERS
Plug the speaker connector into the Green
Speaker Port. For your Insignia powered
speakers, plug the speaker AC power cord
into a surge protector or wall outlet.
If your speakers have a volume control, adjust it
to a comfortable listening level.
OPTIONAL: CONNECT THE MODEM
If your new computer will connect to the Internet
using the phone cord, connect one end of the
cord to a working telephone jack and the other
end to the "Line" modem port on the back of the
computer. Use the "Phone" modem port to
connect a telephone to share same line and a
separate cord.
NOTE: The modem should be connected to a working phone jack before turning on your
computer for the first time.
8
singlepages 8/10/04 1:38 PM Page 8

OPTIONAL: CONNECT TO A NETWORK
If you're using your Insignia computer as part
of a home network, or connecting to a LAN, connect
one end of a CAT5 network cable to the network port
on the back of the computer and the other end to a
working cable or DSL modem.
NOTE: The CAT5 cable should be connected to a
working network that can access the Internet before
turning on your computer for the first time.
CONNECT THE COMPUTER POWER CORD
Connect the AC power cord (the end with no metal
prongs) to the AC power port on the back of the
computer. Plug the other end into a surge protector
or a wall outlet.
SETTING UP WINDOWS XP
Your new Insignia computer already has the Windows XP operating system installed.
When you turn on your computer for the first time, Windows XP will guide you through the
set-up process. NOTE: If your Best Buy Geek Squad Agent set up your computer and
Windows XP in the store, you may not see these screens.
STARTING YOUR COMPUTER
Turn on the monitor and any other peripherals connected to
your computer (printer, scanner, etc.). Press the power but-
ton on the front of your computer. The activity lights will turn
on and Windows XP will begin to load.
NOTE: If a CD, DVD, floppy or other media card is in your
computer when it is turned on, your computer may attempt
to start up from that disk rather than the hard drive. If you
mistakenly start from a disk and wish to start from the hard
drive, remove all media and then restart your computer.
Insignia User Manual
9
singlepages 8/10/04 1:38 PM Page 9

TURNING OFF YOUR COMPUTER
First, save all data and files, and close all application programs. Click "Start" on the
desktop menu, then in the "Shut Down Computer" dialog box, click "Shut Down" and
"OK." Turn off your monitor, speakers, and any other devices connected to your comput-
er.
If your computer does not respond to keyboard or mouse input, hold in the power button
for four seconds to turn off your computer.
HOW TO USE YOUR INSIGNIA COMPUTER
Your Insignia Computer is designed for powerful computer applications. Many involve
using CDs and DVDs, digital memory cards, and floppy disks. Follow these instructions
to get the most out of your computer.
FLOPPY DISK DRIVE INSIGNIA (MODEL D300 ONLY)
Insert a floppy disk with the label
side up and the metal square
toward the computer. Push the disk
gently until it clicks into place. Do
not force the floppy disk into the
drive - it will only go in one way.
To remove a floppy disk, wait until
the activity light on the floppy disk
drive is off, then push the eject
button to pop out the disk.
Do not eject the disk while the drive
is still operating, or serious damage
and loss of data can occur.
10
singlepages 8/10/04 1:38 PM Page 10

MEDIA CARD READER (MODEL D400 ONLY)
The Media Card Reader reads memory cards used in digital cameras, MP3 players and
other devices. Insert cards according to the illustration. Do not force cards into slots as
this can damage cards and/or the reader.
If you insert a media card and your computer does not automatically open a window for it,
go to My Computer and double-click the drive associated with your media type.
To safely remove the media cards from the reader, ensure all data transfer activity is
complete. Then close the open window for the media card and simply pull out the card.
CAUTION: The reader operates similarly to external USB devices connected to your PC.
However, because it is an internal device, to remove inserted media cards, never use the
Windows "Safely Remove Hardware" function found as an icon in the system tray at the
bottom right hand side of your screen. Using this application will disable the function of
the entire media reader, not just the inserted card. Instead, to remove safely remove the
media cards from the reader, ensure all data transfer activity is complete. Then close the
open window for the media card and simply pull out the card. If the reader becomes dis-
abled by the "Safely Remove Hardware" application, you must restart the computer to
make the drive functional again.
Insignia User Manual
11
singlepages 8/10/04 1:38 PM Page 11

CD/DVD DRIVES
To play a CD or DVD, press the load/eject button on the front of the drive. Place the CD
or DVD label-side up in the center of the tray and press the button again to load the disc.
Use PowerDVD, an application included with your Insignia computer, to access your DVDs.
Note: Some models have multiple drive configurations. Make sure to use the appropriate
drive for the type of media you wish to use (i.e. DVDs are played in the DVD-ROM drive,
Model D400).
You may notice a headphone jack on the face of a drive. This is disabled in the PC's
default settings. To enable it, open Windows Media Player, select Tools, then Options,
then the Devices tab. Select the drive you wish to use under Playback, and check Analog.
Restart Media player. To return to the default setting, repeat this process and select
Digital instead of Analog.
12
Model D400 shown
singlepages 8/10/04 1:38 PM Page 12

ADDING PERIPHERALS
Peripherals are devices that work with your computer to expand your capabilities.
Peripherals include monitors, printers that use a parallel connection, USB devices such
as printers, scanners, keyboards, headphones, and more. Follow the manufacturer's
directions for easy installation of peripheral hardware and software.
CAUTION: Adding peripherals and software to your system departs form the original
manufacturer's specifications for your computer. Some hardware and software may
cause your system to not operate as originally shipped, and can limit your ability to use
your computer. Insignia products is not responsible for operating problems with added
peripherals and hardware not originally shipped with your computer.
NOTE: Cables and AC cords are often not included with peripherals. Visit your nearest
Best Buy store to purchase these cables and cords.
INSTALLING PARALLEL PRINTERS
You must use a parallel printer cable to connect
printers that use a parallel connection.The cable
is usually not included with the printer. The
parallel cable has two different connectors.
Plug the larger of the two connectors into the
port on the printer and secure it into place
using the clips on the left and right side of the
port. Connect the smaller end of the cable to
the parallel port on the back of your computer
and secure it into place using the screws on the
left and right sides of the plug. The plugs will
only go in one way - do not force them into
place or you could damage the cable.
CONNECTING USB PERIPHERALS
Universal Serial Bus (USB) devices are connected to your computer using a USB cable,
which is often not included with the peripheral. The cable has different connectors on
either end to prevent mistakes. Plug the rectangular connector into one of the six USB
ports on your Insignia computer. Four USB ports are on the back of the computer, and
another two are conveniently placed on the side in front. You can connect up to six USB
peripherals on your computer, and even add more with an expansion card or USB hub.
Plug the smaller connector that looks square into the USB peripheral.
Insignia User Manual
13
singlepages 8/10/04 1:38 PM Page 13

ABOUT EXPANDING AND UPDATING YOUR COMPUTER
You may wish to upgrade or expand your computer's capabilities by adding more memory,
an additional hard drive, or an expansion card. You'll need to open the computer to
perform these tasks.
WARNING: Some procedures described in this section, if performed improperly by you,
may result in damage to your computer. Insignia products is not responsible for damage
caused by you in attempting to expand or update your computer's internal hardware.
If you feel uncomfortable or unsure with any part of the process, bring your Insignia
computer to Best Buy for the installation of your expansion hardware and/or updates.
REMOVING THE COMPUTER COVER
Begin by turning off your computer and all
peripheral devices. Disconnect all network
cables by first unplugging the cable from
your computer and then from the network.
Also disconnect any telephone lines from
the computer. Unplug your computer from
the AC electrical outlet.
Lay your computer on its side with the
left side (as you face the front of the
computer) panel facing up. Remove the
large thumbscrew on the back of the
computer and press down on the black
release tab with your left hand. With your
thumbs, slide the side panel to the rear to
release it, and then lift it off.
To replace the side panel, set it into place
and push it forward. The release tab will
click into place when the panel is seated.
Replace the thumbscrew.
14
singlepages 8/10/04 1:38 PM Page 14

INSTALLING ADDITIONAL MEMORY
Follow instructions on page 14 for removing the computer cover.
.
Open the securing clips at each end of the memory module connector. Insert the
additional memory module in its correct alignment into the module connector until it
snaps into position. The securing clips will automatically snap into place when the
memory module is correctly inserted.
Replace the computer cover, reattach all cables, and start your computer.
INSTALLING A PCI EXPANSION CARD
Follow instructions on page 14 for removing the computer cover.
Remove the screw that holds the filler
bracket in place for the card slot you
want to use and save the screw.
Align the gold connectors on the bottom
of the card with the connector on the
computer board. Rock the card back
and forth while pressing it into place
until it is seated.
Secure the card to the chassis using the
screw you removed earlier. Connect
any cables that are attached to the card
following manufacturer's recommenda-
tions in the instructions that came with
the card.
Replace the computer cover, reattach all cables, and start your computer.
Insignia User Manual
15
singlepages 8/10/04 1:38 PM Page 15

ADJUSTING YOUR MONITOR
Refer to the Insignia C170 monitor manual (or manual for other monitor you are using)
and follow the guidelines to ensure that your monitor is performing optimally.
You can make additional adjustments by clicking "Start" then "Control Panel,
"Appearance and Themes," and "Display," and make any modifications to the look of your
computer's desktop. Under "Settings," you can adjust the color depth from the pull down
list. Use the highest setting possible. If your screen flickers or your computer's perform-
ance is diminished, use a lower setting.
ADJUSTING AUDIO
To adjust audio volume use the "Adjusting the System Volume" feature in "Sound,
Speech, and Audio Devices" in the "Control Panel." If you're using an audio expansion
card, you may be able to use an enhanced audio control panel that came with the
expansion card. Read and follow manufacturer's recommendations. If you're using an
audio expansion card, install the software that came with the card and follow the
manufacturer's recommendations.
ABOUT VIRUSES
Viruses from e-mail, the Internet, or illegally pirated software can delete information and
data from your Hard Disk Drive. The best defense against viruses is to use a firewall and
anti-virus software, and also by updating Windows XP through Microsoft's website.
Back up all of your important files, which can save you time and money in the event of
damage and loss of data from a virus. Backing up your files is the best insurance
available to ensure the safety of your photos, videos, and data.
If anti-virus software was not added to your Insignia computer when you purchased it, we
recommend that you go to Best Buy or Bestbuy.com to purchase and install an anti-virus
software package.
Using a firewall is another important line of defense for computer security. Here's how to
make sure the Windows XP firewall is turned on.
Click "Start," and then "Control Panel," "Network and Internet Connections," and then
"Network Connections." Under the "Dial-Up" or "Local Area Connection" or "High Speed"
Internet heading, click the icon to select the connection that you want to help protect.
In the task pane on the left, under "Network Tasks," click "Change Settings of this
Connection." On the "Advanced" tab, under "Internet Connection Firewall," check the box
next to "Protect my computer and network by limiting or preventing access to this
computer from the Internet." Windows will guide you through the set-up process.
16
singlepages 8/10/04 1:38 PM Page 16

HOW TO RESTORE YOUR COMPUTER USING WINDOWS XP
The Microsoft Windows XP operating system provides System Restore to enable you to
return your computer to an earlier operating state (without affecting data files) if changes
to the hardware, software, or other system settings have left the computer in an
undesirable operating state.
You can choose to restore your computer to an earlier time, or create a restore point.
Windows will guide you through the process.
RESTORING THE COMPUTER TO AN EARLIER OPERATING STATE
If problems occur after you install a device driver, use Device Driver Rollback to resolve
the problem. Click "Start" and then "Control Panel" and "Performance and
Maintenance," and then click "System." On the Hardware Tab, click "Device Manager."
Right click on the driver you want to roll back and choose "Properties." Click the Driver
Tab, and then click "Roll Back Driver." If that is unsuccessful, then use System Restore.
Click "Start," and then "Programs," " Accessories," "System Tools," and finally "System
Restore." Make sure that "Restore my computer to an earlier time" is selected and click
"Next."
The "Select a Restore Point" screen provides a calendar that allows you to see and
select restore points. All calendar dates with available restore points appear in boldface
type.
Select a restore point and click "Next." If a calendar date has only one restore point,
then that restore point is automatically selected. If two or more restore points are avail-
able, click the restore point that you prefer. Click "Next." The Restoration Complete
screen appears after System Restore finishes collecting data and then the computer
restarts.
After the computer restarts, click "OK." To change the restore point, you can either
repeat the steps using a different restore point, or you can undo the restoration.
For additional help, contact Geek Squad or visit your local Best Buy store and talk with a
customer support professional.
Insignia User Manual
17
singlepages 8/10/04 1:38 PM Page 17

USING THE RESTORE DVD
If Windows no longer operates, you may need to use the Restore DVD.
Note: This operation may remove all data files from your hard disk. Back-up your files
regularly to prevent data loss.
Once you insert the DVD, the recovery application will default to Non-Destructive recov-
ery. If you press “Next”, the application will over-write your Windows XP system and leave
your data files in place. The mode will often recover systems which have missing files,
however sometimes you will want to restore your system completely to the factory
settings and re-format the hard drive. This will ensure that your system is completely
restored to the same settings that you originally had when first taking the system out of
the box. To select Recovery with Formatting, click “Advanced Options” on the System
Recovery screen. Select the “System Recover - Quick Format” option and then press
“Next”.
Follow the confirmation prompts to continue with the Recovery. When the system
displays the “System Recovery Finished” dialog box, click “Restart”. Do not remove
the DVD from the drive until you see Windows booting.
Re-installing Drivers:
To re-install any of the drivers for your Insignia Computer please insert your DVD Recovery
Disk in your DVD drive. Windows will then open a folder on the desktop with all your
original drivers shown in separate device folders. To re-install your drivers follow the
Windows instructions for each device.
Restoring BIOS Settings:
When you first power on your Insignia PC you will see an “Insignia” splash screen.
Press “F1” and you will see the BIOS Setup Utility. To restore settings press “F9”,
and then press “OK”. Press “F10” and then select “OK”. Your system will reboot.
18
singlepages 8/10/04 1:38 PM Page 18

ABOUT INSIGNIA CUSTOMER SUPPORT
Visit the Insignia website for customer support. If, after checking
www.Insignia-Products.com, you continue to have questions regarding your computer,
toll-free technical support is available to you, 24 hours a day, 7 days a week by calling
1-877-467-4289.
FREQUENTLY ASKED QUESTIONS
Q. Why doesn't my computer turn on?
A. If the two small lights on the front panel are not on, it's probably because power isn't
getting to the computer. Check to see if the power switch on the back of the computer
just below the AC power cord port is turned on. Also make sure the power cord is
plugged into a working AC wall outlet or surge protector. A faulty wall outlet or a sudden
power failure could also have caused a power failure. If you've experienced a power
failure, unplug your AC power cord, wait 10 seconds, reconnect the power cord, and
press the power button.
Q. Why isn't my keyboard working?
A. Check to ensure that the keyboard cable is connected to the keyboard port on the
back of your computer. Make sure that no keys are stuck. Verify that the keyboard
works by trying it on another computer, then try another keyboard on your Insignia com-
puter. If the keyboard is bad, you'll need to replace it.
Q. Why doesn't my mouse work?
A. Check to make sure that the mouse cable is connected to the mouse port on the
back of your computer. If you're using the Insignia mouse, remove the ball and clean the
mouse. Check your mouse on another computer to verify that it's working. If not,
replace the mouse.
Insignia User Manual
19
singlepages 8/10/04 1:38 PM Page 19
This manual suits for next models
2
Table of contents
Popular Desktop manuals by other brands

ViewSonic
ViewSonic VS12602 user guide

AXIOMTEK
AXIOMTEK eBOX565-312-FL Series Quick installation guide

C&T Solution
C&T Solution ACO-6000-8L user manual

Lenovo
Lenovo 10TV0023IX User guide and hardware maintenance manual

Avalue Technology
Avalue Technology ERS-CDVE Quick reference guide

HP
HP Xw4550 - Workstation - 2 GB RAM troubleshooting guide