Intec CP2020 User manual

CP2020
Conguration Guide

Preface > 2
P
REFACE
Every effort has been made to ensure that the information in this document is
complete, accurate, and up-to-date. The manufacturer assumes no responsibility
for the results of errors beyond its control. The manufacturer also cannot guarantee
that changes in software and equipment made by other manufacturers and referred
to in this guide will not affect the applicability of the information in it. Mention of
software products manufactured by other companies does not necessarily constitute
endorsement by the manufacturer.
While all reasonable efforts have been made to make this document as accurate and
helpful as possible, we make no warranty of any kind, expressed or implied, as to
the accuracy or completeness of the information contained herein.
Copyright © 2011 Intec Printing Solutions. All rights reserved.
Microsoft, MS-DOS and Windows are registered trademarks of Microsoft
Corporation.
Apple, Macintosh, Mac and Mac OS are registered trademarks of Apple Inc.
Other product names and brand names are registered trademarks or trademarks of
their proprietors.

Contents > 3
C
ONTENTS
Preface . . . . . . . . . . . . . . . . . . . . . . . . . . . . . . . . . . . . 2
Contents . . . . . . . . . . . . . . . . . . . . . . . . . . . . . . . . . . . 3
Notes, cautions and warnings. . . . . . . . . . . . . . . . . . . 6
Introduction . . . . . . . . . . . . . . . . . . . . . . . . . . . . . . . . 7
Sections . . . . . . . . . . . . . . . . . . . . . . . . . . . . . . . . . 8
Specifications . . . . . . . . . . . . . . . . . . . . . . . . . . . . . 9
Network summary printout . . . . . . . . . . . . . . . . . . . 11
Configuration methods . . . . . . . . . . . . . . . . . . . . . . 12
Section 1: configuring
the print server. . . . . . . . . . . . . . . . . . . . . . . . . . 14
Using a web browser . . . . . . . . . . . . . . . . . . . . . . . . 15
Launching the web browser . . . . . . . . . . . . . . . . . . . 15
Changing the Password . . . . . . . . . . . . . . . . . . . . . . 19
Using TELNET . . . . . . . . . . . . . . . . . . . . . . . . . . . . . . 20
Example TELNET configuration. . . . . . . . . . . . . . . . . 20
Section 2: utilities. . . . . . . . . . . . . . . . . . . . . . . . . . . 22
Intec LPR printing utility. . . . . . . . . . . . . . . . . . . . . . 23
System requirements . . . . . . . . . . . . . . . . . . . . . . . 23
Installing Intec LPR. . . . . . . . . . . . . . . . . . . . . . . . . 23
Step1: install the utility . . . . . . . . . . . . . . . . . . . 23
Step 2: add the printer to the utility. . . . . . . . . . . 25
Using Intec LPR . . . . . . . . . . . . . . . . . . . . . . . . . . . 25
Section 3: printing from Windows . . . . . . . . . . . . . . 26
Installing a network printer . . . . . . . . . . . . . . . . . . . 27
Using the Intec driver installer . . . . . . . . . . . . . . . . . 27
Why use the Intec driver installer?. . . . . . . . . . . . 27
Using the add printer wizard . . . . . . . . . . . . . . . . . . 28
Method summary . . . . . . . . . . . . . . . . . . . . . . . . 28
About the different methods . . . . . . . . . . . . . . . . 28
Section 4: printing using MacOS . . . . . . . . . . . . . . . . 30
Overview. . . . . . . . . . . . . . . . . . . . . . . . . . . . . . . . . . 31
Setting up a network printer . . . . . . . . . . . . . . . . . . 31
Network summary printout. . . . . . . . . . . . . . . . . . . . 32
MacOS printer setup utility . . . . . . . . . . . . . . . . . . . . 33
Installing the printer setup utility . . . . . . . . . . . . . . . 33
The printer setup utility interface . . . . . . . . . . . . . . . 34

Contents > 4
Menu options . . . . . . . . . . . . . . . . . . . . . . . . . . . . . 37
Discover Printers . . . . . . . . . . . . . . . . . . . . . . . . 37
Printer status monitor. . . . . . . . . . . . . . . . . . . . . 37
Printer NIC card summary. . . . . . . . . . . . . . . . . . 37
Change settings. . . . . . . . . . . . . . . . . . . . . . . . . 37
Open web browser . . . . . . . . . . . . . . . . . . . . . . . 42
Change utility preferences. . . . . . . . . . . . . . . . . . 42
Connecting to your printer . . . . . . . . . . . . . . . . . . . . 45
Snow Leopard (10.6) and Leopard (10.5) . . . . . . . . . 45
USB . . . . . . . . . . . . . . . . . . . . . . . . . . . . . . . . . 45
Bonjour. . . . . . . . . . . . . . . . . . . . . . . . . . . . . . . 46
AppleTalk (Leopard only) . . . . . . . . . . . . . . . . . . 46
TCP/IP Connection . . . . . . . . . . . . . . . . . . . . . . . 46
Configuring printer hardware options . . . . . . . . . . . 48
Section 5: troubleshooting . . . . . . . . . . . . . . . . . . . . 49
Self-Diagnostic Test . . . . . . . . . . . . . . . . . . . . . . . . 49
Printer does not print . . . . . . . . . . . . . . . . . . . . . 49
NG is printed in the self-diagnostic test. . . . . . . . . 49
TCP/IP . . . . . . . . . . . . . . . . . . . . . . . . . . . . . . . 49
Computer cannot find the network interface card. . 49
Cannot print with LPR and FTP. . . . . . . . . . . . . . . 50
Web browser . . . . . . . . . . . . . . . . . . . . . . . . . . . . . 50
Microsoft Internet Explorer . . . . . . . . . . . . . . . . . 51
Mozilla Firefox . . . . . . . . . . . . . . . . . . . . . . . . . . 52
Appendix: the printer menu . . . . . . . . . . . . . . . . . . . 53
Menu Basics. . . . . . . . . . . . . . . . . . . . . . . . . . . . . . 53
Top Level Functions . . . . . . . . . . . . . . . . . . . . . . 53
Special Menu. . . . . . . . . . . . . . . . . . . . . . . . . . . 53
Overview. . . . . . . . . . . . . . . . . . . . . . . . . . . . . . . . 53
Table Conventions Used . . . . . . . . . . . . . . . . . . . 53
Functions Menu Tree: Admin Setup,
Calibration, Print Statistics . . . . . . . . . . . . . . 54
Boot Menu Tree . . . . . . . . . . . . . . . . . . . . . . . . . 59
Printer Menu: Making Changes in the Menu . . . . . . . . 60
Making Changes in the Function Menu . . . . . . . . . 60
Making Changes in the Boot Menu . . . . . . . . . . . . 61
Printer Menu: Functions List. . . . . . . . . . . . . . . . . . . 62
Admin Setup . . . . . . . . . . . . . . . . . . . . . . . . . . . 62
Network Setup. . . . . . . . . . . . . . . . . . . . . . . . . . 62
Printer Menu: boot menu. . . . . . . . . . . . . . . . . . . . . 77
Parallel Setup . . . . . . . . . . . . . . . . . . . . . . . . . . 77
USB Setup. . . . . . . . . . . . . . . . . . . . . . . . . . . . . 78


Notes, cautions and warnings > 6
N
OTES
,
CAUTIONS
AND
WARNINGS
Specifications subject to change without notice. All trademarks
acknowledged.
NOTE
A note provides additional information to supplement the
main text.
CAUTION!
A caution provides additional information which, if
ignored, may result in equipment malfunction or
damage.
WARNING!
A warning provides additional information which, if
ignored, may result in a risk of personal injury.

Introduction > 7
I
NTRODUCTION
The IntecLAN Internal Print Server is a fast 10BASE-T/
100BASE-TX/1000Base-T network interface.
This network print server supports IEEE 802.2, IEEE 802.3,
Ethernet-II and SNAP, and can detect those frame types
automatically.
It supports major protocols such as TCP/IP, EtherTalk (Mac) and
NetBEUI (Windows).
The print server has a number of security features, including
SSL/TLS, IP Filtering, disabling unused protocols, etc.
Password protection ensures that the print server is safe from
unauthorised changes in settings. You can also restrict access by
disabling network services, protocols and ports you are not using.
You can limit access to specific authorised IP addresses as well.
The SMTP feature allows you to have an E-mail sent to
designated addresses when certain errors occur.
NOTE
The network addresses used in this manual are shown for
example only. Network addresses used in your installation
should be within the appropriate address range and have the
correct subnet mask for your network segment.
NOTE
Change the emulation in the Printer Menu settings to Auto or
PS before printing the network summary.


Introduction > 9
S
PECIFICATIONS
Frame types • IEEE 802.2
• IEEE 802.3
• Ethernet-II, SNAP, AUTO
Network
interface • 1000BASE-T
• 100BASE-TX
• 10BASE-T
Network
protocols • TCP/IP
– Network layer: ARP, RARP, IP, ICMP, PnP
– Session layer: TCP, UDP
– Application layer: PR, FTP, TELNET, HTTP,
IPP, BOOTP, DHCP, SNMP, DNS, SMTP,
POP3
• IPX/SPX (NetWare)
– Remote printer mode (up to eight file servers
and 32 queues)
– Print server mode (up to eight print servers)
– Encrypted password supported in print server
mode
–SNMP
• EtherTalk:ELAP, AARP, DDP, AEP, NBP, ZIP,
RTMP, ATP, PAP
• AppleTalk
• Bonjour
• NetBEUI:SMB, NetBIOS
Supported
Operating
Systems
• Windows
–Vista
–XP
– 2000
– 2008
–7
• Mac OS X 10.4or greater

Introduction > 10
Print Service •LPR
•FTP
• Port 9100
• Web Direct Printing
• QSERVER Binder
• QSERVER NDS
Functions • Self-diagnostic test printing
• Banner supported
• Monitoring/configure by Web browser
• Printer status notification by E-Mail
Introduction > 11
N
ETWORK
SUMMARY
PRINTOUT
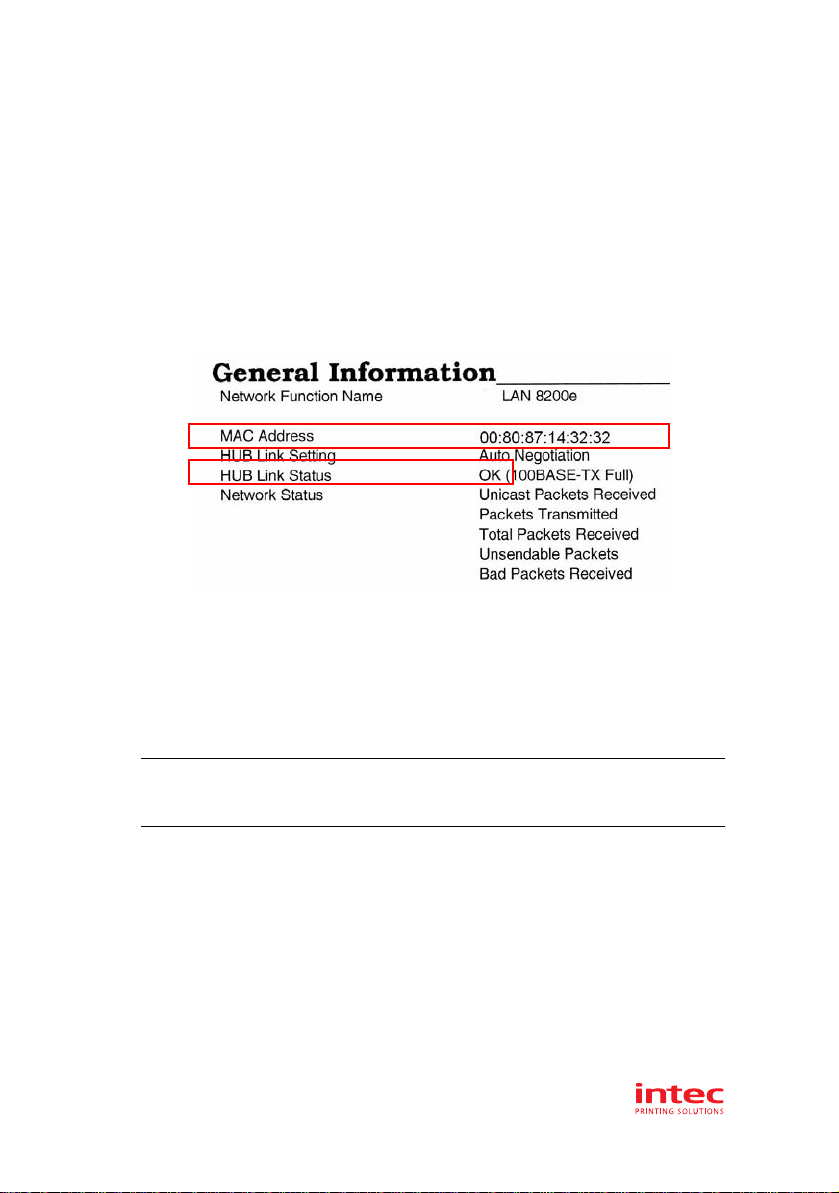
The printer server’s network summary reports the printer’s MAC
Address (Ethernet address).
1. Turn the printer on.
2. Press the print server Test button for more than three
seconds and release.
The printer’s MAC Address (Ethernet address) appears on the
first page under General Information.
The first six digits of the MAC Address are the same for all
IntecLAN print servers.
The last six digits of the MAC Address are unique to each
IntecLAN,and are required to set up the print server.
The hub link status results are also printed (normally “OK”).
NOTE
If anything other than “OK” is displayed see page 49.

Introduction > 12
C
ONFIGURATION
METHODS
You can configure the print server by using one of the following
methods:
UTILITY FEATURES SYSTEM
REQUIREMENTS
Quick Setup Configure the print server
easily and simply without
installing any software
packages into your
system.
You can set the following:
• Enable/disable TCP/IP,
EtherTalk, NetBEUI
protocols.
• Set IP address, Subnet
Mask and Gateway for
TCP/IP manually or by
using DHCP.
• Zone name and Port
name for EtherTalk.
Windows*
• Windows 2000 Server/
Professional
• Windows XP Home/
Professional
• Windows XP
Professional x 64
Edition
• Windows Server 2003
• Windows Server 2003 x
64 Edition
• Windows Server 2008
• Windows Server 2008 x
64 Edition
• Windows Vista 32-bit
• Windows Vista 64-bit
• Windows 7
• Windows 7 x 64 Edition
• Windows Server 2008
R2
* with TCP/IP protocol or
IPX/SPX protocol
installed.
Mac:
Mac OS X 10.4or
greater
You need to install
Rosetta if using MAC OS
X 10.6

Introduction > 13
Web Browser Configure the print server
and printer by using a
Web browser such as
Microsoft Internet
Explorer or Mozilla
Firefox.
Microsoft Internet
Explorer or similar.
Operating system that
supports the Web
browser.
TELNET Configure the print server
using TELNET. Third-party vendor
developed TELNET client
package.
A TELNET Application is
standard in Windows.
SNMP The printer and network
card can be controlled
using a third-party vendor
developed SNMP
application.
Third-party vendor
developed SNMP
application.
UTILITY FEATURES SYSTEM
REQUIREMENTS


Using a web browser > 15
U
SING
A
WEB
BROWSER
If the print server is connected to the network using TCP/IP, its
settings and the printer menu settings can be configured using a
Web browser.
L
AUNCHING
THE
WEB
BROWSER
1. Have a copy of the network summary printout to hand
(see page 11).
>The MAC address is listed under “General Information.”
You will use the last six digits of the MAC Address
(minus punctuation marks) as the password when
logging in for the first time.
>The IP Address, Subnet Mask and Default Gateway are
listed under “TCP/IP Configuration.”
2. Launch the Web browser.
NOTE
The network addresses used in this manual are shown for
example only. Network addresses used in your installation
should be within the appropriate address range and have the
correct subnet mask for your network segment.
To apply configuration changes using a Web browser, you will
be prompted for a username and password:
username = root
default password = the last six digits of the MAC address.
Note the password is case sensitive, use uppercase.
NOTE
The following illustrations are from Microsoft Internet
Explorer.

Using a web browser > 16
3. Enter the print server’s IP Address.
4. Press the ENTER key.
The Printer Status window displays.
5. To ensure correct operation, change the browser cache or
temporary internet settings to ensure the latest version is
viewed at each session. For example, using Internet
Explorer:
(a) In the Tools pull-down menu, select Internet
Options.
(b) On the General tab, under Temporary Internet
files, click Settings….
(c) Under Check for newer versions of stored
programs, select Every visit to the page.
(d) Click OK.
6. Click OK.
7. Click Administrator Login.
The Connect to window displays.
NOTE
If you change the window size of the browser immediately
after changing the configuration, Security information may
appear. Uncheck Display this message next time.

Using a web browser > 17
8. Enter “root” for the User Name and your password—the
default is the last six digits of the MAC address (case
sensitive, use uppercase)—under Password.
9. Click OK.
10. Click Skip to navigate to the main menu page.

Using a web browser > 18
11. In the left column, click the category for which you wish to
make changes.
12. When you are finished, click Submit to send the changes
to the print server.

Using a web browser > 19
C
HANGING
THE
P
ASSWORD
1. Open the browser and enter the IP Address for the print
server, then login with your current password.
2. Click Security > Password Configuration.
3. Under Administrator(root/admin) Password
Configuration, enter the new password, then enter it
again under Confirm New Admin Password.
4. Click Submit to save the changes or Cancel to exit.
NOTE
Maximum 15 characters.

Using TELNET > 20
U
SING
TELNET
E
XAMPLE
TELNET
CONFIGURATION
TELNET requires the print server to have a valid IP address
configured. If the NIC already has an IP address configured, skip
steps 1 to 3 below.
1. Use the PING command to confirm the connection with
the network card.
Example
For IP address 172.168.20.127:
ping 172.168.20.127
If there is no reply, there is a problem with the
configuration of the IP address (the IP address has been
already set manually or by the DHCP/RARP server), or with
the network. Reset the network interface card settings to
the default and try to set a temporary IP address. If you
still have the problem after resetting the network interface
card, consult the network manager.
2. Login to the network card using TELNET.
Example
For IP address 172.168.20.127
telnet 172.168.20.127
CAUTION!
Please ensure that a valid IP address for your network
environment is used. Use of an incorrect IP address
can cause serious problems on your network.
NOTE
The method of configuring commands may differ between
workstations. Refer to the workstation’s manual.
Other manuals for CP2020
1
This manual suits for next models
1
Table of contents
Other Intec All In One Printer manuals


