IntelliHeat iSense ISEN-0750 User manual
INSTALLATION AND OPERATING
INSTRUCTIONS
SMART THERMODYNAMIC FLUID ELECTRIC RADIATOR
GAUGE AND ENERGY CONSUMPTION INDICATION - OPEN WINDOW DETECTION - 7 DAY AND DAILY
PROGRAMME BOOST - PROGRAMMABLE HOLIDAY MODE - LIMIT OF THE TEMPERATURE SLOT -
PIN CODE LOCK
ECO-DESIGN SMART FEATURES
OCCUPANCY DETECTION - AUTOMATIC PROGRAMMING WITH SELF-LEARNING
PROCESS AND DUAL OPTIMISATION FEATURE
WIFI CONNECTION


3
TABLE OF CONTENTS
Installing the heating device...................................................................................................................................................... 4
Warnings and precautions ............................................................................................................................................................................................. 4
Connecting, wall-mounting procedure............................................................................................................................................................................ 5
Wifi connection.............................................................................................................................................................................................................. 7
Overview ..................................................................................................................................................................................... 8
Benefits......................................................................................................................................................................................................................... 8
Operating .................................................................................................................................................................................... 9
Overview ....................................................................................................................................................................................................................... 9
Power On/Heating standby mode................................................................................................................................................................................... 10
First power up ............................................................................................................................................................................................................... 10
Selection of an operating mode ..................................................................................................................................................................................... 10
Manual and temporary exemption override to a current operating mode ........................................................................................................................ 11
Gauge consumption, energy savings.............................................................................................................................................................................. 11
Adjustment of setting temperatures ............................................................................................................................................................................... 12
Consumption indication accumulated in kWh, energy savings........................................................................................................................................ 12
Child anti-tamper, keypad lock/unlock ........................................................................................................................................................................... 13
7 day and daily program integrated, energy savings ...................................................................................................................................................... 13
Automatic programming with self-learning process............................................................................................................................................... 13
7 day and daily program........................................................................................................................................................................................ 13
Dual Optimisation feature ...................................................................................................................................................................................... 15
Open window detection, energy savings ........................................................................................................................................................................ 15
Occupancy detection, energy savings ............................................................................................................................................................................ 16
Information about remote control by pilot wire ............................................................................................................................................................... 16
Information about priorities between the different modes............................................................................................................................................... 17
Product information ....................................................................................................................................................................................................... 17
User settings............................................................................................................................................................................... 18
Choice of language use.................................................................................................................................................................................................. 18
Wifi connection.............................................................................................................................................................................................................. 18
Date setting................................................................................................................................................................................................................... 19
Time setting................................................................................................................................................................................................................... 19
Display .......................................................................................................................................................................................................................... 19
Regional units................................................................................................................................................................................................................ 19
Reset user settings ........................................................................................................................................................................................................ 20
Advanced settings ...................................................................................................................................................................... 20
Occupancy detection: activation/deactivation................................................................................................................................................................. 20
Open window detection: Activation/deactivation of the automatic mode......................................................................................................................... 21
User profile.................................................................................................................................................................................................................... 21
Comfort setting temperature limitation........................................................................................................................................................................... 21
Boost duration ............................................................................................................................................................................................................... 21
Aeration cycle time ........................................................................................................................................................................................................ 21
Forget Wifi network........................................................................................................................................................................................................ 21
Expert settings (reserved to the installer)................................................................................................................................. 22
Ambient temperature sensor.......................................................................................................................................................................................... 22
PIN code lock................................................................................................................................................................................................................. 22
Reset expert settings ..................................................................................................................................................................................................... 23
Power cut .................................................................................................................................................................................... 23
Other remotely management by power shutdown .......................................................................................................................................................... 23
In case a power cut, backup .......................................................................................................................................................................................... 23
Troubleshooting .......................................................................................................................................................................... 23
Diagnosis support.......................................................................................................................................................................................................... 23
Technical informations............................................................................................................................................................... 25
Maintenance.................................................................................................................................................................................................................. 25
Product label ................................................................................................................................................................................................................. 25
Dimensionnal specifications .......................................................................................................................................................................................... 25
Technical information..................................................................................................................................................................................................... 25
Information requirements for electric local space heaters .............................................................................................................................................. 26

4
WARNINGS AND PRECAUTIONS
INSTALLING THE HEATING DEVICE
Warnings
ESE INT ENG PM V02 23 03 2021
All damage resulting from non-compliance
with this advice gives rise to non-application
of the terms of the manufacturer’s warranty.
-Do not use the appliance outdoors.
-Your appliance is intended for domestic usage
and must not be used for other purposes.
-If the appliance has fallen on the ground, has
been damaged or does not work properly, do
not switch it on and ensure that the power sup-
ply to it has been cut off (by means of a fuse or
a circuit breaker).
-Never disassemble the appliance. A badly-re-
paired appliance may present risks for the user.
-Please consult your local point of sales regar-
ding any problems.
-If the power supply cable is damaged, it must
be replaced by the manufacturer, its after-sales
service department or another electrical profes-
sional in order to avoid any dangers arising.
-This heating device has been filled with a pre-
cise quantity of special fluid, (a product safety
data sheet is available upon request).
Should a leak occur, switch off the appliance,
put it somewhere out of the way so that the fluid
spill does not spread and so that the thermal
fluid is not accidentally swallowed by a child,
and then immediately contact yhe company that
sold you the appliance or a representative of the
manufacturer. Any operation requiring the ope-
ning of one of the plugs of the fluid tank should
be carried out by the authorized representative
of the manufacturer.
-When the heating appliance is scrapped, com-
ply with legislation and regulations regarding
disposal of the thermal fluid.
-WARNING: in order to avoid overheating,
don’t cover the device. If the device is co-
vered, the rise in temperature will trigger
the internal circuit breaker. Any damage
caused by this will invalidate the warranty.
-This appliance can be used by children aged
from 8 years and above and persons with re-
duced physical sensory or mental capabilities
or lack of experience and knowledge, if they
have been given supervision or instruction
concerning use of the appliance in a safe way
and understand the hazards involved. Children
shall not play with the appliance. Cleaning and
user maintenance shall not be made by children
without supervision.
Children of less than 3 years should be kept
away unless continuously supervised.
Children aged from 3 years and less than 8
years shall only switch on/off the appliance
provided that it has been placed or installed
in its intended normal operating position and
they have been given supervision or instruction
concerning use of the appliance in a safe way
and understand the hazards involved.
Children aged from 3 years and less than 8
years shall not plug in, regulate and clean the
appliance or perform user maintenance.
CAUTION - Some parts of this product
can become very hot and cause burns.
Particular attention has to be given
where children and vulnerable people
are present.
When the appliance is heating, make sure they
don’t lean on it and don’t play nearby. Vulnerable
people and young children should not be left in
the vicinity of the heater unless a suitable guard
is fitted.
The normal cleaning is the responsibility of an
adult who has read the instructions and un-
derstood the operation of the appliance.
Any other operation or technical intervention
must be performed by a qualified professional
installer.
-Do not insert objects or paper in the appliance.
-If the removal of the appliance is necessary,
do not remove or refit the appliance onto the
wall-mounting brackets without making sure it
is cold and the main electrical supply and main
board to the system are off.
5
Before connecting up the radiator to the
mains power supply, switch off mains power
at the main circuit breaker.
This electric radiator is a class II double insulat-
ed IP24 device, therefore it can be installed in all
the rooms of a house including in safety zones 2
and Out of zone in bathrooms, but sheltered from
water splashes.
The heating device must be installed in such a
way that on-off switches and other control devic-
es cannot be touched by a person located in a
bathtub or in a shower cabinet (in accordance
with I.E.E. Wiring Regulations (BS 7671:2008).
The radiator must not be located immediately
below a socket-outlet.
The radiator must be installed at least 15cm from
any obstacle (ie shelving, curtains, items of fur-
niture, etc.).
A mean of disconnection from the mains elec-
trical supply, the radiator should provided with
a local isolator switch capable of disconnecting
all poles, having a contact separation of at least
3mm. In accordance with local Electrical Code
regulations and installation rules. The radiator
should only be used in conjunction with its exist-
ing fixed wiring.
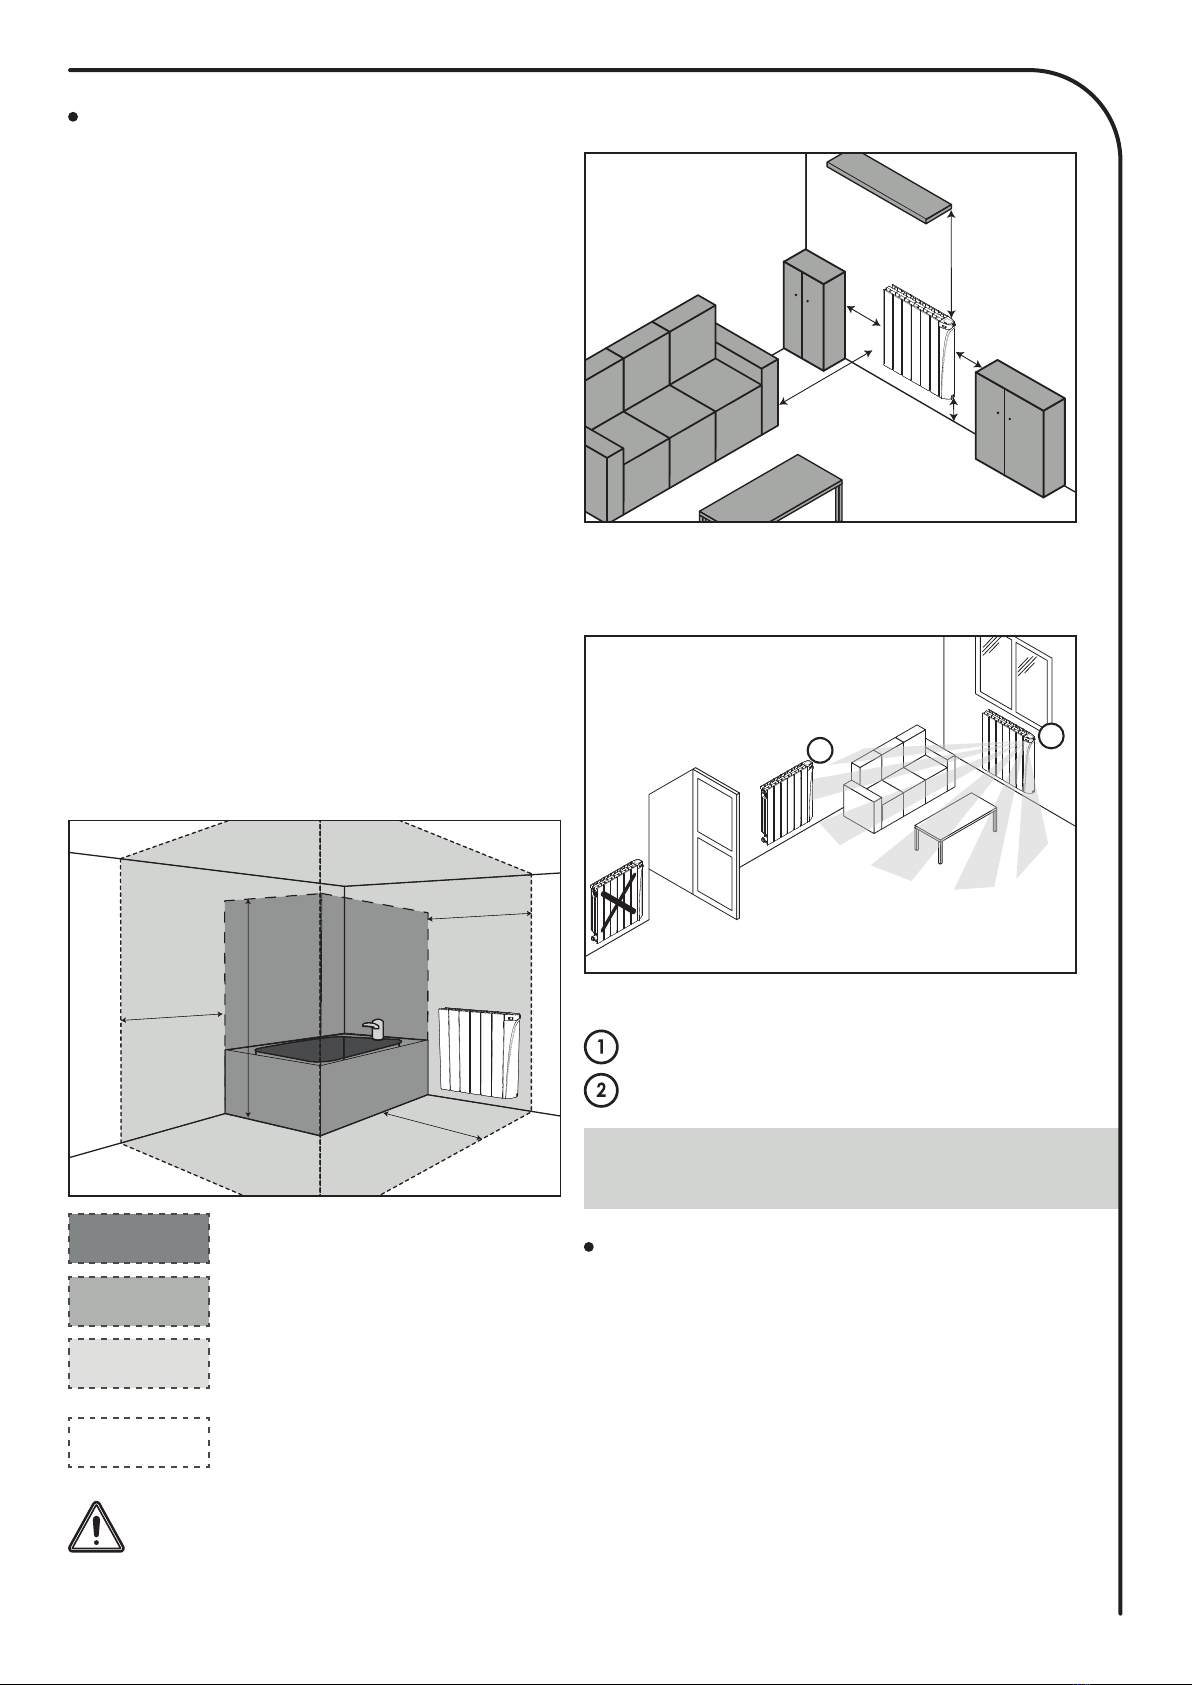
Suggestion, positioning, location
Electric heating device of class II
and IPX4 protected by a differen-
tial circuit breaker 30mA.
Zone 2
No electric heating device
Zone 0
Zone 1
Electric heating device of class I
or II protected by a differential cir-
cuit breaker 30mA.
Out of zone
This picture is only for your reference. In
any case, the product must be installed
by a qualified professional installer, ac-
cording to applicable standards and direc-
tives of the country in which it is installed.
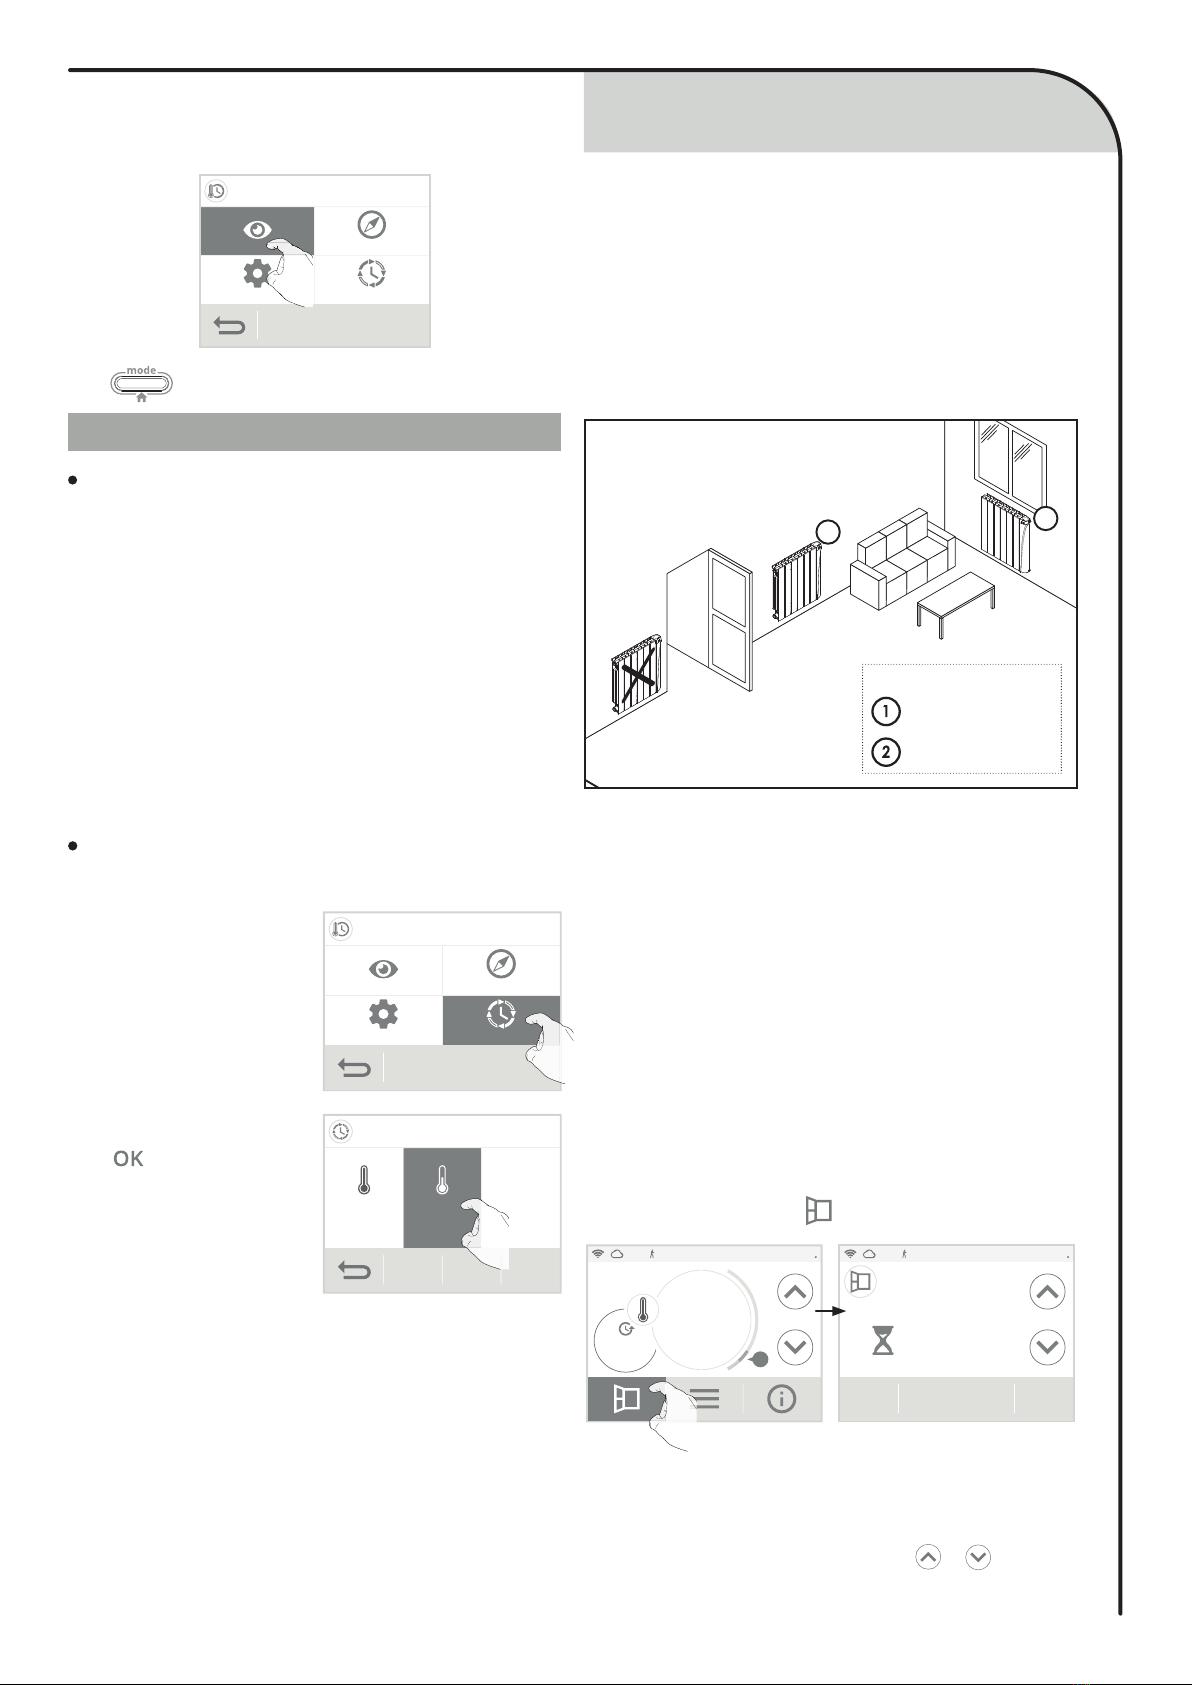
Locate the heater within minimum distances
from obstacles.
Installation recommended in the context of us-
ing automatic open window detection and occu-
pancy detection.
Legend installation layout diagram
= The ideal recommended location
= Alternative location
All electrical installation work should be car-
ried out by a qualified Electrician or other
competent person.
-The power supply of the device must have
means of disconnection from main supply capa-
ble of disconnecting all poles, having a contact
separation of at least 3mm in accordance with
local regulations and installation rules, a protec-
tion by a 30mA RCD differential switch and a
protection device against overloads adapted to
the characteristics of the connecting line.
-Before you first use the equipment, check that
the voltage used 230- 240V does indeed match
that listed on the device.
Connecting the device
CONNECTING, WALL-MOUNTING
PROCEDURE
50 cm
50 cm
15 cm
15 cm
15 cm
1
2
Out of zone
Out of zone
Zone 2
Zone 2
Zone 1
Zone 1
0,60 m
2,25 m
0,60 m
0,60 m
Zone 0
6
ELECTRICAL CONNECTIONS
Monophase power supply 230V +/-10% 50Hz
You must isolate the pilot wire if it is
not used. Do not connect the pilot wire
(black) to hearth.
- Blue-grey wire : Neutral
- Brown wire: Phase
- Black wire : Pilot wire (DO NOT CONNECT)
ONLY TO BE USED WITH AN EXTERNAL
CONTROLLER.
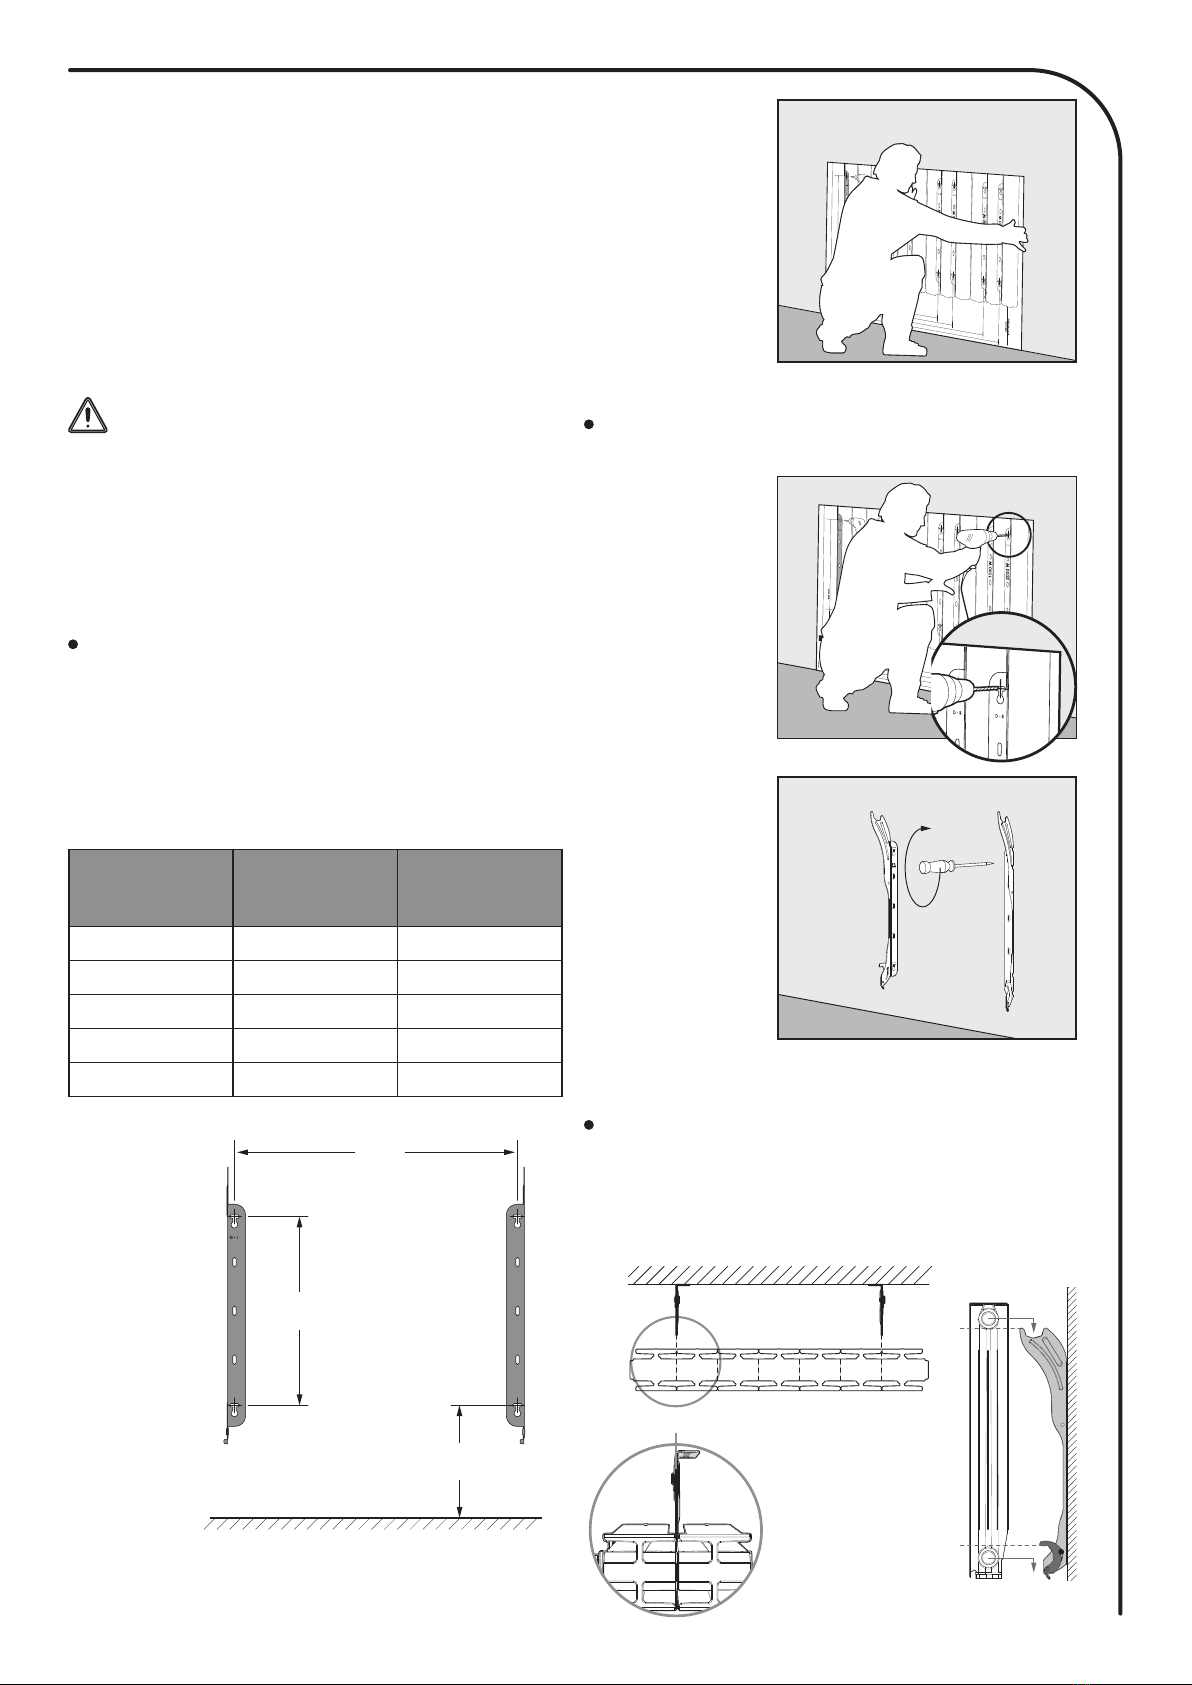
Fix the bracket according to the dimensions
specified in the enclosed table template, use
the drilling template supplied to install and fix
your radiator onto the wall.
Positioning of the wall mounting
bracket and tracing
References
Power
outputs
(W)
X = Width
fixing holes in
(mm)
ISEN-0750 750 299
ISEN-1000 1000 380
ISEN-1250 1250 541
ISEN-1500 1500 622
ISEN-2000 2000 865
Installation of the wall-mounting
brackets
Stage 1
Open the tem-
plate and position
it against the wall,
at the desired lo-
cation. Ensure
that the bottom
of the template
touches the floor
or the top of the
skirting board, in
order that the fitting height can be adjusted.
Stage 2
Find the power
of your radiator
and drill the cor-
responding holes
into the wall.
Stage 3
Remove the tem-
plate then screw
the wall-mounting
brackets of the
electric radiator
into the wall.
IMPORTANT: use
a screw anchor
which is suitable
in relation to the
wall type (screws and screw anchors not sup-
plied: screw Ø 6mm max).
Installing of the radiator on the
wall-mounting brackets
1- Take the radiator by the sides and lift it slight-
ly by presenting it parallel to the wall.
Top view Side view
-This radiator is a class II device (meaning that
it has double electrical insulation). Connection
to earth is prohibited.
-The two wires (Live and Neutral) must be
connected through a fused spur (FCU) or a
standard electric plug which complies with
applicable standards.
H
244mm
X
Floor
244mm
357mm
X
7
Top view Side view
At the back of the product, make sure that each
wall-mounting brackets are inserted between the
intermediate fins without altering them.
The wall mounting brackets are designed to
secure the installation and to limit the translational
movements of the device in case of impact.
2- Place the radiator on the wall-mounting
brackets.
Intermediate fins
After the establishment of the radiator on the
wall-mounting brackets, proceed to the installa-
tion locking in the following order:
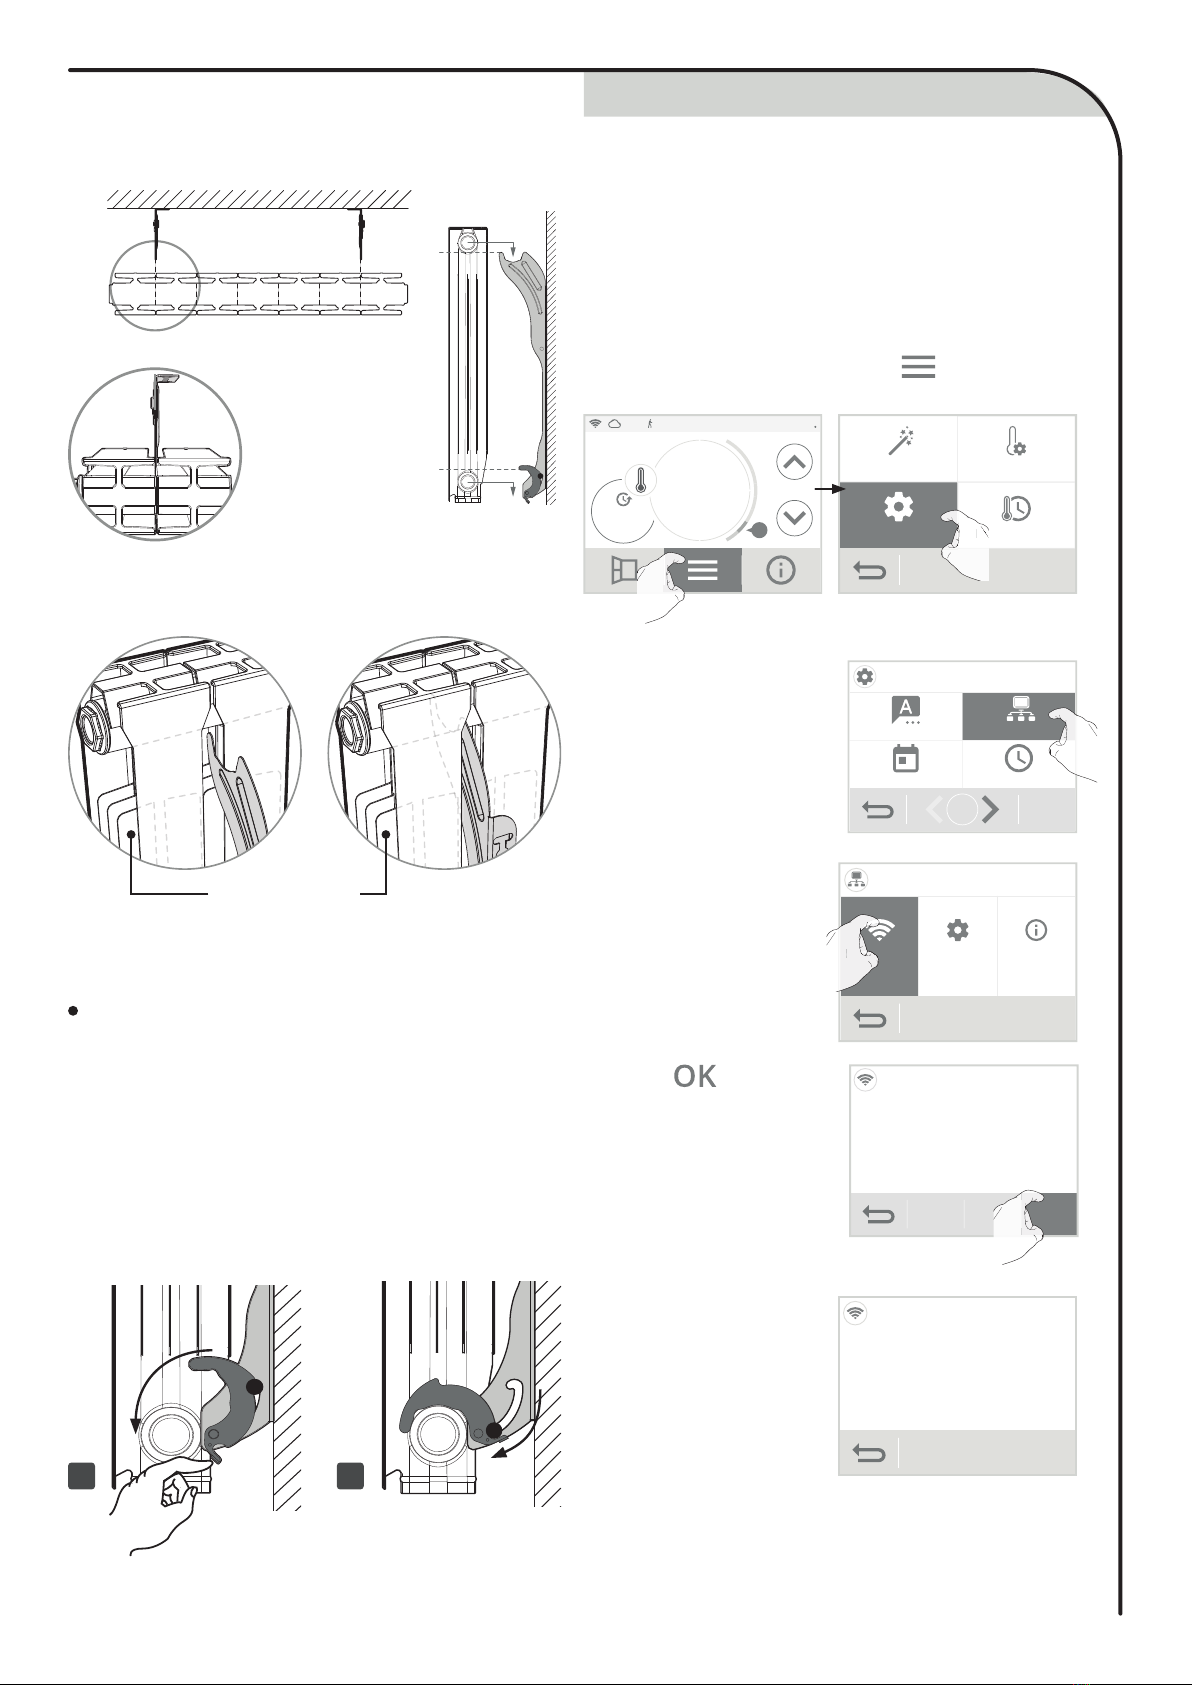
1- Fold down the hooks.
2- The rivet goes down into the notch and au-
tomatically locks the wall-mounting bracket.
Make sure that the rivet is well down at the
end of the notch.
Automatic lock of wall-mounting
brackets
The anti-tilt safety is in place, the radiator can not
be unhooked from the wall without unlocking.
21
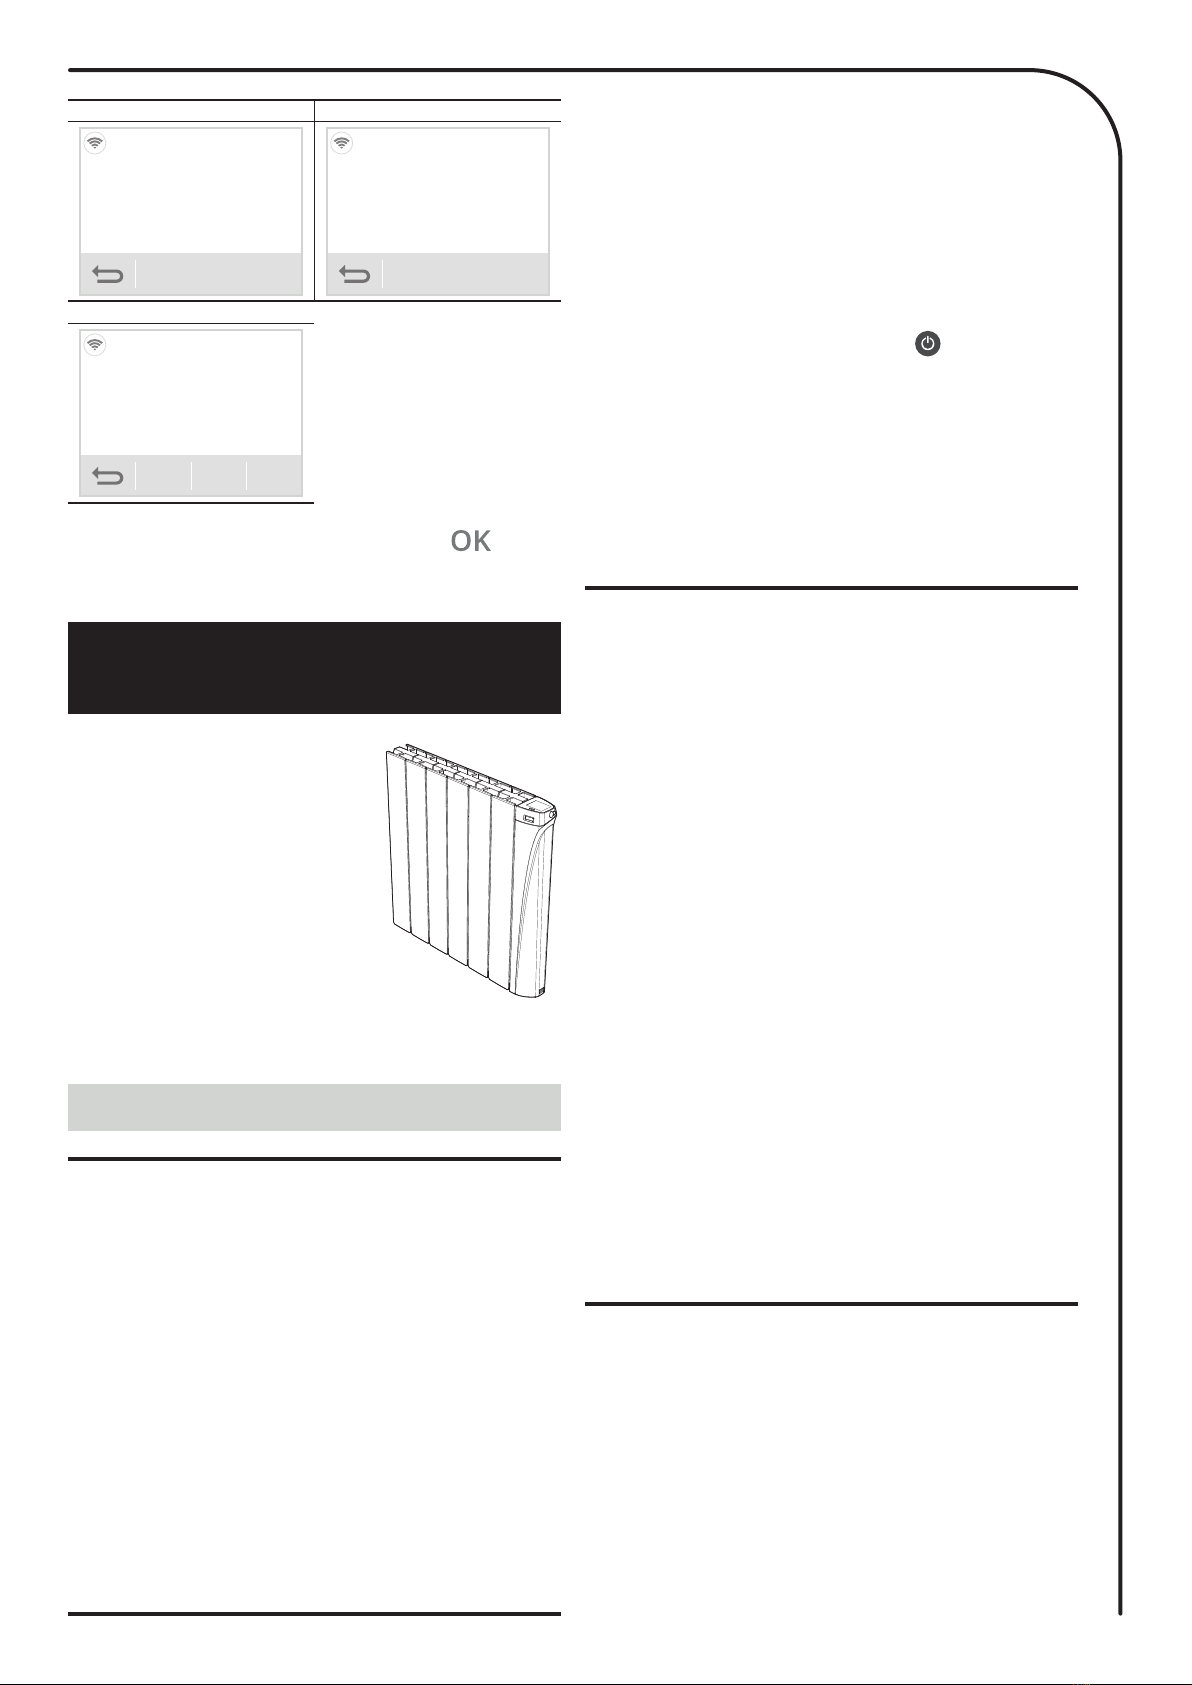
WIFI CONNECTION
Your radiator has been specially designed to be
connected directly to your home home router
without the need of a hub.
To pair the device with your wireless network,
proceed in the following order:
2-
From Settings, press
Network.
Settings
Language
TimeDate
1/3
Network
• On the radiator
1- From the main screen, press and select
Settings.
11:00 03/06/15
ON
Comf.
Auto 19°C
.0
AProgramming
Temperatures
Settings
Quick installation
Settings
Pro
ro
3- Press Connection to
start the pairing pro-
cess.
Network
connection Settings info
connection
conne
n
nne
n
n
n
4- Press .
Wi connection
Connect to your
MySense application
OK
Note: The following 3 screens will appear when
the connection is made. You have nothing to do
on the product.
Wifi connection
Network:
EV30-ABCDEFGH
5- Your device is in
connection mode.
Please refer to the
instructions on your
application and fol-
low the instructions
until the complete
connection of the
device.
8
Thank you for choosing one of our prod-
ucts we are confident that you will get
many years of service.
Our stylish, innovative range of Thermo-
dynamic fluid electric radiators was de-
signed and developed to be maintenance
free and bring you the comfort of heating
with significant energy savings thanks to
its smart features. Your IntelliHeat radia-
tor incorporates innovative technologies
designed for your comfort and to increase
your energy saving, control performance
PID (stability), occupancy detection, open
window detection, 7 day and daily pro-
gram, optimisation feature.
In new build or renovation applications, our radiators will provide you
with comfort and satisfaction!
BENEFITS
OVERVIEW
12
Wifi connection
Application connected to the
product
Wifi connection
Connection in progress...
3
Wifi connection
Connected to wifi
OK
Once the product is connected, press to exit
the connection mode. The unit automatically returns
to the setup menu.
Discover the true vocation of connected ob-
jects: manage, control your comfort and your
energy budget
- Internet connection through your internet provider box, without
any other accessory.
- Control and remote control from a smartphone, tablet or PC.
- Free web based App, app to download on Apple IOS and Android
platforms: my-sense.co.uk
- Supervision and control of the installation in 3 levels: all con-
nected products of the housing, part of the housing (zone) or the
level of the connected product.
- Visualization of the operating status, settings and weather.
- Real-time information: notifications, news feed, alerts.
- Remote contingency management to save money when I’m
away and anticipate heating up when I return.
- Control: interact, schedule, adjust at any time.
- Optimisation of consumption: display of consumption in kWh or
in £, display of the consumption history on day, week, month, year
with possible comparison between 2 periods given, savings wizard
and predictive system of consumption, anticipation and optimisa-
tion of consumption.
- Ultra secure system: Secure cloud design with backup security
and localization of hosted data in EUROPE.
- Seven different outputs (from 750W to 2000W) to ensure the per-
fect heating solution for every room size, thus enabling you to opti-
mize your electricity bills in line with your actual needs.
- The comfort of central heating: This concept with thermodynamic
fluid circulation ensures a gentle heat and a stable temperature. The
aluminum alloy heating body optimizes the heat diffusion.
- Stylish design: the perfect finish of the radiator with steel cheeks
covered with epoxy paint makes it exclusive and sober style. It fits
perfectly into any style of home.
- Help for the visually impaired: the button power on/Heating
standby mode is in relief to be easily identifiable to the touch. The
device has audible beeps indicating the change from the heating
standby mode to active mode.
- Easy to set: controls are positioned on the upper part of the radiator
and have a backlight color touch screen for easy access and view-
ing. The interface is simple, straightforward and intuitive.
- Gauge consumption: An automatic indication of the level of energy
consumption according to the setting temperature.
-Energy consumption indication: posting of the estimated amount
of energy consumed in kWh since the last reset to 0 of the energy
meter as well as for the current month and year.
New smart features
- Open window detection: Automatic switching to frost protection
mode when I-sense detects a significant drop in temperature.
- Occupancy detection integrated: During an unoccupied period,
I-sense decreases automatically and progressively the temperature
setting.
- Smart Auto-programmable radiator: The radiator I-sense adopts
the learning mode as soon as it is put into operation and without
any prior adjustment, this enables it to understand and memorize
your life patterns: detecting and adapting to periods of absence and
presence. The initial learning phase lasts 7 days, but the product will
perpetually learn and adapt to changes in your occupancy patterns,
adapting week after week to optimize to any changes. The products
intelligent algorithm analyzes this information in real-time in order to
optimize and adapt the program for the coming weeks.
The goal: to make your life easier, to anticipate your comfort needs
and to continuously maximum energy savings.
- Dual optimisation feature, allows you to optimize your pro-
gramming by favouring comfort or savings: Dependent on var-
ious parameters: inertia of the room, ambient temperature, desired
temperature, seasonality, the radiator will calculate and optimize
its programming for the periods of comfort and economy (Eco) de-
pending on your preference:
- Whilst in the OPTI ECO (priority to economy) mode, the pro-
cessors within the radiator will calculate the best compromise
to guarantee maximum energy efficiency throughout the pro-
grammed periods of temperature variation (increase/decrease).
This mode effectively accepts a slight reduction in the temperature
levels both at the beginning and the end of the comfort periods, to
maximize energy efficiency.
- Whilst in the OPTI COMFORT (priority to comfort) mode, the
processors within the radiator will calculate the best compromise
to guarantee maximum user comfort throughout the programmed
periods of temperature variation (increase/decrease). This mode
will look to anticipate and maintain the set comfort temperature
during all detected periods of occupancy within the area.
- 7 day program: In addition to the auto-programming, you have the
option, for each day of the week, of assigning one of the 7 available
programs.
- Special safety for social or private rental housing:
- Limits of the adjustment range of the Comfort setting temperature.
- Administrator/installer PIN code.
- 4 User profiles to adapt to each need.
- Boost: Rises the heat of the room for an adjustable time and in a
punctual manner.
- Programmable holiday mode: Frost protection for a long-sched-
uled absence.
- Automatic changeover summer / winter of the timer.
- “Smart” electronic controller: This means stable and accurate

9
OVERVIEW
OPERATING
A- Indicators: B- Controls and navigation:
11:00 03/06/15
ON
Comfort
Auto 19°C
.0
A
Pilot wire
PIN
2
1
3
45
6
7
8
9
1011
Operating modes access
2
Operating modes display
4
Increase / Decrease the temperature
5
Power on/Heating standby mode
6
Navigation bar from left to right:
- Manual open window
- Menu
- Information
3
Account login My sense
2
Wifi connection
1
Manual override or pilot wire
3
Current operating mode
4
Gauge consumption
5
Setting temperature
6
Date
7
Hour
8
PIN code lock
9
Occupancy detection indicator
10
Heat demand
11
• Home screen
Cancellation of the current exemption
1
11:00 03/06/15
PIN
A
19°C
.0
A
Comf.
12:00
1
2
3
4
5
6
• Setting screens
Important: During navigation, pressing the or
button does not save the settings made.
Back to main screen
1
Back to the settings menu
2
Navigation in the Settings menu with the indication of screens
number
3
Current setting
Current prog Technical support
Energy saving
Settings
Language
Time
Network
Date
1/3
1
2
3
temperatures in your room all year round.
- Setting temperature can be viewed in all operating modes.
- Active memory: Permanent backup of all settings and program-
ming.
- Overheating protection: The radiators are equipped with a system
protecting the device against any overheating.
- No risk of the radiator falling on the wall: Secure patented wall
brackets fixing system.
- Child anti-tamper: Keypad lock, making changes impossible.
10
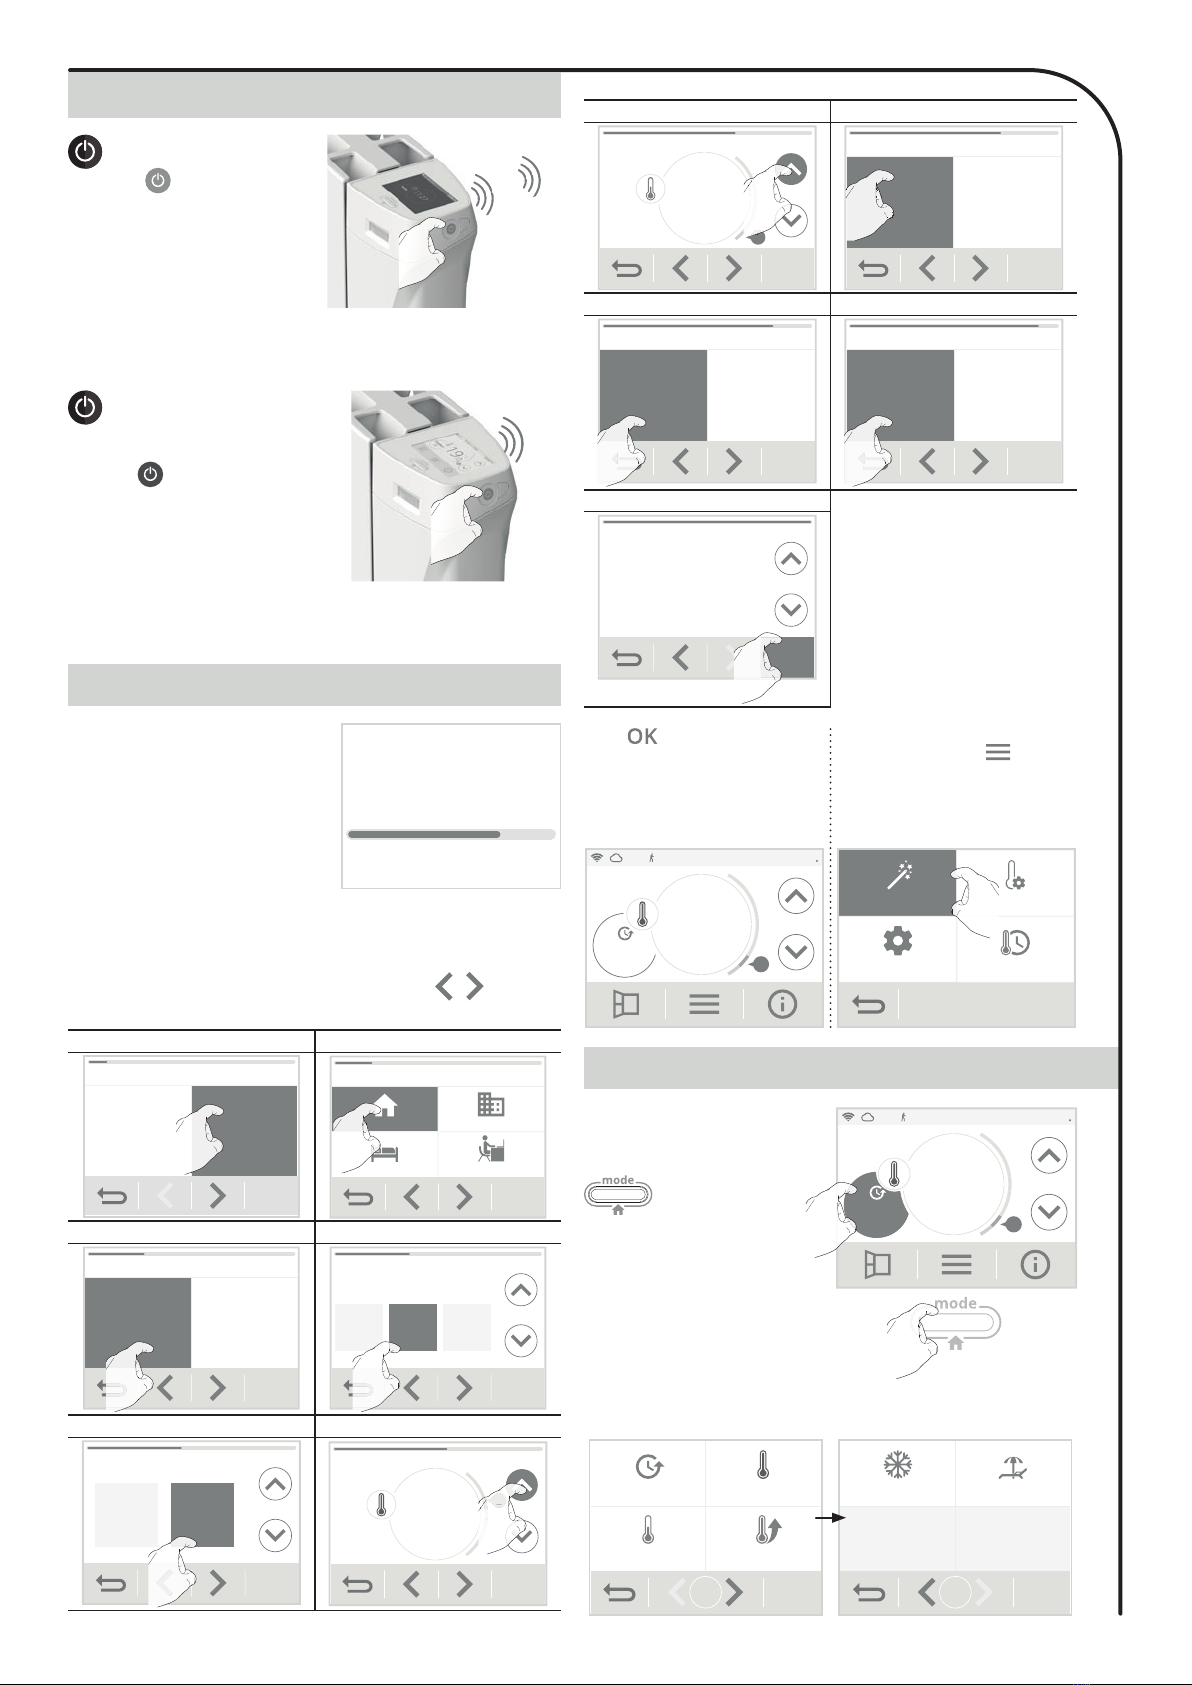
SELECTION OF AN OPERATING MODE
POWER ON/HEATING STANDBY MODE
Help for the visually impaired: sound signals
The device makes two short beeps to notify that it is in operation, in
Auto mode.
Heating standby mode
This function allows you to stop the
heating in summer, for example.
Press the button to put the device
in Heating standby mode.
beep
Help for the visually impaired: sound signals
The device makes one short beep to notify that it is in Heating stand-
by mode.
FIRST POWER UP
During the first power-up of your
device, a progress bar appears to in-
form you that the software is loading.
Once the load has been loaded, a quick start procedure is automat-
ically proposed in order to set the main settings necessary for the
correct operation of the product.
Step 1 Step 2
Choose your language of use
French English
Enter your user profile
Housing
Hotel Offices
Public building
H
H
Step 3 Step 4
Connect your device to the network
Now Later
Set the date
YearDay
20156
Month
Sept.
Step 5 Step 6
Set the time
10 37:
Set the comfort temperature
19°C
.0
B
B
Follow the steps below using the navigation arrows / and select
the desired setting by pressing directly on the screen:
From the main screen, you can
access the operating modes
by pressing Auto Comfort
displayed on the screen or
.
11:00 03/06/15
ON
Comf.
Auto 19°C
.0
A
Comf.
Auto
OR
Comf.
Auto
Eco Boost
1/2
Frost Holidays
2/2
View the different modes available with the navigation arrows and se-
lect the desired mode by pressing directly on the screen.
Power on feature
Press the button located on
the side of the device to put it in
operation in Auto mode.
beep
beep
Step 7 Step 8
Set the Eco temperature
15°C
.5
A
A
A
Use a predefined program
Smart
Ecosens
Existing
programme
S
Eco
S
S
o
S
S
o
co
S
Step 9 Step 10
Activate the occupancy detection
Yes No
Activate the opened window detection
Yes No
Step 11
Profile: Individual housing
Wifi connection: No
Date format: 04_02_2015
Time format: 10:37AM
Programme: 1
Comfort temperature: 19°C
Eco temeprature: 15,5°C
Occupancy detection: Activated
Selected settings
OK
O
Press to confirm the settings.
The main screen appears. By de-
fault, the device is in Auto Comfort
mode (according to the program-
ming selected in step 8 of the start-
up).
11:00 03/06/15
ON
Comf.
Auto 19°C
.0
A
You can return to these settings at
any time by pressing , then se-
lecting Quick Installation.
Programming
Temperatures
Settings
Quick installationQuick installation Tem
11
MANUAL AND TEMPORARY EXEMPTION
OVERRIDE TO A CURRENT OPERATING MODE
GAUGE CONSUMPTION, ENERGY SAVINGS
Mode description Display
• Auto Mode
In Auto mode, the device will ex-
ecute the mode orders in line with
the selected program.
11:00 03/06/15
ON
Conf.
Auto 18°C
.5
A
2 different cases depending on your set-up
17 day and daily program
Your radiator has been programmed and is executing Comfort and
Eco mode orders in line with the settings and time periods you have
selected (see “7 day and daily program integrated” chapter page 13).
2Programming by pilot wire
If you do not want to use the programming feature.
Orders sent by the pilot wire will only be applied in Auto mode, thus
your radiator will automatically receive and apply the programmed
orders sent by your power manager or your time switches (see Infor-
mation about remote control by pilot wire chapter page 16).
• Comfort temperature
Non-stop Comfort mode. The radi-
ator will operate 24 hours a day to
achieve the temperature which has
been set (e.g. 19°C). The Comfort
mode temperature level can be
set by the user (see Adjustment
of setting temperatures chapter
page 12).
11:00 03/06/15
ON
A
19°C
.0
A
Comf.
• Eco temperature
Eco, which means the Comfort
Mode temperature minus 3.5°C.
This enables you to lower the tem-
perature without having to reset the
Comfort Mode temperature. Select
this mode for short-term absences
(between 2 and 24h ) and during
the night.
11:00 03/06/15ON
A
15°C
.5
A
Eco
• Boost Mode
In Boost mode, the setting temper-
ature is up to the Comfort tempera-
ture + 2°C (for example if the Com-
fort temperature is set to 19°C, the
boost will temporarily increase it to
21°C).
11:00 03/06/15ON
Boost cycle
30min.
Stop
The Boost is active for an adjustable time of 60 min (see page 21 for
changing the boost duration).
During the first minute, you can modify the Boost duration from 30
to 180 minutes by intervals of 10 min by pressing or . This
change will be saved and executed for the next Boost.
After one minute, the countdown begins.
Note: beyond a minute, you can temporarily change the duration
for this period only. It will be applied for this activated Boost and
non-recurring for the next Boosts.
Stop the Boost
Manual stop: At anytime, you can stop the Boost and return to the
previous mode by pressing .
Automatic stop: : If the room temperature reaches the Comfort
temperature + 2°C (in our example 21°C) during the countdown,
then the Boost stops. The device does not heat anymore but the
Boost is still on, the countdown, the symbol and the heating in-
dicator are on the display. When the temperature drops 2°C
below the comfort temperature (in our example 20°C) ; the Boost will
be reactivated until the end of the countdown.
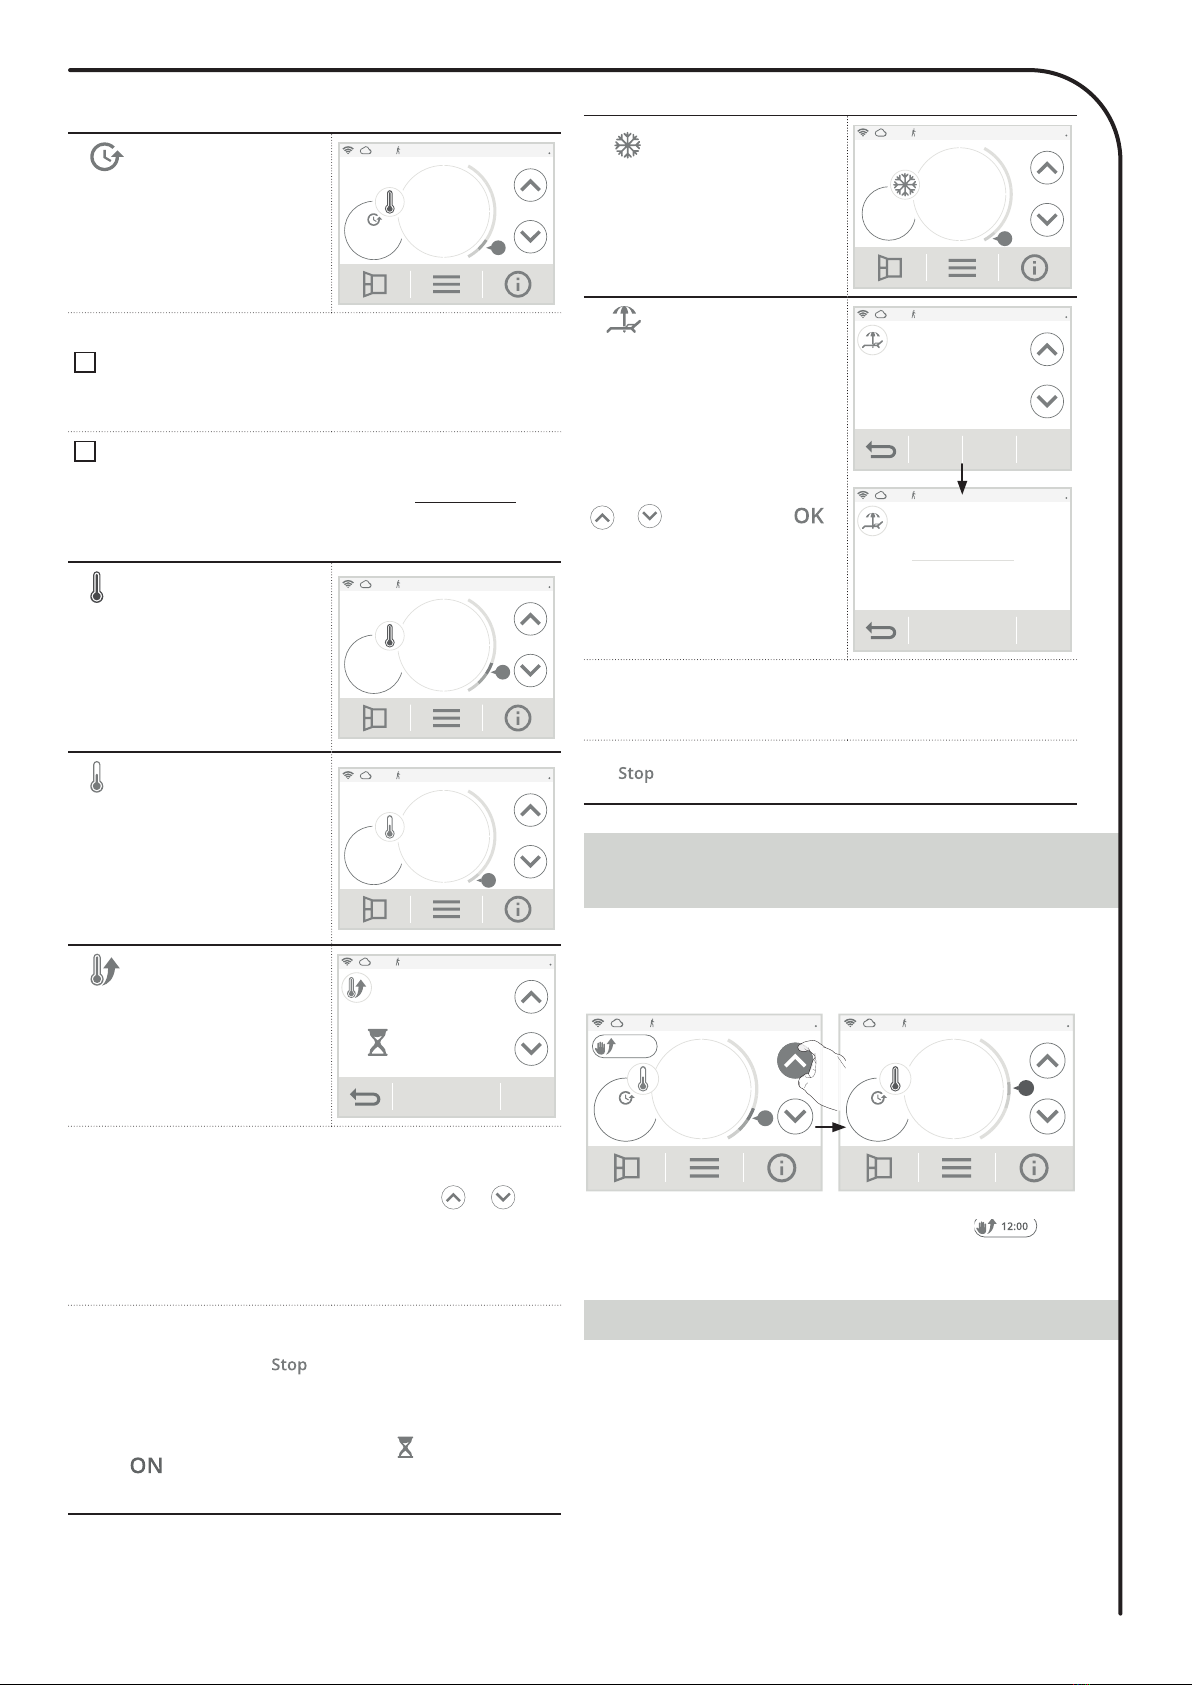
Mode description Display
• Frost protection mode
Frost protection mode, enables you
to protect your installation against
the effects of cold weather, by
maintaining a minimum tempera-
ture of 7°C. Select this mode when
you will be away from your home
for a long time (more than 5 days).
11:00 03/06/15
ON
A
7°C
.0
Frost
AA
• Holiday mode
You can program an absence pe-
riod during which your installation
will be protected from frost. At the
end of this period, the device will
return to Auto mode. This guaran-
tees you maximum savings during
your holidays and an optimal level
of comfort when you return.
Set the date of your return using
or then confirm with .
The device automatically displays
the countdown of days remaining
before your return and your return
date.
11:00 03/06/15ON
Expected return in:
13 days
Wednesday
06/17/2015
Stop
11:00 03/06/15ON
Return date
Wednesday
06/17/2015
OK
Tip: It is advisable to set a return date on a day prior to the actual
date. In this way, you will find the right temperature when you return.
Example: if you return from vacation on February 20, schedule a
return to February 19 and have the right temperature on your return!
Manual stop: At anytime, you can stop the Holiday mode by press-
ing . The device returns to the previous mode (active mode
before switching on the Holiday Mode).
This feature allows you to modify temporarily the Eco temperature until
the next programmed temperature change (via integrated programming
or pilot wire) or by switching to 00:00 clock.
You can cancel this exemption at any time by pressing . The
device automatically returns to the original operating mode (active
mode before manual exemption).
11:00 03/06/15ON
12:00
Eco
Auto 19°C
.0
A
03/06/15
ON 12:00
Comf.
Auto 21°C
.0 B
The Energy Saving Trust (EST) and carbon trust recommends re-
ducing temperature control down by 1°C to save up to 10% of
your energy bill.
A cursor indicates the level of energy consumption by automatically
changing color: red, orange or green.
So, depending on the setting temperature, you can choose your level
of energy usage. As the temperature setting increases, the consump-
tion will be higher.
In which case?
In Auto, Comfort, Eco and Frost protection modes and whatever the
temperature level.

12
2-
Select the setting temperature
to be modified: Comfort, Eco or
frost protection.
Comf.
19°C
Eco
15,5°C
Frost
7°C
Temperatures settings
Eco
15,5°C
E
1
E
1
E
3- Adjust the desired setting temperature with or then press
to confirm and return to the main screen.
Comfort temperature
Preset at
19°C
Adjustable from 7°C to
30°C by intervals of
0.5°C.
It is possible to limit
this comfort period,
see page 21 for details. OK
19°C
.0 A
Comfort temperature setting
Eco temperature
Preset at
15.5° C
(equivalent
to Comfort
-3.5° C)
Adjustable from 5°C to
19°C by intervals of
0.5°C and accord-
ing to the Comfort
setting temperature
(from Comfort -8°C to
Comfort -1°C). For ex-
ample, if the Comfort
temperature is set to
20°C, the eco temper-
ature is adjustable from
12°C to 19°C.
Important: The Eco
setting temperature
will never exceed
19°C.
Eco temperature setting
OK
A
15°C
.5
A
CONSUMPTION INDICATION ACCUMULATED
IN KWH, ENERGY SAVINGS
It is possible to see the estimation of power consumption in kWh
since the last reset of the energy meter.
1-
Press and select
Energy consumption
.
• Visualization
11:00 03/06/15
ON
Comf.
Auto 19°C
.0
A
Current setting
Current prog Technical support
Energy saving
Energy consump. Curr
C - Red colour
High Temperature
level : it is advisable to
significantly reduce the
setting temperature.
Setting temperature
> 22°C
When the setting
temperature is higher
than 22°C
A
22°C
.5
C
B - Orange colour
Average temperature
level : it is advisable
to slightly reduce the
setting temperature.
19°C < Setting
temperature 22°C
When the setting
temperature is higher
than 19°C and lower or
equal to 22°C
A
19°C
.5 B
A - Green colour
Ideal temperature.
Setting temperature
19°C
When the setting
temperature is lower or
equal to 19°C A
18°C
.5
A
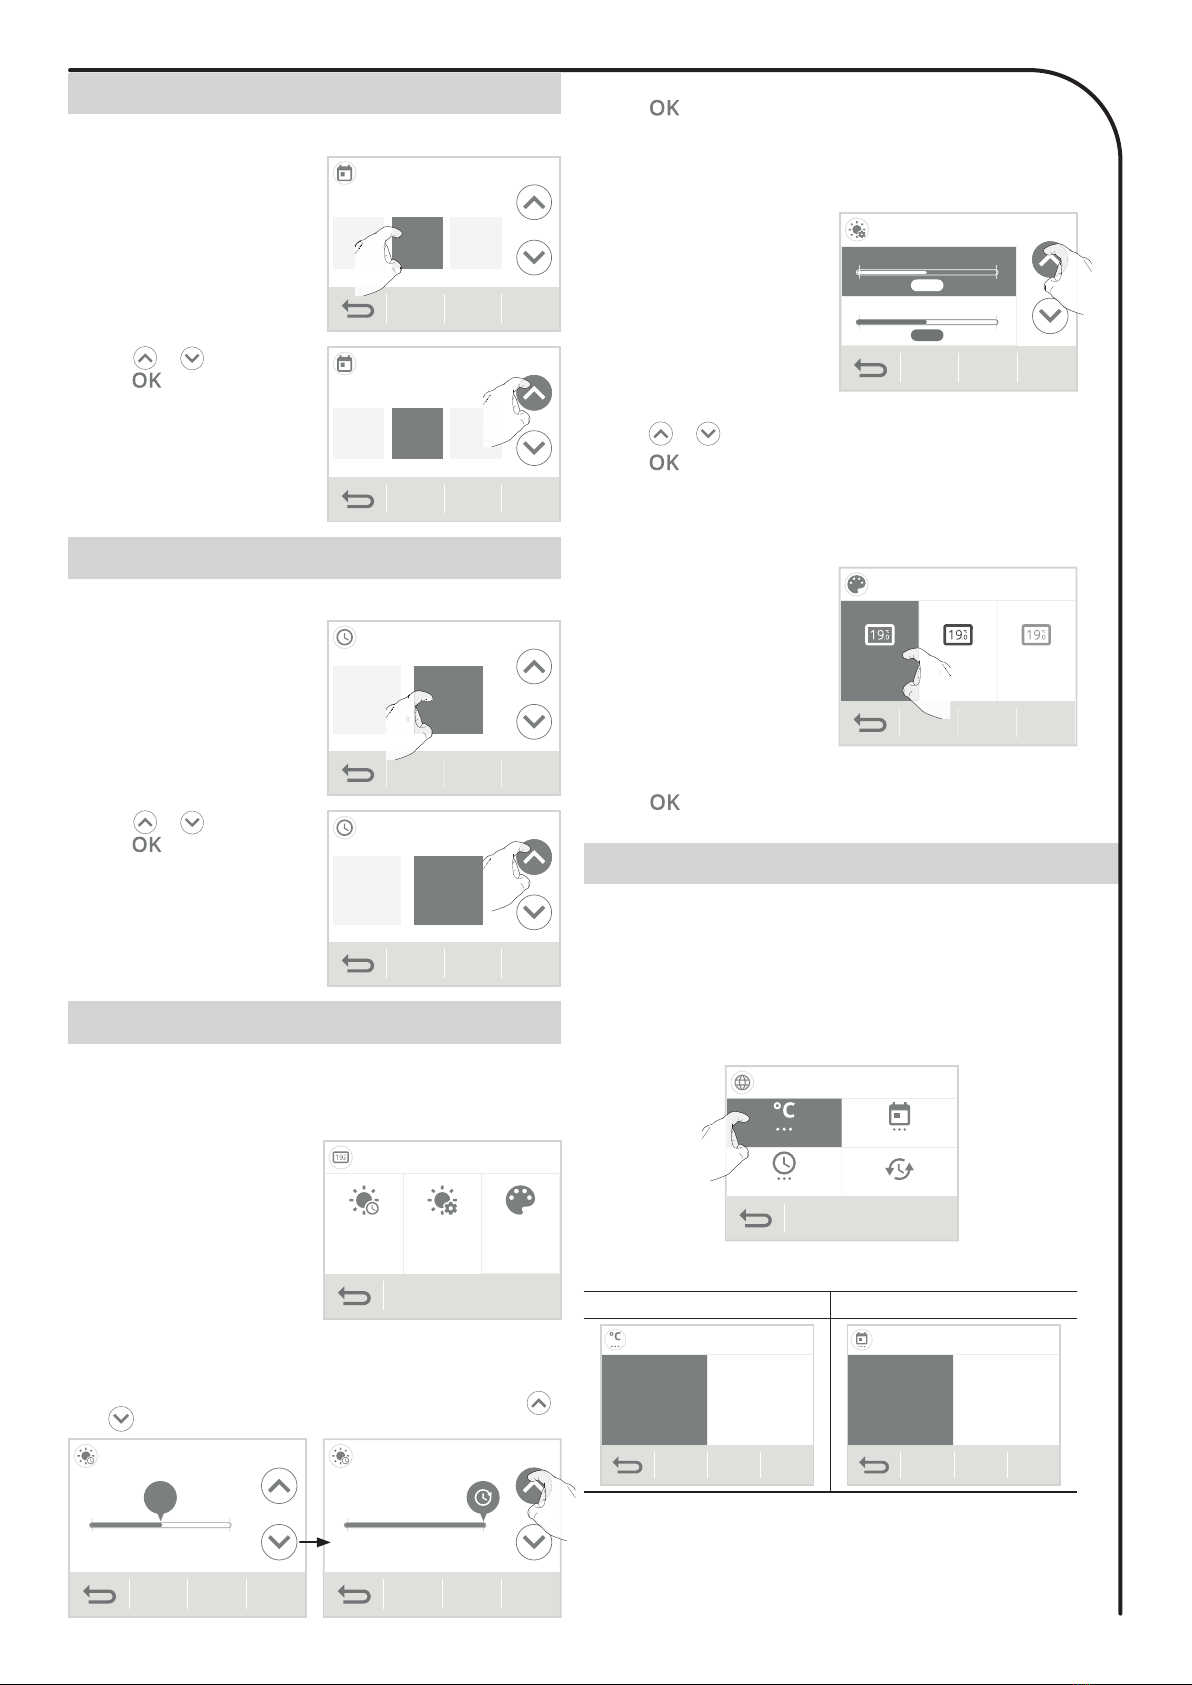
ADJUSTMENT OF SETTING
TEMPERATURES
1-
From the main screen, press , and select Temperatures.
11:00 03/06/15
ON
Comf.
Auto 19°C
.0
AProgramming
Temperatures
Settings
Quick installation Temperaturesio
n
T
T
2-
View the device’s energy consump-
tion in kWh over the year, current
month and accumulated since the
first power up or the counter reset.
2015 2000 kWh
April 300 kWh
Since
09/25/2015 36 kWh
Energy consumption
0
Reset
3-
Press to exit and return to the main screen.
• Resetting the energy meter
1-
To reset the counter, press .
2-
Confirm by pressing Yes or No. The device automatically returns to
the previous screen.
Energy consumption
reset counter?
Yes No
2015 0kWh
April 0kWh
Since
25/09/2015 0kWh
Energy consumption
0
Reset
3-
Press to exit and return to the main screen.
Frost protection temperature
Preset at
7°C
Adjustable from 5°C to
12°C by intervals of
0.5°C.
Frost p. temperature setting
OK
A
7°C
.0
A

13
• Controls lock
• How to unlock controls
To unlock controls, press and hold down the button for
5
seconds.
The padlock symbol disappears from the display, touchscreen is
unlocked.
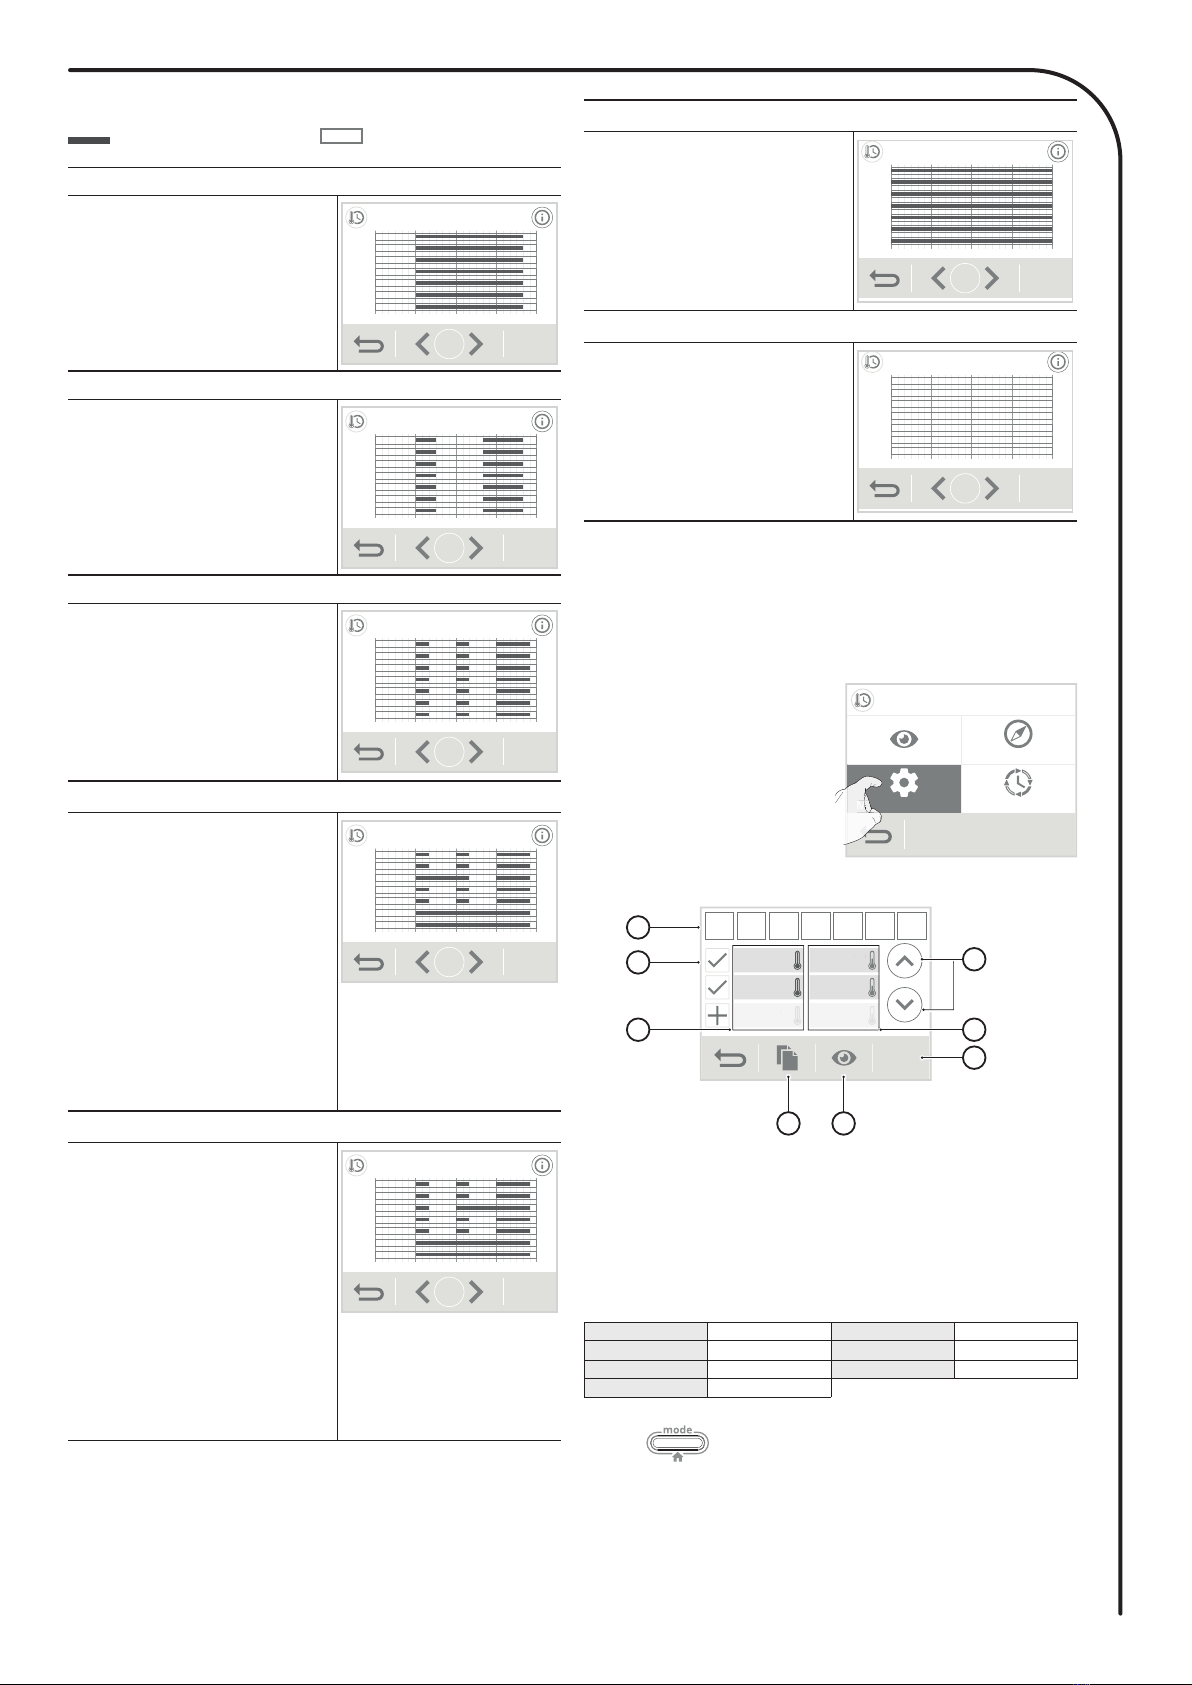
• Access to the programming mode
CHILD ANTI-TAMPER,
KEYPAD LOCK/UNLOCK
7 DAY AND DAILY PROGRAM
INTEGRATED, ENERGY SAVINGS
Important: when the touchscreen is locked, only the key
is active.
If the device is on heating standby mode when the touchscreen is
locked, you have to unlock it for the next heating on to access the
setup.
1- From the main screen, press and select Programming.
11:00 03/06/15
ON
Comf.
Auto 19°C
.0
AProgramming
Temperatures
Settings
Quick installation
Programming
To lock the controls, press and hold
down for
5 seconds.
The padlock symbol
appears
on the display, touchscreen is
locked.
11:00 03/06/15
ON
19°C
.0
A
Comf.
5 sec.
• Choosing a pre-recorded program
2- Press Prog. assistant
and then .
Prog. in progress
Optimisation
Prog. assistant
Modify the prog.
Programming
Prog. assistant
O
Prog
Pr
O
rog
P
Prog. assistant
Select the desired
programme, then you can
modify it.
OK
Smart
Ecosens
Existing
program
Prog. Assistant
OK
Overview
Auto-programming (Auto-prog): After an initial learning period of
one week, the radiator will analyze occupancy cycles to determine
and implement a weekly program adapted to your lifecycle alternating
periods in comfort and periods in eco, the goal being to deliver the
most efficient yet comfortable and user focused heating cycle.
The product algorithm will perpetually learn and adapt to changes in
your occupancy patterns, adapting week after week to optimize the
heating program to any changes in your evolving occupancy patterns.
Operating
Upon the first activation of your radiator, the mode “auto-program”
is activated by default, in mode Auto. To deactivate and change the
program, see program modification and allocation page 13.
The first week of operation is a learning week during which the radi-
ator memorizes your habits and elaborates a program for the week.
It therefore defines a program built up of periods of Comfort and Eco,
independently for each day of the week.
During this learning week, the radiator will provisionally function in
permanent “Comfort” mode.
Important: To ensure the auto-programming is optimized, please
ensure the presence detection sensor is not interrupted by an
external source, see important information concerning the presence
detection system on page 16.
AUTOMATIC PROGRAMMING WITH
SELF-LEARNING PROCESS
7 DAY AND DAILY PROGRAM
Application of the intelligent program
One week after switching on, the device will apply the new program
for the next 7 days.
Then week after week the device will continue to optimize the intel-
ligent program “Auto”, adjusting the Comfort and Eco periods to fit
closely with your lifestyle.
When the product is in Frost protection mode or in heating stand-
by mode for more than 24 hours, learning and optimisation of the
intelligent program stops: the device stores the previously recorded
program from the last week before switching to the Defrost or heating
standby mode.
- Example 1: If the product is installed in mid-season or if its installa-
tion is anticipated on the construction site, it can be switched on in
stand-by mode. When you select the Auto mode, the learning week
will start automatically. The device will be in permanent comfort and
will memorize your habits to apply the adapted program the follow-
ing week.
- Example 2: You select frost protection mode before going on hoday
Upon your return, when you return to Auto mode, the unit will amat
ically apply the previously stored intelligent program from the last
week before you left.
In the case of control by pilot wire coming from an energy manager
for example, the pilot wire will take precedence over the AUTO pro-
gram which results from the Self-learning algorithm.
11:00 03/06/15
ON
Comf.
Auto 19°C
.0
A
11:00 03/06/15ON
Eco
Auto 15°C
.5
A
Example of display in Comfort
period
Example of display in Eco period
Choices program
The radiator is delivered by default with the self-learning mode enabled
as described opposite. If this program suits your requirements, you have
nothing more to do, the radiator, after the initial 7 day learning period will
follow the autoprogram which will continue to tailor itself to your occupancy
cycles.
If this program does not suit you, scroll through the pre-recorded programs
using the navigation arrows and select the one adapted to your lifestyle by
pressing directly on the screen:
In this mode, you have the option of programming your radiator, by setting
one of the seven programs on offer for each day of the week.
14
Program 1
The device will operate in Comfort
mode from 06:00 to 22:00 and in
Eco mode from 22:00 to 06:00. Mon
Tue
Wed
Thu
Fri
Sat
Sun
6 am 12 pm 6 pm 12 am12 am
Programme 1
OK
1/8
Program 2
The device will operate in Comfort
mode from 06:00 to 09:00 and from
16:00 to 22:00 and in Eco mode
from 09:00 to 16:00 and from 22:00
to 06:00.
Mon
Tue
Wed
Thu
Fri
Sat
Sun
6 am 12 pm 6 pm 12 am12 am
Programme 2
OK
2/8
Program 3
The device will operate in Comfort
mode from 6am to 8am, from 12pm
to 2pm and from 6pm to 11pm. It
works in Eco mode from 11pm to
6am, from 8am to 12pm and from
2pm to 6pm
Mon
Tue
Wed
Thu
Fri
Sat
Sun
6 am 12 pm 6 pm 12 am12 am
Programme 3
OK
3/8
Program 4
Monday, Tuesday, Thursday and
Friday:
The device operates in Comfort
mode from 6am to 8am, from 12pm
to 2pm and from 6pm to 11pm. It
works in Eco mode from 11pm to
6am, from 8am to 12pm and from
2pm to 6pm.
Wednesday: The device operates
in Comfort mode from 6am to 2pm
and from 6pm to 11pm. It works in
Eco mode from 2pm to 6pm and
from 11pm to 6am.
Saturday and Sunday: The device
operates in permanent comfort for
the 24 hours of each day.
Mon
Tue
Wed
Thu
Fri
Sat
Sun
6 am 12 pm 6 pm 12 am12 am
Programme 4
OK
4/8
Program 5
Monday, Tuesday, Thursday and
Friday:
The device operates in Comfort
mode from 6am to 8am, from 12pm
to 2pm and from 6pm to 11pm. It
works in Eco mode from 11pm to
6am, from 8am to 12pm and from
2pm to 6pm.
Wednesday: The device operates in
comfort mode from 6am to 8am and
from 12am to 11pm. It works in Eco
mode from 8am to 12pm and from
11pm to 6am.
Saturday and Sunday: The device
operates in permanent comfort for
the 24 hours of each day.
Mon
Tue
Wed
Thu
Fri
Sat
Sun
6 am 12 pm 6 pm 12 am12 am
Programme 5
OK
5/8
Comfort mode Eco mode
• Legend
Note : you can set the setting temperature (see to set the setting
temperatures page 12).
• Changes in program allocation
If you are not satisfied with the timetable of the chosen program, you
can modify it day-by-day or in a group of days.
1-
Press
Modify the prog.
Prog. in progress
Optimisation
Prog. assistant
Modify the prog.
Programming
Modify the prog.
Mod
Mo
od
o
Mo
M
2- Change the programming by following the steps below:
OK
6:00am
12:00pm
6:00pm
8:00am
2:00pm
8:00pm
Mon Tue Wed Thu Fri Sat Sun
2.1
2.2
2.3 2.4
2.8
2.5
2.6 2.7
6
:
00
am
12
:0
0
pm
6:00
pm
8
:
0
0
am
2:
00
pm
8:0
0
pm
2.1-
Select the day(s) of the week.
2.2-
Add a comfort period.
2.3- Comfort periods starting
times.
2.4- Eco periods starting times.
2.5-Change the scheduled
periods.
2.6- Copy the schedules to one
or more days of the week.
2.7- View the modified program-
ming.
2.8- Confirm, the modified pro-
gram appears.
Mon Monday Tue Tuesday
Wed Wednesday Thu Thursday
Fri Friday Sat Saturday
Sun Sunday
3-
Press to exit and return to the main screen.
Comfort mode
The device will operate in Comfort
mode, 24 hours a day, as regards
each day selected.
Mon
Tue
Wed
Thu
Fri
Sat
Sun
6 am 12 pm 6 pm 12 am12 am
Permanent Comfort
OK
7/8
Eco mode
The device will operate 24 hours a
day in Eco mode. Mon
Tue
Wed
Thu
Fri
Sat
Sun
6 am 12 pm 6 pm 12 am12 am
Permanent Eco
OK
6/8
15
OPEN WINDOW DETECTION,
ENERGY SAVINGS
• Visualization of the current program
At any time, you can view the current programming by pressing Prog. In pro-
gress.
Prog. in progress
Optimisation
Prog. assistant
Modify the prog.
Programming
Prog. in progress
prog.
rogress
pro
rogress
re
g
o
e
Press to exit and return to the main screen.
DUAL OPTIMISATION FEATURE
Overview
Dual function optimisation, priority to comfort or energy savings,
the choice is yours: Depending on various parameters: room iner-
tia, ambient temperature, desired temperature, the radiator calculates
and optimizes the programming for each heating period whether set
to Comfort or Savings (Eco):
- In OPTI ECO mode (efficiency priority), the radiator inbuilt algo-
rythmes will calculate the best compromise in order to guarantee
maximum energy savings throughout the programmed increase and
decrease phases.
In this mode, a slight drop in the temperature level at the beginning
and end of the comfort period is allowed to maximize energy savings.
- In OPTI COMFORT mode (priority to comfort), the radiator intelli-
gence calculates the best compromise in order to guarantee maxi-
mum comfort during the programmed increase and decrease phases.
In OPTI COMFORT mode, the priority is given to anticipating and
maintaining the comfort temperature during periods of detected oc-
cupancy.
1-
Press
Optimisation
.
Prog. in progress
Optimisation
Prog. assistant
Modify the prog.
Programming
Optimisation
n
n
2-
Select the Optimisation type
you want and confirm by press-
ing .
Optimisation
OK
Opti
Comf.
Opti
Eco
disabled
Opti
Eco
The OPTI COMFORT mode is activated by default.
Optimisation choice
• Important information about the open window de-
tection:
Important: the open window detection is sensitive to temperature
variations. The device will react to the window openings in accord-
ance with different parameters: temperature setting, rise and fall of
temperature in the room, the outside temperature, the location of the
device...
If the device is located close to a front door, the detection may be
disturbed by the air caused by opening door.
If this is a problem, we recommend that you disable the automatic
mode opened window detection (see page 21).
You can, however, use the manual activation (see above).
1
2
Legend
= the favourite
location
= another location
• Overview
Lowering temperature cycle to Frost protection during aeration of a
room by opened window. You can access the opened window de-
tection from the Comfort and Auto Modes. Two ways to enable the
detector:
- Automatic activation, the lowering temperature cycle starts as
soon as the device detects a temperature change.
- Manual activation, the cycle of lowering temperature starts by
pressing a button.
• Automatic activation (factory settings):
To disable this mode, see page 21.
The device detects a temperature fall. An opened window, a door to
the outside, can cause this temperature fall.
Note: The difference between the air from the inside and the outside
must cause a significant temperature fall to be perceptible by the
device.
This temperature drop detection triggers the change to Frost
Protection mode.
• Manual activation (activated by default):
From the main screen, press . The device will switch on Frost
protection mode.
11:00 03/06/15
ON
Comf.
Auto 19°C
.0
A
11:00 03/06/15
Aeration cycle
30min.
Stop
- Aeration cycle time
The frost protection mode is active for an adjustable time of 30 min. The
countdown of the aeration cycle begins and the time elapses, minute by
minute. You can temporarily change the duration of the aeration cycle from
5 to 90 minutes in 5-minute intervals by pressing
or . This modi-
fication will only be valid for this active, and therefore non-recurring,
aeration cycle (see page 21 for permanent modification of the aeration
cycle time).
16
OCCUPANCY DETECTION, ENERGY
SAVINGS
• Important information about the occupancy de-
tection
The occupancy detector is sensitive to temperature variations and
light. It is likely to be disturbed by the following items:
- Hot or cold sources such as forced air vents, lights, air
conditioners
- Reflective surfaces such as mirrors
- Animal crossing in the detection zone
- Objects moving with the wind like curtains and plants.
Disable the occupancy detection if your radiator was installed near
of these.
To disable the occupancy detection, see page 20.
Note: the detection range varies depending on the ambient temper-
ature.
* Unchangeable factory settings
Unoccupied periods * Lowering setting temperature
20 minutes Comfort -1°C
40 minutes Comfort -1,5°C
1 hour Comfort -2°C
72 hours Frost protection
Note: when presence is detected in the room, the device automati-
cally returns to the initial mode.
Remarks: by default, when the sensor is enabled and detects move-
ment in the room, the screen lights up for a few seconds and then
turns off. To delete the backlight when occupancy is detected, see
page 20, advanced settings - occupancy detection: activation/deac-
tivation.
• Overview
I-sense fits your lifestyle while
keeping your power consumption
under control.
With its front infrared sensor, I-sense
optimizes the management of heat-
ing: it detects movement in the room
where it is installed and in case of
absence, automatically performs a
progressive lowering of the setting
temperature resulting in: energy sav-
ings. To ensure proper operation, do
not block the sensor’s field of view by any obstacle (curtains, furni-
tures ...).
• Operating
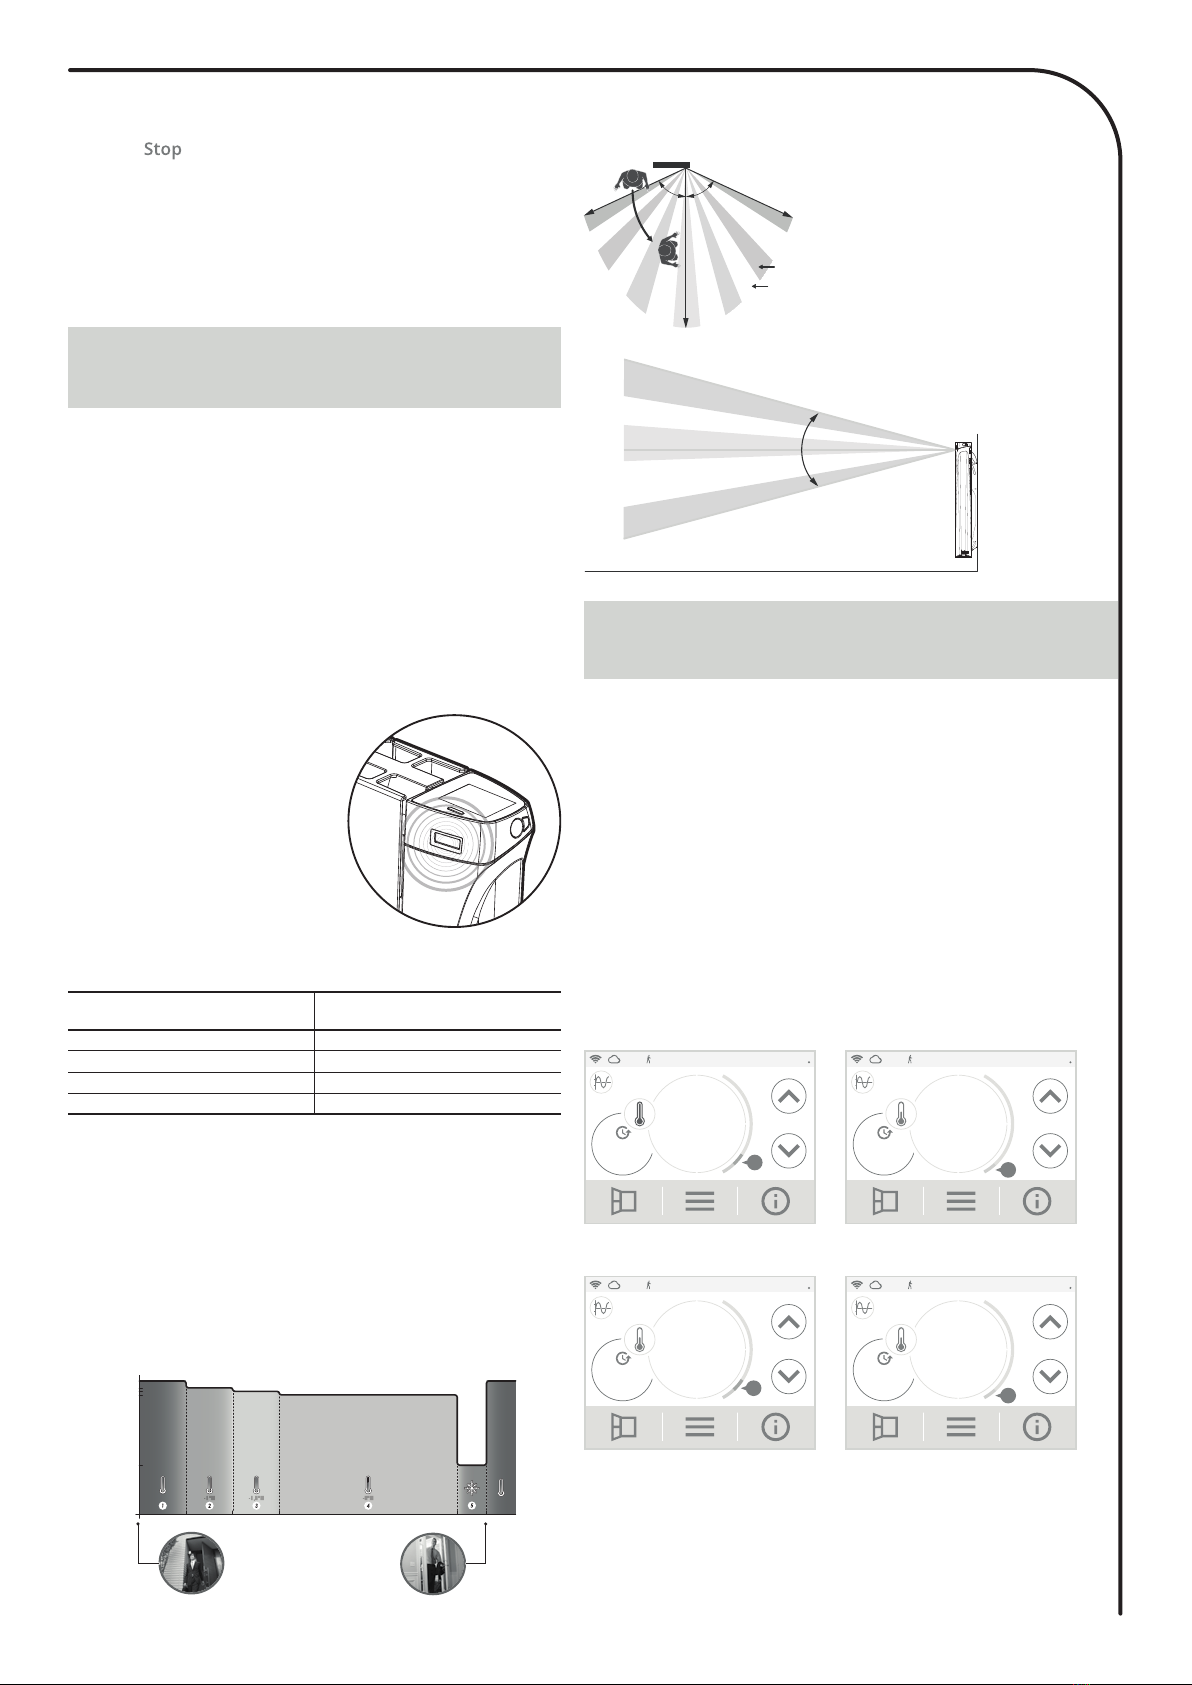
• Divisions of the detection zone
Detection zone, for a temper-
ature of 19°C.
The detection zone is divided
into active and inactive areas.
A person that crosses the area
will be detected by the infrared
sensor.
65° 65°
Active area
Inactive area
Top view
30°
0°
20min. 40min. 60min. 72hr
19°C
18°C
17,5°C
17°C
7°C
7°C
17°C17,5°C18°C19°C
Time
Setting
temperature
Occupancy detectedUnoccupancy detected
hr
INFORMATION ABOUT REMOTE
CONTROL BY PILOT WIRE
Pilot wire = Comfort Pilot wire = Eco
11:00 03/06/15ON
Comfort
Auto 19°C
.0
A
Pilot wire
11:00 03/06/15ON
Eco
Auto 15°C
.5
A
Pilot wire
Pilot wire = Eco - 1
Comfort - 1°C
Pilot wire = Eco - 2
Comfort - 2°C
11:00 03/06/15ON
Eco-1
Auto 18°C
.0
A
Pilot wire
11:00 03/06/15ON
Eco-2
Auto 17°C
.0
Pilot wire
A
• Overview
Your heating device can be controlled by a central control unit through
a pilot wire, in which case the different operating modes will be re-
motely enabled by the programmer.
You can only control the device by pilot wire in the Auto mode. In
the other modes, the orders transmitted by the pilot wire will not be
executed.
In general, a pilot wire control system makes it possible to impose
externally a lowering of the temperature setpoint, combined with the
internal programming and the occupancy detection.
If several lowering requests appear simultaneously, priority is given to
the lowest temperature setpoint, thus maximizing savings (see infor-
mation on priorities for different modes on page 17).
When a signal is sent from the pilot wire, the self-learning optimisation
function is suspended.
Below the different views of the display for each order sent by pilot
wire:
- Stopping the aeration cycle
- Manual shutdown: At any time, you can stop the aeration cycle by
pressing .
- Automatic shutdown: At the end of the countdown, the ventila
tion cycle stops.
When the aeration cycle is stopped, the device automatically returns
to the original operating mode (active mode before the aeration cycle
is activated).
Note: If a sufficient rise in temperature is perceived, the device can
return to the original mode (active mode before the opened window
detection).
17
PRODUCT INFORMATION
Pilot wire = Frost protection Pilot wire = Stop (Heating
standby mode)
11:00 03/06/15ON
Frost p.
Auto
Pilot wire
A
7°C
.0
AA
ON 03/06/15
11:27
Pilot wire
Standby
Auto
INFORMATION ABOUT PRIORITIES
BETWEEN THE DIFFERENT MODES
Principle
In Comfort, Eco and Frost protection mode, only orders of the
occupancy sensor and those of the opened window sensor will be
considered.
In Auto mode, the radiator can receive different orders coming from:
- 7 day and daily program integrated (Comfort or Eco orders) ;
- Pilot wire 6 orders, if connected to a central control unit ;
- Opened window detector ;
- Occupancy detector.
In general, it is the lowest received order which prevails.
If an open window detection or an occupancy absence of more
than 72 hours is detected, switching to frost protection takes
precedence unless a load shedding order is present on the pilot
wire.
Special case of self-programming where the temperature level in
the room is decided according to the learning of the lifestyle and
the optimisation mode selected (Opti Comfort or Opti Eco):
- During the programmed passage in period Eco, if a presence is
detected in the room, it will be taken into account and the appliance
automatically switches to Comfort mode.
- During the programmed passage to the Comfort mode period, the
absence detection system is temporarily suspended (30 minutes).
Examples
7 day and daily programming = Comfort
Pilot wire 6 orders = Eco
Eco 11:00 03/06/15ON
Eco
Auto 15°C
.5
A
Pilot wire
11:00 03/06/15
ON
A
7°C
.0
Frost
AA
7 day and daily programming = Comfort
Pilot wire 6 orders = Eco
Occupancy detector = Frost protection
Frost protection
ON 03/06/15
11:27
Pilot wire
Standby
Auto
7 day and daily programming = Eco
Pilot wire 6 orders = Stop (heating standby
mode)
Occupancy detector = Eco
Open window detector = Frost protection
Heating standby mode
At any time you can view the operating status of the product.
1- From the main screen, press .
11:00 03/06/15
ON
Comf.
Auto 19°C
.0
A
Current setting
Current prog Technical support
Energy saving
2- Press on the information you want to view. Press to exit
and return to the main screen.
Energy consumption
Energy consumption of the device
in kWh over the year, current month
and accumulated since the first
power-up or the counter reset (see
page 12 for resetting the meter).
2015 2000 kWh
April 300 kWh
Since
09/25/2015 36 kWh
Energy consumption
0
Reset
Active settings
List of all settings set on the prod-
uct.
Press or to scroll and
to exit and return to the previous
screen (see page 18, 20 and 21 to
modify it). OK
Profile: Individual housing
Wifi connection: No
Date format: 02_04_2015
Time format: 10:37AM
Programming in progress: Comfort
Comfort temperature: 19°C
Eco temperature: 15,5°C
Active settings
Programming in progress
Program in progress during the
week.
Comfort mode
Eco mode
(See page 13 to modify)
Mon
Tue
Wed
Thu
Fri
Sat
Sun
6 am 12 pm 6 pm 12 am12 am
Programming in progress
Technical support - See "Troubleshooting" page 23
In case of technical assistance,
communicate the information
displayed on the screen to our team
to identify your product and provide
assistance in installation or use.
Technical support
Power: 1250W
Software: V0.0
RF Chip version
S/N: 2536NS5012345
RF Chip:
18
USER SETTINGS
CHOICE OF LANGUAGE USE
• Access
From the main screen, press and select
Settings
.
11:00 03/06/15
ON
Comf.
Auto 19°C
.0
AProgramming
Temperatures
Settings
Quick installation
Settings
Pro
ro
• Settings menu
Settings
Lang.
Time
Netwk.
Date
1/3
Display
Reset Advanced settings
Region
Settings
2/3
1- Press Language.
2- Press the desired language and confirm by pressing . The
device automatically returns to the settings menu.
Français English
OK
Language
Français Français English
OK
Language
English
O
O
O
O
O
O
O
Your radiator has been specially designed to be connected directly to
your home home router without the need of a hub.
To pair the device with your wireless network, proceed in the following
order:
3- Press . Wi connection
Connect to your
MySense application
OK
WIFI CONNECTION
1- Press Network.Settings
Lang.
Time
Netwk.
Date
1/3
Netw.
2- Press Wifi Connection to start
the pairing process. Network
connection Settings info
connection
conne
n
nne
n
n
n
Wifi connection
Network:
EV30-ABCDEFGH
4- Your device is in connection
mode. Please refer to the in-
structions on your application
and follow the instructions until
the complete connection of the
device.
Once the product is connected, press to exit the connection mode.
The unit automatically returns to the setup menu.
Note: The following 3 screens will appear when the connection is made.
You have nothing to do on the product.
123
Wifi connection
Application connected to the
product
Wifi connection
Connection in progress...
Wifi connection
Connected to wifi
OK
• Product disconnection
If you want to disable your product from the wifi network without
unpairing it, proceed as follows:
1- On Network display, press
Settings.Network
connection Settings info
o
rk
Settings
c
tion
S
S
2- Select and press
to confirm.
OK
Settings
Wifi
enabled
Wifi
disabled
d
3- On Network display, you cannot
access to Connection.Network
Connection Setting Infos
4- To reconnect the product to the
wifi network, in the previous
step simply select -
.
OK
Settings
Wifi
enabled
Wifi
disabled
d
d
d
19
REGIONAL UNITS
DATE SETTING
1- Press Date.
Date
YearDay
20156
Month
Sept.
OK
Sept.Sept.
6
S
6
S
6
2- Select the item to modify (day /
month / year).
Date
YearDay
20156
Month
Sept.
OK
Sept.Sept.
ar
5
ar
r
3- Press or to set and
press to confirm. The
device automatically returns to
the settings menu.
TIME SETTING
1- Press Time.
37
am
OK
10:
Time
37
:
37
0
:
::
3
3
0
:
::
3
:
3
3
0
:
::
2- Select the item to modify (hour/
minute).
3- Press or to set and
press to confirm. The
device automatically returns to
the settings menu. 37
am
OK
10:
Time
3737
am
a
DISPLAY
1- Press Display.
2- Select the setting to change.
1- Press Backlight duration.
Display
Backlight
duration
Backlight
brightness
Appearance
Backlight time = Display lighting
time
Backlight brightness = Screen
intensity
Appearance = Screen color
theme
• Backlight duration
3- Press to confirm, the device automatically returns to the dis-
play menu.
• Display menu
2- The backlight time is preset to 30 seconds. To change it, use
or
Backlight: duration
30
sec.
OK
None Permanent None Permanent
OK
Backlight: duration
1- Press .
• Backlight brightness
2-
Select the parameter to be modi-
fied:
Active screen = brightness
of the screen when one of the
buttons is pressed
Standby screen = display
brightness after 30 seconds
can be set (see Backlight
duration above) without any
action on one of the buttons.
3- The brightness of the backlight is pre-set to 50%. To change it,
press or .
4- Press to confirm, the device automatically returns to the
display menu.
Backlight: brightness
OK
0% 100%
50%
Active display
0% 100%
50%
reduced display
1- Press Appearance.
• Appearance
OK
Appearence
White
Green
Black
Green
White
Orange
B
Gr
B
Gr
2- The pre-set screen color
theme is white / green. To
change it, press the theme of
your choice.
White / green = white back-
ground, green inscriptions
Black / green = black back-
ground, green markings
White / orange = white
background, orange inscrip-
tions
3- Press to confirm, the device automatically returns to the dis-
play menu.
In this setting level, you can change the temperature unit, the date
and time format as well as the automatic changeover summer / winter
of the timer.
2- Select the parameter to be modified.
Region
Temp. unit
Time format sum./wint. Time
Date format
Temp. unit
• Region menu
1- Press Region.
3- To modify, press the desired value.
Temperature unit Date format
Temperature unit
°C °F
OK
Date format
Day
Month
Year
Year
Month
Day
OK
20
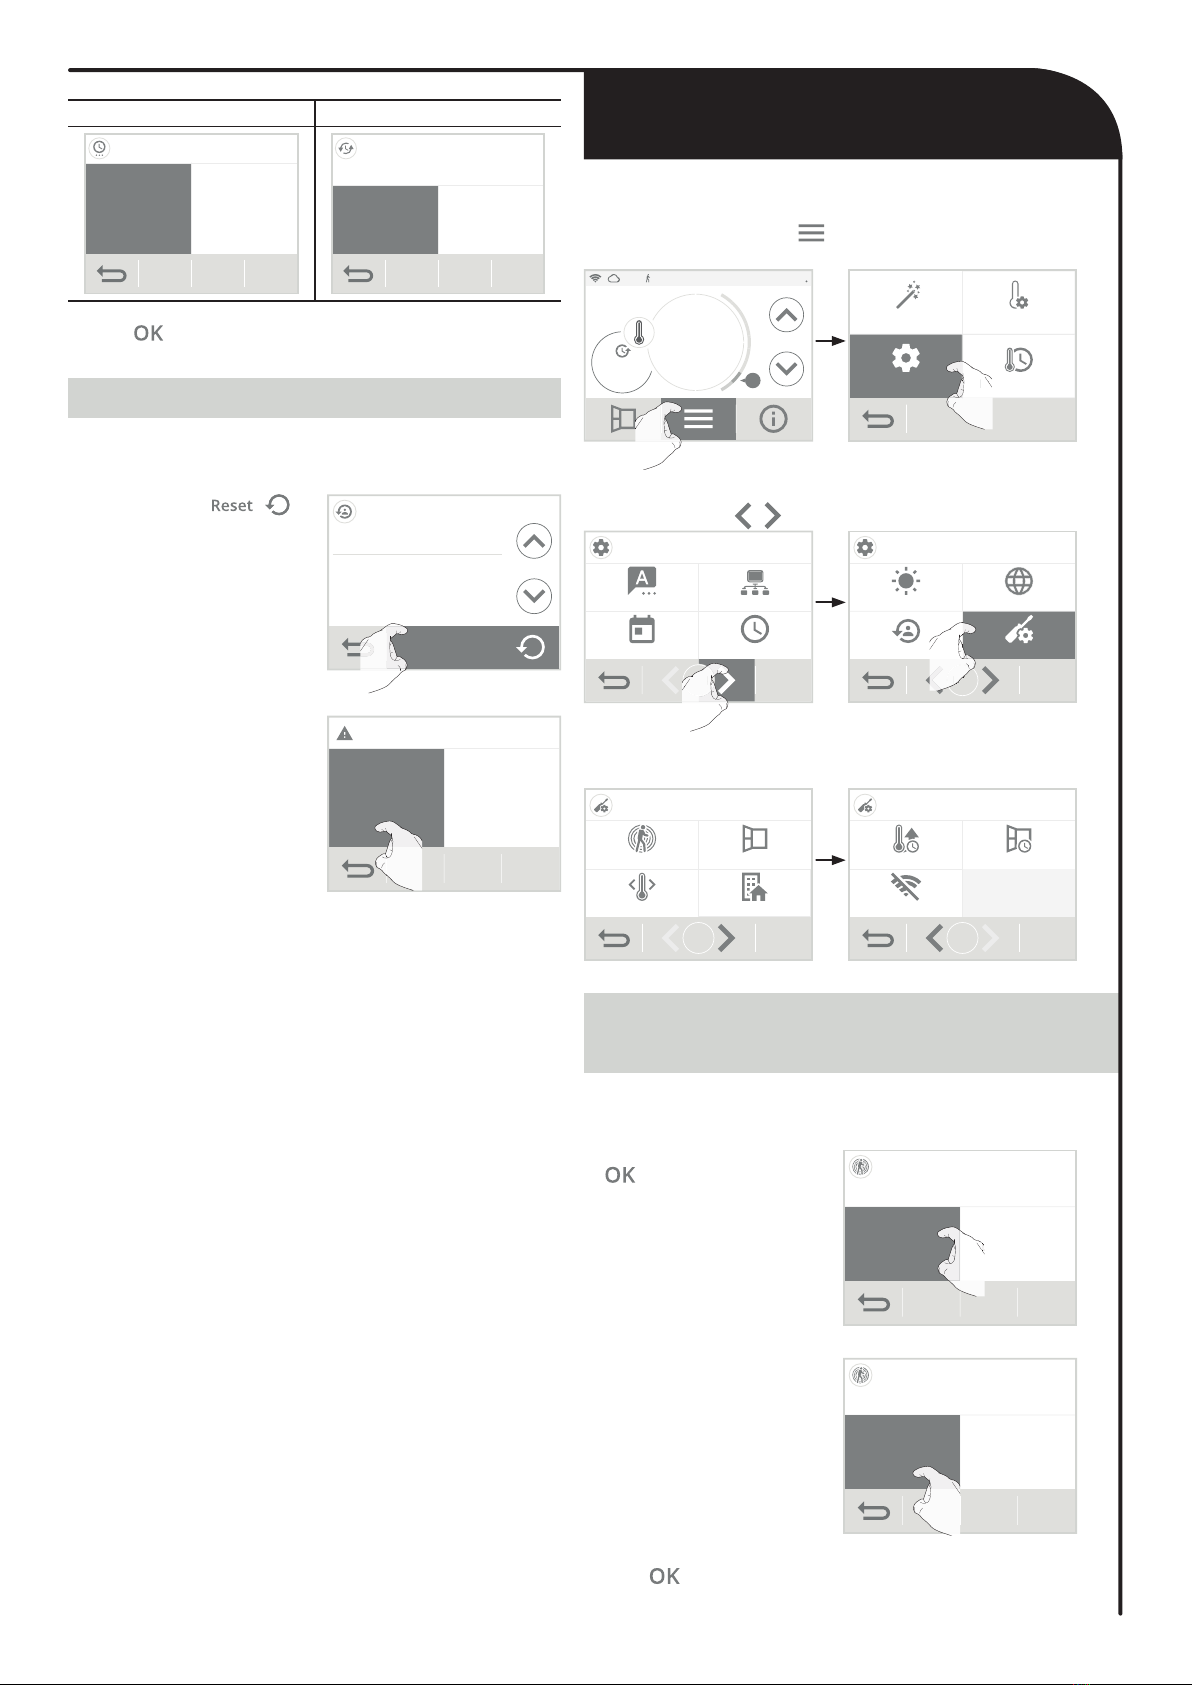
ADVANCED SETTINGS
OCCUPANCY DETECTION: ACTIVATION/
DEACTIVATION
4- Press to confirm, the device automatically returns to the dis-
play menu.
RESET USER SETTINGS
1- Press Reset. The list of applicable factory settings appears on the
screen.
11:00 03/06/15
ON
Comf.
Auto 19°C
.0
AProgramming
Temperatures
Settings
Quick installation
Settings
Pro
ro
2-
Scroll screens with / and press
Advanced settings
.
Settings
Lang.
Time
Netwk.
Date
1/3
1/
3
1
1
Display
Reset Advanced settings
Region
Settings
2/3
Advanced settings
2/
A
2/
A
• Advanced settings menu
Advanced settings
Occupancy detect.
Profil
Window detect.
Comfort limit
1/2
Aeration durationBoost duration
2/2
Advanced settings
Forget network
1- Press Occupancy detection.
4- Press to confirm and automatically return to the advanced
settings menu.
2- Press the desired value and
to confirm. Occupancy detection
Automatic lowering of the setpoint
temperature
Enabled Disabled
OK
D
D
D
3- If you have enabled occupancy
detection, press Yes or No
whether or not you want the
screen to light to indicate that
a presence is detected in the
room.
Occupancy detection
Confirm detection with backlight?
OK
NoYes
• Access
1-
From the main screen, press and then Settings.
2- Press the button . Reset settings
The device will apply the fac-
tory values below:
Profile: Individual housing
Wifi connection: No
Date format: 04_02_2015
Time format: 10:37AM
Programme in progress: Comfort
ResetReset
3- Press the button Yes to con-
firm the reset, and return to the
Settings menu automatically.
Reset settings?
Yes No
Time format Summer / winter time
Time format
24h 12h
am/pm
OK
sum./wint. Time
Automatic switch
Enabled Disabled
OK
Other manuals for iSense ISEN-0750
1
This manual suits for next models
4
Table of contents
Other IntelliHeat Heater manuals


