InterCure RESPeRATE User manual
User Manual

Contacts
Web: www.resperate.com
E-mail: support@resperate.com
Telephone:
USA: 1-877-988-9388 (Toll Free)
United Kingdom: 0800-177-7778 (Toll Free)
Other Countries: +1-646-652-5800 (USA)
Manufactured by InterCure Ltd., Lod, Israel
www.intercure.com
Telephone: +972-73-220-7000
Copyright © 2002–2007 InterCure, Inc. All rights reserved. RESPeRATE,
RESPeRATE To Lower Blood Pressure, and InterCure are trademarks of InterCure.

1
Table of Contents
Welcome: RESPeRATE To Lower Blood Pressure
Introduction
The therapeutic power of breathing
Breathing with RESPeRATE makes the difference
To achieve best results
Exploring Your RESPeRATE Device
RESPeRATE device and components
RESPeRATE display
Using Your RESPeRATE Device
Preparing to Use RESPeRATE
Step 1: Set-Up
Step 2: Determine the best position for the
sensor
Step 3: Put on the sensor belt
Step 4: Put on the headphones
Using RESPeRATE
Step 1: Turn RESPeRATE on
Step 2: Breathe normally (Recognition Phase)
Step 3: Breathe according to the guiding tones
(Breathing Exercise Phase)
Step 4: Therapeutic Breathing Zone
3
4
4
5
7
7
8
10
10
11
12
13
14
14
15
16
18

2
Personalizing RESPeRATE
Adjusting volume
Selecting the melody
Viewing and changing the duration of
a session
Turning the voice instructions on/off
Changing the language of voice instructions
Displaying the Breathing Gauge
Assessment of Your Performance
To view Performance Statistics
Performance Statistics
Errors and Troubleshooting
Error Messages
Troubleshooting
Sensor Position Help Mode
Warranty and Additional Product Information
Cleaning and Maintenance
Technical Information and Approvals
Technical Information
Country Specific Market Clearance
Indication for Use
RESPeRATE Limited Warranty
Customer Support
22
22
22
23
24
24
25
26
27
28
34
34
36
39
41
42
42
42
43
44
45
3
Welcome:
RESPeRATE To Lower
Blood Pressure
Introduction
Congratulations on the
purchase of your RESPeRATE,
the first medical device
clinically proven to lower
blood pressure (BP) in an
effective and pleasant way.
This User Manual provides all the information you
need to use RESPeRATE effectively. It will guide you to
therapeutic breathing and a lowering of blood pressure within
a few weeks. Let’s begin lowering blood pressure, one breath
at a time.
Note: RESPeRATE should only be used as part of your
overall health program for achieving goal blood
pressure, as recommended by your doctor.
RESPeRATE can be safely used in conjunction with
medication and lifestyle modifications such as diet
and exercise.
4
The therapeutic power of breathing
Modern science has only recently confirmed that structured,
therapeutic breathing, performed correctly, can significantly
lower blood pressure. The therapeutic power of breathing
has been known for centuries and is used predominantly in
relaxation techniques such as meditation and yoga.
Effortless
therapeutic breathing can be difficult to perform
on your own
effectively without years of training and individualized coaching.
RESPeRATE makes therapeutic paced breathing easy to do on
your own.
Breathing with RESPeRATE makes
the difference
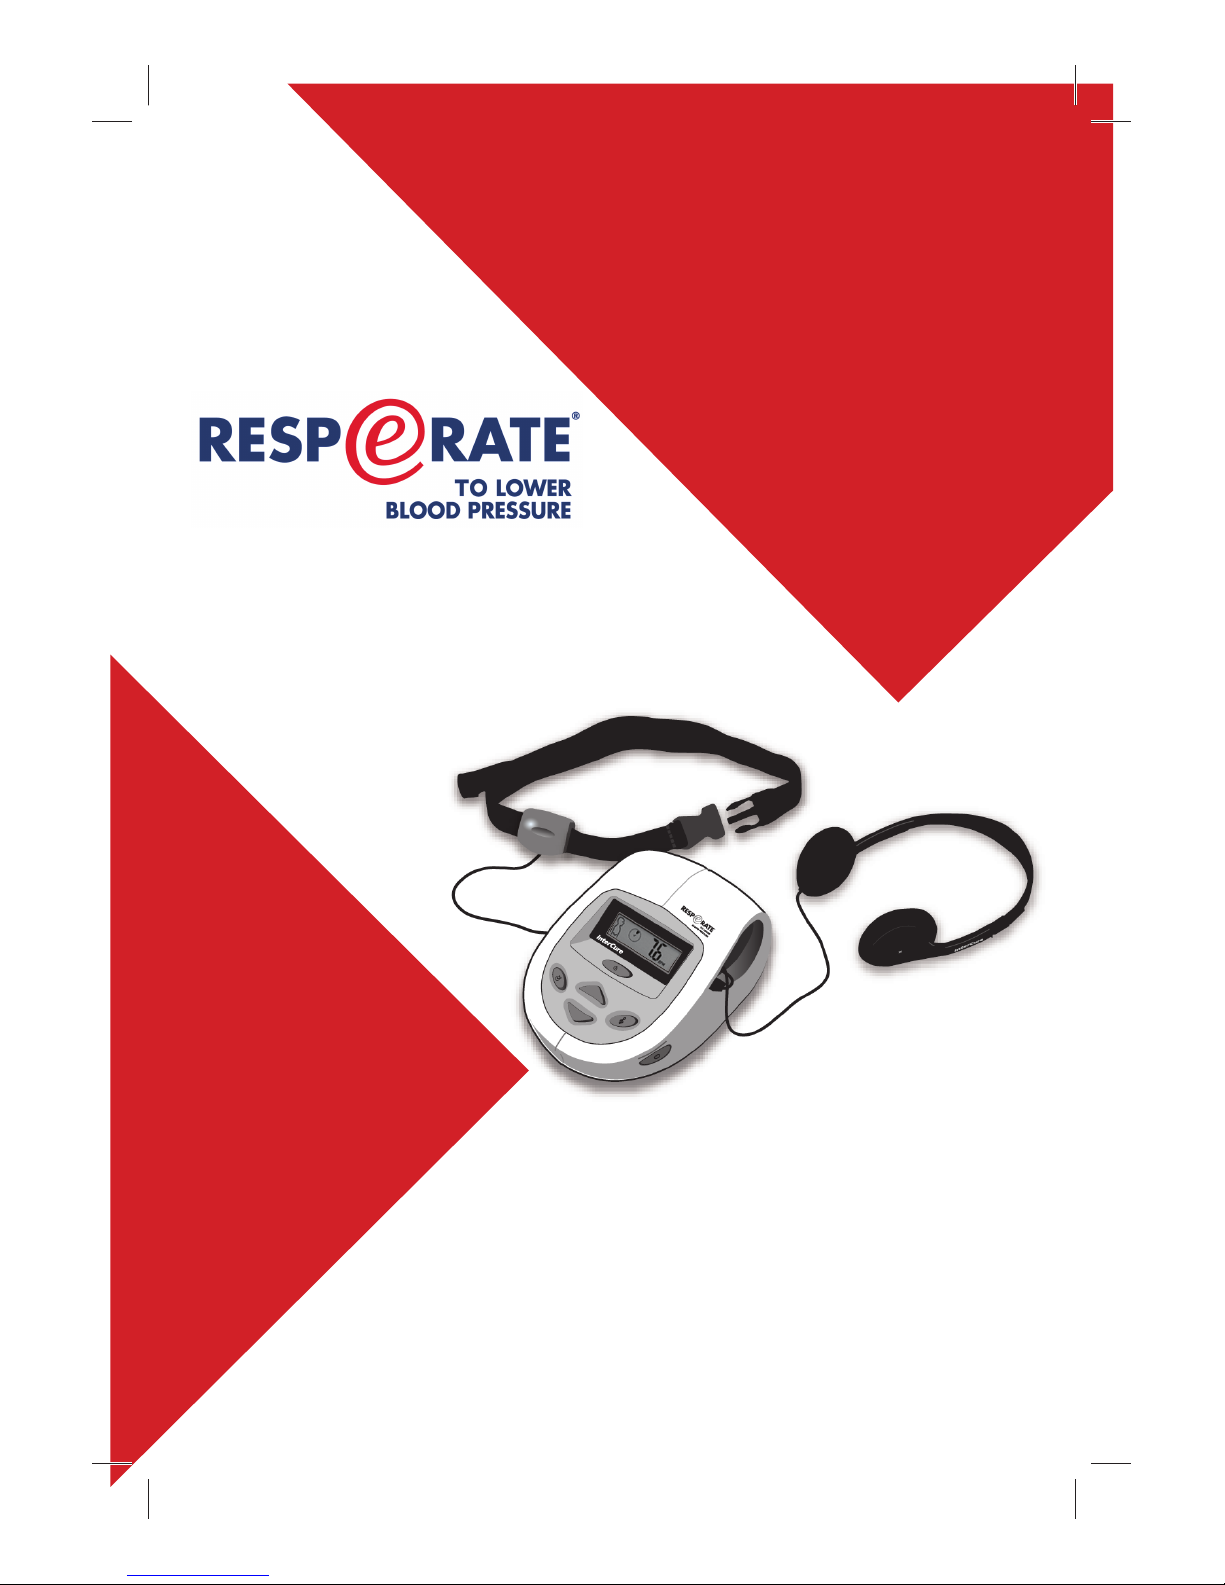
RESPeRATE’s patented “Interactive Paced Breathing” technology,
ingeniously takes advantage of the body’s natural tendency
to follow external rhythms. Composed of a Breathing Sensor,
a computerized unit and headphones, RESPeRATE
Headphones
Breathing Sensor
Computerized unit
5
automatically analyzes your individual breathing pattern.
It then
creates a personalized melody as it subliminally
paces you to
slower breathing to reach the Therapeutic
Breathing Zone of
less than 10 breaths per minute.
The physiological result? The
muscles surrounding the small
blood vessels in your body dilate
and relax. Blood is allowed to
flow more freely, and pressure is
significantly lowered. After each
exercise with RESPeRATE, your
breathing returns to its normal
rate and pattern. Nevertheless, the beneficial effect on blood
pressure will accumulate.
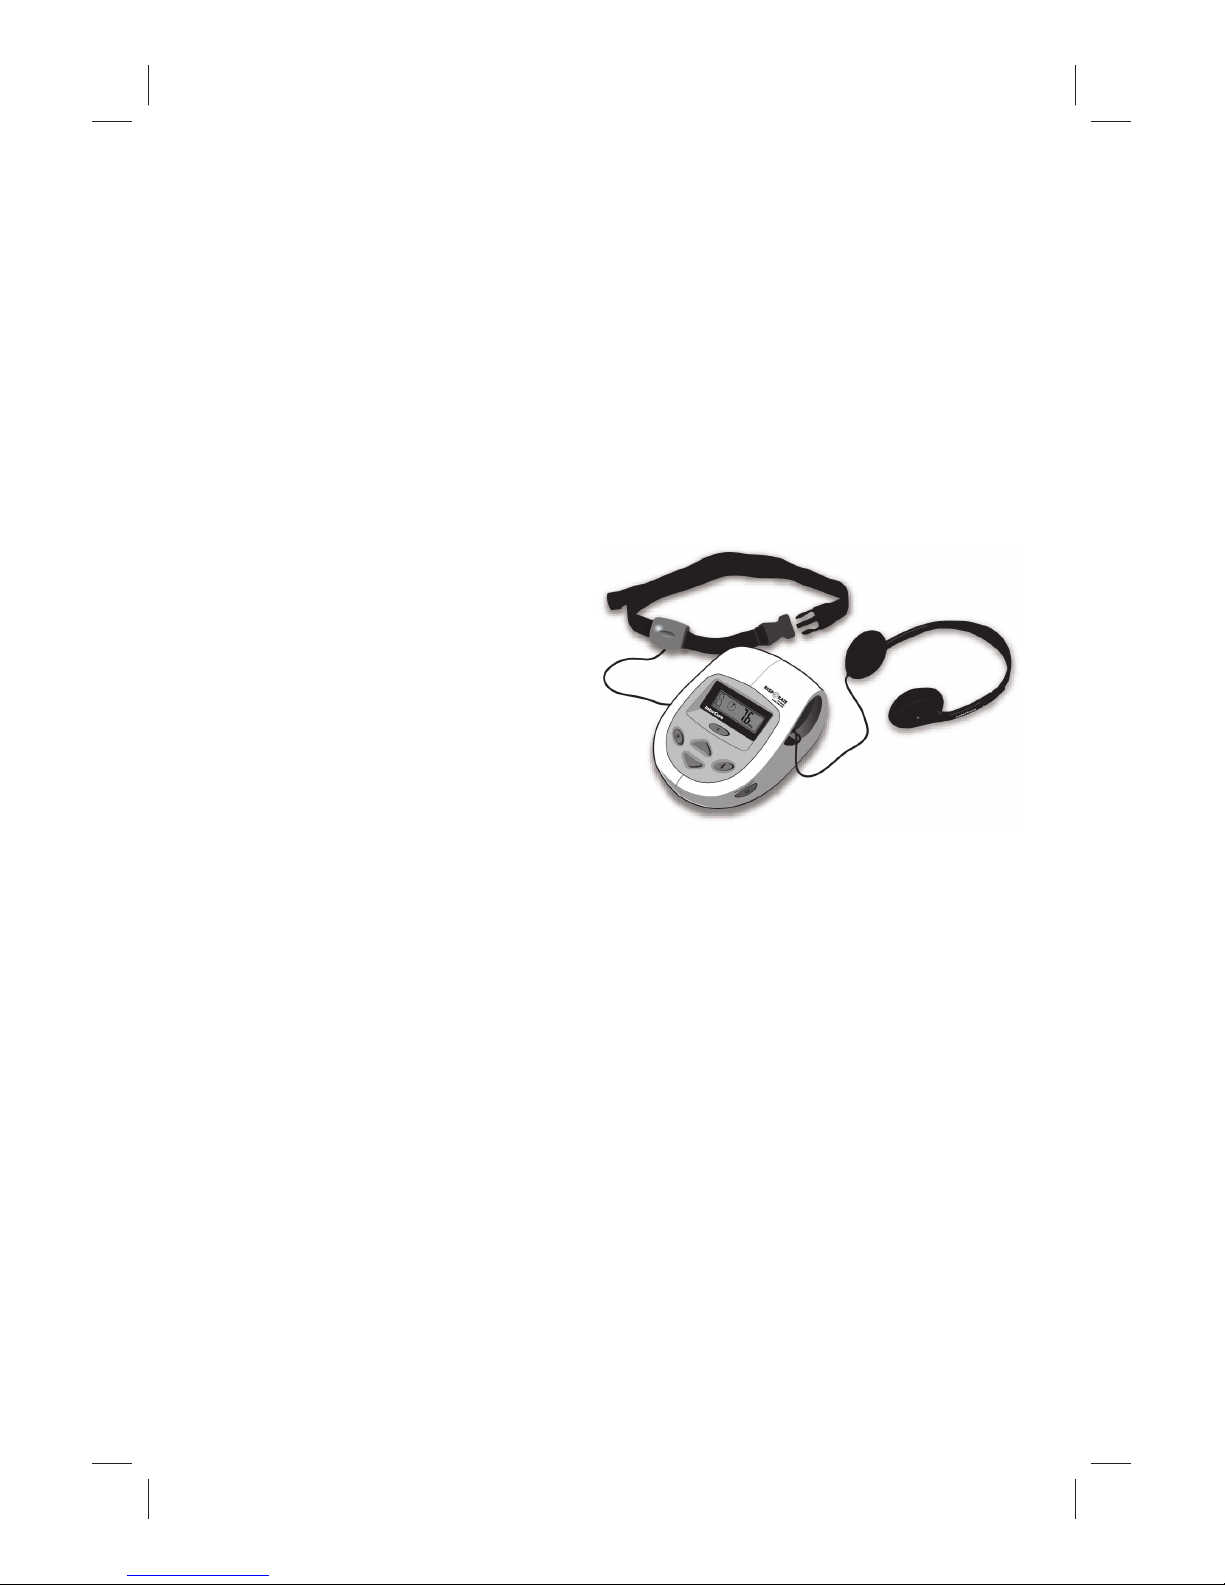
To achieve best results
Create a relaxing environment for your RESPeRATE
sessions. Sit in a comfortable chair in a quiet room
where there are minimal distractions.
“Therapeutic breathing” occurs when you breathe
slower than 10 breaths per minute without an effort.
Breathe lightly and naturally without force or tension.
Your goal is to log at least 10 minutes of slow
therapeutic breathing per session. With as little as
40 minutes of slow breathing per week, significant
blood pressure lowering. Additional use may provide
even better results. Daily sessions, if possible, are
recommended.

6
Be patient. As with any physical exercise program, you
can expect to see notable progress within 3-4 weeks.
Continue using RESPeRATE regularly and you will
experience additional, sustained reductions in blood
pressure.
7
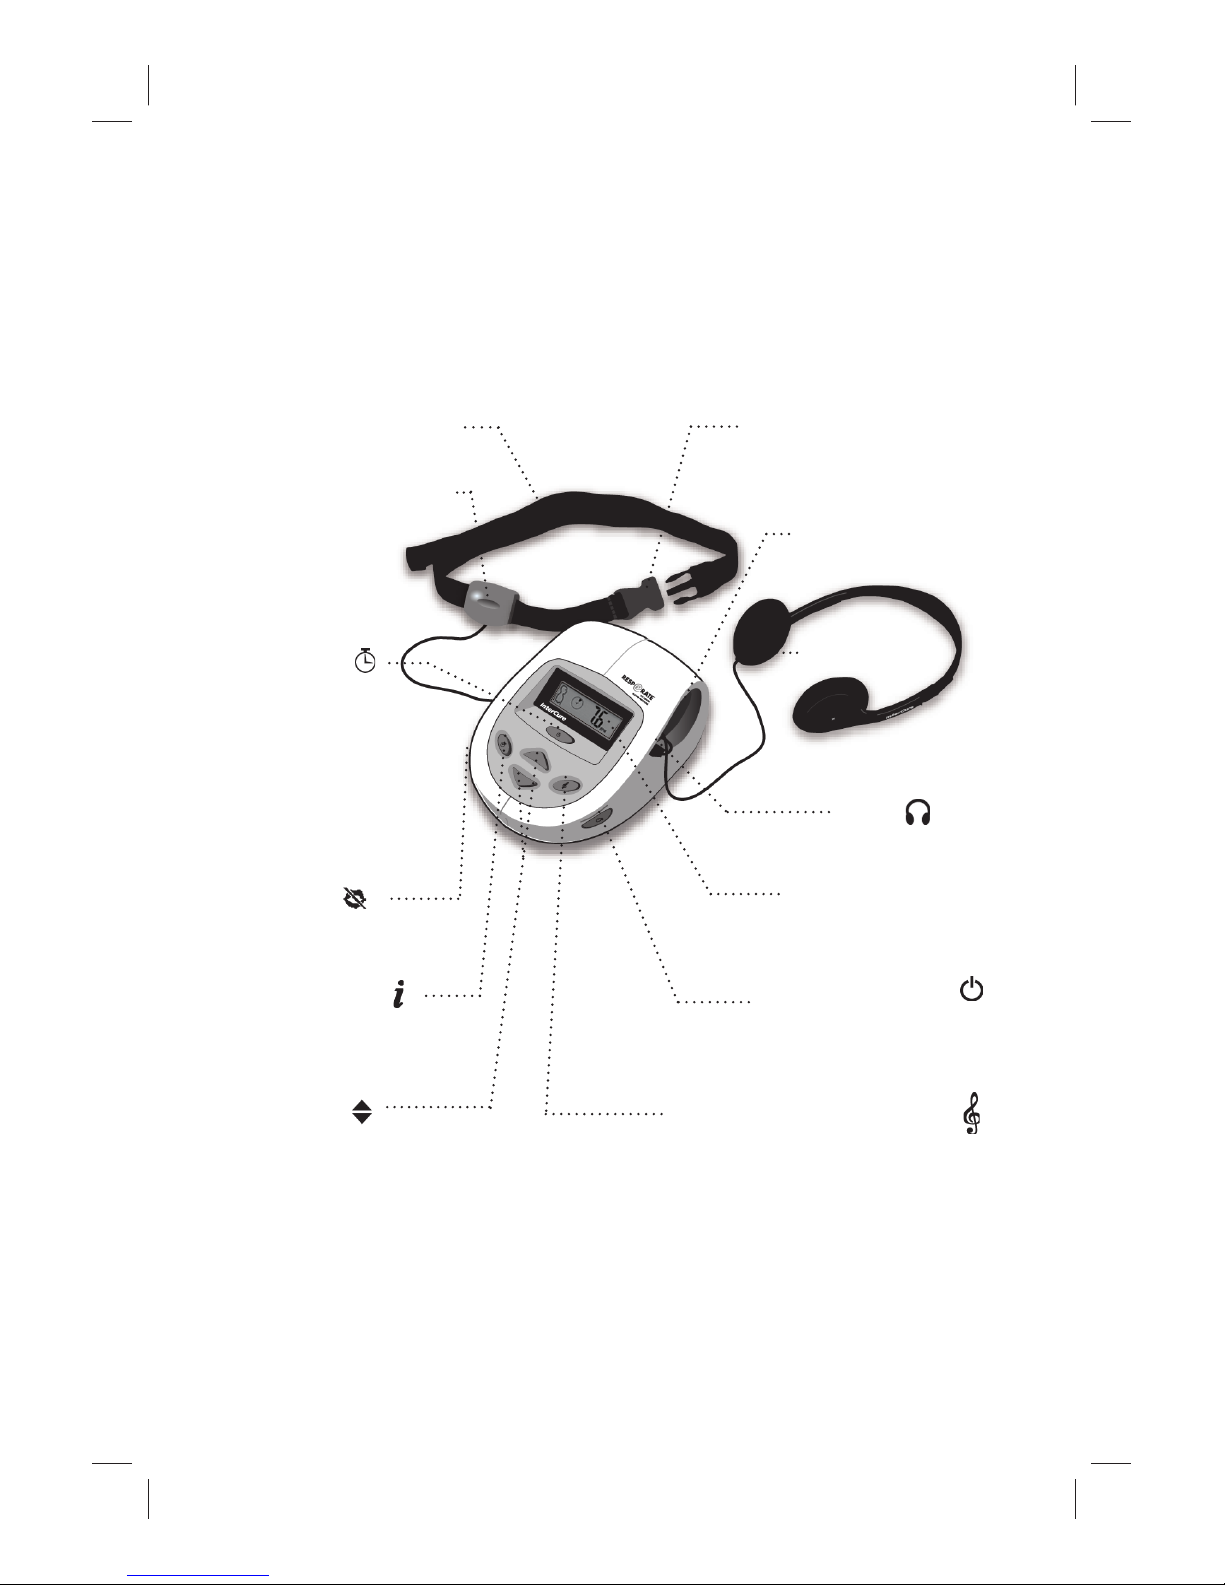
Exploring Your RESPeRATE Device
RESPeRATE Device and Components
Elastic belt
Breathing Sensor
Session Duration
button
Voice Instructions
On/Off
button
Info button
Volume Up/Down
buttons
Buckle
Storage
compartment
Headphones
Headphones
Jack
Display screen
On/Off
(orange) button
Melody Selection button

8
RESPeRATE Display
Main Display
The following values appear here:
Weekly Therapeutic Breathing Time
Breaths per minute
Volume level
Melody selection number
Statistics
Therapeutic minutes
Session duration (minutes)
User selection (Duo model only)
Guiding Figure
(with guiding arrows
and notes)
Sensor Belt Errors
(tight/loose/improper)
Breathing Gauge
10 - Therapeutic Minutes Clock
4 Breath Recognition Triangles
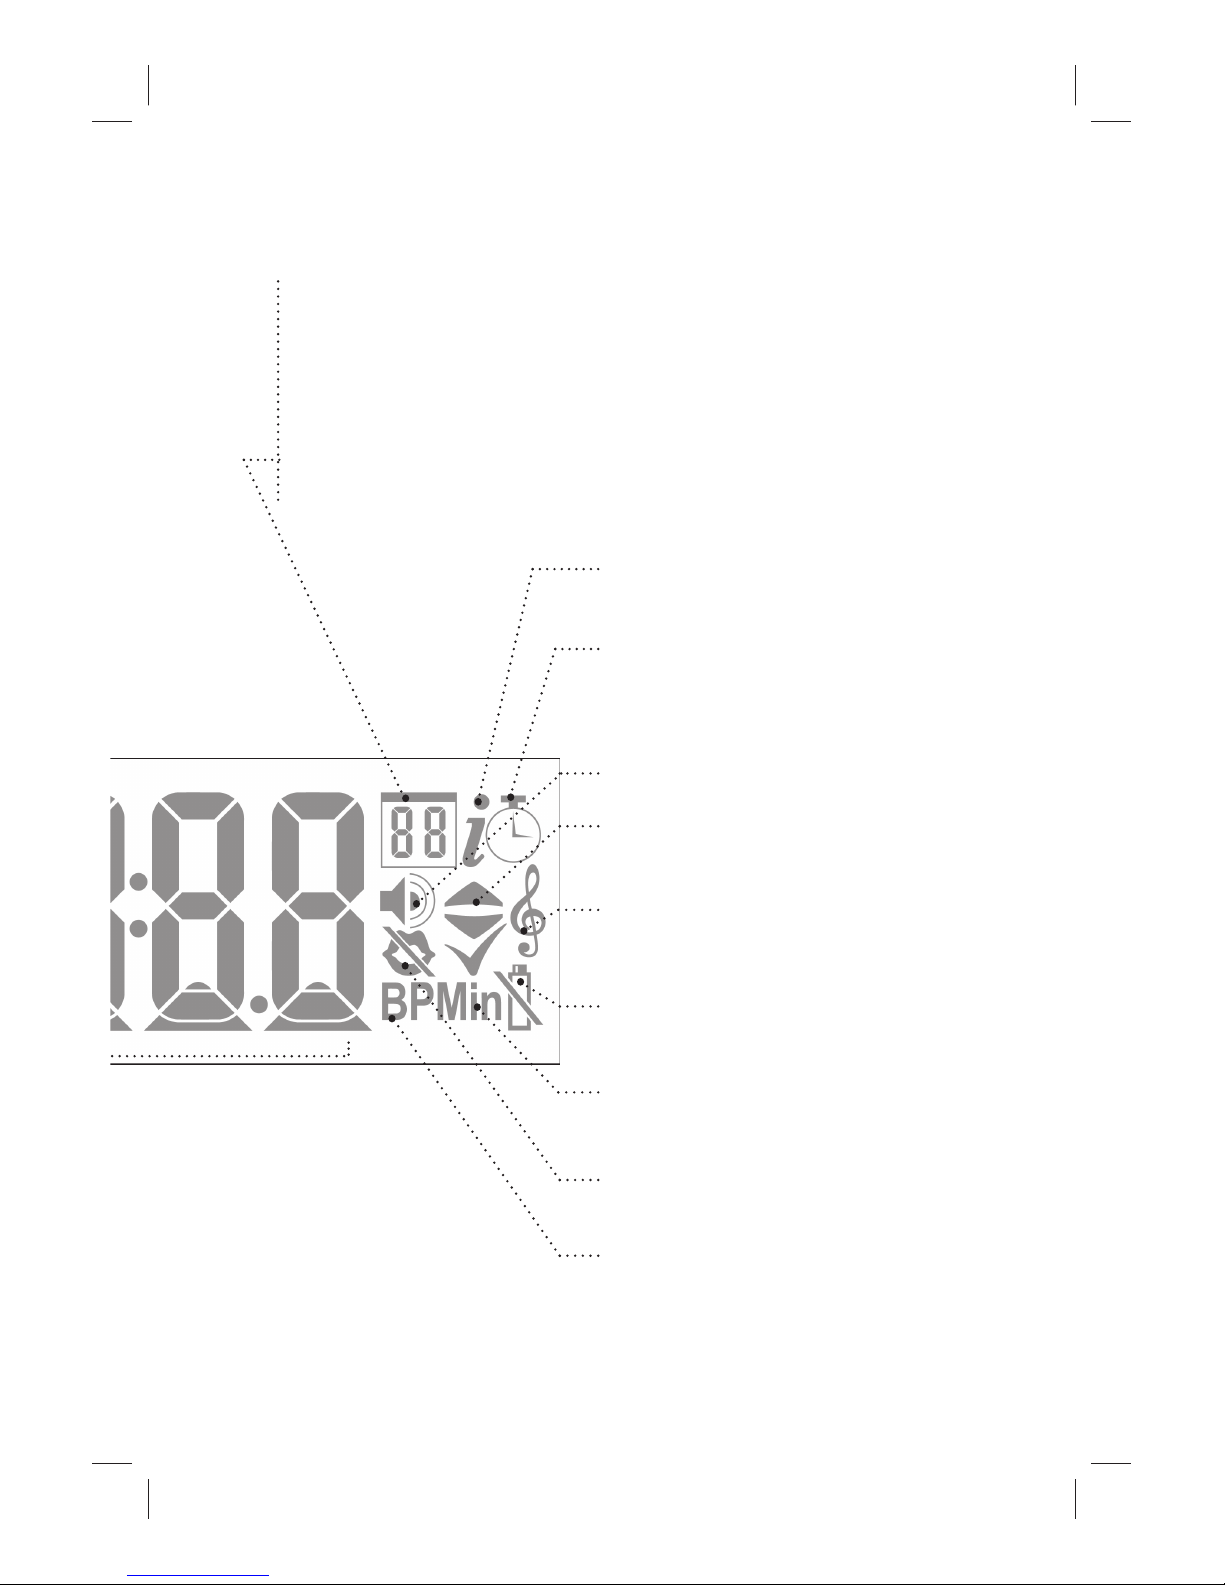
9
Secondary Display
Session duration (seconds)
Statistic report period
Info Function symbol
Session Duration symbol
Volume Level symbol
Scroll Up/Down symbol
Melody Selection symbol
Low Battery symbol
Therapeutic Minutes symbol
Voice Instructions Muted symbol
Breaths Per Minute symbol

10
Using Your
RESPeRATE Device
Preparing to Use RESPeRATE
Step 1: Set–Up
I. Install the batteries.
When using RESPeRATE for the first time,
install the 4 AA batteries in the battery
compartment at the back of the device.
Position the batteries as shown inside the
compartment.
II. Take out the headphones and sensor.
Carefully remove the headphones
and the sensor from the storage
compartment located within the top
part of the device itself.
Pull the cables with care. Both the
sensor cable and headphones are
already connected to the main unit from the inside of the
storage compartment.
Return the sensor to its compartment at the end of each
session. It’s best not to wind the cable around the sensor.

11
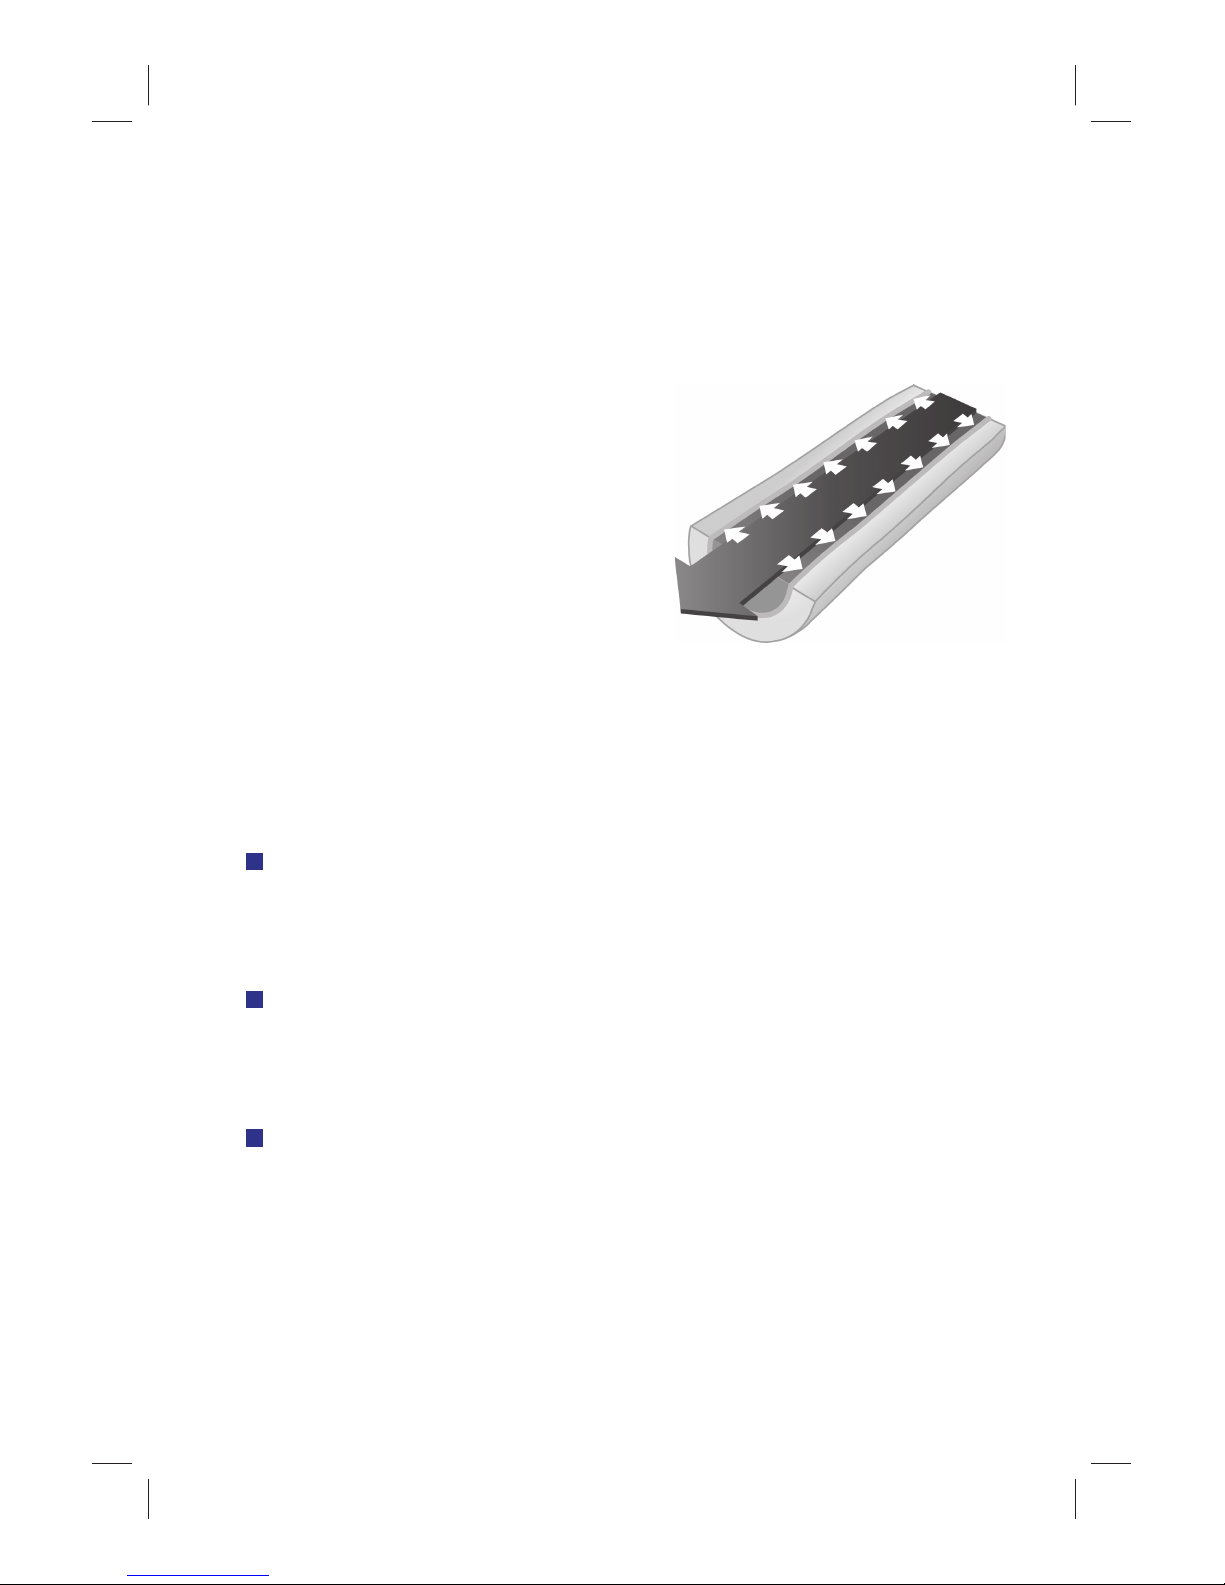
Step 2: Determine the best position for the
sensor
Breathing involves movement of the chest, abdomen, or
both. The best position for the sensor depends on how
you breathe. The following procedure helps to determine
if you breathe predominantly from the chest or abdomen.
Sit comfortably on a chair. Lean back and place your right
hand on the right side of the chest. Place your left hand
on the upper abdomen, above the navel. Breathe normally.
Feel which hand moves first when you start to inhale and
exhale. That is the location to place your Breathing Sensor.
Loosen any tight clothes or belt that might restrict your natural
breathing.
Left hand
on upper
abdomen
Right hand
on right
chest
Determining the best position for the sensor
If you are unable
to determine the
preferred position,
place the sensor on
your upper
abdomen.
12
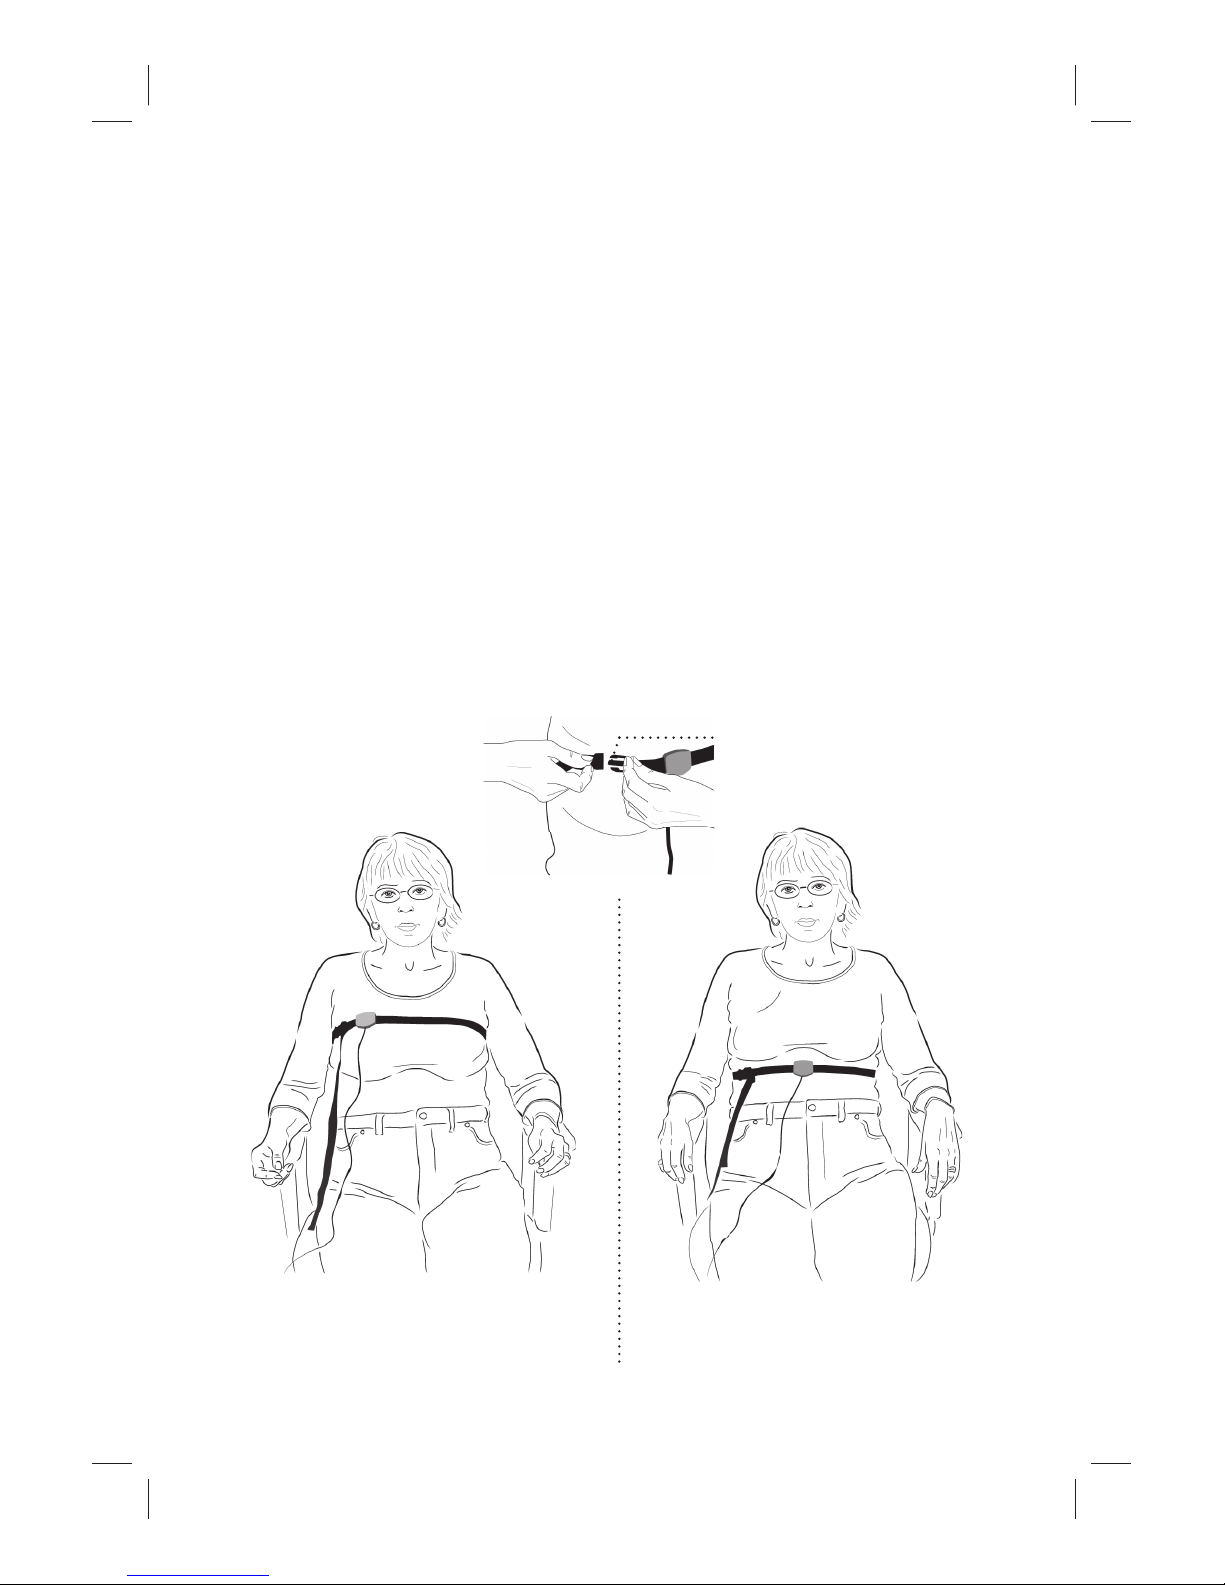
Step 3: Put on the sensor belt
Place the sensor belt around your upper abdomen or chest.
The sensor belt must be worn over the clothes. Buckle it
up at the front of the body with the cable below the sen-
sor (See Step 2 to determine the best position for the
sensor.)
Check that the label side of the sensor is placed against your
body and that the cable extends downward.
While sitting, position the sensor unit and adjust the belt to fit
snugly. Be sure it is neither too tight nor too loose. Slide the
blue sensor unit slightly left and right along the belt to ensure
it can slide freely.
Buckle
Chest sensor position Upper abdomen sensor position

13
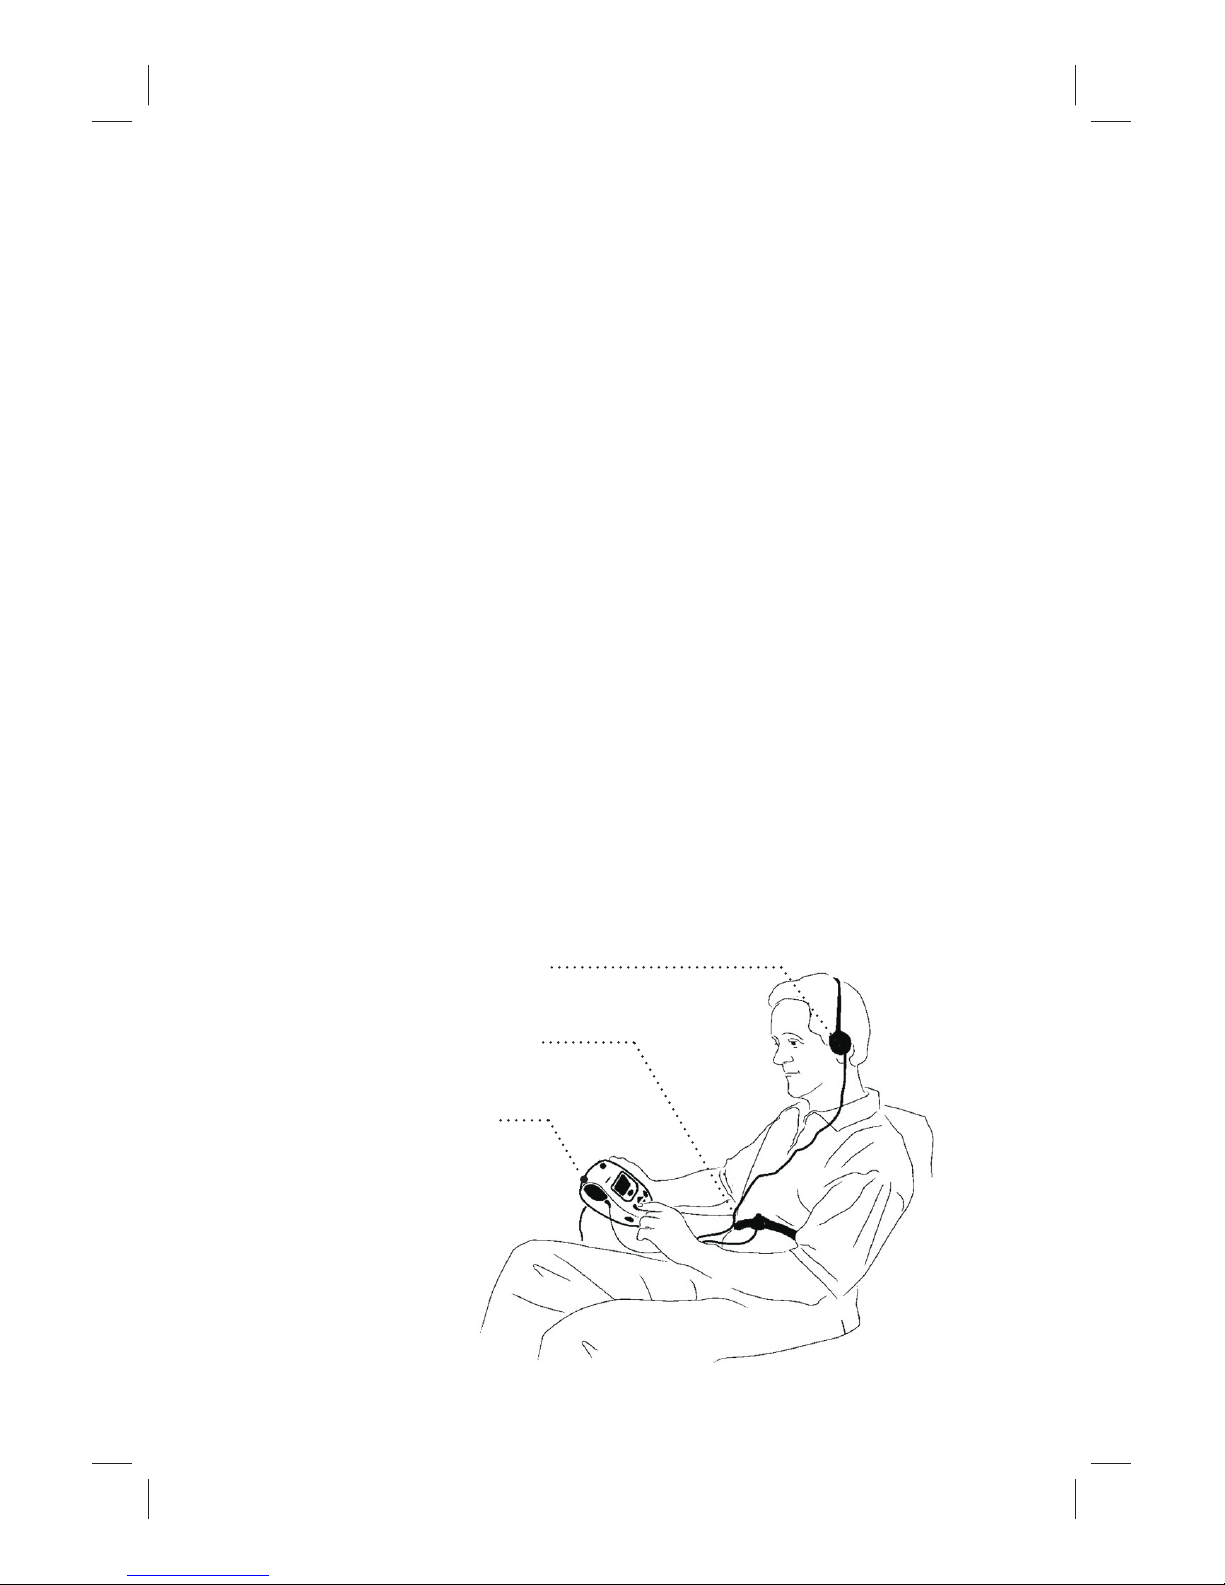
Step 4: Put on the headphones
Put on the headphones. Verify that the headphones are
plugged into the jack, which is located on the right-hand side
of device, marked with the ( ) icon.
When the headphones are fully inserted into the jack, listen for
a “click”.
Put on the headphones. Lean back slightly, as sitting forward
restricts your breathing movement.
You’re ready to begin your RESPeRATE session.
14
Using RESPeRATE
Step 1: Turn RESPeRATE On
Press the orange On/Off button ( ),
located on the right-hand side of
the device. At first, RESPeRATE
momentarily displays your Weekly
Therapeutic Breathing Time. This is the
total time in minutes that you have
spent in the Therapeutic Breathing Zone
over the last 7 days.
Note: Therapeutic breathing time is accumulated when
you breathe slower than 10 breaths per minute as
guided by RESPeRATE. To achieve best results, we
recommend that you accumulate at least 40 minutes
of Weekly Therapeutic Breathing Time. When
first used, this number will show “0” minutes.
Once you have used the device for 7 days, this
number shows a “running tab”. With each new
day, it adds a day and drops a day of your daily
therapeutic breathing time. It will never show “0”
minutes again unless you have accumulated zero
therapeutic breathing time for 7 consecutive days
.
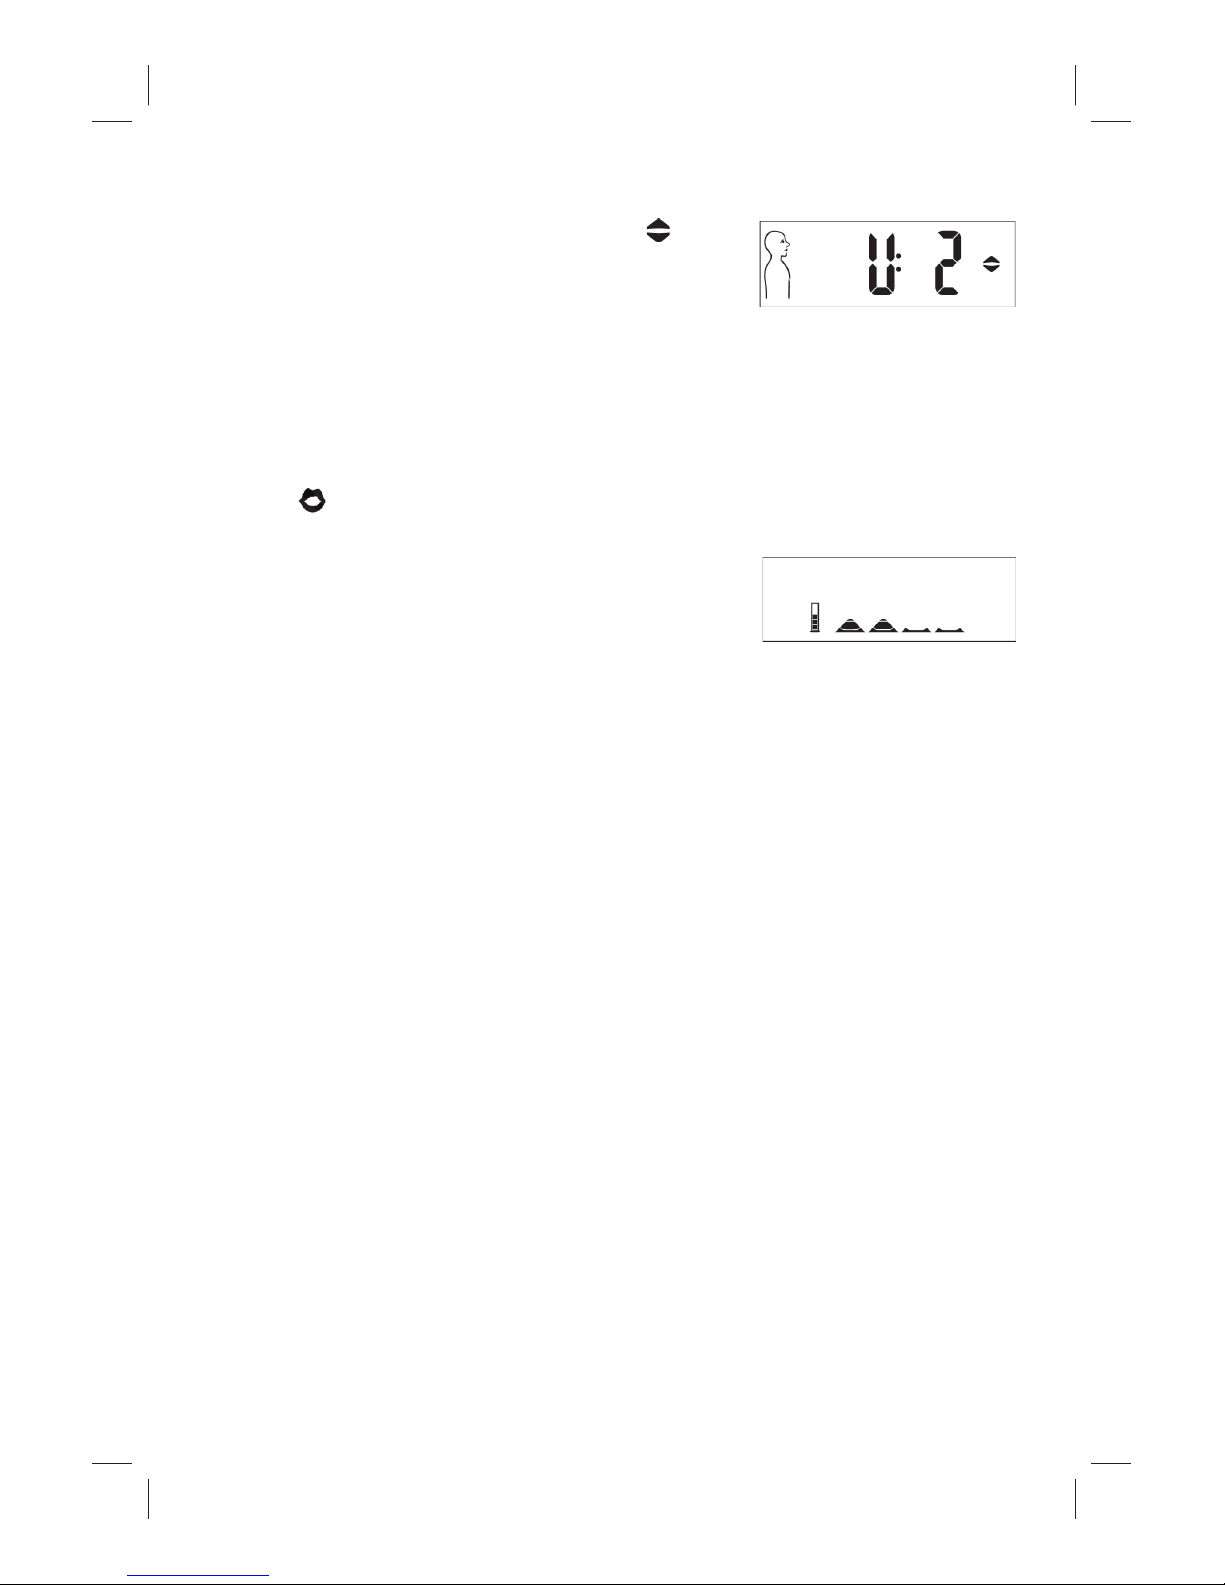
RESPeRATE Duo™ model only: Select User 1 or User 2
The RESPeRATE Duo model allows two users to store the
performance statistics in separate memories (See page 26 for
additional information).
Weekly Therapeutic
Time display
15
Press the UP or DOWN button ( ) to
select User 1(U1) or User 2 (U2). If no
button is pressed within 5 seconds,
RESPeRATE automatically begins the
session, storing the memory under the
last user.
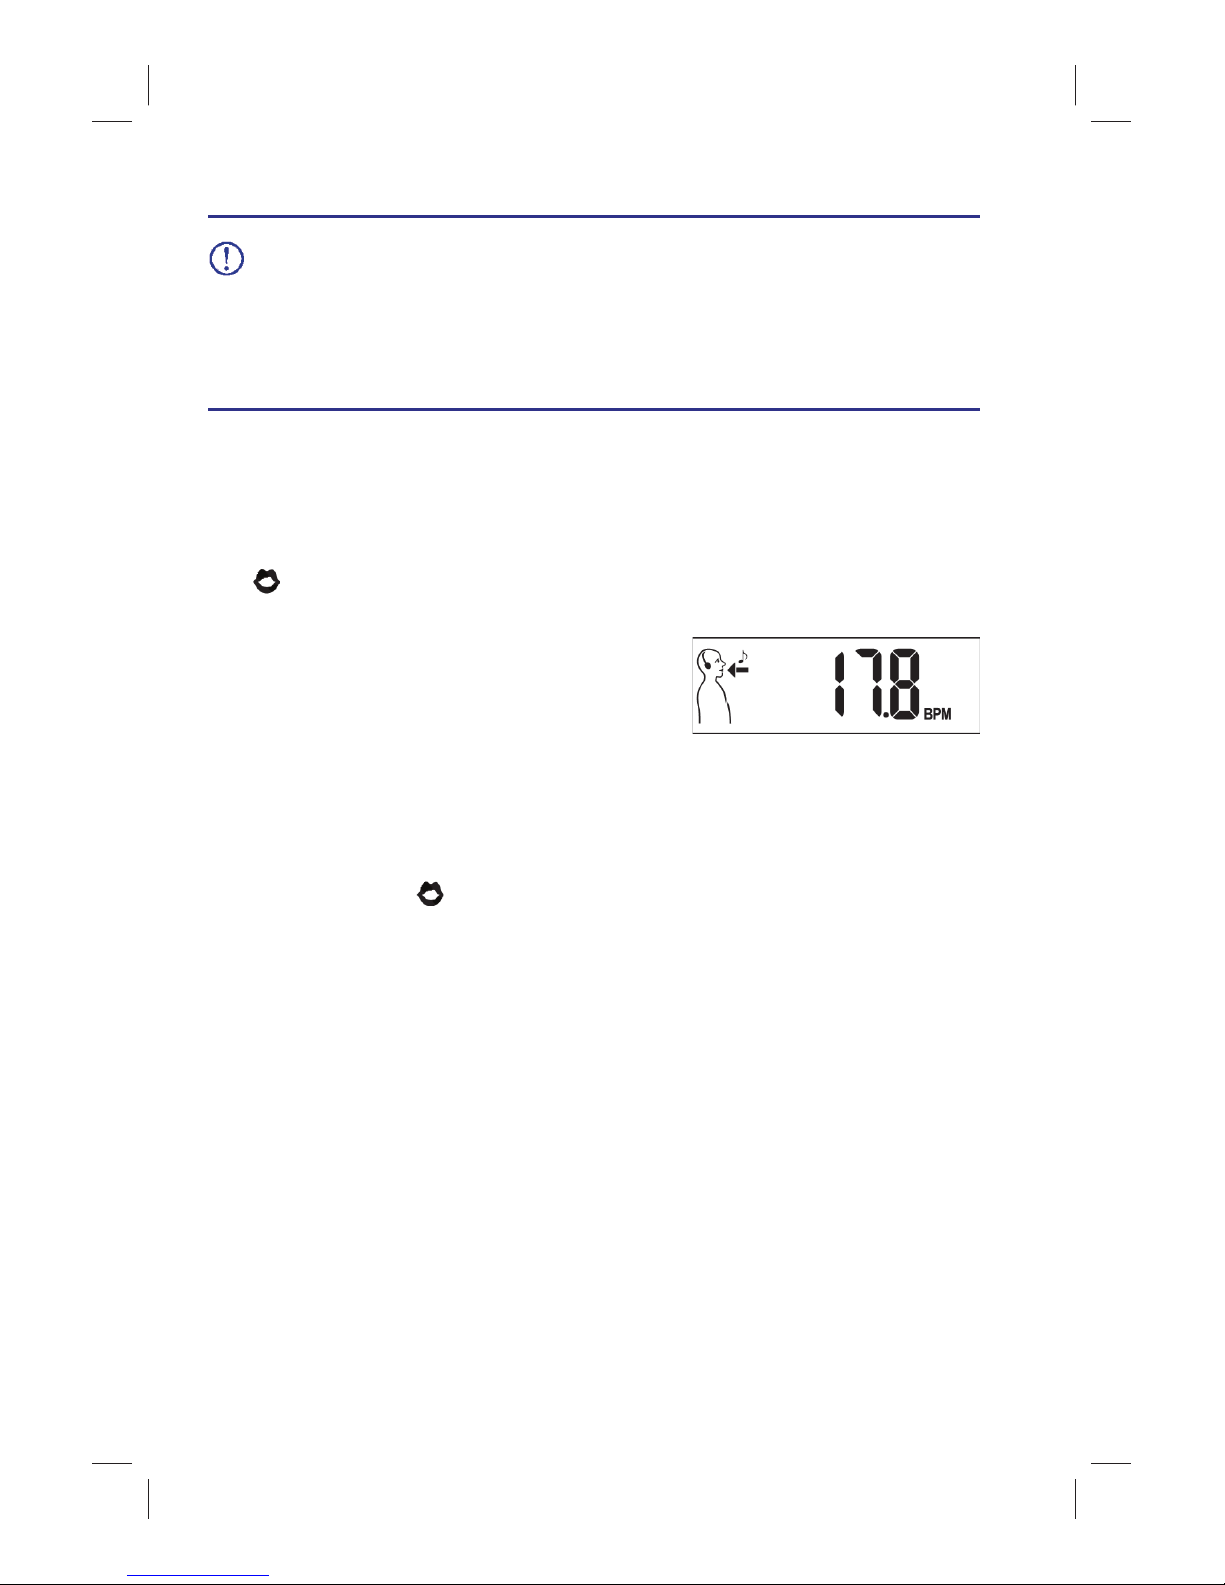
Step 2: Breathe normally (Recognition Phase)
( voice instruction)
At
the beginning of each session,
breathe normally. It is not recommended
to purposely try to breathe slowly or
deeply. Simply allow RESPeRATE to
learn your natural breathing rate
and pattern.
Each breath that RESPeRATE detects is represented by two short
”recognition tones”as well as changes in the Breathing Gauge.
A short high note is heard when you start to inhale. A short
low note is heard when you start to exhale. The vertical Breathing
Gauge that appears on the display fills as you breathe in and
empties as you breathe out.
Each breath detected and analyzed by the device appears as a
triangle on the display. Once four breaths have been analyzed,
(and four triangles appear on the display), a melody begins.
This is the start of the Breathing Exercise Phase.
Recognition Phase
display
Choosing user
(Duo model only)
16
If the “recognition tones” or Breathing Gauge do
not match
your feeling of breathing out, the sensor
needs to be positioned
differently. Please refer to the
Troubleshooting section, Sensor Position Help Mode,
page 39.
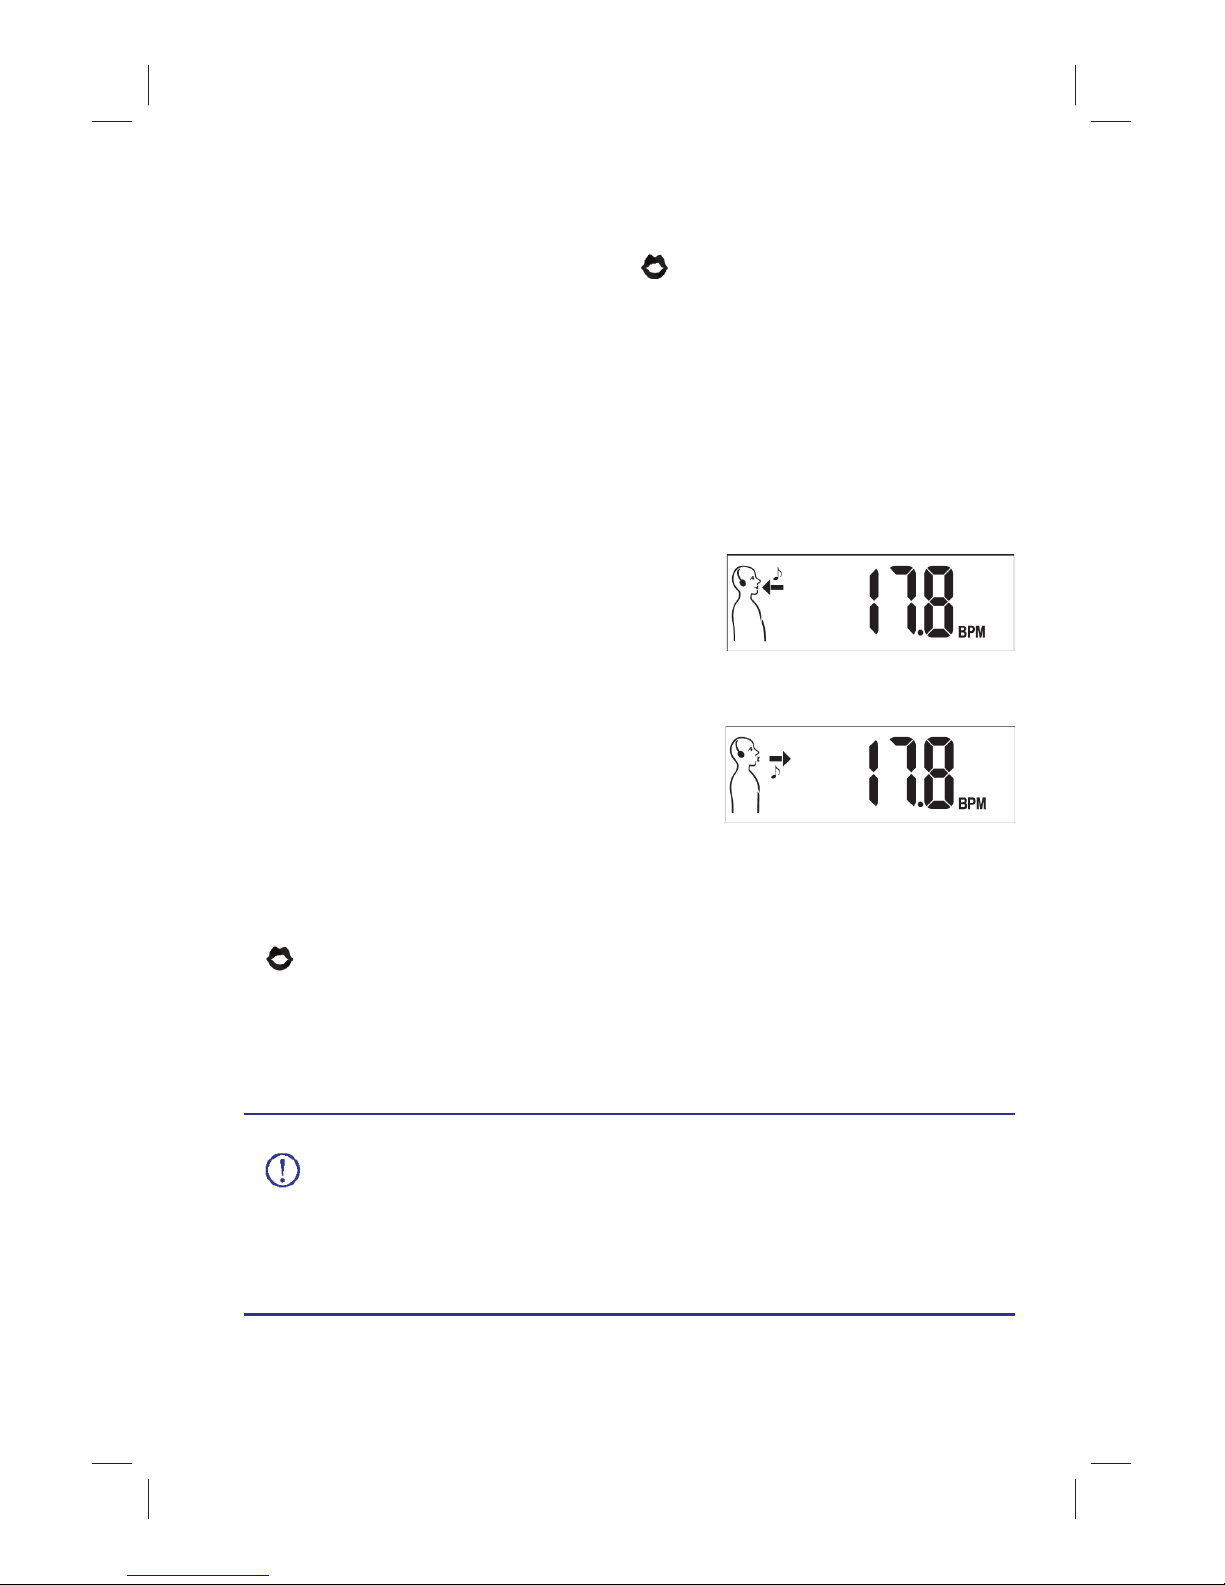
Step 3: Breathe according to the guiding
tones (Breathing Exercise Phase)
( voice instruction)
Once RESPeRATE has recognized
four stable breaths, it displays your
breathing rate in minutes (e.g. 17.8
breaths per minute, or BPM). The
Breathing Exercise Phase begins
now , signified by the start of the
melody and the voice instruction to “
breathe according to the
guiding tones
” ( ).
RESPeRATE composes a melody according to your individual
breathing pattern made up of two distinct guiding tones.
By gradually prolonging the breathe-in and breathe-out
tones, RESPeRATE gently slows your breathing toward the
Therapeutic Breathing Zone of less than 10 breaths per minute.
Simply synchronize your breathing with the breathe-in and
breathe-out guiding tones of your personalized melody.
Inhale gradually when you hear the high tone and exhale
gradually when you hear the low tone. Breathe comfortably
without effort and avoid holding your breath.
First minute display with
guiding figure
17
To assist you in distinguishing between the two tones, voice
instructions of “
in
”, “
out
” ( ) accompany the first few
breaths. The movements of the “guiding figure” are
synchronized with the guiding arrows and tones.
Within a few breaths, the voice instructions stop, but you are to
“
close your eyes, and continue following the guiding tones
.”
( ) After one minute, the “guiding figure” and arrows
disappear. This is because a visual guide requires far more
attention than an auditory guide, which reduces the
therapeutic effect.
If you are having difficulty learning to synchronize your
breathing with the guiding tones, try changing the
melody to #4 (Personalizing RESPeRATE, Selecting a
Melody, page 22.)
Breathe-in
with the high tone
Breathe-out
with the low tone
18
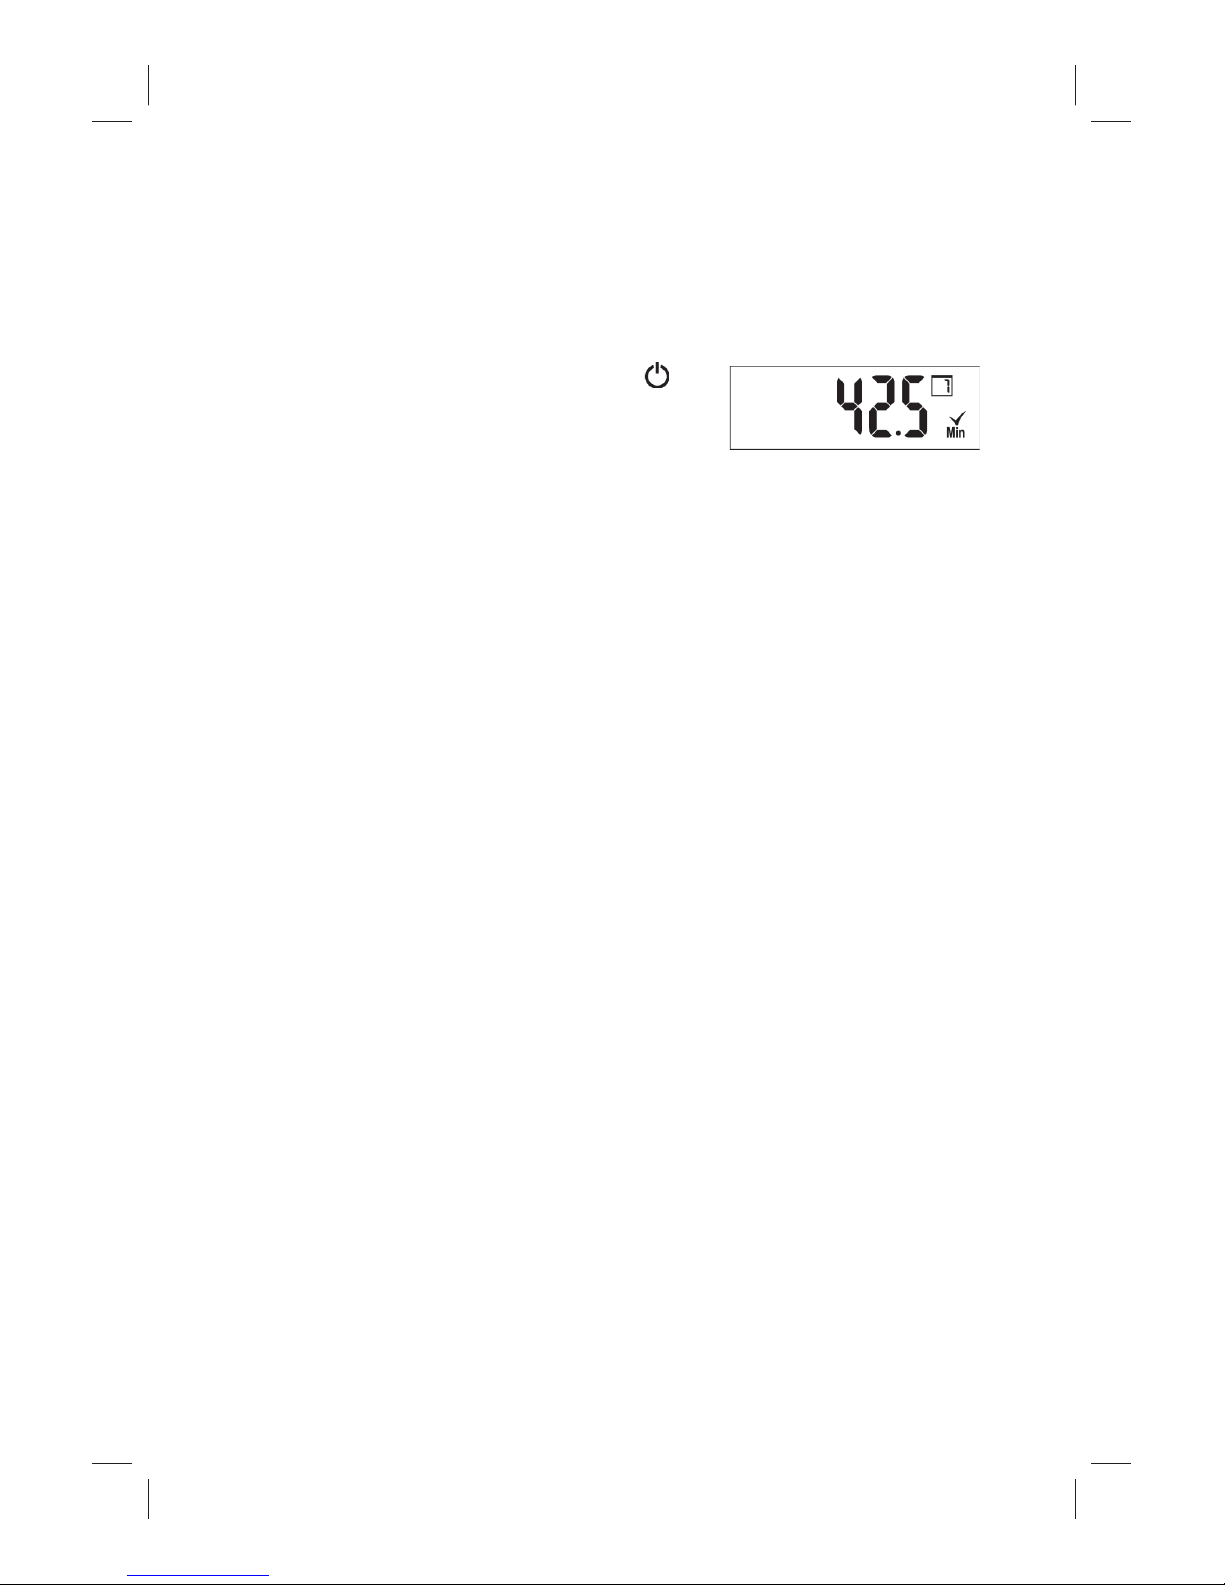
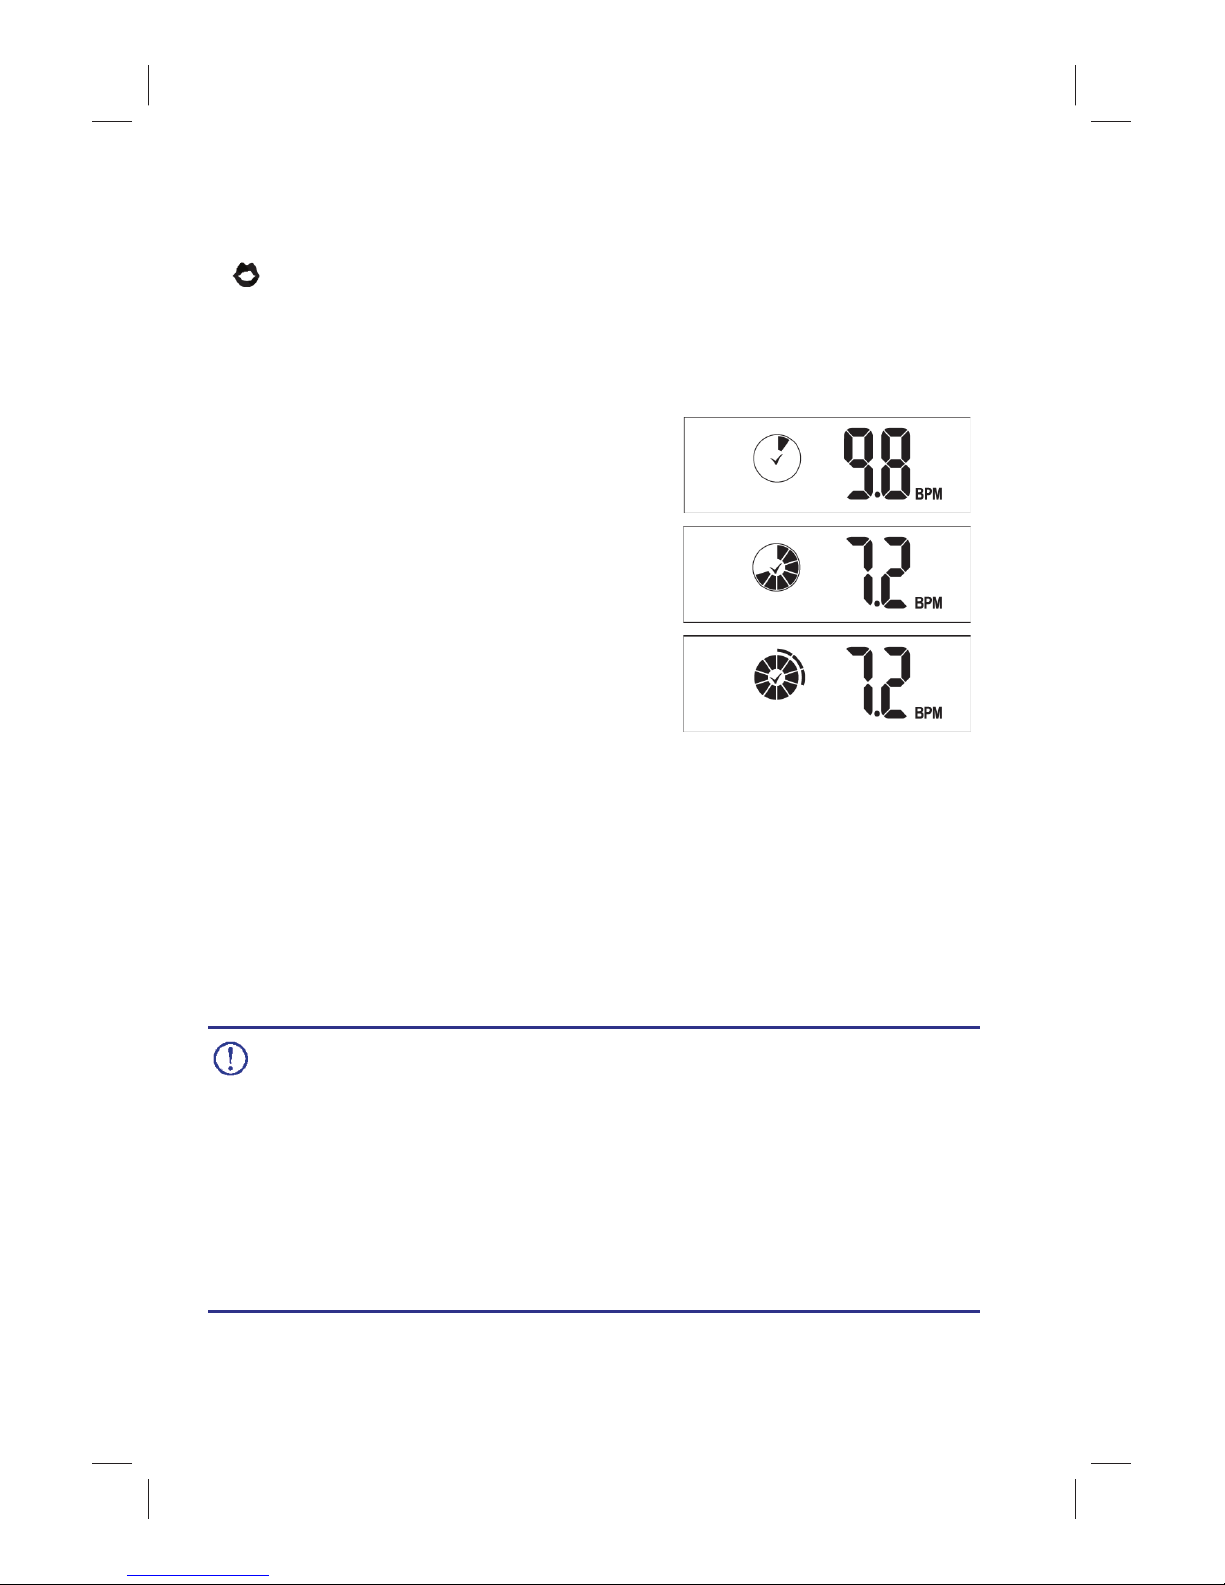
Step 4: Therapeutic Breathing Zone
( voice instruction)
Once your breathing has slowed
down to below 10 breaths per
minute, you are notified that
you are entering the Therapeutic
Breathing Zone.
The“10–Therapeutic Minutes clock”
icon appears on the display, as well
as your breathing rate (eg. 9.8 bpm
in the top figure).
Each additional minute spent in
the Therapeutic Breathing Zone
appears as an additional segment
filled in on the clock. Once the
“10–Therapeutic Minutes clock” (bottom figure) is completely
filled (10 minutes), a second ring appears around the original
clock. It continues to fill in with each additional minute spent
in the Therapeutic Breathing Zone.
Your goal for each session is to achieve at least 10
minutes of your 15-minute breathing session in the
Therapeutic Breathing Zone.
Please complete the 15-minute exercise session. The
more therapeutic minutes accumulated, the better
the likelihood for a greater blood pressure reduction.
10–Therapeutic Minutes
Clock icon
Therapeutic Zone display
Other manuals for RESPeRATE
4
Table of contents
Other InterCure Medical Equipment manuals


Popular Medical Equipment manuals by other brands


Chattannoga
Chattannoga OptiFlex SHOULDER CPM operating instructions

Top shelf Orthopedics
Top shelf Orthopedics Hinge Knee Brace Instructions for use

Vicks
Vicks VH200WAU use and care manual

Direct Supply
Direct Supply Panacea 3000 owner's manual

Enraf Nonius
Enraf Nonius 4 Series Instructions for use

ECOPOSTURAL
ECOPOSTURAL C7521 instructions


