Orpyx LogR User manual

Orpyx LogR™ is a solution designed for the
accurate, efficient, and real-time
measurement of foot and plantar pressure
analysis. Comprised of sensor-embedded
inserts, iOS application and cloud-based
software for data storage and
management, this system is used by
researchers in a variety of different
applications that might include footwear
and orthotic design, biomechanics, sports
performance, gait and balance
assessments, posture research,
rehabilitation, injury prevention, fall
prevention, and more.
The Orpyx LogR system is an in-shoe
plantar pressure research device with a
simple 5-minute setup that is not tethered
to a computer in a lab. By using a 0.5mm
thick proprietary sensor array that is worn
under foot, it connects to attached
measurement electronics that stream
real-time sensor measurements to the iOS
Orpyx LogR app and when connected to the
Internet, automatically syncs the
collected measurements to the Orpyx LogR
cloud-based data management portal.
INCLUDED WITH PURCHASE
Plantar pressure shoe inserts
BTLE-enabled Shoe Pods
(Left and Right for each pair)
Orpyx LogR iOS app
USB charging and sync cables
User documentation
One (1) software site license for
browser-based data collection tool
One (1) year set-up, maintenance
and support services
One (1) getting started training
session with Orpyx Customer Care
Additional inserts and software licenses –
sold separately
iOS device not included with purchase
For more information, please contact: Page 1
Orpyx Customer Care www.orpyx.com
1.0 ORPYX LOGR™

For more information, please contact: Page 2
Orpyx Customer Care www.orpyx.com
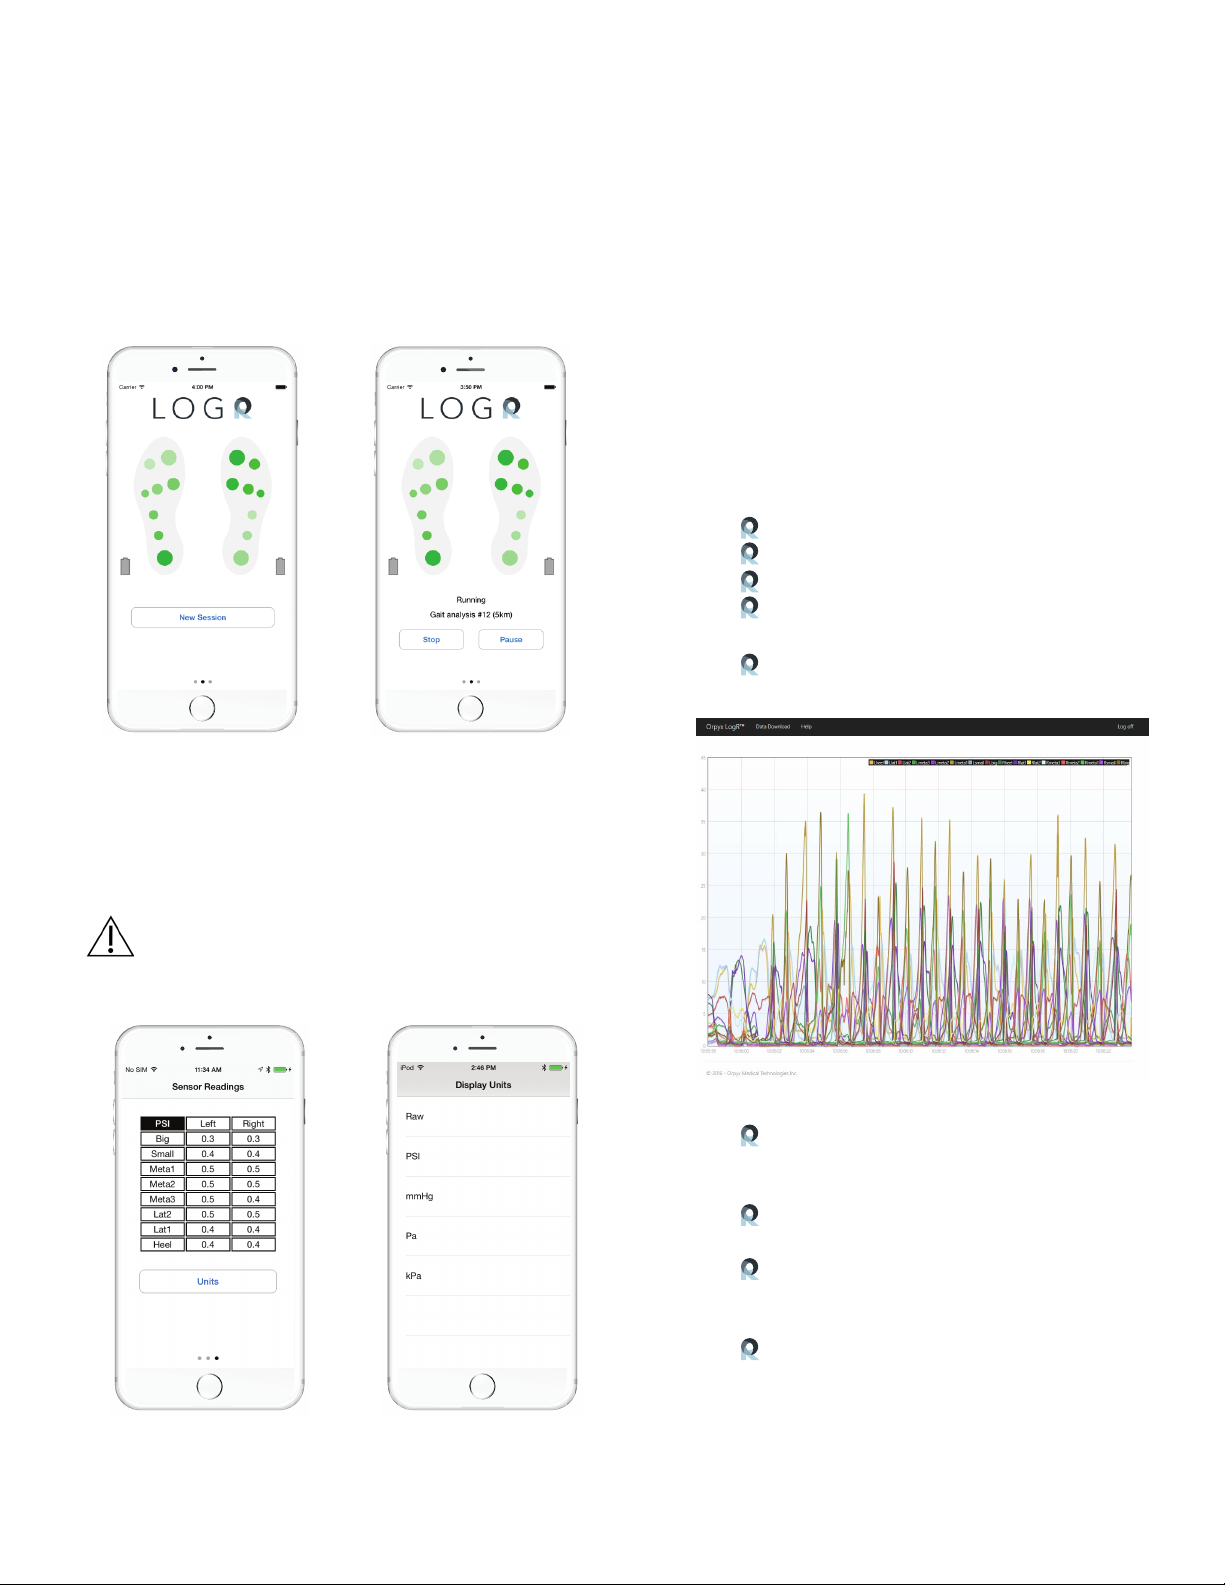
2.0 SETTING UP YOUR SYSTEM
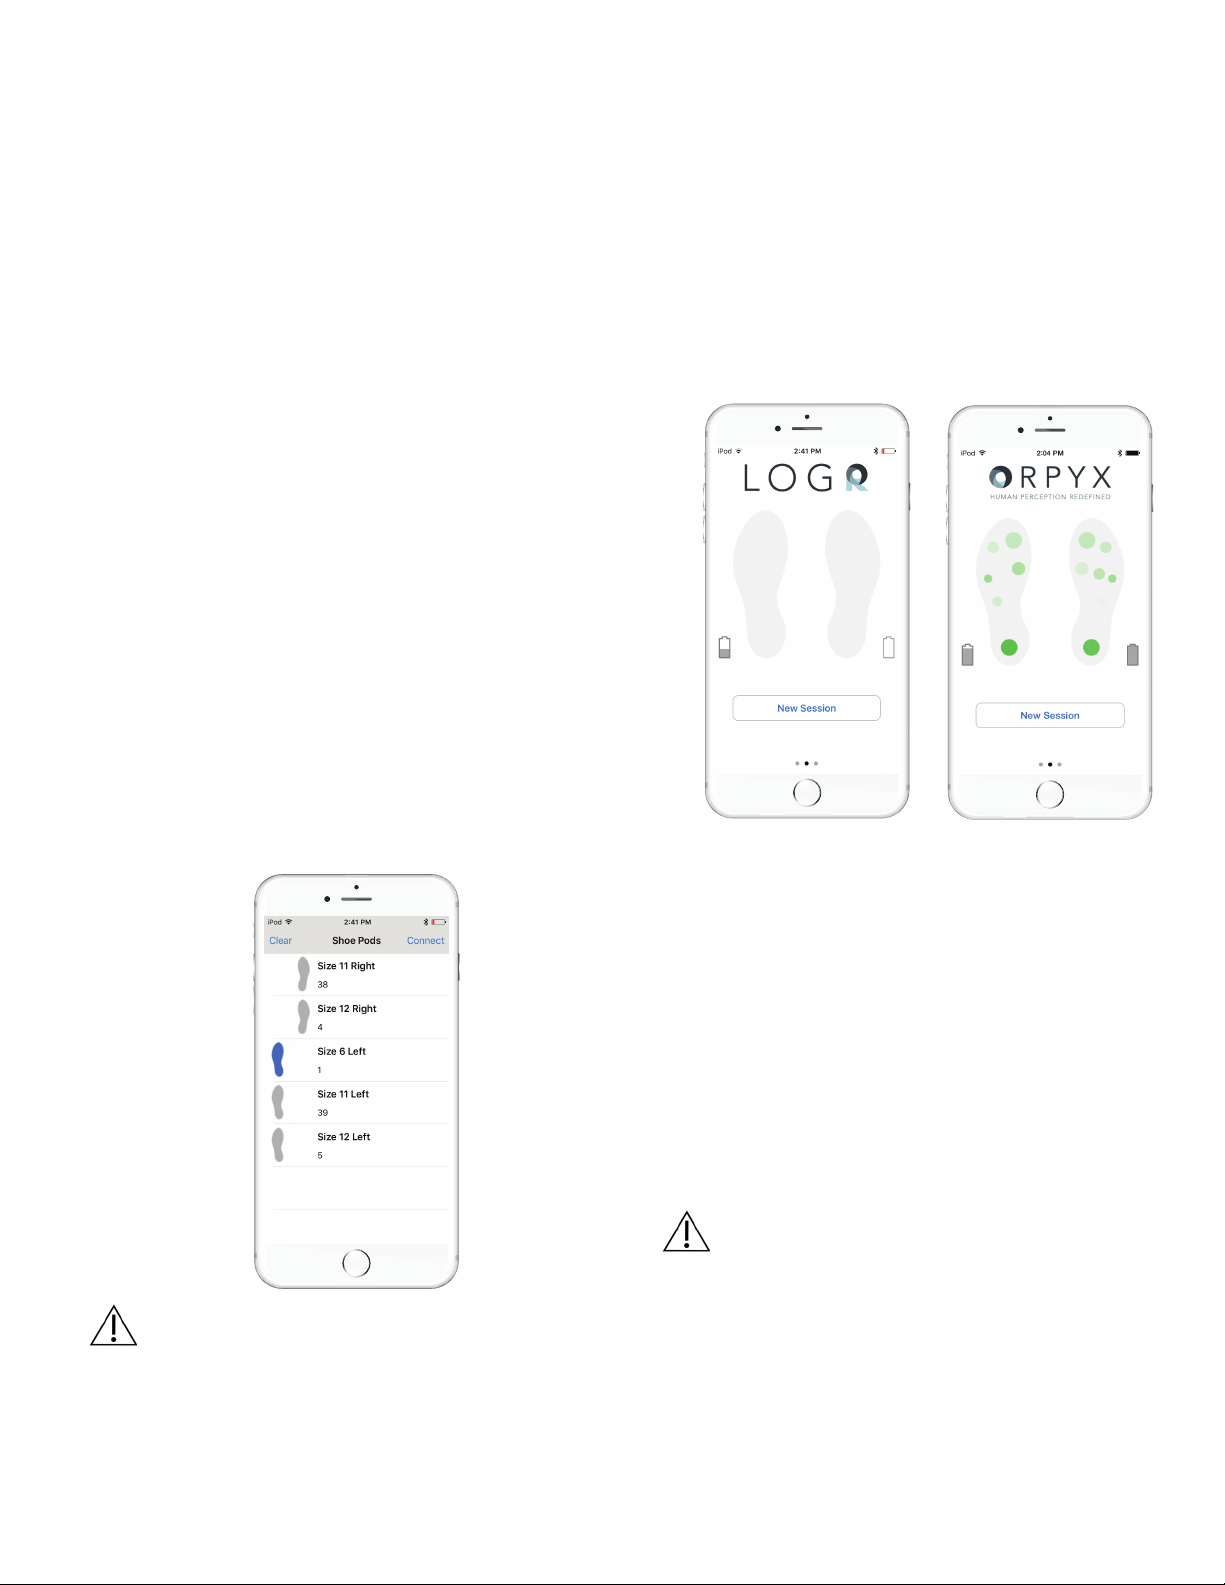
Getting started with your Orpyx LogRsystem
How to properly fit your Orpyx LogR inserts
How to properly fit your Orpyx LogR
shoe pods
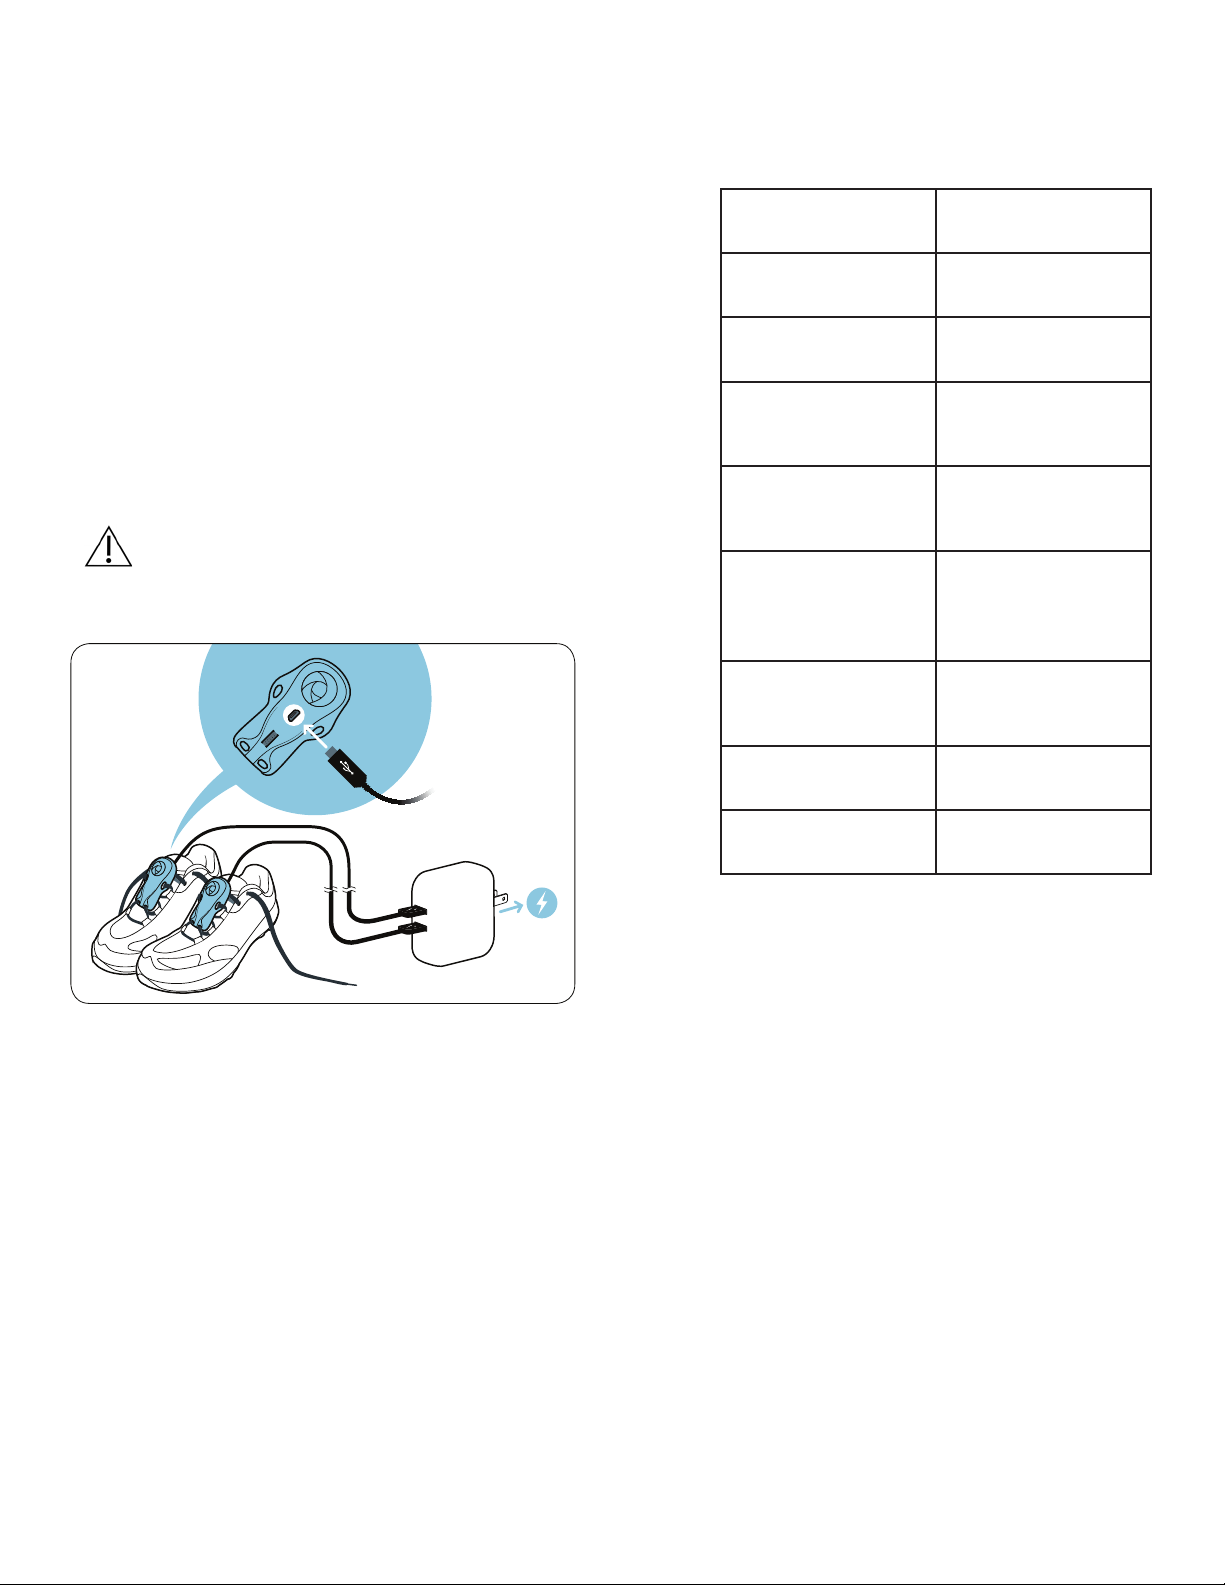
Your Orpyx LogR system will need to be
initialized before first use. To initialize the
system, plug each shoe pod into the USB
charging cable attached to the wall adapter
or computer. Once the shoe pod is plugged
in, it will flash red and green, followed by
a solid red LED light for approximately 6
seconds. After 6 seconds, you may unplug
the shoe pod(s) from the charging cable and
proceed to use your Orpyx LogR system.
Note: We recommend fully charging shoe
pods (minimum 8 hours) before use to
ensure optimal battery performance. Shoe
pods must be kept charging when not in use.
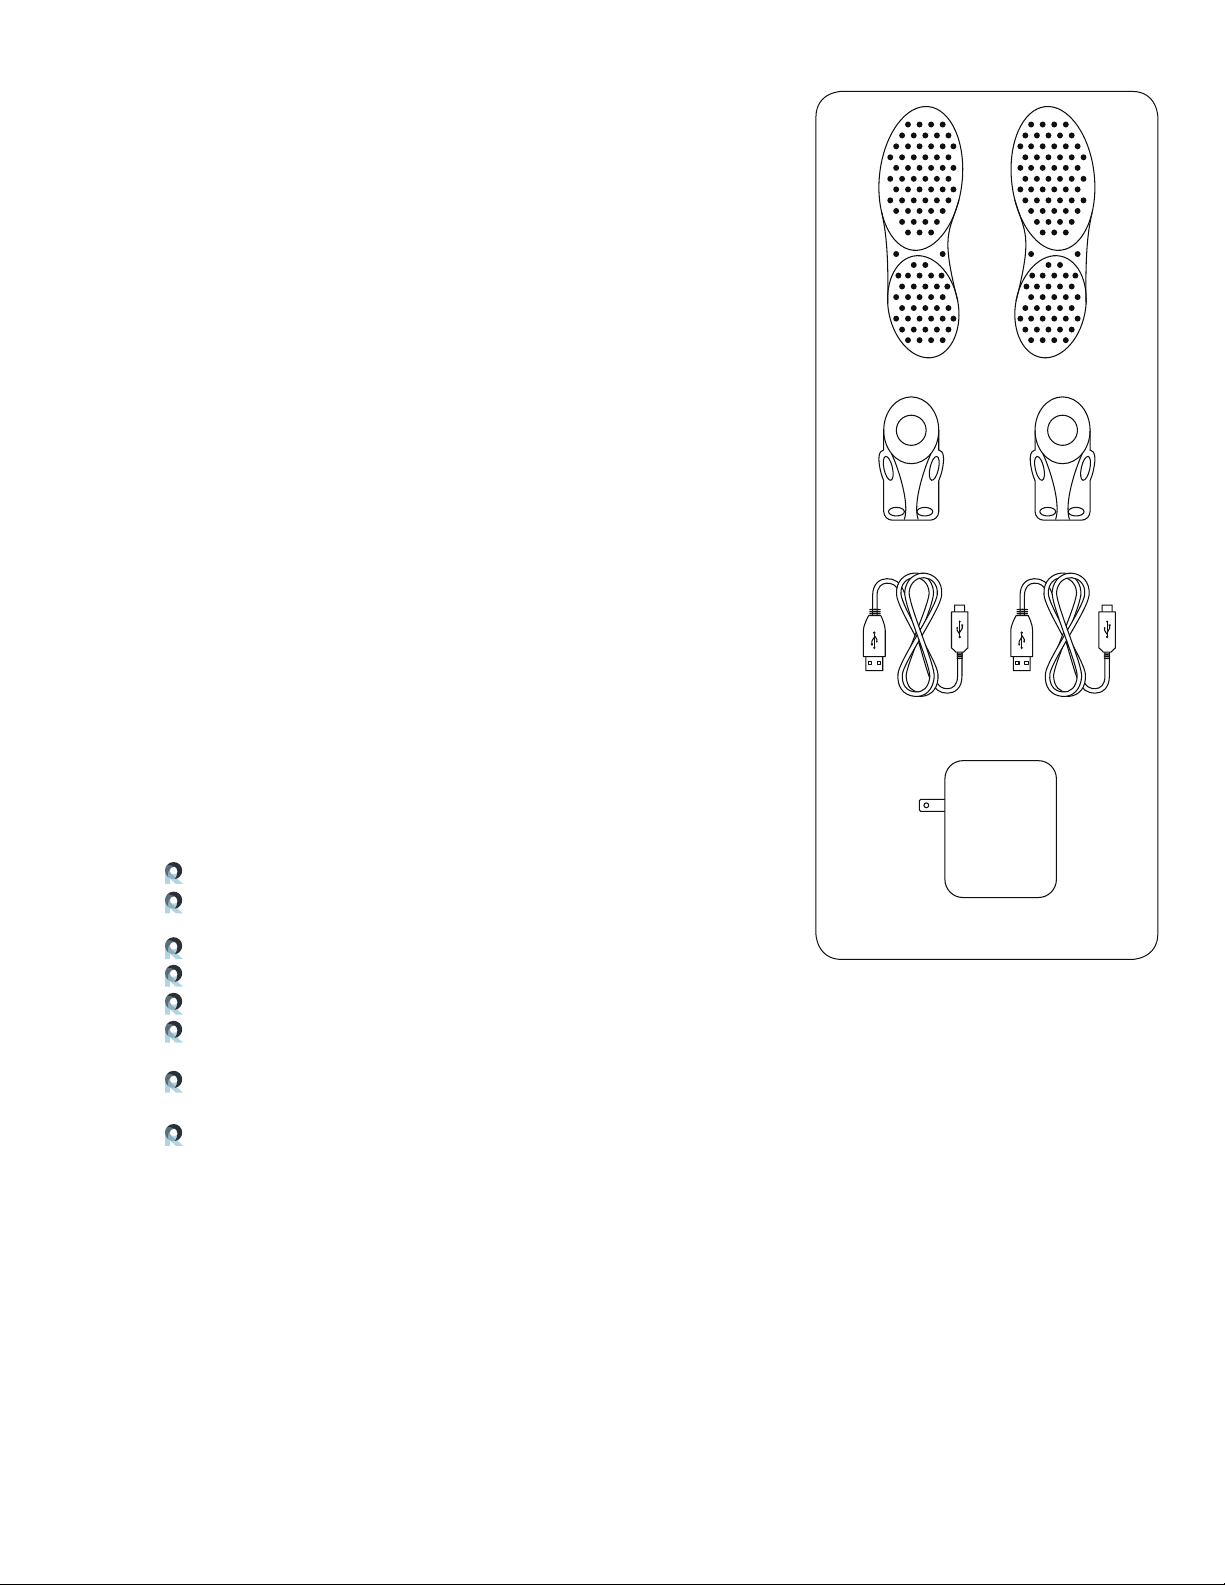
The Orpyx LogR inserts fit inside your
running or walking shoe, underneath
the insole or orthotic. To install, unlace
the shoe-laces, fold back the tongue and
remove the existing insole from your shoe.
Peel the paper backing off the double sided
tape and place the appropriate left or right
Orpyx LogR insert into the shoe. If the insert
is used in multiple shoes, the double sided
tape may need to be re-applied. The insert
should lay flat on the bottom of the shoe
without bunching, creasing, moving or
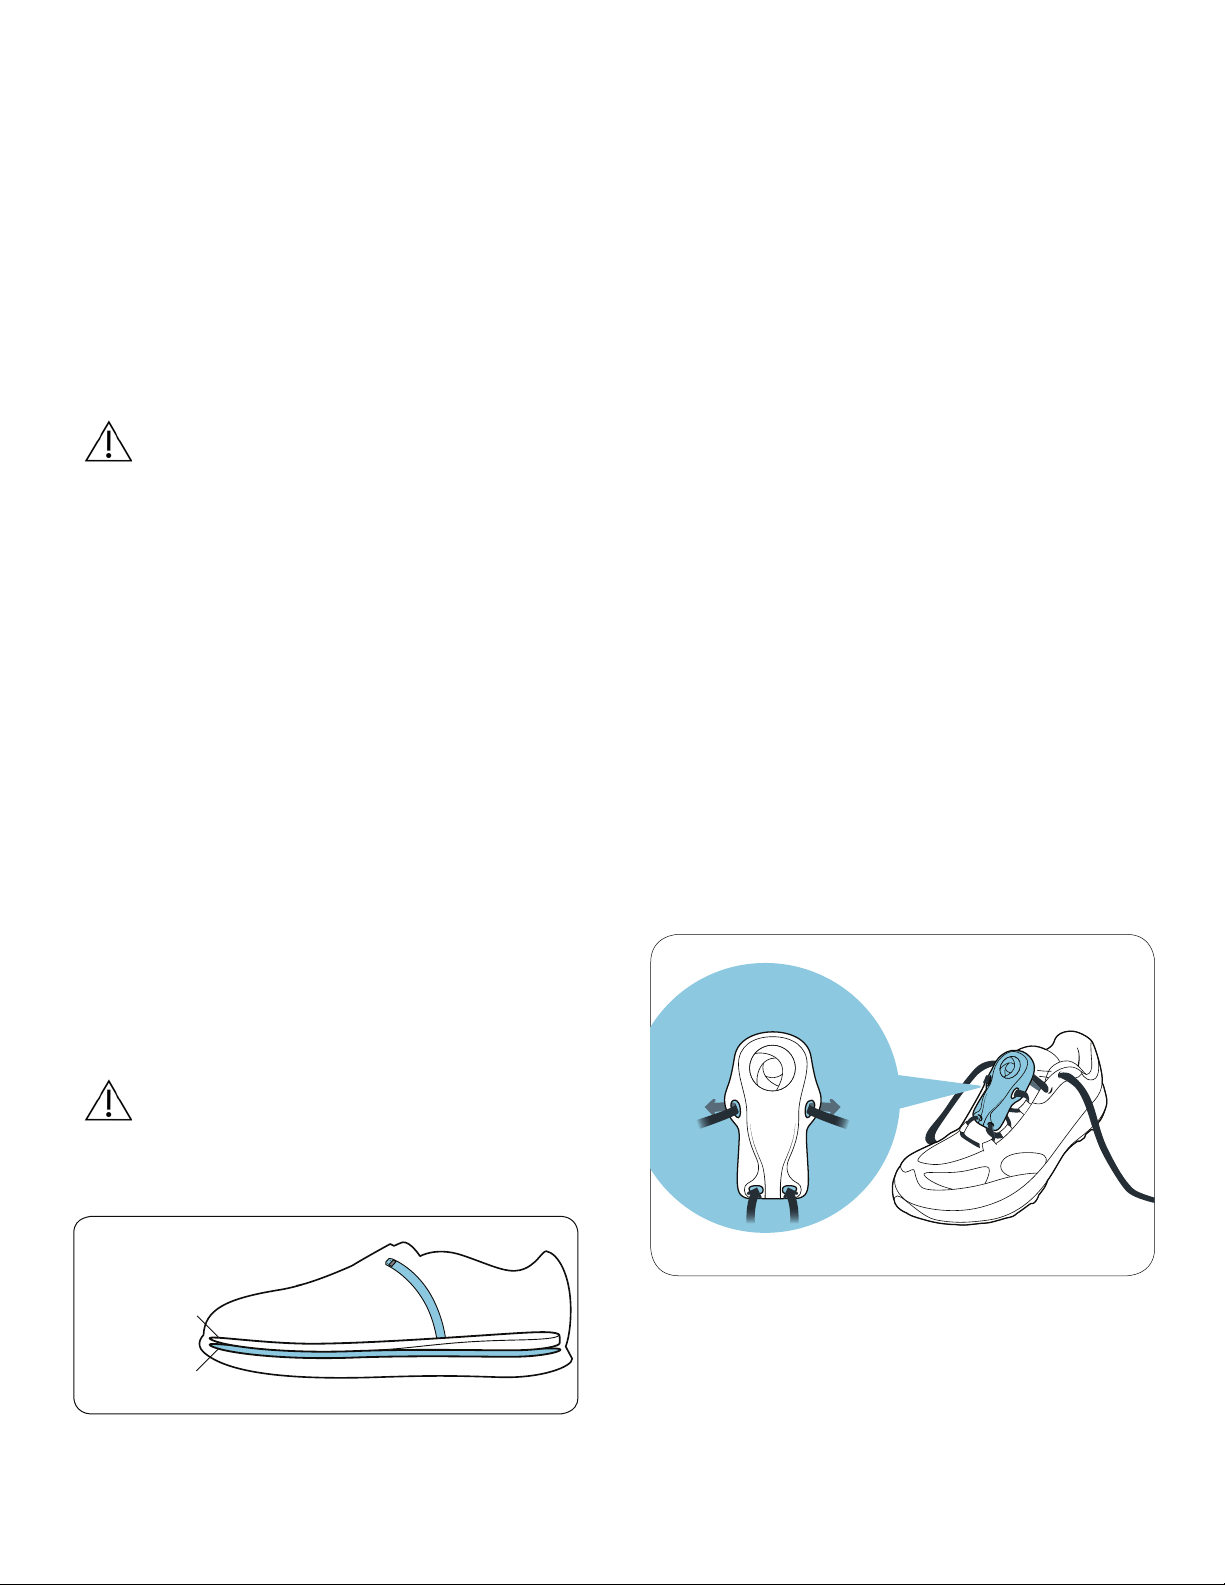
curving up the sides. The lead should run
along the instep of the shoe, up and over
the shoe tongue. When in place, your shoe
insole can be put back into the shoe on top
of the Orpyx LogR insert – the insert should
not bend or shift during this step.
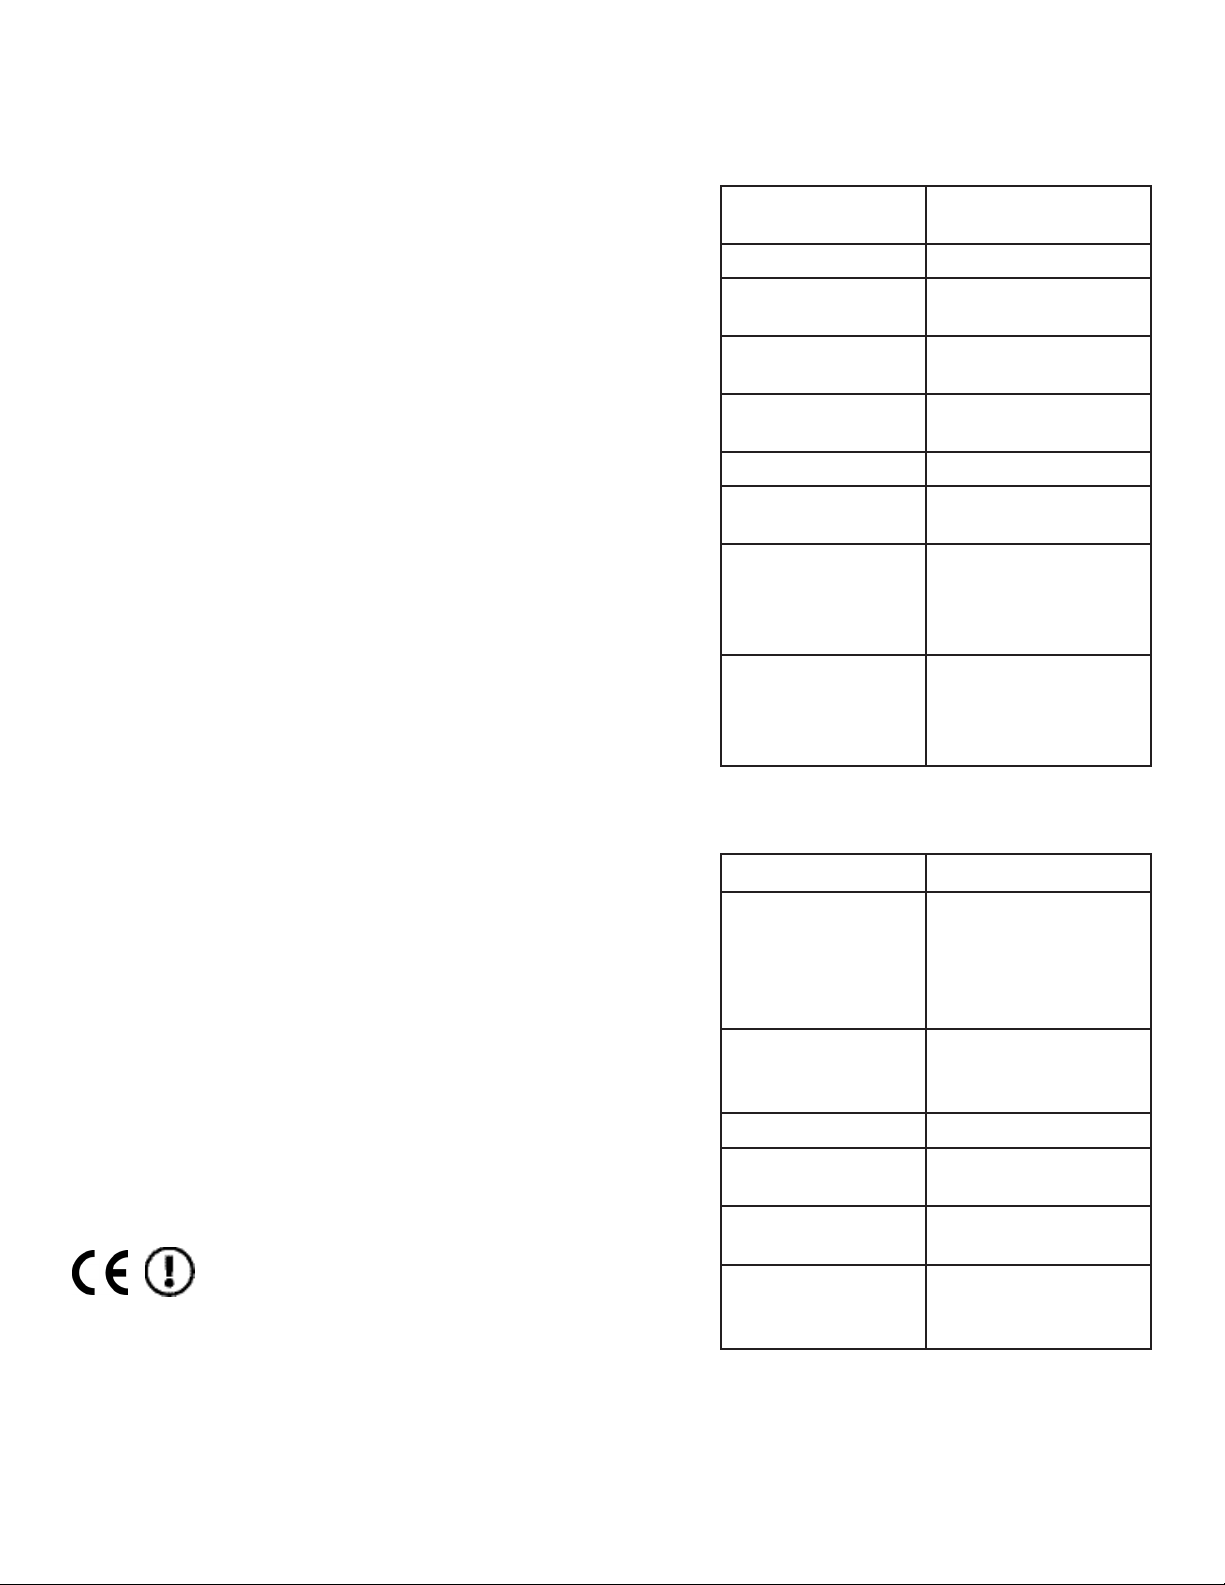
Note: The Orpyx LogR inserts should not be
placed under insoles that have hard
plastic on their undersurfaces, or used
outside of the shoe. The inserts are
designed to be used in-shoe only.
Option 1 - Shoe Pod Clips (Recommended):
Adjust the shoe pod to sit centered on the
top of the tongue. Take the shoe pod clip,
included with the Orpyx LogR system, and
slide the clip under the shoe laces (or
Velcro). Make sure that the 2 (two) prongs
on the clip are facing upwards at the base of
the shoe tongue. The clip should be
positioned in the middle of the laces/Velcro,
not too far towards the top or bottom of the
shoe tongue. Attach the shoe pod clip –
hook the prongs in first to the bottom holes
of the shoe pod, and then push the top until
you hear it click into place.
Option 2 - Shoe Pod Lacing: Adjust the shoe
pod to sit centered on the top of the tongue.
Lace up the shoe normally until there are
only two shoelace holes left on each side.
Take one lace and lace it through the top
shoe pod hole, coming from the front to the
back of the shoe pod. Cross the lace under
the bottom of the shoe pod (along the back)
and lace it through the opposite shoe pod
hole (from bottom to top). Lace the shoe up
as you normally would, back through the top
two shoe lace holes. Ensure that the shoe
pod is sitting centered in the shoe, and that
the lead is still flat against the instep of the
shoe.
Your Insole
Orpyx LogR™ Insert

For more information, please contact: Page 3
Orpyx Customer Care www.orpyx.com
How to charge the Orpyx LogR shoe pods Orpyx LogR shoe pod lights
With regular use, the shoe pods will require
charging daily. Battery life for the shoe pods
can be monitored from the foot map screen
on the Orpyx LogR application. To charge
the shoe pods, insert the mini USB cable
into the mini USB port on the back of the
shoe pod. You should hear a click when in
place. The other end of the cable should be
inserted into the AC adaptor, which plugs
directly into an electrical outlet.
When the shoe pods are charging, a red
light flashes on each shoe pod. When the
shoe pods are fully charged, the lights turn
solid green.
Note: The device should only be charge with
the AC Adaptor included with the system.
The shoe pods should be kept charging
when not in use.
There are red and green lights inside each
shoe pod to indicate device status.
The meaning of the light is as follows:
Shoe Pod Indicator
Light
Status/Meaning
Solid green with
USB connection
Battery fully
charged
Flashing red with
USB connection
Battery charging
Flashing green once
every 10 seconds
Not connected to
iOS device,
battery level OK
Flashing red once
every 10 seconds
Not connected to
iOS device,
battery level low
Flashing green
twice every second
Connected to iOS
device &
sending data,
battery level OK
Flashing red twice
every second
Connected &
sending data,
battery level low
Flashing green once
per second
Connected, battery
level OK
Flashing red once
per second
Connected, battery
level critical
AC Adaptor
Back
Mini USB

For more information, please contact: Page 4
Orpyx Customer Care www.orpyx.com
3.0 INSTALLING THE ORPYX LOGR APP
4.0 CONNECTING THE ORPYX LOGR
SYSTEM FOR THE FIRST TIME TO THE
ORPYX LOGR APP
You can download the Orpyx LogR app from
the Apple App Store in countries where the
Orpyx LogR system is sold. To find the app,
enter Orpyx into the search bar and you will
see the Orpyx LogR app.
When you launch the Orpyx LogR app for
the first time, you will be prompted to set up
your device. You can set up your device by
following the instructions below:
1. Reset your system by plugging the
shoe pods in to a USB charging cable
– you will see the red and green
light flash together quickly, followed
by a solid red light. Once the shoe
pod shows solid green or flashing
red, unplug the shoe pods
2. Launch the Orpyx LogR app and
swipe right to access the
configuration screen, then press
Setup Devices.
3. Select the appropriate right and left
shoe pods using the number found
on the shoe pod. To select a shoe
pod on the app, touch the foot icon
so that it highlights in blue.
Note: Data can not be collected from multiple
pairs of inserts. The Orpyx LogR app can only
connect and collect data from a single left
and right insert at a time, either as a pair (left
and right) or separately (left or right)
.
4. The shoe pod name can be changed
by selecting the shoe pod row and
entering your device name.
5. Press Connect in the top right corner
to connect the shoe pods you have
selected.
6. Once connected, swipe left to return
to the footmap screen. Here, you will
see the battery levels of connected
each pod, and the New Session
button will be enabled.
7. To test that the connection is
working, exert pressure on the
inserts, and the foot map screen will
show green dots where pressure is
detected.
8. Press the New Session button. You
will be required to enter your activity
information, including the activity
type and a brief description.
9. Press the Start button to begin
logging data.
Note: Repeat steps 1-7 to connect other
devices.
100%
10:05 PM
100%
10:05 PM 100%
10:05 PM

5.0 USING THE ORPYX LOGR™ APP
Once you have connected the shoe pods to
the Orpyx LogR app, you can begin to use
the Orpyx LogR system.
A. Foot Map
The foot map indicator light goes from light
green to dark green based on low to high
pressure. When more pressure is exerted,
the indicator light will display dark green.
B. Sensor Readings
Swipe left to access the sensor readings
screen. Real-time pressure values for each
sensor and foot are shown here. Pressure units
can be changed to: PSI, mmHg, kPa
Note: The data shown on the Orpyx LogR
app should not be used for data analysis.
Data analysis should be done using data
downloaded from the cloud software.
For more information, please contact: Page 5
Orpyx Customer Care www.orpyx.com
6.0 ORPYX LOGR™ DATA
How do I view my data?
How do I access the Orpyx LogR cloud?
Data recorded on the Orpyx LogR app can be
viewed on the Orpyx LogR cloud
(logr.orpyx.com). Log in with your
username and password to view the data.
Included with purchase of the Orpyx LogR
system is a seat license to the Orpyx LogR
cloud; a browser-based data collection tool.
Login credentials for the cloud will be
provided at the time of purchase, or during
the initial LogR training session.
Once you have accessed your Orpyx LogR
account, you will be able to:
View individual data sessions
Download pressure files
Configure date ranges
Highlight sessions and view in
graph format
Highlight specific data sections on
the data graphs
How do I change my password?
Click on your username at the top
right of the Orpyx LogR cloud home
page.
A new page will appear to show
change password.
When prompted, enter your current
password (Orpyx will provide the
inital password).
When prompted, enter your new
password and press
“change password”.
100
%
10:05
PM
100
%
10:05
PM
100
%
10:05
PM
100
%
10:05
PM

For more information, please contact: Page 6
Orpyx Customer Care www.orpyx.com
How to use the Orpyx LogR cloud?
Login using your credentials
Sessions are listed on the page – you
can search for specific session using
the search bar (using the activity,
description or shoe pod numbers
To access Orpyx Knowledge Base
(Help Centre), click the Help
button on the top left
To download data, highlight the
session and click Export as CSV –
this will initiate a download
To view the data in graphical format
– highlight session and click on the
graph icon beside the Session ID
number
To select other sensors, click on the
legend and select appropriate
sensors
Highlight region – zoom in or
download data from that region

For more information, please contact: Page 7
Orpyx Customer Care www.orpyx.com
7.0 MAINTENANCE AND CLEANING
Orpyx LogR Insert Replacement
Cleaning the Orpyx LogR System
Disposal of the Device
Calibration
8.0 STORAGE AND HANDLING
Orpyx LogR System Handling
AVOID dropping the Orpyx LogR shoe
pods. Although robustly designed, damage
may occur that could cause the system to
malfunction.
DO NOT open the Orpyx LogR shoe pods
for any reason.
DO NOT submerge the Orpyx LogR shoe
pods or inserts in water for any reason.
Keep the Orpyx LogR shoe pods charged
when not in use.
DO NOT cut or trim the Orpyx LogR
inserts. Cutting the sensor insert will
damage the sensors.
DO NOT puncture the Orpyx LogR inserts.
Sharp elements may cause damage to the
sensors.
DO NOT fold or crease the Orpyx LogR
inserts.
DO NOT pull on the Orpyx LogR insert and
shoe pod lead. Be careful installing and
uninstalling from shoes.
DO NOT use the Orpyx LogR inserts for
measurements outside of the shoe.
DO NOT use excessive force/body weight
on the Orpyx LogR inserts. The sensor
inserts can withstand pressures up to
785 kPa (approximately 130 PSI).
Note: Failure to follow these steps may void
your warranty.
Orpyx LogR System Storage
Keep dry.
Keep charged.
The Orpyx LogR inserts were designed to
be durable and reliable over an extended
period of time; however, the usable life of
the inserts will vary depending on their use
case. If you have questions about the life
span of your Orpyx LogR inserts, please
contact Orpyx Customer Care.
A damp cloth with mild detergent may be
used to wipe the outside of the Orpyx LogR
shoe pods and inserts. DO NOT use strong
cleaning solution that contains bleach or
immerse the Orpyx LogR system in the
water.
There are no user-repairable components
in the Orpyx LogR system. When the device
has reached the end of its useful life, please
dispose of properly in accordance with all
local and national regulations.
The Orpyx LogR inserts will not require
calibration with daily use before each
measurement. Due to normal wear, it may
be necessary to send the Orpyx LogR inserts
back to Orpyx for re-calibration.

For more information, please contact: Page 8
Orpyx Customer Care www.orpyx.com
9.0 REGULATORY COMPLIANCE
INFORMATION
10.0 TECHNICAL INFORMATION,
SPECIFICATIONS AND WARRANTY
TECHNICAL SPECIFICATIONS
FOR SHOE PODS
TECHNICAL SPECIFICATIONS
FOR INSERTS
FCC COMPLIANCE STATEMENT
This device complies with part 15 of the
FCC rules. Operation is subject to the
following two conditions: (1) This device may
not cause harmful interference, and (2) this
device must accept interference received,
including interference that may cause
undesired operation.
NOTE: Orpyx is not responsible for any
changes or modifications not expressly
approved by the party responsible for
compliance. Such modifications could void
the user’s authority to operate the
equipment.
CANADIAN COMPLIANCE STATEMENT
This device complies with Industry Canada
license-exempt RSS standard(s). Operation
is subject to the following two conditions: (1)
this device may not cause interference, and
(2) this device must accept any interference,
including interference that may cause
undesired operation of the device.
Le présent appareil est conforme aux CNR
d’Industrie Canada applicables aux
appareils radio exempts de licence.
L’exploitation est autorisée aux deux
conditions suivantes: (1) l’appareil ne doit
pas produire de brouillage, et (2) l’utilisateur
de l’appareil doit accepter tout brouillage
radioélectrique subi, même si le
brouillage est susceptible d’en
compromettre le fonctionnement.
SOFTWARE LICENSE AGREEMENT
A copy of the Orpyx Software License
Agreement is available online through the
Orpyx LogR portal at: logr.orpyx.com
Size: 2.75 in x 1.18 in x 0.5
in (L x W x H)
Weight: 20 grams / 0.7oz
Power Source: Rechargeable LiPo
battery
Frequency of
Operation:
2406-2475 MHz
Max.20 dB
Bandwidth:
1 MHz
Max.Output Power: +0 dBm
Number of
Operation Modes:
2 - ON / Ship Mode
Storage: Temperature -20 to
+55 Celsius / -4 to
131 Fahrenheit / 95%
humidity
Operation: Temperature -20 to
+55 Celsius / -4 to
131 Fahrenheit / 95%
humidity
Thickness: 0.5 mm (0.02 in)
Sensors: 8 pressure sensors
per insole, aligned
with the bony
prominences of the
foot
Sensing Area: Sensing area of 6.13
in (size 5) to 7.75 in
(size 13)
Hysteresis: Approximately +/- 4%
Pressure
Resolution:
1.5 to 3.0 PSI / 10 to
20 kPA
Sizes: US Men 5 to 13, US
Women 7 to 13
Pressure
Measurement
Range:
0 to 75 PSI / 0 to 517
kPa

For more information, please contact: Page 9
Orpyx Customer Care www.orpyx.com
11.0 FREQUENTLY ASKED QUESTIONS
Orpyx Medical Technologies Inc.
©2016 Orpyx Medical Technologies Inc.
All rights reserved. All trademarks and registered
trademarks are the property of their respective owners.
What type of sensors does the system use?
The Orpyx LogR has 8 Piezoresistive
sensors which can measure pressure
between 0 to 75 PSI / 0 to 517 kPa.
Will change in temperature have an effect
on the accuracy? What effect will change in
temperature cause, if any?
The operating temperature range of the
inserts is between -20 to +50 Celsius / -4
to 122 Fahrenheit. Within this range the
sensors have a temperature sensitivity of
0.35%/Celsius / 0.19%/Fahrenheit.
Do the sensors experience “sensor –
creep”?
Under a constant static load, the sensor
response changes on as described by a
logarithmic time scale [6%/log(second].
This creep is typically not measurable
during cyclic loading and this effect can be
compensated for in post data processing.
Does the sensor saturate?
Sensor measurements saturate at
approximately 75 PSI / 517 kPa.
Will excessive force/body weight have an
adverse effect on the sensor and it’s
accuracy?
The sensor inserts can withstand pressures
up to 785 kPa (approximately 130 PSI). The
Orpyx LogR sensor readings will saturate
above 75 PSI / 517 kPa, meaning that the
system is unable to accurately measure the
applied pressure.
How do I calibrate inserts?
The Orpyx LogR inserts will not require
calibration with daily use. Due to normal
wear, it may become necessary to send
the Orpyx LogR inserts back to Orpyx for
a re-calibration. Please contact Customer
Care for additional information.
What is “event synchronization”?
Current customers use an event to
synchronize data streams from other
devices and systems. For example, a
particular foot motion which is observable
by the Orpyx LogR system as well as other
devices being used.
Sensor Hysteresis
Pressure sensor hysteresis is approximately
+/- 4%.
Warranty
Orpyx Medical Technologies Inc. guarantees
that the Orpyx LogR system will be free of
defects in material and workmanship for
one year, valid from the date of purchase.
The warranty extends only to the original
purchaser and is not transferable. Due to
the varying uses of the Orpyx LogR inserts,
the performance of the inserts are not
covered under warranty.
For more information, please contact Orpyx
Customer Care.
Table of contents
Other Orpyx Medical Equipment manuals