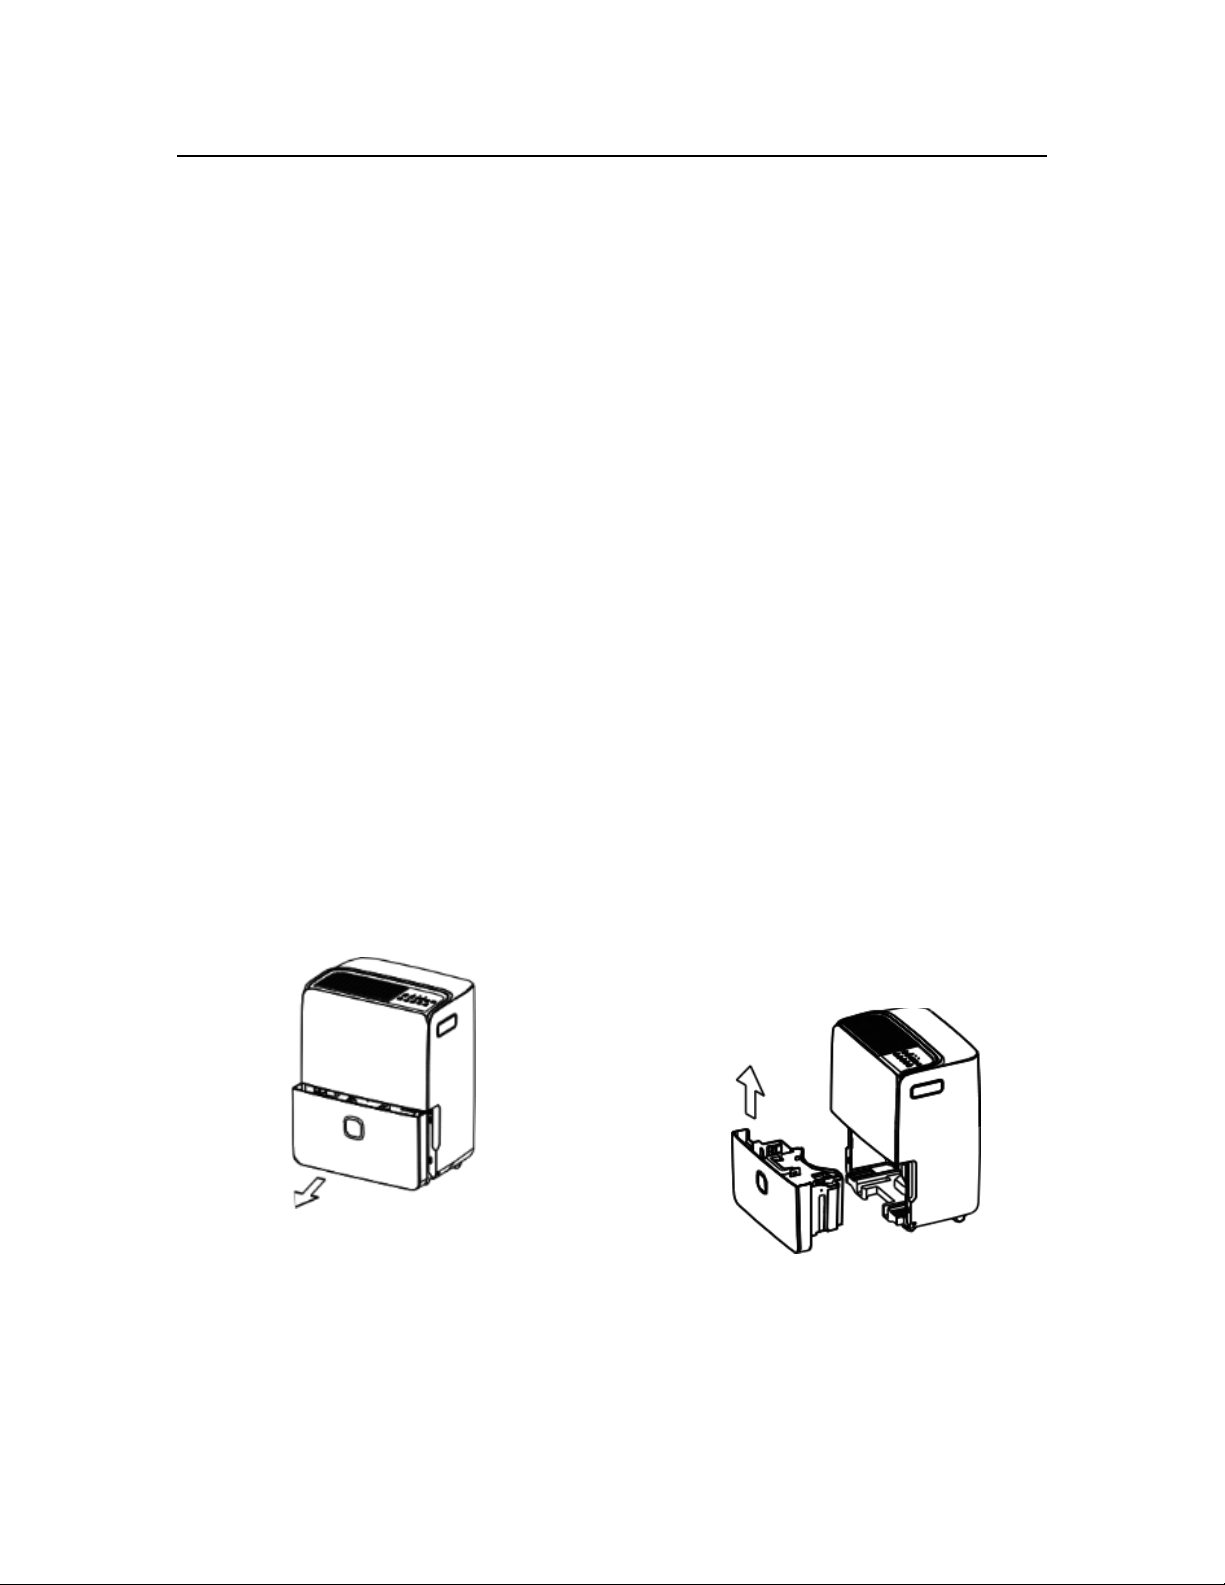
International Refrigeration Products DH495SM User manual

DEHUMIDIFIER USER MANUAL
For Models:
DH495SM
DH495SMP
DH495SMA
Dh495SMPA
950-0231-revD 4/25/2017

- 2 -
CONTENTS
SAFETY PRECAUTIONS................................................................................ - 3 -
OPERATION.................................................................................................... - 6 -
UNIT OUTLINE......................................................................................... - 6 -
CONTROL PANEL ................................................................................... - 7 -
EXTRA FEATURES.................................................................................. - 9 -
POSITIONING THE UNIT....................................................................... - 10 -
TIPS WHILE OPERATING ..................................................................... - 10 -
REMOVING THE COLLECTED WATER................................................ - 11 -
USING THE BUCKET............................................................................. - 11 -
CONTINUOUS DRAINING..................................................................... - 12 -
PUMP DRAINING................................................................................... - 13 -
MAINTENANCE............................................................................................. - 14 -
GRILL AND CASE.................................................................................. - 14 -
AIR FILTER ............................................................................................ - 14 -
WATER TANK........................................................................................ - 14 -
TROUBLESHOOTING................................................................................... - 15 -
SPECIFICATIONS......................................................................................... - 16 -
WARRANTY .................................................................................................. - 17 -
FOREWORD
•The appearance of the units that you purchase may be slightly different from the ones
described in this manual, but will not affect proper operation and usage.
•Please read carefully the sections corresponding to the specific model you have, and keep
the manual in a safe place for reference.
•The refrigerant used in your dehumidifier is an environmentally safe and friendly.
ATTENTION
•Keep small children away from dehumidifier.
•Do not modify or otherwise damage the plug.
•Do not operate the machine when the ambient temperature is below 41°F or above 95°F.
•If the supply cord is damaged, it must be replaced by a qualified person in order to avoid a
fire hazard.

- 3 -
SAFETY PRECAUTIONS
READ ALL INSTRUCTIONS BEFORE USING
To prevent injury to the user and/or property damage, the following instructions must be followed.
Incorrect operation due to not following instructions will cause harm or damage. The seriousness
is classified by the following indications.
WARNING
CAUTION
This symbol indicates the possibility of death or
serious injury.
This symbol indicates the possibility of injury or
damage to property only
WARNING
Follow all grounding and electrical requirements as shown on
page 5.
Turn unit "OFF" and disconnect power cord from receptacle
prior to servicing or cleaning.
Do not use flammable fluids, solvents, or strong detergents to
clean the Dehumidifier.
When cleaning the outside surfaces of the unit do not plug the
unit into the receptacle until it is completely dry.
Do not use the water collected in the water tank for drinking
or cooking purposes.
Do not clean the dehumidifier while it is plugged in. This can
cause electrical shock.

- 4 -
CAUTION
Unit can fall if placed on a shelf or table. Be sure to secure
dehumidifier to prevent injury or damage from falling unit. Shelf
or table must be able to support the weight of the unit and a full
water tank (about 90 lbs).
Replace water tank after emptying to prevent water damage to
property and unit.
Do not operate unit with wet hands.
Close all doors and windows to the room where the dehumidifier
is to be operated. Dehumidifier will be more effective in enclosed
areas.
Do not operate the Dehumidifier in areas where the temperature
will drop below 41°F. When the unit operates in an ambient below
41°F frost may occur and the efficiency will be affected.

- 5 -
WARNING
OBSERVE ALL LOCAL ORDINANCES.
•DO NOT, UNDER ANY CIRCUMSTANCES,
REMOVE THE POWER SUPPLY CORD GROUND
PRONG. ELECTRICAL GROUND IS REQUIRED
ON THIS APPLIANCE.
•USE ONLY UL APPROVED EXTENSION CORD.
DO NOT ALLOW WATER OR MOISTURE TO
ENTER ELECTRICAL CONNECTIONS.
Properly grounded electrical supply is required. Time delay fuse or time delay circuit
breaker is recommended. Use a dedicated circuit, serving only this appliance.
For your personal safety, this appliance must be grounded.
This appliance has a power supply cord with a grounding
plug. To minimize possible shock hazard, the cord must be
plugged into a mating grounding type wall receptacle and
grounded in accordance with latest edition of the National
Electrical Code and all local codes and ordinances. If a
mating wall receptacle is not available, it is the personal
responsibility and obligation of the customer to have a
properly grounded wall receptacle installed by a qualified
electrician.

- 6 -
OPERATION
UNIT OUTLINE
NOTE: The appearance of the unit(s) that you purchased may be slightly different from following
pictures shown.
Front
1. Control panel
2. Air outlet grill
3. Water bucket
4. Handle (both sides)
2
1
4
3
Rear
1. Continuous drain hose outlet
2. Caster
3. Power cord and plug
4. Pump drain hose outletP
5. Band (used only when storing the unit)
6. Air intake filter
P
PFor pump version only

- 7 -
CONTROL PANEL
NOTE: The control panel of the unit you purchased may be slightly different according to the
models.
CONTROL BUTTONS
All control buttons will make a beep sound to indicate a change in mode or setting.
1. Pump ButtonP
Press to activate pump operation.
NOTE: Make sure the pump drain hose is installed and the continuous drain hose is
removed before the pump operation is activated.
CAUTION: DO NOT PUMP TO ANY AREA WHERE THE TEMPERATURE IS LESS THAN
OR EQUAL TO 0°C (32°F).
2. Comfort Button
Press to activate the comfort dehumidifying operation. When activated, the unit will set the
relative humidity setpoint based on the room temperature for maximum comfort.
NOTE: When this is activated, the humidity level cannot be manually changed.
3. Filter Button
The Filter Light will illuminate after 250 hours of operation. Press and hold the Filter Button to
turn off the Filter Light after the air filter has been cleaned.
4. Turbo Button
Press to toggle between High or Normal fan speed. Set the fan control to High for maximum
moisture removal. The Turbo Light will be lit indicating the fan is operating on high speed.
5. ION Button
Press to activate the ionizer. Anions are automatically generated by ionization. Press again
PFor pump version only

- 8 -
to stop the function.
6. POWER Button
Press to turn the unit on and off.
7/8. Up/Down Buttons
•Humidity Set Control Buttons
The humidity level can be set within a range of 35% RH (Relative Humidity) to 85%
RH (Relative Humidity) in 5% increments.
For drier air, press the Button to set a lower percent value (%).
For damper air, press the Button to set a higher percent value (%).
•Timer Set Control Buttons
When changing the timer use the Buttons to change AutoStart and AutoStop
time. See “Setting the Timer” section on page 8 for more details.
9. Timer Button
Press to initiate the AutoStart and AutoStop feature in conjunction with the Buttons.
See “Setting the Timer” section on page 9 for more details.
10. Continuous Button
Press to toggle continuous operation. During continuous operation, the unit will continue to
dehumidify the space regardless of what the relative humidity is.
11. Display
Shows the room % humidity level in a range of 30% RH to 90% RH with a ±5% accuracy.
Shows the desired % humidity level (35% - 85%) while being adjusted.
Shows the AutoStart/Stop time (0-24) while being adjusted.
Error Codes and Protection Code:
Code
Error
Solution
AS
Humidity sensor error
Unplug the unit and plug back in. If error
repeats, call for service.
ES
Temperature sensor error
Unplug the unit and plug back in. If error
repeats, call for service.
P2NP
Full or misplaced bucket
Empty bucket or place in the proper position.
P2P
Full bucket
Empty the bucket.
EC
Unit malfunction
Make sure the environment temperature is
suitable according to the operating temperatures
stated in the manual. If the environment
temperature is suitable for the stated
temperature, call for service.
EbP
Missing or misplaced bucket
Place the bucket in the proper position.
NP For non-pump version only
PFor pump version only

- 9 -
EXTRA FEATURES
BUCKET FULL LIGHT
Glows when the bucket is ready to be emptied, or when the bucket is removed or not placed in
the proper position.
FILTER ALERT
A light will illuminate alerting you to clean filter.
AUTO SHUT OFF
The unit will automatically shut off when the bucket is full, removed, not placed in the proper
position, or the desired % humidity level is reached.
AUTO DEFROST
If frost builds up on the evaporator coils, the compressor will turn off and the fan will continue
running until the frost disappears.
3 MINUTE DELAY
After the unit has stopped, it cannot be started within 3 minutes. Operation will automatically start
after the first 3 minutes.
CHECK FILTER FEATURE
The Filter Light will start flashing after 250 hours of operation. After cleaning the filter, press and
hold the Filter Button to reset the Filter Light.
AUTO RESTART
If the unit turns off unexpectedly (such as a power outage), it will resume operation with the
previous settings when the power resumes.
FAN SELECTION
Select two fan speeds
TANK, CONTINUOUS DRAIN, & PUMP DRAINP
Select between a drain hose or installed tank to remove moisture.
TIMER
Turns the unit on/off automatically
Setting the Timer
•Press the Timer Button to initiate the Auto Start or Auto Stop function.
The Timer On Light will illuminate indicating the Auto Start function is initiated.
The Timer Off Light will illuminate indicating the Auto Stop function is initiated.
•Press or hold the Buttons to change the Auto Start/Stop time by 0.5
hour increments, up to 10 hours, and 1 hour increments, up to 24 hours.
•After the desired time is set, the display will revert back to the previous
humidity setting.
•Turning the unit ON or OFF or adjusting the timer setting to 0.0 will cancel
the Auto Start/Stop function.
•When the code “P2” is displayed, the Auto Start/Stop function will be
cancelled.
PFor pump version only

- 10 -
POSITIONING THE UNIT
A dehumidifier operating in a basement will have little or no effect in drying an adjacent
enclosed storage area, such as a closet, unless there is adequate circulation of air in and
out of the area.
•Do not use outdoors.
•This dehumidifier is intended for indoor
residential applications only. This
dehumidifier is not recommended for
commercial or industrial applications.
•Place the dehumidifier on a smooth,
level floor strong enough to support the
unit with a full bucket of water.
•Allow at least 12 inches of air space on
all sides of the unit for good air
circulation.
•Place the dehumidifier in an area where
the temperature will not fall below 41°F
(5°C). The coils can frost over at
temperatures below 41°F, which may
reduce performance.
•Use the dehumidifier in cooking, laundry,
bathing and dishwashing areas that
have excessive moisture. NOTE: Place
the dehumidifier away from the clothes
dryer, heater, or radiator.
•Use the dehumidifier to reduce moisture where books and/or valuables are stored.
•Use the dehumidifier in a basement to help prevent moisture damage.
•The dehumidifier must be operated in an enclosed area to be most effective.
•Close all doors, windows and other outside openings to the room.
NOTE: The unit has rollers to aid in placement, but it should only be rolled on smooth, flat
surfaces. Do not attempt to roll the dehumidifier on carpet or over objects.
TIPS WHILE OPERATING
•When first using the dehumidifier, let the unit run continuously for 24 hours.
•This unit is designed to operate with an environment between 41°F/5°C and 95°F/35°C.
•If the unit has been switched off and needs to quickly be switched on again, please allow
three minutes for the unit to resume operation.
•Do not connect the dehumidifier to a multiple socket outlet which is also being used for
other electrical appliances.
•Select a suitable location, making sure you have easy access to an electrical outlet.
•Plug the unit into an electrical socket with a ground connection.
•Make sure the water bucket is correctly fitted otherwise the unit will not operate properly.
NOTE: When the water in the bucket reaches to a certain level, please be careful moving
the machine to avoid having it fall over.

- 11 -
REMOVING THE COLLECTED WATER
There are three ways to remove the collected water.
USING THE BUCKET
1. The Full Light will illuminate indicating that bucket is full.
If the unit is on and the bucket is full, the unit will automatically turn off and the
display will show the error code “P2”.
2. Slowly pull out the bucket.
3. Grip the left and right handles securely and carefully pull out straight so water does
not spill.
Do not put the bucket on the floor because the bottom of the bucket is uneven.
4. Discard the water.
5. Place the bucket back into the unit. The bucket must be in the proper position for the
dehumidifier to operate.
6. If on, the unit will resume operation once the bucket is in the proper position.
NOTES:
oWhen removing the bucket, do not touch any parts inside the unit. Doing so may
damage the product.
oBe sure to place the bucket back gently all the way into the unit. Forcing the
bucket in or failing to place the bucket in the proper position may cause the unit
not to operate.
oIf the pump inlet shaft drops when removing the bucket, reinstall the pump inlet
shaft properly before placing the bucket back into the unit. See next page
oWhen the bucket is removed, the unit will beep 8 times while displaying the error
code “Eb”. The unit will automatically turn off when the bucket is removed.
1. Pull out the bucket a little.
2. Hold both sides of the bucket
with even strength and pull it
out from the unit.
3. Pour the water out.

- 12 -
CONTINUOUS DRAINING
Water can be automatically emptied into a floor drain by attaching the unit with a
standard water hose (Not included).
NOTE: Make sure pump inlet shaft is in the upright position.
Installation Steps
1. Remove the plastic cover from the back
drain outlet of the unit and set aside. Dry
or remove any water in the drain outlet
before proceeding.
2. Install the female threaded end of the
water hose (garden hose not included)
onto the threaded drain outlet.
3. Make sure the hose is secure so there
are no leaks.
4. Lead the water hose to a floor drain or
an appropriate drainage facility.
5. Make sure there are no kinks in the
hose that stop water from flowing
properly.
6. Place the end of the hose into the drain
and make sure the end of the hose is
level or pointed down to let water flow
smoothly. Do not let the hose point up.
7. Select the desired humidity setting and
fan speed on the unit for continuous
draining to start.
NOTE: When the continuous draining
feature is not being used, remove the
drain hose from the outlet.

- 13 -
PUMP DRAININGP
Water can automatically be emptied into a floor drain or an appropriate drainage
facility by attaching a pump drain hose*to the pump drain hose outlet on the rear side
of the unit.
Installation Steps
1. Remove the continuous drain hose from the unit.
2. Ensure the plastic cover is installed on the
continuous hose outlet of the unit by securely
tightening it clockwise.
3. Firmly insert the pump drain hose at least ½’’ into
the pump drain hose outlet.
4. Make sure the hose is secure so there are no leaks.
5. Lead the water hose to a floor drain or an
appropriate drainage facility.
6. Make sure there are no kinks in the hose that stop
water from flowing properly.
7. Place the end of the hose into the drain and make
sure the end of the hose is level or pointed down to
let water flow smoothly. Do not let the hose point
up.
8. Press the Pump Button to enable the pump
operation. The Pump Light will illuminate to indicate
the pump operation is enabled. The pump will
automatically turn on when the bucket is full.
NOTE: The pump operation may be loud when it
starts working for the first 3-5 minutes.
9. Select the desired humidity setting and fan speed on
the unit to start normal operation.
10. To remove pump drain hose, press the rim around
the hose in to release then pull to remove the pump
drain hose. Be careful when removing the hose to
make sure water does not spill or drip out onto the
floor.
NOTES:
oDo not use this operation when the outdoor
temperature is less than or equal to 32°F /0°C .
Water may freeze inside the hose blocking the
flow of water and causing the unit to fail.
oThe highest water can be pumped is 6’ (2
meters).
oMake sure to empty the bucket once a week
while using the pump draining feature.
oWhen the pump draining feature is not being
used, remove the pump drain hose from the
outlet.
oIf the Pump Light blinks, an error with the
pump has occurred. If this happens, turn off
and unplug the unit. Do the following things:
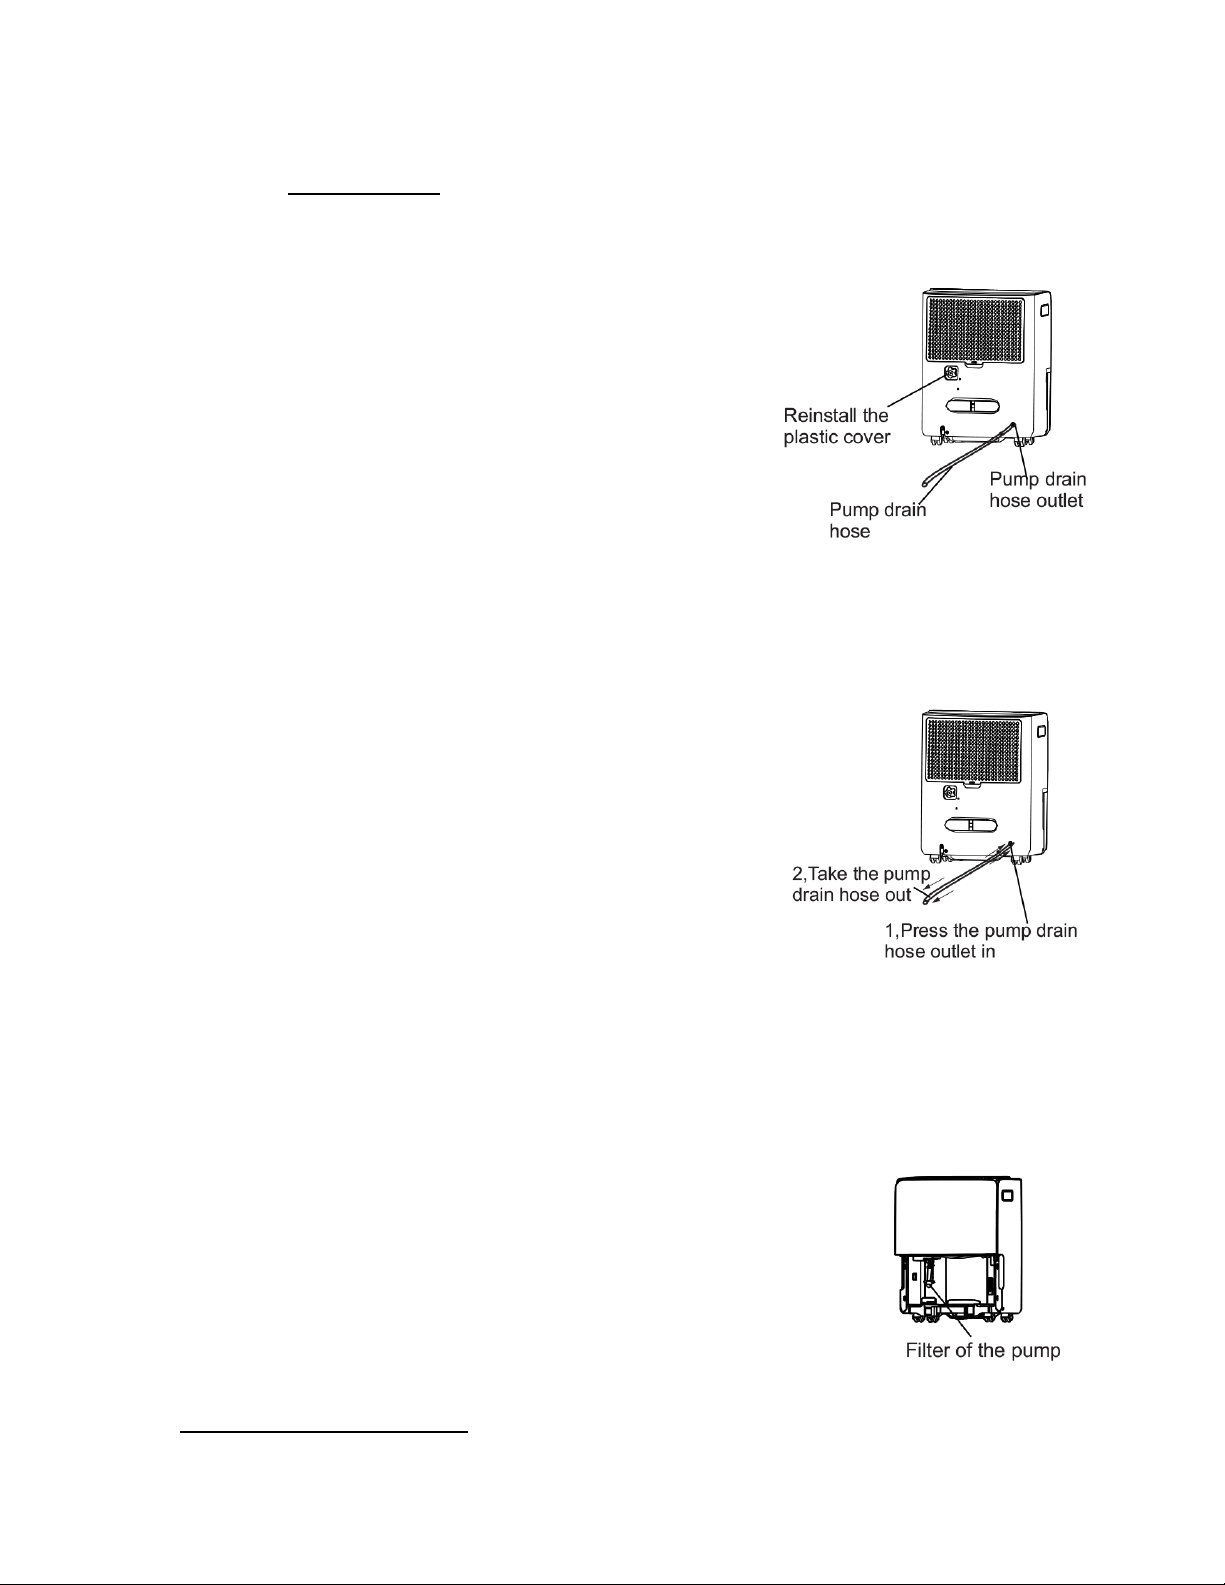
1. Make sure the pump filter is clean. To clean,
remove the bucket and take down the pump
filter.
2. Make sure the pump drain hose is properly
connected and secured to the unit.
3. Empty any water inside the bucket.
4. Reinstall the pump hose if removed and
properly place the bucket back into the unit.
5. If error repeats, call for service.
PPump version only
*Pump drain hose included

- 14 -
MAINTENANCE
NOTE: TURN OFF THE UNIT AND REMOVE PLUG FROM OUTLET BEFORE CLEANING.
GRILL AND CASE
To clean the case:
Use water and a mild detergent.
DO NOT use bleach or an abrasive cleaner.
DO NOT splash water directly onto the main unit. Doing so may cause an electrical shock,
cause the insulation to deteriorate, or cause the unit to rust.
To clean the grill:
Use a vacuum with an attachment or brush.
AIR FILTER
The air filter is behind the front grill of the dehumidifier. It should be
checked and cleaned at least every 250 hours of operation or more often
if necessary.
To remove:
Remove the bucket, grasp the filter edge, and pull it outwards.
To clean:
Clean the filter with warm, soapy water. Rinse and let the filter dry before
reinstalling it.
NOTE:
DO NOT rinse or put the filter in an automatic dishwasher.
DO NOT operate the dehumidifier without a filter because dirt and lint will
clog it and reduce performance.
WATER TANK
To clean:
Every few weeks, rinse the inside of the water tank
with a mild detergent to prevent growth of mold,
mildew, and bacteria. Partially fill the tank with clean
water and add a little mild detergent. Swish it around
inside the tank, empty and rinse.
NOTE: DO NOT use dishwasher to clean the water tank.

- 15 -
TROUBLESHOOTING
USE THE CHART BELOW TO DETERMINE OPERATIONAL ISSUES THAT MAY NEED SERVICE
PROBLEM
POSSIBLE CAUSES
SOLUTIONS
Dehumidifier does
not start.
Power cord is unplugged.
Verify that outlet is working, and that plug
is firmly plugged into the outlet.
Blown fuse or circuit breaker.
Check and replace/reset circuit breaker.
Water tank is full.
Empty water tank and replace.
Water tank is not installed
properly.
Verify that water tank is installed properly.
Dehumidifier does
not dry the air as
it should.
Unit was not allowed enough
time to remove moisture.
Allow at least 24 hours to maintain a
desired humidity level.
Airflow is restricted.
Make sure intake grill is not blocked, and
have proper clearances. See “Positioning
the Unit”section on page 10.
Dirty filter.
See “Air Filter”section on page 14.
Doors and windows may not
be closed tightly.
Check that doors, windows, and other
openings are securely closed.
Humidity may be entering the
room via other sources
i.e. clothes dryer, etc.
Look for sources of humidity and correct if
necessary
Ambient temperature to low.
Moisture removal is best at higher room
temperature. Lower room temperatures
will reduce the moisture removal rate. Unit
is designed to be operated at
temperatures above 41°F.
Dehumidifier runs
too much.
Area to be dehumidified is too
large.
The capacity of your dehumidifier may not
be adequate.
Doors and windows are open.
Close all doors and windows to the
outside.
Frost appears on
the coils.
Dehumidifier has been recently
turned on, or room temperature
is below 41 °F
This is normal. Frost will usually disappear
within 60 minutes. See “Auto Defrost”in
the “Extra Features” section on page 9.
Fan Noise.
Air is moving through the
Dehumidifier
This is normal.
Water leakage.
Drain hose1may be loose
Check hose connection and tighten if
necessary
Water Tank not installed
properly
See “Using the Bucket”section on page
11.
ES, AS, P2, EC,
or Eb appear on
Display
See “Display” in the “Control Panel” section on page 8 for error code
definitions and solutions.
If problem persists, call for service.
1
Applies for both continuous drain hoses and pump drain hoses

- 16 -
SPECIFICATIONS
Model
DH495SM
DH495SMP
DH495SMA
DH495SMPA
Product Code
270-0021
270-0022
270-0026
270-0027
Capacity
95 Pints/Day
95 Pints/Day
95 Pints/Day
95 Pints/Day
Tank Size
2.64 gal
2.64 gal
2.64 gal
2.64 gal
Rated Frequency
60 Hz
60 Hz
60 Hz
60 Hz
Rated Voltage
115 VAC
115 VAC
115 VAC
115 VAC
Rated Current
6.8 A
6.8 A
6.8 A
6.8 A
Rated Input
730 W
730 W
680 W
670 W
Plug Type
5-15P
5-15P
5-15P
5-15P
Refrigerant (R410A)
14.11 OZ
14.11 OZ
14.64 OZ
14.64 OZ
Net Weight
58 lbs
58 lbs
59.5 lbs
60.6 lbs
EEV
2.5 L/kWH
2.5 L/kWH
2.8 L/kWH
2.8 L/kWH
HP.PSIG
540 PSI
540 PSI
540 PSI
540 PSI
LP.PSIG
300 PSI
300 PSI
300 PSI
300 PSI
NOTE: Product specification subject to change without notice.

- 17 -
WARRANTY
International Refrigeration Products warrants that the product supplied is free from defects in
material and workmanship. This warranty is valid as long as this product is properly handled,
installed, operated and serviced in accordance with the Installation and Operating
Instructions shipped with this unit, and the warranty card is completed and mailed no later
than 30 days after date of purchase. All warranty claims must be made within one (1) year for
spare parts and compressor from date of purchase (unless national regulations require a
longer registration period).
This warranty provides free replacement of defective parts only. Labor is not covered under
this warranty. Replacement as a result of normal wear and tear is not covered under
this warranty.
Additional claims are excluded, unless required by national regulations. International
Refrigeration Products Inc. is not responsible for incidental, consequential, direct, or indirect
damages, or expenses relating to the use of, or the inability to use the product for any
purpose. Other implied warranties are excluded.
This constitutes International Refrigeration Products’ warranty obligation and replaces any
and all prior warranties for this product.
International Refrigeration Products Inc.
1035 Wheeler Way
Langhorne, PA 19047
Service - Tel: +1 (215) 750-9876 Fax: +1 (215) 750-1169
Hours: 8:00 AM to 4:30 PM EST
Website: www.irproducts.biz
This manual suits for next models
3
Table of contents
Other International Refrigeration Products Dehumidifier manuals

International Refrigeration Products
International Refrigeration Products DH470 User manual

International Refrigeration Products
International Refrigeration Products DH45S User manual

International Refrigeration Products
International Refrigeration Products DH450SM User manual

International Refrigeration Products
International Refrigeration Products DH45 User manual