Intertek ayce User manual

BEDIENUNGSANLEITUNG |
MODE D‘EMPLOI |ISTRUZIONE D‘USO |
INSTRUCTION MANUAL
CH-Import & Distribution exklusiv durch:
Jumbo-Markt AG, 8305 Dietlikon
Technische und gestalterische Änderungen im Zuge stetiger Produktverbesserungen vorbe-
halten.
Sous réserve de modifications techniques et structurelles dans le cadre de l‘amélioration
constante des produits.
Su riserva di eventuali modifiche tecniche e strutturali derivate dal costante miglioramento
dei prodotti.
9. 2013
7613164 334404
Haushaltsluftreiniger mit HEPA und UV Lampe |
Purificateur d’air avec filtre HEPA et lampe UV |
Purificatore d’aria con HEPA e lampada UV |
Household air purifier with HEPA and UV lamp
airĕo 2013.4.1
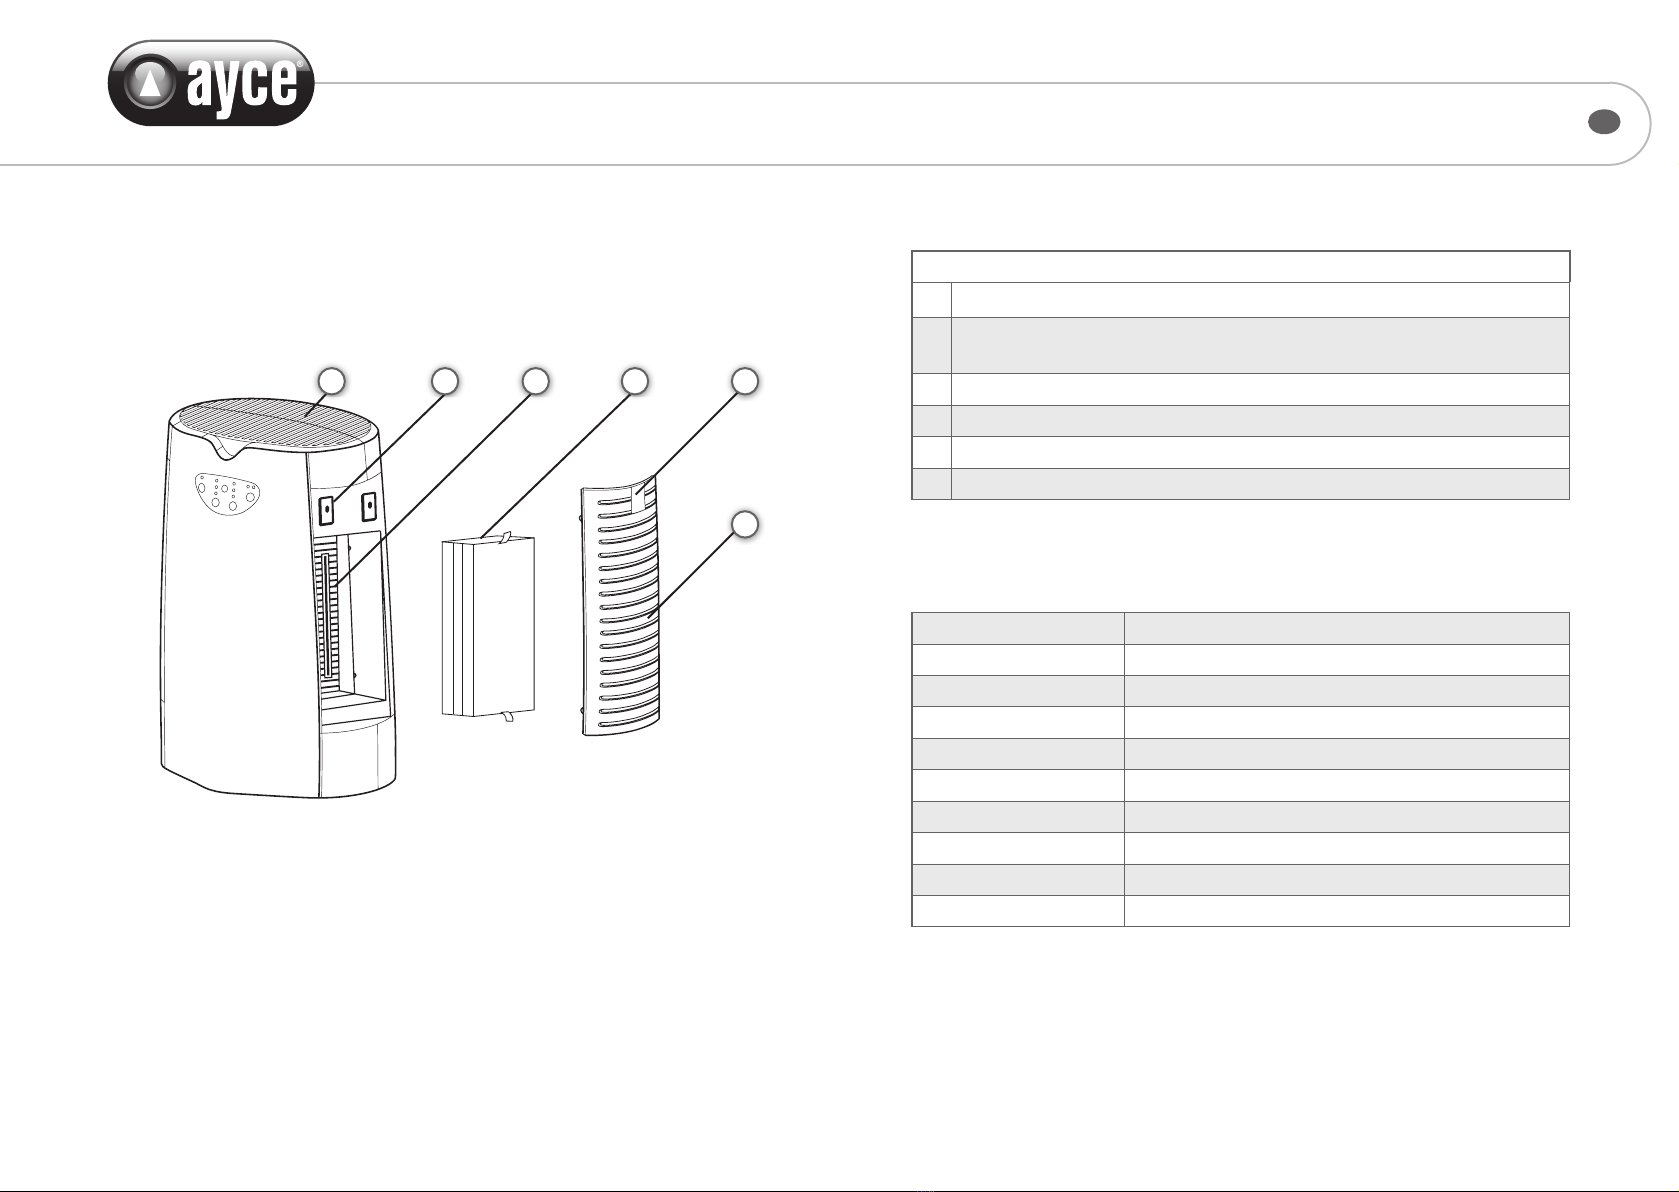
BESCHREIBUNG DES GERÄTES
02 | 03
Haushaltsluftreiniger mit HEPA und UV Lampe
1Knopf zur Önung des Filters
23 in 1 Filtermatten (1 Set)
HEPA Filter (Aussenseite)/Aktivkohlefilter (Mitte)/PCO Filter (Innenseite)
3UV Lampe (254NM), 2 Stück
4Magnetismus Matten (2 Stück)
5Luftausgang & Ionisator (Ionen-Generator ist unter dem Luftausgang)
6Lufteingang & Filterdeckel
D
Nennspannung 230 V
Nennfrequenz 50 Hz
Nennleistung 35W
Negativ-Ionen ≥ 3,0 × 10⁶ Ionen / cm³
Luftstrom max. 108 m3/h
UV Licht Wellenlänge: 254 Nanometer
Lampenlebensdauer Ca. 20.000 Stunden
Gewicht 2.9 kg
Dimensionen 28 x 20,5 x 41,5 cm
Reichweite Ca. 30 m²
TECHNISCHE DATEN
6
12345
(Bild 1)

04 | 05 D
WIE IHR HAUSHALTSLUFTREINIGER FUNKTIONIERT
a) Die schmutzige Luft tritt durch die rechte Seite in den Haushaltsluftreiniger ein.
Durch den HEPA Filter werden Partikel erfasst wie z.B. Rauch, Flusen, (Tier-)Haare,
Pollen und Staub. .
b) Der eektive HEPA Filter kann bis zu 99,97 % der Mikropartikel erfassen und bis zu
0,03 Mikron kleine Partikel einfangen.
c) Im Absorptionsdurchgang werden durch den Aktivkohlefilter Gerüche und giftige
Gase entfernt.
d) Die UV Lampe und der PCO Filter töten Bakterien und Viren und beseitigen zur
gleichen Zeit die Gerüche.
e) Zudem ist der Haushaltsluftreiniger mit einem Negativ-Ionen-Strahler ausgestattet,
der durch das elektrostatische Präzipitat die Luft weiterhin verbessert und von klei-
nen Partikeln befreit.
Saubere Luft für immer bessere Lebensqualität! Mit der Wahl unseres Haushaltsluft-
reinigers haben Sie ein spitzentechnologisches Gerät ausgewählt, das verschiedene
Luftverschmutzungen reinigen kann.
Das Gerät enthält einige Filterfunktionen: HEPA Filter, PCO Filter Aktivkohlefilter, UV
Lampe, negativ Ionisator u.s.w., die Luft wird ideal gereinigt! Das Gerät wurde sorgfältig
produziert um Ihre Zufriedenheit zu gewährleisten.
VORBEUGUNGSMASSNAHME
Stecken Sie das Gerät direkt in eine Steckdose, verwenden Sie bitte kein Verlänge-
rungskabel.
a) Schalten Sie den Haushaltsluftreiniger aus, wenn Sie das Gerät bewegen oder den
Filter wechseln/reinigen.
b) Stecken Sie keine anderen Gegenstände, wie z.B. Metallstangen in den Haushaltsluft-
reiniger.
c) Betreiben Sie den Haushaltsluftreiniger nicht, wenn Ihnen ein Zubehörteil fehlt oder
wenn es kaputt ist.
d) Dieses Gerät sollte nicht in kleinen, geschlossenen Räumen verwendet werden.
e) Nicht für den Einsatz im Freien geeignet.
f) Bewahren Sie das Gerät für Kinder unzugänglich auf.
g) Legen Sie keine Gegenstände auf dem Gerät ab.
h) Benutzen Sie den Haushaltsluftreiniger nicht im Umkreis von brennbaren Gasen.
i) Das Gerät darf nicht in Berührung mit Wasser kommen, auch bei der Reinigung darf
es nicht feucht oder nass werden.
j) Wenn das Netzkabel kaputt ist, darf es nur vom Hersteller oder einem qualifizierten
Techniker ersetzt werden.
BEDIENUNGSANLEITUNG
Lesen Sie diese Bedienungsanleitung sorgfältig durch und bewahren Sie sie gut auf.

L
M
H
2H
4H
8H
Ion
On/Off UV
06 | 07 D
Bei der Standardeinstellung ist der Ionisator eingeschaltet und die UV-Lampe ausge-
schaltet. Nach dem dritten Drücken (siehe oben) ist der Haushaltsluftreiniger wieder im
Ausgangszustand.
Wichtiger Hinweis: Bitte schalten Sie das Gerät aus und ziehen Sie den Stecker aus der
Steckdose, wenn das Gerät nicht in Betrieb ist!
DIE INBETRIEBNAHME
Überprüfen Sie das Gerät auf Transportschäden, nachdem Sie es der Verpackung
entnommen haben.
Bitte Folgendes beachten: Folgen Sie diesen Schritten, bevor Sie den Luftreiniger in
Betrieb nehmen:
a) Entfernen Sie die Kunststo-Schutzhülle von den 3- in-1- Filtermatten (HEPA,
Aktivkohle und PCO Filter), danach installieren Sie die Filter nach den Anweisungen
im Kapitel "Filterwechsel" (Seite 8).
b) Nach der Installation der Filter wählen Sie einen geeigneten Standort zur Verwen-
dung des Gerätes.
c) Schliessen Sie das Gerät an eine Steckdose an.
d) Für Details zu den verschiedenen Funktionen beachten Sie bitte das Kapitel „Bedie-
nungsfeld“ (Seite 6, 7).
PFLEGE UND REINIGUNG
Kunststogehäuse: Schmutz, Staub oder Flecken lassen sich mit einem weichen feuch-
ten Tuch und nicht kratzenden Reinigern abwischen. Bei sorgfältiger Reinigung kann
der Haushaltsluftreiniger viele Jahre verwendet werden. Der Vorfilter kann mit einem
Staubsauger von Staub befreit und auch in kaltem Wasser gewaschen werden.
WARNUNG: Die 3- in- 1 Filter Matten dürfen nicht gewaschen werden, es handelt sich
um Einwegartikel.
BEDIENUNGSFELD
1.
L
M
H
2H
4H
8H
Ion
On /Off UV
“ON / OFF“ Taste
Drücken Sie diese Taste zum Ein- oder Ausschalten des Gerätes.
2.
L
M
H
2H
4H
8H
Ion
On /Off UV
“Timer” (Schaltuhr) Taste
a) Durch Drücken dieser Taste können Intervalle von 2 Stunden, 4 Stunden oder 8 Stun-
den eingestellt werden. Der Haushaltsluftreiniger stoppt automatisch,
wenn die ausgewählte Betriebszeit abgelaufen ist.
b) Drücken Sie diese Taste
L
M
H
2H
4H
8H
Ion
On /Off UV
(Timer), um die gewünschte Betriebsdauer auszuwählen.
c) Um den kontinuierlichen Betriebsmodus auszuwählen, drücken Sie die Taste wieder-
holt, bis die gelbe Anzeige erloschen ist.
3.
L
M
H
2H
4H
8H
Ion
On /Off UV
“Speed “(Geschwindigkeits)-Taste
Die Geschwindigkeit kann geregelt werden, wenn das Gerät in Betrieb ist. Durch
erneutes Drücken der Taste
L
M
H
2H
4H
8H
Ion
On /Off UV
(Speed / ON) wird die Geschwindigkeit von L (niedrig) zu
M (mittel) bis H (hoch) gesteigert.
a) Beim Einschalten des Gerätes ist es automatisch auf Stufe L (niedrig) eingestellt.
b) Um die Geschwindigkeit zu ändern, drücken Sie die Taste
L
M
H
2H
4H
8H
Ion
On /Off UV
(Speed/ON). Die rote
LED-Lampe zeigt die ausgewählte Geschwindigkeit an.
c) Bei der ersten Verwendung sollte das Gerät erst nach 30 Minuten auf die hohe Ge-
schwindigkeit gestellt werden!
4.
L
M
H
2H
4H
8H
Ion
On /Off UV
“Ionisator und die UV “-Taste:
a) Erstes Drücken: Ionisator eingeschaltet und die UV -Lampe eingeschaltet
b) Zweites Drücken: Ionisator abgeschaltet und UV-Lampe eingeschaltet
c) Drittes Drücken: Ionisator abgeschaltet und UV-Lampe abgeschaltet

08 |09
WECHSEL DER FILTER
Bitte tauschen Sie die Filtermatten regelmässig, um eine hohe Ezienz zu gewähr-
leisten. In der Regel können die Filter für eine Laufzeit von 6 bis 12 Monaten ver-
wendet werden. Diese Lebensdauer verkürzt sich, wenn das Gerät kontinuierlich
mit hoher Geschwindigkeit in einem Raum mit hoher Verschmutzungskonzentration
verwendet wird. Die Lebensdauer erhöht sich, wenn das Gerät in einem sauberen
Umfeld mit niedriger Geschwindigkeit bedient wird. Wenn der Filter gewechselt
werden muss, erscheint auf dem Gerät eine Anzeige. Wenn die Farbe des HEPA Fil-
ters schwarz ist (siehe unten), muss der Filter gewechselt werden.
Ersetzen Akzeptabel Neu
D
Für Ersatzfiltermatten kontaktieren Sie bitte Ihre JUMBO-Filiale.
Schritt 1 Schritt 2 Schritt 3
AUSTAUSCH DER FILTER
SCHRITT 1
a) Schalten Sie das Gerät aus und ziehen Sie den Stecker aus der Steckdose.
b)Önen Sie die Filterabdeckung (siehe Bild 1).
c) Entnehmen Sie die alten Filtermatten.
SCHRITT 2
a) Packen Sie die neuen Filter sorgfältig aus, entfernen Sie die Schutzverpackung.
b) Legen Sie die neuen Filter in das Gehäuse: Der PCO Filter muss an der UV Lampe
und der HEPA Filter an der Aussenseite angebracht werden.
SCHRITT 3
Schliessen Sie die Abdeckung ( siehe Bild 3).
FEHLERBEHEBUNG
Vor der Durchführung einer der folgenden Prüfungen ziehen Sie den Stecker aus
der Steckdose.
Mangelhafter Luftstrom
Prüfen Sie, ob die Filter sauber sind.
Prüfen Sie den Ein- und Ausgang der Luft auf mögliche Blockaden.
Das Gerät startet nicht
Überprüfen Sie die Stromversorgung und elektrische Sicherungen.
Übermässiger Lärm
Prüfen Sie, ob sich im Ventilator Gegenstände befinden. Möglicherweise ist der Filter blockiert
und muss ersetzt werden.
Die Schaumsto-Dichtungen wurden falsch installiert.
Das Gerät steht schräg.
ENTSORGUNG
Gerät, Zubehör und Verpackung sollten einer umweltgerechten Wiederverwertung zuge-
führt werden.
Zum sortenreinen Recycling sind Kunststoteile gekennzeichnet.
Nicht mehr gebrauchsfähige Elektrogeräte können zum Recycling beim Handel abgegeben
werden.
Werfen Sie Elektrogeräte nicht in den Hausmüll.
Gemäss der Europäischen Richtlinie 2002/96/EG über Elektro- und Elektronik-Altgeräte
und ihrer Umsetzung in nationales Recht müssen nicht mehr gebrauchsfähige Elektrogerä-
te getrennt, gesammelt und einer umweltgerechten Wiederverwertung zugeführt werden.

DESCRIPTION DE L�APPAREIL
10 | 11
Purificateur d’air avec filtre HEPA et lampe UV
1Bouton d’ouverture du filtre
2Filtres 3 en 1 (1 set):
Filtre HEPA (extérieur)/filtre à charbon actif (centre)/filtre PCO (intérieur)
3Lampe UV (254 nm), 2 pièces
4Tapis magnétiques (2 pièces)
5Sortie d’air & ioniseur (le générateur d’ions se trouve sous la sortie d’air)
6Entrée d’air & grille
F
Tension nominale 230 V
Fréquence nominale 50 Hz
Puissance nominale 35W
Ions négatifs ≥ 3,0 °— 106 ions / cm3
Débit d’air max. 108 m3/h
Longueur d’onde des
rayons UV
254 nanomètres
Durée de vie de la lampe env. 20’000 heures
Poids 2,9 kg
Dimensions 28 x 20,5 x 41,5 cm
Rayon d’action env. 30 m2
DONNÉES TECHNIQUES
6
12345
(Figure 1)

12 | 13 F
COMMENT FONCTIONNE LE PURIFICATEUR D’AIR
a) L’air vicié est aspiré par le côté droit de l’appareil.
Le filtre HEPA capture les particules, comme par ex. la fumée, les peluches, les poils
d’animaux, les cheveux, le pollen et la poussière.
b) Ecace, le filtre HEPA réussit à capter jusqu’à 99,97% des micro-particules ainsi
que les particules jusqu’à 0,03 micron de diamètre.
c) Lors de la phase d’absorption, le filtre à charbon actif élimine les mauvaises
odeurs et les gaz toxiques.
d) La lampe UV et le filtre PCO détruisent bactéries et virus, supprimant du même
coup toute odeur désagréable.
e) De plus, le purificateur d’air est doté d’un diuseur d’ions négatifs qui, grâce à la
précipitation électrostatique, améliore encore la qualité de l’air et élimine les
particules fines.
L’air pur améliore la qualité de vie ! En optant pour notre purificateur d’air, vous avez
choisi un appareil au bénéfice d’une technologie de pointe, capable d’éliminer
diérentes sortes de pollutions ambiantes.
L’appareil dispose de plusieurs filtres : un filtre HEPA, un filtre PCO à charbon actif,
une lampe UV, un générateur d’ions négatifs, etc., ce qui lui permet de purifier
parfaitement l’air. En outre, il a été produit avec le plus grand soin afin de orir une
satisfaction maximale.
MESURES DE SÉCURITÉ
Branchez directement l’appareil dans une prise. Evitez d’utiliser une rallonge.
a) Veuillez éteindre le purificateur lorsque vous déplacez l’appareil ou que vous
changez/nettoyez le filtre.
b) Ne glissez aucun objet dans le purificateur, comme par ex. une tige métallique.
c) Ne mettez pas en service le purificateur s’il est cassé ou si un accessoire fait défaut.
d) L’appareil ne doit pas être utilisé dans des espaces fermés et exigus.
e) Le purificateur n’est pas indiqué pour une utilisation en plein air.
f) Entreposez l’appareil dans un endroit inaccessible aux enfants.
g) Ne posez pas d’objets sur l’appareil.
h) N’utilisez pas le purificateur à proximité de gaz combustibles.
i) L’appareil ne doit pas entrer en contact avec l’eau ; même lors du nettoyage, il ne doit
pas être humidifié ou mouillé.
j) Si le câble d’alimentation est hors d’usage, il ne peut être remplacé que par le
fabricant ou un technicien qualifié.
MODE D’EMPLOI
Lisez attentivement le présent mode d’emploi et conservez-le soigneusement.

L
M
H
2H
4H
8H
Ion
On/Off UV
UTILISATION
1.
L
M
H
2H
4H
8H
Ion
On /Off UV
Touche “ON / OFF “
Pressez cette touche pour démarrer ou arrêter l’appareil.
2.
L
M
H
2H
4H
8H
Ion
On /Off UV
Touche « Timer » (minuterie)
a) Cette touche vous permet de paramétrer des durées de fonctionnement de 2, 4 ou 8
heures ; le purificateur s’arrête automatiquement à la fin du temps programmé.
b) Pressez cette touche
L
M
H
2H
4H
8H
Ion
On /Off UV
pour sélectionner la durée de fonctionnement.
c) Si vous optez pour un fonctionnement continu, pressez la touche à plusieurs
reprises jusqu’à ce que le voyant jaune s’éteigne.
3.
L
M
H
2H
4H
8H
Ion
On /Off UV
Touche « Speed » (vitesse)
La vitesse peut être réglée lorsque l’appareil est en service. En opérant une pression
répétée sur la touche
L
M
H
2H
4H
8H
Ion
On /Off UV
(Speed / ON), la vitesse passe de L à M et à H.
a) Lors de la mise en marche, l’appareil est toujours programmé à la vitesse L (basse).
b) Pour modifier la vitesse, pressez la touche
L
M
H
2H
4H
8H
Ion
On /Off UV
(Speed / ON). La lampe LED rouge
vous indique la vitesse sélectionnée.
c) Lors de la première mise en marche, la vitesse H (élevée) ne doit être sélectionnée
qu’après 30 minutes d’utilisation !
4.
L
M
H
2H
4H
8H
Ion
On /Off UV
Touche « Ioniseur et UV »
a) La première pression active l’ioniseur et la lampe UV.
b) La deuxième pression éteint l’ioniseur et maintient activée la lampe UV.
c) La troisième pression éteint l’ioniseur et la lampe UV.
14 | 15 F
Paramétrage standard : à l’allumage, l’ionisateur est activé et la lampe UV éteinte.
Après la troisième pression sur la touche (voir ci-dessus), l’appareil revient à son état
initial.
Conseil important: veuillez éteindre l’appareil et ôter la prise de la fiche d’alimentation
lorsque le purificateur n’est pas en marche !
MISE EN SERVICE
Vérifiez que l’appareil n’a pas été endommagé par le transport lorsque vous le sortez
de son emballage.
Attention: veuillez respecter les étapes suivantes lorsque vous mettez en marche le
purificateur d’air :
a) Ôtez la housse de protection en plastique des trois filtres (filtre HEPA, filtre à charbon
actif et filtre PCO) ; installez ensuite les filtres en suivant les indications figurant au
chapitre « Changement des filtres » (page 8).
b) Après avoir installé les filtres, choisissez un endroit adéquat pour votre appareil.
c) Branchez l’appareil à une fiche d’alimentation.
d) Pour plus de détails sur les diérentes fonctions de l’appareil, reportez-vous au
chapitre « Utilisation » (page 6, 7).
ENTRETIEN ET NETTOYAGE
Boîtier en plastique : saleté, poussière ou taches peuvent être éliminées facilement à
l’aide d’une lingette humide et d’un détergeant non abrasif. Nettoyé avec soin, votre
purificateur d’air peut fonctionner de nombreuses années. Le pré-filtre peut être
dépoussiéré avec un aspirateur et lavé à l’eau froide.
ATTENTION: les 3 filtres ne doivent pas être lavés ; il s’agit d’articles jetables.

16 |17
CHANGEMENT DES FILTRES
Afin de garantir une ecacité maximale à votre purificateur, veuillez changer régu-
lièrement les filtres. En règle générale, leur durée d’utilisation est de 6 à 12 mois.
Cette durée se réduit si l’appareil fonctionne en permanence à haute vitesse dans
un espace fortement pollué. Elle s’accroît en revanche lorsque l’appareil est utilisé
à vitesse réduite dans un environnement sain. Un voyant lumineux vous indique que
le filtre doit être changé. Lorsque la couleur du filtre HEPA devient noire
(voir ci-dessous), celui-ci doit être remplacé.
F
REMPLACEMENT DES FILTRES
Etape 1
a) Eteignez l’appareil et retirez la prise de la fiche d’alimentation.
b) Enlevez la grille (voir illustration 1).
c) Ôtez les anciens filtres.
Etape 2
a) Déballez soigneusement les nouveaux filtres ; ôtez les housses de protection.
b) Placez les nouveaux filtres dans le boîtier: le filtre PCO doit être mis en place
avant la lampe UV et le filtre HEPA placé à l’extérieur.
Etape 3
Refermez la grille (voir illustration 3).
CORRECTION D’ERREURS
Avant de procéder aux vérifications suivantes, veuillez retirer la prise de la fiche
d’alimentation.
Débit d’air défectueux
Vérifiez la propreté des filtres.
Vérifiez l’entrée et la sortie d’air afin d’identifier d’éventuels blocages.
L’appareil ne démarre pas
Vérifiez l’alimentation électrique et les fusibles.
L’appareil est trop bruyant
Vérifiez la présence d’objets dans le ventilateur. Il est possible que le filtre soit bloqué ou
qu’il doive être remplacé.
Les joints d’étanchéité en mousse ont été mal installés.
L’appareil est dans une position inclinée.
Remplacer Acceptable Nouveau
Pour obtenir des filtres de rechange, veuillez contacter votre filiale JUMBO.
ELIMINATION
La valorisation des appareils, accessoires et emballages doit être eectuée dans le respect
de l’environnement.
Afin de faciliter le tri sélectif, les parties en plastique ont été indiquées.
Les appareils électriques hors d’usage peuvent être rapportés dans les commerces pour
recyclage.
Ne jetez pas les appareils électriques dans les déchets ménagers.
Conformément à la directive européenne 2002/96/CE relative aux déchets d’équipements
électriques et électroniques (DEEE) et à son application dans le cadre du droit national, les
appareils électriques hors d’usage doivent être triés, collectés et valorisés dans le respect
de l’environnement.
Etape 1 Etape 2 Etape 3

18 | 19 I
DESCRIZIONE DELL’APPARECCHIO
Purificatore d’aria con HEPA e lampada UV
1Bottone di rilascio per l’apertura del filtro
2Elemento del filtro 3 in 1 (1 set)
Filtro HEPA (parte esterna) / Filtro a carboni attivi (parte centrale) / Filtro PCO (parte interna)
3Lampada UV (254 nm), 2 pezzi
4Tappeto magnetico, 2 pezzi
5Uscita dell’aria e ionizzatore (lo ionizzatore si trova sotto l’uscita dell’aria)
6Entrata dell’aria e coperchio del filtro
Tensione nominale 230 V
Frequenza nominale 50 Hz
Potenza nominale 35W
Ioni negativi ≥ 3,0 x 10⁶ ioni / cm3
Portata d’aria max. 108 m3/h
Luce UV Lunghezza d’onda: 254 nanometri
Durata di vita della lampada
Ca. 20.000 ore
Peso 2,9 kg
Dimensioni 28 x 20,5 x 41,5 cm
Raggio d’azione Ca. 30 m²
DATI TECNICI
6
12345
(Figure 1)

20 | 21 I
COME FUNZIONA IL PURIFICATORE D’ARIA
a) L’aria sporca entra nel purificatore dal lato destro. Il filtro HEPA cattura sostanze
quali fumo, lanugine, capelli, peli di animali, pollini e polvere.
b) L’ecace filtro HEPA è in grado di catturare fino al 99,97 % delle microparticelle
di soli 0,03 micron.
c) Nel processo di assorbimento attraverso i carboni attivi, vengono eliminati odori
e gas velenosi.
d) La lampada UV e il filtro PCO uccidono batteri e virus e, allo stesso tempo,
distruggono gli odori.
e) Il purificatore, inoltre, è dotato di uno ionizzatore in grado di emettere ioni negativi,
che, attraverso il precipitato elettrostatico, migliorano ulteriormente la qualità
dell’aria liberandola dalle particelle più piccole.
Aria pulita per una qualità di vita migliore! Scegliere il nostro purificatore significa
avvalersi di un apparecchio tecnologicamente avanzato, in grado di eliminare dall’aria
varie sostanze nocive.
L’apparecchio presenta diverse funzioni di filtro: il filtro HEPA, il filtro ai carboni attivi,
la lampada UV, lo ionizzatore, ecc. purificano l’aria in maniera ottimale! L’apparecchio è
stato prodotto con cura nell’ottica di garantire la soddisfazione dei clienti.
PRECAUZIONI PER L’USO
Collegare l’apparecchio direttamente alla presa della corrente, senza utilizzare
prolunghe.
a) Spegnere il purificatore d’aria per spostarlo o per la sostituzione e la pulizia del filtro.
b) Non inserire oggetti come asticelle di metallo nelle aperture del purificatore.
c) Non utilizzare il purificatore d’aria se un pezzo manca o è guasto.
d) Si consiglia di non utilizzare l’apparecchio in spazi piccoli o chiusi.
e) Non adatto ad essere utilizzato all’aperto.
f) Tenere fuori dalla portata dei bambini.
g) Non posare oggetti sull’apparecchio.
h) Non utilizzare il purificatore nelle vicinanze di gas infiammabili.
i) L’apparecchio non può entrare in contatto con l’acqua. Anche durante la pulizia,
non può essere bagnato né inumidito.
j) Qualora si dovesse rendere necessario sostituire il cavo di alimentazione,
si raccomanda di rivolgersi al produttore o a un tecnico qualificato.
ISTRUZIONI D’USO
Leggere attentamente e conservare con cura queste istruzioni d’uso.

L
M
H
2H
4H
8H
Ion
On/Off UV
COMANDI E SPIE DI CONTROLLO
1.
L
M
H
2H
4H
8H
Ion
On /Off UV
Tasto “ON / OFF”
Premere questo tasto per accendere e spegnere l’apparecchio.
2.
L
M
H
2H
4H
8H
Ion
On /Off UV
Tasto “Timer” (temporizzatore)
a) Con questo tasto è possibile programmare intervalli di 2, 4 o 8 ore. Il purificatore si
arresta automaticamente quando l’intervallo di funzionamento scelto è terminato.
b)
Premere questo tasto
L
M
H
2H
4H
8H
Ion
On /Off UV
(Timer) per scegliere la durata di funzionamento desiderata.
c) Per scegliere la modalità di funzionamento continua, tenere premuto il tasto finché
non si spegne la spia gialla.
3.
L
M
H
2H
4H
8H
Ion
On /Off UV
Tasto “Speed” (velocità)
Quando l’apparecchio è in funzione è possibile regolare la velocità. Premendo il tasto
L
M
H
2H
4H
8H
Ion
On /Off UV
(Speed/ON) è possibile aumentare la velocità da L (bassa) a M (media) fino a H (alta).
a)
All’accensione, l’apparecchio si imposta automaticamente sul livello L (bassa velocità).
b) Per cambiare la velocità premere il tasto
L
M
H
2H
4H
8H
Ion
On /Off UV
(Speed/ON). La spia a LED rossa
mostra la velocità selezionata.
c) Al primo utilizzo è possibile impostare una velocità elevata solo dopo 30 minuti!
4.
L
M
H
2H
4H
8H
Ion
On /Off UV
Tasto “Ionizzatore e UV”
a) Premere una volta per accendere sia lo ionizzatore sia la lampada UV.
b) Premere due volte per spegnere lo ionizzatore e accendere la lampada UV.
c) Premere tre volte per spegnere sia lo ionizzatore sia la lampada UV.
22 | 23 I
L’impostazione standard prevede che lo ionizzatore sia acceso e la lampada UV sia
spenta. Dopo aver premuto il tasto per tre volte (si veda sopra), il purificatore ritorna
all’impostazione iniziale.
Importante: quando l’apparecchio non è in funzione, spegnerlo e scollegarlo dalla
presa della corrente!
ATTIVAZIONE
Dopo aver rimosso la confezione, controllare che l’apparecchio non si sia danneggiato
durante il trasporto.
Attenzione: osservare la seguente procedura prima di mettere in funzione il purificatore.
a) Rimuovere l’involucro protettivo in plastica dall’elemento di filtro 3 in 1
(HEPA, carboni attivi e PCO), quindi installarlo seguendo le istruzioni del capitolo
“Sostituzione del filtro” (pagina 8).
b) Una volta installato il filtro, scegliere un luogo adatto per utilizzare l’apparecchio.
c) Collegare l’apparecchio alla presa della corrente.
d) Per i dettagli relativi alle diverse funzioni, si rimanda al capitolo “Comandi e spie
di controllo” (pagine 6, 7).
MANUTENZIONE E PULIZIA
Rimuovere sporco, polvere o eventuali macchie all’esterno dell’apparecchio con un
panno morbido inumidito, senza utilizzare detergenti aggressivi. Se l’apparecchio viene
pulito accuratamente, può essere utilizzato per molti anni. È possibile rimuovere la
polvere dal pre-filtro utilizzando un aspirapolvere o lavandolo con acqua fredda.
ATTENZIONE: non lavare il filtro 3 in 1 in quanto si tratta di un prodotto monouso.

24 |25 I
CAMBIO DEL FILTRO
Cambiare regolarmente il filtro per garantire un funzionamento ottimale. General-
mente i filtri possono essere impiegati per un periodo di 6-12 mesi. La durata dei
filtri si riduce se l’apparecchio viene ripetutamente utilizzato a un’alta velocità in una
stanza con un’elevata concentrazione di particelle inquinanti, mentre aumenta se
l’apparecchio viene utilizzato in un ambiente pulito e impostando una bassa velocità.
Se occorre cambiare il filtro, sull’apparecchio si accende una spia. Se il filtro HEPA è
nero (si veda sotto), è necessario cambiare il filtro.
Per la sostituzione del filtro, contattare la filiale JUMBO.
SOSTITUZIONE DEL FILTRO
FASE 1
a) Spegnere l’apparecchio e scollegarlo dalla presa della corrente.
b) Aprire il coperchio del filtro (immagine 1).
c) Rimuovere il filtro vecchio.
FASE 2
a) Disimballare delicatamente il nuovo filtro e rimuovere l’involucro protettivo.
b) Installare il nuovo filtro: il filtro PCO va montato sulla lampada UV e il filtro
HEPA sul lato più esterno.
FASE 3
Chiudere il coperchio (immagine 3).
RISOLUZIONE DEI GUASTI
Prima di eettuare le seguenti operazioni, scollegare l’apparecchio dalla presa
della corrente.
Flusso d’aria insuciente
Verificare che i filtri siano puliti.
Rimuovere eventuali oggetti che ostacolano l’entrata o l’uscita dell’aria.
Non è possibile avviare l’apparecchio
Verificare l’alimentazione elettrica e l’integrità dei fusibili.
Rumore eccessivo
Verificate che non ci siano oggetti nel ventilatore. Probabilmente il filtro non funziona e deve
essere sostituito.
Le guarnizioni in materiale espanso non sono state installate correttamente.
L’apparecchio è in posizione inclinata.
SMALTIMENTO
Per garantire la protezione dell’ambiente, è possibile riciclare l’apparecchio, gli accessori
e la confezione.
Per consentire un riciclaggio mirato, le parti in plastica sono contrassegnate.
Le apparecchiature elettroniche non più idonee all’uso possono essere riciclate reimmet-
tendole sul mercato.
Le apparecchiature elettroniche non possono essere gettate nei rifiuti domestici.
Conformemente alla direttiva europea 2002/96/CE sui rifiuti di apparecchiature elettriche
ed elettroniche, recepita nel diritto nazionale, per garantire la protezione dell’ambiente è
prevista la separazione, la raccolta e il riciclaggio degli apparecchi elettronici inutilizzati.
Da cambiare Accettabile Nuovo
Fase 1 Fase 2 Fase 3

DESCRIPTION OF THE UNIT
26 | 27
Household air purifier with HEPA and UV Lamp
1Handle to open the filter
23 in 1 filter pads (1 set)
HEPA filter (outside)/Active carbon filter (middle)/PCO Filter (inside)
3UV Lamp (254NM), 2 pieces
4Magnetic pads (2 pieces)
5Air outlet & Ionizer (Ion generator is below the air outlet)
6Air inlet & Filter cover
GB
Rated Voltage 230 V, 50 Hz
Rated Power 35W
Negative Ion ≥ 3,0 × 10⁶ Ionen / cm³
A i r fl o w 108 m3/h (high)
UV Light Wavelength: 254nanometers
Lamp life Approx. 20,000 hours
Weight 2.9 kg
Dimensions 28 x 20,5 x 41,5 cm
Coverage Area Approx. 30 m2
TECHNICAL SPECIFICATIONS
6
12345
(Figure 1)

28 | 29 GB
HOW YOUR AIR PURIFIER WORKS
a) Dirty air is drawn through the right-hand side of the unit. It then passes through the
HEPA filter which captures particles such as smoke, flu, pollen, dust and animal hair
etc.
b) The eective HEPA filter can remove up to 99.97% of the micro particles and is able to
trap particles as small as 0.03 microns.
c) The active carbon filter removes odours and toxic gases through its absorption process.
d) The UV lamp and PCO filter can kill the bacteria and viruses while breaking down the
odours at the same time.
e) The unit is equipped with a negative ion emitter, which further enhances the cleaning
of the air through the electrostatic precipitation of small airborne particles.
Purified air for your enhanced comfort and safety! By choosing our air purifier, you
have selected a unit that features cutting-edge technology for combating all forms of
airborne pollution.
Incorporating various stages of filtration: HEPA filter, PCO filter, active carbon filter, UV
lamp, negative ionizer etc., this unit provides you with a source of superior air quality.
This unit has been manufactured with care and will guarantee your complete satisfac-
tion if used according to the guidelines provided in this manual.
SAFETY PRECAUTIONS
Always plug the unit into a wall outlet, never use an extension cord.
a) Switch o and unplug the air purifier each time that you move/clean the unit or
change the filter.
b) Do not insert foreign objects, such as metal rods, into the air purifier.
c) Do not operate the air purifier if there is a component missing or if it is damaged.
d) This unit should not be used in a small enclosed space.
e) This unit is not intended for outdoor use.
f) Never allow children to play with the air purifier. They may also not place objects on
the unit.
g) Never use the air purifier in the presence of flammable gases.
h) The unit may never come into contact with water, even when cleaning it.
i) If the power cord is damaged, it should be replaced by the manufacturer or by a qua-
lified person.
INSTRUCTION MANUAL
Please read this manual carefully and keep it in a safe place for future reference.

L
M
H
2H
4H
8H
Ion
On/Off UV
CONTROL PANEL
1.
L
M
H
2H
4H
8H
Ion
On /Off UV
“ON / OFF“ Button
Press this button to turn on or switch o the unit.
2.
L
M
H
2H
4H
8H
Ion
On /Off UV
“Timer” Button
a) By pressing this button, the purifier can operate for intervals of 2, 4 or 8 hours, stop-
ping automatically when the selected operating time has elapsed.
b) Press this button
L
M
H
2H
4H
8H
Ion
On /Off UV
(Timer) to select the required operating time. A warning light
automatically indicates the remaining operating time.
c) To select the continuous operating mode, press the button repeatedly until there are
no further indicator lights.
3.
L
M
H
2H
4H
8H
Ion
On /Off UV
“Speed“ Button
The fan speed of the unit can be adjusted when the unit is in operation. Each time that
you press the
L
M
H
2H
4H
8H
Ion
On /Off UV
(SPEED/ON) button, the speed is adjusted from L (low) to M (medium)
to H (high).
a) When the unit is switched on, it is automatically positioned in L (low) mode.
b) To change this speed, press the
L
M
H
2H
4H
8H
Ion
On /Off UV
(SPEED/ON) button again. The red LED light indi-
cates the selected speed.
c) We suggest the use of high speed setting for the first 30 minutes of usage.
4.
L
M
H
2H
4H
8H
Ion
On /Off UV
“Ionisator and UV“ Button:
a) 1st press: Ionizer and UV lamp on.
b) 2nd press: Ionizer o and UV lamp on.
c) 3rd press: Ionizer o and UV lamp o.
30 | 31 GB
The default setting is Ionizer on and UV lamp o. The purifier will be set back to the
default setting after you press the button more than 3 times.
Important note: When the unit is not in use, please switch it o and unplug it.
PRE-OPERATING INSTRUCTIONS
When removing the unit from the packing, check for any shipping damage.
PLEASE FAMILIARISE YOURSELF WITH THE FOLLOWING PROCEDURES BEFORE OPE-
RATING YOUR NEW AIR PURIFIER.
a) Remove the plastic protective wrap from the for 3-in-1 filter pads (HEPA, active
carbon and PCO filters). After removing the protective wrap, re-install the filters in
accordance to the instructions set out in the “filter replacement” section.
b) After installing the filters, choose a suitable location to position the unit.
c) Plug the unit in.
d) See “control panel” section for details on the various features.
CARE AND CLEANING
Plastic housing – Dirt, dust or spots can be wiped away with a damp soft cloth and non-
abrasive cleaner. Treated with care, this high quality air purifier will retain its attractive
appearance for many years.
The pre-filter can be cleaned with a vacuum cleaner and can also be washed in cold
water.
WARNING: Do not wash the 3-in-1 filter pads; they are disposable items.

32 |33
FILTER REPLACEMENT
To keep your unit operating at strong eciency, the set of filter pads should be
replaced regularly. The filter can last from 6 to 12 months under normal conditions
of usage. If the unit is used continuously on high speed in a room with a strong con-
centration of contaminants, the service life of the filter will be shortened. The life of
the filter will be prolonged when used in a clean environment, mainly operating at
lower speeds.
The unit has a filter replacement label to indicate the replacement time. If the colour
of HEPA filter changes to black, like below (replacement level), then please change
the filter promptly.
Replacement level Accepted level Better level
For replacement filters, please contact your nearest JUMBO location.
GB
REPLACING THE FILTER
STEP 1
a) Switch o and unplug the unit.
b) Open the filter cover by the handle (see Step 1).
c) Take out the old filter pads.
STEP 2
a) Carefully unpack the new filters, removing the protective wrap.
a) Place the new filters into the housing compartments: the PCO filter needs to face
the UV lamp and the HEPA filter needs to face outward.
STEP 3
The unit has a full set of magnet pads, so that it is easy to close.
TROUBLESHOOTING GUIDE
Before carrying out any of the following service checks, unplug the unit.
Insucient air flow
Check that the filters are clean.
Check for any obstructions in the air inlet and outlet.
Unit will not start
Check the power supply and electric fuses.
Excessive noise
Check for any foreign objects in contact with the fan.
The filter may be clogged and in need of replacement.
The foam sealing gaskets have been installed incorrectly.
The unit is unevenly positioned.
DISPOSAL
The unit, accessories and packaging are all to be disposed of in an environment-friendly
way.
Plastics are marked, to advocate sorted recycling.
Electronics that are inoperable, can be brought to stores for recycling.
Do not throw electronic devices into the household waste.
According to the EU Guideline 2002/96/EG pertaining to electronic devices, all inoperable
devices must be disposed of bundled, and in an environmentally friendly manner.
Step 1 Step 2 Step 3

34 |35
Table of contents
Languages:


