Intimus 331 User manual

intimus International GmbH
Bergheimer Straße 6-12
88677 Markdorf
Germany
www.intimus.com
95506 2 08/19
intimus 331
Instructions for Guillotine
Manual pentru Ghilotina
UK
ROM
intimus 363
intimus 960
(optional with stand)
intimus 331
DP 19028
DP

intimus 331
RO
GB
Principalele parti ale ghilotinei
1. Protectie din plastic
2. Presator manual
3. Portalama
4. Suruburi
5. Rigla de ghidare fixa
6. Rigla de ghidare mobila
7. Lama
8. Contralama
9/10. Surub-Piulita
11. Protectie suplimentara
Main parts of the guillotine
1. Plexiglass
2. Hand press
3. Blade holder
4. Screws
5. Fixer ruler
6. Moveable ruler
7. Blade
8. Contra blade
9/10. Tightening screw-Nut
11. Clamp
IMPORTANT:
Before using the Guillotine, fix and never remove the plexiglass guard which
comes provided (1).
When the machine is not used, keep the blade down in a closed position.
If the blade doesn`t stay up due to the wear of the fulcrum, adjust by tightening
the screw (9) and the nut (10).
IMPORTANT:
Inainte de utilizarea ghilotinei, fixati si nu indepartati niciodata protectia
transparenta din plexiglas (1), care este furnizata odata cu ghilotina .
Cand ghilotina nu se foloseste pastrati lama in pozitie inchisa ( lama in jos).
Daca, datorita uzurii fulcrului, lama nu ramane ridicata, se va efectua
strangerea surubului (9) si piulitei (10) pentru ajustare.
GB RO
GB
RO
9
10
11
B
A
5
6
1
3
7
4
2
8
C

intimus 331
L
K
M
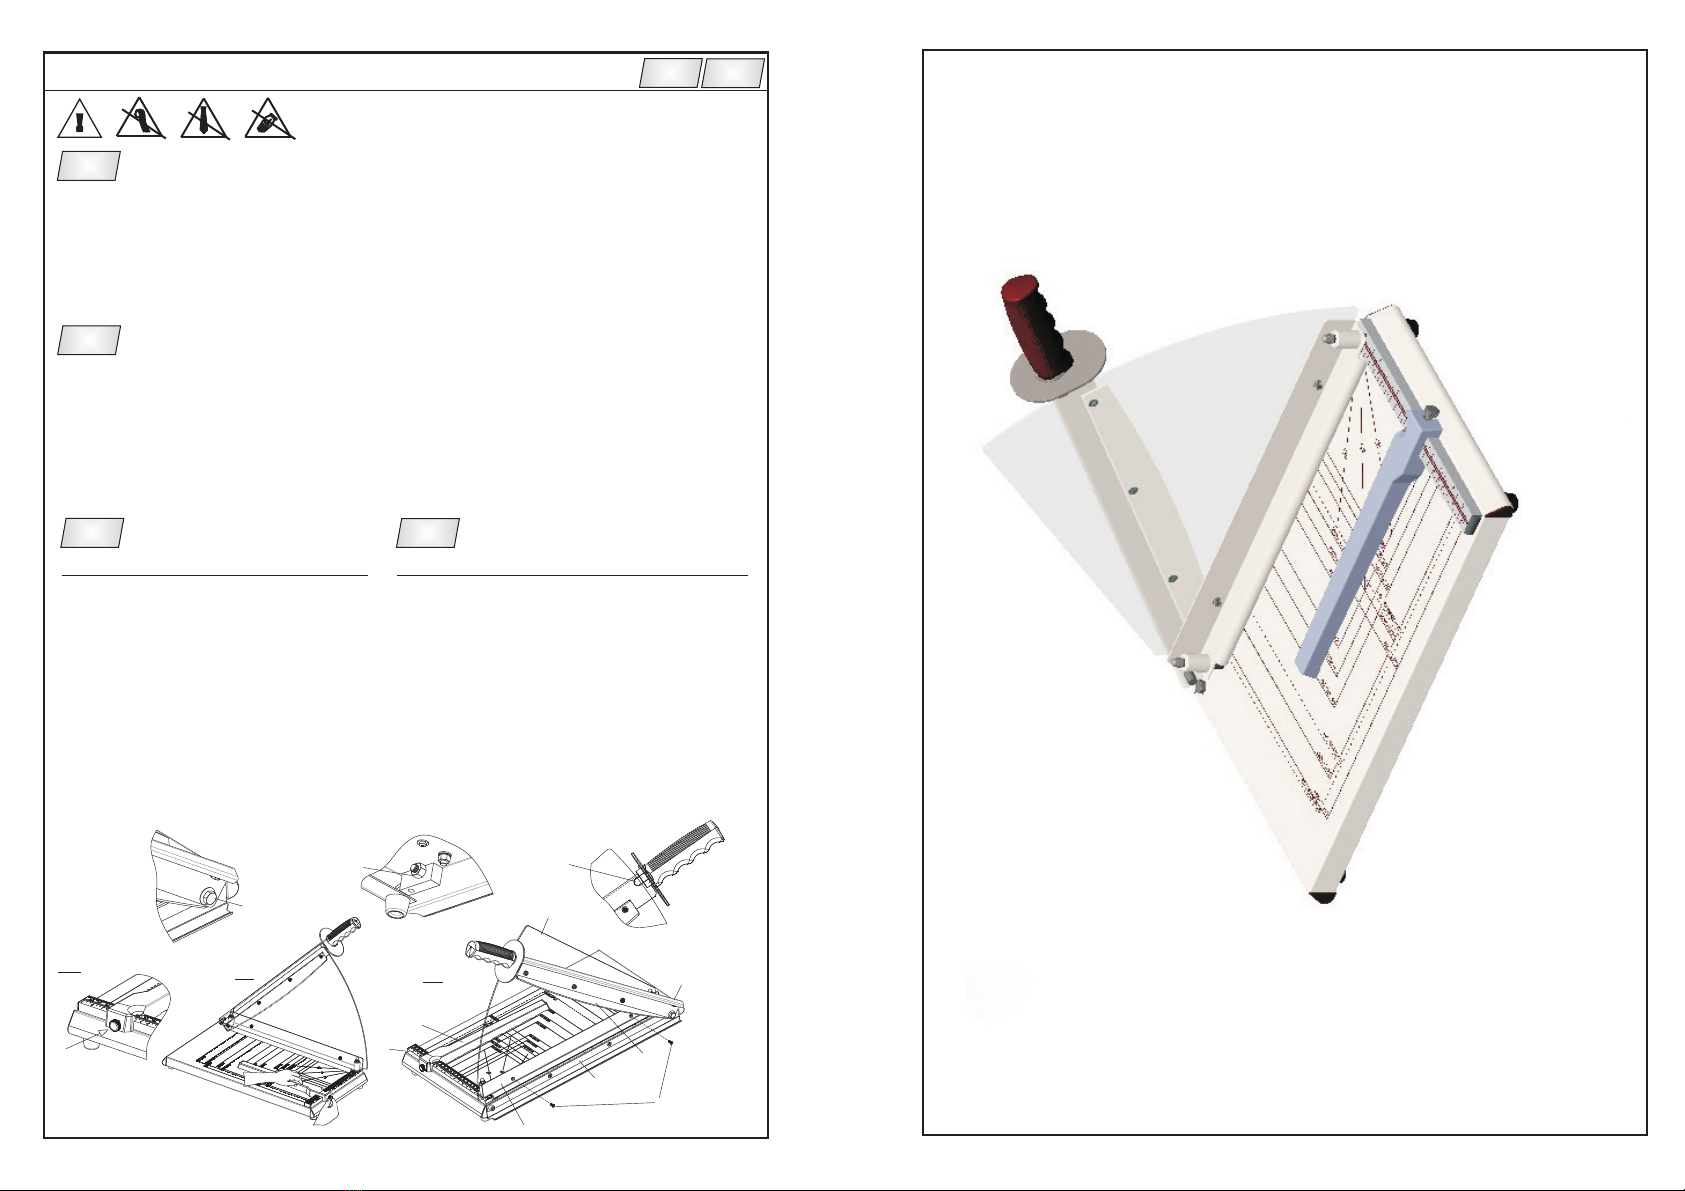
Maintenance of the blade and the counter blade
GB
Ghilotina estedestinata pentru taierea hartiei* ; orice alt material poate
conduce la uzura prematura a lamei si contralamei sau a deteriorarii
muchiilor taietoare.
Intretinerea periodica a lamei si contralamei se face prin curatarea
acestora initial cu o carpa moale si uscata dupa care se vor unge
suprafete cu ulei conform Fig. K, M si L;se va evita curatarea lamei sau
controlamei cu apa sau cu alti agenti de curatare;
* - pentru alte materiale in afara hartiei (carton, folie laminata, textile,
etc.) se va contacta Departamentul Tehnic.
Intretinerea lamei si contralamei
RO
RO
GB
The guillotine is to be used for cutting paper*; any other material may
lead to the premature usage of the blade and counterblade or to the
damage of the cutting edges.
The periodical maintenance of the blade and counterblade is to be
made by cleaning them first with a soft and dry material and after that
the surfaces are to be greased with oil as for the Fig. K, M and L; avoid to
clean the blade or the counterblade with water or with any other
cleaning agents.
* - for any other material beside paper (cardboard,laminated foil, textile,
etc.) contact our Tehnic Department.
ASSEMBLY
USE
MAINTENANCE
TECHNICAL DETAILS
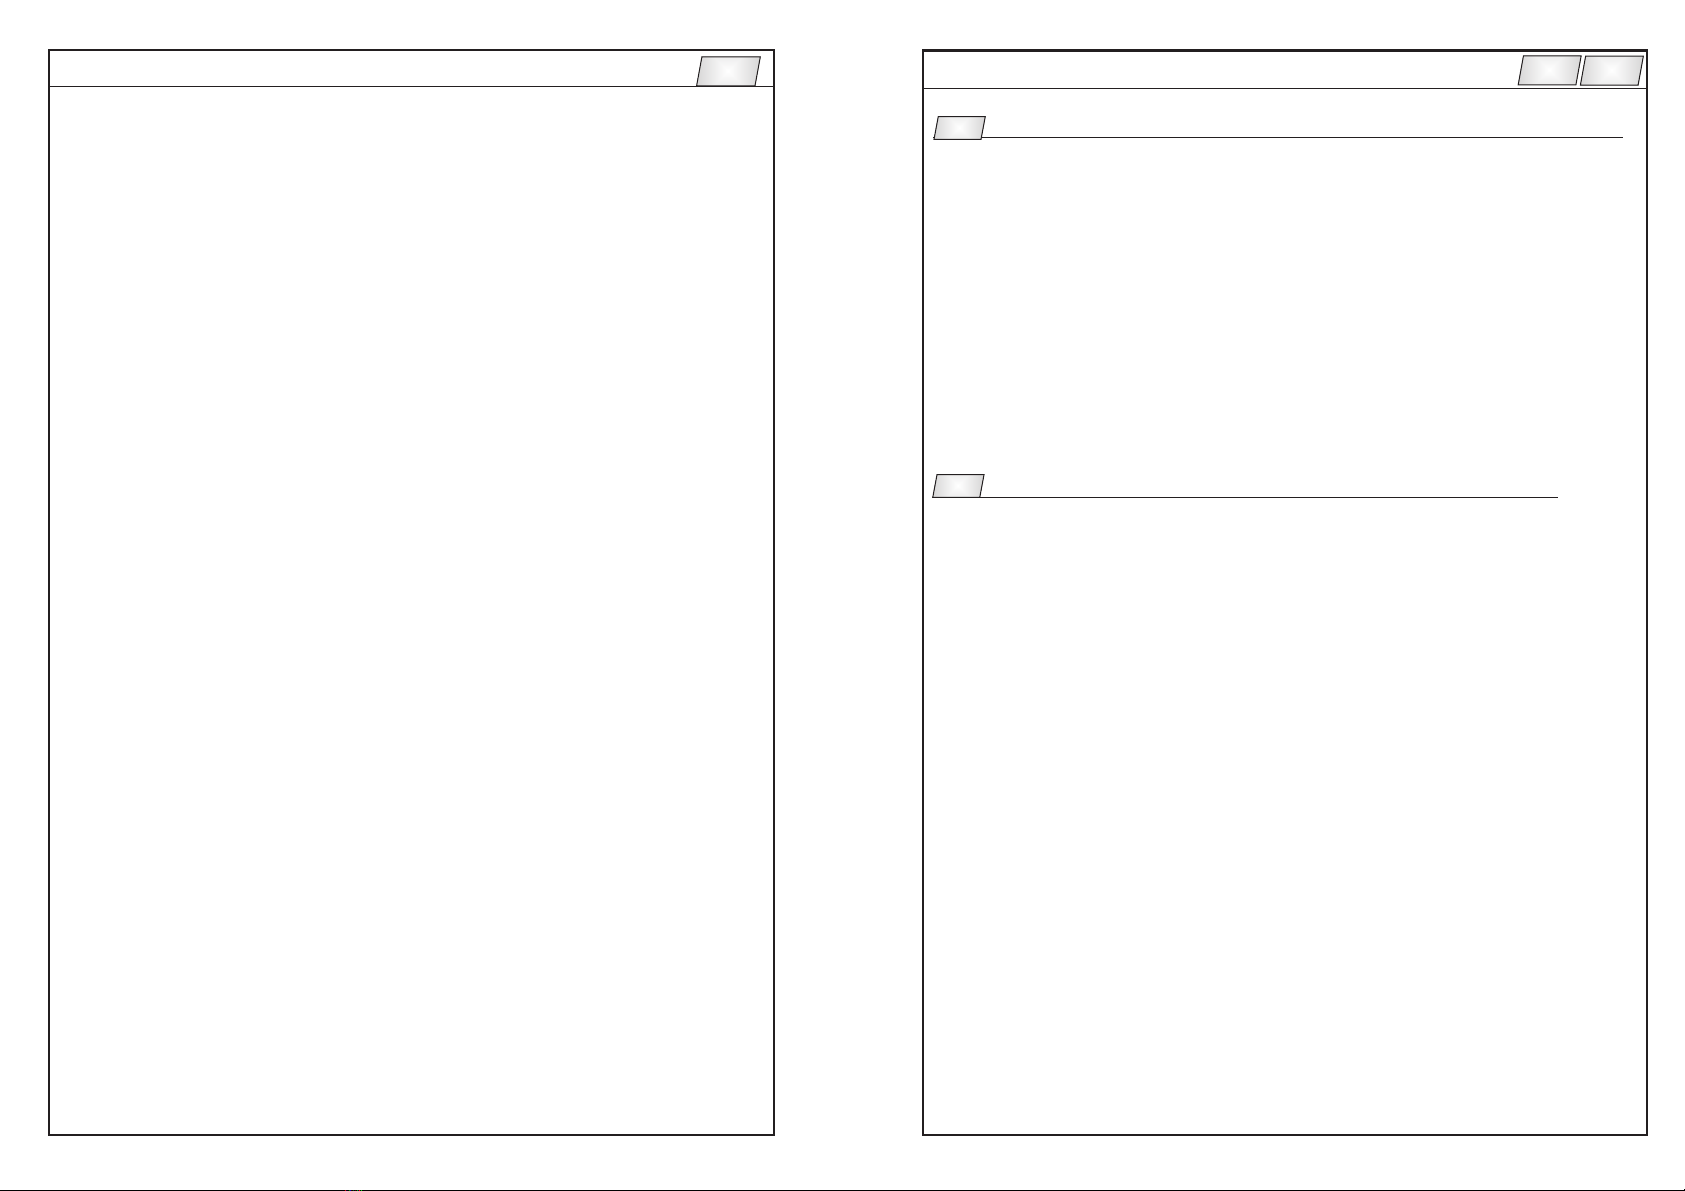
Unscrew the two screws from the hand press (2) and remove the paper
sheets from the protection which is in plexiglass (1), position the latter
between the casing and the blade holder (3), raise the blade holder and
fasten the protection rescrewing the two screws (4) - See fig.A.
Avoid lightening the screws with too much force because this could lead
to damage the plexiglass. Make sure the plexiglass is well positioned in the
guide (11) which is already mounted on the blade holder .
Place the equipment on a horizontal surface with enough space for the
four supporting feet. Raise the blade to the maximum. Slide the paper
under the press device aligning it against the fixed ruler (5) and if necessary
against the moveable ruler (6) stopping at the desired measurement and
tightening the appropriate knob. ( See figure B-C ).
For the UNI format cut refer to the silk screen on the base. After having
positioned the material for cutting, keep the press device down to fix the
paper and performing the cutting.
This model does not require any particular attention, it is however advisable
to wipe the blade (7) and the counter blade (8), with a cloth lightly soaked
in vaseline
For the general cleaning of the equipment use non abrazive polishing
products witch give a good luster.
Cutting width : 3 mm
Dimensions : with equipment assembled
.
Safety measures :
For spare parts and general assistance refer to the machine model and the
identification code under its base.
The cleaning products do not contain alcohol.
Cutting length : 330 mm
Cutting capacity : 20 sheets (80 gr/m ) or 24 sheets (70 gr/m )
Paper press system : manual
L 554 x l 286 x H 440 mm
Net weight : 3,2 kg
anatomical anti-slide handle, hand protection
in plexiglass.
2 2
intimus 331
GB

ASAMBLARE
UTILIZARE
INTRETINERE
DATE TEHNICE
Desfiletati cele doua suruburi (4) de pe sistemul de presare (2) si
indepartati folia protectoare de pe plexiglas, pozitionati-l pe acesta din
urma intre sistemul de presare si portlama (3), ridicati portlama si fixati
protectia infiletand cele doua suruburi (4) - Vezi fig.A.
Evitati sa strangeti puternic cele doua suruburi, deoarece riscati
craparea protectiei din plexiglas.
Asigurati-va ca la montare protectia din plexiglas este asezata exact
intre portlama si protectia suplimentara (11) deja existenta pe
portlama.
Pozitionati ghilotina pe o suprafata orizontala cu suficient spatiu pentru
cele 4 picioruse de sustinere.
Ridicati lama pana la capatul cursei sale. Asezati hartia sub presatorul
manual, pozitionati-o intre rigla de ghidare fixa (5) si rigla de ghidare
mobila (6), blocand la dimensiunea dorita prin insurubarea surubului
de fixare special (vezi fig. B-C).
Pentru taierea la formate UNI trebuie respectate formatele serigrafiate
pe baza ghilotinei. Dupa ce s-a pozitionat materialul pentru taiere, se
preseaza manual sistemul de presare si se executa taierea.
Acest model nu necesita intretinere speciala, dar este recomandabil
ca periodic sa stergeti lama (7) si contralama (8) cu o bucata de
material inmuiata in putina vaselina. Pentru curatarea generala a
ghilotinei trebuie utilizate produse de curatare neabrazive care dau
luciu. Produsele de curatare sa nu contina alcool.
Lungimea de taiere : 330 mm
Capacitatea de taiere : 20 coli or 24 coli
Grosimea de taiere : 3 mm
Sistem de presare a hartiei : manual
Dimensiuni de gabarit : L 554 x l 286 x H 440 mm cu echipamentul
asamblat
Greutatea neta : 3,2 kg
Masuri de siguranta :
Pentru piese de schimb si asistenta generala, faceti referire la modelul
masinii si codul de identificare aflat sub baza acesteia.
(80 gr/m ) (70 gr/m )
maner cu forma anatomica, antialunecare,
protectia mainii din plexiglas.
2 2
intimus 331
RO
intimus 331
Note importante dupa montarea lamei si contralamei
RO
Pentru a avea o taiere optima trebuie ca dupa montajul manerului cu
lama pe bazament sa se execute cateva miscari circulare in directia si
sensul prezentat in fig.L. Miscarea incepe din pozitia de sus - Fig.L-pct.a;
Se coboara portamala printr-o miscare circulara dupa un arc de cerc
fara a se solicita maneta cu forta - Fig.L-pct.b.
Se preseaza lama pe contralama cu mentinerea fortei pana se ajunge
in pozitia de sus - Fig.L-pct.c si d.
Atentie!
Daca nu se respecta indicatiile prezentate mai sus se poate ajunge la
scaderea efectului de taiere sau deteriorarea muchiilor taietoare.
Important notes after assembling the blade and the counterblade
GB
For having an optimum cut after installing the handle with blade on the
basament must be executed some circular movements in the direction
and sense given in fig. L.
The blade holder descents witch a circular movement without requiring
a forced hand lever.The blade is pressed on the counterblade by
maintaining the force until is reached the top position
Attention!
If the indication above are not respected the cutting effect can be
decreased or the cutting edges can be damaged.
Movement start from up - Fig.L-pct.a.
- Fig.L-pct.c and d
RO
GB

intimus 331
RO
GB
J
K
L
a
b
c
d
10
intimus 331
RO
GB
DE
THE SETTING OF THE
REGLAJUL PORTALAMEI
BLADE HOLDER
The Free fall of the hand lever or the reduction of the cutting effect
resulted by the wear in time of the blade and the counter blade can be
reshuffled trough the following steps:
Unscrew of the nut Fig. D-pos.10;
Tightening the screw Fig. E-pos.9;
Tightening of the nut and introducing the cover Fig. F-pos.10.
After tightening, the hand lever with the blade must remain lifted and his
manipulation must be made without any effort.
a.
b.
.C
The setting of the blade holder
GB
Caderea libera a manerului sau reducerea efectului de taiere rezultat
prin uzura in timp a lamei si contralamei poate fi remaniata prin
parcurgerea urmatoarelor faze de lucru :
Desfacerea piulitei - Fig.D -poz.10 ;
Strangerea surubului - Fig.E-poz.9;
Strangerea piulitei - Fig.F-poz.10 .
Dupa strangere, manerul cu lama trebuie sa ramana ridicat iar
manipularea acestuia sa fie facuta fara efort.
a.
b.
c.
Reglajul portalamei
RO
F
10
9

intimus 331
Pentru demontarea si montarea contralamei se va respecta ordinea si
procedeul prezentat in fig.J, K si L cu atentionarea ca la montarea
contralamei muchia taietoare trebuie sa fie aliniata cu suprafata
bazamentului.
Daca muchiile taietoare ale lamei sau contralamei prezinta ciobituri sau
uzura, taierea nu mai poate fi efectuata in parametrii optimi, fapt pentru
care acestea trebuiesc schimbate sau reascutite.
Demontarea lamei (fig.G,H si I) sau a contralamei (fig.J si K) se face dupa
cum urmeaza :
:
1. Indepartarea protectiei din plastic (fig.G.-poz.1);
2. Desurubarea piulitei ( fig.D-poz.10);
3. Separarea manerului (cu lama) de basament (fig.H);
4. Demontarea lamei de maner (fig.I).
:
In ordinea inversa prezentata la punctele 1...4 din explicatia dat
pentru demontarea lamei;
Pentru a avea o taiere optima trebuie ca dupa montajul manerului cu
lama pe bazament sa se execute cateva miscari circulare in directia si
sensul prezentat in fig.L;
Pentru demontare lama
Pentru montare lama
Schimbarea lamei si contralamei
RO
When the cutting edges of the blades or counter blade presents rupter or
wear, cutting can not be made in optimal parameters, fact that these
must be changed or sharped.
Removal blade (fig.G,H and I) or counter blade (fig.J and K) is as follows:
:
1. Remove the plastic protection (fig. G.-pos.1);
2. Unscrew nut (fig.D-pos.10);
3. Separation of the handle (with blade) from the base (fig.H);
4. Removal the blade from handle (fig.I).
:
Presented in reverse order of points 1…4 from the explanation for
dismantling the blade;
To have an optimum cut after mountin the handle with the blade on the
basament must run several circular movements in the direction and
sense given by fig.L.;
For dismantling and assembling of the counterblade will follow the order and
the procedure presented in fig. J, K and L with the reminder that at the
mounting of the counterblade, its cutting edge must be aligned with the
surface of the basament.
For removal blade
For mounting blade
Changing the blade and the counter blade
GB
RO
GB
intimus 331 RO
GB
G
H
I
1
Table of contents
Languages:
Other Intimus Trimmer manuals