Intuix S800 User manual

www.intuix.net
S-800/S-810
Tuner TNT/DVB-T USB
User guide
Manuel d’utilisation
Benutzerhandbuch

Service Hotline 0900-510 255 00*
* 1,99 /Min. vom deutschen Festnetz
Einen kostenlosen eMail-Support erhalten Sie
über www.intuix.net
(and other countries)
www.intuix.net
Service Hot line 0820 825 333*
* numéro indigo 0,15 TTC/min
www.intuix.net
www.intuix.net
ADAPTATEUR TV
ANTENNE MURALE
www.intuix.net
ADAPATEUR TV
antenne murale
Adapatateur pour prise d’antenne murale.
Wall antenna adaptator
Hausantennenadaptater
Compatible TV Tuner USB
S800 / S810 / S815 / S820
Raccordez votre clé tuner TNT INTUIX
à votre prise d’antenne murale !!
21
30
0E-
/21
07
≠_
2
%¥
50
0
7
(2÷
0
+§
1
__
2+
5
8
21
300
E-
/21
7
2%
¥50
0*
7
5
0
0*
2
1
3
0
0E
-
/2
1
0
7
≠
_
2
%
¥
5
0
0
7
(2
÷
0
+
§
1
_
_
2
+
5
8
2
1
21
30
0E
-
/2
10
7≠
_
2
%
¥5
00
7
(2
÷0
+§
1
__
2+
5
8
21
30
0E
-
/2
17
2
%
¥5
0
0*
7
5
0
0*
2
1
3
0
0
E
-
/
2
1
0
7
≠
_
2
S810
S815
S820
S800
Link your USB DVB-T tuner
to your wall antenna !!

S-800/S-810
DVB-T TUNER
User guide

D-33
Wo ist DVB-T zu empfangen?
DVB-T Empfangsbereich
deutschlandweit
Stand : 29 Juni 2005
EINFACH
• Ohne Kabel
• Ohne Satellit
• Nur mit Antenne
ÜBERALL
• In der Wohnung
• Im Fahrzeug
• Unterwegs
FERNSEHEN
• Unterhaltung
• Information
• Neue Mediendienste
DVB-T in Betrieb
DVB-T in Betrieb öffentlich-rechtlich
DVB-T Start ab November 2005 (öffentlich-rechtlich)
DVB-T Start in Planung (öffentlich-rechtlich)
DVB-T Start in Planung
Die Programmbelegung variiert in den einzelnen
Regionen. DVB-T Projekte in Deutschland
www.ueberallfernsehen.de
Stand : 29 Juni 2005

EN-1
About the DVB-T Dongle ....................................................................................................................................EN-2
Software Installation ............................................................................................................................................EN-2
Connecting the DVB-T Dongle ...........................................................................................................................EN-3
Initial Setup ..........................................................................................................................................................EN-3
Description of Toolbars .......................................................................................................................................EN-4
Watching Digital TV .............................................................................................................................................EN-5
Viewing Modes .....................................................................................................................................................EN-5
Recording ...............................................................................................................................................................EN-6
Teletex.....................................................................................................................................................................EN-8
EPG (Electronic Program Guide) ........................................................................................................................EN-8
Troubleshooting Guide ........................................................................................................................................EN-9
CONTENTS

EN-2
The DVB-T dongle is a digital video broadcast receiver that plugs straight into the USB port of your
computer and requires no additional power source, making it extremely portable. It can scan for and save
all available digital TV stations and play any of these on your computer screen.
Minimum System Requirements
• USB port
• DirectX 9c
• Windows 2000/XP
• Pentium III 800MHz or equivalent
• 256MB RAM
• DirectX 9c compatible sound card
• DirectX 9c compatible video card
• 32MB HDD space (installation only)
Package Contents
• DVB-T dongle
• Software CD
• Quickstart guide
• Antenna
* Please note that the antenna has a magnetic base and should not be placed near any items that can be
affected by magnetic fields, for example, computer or TV screens, floppy disks, or credit cards.
Note that Microsoft, Windows, Windows 2000 and Windows XP are registered trademarks of Microsoft Corp.
ABOUT THE DVB-T DONGLE
Please install all necessary software BEFORE connecting your DVB-T dongle.
• Insert the provided CD-ROM into the CD drive of your computer.
• The installation screen will appear. However, if it does not,
click on Start>Run and type D:\setup.exe, where D refers
to the letter assigned to your CD drive.
• You will be asked to choose the setup language, as follows :
Choose a language and then click OK. You will now be asked to accept
the End User License Agreement. Be sure to check the I accept the terms
in the license agreement box, then click on Next.
After a few seconds, the following screen will appear.
Click on Install to continue the installation.
Once the software has finished being installed, you will be asked to restart
the computer. Press Yes.
SOFTWARE INSTALLATION

EN-3
Remove the cap from the DVB-T dongle, locate a free USB port
on your computer and plug in the dongle. Once the computer
recognises the new hardware, the New Hardware wizard will begin.
As the DVB-T is a Hi-Speed device, you may receive the following message if it is plugged into an older
USB 1.1 port. The DVB-T will still work with USB 1.1. Simply click on the X in the top right-hand corner
of this message.
You will see several messages during the installation of the DVB-T dongle.
Please be patient, as this process make take a few minutes.
CONNECTING THE DVB-T DONGLE
Double-click on the Sawy DTV icon, which appears on your desktop.
The Sawy Digital TV display panel and control panel will appear in the background
and the following Setup screen will appear on top.
INITIAL SETUP
Top window (all channels available to user)
Bottom window (all channels available to user)

EN-4
D-4
On the Left
• Time Shift Buffer : Specify the maximum Time Shift allowed.
• Time Shift File Drive : Browse to the location where you would like to temporarily store time shifted
programs (Also shows available maximum space available for Time Shift).
• Record Video Folder : Browse to the location where recorded programs will be stored.
• Snapshot Folder : Browse to the location where you would like to store snapshot images
• Select Skin : Choose your preferred skin for the Sawy Digital TV software.
• UI Language : Choose which language you would like for the user interface.
• Always on Top : Tick this box if you prefer the display panel not to be hidden by other windows.
• Panorama / 16:9 / 4:3 : Choose the screen proportions that best suit your needs
On the right
The top window displays all the channels found by pressing Auto Scan*.
The bottom window displays the channels that you wish to be available to you.
You can add individual channels by highlighting the channel of your choice (in the top window)
and clicking on Add.
To remove individual channels from the bottom window, highlight the channel you wish to remove,
and then click on Delete.
To rename any channels in the bottom window, highlight the channel you wish to rename,
click on Rename and enter a name.
*Auto Scan : Press to automatically scan for and save all available channels (Ensure that the correct region
is chosen first). This must be done before you can watch TV.
DESCRIPTION OF TOOLBARS
Set TV as wallpaper Minimise Full screen
Manually resize window
Display/choose channel
Signal Strength Indicator
Mode
Subtitles
Choose audio
stream
Record
Minimise
Exit
Setup :
Schedule record
Open file
Reveal/hide
extended toolbar
Snapshot
Teletext
EPG
Time shift recording
Volume indicator
Mute
Volume control
Channel up/down

EN-5
Display as Wallpaper
This option will set the TV screen as the computer wallpaper.
In effect, it will be set as full screen and moved to the back.
Any other windows or icons will be placed on top of the TV screen.
Normal viewing mode can be restored from the Windows taskbar (see note below).
VIEWING MODES
WATCHING DIGITAL TV
Launching the Sawy Digital TV Software
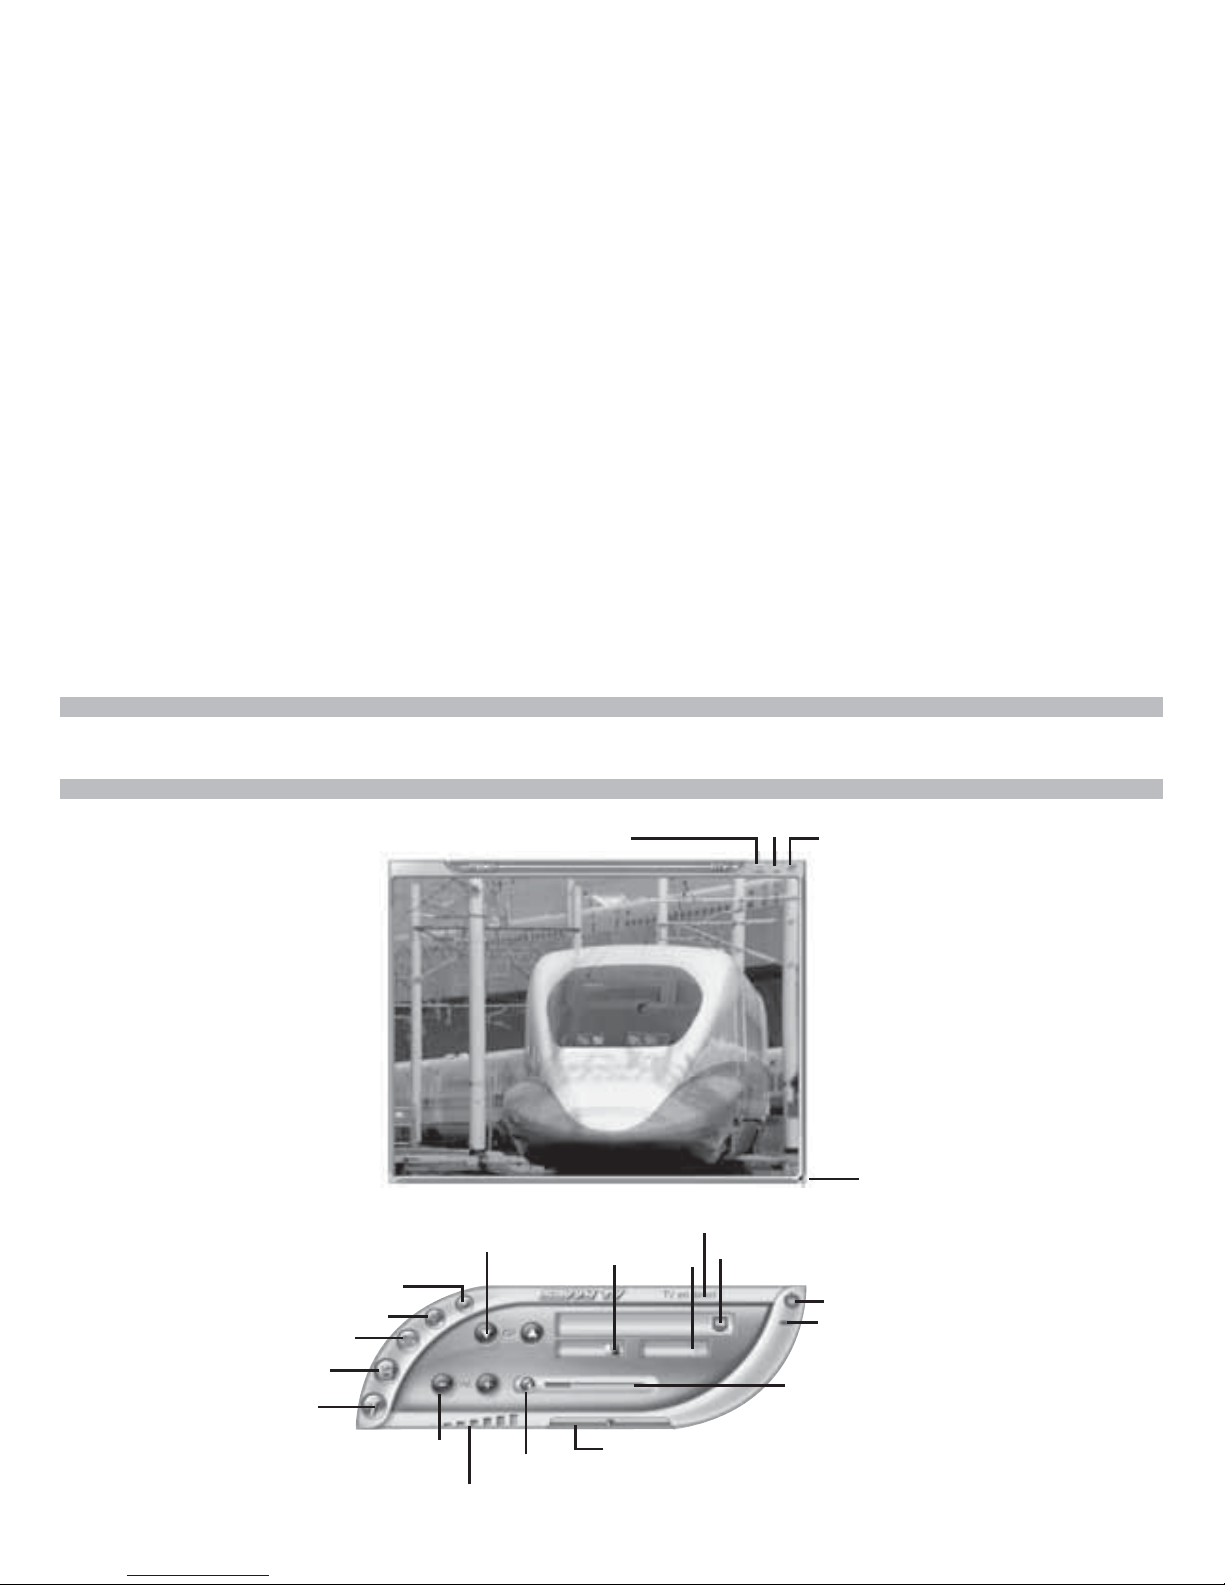
To start watching digital TV, simply double-click on the Sawy DTV icon,
which appears on your desktop.
Please be patient, as the software may take a few seconds to appear.
Changing Channel
There are two ways to change channel.
1. Moving through the channels one at a time, by using the Channel up/down buttons
(You can also use the up/down cursor keys on the computer keyboard).
2. Jumping straight to a channel, by choosing a channel from the drop-down list
(click on this window to display list).
Adjusting the Volume
To adjust the volume click on the left (decrease) or right (increase) volume buttons
(you can also use the left/right cursor keys on the computer keyboard).
The volume indicator bar will show you how loud the volume is.
Choose Audio Stream
On certain channels you may be offered more that one audio stream
(for example, a second language may be offered). If this is the case, you can click here to
choose which stream you prefer. Note that this service is not available on all channels.
Mute
To mute the sound, press the mute button beside the volume indicator.
When the sound is muted, a red line will appear through the speaker symbol.
To cancel the mute, click again.
Snapshot
To take a snapshot of the image currently on screen, click on this button.
To later view the image, browse to the location of the snapshots
(specified in the Setup screen) and double-click on the file.
It will be opened by your default image viewing software.

EN-6
RECORDING
Minimise Window
This option will minimise the screen.
It can be restored from the Windows taskbar (See note below).
Full Screen
This option will display the TV full screen, and remove the control panel.
Click anywhere on the screen to return to normal viewing mode.
Both the display screen and the control panel can be restored
from the Windows taskbar as follows:
• Right-click on the Sawy DTV tab in the Windows taskbar.
• Select Restore Display Panel or Restore Control Panel.
Note that if you are currently in Wallpaper mode,
you will need to choose the Window Mode option to return to normal viewing mode.
Live recording
To record what is currently being shown on the screen, simply press the record button.
Pressing this button will instantly start recording the current program. To stop recording, press the stop
button.
Time Shift recording
Time Shift recording is very useful when you are watching a programme and may have to leave just for a
moment, for example if the phone rings.
To activate Time Shift recording, simply press the time shift button.
This will start time shifting the programme currently being shown. The computer may now be left
unattended. When you return to the computer, you can use the forward wind or rewind buttons to search
within the recording. You can also press the play button to start watching the program or the pause button
to pause what you are viewing. None of these buttons will affect the recording process. To stop time shift
recording, press the stop button. Please see next page for more information about the recording/playback
control panel.
The recording/playback control panel differs slightly from the standard control panel, with the following
buttons added :
Rewind Pause Play
Stop Forward Wind
Slider bar, shows how far through the recording you are. During playback, you can also
drag the slider with the mouse rather than using the rewind / forward wind buttons.

EN-7
Scheduled recording
Press on the schedule record button in the extended toolbar.
This will open the Schedule Record window, as follows :
To schedule a recording, you will need to enter the following information :
1. The date
Do this by clicking on a date in the top right-hand window, thus highlighting it by turning it blue.
By default, today’s date will already be highlighted.
2. The start and end times of the recording
These must be written in 24 hour format, e.g. half past three in the afternoon would be written 15 30.
3. The channel
Choose a channel from the list.
4. The frequency of the recording
For Frequency, you can choose the following from the drop-down list :
1Time Record (will be displayed in orange), Daily Record (will be displayed in purple),
or Weekly Record (will be displayed in green).
Once you have programmed the recording, press Add. You can then add more programmed recordings to
the list, remembering to press Add after each one.
Below the channel list, you will see a representation of the disc space assigned to store recordings. The
blue area shows what disk space has already been used, the yellow is which space has been allocated for
scheduled recordings, and red shows available disk space.
Note that the Sawy Digital TV software will have to be running when it is time to start the scheduled
recording. If you are watching another channel at the time the scheduled recording is due to start,
the software will automatically change channel.
Watching a Recorded Programme
Press the recorded files button (in the extended toolbar).
Pressing this button will open up a browser window which will allow you to search for recorded mpg/mpeg
files. Note that this method allows you to view both scheduled recordings and live recordings.

EN-8
TELETEXT
The Sawy Digital TV software can also access Teletext. To do so, click on the Teletext button
on the control panel.
The Teletext control panel and the Teletext display screen will appear as follows:
There are several ways to navigate whilst in Teletext mode.
The left/right arrow keys can be used to move through the teletext pages one at a time. If subpages are
available, then the up/down cursor keys can be used to navigate through these. In the above picture, for
example, the page is 100, and the subpage is 08.
The page number display field can also be typed into directly. After the page number is typed, click on the
Go to Page button in order to go to that page.
The four coloured buttons (red, green, yellow and blue) can be used at hotkeys to go directly to the
coloured links which appear at the bottom of the teletext display screen.
The action button enables you to choose any page number displayed within the screen.
Once the action button has been pressed, it will change colour. You can then use the up/down arrow keys
to navigate within the screen.
Once the page you would like to go to is highlighted, press the action button again to go to that page.
Coloured hotkeys
Go to page button
Page number display Action button
Arrow keys
The Sawy Digital TV software is EPG compatible. This means that you can get instant access to the list
of programmes available to you.
To access this feature, click on the EPG button on the control panel.
EPG (Electronic program guide)

EN-9
Problem Possible Reason Solution
No picture Currently viewing radio No picture will appear on
station radio channels
No sound Mute mode is activated Click on the speaker icon
beside the volume indicator
to restore the sound
Volume level is set too low Increase volume
Cannot tune stations Poor signal Move the antenna for better
reception
Wrong country is chosen in Setup Choose the correct country in Setup
Picture performance is poor Not using latest version of Download latest version of
Direct X Direct X
Computer hardware does Upgrade hardware to meet
not meet minimum requirements minimum requirements
Too many programs are Close unnecessary programs
being used at the same time
Poor signal Move the antenna for better
reception
Laptop computer is using Try plugging the laptop into
battery power its power supply
Error message appears Tuner is not plugged in Plug in tuner, or if
when starting software, saying necessary, disconnect and
“Please plug in the tuner”. then reconnect.
The DVB-T tuner Electronic parts of this tuner this doesn't affect your PC ;
is heating while operating are reasonably heating heat stabilizes automatically
after 15 minutes
TROUBLESHOOTING GUIDE
This will open up the following screen:
You will find a list of channels down the left-hand side.
These can be scrolled through, using the up and down arrows above and below the list.
Clicking on any of the channels will change which channel you are currently viewing (highlighted in green,
with programmes highlighted in blue). In the top left-hand corner, you will see the date.
This can also be changed, using the accompanying arrows. To the top of the main section,
you will see the time.
Again, this can be scrolled through, using the arrows.
Note that some channels may not offer the EPG function.

S-800/S-810
DVB-T TUNER
Manuel d’utilisation

FR-11
A propos de la clé électronique TNT ...............................................................................................................FR-12
Installation du logiciel ........................................................................................................................................FR-12
Connecter la clé électronique TNT ..................................................................................................................FR-13
Configuration initiale .........................................................................................................................................FR-13
Description de la barre d'outils ........................................................................................................................FR-14
Regarder la TV numérique .................................................................................................................................FR-15
Modes d’affichage ..............................................................................................................................................FR-15
Enregistrement.....................................................................................................................................................FR-16
Télétexte................................................................................................................................................................FR-18
EPG (Guide de programme électronique) ........................................................................................................FR-18
Guide de dépannage ...........................................................................................................................................FR-19
SOMMAIRE

FR-12
La clé électronique TNT est un récepteur de diffusion vidéo numérique qui se branche directement dans
le port USB de votre ordinateur et ne nécessite aucune source d'alimentation supplémentaire, la rendant
extrêmement portable. Elle peut rechercher et enregistrer toutes les stations TV numériques disponibles
et reproduire n'importe laquelle sur l'écran de votre ordinateur.
Configuration minimale requise
• Port USB
• Direct-X 9
• Windows 2000/XP
• Pentium III 800MHz ou équivalent
• 256 Mo de RAM
• Carte son compatible DIrectX 9c
• Carte vidéo compatible DIrectX 9c
• 32Mo d'espace de disque dur (installation seulement)
Contenu de l'emballage
• Clé électronique TNT
• CD du logiciel
• Guide de démarrage rapide
• Antenne
* Veuillez noter que l'antenne a une base magnétique et ne doit pas être placée à côté de tout article qui peut
être affecté par les champs magnétiques, par exemple, ordinateur ou écran TV, disquettes ou cartes de crédit.
Notez que Microsoft, Windows, Windows 2000 et Windows XP sont des marques commerciales déposées de Microsoft Corp.
A PROPOS DE LA CLÉ ÉLECTRONIQUE TNT
Veuillez installer le logiciel fourni AVANT de connecter votre clé électronique TNT.
• Insérez le CD-ROM fourni dans le lecteur CD de votre ordinateur.
• L'écran d'installation apparaîtra. Cependant, si ce n'est pas le cas, cliquez
sur Démarrer > Exécuter et saisissez D:\setup.exe, où Dcorrespond
à la lettre attribuée à votre lecteur CD.
• Il vous sera demandé de choisir la langue de configuration, comme suit :
Choisissez une langue et puis cliquez sur OK.
Il vous sera maintenant demandé d'accepter le Contrat de licence d'utilisateur
final. Assurez-vous de cocher la case J'accepte les termes dans le contrat
de licence, puis cliquez sur Suivant.
Après quelques secondes, l'écran suivant apparaîtra.
Cliquez sur Installer pour continuer l'installation.
Une fois que le logiciel a terminé son installation,
il vous sera demandé de redémarrer l'ordinateur. Appuyez sur Oui.
INSTALLATION DU LOGICIEL

FR-13
Retirez le capuchon de la clé électronique TNT, localisez un port USB libre
sur votre ordinateur et branchez la clé. Une fois que l'ordinateur détecte
le nouveau matériel, l'assistant Nouveau matériel commencera.
Le TNT Tuner étant un périphérique compatible USB 2.0, vous pouvez recevoir le message suivant
s'il est branché dans un port USB 1.1. Le TNT marchera néanmoins avec l'USB 1.1.
Cliquez simplement sur le X en haut à droite de ce message
pour faire disparaître ce dernier.
Vous verrez plusieurs messages pendant l'installation de la clé électronique TNT.
Veuillez être patient, ce processus prend quelques minutes.
CONNECTER LA CLÉ ÉLETRONIQUE TNT
Double-cliquez sur l'icône Sawy TV, qui apparaît sur votre bureau.
Le panneau d'affichage et celui de contrôle Sawy TV apparaîtront (Notez qu'il peut n'y en avoir
aucun jusqu'à ce que les chaînes soient recherchées pour la première fois).
CONFIGURATION INITIALE
Fenêtre supérieure (toutes les chaînes trouvées
par recherche automatique)
Fenêtre inférieure (toutes les chaînes disponibles
pour l'utilisateur)

FR-14
A gauche
• Tampon Time Shift: Spécifiez le Time Shift maximum permis
• Lecteur de fichier Time Shift: naviguez à l'emplacement où vous voudriez stocker temporairement
les programmes décalés (Montre aussi l'espace de disque maximum disponible pour Time Shift)
• Dossier Enregistrement vidéo: Naviguez à l'emplacement où les programmes enregistrés seront stockés
• Dossier instantané : Naviguez à l'emplacement où vous voudriez stocker les images instantanées
• Sélection habillement: Choisissez votre habillement préféré pour le logiciel Sawy TV
• Langue IU : Choisissez quelle langue vous voulez pour l'interface utilisateur.
• Toujours en haut : Cochez cette case si vous préférez que le panneau d'affichage ne soit pas masqué
par d'autres fenêtres
• Panorama / 16:9 / 4:3 : Choisissez les proportions d'écran qui correspondent le mieux à vos besoins
A droite
La fenêtre supérieure affiche les chaînes trouvées en appuyant sur Recherche automatique*.
La fenêtre inférieure affiche les chaînes que vous désirez rendre disponibles pour vous. Vous pouvez
ajouter des chaînes individuelles en mettant en évidence la chaîne de votre choix (dans la fenêtre
supérieure) et en cliquant sur Ajouter.
Pour supprimer des stations individuelles de la fenêtre inférieure, mettez en évidence la station que vous
voulez supprimer, et puis cliquez sur Supprimer. Pour renommer n'importe quelle chaîne dans la fenêtre
inférieure,mettez en évidence la chaîne que vous voulez renommer, cliquez sur Renommer et saisissez
un nom.
*Recherche automatique : Appuyez pour automatiquement rechercher et enregistrer les chaînes
disponibles. (Assurez-vous d'abord que la région correcte est choisie). Ceci doit être effectué avant
de regarder la TV.
DESCRIPTION DE LA BARRE D’OUTILS
Définir la TV comme fond d’écran Réduire Plein écran screen
Redimentionner manuellement
la fenêtre
Affichage/Choisir la chaine
Indicateur de la force du signal
Mode
Sous-titres
Choisir
le flux audio
Enregistrement
Minimiser
Quitter
Barre d’outils :
Configuration
Enregistrement
programmé
Ouvrir fichiers
Capture d’écran
Télétexte
EPG
Enregistrement Time Shift
Indicateur de volume
Silence
Commande du volume
Chaîne haut/bas

FR-15
Affichage en fond d'écran
Cette option définira l'écran TV comme fond d'écran d'ordinateur (mode plein écran).
Toute autre fenêtre ou fenêtre sera placée au dessus de l'écran TV.
Le mode de visionnement normal peut être restauré à partir de la barre des tâches
Windows (voir la remarque ci-dessous).
MODES D’AFFICHAGE
REGARDER LA TV NUMÉRIQUE
Lancer le logiciel Sawy TV
Pour commencer à regarder la TV numérique, double-cliquez simplement sur l'icône Sawy
TV, qui apparaît sur votre bureau. Le logiciel peut prendre quelques secondes avant
d'apparaître.
Changer de chaîne
Il y a deux façons de changer de chaîne.
1. Naviguez de chaîne en chaîne, en utilisant les boutons Chaîne suivante/précédente
(vous pouvez aussi utiliser les touches de curseurs haut/bas du clavier d'ordinateur).
2. Allez directement à une chaîne, en choisissant une chaîne dans le menu déroulant.
(Cliquez sur cette fenêtre pour afficher la liste).
Ajuster le volume
Pour ajuster le volume cliquez sur les boutons de volume gauche (diminuer) ou droit
(augmenter). Vous pouvez aussi utiliser les touches de curseur gauche/droite du clavier
de l'ordinateur. La barre d'indication de volume vous montrera le niveau du volume.
Choisir le flux audio
Certaines chaînes vous permettent une écoute de différents flux audio (par exemple,
une seconde langue peut être offerte). Si c'est le cas, vous pouvez cliquer ici pour choisir
un flux particulier. Notez que ce service n'est pas disponible sur toutes les chaînes.
Silence
Pour couper momentanément le son, appuyez sur le bouton silence à côté de l'indicateur
de volume. Lorsque le son est sous silence, une ligne rouge barre le symbole de
haut-parleur. Pour activer le son à nouveau, appuyez sur le bouton silence.
Instantané
Pour faire une capture d’écran, cliquez sur ce bouton.Pour visualiser l'image plus tard,
naviguer à l'emplacement des instantanés (spécifié dans l'écran Configuration)
et double-cliquez sur le fichier. Il sera ouvert par votre logiciel de visionnement d'image
par défaut.

FR-16
ENREGISTREMENT
Réduire la fenêtre
Cette option réduira l'écran. Il peut être restauré à partir de la barre des tâches
(Voir la remarque ci-dessous).
Ecran plein
Cette option affichera le plein écran TV, et supprimera le panneau de contrôle.
Cliquez n'importe où sur l'écran pour revenir au mode de visionnement normal.
L'écran d'affichage et le panneau de contrôle peuvent être
restaurés à partir de la barre des tâches comme suit :
• Cliquez droit sur l'onglet Sawy TV dans la barre des tâches
Windows.
• Sélectionnez Restaurer le panneau d'affichage
ou Restaurer le panneau de contrôle.
Notez que si vous êtes actuellement en mode Fond d'écran, vous aurez besoin de choisir
l'option Mode fenêtre pour revenir au mode de visionnement normal.
Enregistrement en direct
Pour enregistrer ce qui est actuellement affiché à l'écran, appuyez simplement sur le bouton enregistrer.
Appuyer sur ce bouton lancera instantanément l'enregistrement du programme actuel. Pour arrêter
l'enregistrement, appuyez sur le bouton stop.
Enregistrement Time Shift
L'enregistrement Time Shift est très utile lorsque vous visionnez un programme et devez quitter l’écran
des yeux un moment, par exemple si le téléphone sonne.
Pour activer l'enregistrement Time Shift, appuyez simplement sur le bouton time shift.
Ceci commencera de décaler le programme actuellement visionné. Lorsque vous retournez à l'ordinateur,
vous pouvez utiliser les boutons avance rapide ou rembobinage pour rechercher dans l'enregistrement.
Vous pouvez aussi appuyez sur le bouton lire pour mettre en pause ce que vous visionnez. Aucun de ces
boutons n'affectera le processus d'enregistrement. Pour arrêter l'enregistrement time shift, appuyez sur
le bouton stop. Veuillez vous reporter à la page suivante pour plus d'informations à propos du panneau
de contrôle enregistrement/lecture.
Le panneau de contrôle enregistrement/lecture diffère légèrement du panneau de contrôle standard, avec
les boutons suivants ajoutés :
Rembobiner Pause Lecture
Stop Avance rapide
Le glisseur, montre à quel point dans l'enregistrement vous êtes. Pendant la lecture,
vous pouvez aussi déplacer le glisseur avec la souris au lieu d'utiliser les boutons
rembobinage/ avance rapide.
This manual suits for next models
1
Table of contents
Languages:
Popular TV Tuner manuals by other brands

eversense
eversense eversense quick start guide

Avermedia
Avermedia AVerTV Box Genie I specification

Encore
Encore ENUTV-DITF user manual

BenQ
BenQ VB Series Installation and operation guide

Diamond Multimedia
Diamond Multimedia XtremeTV PVR660RCUSB Specifications

Avermedia
Avermedia AVerTV Hybrid Volar T2 H831 quick guide