Inventini ADVERTISING TOTEM User manual

INSTRUKCJA
USER’S MANUAL
www.inventini.com
TOTEM REKLAMOWY
ADVERTISING TOTEM

INSTRUKCJA MONTAŻU TOTEMU REKLAMOWEGO
2
WARUNKI
BEZPIECZEŃSTWA
ZALECENIA
1. Totem reklamowy jest przeznaczony do użytkowania
w pomieszczeniach lub okazjonalnego korzystania na zewnątrz.
Produkt należy chronić przed bezpośrednim działaniem
słońca lub wilgoci.
2.
W przypadku korzystania z produktu na zewnątrz, podczas silnego
wiatru, zaleca się bezwzględnie złożenie produktu.
3.
Trzymaj produkt z dala od źródeł ciepła i otwartego ognia.
Nie umieszczaj w pobliżu produktu żadnych źródeł ciepła, mogą
doprowadzić do stopienia się materiału przy wysokich temperaturach.
1. Przed przystąpieniem do rozłożenia totemu należy dokładnie
zapoznać się z poniższą instrukcją montażu.
2. Podczas rozkładania i składania totemu należy zachować ostrożność,
aby zapobiec obrażeniom ciała i innym szkodom.
3. Przed złożeniem totemu należy go dokładnie wyczyścić.
Ewentualne zabrudzenia należy usunąć z tkaniny za pomocą
zwilżonej w ciepłej wodzie szmatki. Nie należy używać detergentów
ani myjek wysokociśnieniowych. Stosuj się do zaleceń podanych
przez producenta na metce.
4. Przed rozpoczęciem składania totemu należy upewnić się, że jest
suchy. Jeśli jednak z przyczyn od użytkownika niezależnych
(np. pogody) totem zostanie złożony wilgotny, należy najszybciej
jak to możliwe ponownie go rozłożyć w celu całkowitego wysuszenia.
WARUNKI
GWARANCJI
Warunki gwarancji pobierzesz na stronie internetowej producenta.

www.inventini.com
PL
3
INSTRUKCJA MONTAŻ
DEMONTAŻ
NAPRAWA
1. Wybierz płaskie miejsce do rozłożenia totemu.
2. Wyjmij elementy totemu z toreb transportowych.
3. Wsuń pionowe rurki stelaża w trzpienie przymocowane
do podstawy (Rys.1).
4.
Połącz poziome rurki stelaża za pomocą elementów łączących (Rys.2),
tak aby taśma LED znalazła się w środku (Rys.3).
5. Połącz pionowe i poziome rurki za pomocą elementów
łączących (Rys. 4).
6. Przypnij karabinek przymocowany do taśmy LED do oczka
na środku bazy (Rys.5)
7.
Włóż wtyk w gniazdo na środku bazy (Rys. 6).
8. Nasuń poszycie na stelaż (Rys.7).
9. Przypnij poszycie do stelaża za pomocą rzepów (Rys.8).
10. Zapnij zamek poszycia (Rys.9).
11.
Jeśli to możliwe, zakotw totem do gruntu, wbijając
szpilki w oczka u podstawy totemu (Rys.10).
Istnieje możliwość odesłania produktu do producenta.
Gwarantujemy odpłatny serwis uszkodzeń mechanicznych.
Wykonaj czynności w odwrotnej kolejności do instrukcji montażu.
Rys. 1 Rys. 2
Rys. 4Rys. 3
Rys. 10
Rys. 6Rys. 5 Rys. 8 Rys. 9Rys. 7

4
PANEL STEROWANIA
OŚWIETLENIE
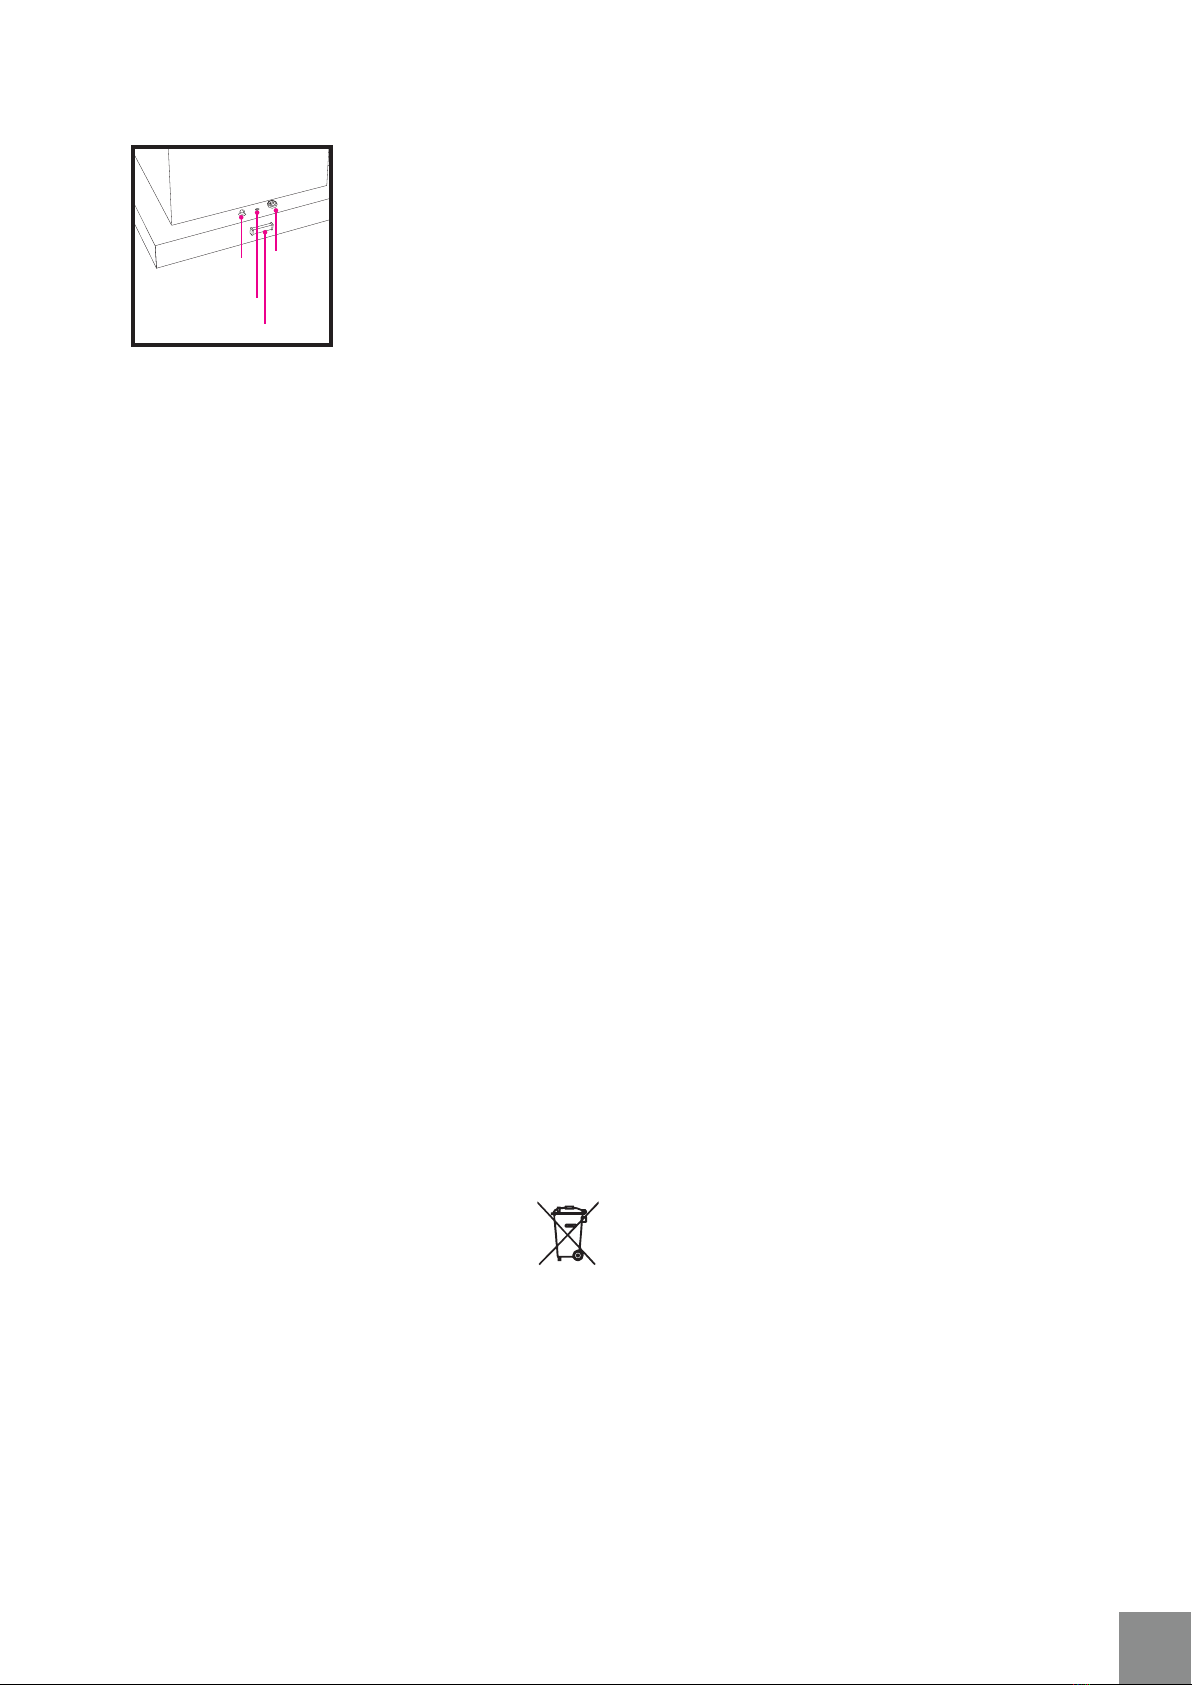
1. Włącznik oświetlenia znajduje się na górze bazy totemu.
2.
Aby sprawdzić działanie oświetlenia w ciągu dnia, należy zasłonić
czujnik zmierzchu, znajdujący się z boku bazy totemu.
3. Należy pamiętać o wyłączaniu produktu w trakcie jego transportowania.
4. Gniazdo ładowania znajduje się na górze bazy totemu, obok
włącznika oświetlenia.
Rys. 11
OŚWIETLENIE I ŁADOWANIE
1. Czas świecenia produktu wynosi do 8 godzin ciągłej pracy
w zależności od temperatury otoczenia i stopnia naładowania.
2. Produkty z oświetleniem wewnętrznym wyposażone są w akumulatory.
3. Ładowanie odbywa się za pomocą dołączonej do zestawu ładowarki.
4. Czas ładowania do 100% wynosi ok. 10h.
UŻYTKOWANIE / ŻYWOTNOŚĆ BATERII
1. Nie należy przekraczać 8-godzinnego czasu pracy bez ładowania
produktu.
Baterie w akumulatorach powinny być naładowane również podczas
magazynowania produktu.
UTYLIZACJA
Elektryczne/ elektroniczne produkty nie są odpadami z gospodarstwa
domowego!
Produkt należy utylizować po zakończeniu jego eksploatacji, zgodnie
z obowiązującymi przepisami prawnymi.
Należy usunąć wszystkie włożone baterie/akumulatory i pozbyć się ich
w odpowiedni sposób, oddzielnie od produktu. Konsument jest prawnie
zobowiązany (odpowiednimi przepisami dotyczącymi baterii) do zwrotu
wszystkich zużytych baterii i akumulatorów; utylizacja wraz z odpadami
z gospodarstw domowych jest zabroniona.
Baterie i akumulatory zawierające substancje szkodliwe
oznaczone są tym symbolem, oznaczającym zakaz pozbywania
się ich wraz z odpadkami domowymi.
Zużyte akumulatory/baterie można bezpłatnie oddawać na lokalne
wysypiska śmieci, do oddziałów firmy producenta lub wszędzie tam,
gdzie sprzedawane są baterie/akumulatory.
Dostosowując się do powyższych zaleceń, spełniacie Państwo wszystkie
odpowiednie wymogi prawne i przyczyniacie się do ochrony środowiska.
2.
INSTRUKCJA MONTAŻU TOTEMU REKLAMOWEGO
bezpiecznik
gniazdo
ładowania
czujnik zmierzchu
główny
włącznik
światła

www.inventini.com
EN
5
SAFETY RULES
RECOMMENDATIONS
1. Totem is intended for indoor or occasional outdoor use.
The product should be protected from sunlight and moisture.
2. In case of strong winds, disassemble the product.
3. Keep the product away from sources of heat and open flames.
Please do not place any sources of heat directly at the product
because the materials can melt at high temperatures
1. Read these instructions carefully before you get to work.
2. Be cautious while setting up the product to avoid being
hurt and prevent other damage.
3. Before disassembling, the product must be thoroughly cleaned.
Any spots or stains on the fabric should be removed immediately
with a warm damp cloth. Do not use detergents or pressure
washers. Follow the instructions on the label.
4. Before putting your product for storage, make sure it is clean
and dry. In case of bad weather, pack your product to avoid
damage, but as soon as it’s possible, unpack it once
again to let it dry.
GENERAL TERMS
OF WARRANTY
General terms of warranty can be downloaded from the
manufacturer’s website.

ADVERTISING TOTEM ASSEMBLY INSTRUCTIONS
6
INSTRUCTIONS ASSEMBLY
DISASSEMBLY
DAMAGE
1. Choose a flat even spot where you want to pitch the product.
2. Take all the elements out of the carry bags.
3. Insert vertical square pipes into the pins on the base (Fig.1).
4. Connect horizontal square pipes with connectors (Fig.2).
The LED strip should be in the center of it (Fig.3).
5. Connect horizontal and vertical square pipes with connectors (Fig.4).
6. Clip the carabiner to the d-ring in the center of the base (Fig.5).
7. Insert plug into the socket in the center of the base (Fig.6).
8. Put the cover on the frame (Fig.7).
9. Fasten the cover with the Velcro (Fig.8).
10. Zip the cover with the zipper (Fig.9).
11. Anchor the product to the ground by inserting spike into
the rings at the base (Fig.10).
There is a possibility of sending the product back to the manufacturer.
We oer paid service for mechanical damage.
Perform the operations in reverse order to the assembly instructions.
Fig. 1 Fig. 2
Fig. 4Fig. 3
Fig. 10
Fig. 6Fig. 5 Fig. 8 Fig. 9Fig. 7

www.inventini.com 7
LIGHTS CONTROL PANEL
1. The lighting switch is located on the top of the base.
To check the lighting during the day, cover the dusk sensor,
located on the side of the base.
2.
Always remember to turn the product o prior to transportation.3.
The charging socket is located on the top of the base, next to
lighting switch.
4.
LIGHTING ANG CHARGING
1. The product lighting time is up to 8 hours of continuous operation
depending on the ambient temperature and the degree of charge
2. Products with internal lighting are equipped with accumulators.
Charging takes place using the charger included with the kit.
3. The charging time up to 100% is about 10 hours.
USE AND BATTERY LIFE
1. Do not exceed the 8 hour usage period without charging the product.
The batteries should be charged even when the product is stored.2.
UTILIZATION
Electrical / electronic products are not domestic waste!
Dispose of the product after its use in accordance with applicable law.
Remove all inserted batteries / accumulators and dispose of them
correctly, separately from the product.
The consumer is legally obliged (in accordance with the relevant
regulations regarding batteries) to return all used batteries and
accumulators; disposal along with household waste is prohibited.
Batteries and accumulators containing harmful substances
are marked with this symbol. This means that they can not
be disposed of with household waste.
Used batteries / accumulators can be transferred to local waste
disposal sites, producer’s branches or wherever batteries / accumulatprs
are sold.
By following the above recommendations, you meet all relevant legal
requirements and contribute to environmental protection.
Fig. 11
fuse
charging
socket
dawn dusk sensor
main
light
switch
Table of contents
Languages:
Other Inventini Indoor Furnishing manuals
Popular Indoor Furnishing manuals by other brands

Regency
Regency LWMS3015 Assembly instructions

Furniture of America
Furniture of America CM7751C Assembly instructions

Safavieh Furniture
Safavieh Furniture Estella CNS5731 manual

PLACES OF STYLE
PLACES OF STYLE Ovalfuss Assembly instruction

Trasman
Trasman 1138 Bo1 Assembly manual

Costway
Costway JV10856 manual