IONODES PERCEPT User manual

Quick Start Guide
Version 1
March, 2022
Expand your senses.

2
www.ionodes.com | support@ionodes.com
DESCRIPTION
The PERCEPT Body Camera is an IoT-connected open-platform wearable device designed for commercial and enterprise applications. It
features 4G LTE and Wi-Fi connectivity, immersive 180° video at 4K resolution, bi-directional audio, motion-sensing and multiple innovative
functionalities, making it ideal for customers that need a real-time body worn monitoring and recording solution.
Combined with the PERCEPT Cloud Solution, gain a secure and reliable on-demand live video streaming and storage solution accessible from
anywhere, anytime via web and mobile apps. Offering direct camera-to-cloud connectivity, the PERCEPT Cloud Solution is a complete camera
management solution offering innovative features such as real-time location tracking, centralized camera software upgrades and remote
access for camera control and configuration. With both Wi-Fi and LTE connectivity options, the PERCEPT Body Camera Solution can easily
adapt to any deployment scenario.
The PERCEPT Body Camera Solution has been designed for commercial and enterprise use in various markets and applications including
private security, transportation, warehousing, retail, industrial, manufacturing and more. Use cases include staff safety, incident reporting,
resource and asset tracking, efficiency monitoring, live remote assistance, training, service optimization and theft deterrence.

3
www.ionodes.com | support@ionodes.com
Icons used in this document for user feedback are as follows:
Icon
Description
Repeat interval (examples)
Steady single-color LED
N/A
Flashing single color LED
1000 ms
Rapid flashing single color LED
250 ms
Flashing LED –Alternating colors
500 ms
Heartbeat single color LED
250 ms ON/OFF/ON + 1250ms OFF
Audio sound
Once
Beeping sound
10 secs
Vibration*
Varies
*When haptic feedback occurs, the OLED screen momentarily displays corresponding action or state change

4
www.ionodes.com | support@ionodes.com
CHARGING YOUR CAMERA
▪Use the supplied USB-C cable and a compatible USB charger (minimum 1A)
or
▪Charge your camera to full battery capacity using a PERCEPT docking station.
User Feedback
Charging
Flashing yellow LED
Fully charged
Steady blue LED
Option 1
Connect your device to a USB charger
Option 2
Seat your device in a PERCEPT docking station

5
www.ionodes.com | support@ionodes.com
POWERING YOUR CAMERA ON/OFF
▪Turn on your camera by pressing and holding the power button for 3 seconds.
▪Turn off your camera by pressing and holding the power button for 5 seconds.
User Feedback
Booting
Flashing cyan LED
Ready
Steady blue LED

6
www.ionodes.com | support@ionodes.com
INITIALIZING YOUR CAMERA
1. Power on your camera, wait to see the “Scan Initial QR”message on the OLED screen
2. Visit https://www.ionodes.com/percept-body-cam-QR/ from a computer or mobile device
3. Enter the required information to generate a QR code
4. Scan the QR code with your PERCEPT Body Camera.
User Feedback
Waiting for QR scan
Heartbeat blue LED
QR scan successful
Steady blue LED
1
2
3
Scan to visit the PERCEPT
Body Cam QR web page
4

7
www.ionodes.com | support@ionodes.com
RESETTING YOUR CAMERA’S WI-FI SETTINGS
When using the device with more than one wireless network, perform the following steps to connect it to another network within range. Press
both F2 and F4 buttons simultaneously for more than 5 seconds until you see the message “Scan Network QR”on the OLED screen. Follow
the instructions above for generating and scanning the initial QR code, selecting the option to add Wi-Fi connection.
User Feedback
Waiting for QR scan
Heartbeat blue LED
QR scan successful
Steady blue LED
8
www.ionodes.com | support@ionodes.com
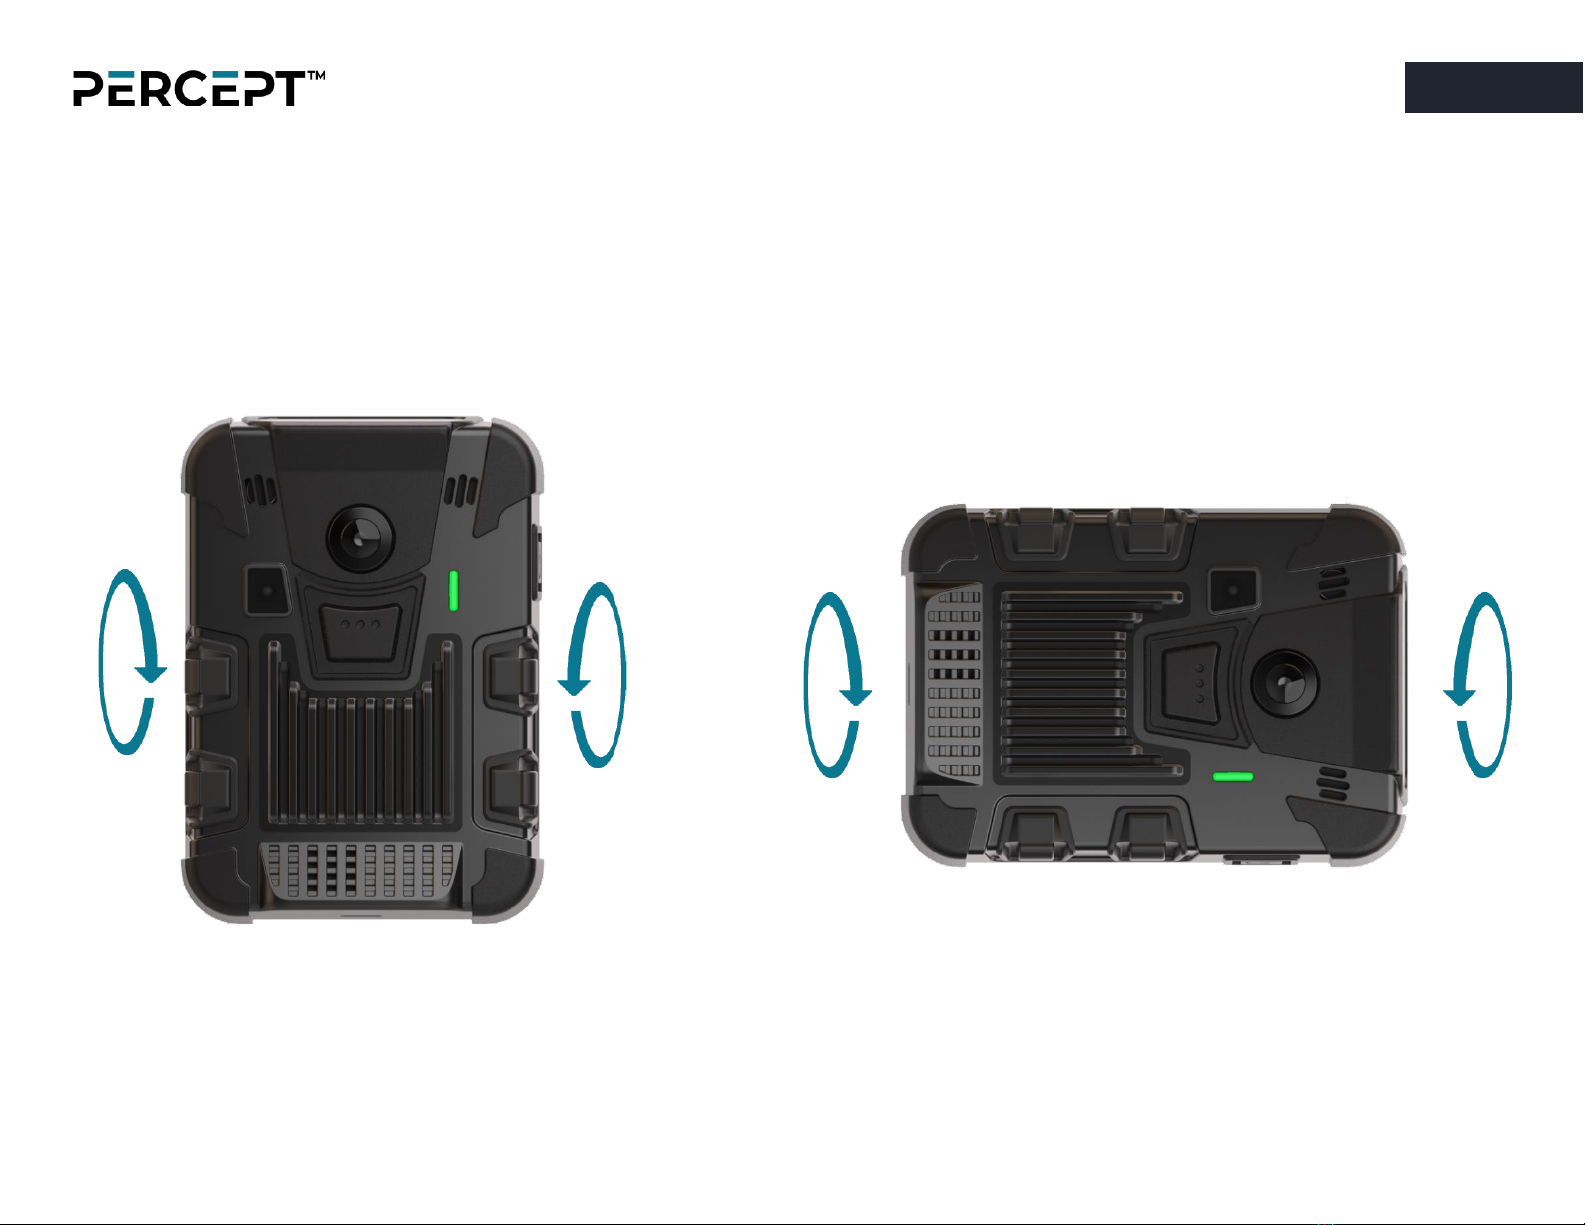
CALIBRATING THE CAMERA’S 9-AXIS MOTION SENSOR
Following certain operations, like a complete device reset for example, a message might appear on the OLED screen that the PERCEPT Body
Camera 9-axis motion sensor must be recalibrated. To do so, simply hold the camera vertically and slowly rotate it 360° and then hold it on its
side and repeat the 360° movement as indicated in the images below. One calibrated, the calibration message will disappear from the OLED
screen.
Step 1
Hold the PERCEPT Body
Camera upright and slowly
rotate 360°.
Step 2
Put the PERCEPT Body
Camera on its side and slowly
rotate 360°.
+

9
www.ionodes.com | support@ionodes.com
ACCESSING ADVANCED CONFIGURATION
Cycle through camera status messages on the OLED screen by pressing on the power button for less than 3 seconds. Note the camera’s Wi-Fi
connectivity and IP address . From a computer or mobile device connected to the same network as the
camera, open the device’s web management interface by entering its IP address in a web browser. Enter Username ‘administrator’ and the
Password set during device’s initialization phase (QR code). Refer to the User Manual for details on the configuration options available through
the web interface.
10
www.ionodes.com | support@ionodes.com
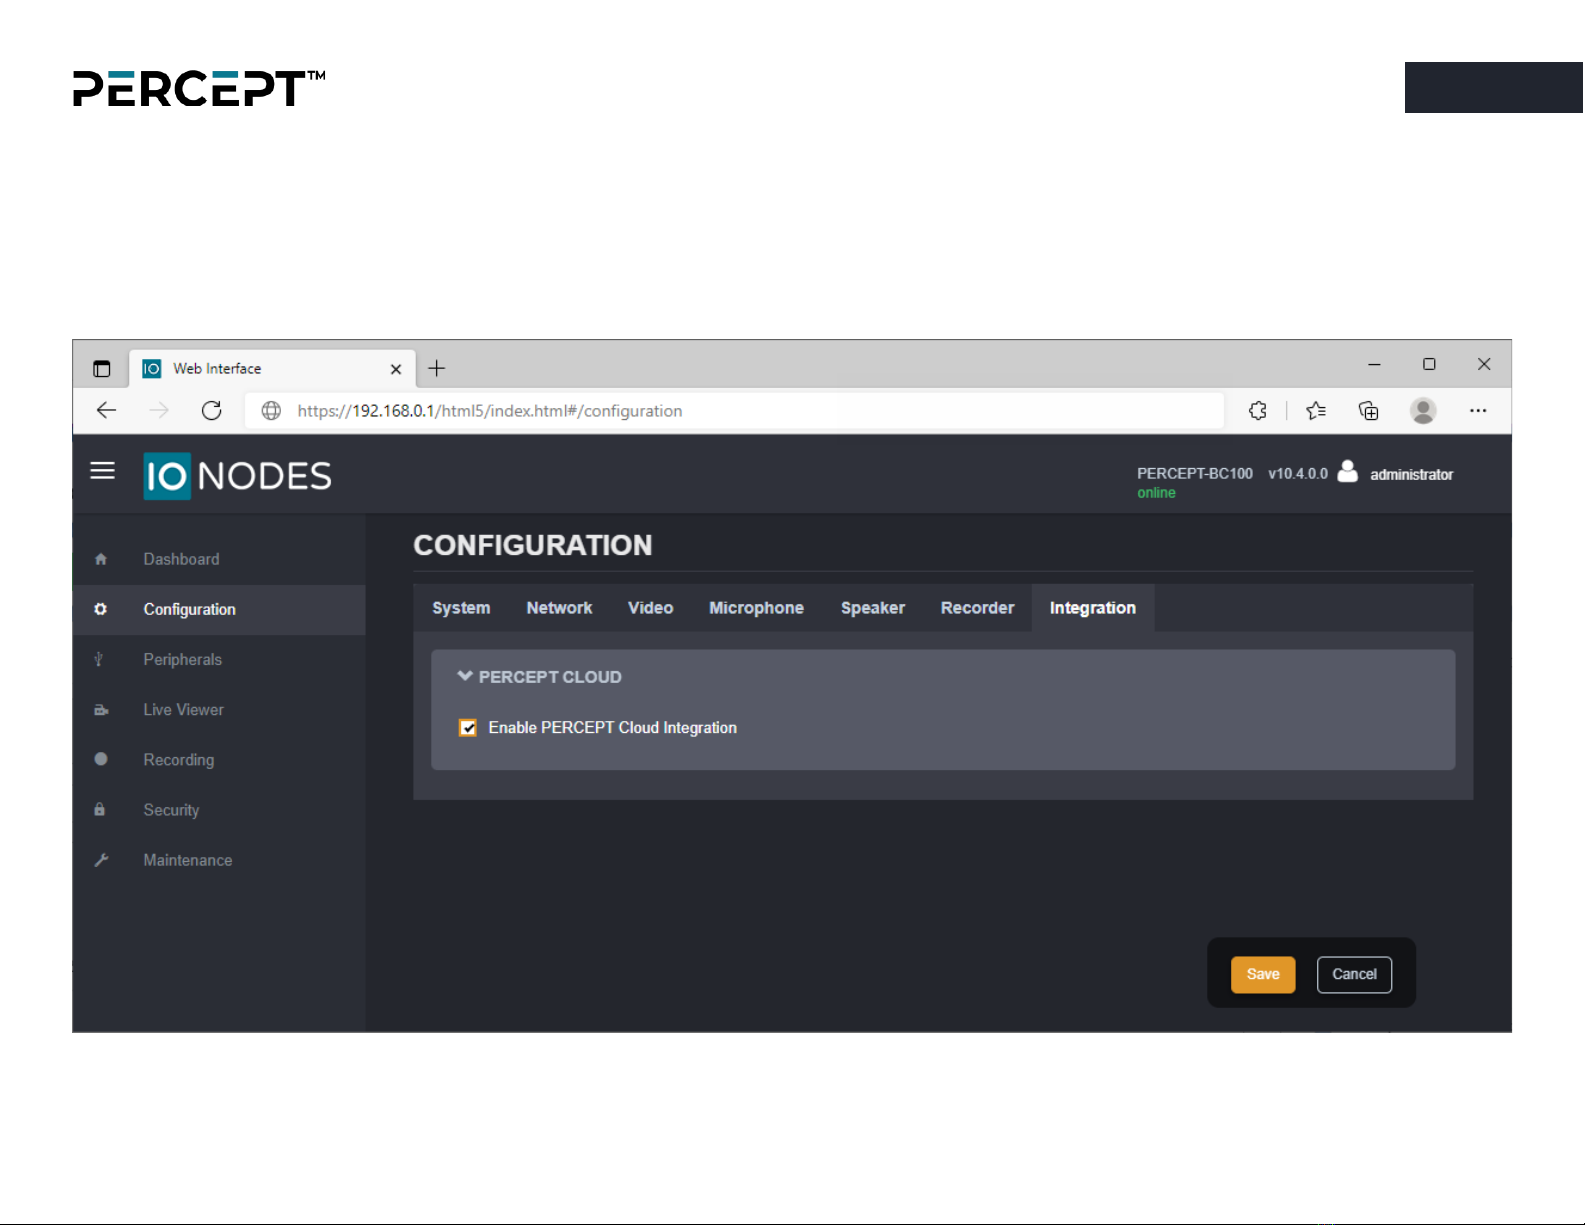
ENABLING PERCEPT CLOUD
To enable communication between the body camera and PERCEPT Cloud, log on to the web interface. Under the Configuration menu,
Integration tab, expand PERCEPT Cloud, check the box to Enable PERCEPT Cloud Integration then Save the configuration.
Please refer to the PERCEPT Cloud User Manual for cloud configuration.
Other manuals for PERCEPT
2
Table of contents
Other IONODES Digital Camera manuals


