iPECS eMG80 User manual

iPECS UCP & eMG80/100 & eMG800
User Portal User Guide
Please read this manual carefully before operating System.
Retain it for future reference.

iPECS eMG80/100 & eMG800 & UCP
User Portal User Guide Issue 1.4
Revision History
ISSUE
DATE
DESCRIPTION OF CHANGES
1.0
Aug., 2016
Initial Release
1.1
Aug., 2017
S/W version 2.2.x.
- Added External Number as Destination Type in Call Forward.
1.2
Mar., 2019
S/W version 3.5.x.
- General Update (Style, Font, etc.)
1.3
Jul., 2019
S/W version 3.6.x.
- Added eMG100 System
1.4
Dec., 2019
S/W version 4.0.x.
General Update (Style, Font, etc.)
Copyright© 2016 Ericsson-LG Enterprise Co., Ltd. All Rights Reserved
This material is copyrighted by Ericsson-LG Enterprise Co. Ltd.Any unauthorized reproductions, use or
disclosure of this material, or any part thereof, is strictly prohibited and is a violation of Copyright Laws.
Ericsson-LG Enterprise reserves the right to make changes in specifications at any time without notice.
The information furnished by Ericsson-LG Enterprise in this material is believed to be accurate and reliable,
but is not warranted to be true in all cases.
Ericsson-LG Enterprise and iPECS are trademarks of Ericsson-LG Enterprise Co., Ltd.

iPECS eMG80/100 & eMG800 & UCP
User Portal User Guide Issue 1.4
i
Table of Contents
1Introduction ...................................................................................................1
2Log in User Portal..........................................................................................2
3User Interface................................................................................................4
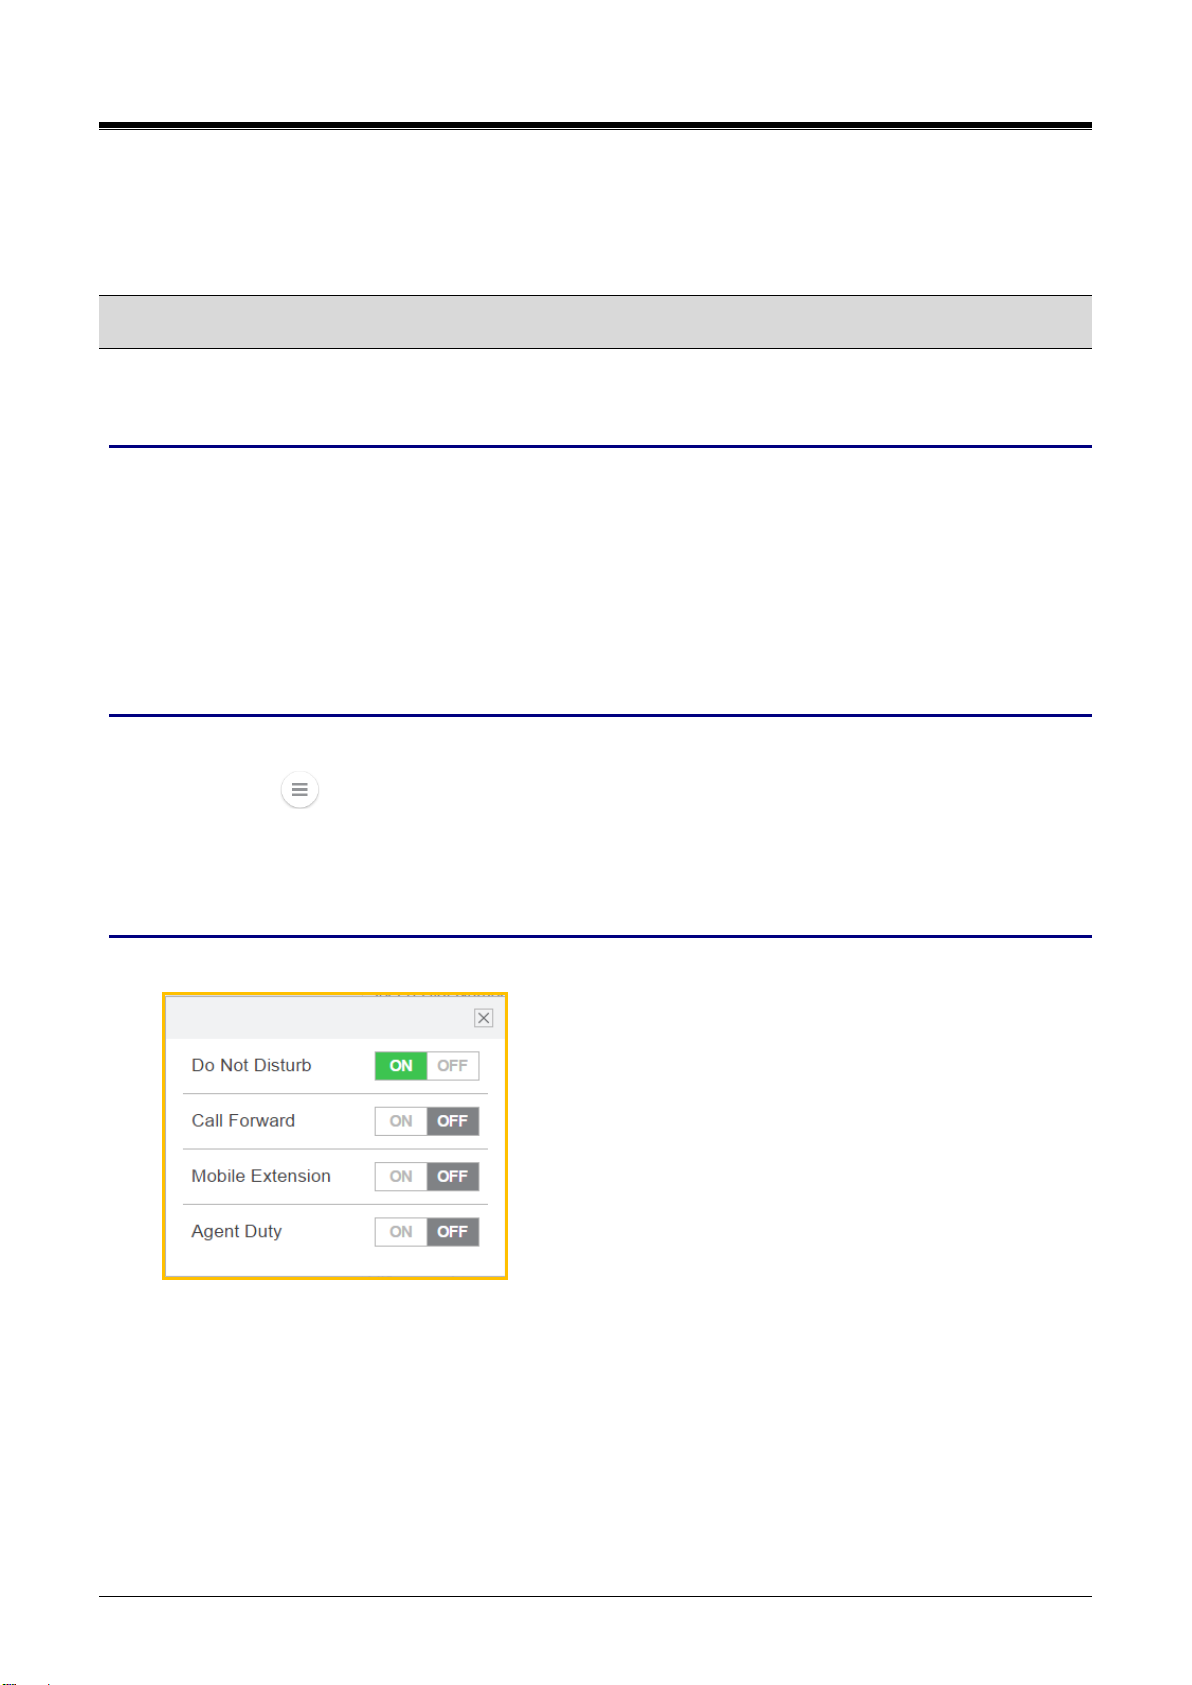
4Setting My Attributes.....................................................................................5
4.1 Do Not Disturb....................................................................................................... 5
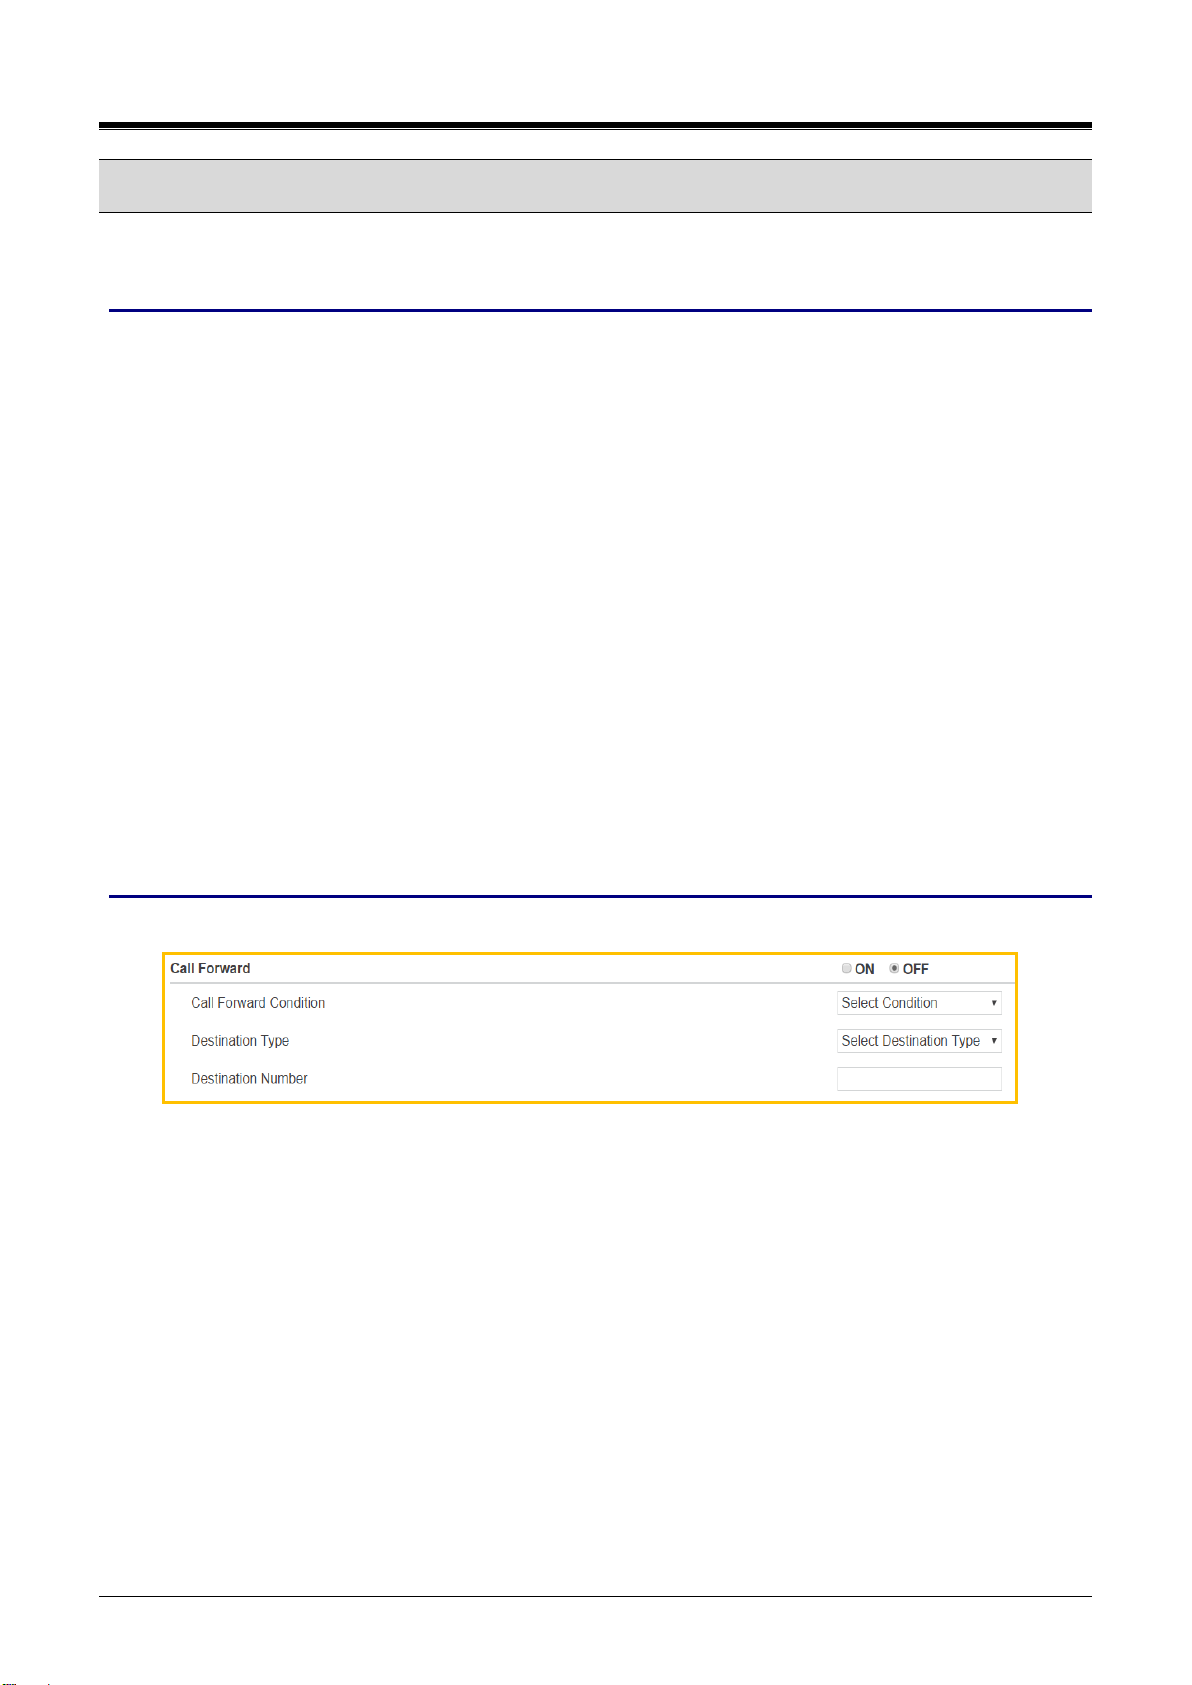
4.2 Call Forward.......................................................................................................... 6
4.3 Mobile Extension ................................................................................................... 7
4.4 Pre-Selected Message .......................................................................................... 8
4.5 Agent Duty............................................................................................................. 9
4.6 Attendant Ring Mode........................................................................................... 10
5Setting My Profile........................................................................................11
5.1 Station Name....................................................................................................... 11
5.2 Change Password ............................................................................................... 11
6Setting Voice Mail........................................................................................12
6.1 Notify to E-mail.................................................................................................... 12
6.2 Notify to Mobile.................................................................................................... 13
6.3 Cascade .............................................................................................................. 14
6.4 User Greeting...................................................................................................... 15
7Setting Button Setting..................................................................................16
8Using Directory............................................................................................17
9Station Web (Old)........................................................................................19
9.1 Station Attributes ................................................................................................. 20
9.2 Station Call Forward............................................................................................ 23
9.3 Station ICR Scenario........................................................................................... 24
9.4 Station Speed Dial............................................................................................... 25
9.5 Pre-selected Message......................................................................................... 26
9.6 Flexible Buttons................................................................................................... 27
9.7 Send Internal and External SMS ......................................................................... 28
9.8 Station Conference Group................................................................................... 29
9.9 System Conference Group.................................................................................. 30
9.10 Mobile extension Table........................................................................................ 31

iPECS eMG80/100 & eMG800 & UCP
User Portal User Guide Issue 1.4
1
1 Introduction
This document describes how to use End User Portal to configure User settings for your iPECS call server.
This user guide documents all of the configuration settings available in User Portal. This guide assumes that
your phone supports all the available settings. But your administrator can set some admin items in System call
server that limit the settings so that users can configure in User Portal.
You can do access this user portal site by using Mobile phone or PC. To access this user portal site, enter the
URL for the target website. Please ask your administrator of URL.
Using this User Portal, you can configure settings such as DND (Do Not Disturb), Call forward, Mobile
extension, Pre-selected message,Agent Duty, Station Name and password, Voice Mail, Button Setting, and
Search the directory on System or LDAP.
This user guide contains the following section:
Section 1: Introduction
Section 2: Log in User Portal
Section 3: User Interface
Section 4: Setting My Attributes
Section 5: Setting My Profile
Section 6: Setting Voice Mail
Section 7: Setting Button Setting
Section 8: Using Directory
Section 9: Station Web (Old)

iPECS eMG80/100 & eMG800 & UCP
User Portal User Guide Issue 1.4
2
2 Log in User Portal
Your administrator must set ID and Password before using this portal as below.
1) Log in to iPECS call server by administrator.
2) Click [Table Data] and [Station Authorization Code Table (227)].
3) Enter the station number and click [Load] button.
4) The following figure will be displayed to set the ID and Password: ID is Station number and
Password is Authorization Code. Tick the check box and click [Save] button after entering
Authorization Code.
5) For example, the login ID is Station number ‘1000’and Password is ‘1000’.
The User Portal is designed to configure each station by End user as the following steps:
1) Enter the ID ‘1000’and Password ‘1000’set by your administrator as below page.

iPECS eMG80/100 & eMG800 & UCP
User Portal User Guide Issue 1.4
3
2) The following main screen will be displayed. The displayed attributes are different between the
normal station and the attendant station.
Attendant Station User Portal
Normal Station User Portal
Checking point
Some attributes are needed to set the related admin in advance by your administrator to use or configure.
Please read ‘Checking point’before setting the feature.

iPECS eMG80/100 & eMG800 & UCP
User Portal User Guide Issue 1.4
4
3 User Interface
User Portal uses a web-based graphical interface with five main tabs. Each tab contains a link to different
options that the user can configure. The tabs are as follows:
My Attributes —settings under this tab allow you to view and configure your phone settings such as
Call forward, Mobile Extension, Agent Duty, Attendant Ring Mode, and Pre Select Message settings.
My Profile —settings under this tab allow you to change Station name and Password.
Voicemail —settings under this tab allow you to set up your voicemail preferences.
Button Setting —settings under this tab allows you to configure your flexible button.
Directory —settings under this tab allow you to search for the directory.
The following tabs are additional function by clicking ( ) in the top right corner of the window:
Change Language (Local) —Change the language as the local by clicking this tab.
Station Web (Old) —Move to the old station web portal as you wish.
Log Out —Log out the user portal.
The following features will be popped up by clicking ( ) in the below right corner of the window. The
features works immediately by clicking On or Off if the feature was set already:
Do Not Disturb —Set the phone status in DND. *Attendant is not available.
Call Forward —Set the phone to forward to another phone.
Mobile Extension —Use the mobile phone with the desktop phone.
Agent Duty —Agent start work or inform the reason to supervisor about Off-Duty.

iPECS eMG80/100 & eMG800 & UCP
User Portal User Guide Issue 1.4
5
4 Setting My Attributes
4.1 Do Not Disturb
If Do Not Disturb is turned on, your phones do not ring when someone dials your number.
Checking point
Please ask your administrator if the following admin. attributes is set in advance.
1) Station Data > Common Attribute (111) > DND: All / ICM Call only / CO Call only.
All: DND is available for all calls.
ICM Call only: DND is available only for Internal call.
CO Call only: DND is available only for CO call.
2) Attendant station is not available for DND function.
Operation
To turn on Do Not Disturb status for your phone, perform the following procedure:
1) Click the ( ) and pop up the small window.
2) Select ‘Do Not Disturb’to turn on or off by clicking.
3) Do Not Disturb is turned on for your company phone according to all calls, Internal call, or CO Call.
Window
The following window shows DND is set to ON.

iPECS eMG80/100 & eMG800 & UCP
User Portal User Guide Issue 1.4
6
4.2 Call Forward
Call forwarding user options allow you to set up your phones to forward calls to another number.
Checking point
Please ask your administrator if the following admin. attributes is set in advance.
1) Station Data > Common Attribute (111) > Call Forward: On.
2) Check the destination type
Station Group: Station Group Data > Station Group Overview: check Group number and Member
list.
Voice Mail: Station Group Data > Station Group Overview: check if there is Group Number of VSF-
VM.
Speed Dial Number is System speed & Station speed. System speed is programmed as below and selects the
desired index. But Station speed is programmed by pressing [PGM] and [Speed] button.
The range of System & Station speed number is different according to the system: check [System ID (100)] >
‘Speed Numbering’.
System speed: System Data > System Speed Dial: check the index including Programmed number
(Dial digit) and Name.
Station speed: Station Web (Old) > Station Speed Dial: check the index including Programmed
number (Dial digit) and Name.
Operation
In the below window, you can set the call forward option as the following steps:
1) Set Call Forward to ON.
2) If you set the call forward ON, the following settings are available as your situation.
3) Use the drop-down list box to configure Call forward condition:
Unconditional (Always): all calls to the station are forwarded internally or externally immediately upon
receipt except recalls.
Busy: If the station is busy, forwards all calls to the selected station except recalls.
No Answer: Forwards all calls to the selected station when the station does not answer within the No
Answer timer except recalls.
Busy or No Answer: Forward all calls if the selected station is busy or does not answer within the No
Answer timer.
4) Use the drop-down list box to select Destination type:
Station Number: Select the station number.
Station Group/Voice Mail: Select the station group number which the station is included, or forward
to Voice mail to record.

iPECS eMG80/100 & eMG800 & UCP
User Portal User Guide Issue 1.4
7
Speed Dial Number: Select the speed dial number if the station is stored by speed dial.
External Number: Select the external number and then enters the external number without CO
access code.
5) Click [Save] button.
Window
The following window shows Call forward is set to ON: e.g., Condition is ‘Unconditional (Always)’, Destination
type is ‘Station number’, and Destination Number is ‘1025’.
4.3 Mobile Extension
Your mobile phone can be registered to a station allowing the mobile phone to place and receive calls through
the system. Also, User can use Mobile phone or Desktop phone alternatively by pressing [My station number]
flexible button.
Checking point
Please ask your administrator if the following admin. attributes is set in advance.
1) Table Data > Mobile Extension Table (236) > PGMAuth: Enable.
2) Making [My station Number] button on Flexible button:
Press [PGM] > Press [Flexible] button > Enter ‘Station number’> Press [Save].
3) For more detailed additional option such as VSF Notify, Announcement, etc., ask your administrator.
Operation
In the below window, you can set an additional phone as a mobile phone, perform the following steps:
1) Set Mobile Extension ON.
2) Enter Destination Number.
3) Click [Save] button.
To move from Mobile phone to Desktop phone
1) The mobile phone of MEX is on MEX call.
2) Press {My station number} flexible button in desktop phone.
3) The user can do the MEX call with the desktop phone.

iPECS eMG80/100 & eMG800 & UCP
User Portal User Guide Issue 1.4
8
To move from Desktop phone to Mobile phone
1) The desktop phone of MEX is on MEX call.
2) Press {My station number} flexible button in desktop phone.
3) Then, the mobile phone is ringing.
4) The desktop phone ends the call.
5) When the user answers with the mobile phone, the user can do the MEX call with the mobile phone.
Window
The following window shows Mobile extension is set to ON & Destination number.
4.4 Pre-Selected Message
There are ten Pre-defined messages as below. User just selects one of 10 messages and enters time, date,
Station number according to Message type. The calling party can see the selected message on LCD for
Internal caller.
The calling party, an outside caller, can hear the voice message of the pre-selected message.
Checking point
Please ask your administrator if the following admin. attributes is set in advance.
1) Station Data > Station VMAttributes (127) > Pre-sel Msg Language: Prompt X.
The prompt can change the desired language on Maintenance ‘VSF Prompt Message’.
2) Attendant station is not available for Pre-Selected Message even though it is displayed on Window.
Operation
In the below window, you set ‘Show Text Message to an internal caller’and ‘Voice message play to an outside
caller’, perform the following steps.
To set ‘Show Text Message to an internal caller’
1) Click the drop-down list box to select Message.
2) Enter the time, date, or Station number: the field will be displayed automatically according to
Message type.
Lunch Return Time: need to enter Time.
On Vacation Return at Date: need to enter Date.
Out of Office Return Time: need to enter Time.
Out of Office Return Date: need to enter Date.
Out of Office Return Unknown

iPECS eMG80/100 & eMG800 & UCP
User Portal User Guide Issue 1.4
9
Call to Station: need to enter Station number.
In Office Station: need to enter Office station number.
In a Meeting Time: need to enter Time.
At Home
At Branch Office
3) Click [Save] button.
To set ‘Voice message play to an outside caller’
1) Click the drop-down list box to select.
2) Select ON.
3) Click [Save] button.
Window
The following window shows Pre-Selected message is set for Internal caller and Outside caller.
4.5 Agent Duty
Agent duty meansAgent start work as the member ofACD group. Agent inform the reason why he/she doesn’t
work (Off-Duty) to ACD Supervisor by displaying the off-duty reason code from 0 to 9. The off-duty reason
code can make the exact reason with code up to 10.
Checking point
Please ask your administrator if the following admin. attributes is set in advance.
1) Station Group: Station Group Data > Station Group Overview: check Group number of ACD and
Member list.
ACD must assign on Group number and the station has to be member.
2) The off-duty reason code has to be checked with each number from 0 to 9. The off-duty reason list
will be made and supported on site.
Operation
In the below window, you set Agent On-Duty and Off-Duty with the reason code. Please perform the following
steps.

iPECS eMG80/100 & eMG800 & UCP
User Portal User Guide Issue 1.4
10
To set ‘Agent On-Duty, perform the following steps:
1) Select ON.
2) Enter Station Group Number.
3) Enter Off-Duty Reason code from 0 to 9.
4) Click [Save] button.
Note
If Agent Duty select OFF, automatically Agent is Off-Duty and informs the reason to Supervisor.
Window
The following window showsAgent is set to On-Duty:ACD group number is *406 and the reason code is 1.
4.6 Attendant Ring Mode
Only Attendant controls the system ring mode service.Attendants can change Ring Mode (Day, Night, Timed,
Scenario (On-Demand)) for the system manually and Auto Ring mode can be programmed on ‘Auto Ring
Mode Table (233)’.
Based on the selected ring mode, the COS (Class Of Service), the different ring assignments, and the
answering privileges are invoked for the system users.
To employ the scenario mode (On Demand Ring Mode), scenarios must be assigned in ‘System Call Routing
(251)’.
Operation
In the below window, you setAttendant Ring Mode: Day Ring mode, Night Ring Mode, Timed Ring Mode, Auto
Ring Mode, On Demand Ring Mode.
The ‘Select On-demand Ring Mode’field is created if you selected On Demand Ring Mode. Please click [Save]
button to apply.

iPECS eMG80/100 & eMG800 & UCP
User Portal User Guide Issue 1.4
11
5 Setting My Profile
5.1 Station Name
To set your station name
1) Enter the desired name up to 20 characters and click [Save] button.
2) The changed station name will be displayed on LCD with Station Number.Also, the portal name will
be changed after refreshing the window.
Note)
Only Station number will be displayed without entering the station name.
5.2 Change Password
To reset the password that you use to log into User Portal
1) Enter the desired number up to 12 digits and click [Save] button.
2) In the password text box, enter the new password when user log in to User Portal.
Window
The following window shows My Profile: Station name is ‘aaaaabbbbbcccccddddd’and enter the password.

iPECS eMG80/100 & eMG800 & UCP
User Portal User Guide Issue 1.4
12
6 Setting Voice Mail
6.1 Notify to E-mail
You can send the notification of Voice message by E-mail and also the voice message is attached in the form
of xxx.wav file.
Checking point
Please ask your administrator if the following admin. attributes is set in advance.
Station Data: Station VM Attributes (127) > E-Mail Notification: check the following admin items. In this window,
the following admin items are set in advance.
SMTP Server Address
SMTP Port
E-Mail Account ID
E-Mail Account Password
Sender E-Mail Address
The rest are additional option.
Operation
In the below window, you just enter ‘Receiver E-mail address’and select On if you want get Voice message
attached and then click [Save] button.
Window
The following window shows Notify to E-mail by entering E-mail address and Attachment.

iPECS eMG80/100 & eMG800 & UCP
User Portal User Guide Issue 1.4
13
6.2 Notify to Mobile
You can get the notification of Voice message on your mobile phone if you set Mobile extension on the
previous tab ‘My Attributes’.
Checking point
Please ask your administrator if the following admin. attributes is set in advance.
Table Data > Mobile Extension Table (236) > VSF Notify: Use.
Additional option ‘Notify Retry’can be set from 1 to 9 according to the situation.
Operation
In the below window, you just select ON if you want get the notification on your mobile phone and then click
[Save] button.

iPECS eMG80/100 & eMG800 & UCP
User Portal User Guide Issue 1.4
14
6.3 Cascade
You can move or copy the voice message to another ‘cascade destination’according to Message type. The
message type is divided into 3: All (Normal message & Urgent message), Urgent message, and Normal
message.
Operation
In the below window, you set the cascade message about Cascade message method, Apply timer, Message
type, and Cascade destination.
Click [Save] button after set the following features.
To set ‘Cascade message method’
✓Select On (Copy) or On (Move).
ON (Copy): if you want to store the original message and send the copied message to other cascade
destination.
ON (Move): If you want to send the original message to other cascade destination without keeping
your original message.
To set ‘Cascade Apply Timer’
✓Enter the time from 1 minute to 250 minutes. The message will be sent sequentially from Cascade
Destination 1 to Cascade Destination 2 according to the entered apply timer.
To set ‘Cascade Message Type’
✓Select the following message type as you wish.
Normal messages Only: only normal message is cascaded to Cascade Destination.
Urgent messages Only: only urgent message is cascaded to Cascade Destination.
All messages: all messages (Normal message and Urgent message) is cascaded to Cascade
Destination.
To set ‘Cascade Destination 1 & 2’
✓Enter the internal station number to get Voice mail message except yours up to 2 destination number.
Window
The following window shows Voice mail message is set to ON (Copy) including Apply timer, Message type,
and Cascade Destination.

iPECS eMG80/100 & eMG800 & UCP
User Portal User Guide Issue 1.4
15
6.4 User Greeting
You can leave a voice message up to 4 user greeting according to Phone status of call forward: Unconditional,
Busy, Do Not Disturb, and NoAnswer. User greeting is recorded yourself and set the user greeting for the
calling party.
Checking point
Please ask your administrator if the following admin. attributes is set in advance.
System Data > System Attributes (160~161)) > Station VM Feature Usage: ON.
Assign the VSF-VM group
Voice Mail: Station Group Data > Station Group Overview: check if there is Group Number of VSF-
VM.
Click [Go to Assignment] to assign the VSF-VM group If there is no VSF-VM group.
To record User Greeting as below:
1) Press ‘VSF-VM’group number on your phone.
2) Enter your station number & Password with prompt (according to ‘VM password check’setting).
3) The following prompt will be played and Press the following number.
Press ‘8’: “to set greeting or password, press eight”.
Press ‘1’: “to edit your greeting, press one”.
Press ‘7’: “to record a new greeting, press seven”.
Select Greeting number from 1 to 4: “at the tone, record your greeting, press pound (#) when you
have finished”.
4) The default system greeting will be played if there is no user greeting recorded.
Operation
In the below window, you set User greeting according to Phone status. You just select the desired user
greeting by clicking the drop-down list box and click [Save] button.
Note) The destination type on tab ‘My attributes > Call forward’set Station Group/Voice mail to play the above
user greeting.
Window
The following window shows User greeting is set according to Call forward condition.

iPECS eMG80/100 & eMG800 & UCP
User Portal User Guide Issue 1.4
16
7 Setting Button Setting
You can see the overall information about Flexible button of your phone. In this window, you can describe
‘Label’on each flexible button up to 15 characters to find with easy.Also, the label is displayed on LCD of your
phone after setting.
Click [Save] button after entering the label on each button.

iPECS eMG80/100 & eMG800 & UCP
User Portal User Guide Issue 1.4
17
8 Using Directory
You can search for the directory by using System or LDAP. You toggle between System and LDAP scope for
search. To search for Directory, enter more than 3 characters.
Checking point
Please ask your administrator if the following admin. attributes is set in advance.
1) System Data > System Attributes (160~161)) > LDAP Server Settings.
Enter ‘Server IP’, ‘Server Port’, ‘Search Base’, ‘LDAP User ID’, and ‘LDAP Password’. The
additional admin items is set or entered according to your situation.
For example,
Server Display Name: LDAP Server
Server IP: 150.150.131.139
Server Port: 3268
Require Login: ON
Use SSL: OFF
Search Base: DC=com
LDAP User ID: user1@ucapp.com
LDAP User Password: XXXXXXX
2) Station Data > Common Attributes (111)) > Click To Call Service: Enable.
Operation
In the below window, you enter more than 3 character for search after selecting ‘System’or ‘LDAP’and click
[Search] button.
Other manuals for eMG80
7
This manual suits for next models
2
Table of contents
Other iPECS Server manuals