ipixo 1080p Outdoor Camera User manual

1080p Outdoor Camera
User Manual
ipixo

Contents
2
3
4
5
6
What you’ll need
Let’s get started
Installing the Camera
Live View
Motion and Sound Detection
7Event Recording
8
9
10
11
13
Recording Playback
Home Management
Add a Family Member
Sharing the Camera
Safety Information
This usermanualhas all the information you needto make the most out of Camera.
Please keepthis manualforfuture reference andensure you have readall safety instructions carefully before
use.
The manual is subject to change without notice. The updates will be added into the newversion of the manual.

2
What you’ll need
This is what you will needto set upyour Outdoor Camera
Wi-Fi broadband
A working internet connection
on a2.4Ghz frequency channel
Clan at Home account
Download the Clan at Home
app and register
Phillips Bit
A power drill with Phillips
driver bit
CompatibleDevice
An Apple or Android
Smartphone or Tablet PC
Indoor Mains Power Supply
Direct access to an indoor
power socket
Drill Bit
To install on surfaces such as
brick or concrete
2

Let’s get started
Add the Camera to the Clan at Home AppPlease complete set up before mounting the camera
If you’re setting the camera up for the first time, you will
needto:
1. Download the Clan at Home app from the Google
Play Store or Apple App Store
2. Open the app and “register” to create an account
3. Create a Home
4. Then add Camera
If you already have a Clan at Home account, simply press
the “+” icon on the top right corner and follow the
on-screen steps.
You will be asked to enter your Wi-Fi router password and
use the Camera to scan the QR code created on your
smartphone, then the camera will connect to your
Wi-Fi network.
If you needhelp with this, please referto
the Quick Start Guide included with Camera.
3
What do the flashing lights mean?
Solid Red
Starting up
Flashing Red
Ready to connect Solid Blue
Micro SD
CardSlot
Reset Button
Connect the camera to the
mains using the power
adapter provided.
The red LED will come on
once plugged in and the
camera will chime before it
is ready to connect.
If you would like the camera
to record, you will be
required to insert a Micro
SD Card. The camera will
support any sized Micro SD
Card up to 128GB

3 Metres
Installing the Camera
4
Choose a good spot
The Camera has an adjustable headanda wide field of
view so you can position it in any direction you want.
We recommendthat you mount the Camera at around
3 metres above the ground, this is the ideal position for
the Camera to sense movement, see faces andtalk through
the speaker andmicrophone.
Ensure that the Camera is mounted in a position that allows you
to see overa large area of yourhome andsurroundings
with an unblocked, clearview.
Test the Wi-Fi signal
Before mounting the Camera, we recommendthat you test the
Wi-Fistrength in the area that you’d like to place it. Ensure
the Camera is still plugged in to a mains power supply andtake
it outdoors.
Hold the Camera in the position that you
would like to mount it and check that
the live stream is working well in
the app.
Working well?Great, continue to the
next page.
Can’t see the live stream?Your Wi-Fimay not be strong
enough in that area, you may needto find anotherspot or
move your Wi-Fi router closer.

Alarm
Speak
Record
Screenshot
Alarm
Speak
Record
Live View
5
Once setup is complete, select the Camera in the Clan at Home app
Change the video quality
from Standard definition
to High Definition
See Full-Screen
Turn the speakeron oroff
See more Settings
See your Wi-FiSignalStrength
Click to turn microphone on oroff
Alarm
Speak
Select to customise motion detection settings
Alarm
Speak
Record
Screenshot
Click to record video manually, this will save to your phone gallery
Click to take a snapshot manually, this will save to your phone gallery

Step 1
Click on the Settings icon
to bring up the
Camera settings
Step 2
Select Sound Detection
Settings orMotion Detection
Settings
Step 3
Turn the setting on and
choose the sensitivity
Selecting a sensitivity level
minimises false alerts
Motion and Sound Detection
6
To set upthe Motion andSound detection, follow the steps below:
When movement orsound
is detected, the Camera will
sendyou alerts straight
to yourSmartphone
or Tablet device.
If your device is locked when
the Camera detects something,
you will receive a
notification on yourhome
screen as long as you are
signed in to the Clan at
Home app

Step 1
Click on the Settings icon
to bring up the
Camera settings
Step 2
Select SD Card Setting
Step 3
Ensure the Record Switch
is turned on.
Turning the Record Switch
off will stop the camera
from recording any footage
Step 4
Select Event Recording.
You can view recorded
footage in the Playback
section of the App
Event Recording
7

Recording Playback
The Camera continuously records for you, so you don’t needto remember to press record. The loop-recording feature automatically
removes the oldest videos to make room fornewones. You can access the recordings from the Clan at Home app.
Turn the speaker
on oroff
Select a date
Click to make a snapshot
manually this will save to
your photo gallery
See
full screen
Scroll to choose a
specific time
Click to record video
manually this will
save to your photo
gallery
8
Pause Video
Screenshot
Record
Screenshot
9
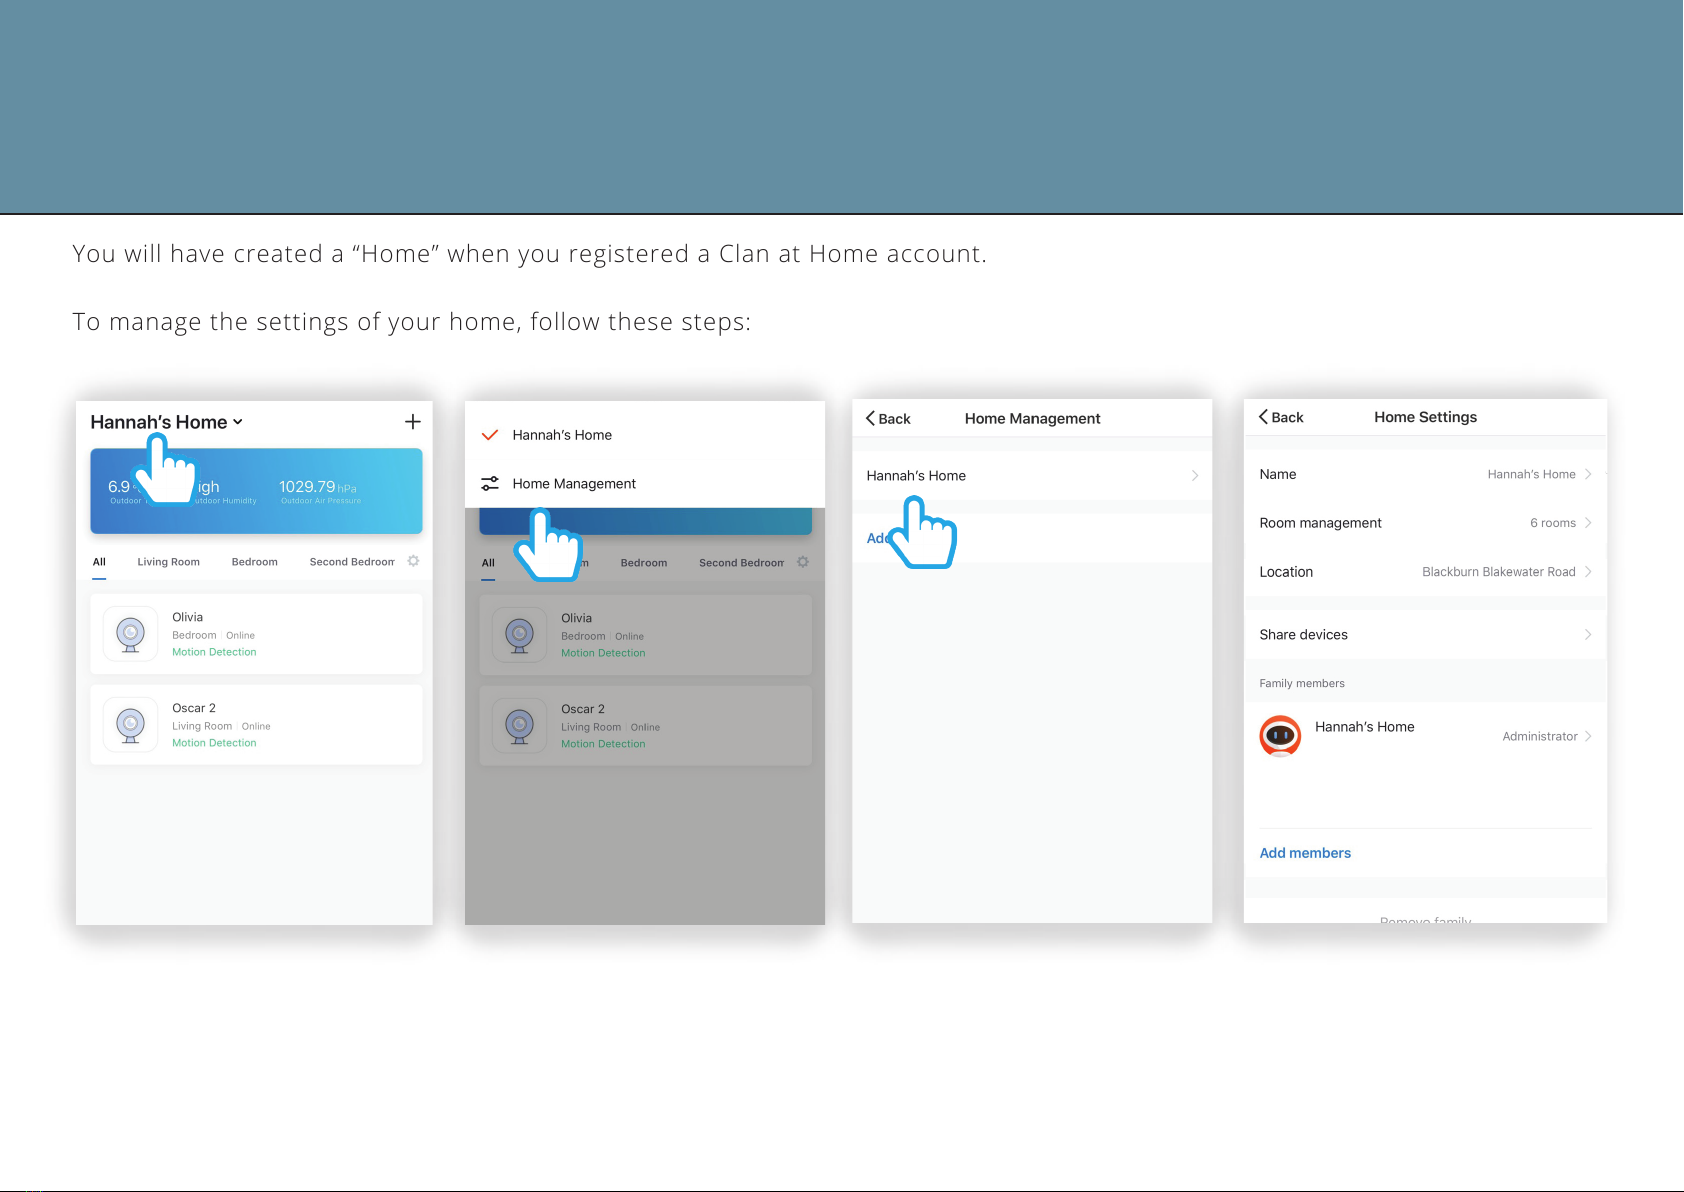
Home Management
You will have createda “Home” when you registered a Clan at Home account.
To manage the settings of your home, follow these steps:
Step 1
Click on your Home name in
the top left corner
Step 2
Select Home Management
.
Step 3
Click on your“Home”
You can also add a new Home
from this page.
Step 4
Change settings, change
location oradd a
family member.
Other manuals for 1080p Outdoor Camera
1
Table of contents
Other ipixo Security Camera manuals


