ipixo WIP21 User manual

1
WIP21 User Manual
Please read all instructions carefully before use to get the most out of your WIP21
Wireless Surveillance Camera.
Please keep this manual for future reference and ensure all safety instructions have
been read carefully before using. Applications and their functions may vary by
country and/or hardware specification.
The design and features are subject to change without notice.

2
Contents
Important Safety Information/Additional Notes
3
What comes in the box?/Camera Features
4
Connecting the IP Camera
5
3 Step WiFi Setup
6
The Home Screen
7
Viewing the camera feed
8
App Management
Skin Styles
Voice Message
Network Limitations
Traffic Statistics
Help
Push
9
9
10
10
10
11
11
Camera Settings
Edit Password
Alarm Setting
Action with alarm
Timing Record
Audio Setting
Video Setting
WiFi Setting
SD Card Setting
Time Setting
Email Setting
FTP Setting
12
13
13
14
15
15
16
16
17
17
18
19
Picture/Video Playback
20

3
Important Safety Information
Do not install the product outdoors or in any place where it may become wet.
Do not install the product in any place that might be exposed to extreme heat
or cold –the camera should be kept out of direct sunlight.
It is not permitted to open the product yourself or to have it opened, neither is
it permitted to repair the product yourself or to have it repaired. This will void
the warranty.
Only use the original accessories from the manufacturer.
Disconnect the device from all power sources before cleaning it. Use a clean,
dry cloth to clean the product.
Do not use any abrasive agents, corrosive cleaning products or any
substances that contain bleach or solvents to clean the product.
Disconnect the camera whenever the product will not be used for a long
period of time.
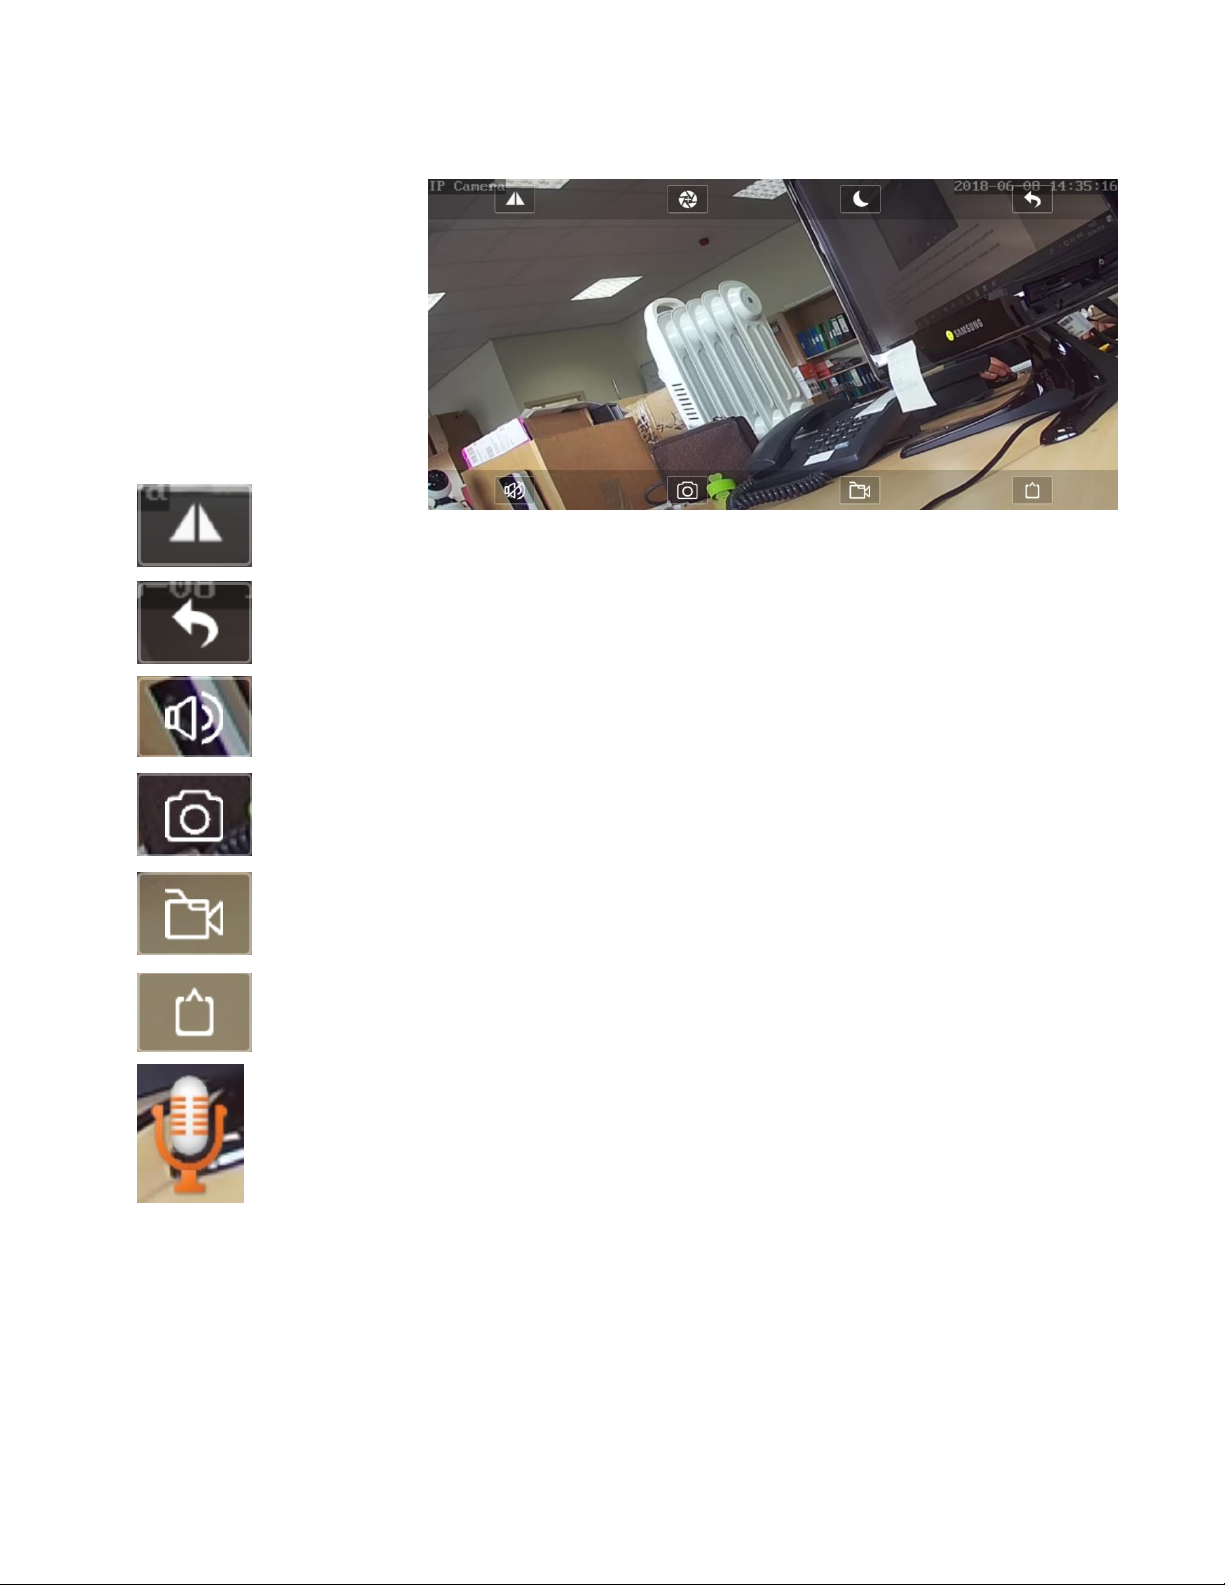
We do not recommend facing the camera towards a window. The glare of the
window may cause complications with the motion detection.
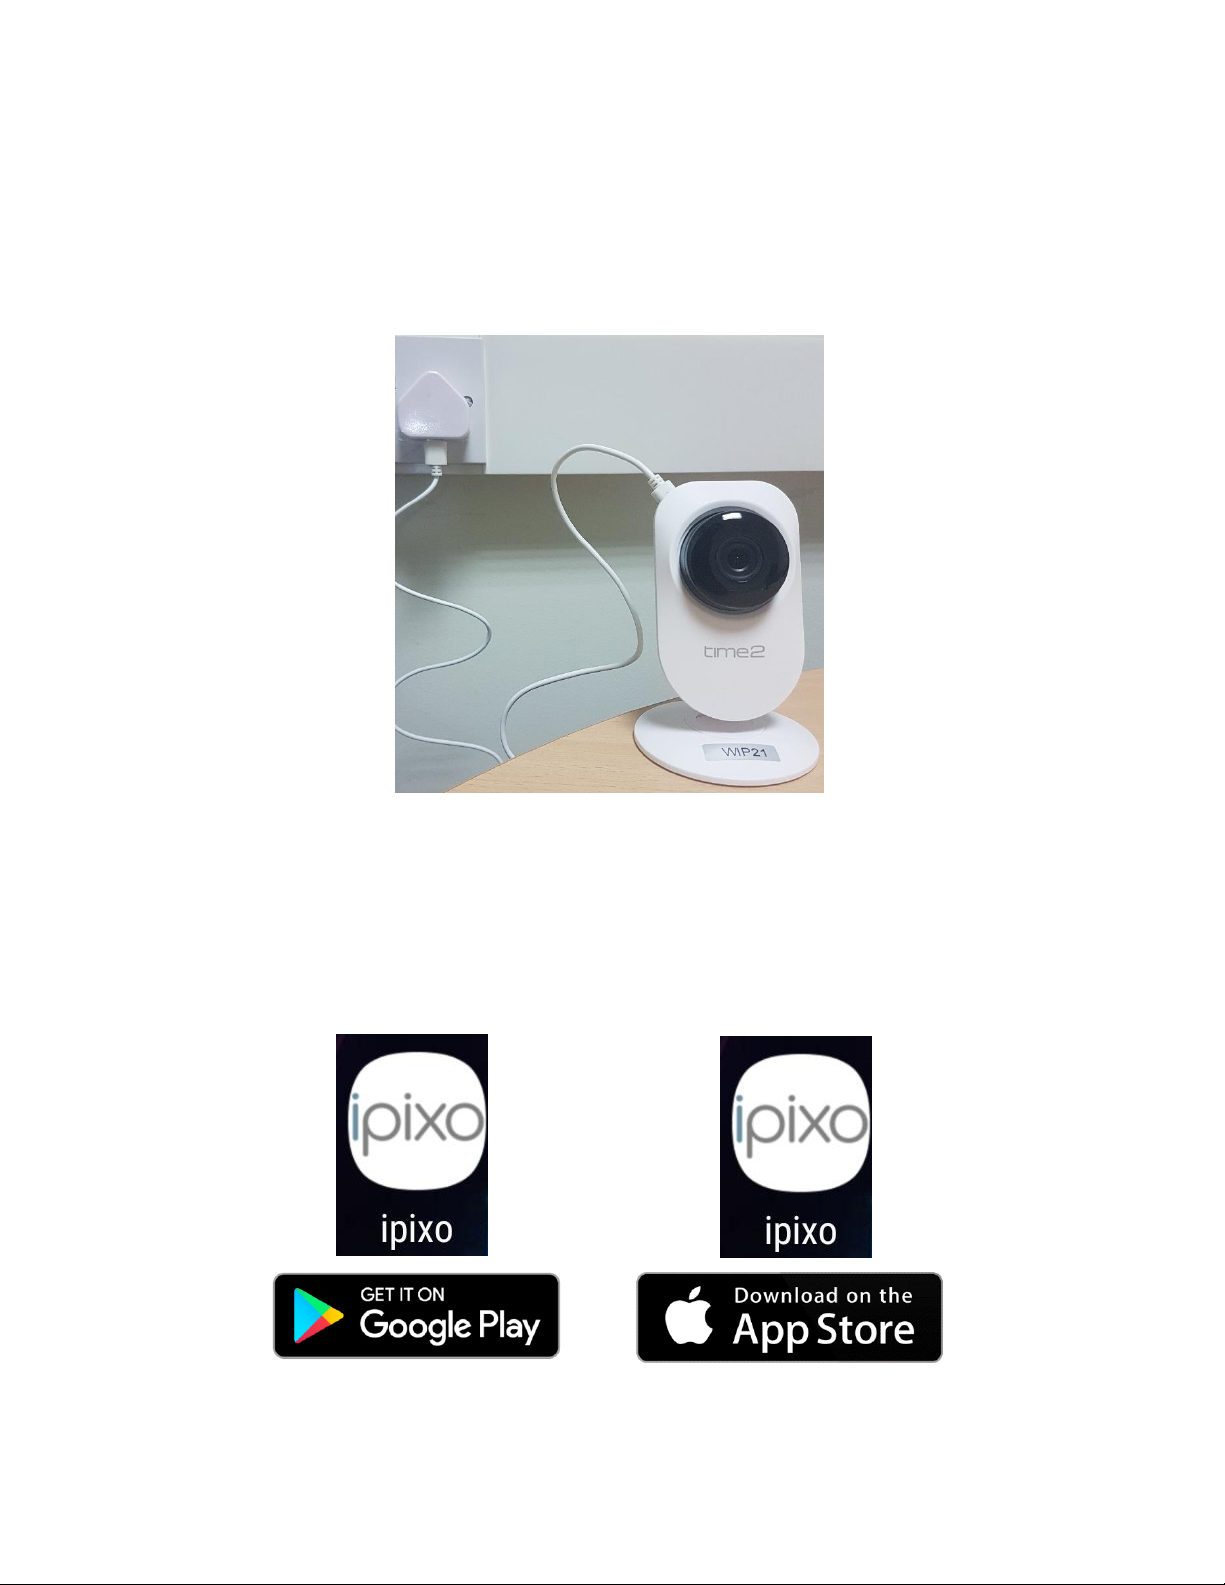
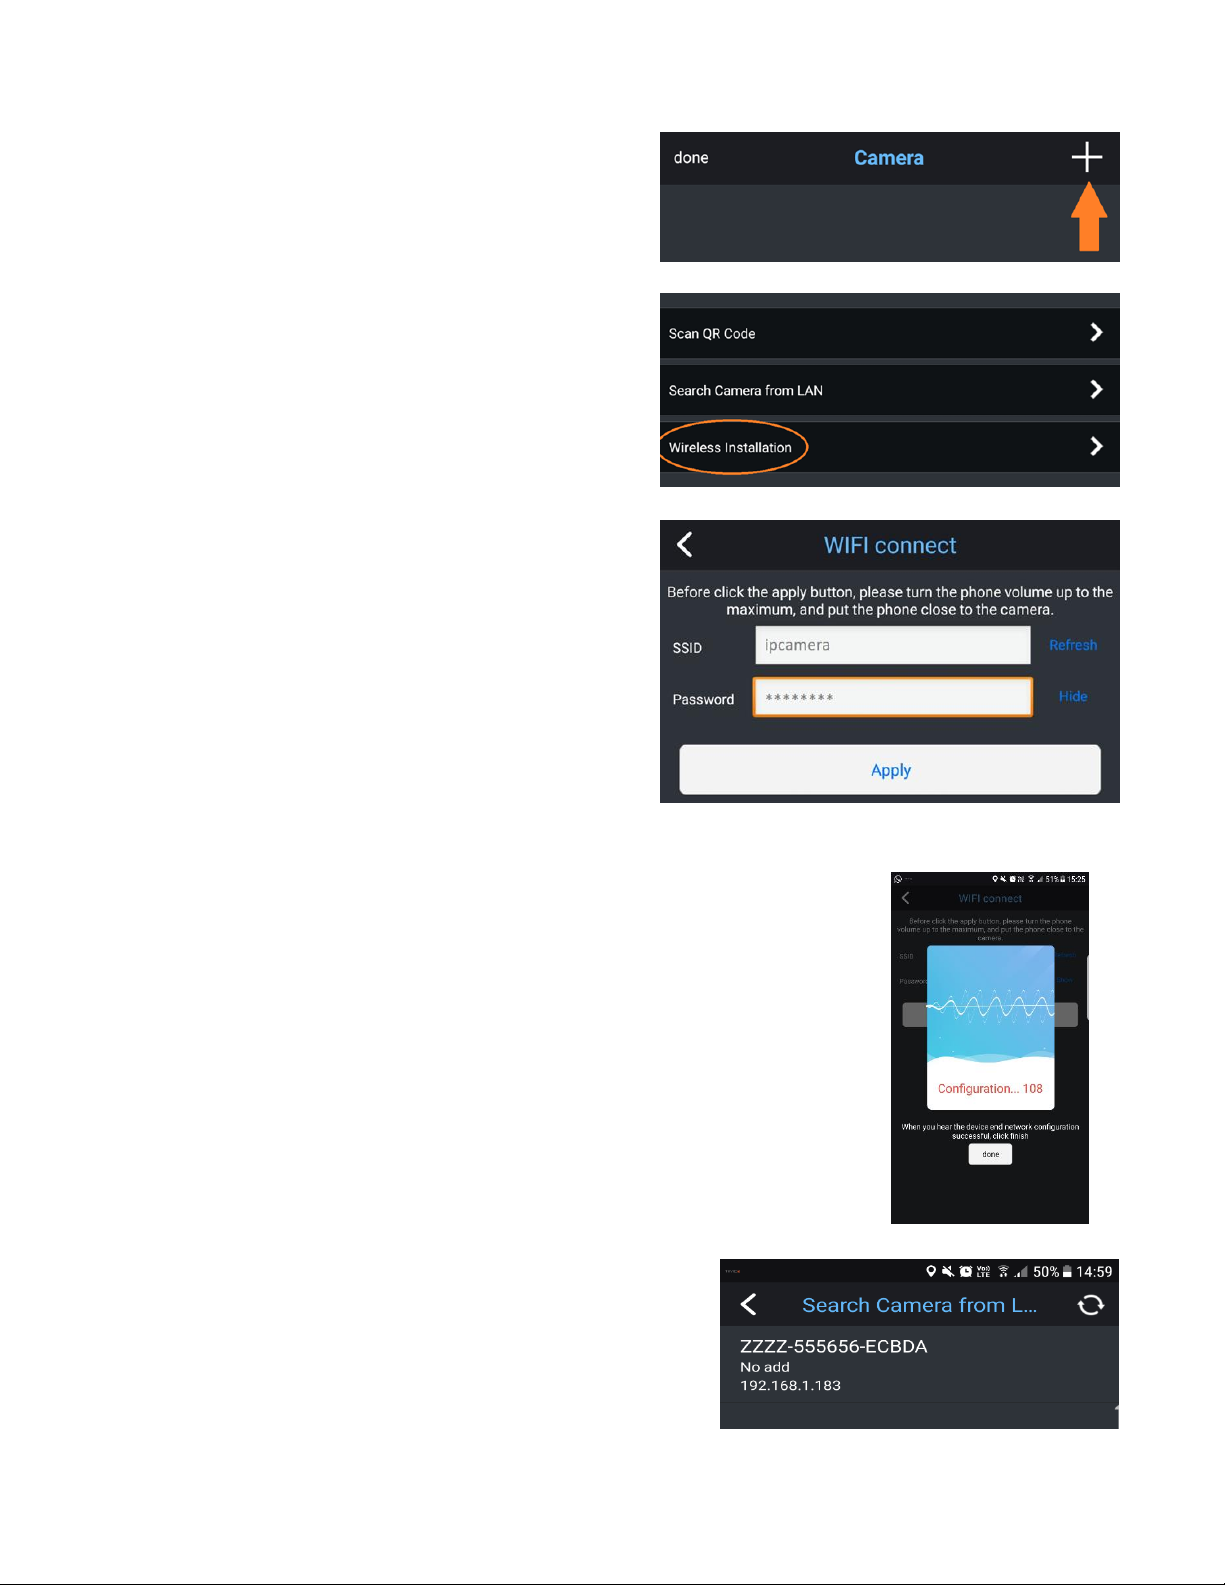
Before setup of the IP Camera, please note the following requirements:
This camera can only be setup on a router that supports a 2.4GHz Wireless
Router. If your Router supports both 2.4GHz and 5GHz bandwidths, please
close the 5GHz connection.
The WIFI Router name and password should not contain special characters
such as @ # $ and should be less than 20 characters
We highly recommend the purchase of a Micro SD Card. This will allow you
to record and playback footage recorded on the Camera. The maximum size
that can be used is 128GB.

4
What comes in the box?
WIP21 HD IP Camera
DC Power Supply
Screw Pack
Support Page Card Insert
Camera Features

5
Connecting the IP Camera
Please connect the IP camera to the mains using the power adapter provided.
The camera will take a few moments to turn on. Wait for the ringing tone before
you move onto the next step.
Downloading the APP
Please download and install the Ipixo cam Application from the Google Play Store
(Android) or Apple App Store (IOS) before setting up the Camera.

6
3 Step WiFi Setup
Step 1 - Click the “+“icon in the top right-
hand corner.
Then click “Wireless Installation”
Step 2 - Your Internet Router name will
appear under SSID. Enter the Router
password and click “Apply”.
The WIFI Setup will now begin and you will
hear a high pitch sound wave from your
phone.
Note: Ensure the volume on your device is turned up so your camera can
hear the soundwaves
Step 3
A confirmation tone will be heard once connected then click
“Done”
Your camera details will appear.

7
Click on it and enter the Camera password
(found on the sticker at the bottom of the
Camera) and Click “done” to see your Camera
online.
Simply click on your camera to view the live
feed.
The Home Screen
The menu along the bottom of the screen shows the following:
Screens
You are able to add up to four cameras to the
Screen page to monitor at one time.
You may stop the video by sliding over the video thumbnail. To view the
camera in full-screen, simply double-click on the respective thumbnail.

8
Viewing the camera feed
Click on the connected
Camera to view your
camera full screen in
real time.
Flip or
mirror the image
Go back to Camera List
Turn Speaker on
Take an image of live-feed
Record live-feed
Switch from Standard view or High-Definition
Press and hold to speak through Microphone

9
App Management
Swipe right on any screen to open up the App Management. This allows
you to see various information relating to your Camera.
Skin Style
You are able to change the appearance of the App from here. Choose
from a variety of colours.

10
Voice Message
Activate or deactivate the Alarm Sounds
Network Limitations
Here you may set the App so that recorded video may only be played
back if the device is connected to WIFI in order to save cellular data.
Traffic Statistics
Here the WIFI/Cellular data usage is shown. The traffic metrics for the mobile
network and the Wi-Fi will be shown. Use the “edit” feature on the top right-hand
corner to add usage limits.

11
Help
Here you will find the User Guide for the Camera.
Push
You may configure whether you want to receive alarm notifications, or not. Once
turned off, the App will not receive any alarm messages anymore.

12
Camera List
You will find all the connected cameras under the Camera section.
Click “Edit” to delete or rename any of the connected cameras
To add a new camera, press the “+” icon
To access the camera settings, simply click on the settings cog on the right-
side of the camera
Click on the camera thumbnail to view the camera in full screen.
Camera Settings
Click the settings cog next to the camera to access this menu.

13
Edit Password
You are able to change the default password of the camera from this section.
Alarm Setting
Turn the Motion Detection On & Off and adjust the sensitivity.

14
Action with Alarm
Choose how you would like to be alerted when motion is detected. You have the
options of:
Smartphone Push Notifications
Motion Alarm Recording
Email Alerts
FTP Upload
You can also set how many images you would like to see per notification.

15
Timing Record
Set how long you would like each recording to be (from 15-900 seconds) and
enable or disable recording. Please note if you turn this on the camera will record
continuously. (SD Card required)
Audio Setting
Adjust the Speaker & Microphone volume.

16
Video Setting
See video settings including Frame Rate per Second and Image quality.
WIFI Setting
WIFI setting is for the activation or deactivation of the camera access via WIFI.
This is a good way to test the signal strength from your router to your camera.
You may require a signal booster if the distance from your router to your camera
is too far away.

17
SD Card Setting
Check the status and storage space of the Micro SD Card (Max 128GB). You can
also format the SD Card from here.
To insert an SD card into the camera please see the image below:
Time Setting
Click “Sync with Phone time” to adjust the time
accordingly.
Alternatively, set the Device Time Zone to your
specific country and tick the Daylight Saving Time
if applicable.

18
Email Setting
Setup your mailbox to receive email notifications when motion has been detected.
SMTP Server: Select the appropriate
SMTP server according to your email
address
Server Port: Enter the correct Server
port according to your email address
Encrypt Type: Enter the applicable
Encrypt Type
Authentication: Ensure the
Authentication is always turned on
Username/Password: This is your email
address and email address password
Send To: Enter your email address
Sender: Enter your email address
Message: Add a message that will appear on the email

19
FTP Setting
Set up an FTP server to save recordings.
Server Address: This is the IP Address of
your server
Server Port: Enter the FTP Port number
User Name: Enter User Name
Password: Enter Password
Passive mode: Keep the passive mode on
Path: Enter the FTP Server path

20
Picture / Video Playback
Click the Picture/Video symbol on the bottom toolbar to access captured images
or recorded videos.
Click on the desired camera and see a list of all Planned and Alarm recordings.
Simply click on a recording to play.
Filter the recordings by clicking the “Search” option on the top right-hand corner.
Table of contents
Other ipixo Security Camera manuals