IQ-group E-294B User manual

INSTALLER GUIDE
13W Low Energy Lantern
E-294B
Version 1 : 12/06
IQ-PCL-PH-13-6
IQ Europe Limited
Sandbeck Lane, Wetherby LS22 7TW.
Visit us at www.iq-europe.co.uk
Installation helpline 0871 717 1100
IQ-PCL-PH-13-6-B.qxp 14/12/2006 10:52 Page 1

MANUFACTURER'S EXTENDED WARRANTY
In addition to your statutory rights relating to this product it is also guaranteed by IQ (Europe)
Limited ("IQ") for 12 months from the date of purchase against faulty materials or workmanship
which affect its designed ability to detect or switch. During this period if the product has a defect
of this nature it will be repaired or replaced free of charge by IQ with the same item, or a similar
one of higher specification, ON CONDITION THAT:-
The buyer takes advantage of any 'return to store' scheme operated by the seller from whom it is
bought.
If the product has a defect outside the period of any seller's 'return to store' scheme it should be
returned to IQ (Europe) Limited at Sandbeck Lane, Wetherby, W. Yorks LS22 7TW, England at
the expense of the buyer together with evidence of the date of purchase (it is the responsibility of
the buyer to prove delivery to IQ).
The product has been bought by the user.
The product has not been misused or handled carelessly, installed incorrectly, or used on a
voltage supply other than that shown on it.
Repairs have not been attempted by anyone other than IQ's staff.
The product has been used for domestic purposes only.
The product has not been installed in any unusually exposed or harsh environmental conditions.
If the buyer is resident in the EU the product or its replacement will be returned to the buyer at
the expense of IQ.
This guarantee excludes liability for discolouration of paint or plastic, or any user replaceable
parts and in particular lamps, glass panels, or globes/lanterns. It does not confer any rights other
than those expressly set out above and does not cover any claims for consequential loss or
damage.
This guarantee is offered as an additional benefit and does not affect your statutory rights as a
consumer.
This contract is subject to the laws of England and Wales.
IQ-PCL-PH-13-6-B.qxp 14/12/2006 10:52 Page 2

SECTION ONE
GENERAL INFORMATION
The unit features an integral daylight sensing photocell which will automatically switch the light on
at dusk and off at dawn or at a time set by the user.
PARTS INCLUDED
- Luminaire c/w PIR Sensor unit
- Instruction manual.
Please keep safe for future reference.
- Accessory Pack
- Wall mounting plate
- 13W PL Low Energy Lamp
Unit is for outdoor use only.
Unit must be mounted as a fixed luminaire, and is not suitable for portable use.
The unit can get hot during use. Ensure the unit has cooled before handling.
Do not attempt to install during wet weather, if you are suffering from nausea or dizzy spells or on
medication with similar side effects.
SECTION TWO
After choosing a suitable location (see previous section) install the unit as follows:
The unit is suitable for connection to a 240 V ac 50Hz electricity supply. It is suggested that
3-core round flexible cable of 1mm² gauge is used. An internal switch should be installed to
switch the power to the unit ON & OFF. This allows the unit to be easily switched off when not
required or for maintenance purposes.
TOOLS & PARTS NEEDED
- 3 flexible core cable
- 240V 60W (max) GLS ES lamp or 23W
CFL Energy Saving Lamp
- Electric/hand-held drill & bits
- Terminal or Electricians screwdriver
- Wire cutters
*** IMPORTANT ***
As of 1 January 2005, changes to the Building Regulations affect domestic electrical installations in
England and Wales. You don't need to be a qualified electrician to make changes to your home's electrical
system, but the work must be done in accordance with the Regulations.
Where you employ an electrician who is a member of a competent person self-certification scheme, they
will be able to certify the work complies with the Regulations.
If you decide to carry out the work yourself we recommend that you make yourself aware of the
Regulations before you begin and if you require any clarification you should contact your Local Authority
Building Control Department.
Details of the Building Regulations can be obtained on the internet via the government website
www.odpm.gov.uk/explanatory-booklet
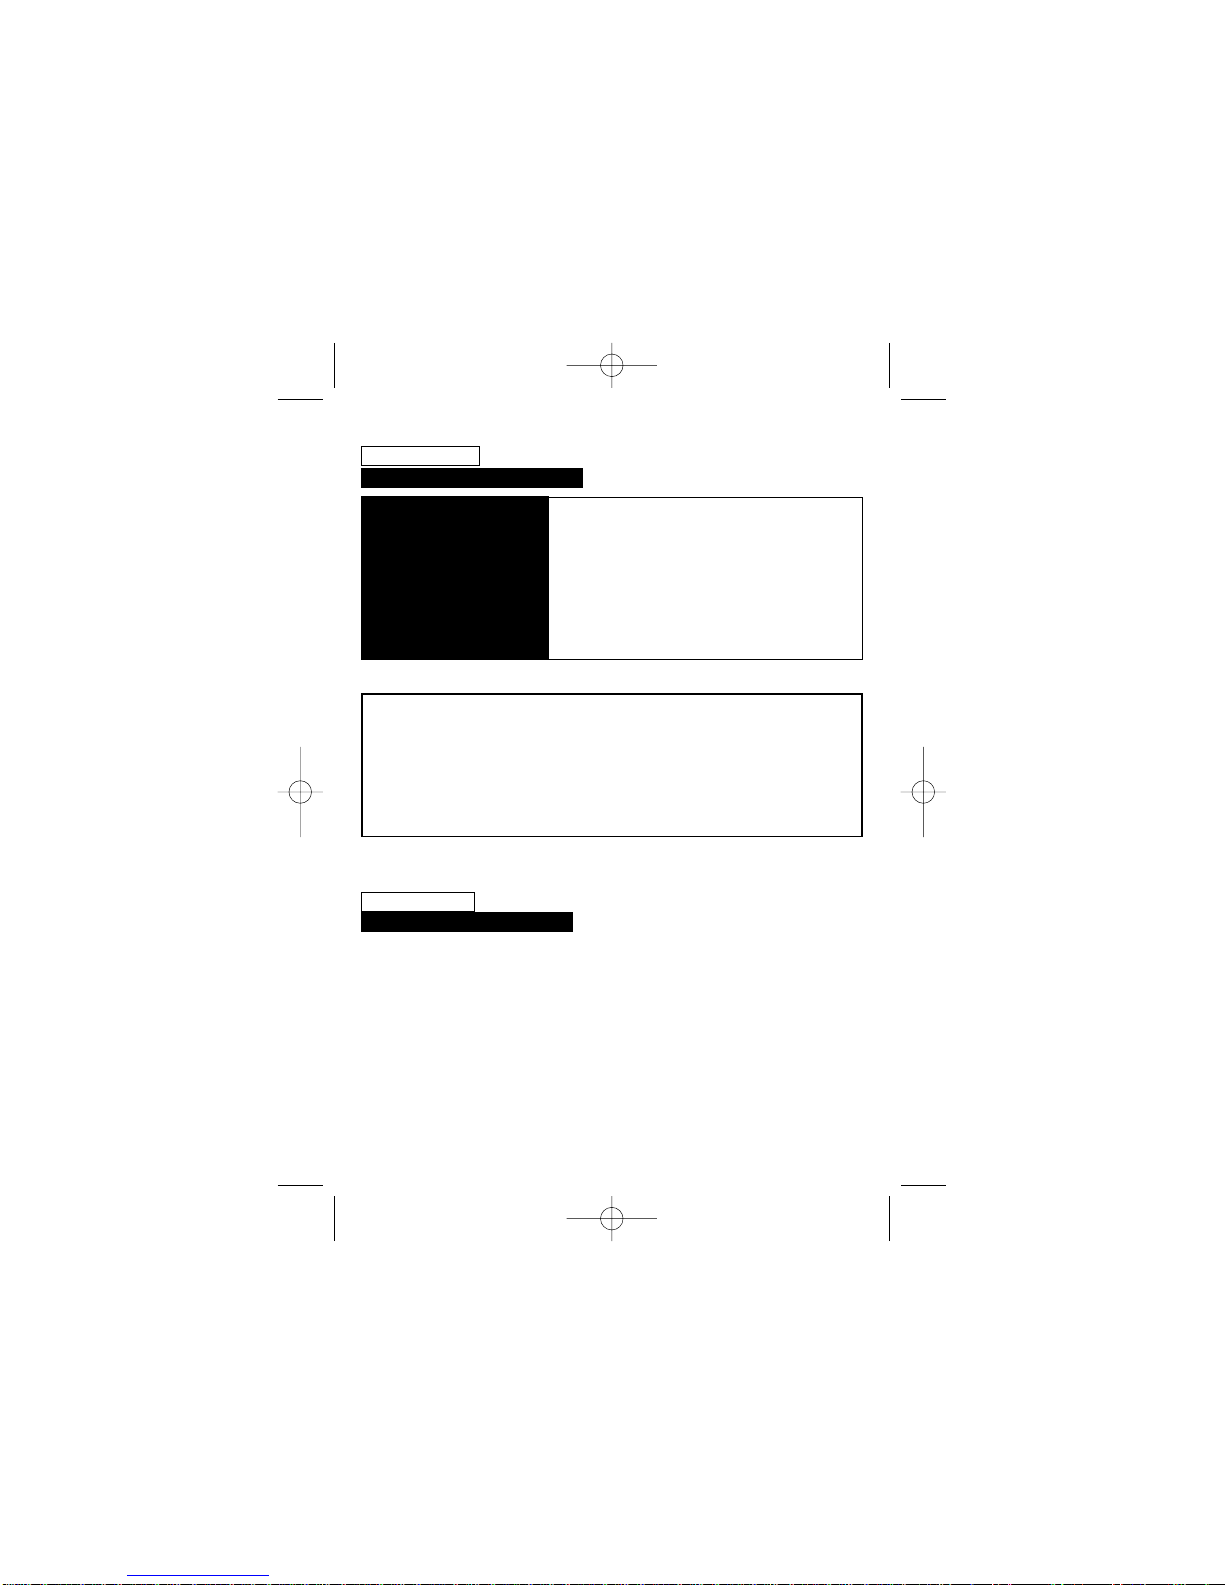
INSTALLATION
Remove wall plate from the lantern as follows:-
Diagram B. Using a small flat blade terminal screwdriver so as not to damage the clip, carefully
prise the lower clip off its locating rib on the lantern bracket. The lower edge of the lantern bracket
will now be partially released
Diagram C. Rotate the lower edge of the lantern off the wall bracket and lift the lantern upwards
and away from the two locating lugs on the top of the wall bracket.
Diagram D. Using the back plate as a template drill the holes. Insert the rawl plugs into the holes.
IQ-PCL-PH-13-6-B.qxp 14/12/2006 10:52 Page 3

PIERCE & PASS THE CABLE THROUGH THE GROMMET BEFORE PROCEEDING.
It is recommended that the grommet is pierced with a screwdriver to ensure a better seal.Allow
approximately 50mm of cable to pass through the grommet.
Fit the grommet into its location, ensuring a good seal.
Fix the mounting plate to the wall. Take care not to overtighten the screws to prevent damage to
the mounting plate. If using a power screwdriver, use the lowest torque setting.
Fit the lamp
The Lantern can be suspended below the wall bracket to ease installation. Simply turn the
lantern as Diagram E and clip the lantern onto to the hook on the inside of the wall plate. The
lantern will now be restrained to aid cable connection.
CONNECTION
Connect the cable to the terminal block on the unit as
follows (see connection diagram):
NEUTRAL (Blue) N
EARTH (Green/Yellow)
LIVE (Brown) L
Ensure that the connections are secure.
Ensure no wires are trapped.
Refit the wall antern to the bracket (reversal of
diagram C) ensuring the lower clip is firmly located.
Clip the lantern top to the lantern ensuring the clips and location marks on lantern top are
aligned. See Diagram F.
Isolation
Switch
A
LUX
Time
dusk/
dawn
2
48
IQ-PCL-PH-13-6-B.qxp 14/12/2006 10:52 Page 4

B
Carefully prise clip off baseplate
to release lantern
2
C
11. Release lower edge of wall
bracket from lantern
2. Lift lantern off wall bracket to
release from locating pillars
Locating holes and pillars
IQ-PCL-PH-13-6-B.qxp 14/12/2006 10:52 Page 5

Insert small flat blade screwdriver as shown
to carefully prise 2 x clips on underside of
lantern lid to release
this mark on the lid above clip location identifies
the position of the clips to aid re-assembly F
D
wall fixing holes
cable inlet E
IQ-PCL-PH-13-6-B.qxp 14/12/2006 10:52 Page 6

SECTION THREE
OPERATION AND TESTING
SETTING UP FOR AUTOMATIC OPERATION
The adjustment controls on the unit (diagram A) should be set as follows.
The TIME control determines how long the lamp remains illuminated after activation.
There are 4 designated “time on” settings 2, 4, 8 hours and dusk/Dawn.
These settings allow the lamp to illuminate for the designated time on period after darkness falls
and the unit is activated.
If you require the lamp to be illuminated all night, set the time control fully clockwise to
“Dusk/Dawn”. The unit will then remain on until the following morning when the lux level increases
enough to switch the unit off during the day.
The DUSK (LUX) control determines the level of darkness required for the unit to start operating.
The setting is best achieved by the procedure below:
Set the DUSK control knob fully anti-clockwise. Wait until darkness falls.
When the ambient light level reaches the level of darkness at which you wish the lamp to become
operative (ie. At dusk), SLOWLY rotate the control in a clockwise direction until a point is reached
where the lamp illuminates. Leave the control set at this point.
At this position, the unit should become operative at approximately the same level of darkness
each evening. Observe the operation of the unit. If the unit is starting to operate too early (ie. when
it is quite light), adjust the control slightly anti-clockwise. If the unit starts to operate too late (ie.
only when it is very dark), adjust the control slightly clockwise.
Continue to adjust until the unit operates as desired.
MANUAL OVERRIDE MODE
The light can be switched on for longer time periods by use of the Manual Override Mode. This
can be activated at night by using the internal wall switch or circuit breaker.
Please note:- The unit CANNOT be operated in Manual Override Mode during daylight hours. If
you want to test this function when installing the unit, this test must be carried out after dusk when
the unit has become operational.
To activate Manual Override Mode:-
Switch the internal wall switch/circuit breaker once (off/on) within 1 second.
The unit will now illuminate continuously until dawn or until it is switched back into Auto Mode.
To de-activate Manual Override Mode (ie. switch the unit back into Auto Mode):-
Switch the internal wall switch/circuit breaker once (off/on) within one second. The unit will return
to its Auto mode and will operate as set up during the walk test period.
IQ-PCL-PH-13-6-B.qxp 14/12/2006 10:52 Page 7

TECHNICAL SPECIFICATIONS
SECTION FOUR
Power Supply
Lamp Type
Time On
Lux Level Adjustment
Environmental Protection
240V AC ~ 50Hz
240V 13W PL Energy Saving Lamp
2, 4 8 hours or dusk/dawn
Day & night or night only operation
IP44 (suitable for outdoor use)
SECTION FIVE
TROUBLESHOOTING GUIDE
PROBLEM
oThe sensor will not
operate at night.
oUnit activates during the
daytime.
SOLUTION
The level of ambient light in the area may be too bright to allow
operation at the current DUSK setting. During the hours of
darkness, adjust the DUSK control slowly clockwise until the
lamp illuminates. Refer to previous section for more details.
Adjust the setting anti-clockwise to lower the level of ambient
light required for activation.
If you experience problems refer to Troubleshooting Guide.
If problems still exist, do not immediately return the unit to store.
Telephone the IQ Customer Helpline
0871 71 71 100 Weekdays 9.00am - 5.00pm
[email protected] www.iq-europe.co.uk
Qualified Customer Support Co-ordinators will be on-line to assist in resolving your query.
IQ-PCL-PH-13-6-B.qxp 14/12/2006 10:52 Page 8

?
DID YOU KNOW...
IQ products are designed and manufactured to give many
years of trouble-free service.
The materials used during manufacture have been
selected to improve their ability to be recycled when the
product is no longer functional.
Please be kind to our environment and help conserve
scarce resources by disposing of this product at your local
waste recycling facility at the end of its life.
LIGHT POLLUTION & CONSIDERATE LIGHTING
Please be aware of the annoyance over-lighting an area
can cause to your immediate neighbours.
Light pollution caused by incorrectly installing a unit or
over-lighting an area can be limited by carefully considering
the location and position of your unit before installation. The
light spread on all halogen floodlights can be reduced by
angling the floodlight downwards on the mounting bracket.
This will also concentrate the light on your property and
limit the potential inconvenience of the light shining into
your neighbours windows etc.
Please see Selecting a Location for information on
choosing the optimum location for your security light.
IQ-PCL-PH-13-6-B.qxp 14/12/2006 10:52 Page 9
Table of contents
Other IQ-group Lighting Equipment manuals
Popular Lighting Equipment manuals by other brands

Image Engineering
Image Engineering CAL2 user manual

Clevertronics
Clevertronics ELIFE-X-LI Installation & maintenance instructions

ALS
ALS ELEDN4 quick start guide

Viabizzuno
Viabizzuno Alva 1 Installing Instruction

Klang
Klang SL-3 quick start guide

Larson Electronics
Larson Electronics GL-9051-F-M instruction manual