Iriso Iricell-2 User manual

irisocamera.com
made in Mexico
Iricell-2
User
Guide

2
General description
Iricell-2 is a universal mobile phone
accessory that turns it into a powerful and
easy-to-use iridoscope.
Fully rechargeable by a Micro USB
connection, it comes equipped with
superior long life NiMH batteries.
Its LED light offers high power for dark eyes
(brown dot on the switch) and low for light
eyes (blue dot).
Four illuminations are possible:
- two side LEDs on for a uniform diagnostic
illumination
- each side LED individually on to observe
the reliefs and textures
- front LED to assess sclera and colors in
pigmentations
Preventive automatic shutdown after 5
minutes, turn back on if necessary.
It can be supplemented with Jörg Eisfeld's
Miniris application (for Android only), which
overlays different iridology graphics on the
photographs taken.

iris lights
selector
On / Off
red / green battery
level indicator
brightness level for
bright or dark irides
iris lights
indicators
latest generation
1.8mm LED
three elements
coated lens
Micro USB
recharge
connection

4
Operation
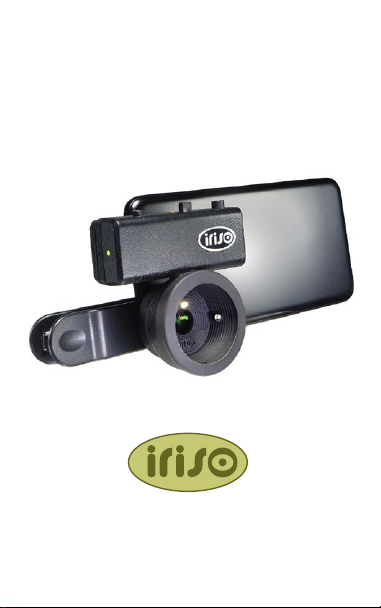
(1) CLEAN PHONE LENS, as fingerprints
soiling heavily degrades the image quality
(2) Position the iricell (see next page)
(3) CENTER THE LENS OF IRICELL WITH
THE PHONE’S OWN
(4) Select the brightness level: blue dot
visible alone on the switch for light eyes, or
with brown dot for dark eyes
(5) Switch on, select with the central switch
the desired lighting scheme for the iris:
- LED on both sides for general diagnosis
- one LED on either side for texture lighting
- Central LED for pigmentation or sclera
(6) Apply the frontal eyepiece of Iricell, making
contact with the eye area
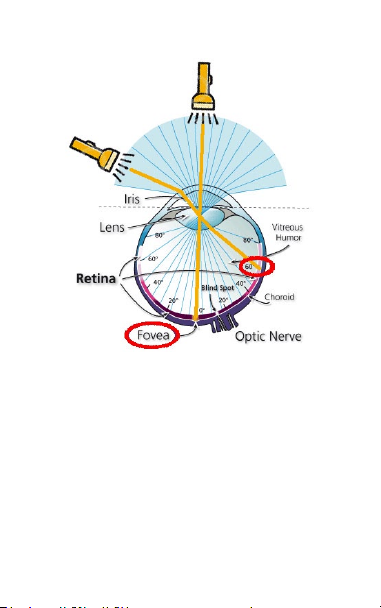
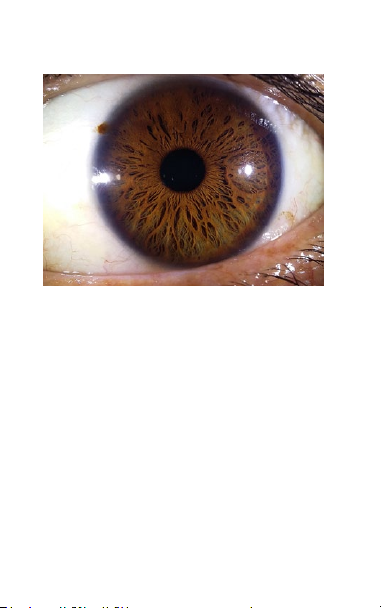
(7) Zoom to 2x or more to enlarge the image
on screen, correctly frame and take the photo
(8) continue shooting varying the lighting
(9) check the quality and sharpness of
images on screen, reshoot some if necessary

5
Fitting on the mobile phone
Iricell can be installed indistinctly in the
center or in a corner. Align horizontally and
always take care to center its lens with the
phone’s own.
When handling and taking pictures, always
wrap the provided strap around a finger to
avoid accidental falls.

6
Lighting system
Front or side light
Each type of lighting will show different
results in the photographs.
It should be considered that while the side
light is comfortable because it falls on less
sensitive peripheral areas of the retina, the
front light is dazzling and must be used briefly.

7
Side lights:
- when both side lights are on, iris reliefs are
moderately perceived, but are strongly
enhanced when lit from one side only
- lateral lights do not dazzle, allowing the
session to last as long as necessary
- its power can be high enough to photograph
very dark irises
Front light:
- it intensifies colors, an important aspect
when observing pigmentations
- vision is flat, however it is suitable for a
general assessment of the iris without reliefs
- suitable for observing the sclera
- its use must be brief
- to avoid altogether with people too sensitive
to the associated glare
Note: glare and ghosting caused by front
lighting disappear in a matter of minutes.

8
General lighting
Center the pupil on screen, and zoom in so
that the iris fills the image enough.
Both side LEDs on will produce a homoge-
neous light, suitable for a general assess-
ment of the iris and its texture.
For its part, front lighting will best define
colors in pigmentation and also lends itself
to an overall visualization with no perception
of reliefs. It is also the proper lighting to
capture the information in sclera.

9
Texture lighting
With a single lateral light (here, on the left
side), the perception of reliefs in the fibers
and crypts is increased.
It also helps to detect anomalies. In the case
above, a brown spot on the edge at 10
o'clock casts a diffuse shadow to its right.
This indicates that the stain is higher up on
the surface of the lens, and not part of iris
pigmentation. This relationship between spot
and shadow would change selecting the
opposite light.

10
Taking care of your Iricell
Because it comes in direct contact with
each patient, THE FRONT OF THE
EYEPIECE (4) should be cleaned after
each session, with alcohol or a disinfectant
for medical use.
It is not necessary or advisable to clean the
internal cavity of the eyepiece.
Occasionally wipe the front of the controller
housing (1) with a damp cloth.
If you need to clean the lens (3), humidify
by blowing and use a cotton swab.

11
(4) eyepiece
(1) lights
control housing
(3) close-up
lens
(2) universal
clip

12
Problems solving
Choosing the correct lens with multiple
camera phones:
- apply a 2x zoom
- cover each lens individually and observe
when the screen complitely darkens
To take iris photos, you will need to apply
the Iricell to this lens, after cleaning it.
The iris is small in the picture
- Apply sufficient zoom when shooting in
order to enlarge the iris on screen. Never
select the wide angle lens.
Images show a milky veil
- Phone lens is dirty, clean it with a cotton
cloth or microfiber prior to installing the Iricell
Edges darken or part of a black circle
appears in corners
- Center the objective of Iricell with that of
the phone
Part of the iris is sharp and the other is
blurry
- The phone must be aligned parallel to the
plane of the iris

13
Erratic focusing under front lighting:
Due to its position, the frontal light
generates a weak contrast, which may
cause difficulties with some focusing
systems based on phase detection.
In such cases, touch the image on the
screen with your fingertip, choosing
different points of the iris until the
displayed image becomes sharp. Take
then the picture without further adjusting
the framing, as this would change the
focus again.

14
SPECIFICATIONS
Weight:
110 gm
Lens:
30 mm 3 elements in 2 groups
Multicoated glass
Power supply:
NiMH rechargeable batteries 750 mAh
Recharge with a USB charger 5V / 0.3A
Use a micro USB terminated cable
Consumption:
2 LEDs at high power = 300 mA
at low power = 160 mA
1 LED at high power = 210 mA
at low power = 130 mA
Power performance:
Number of 3 minute sessions (aprox.):
75 at high power
115 at low power
Power saving system:
5 minutes auto shut-off

Iriso Camera
Bravo sur 451, Centro
Saltillo, Coahuila 25000
Mexico
Whatsapp 52 1844 155 3323
irisocamera.com
15
Table of contents