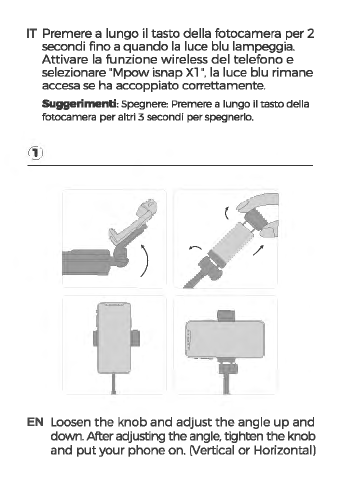
Mpow ISNAP X1 User manual

M'i'OW
□
REAM·EXPLORE·INSPIRE
.:!--
-
3-IN-1
I
SElflE
STICK
MPOW
ISNAP
X1
MODEL:
PA168A

xl
•.,
Ii)
Diagram
\6Y.
,
xl
EN
1.
Fill
Light
2.
Phone Holder
3.
Adjusting Knob
4.
l/4"ScrewforGoProorcamera
5.
Remote Control
6.
Handle
7.
StableTripod Stand

DE
1.
F(jlle Licht
2.
Handyhalter
3.
Einstellknopf
4.
1/4Schraube furGoPro oder Kamera
5.
Fernbedienung
6.
Griff
7.
StabilerStativstander
FR
1.
Lumiere
d'appoint
2.
Support
de
telephone
3.
Bouton
de
reglage
4.
l/4Vis
pour
GoPro
ou
camera
5.
Telecommande
6.
Poignee
7.
Trepied stable
ES
1.
Luz
de
relleno
2.
Soporte para telefono
3.
Perilla
de
ajuste
4.
1/4 'tornillo para GoPro o camara
5.
Control
remoto
6.
Encargarse
de
7.
Soporte
de
tripode
estable

IT
l.
Luce
di
riempimento
2.
Su
pporto
del telefono
3.
Manopola regolabile
4.
Vite
da
l
/4"
per GoPro o fotocamera
5.
Telecomando
6.
Maniglia
7.
Stabile supporto pertreppiedi
Pairing
0
LED
•
-
~~
~~pre;
~
II
(Sltllnp
-
«•@
~
-.
<lm
--·~
~

EN
Long press
the
camera key
for
2s
until
the
blue
lightflashes. Turn
on
the
wireless function
on
your
phone
and
select
"Mpow
isnap
x1
•.
the
blue
light
stays
on
if
paired successfully.
Tips:
Tum
off:
Long
press
the camera key
for
another 3s to
tumitoff.
DE
Halten
Sie
die
Kamerataste
2
Sekunden
lang
gedruckt
bis das blaue Licht
blinkt
Schalten Sie
dieWireless-Funktion lhres Handys ein undwahlen
Sie
'Mpow
isnap
Xl
".
Das blaue Licht
bleibt
an.
wenn
die
Kopplung erfolgreich war.
Tipps:
Ausschalten: Halten Sie
die
Kamerataste
noch
3
Sekunden
lang
gedrOckt.
um
sie
auszuschalten.
FR
Appuyez longuementsur
la
toucheAppareil photo
pendant2 secondesjusqu'a ce
que
levoyant bleu
clignote. Activez
la
function sans fil survotre
telephone
et
selectionnez
«Mpow
isnap Xl •·
La
lumiere bleue reste allumee
si
la
liaison
est
etablie.
consells:
De5activer:
appuyez longuement
sur
la
touche
de
l'appareil photo
pendant
3 secondes supplementaires
pour
l'eteindre.
ES
Mantsnga presionada
la
tecla
de
la
camara durante2
segundos hasta
que
la
luzazul
parpadee.
Encienda
la
funci6n inalambrica en
su
telefonoy seleccione
'Mpow
isnapXl
",
la
luzazul permaneceencendida
si
se
empareja correctamente.
ConsejOS:
Apagar:
Mantenga
presionada
la
tecla
de
la
camara
durante
otros
3
segundos
para
apagarla.

IT
Premere a
lunge
ii
taste della fotocamera per 2
secondi fino a
quando
la
luce blu lampeggia.
Attivare la
funzione
wireless
del
telefono
e
selezionare
"Mpow
isnap Xl
•.
la luce blu rimane
accesa
se
ha accoppiato correttamente.
SUggerimenti:
Spegnere: Premere a lungo
ii
tasto della
fotocamera per
altri
3
secondi
per
spegnerlo.
~II~
Lilll21
EN
Loosen
the
knob
and adjust
the
angle
up
and
down.Afteradjusting
the
angle. tighren
the
knob
and
put
your
phone
on. (Vertical
or
Horizontal)

DE
Losen
Sie
den
Knopf
und
stellen Sie
den
Winkel
nach
oben
und
unten
ein. Ziehen Sie nach
dem
Einstellen desWinkels
den
Knopf
fest
und
legen
Sie das Handyauf. (Vertikal
oder
horizontal)
FR
Desserrez le
bouton
et
ajustez l'angle
de
haut
en
bas. Apres avoir regle l'angle, serrez le
bouton
et
allumezvotre telephone. (Vertical ou horizontal)
ES
Afloje
la perilla y ajuste el
angulo
hacia arriba y
hacia abajo. Despues
de
ajustarel angulo. aprieta
la perilla y coloca el telefono. (Vertical u horizontal)
IT Allentare
la
manopola e regolare l'angolo
su
e giu.
Dopo aver regolato l'angolo. stringere
la
manopola
e accendere
ii
telefono. (Verticale o orizzontale)

EN
The
tripod
is
located
in
the
handle
slot
open
it
outwards
when
in
use.
Afterunfolding
the
tripod, push
the
locking device
• ill •
to
the
left
---+
to
the
state • m•
to
lock
it
in
place
Tips: Before retracting
the
tripod, you need
to
push
the
locking
device"
/1\"
tothe
right
-tothe state •ill" to
fold
it
DE
Das
Stativ
befindet
sich
im
Griffschlitz. Offnen Sie
es
bei
Verwendung
nach
auBen.
Schieben Sie
nach
dem
Aufklappen
desStativs
dieVerriegelung •
ill
"nach
links---+
in
den
Zustand
•
ffi
".
um
sie
zu
verriegeln.
Tippa: Bevor Sie das Stativ einfahren, mUssen Sie
die
Verriegelung drUcken·
II\
•nach rechts -
zum
Zustand
·ill·
klappen.
FR
Le
trepied
est
situe
dans
la
fente
de
la
poignee.
ouvrez-le
vers
l'exterieur
lors
de
son
utilisation.
Aprils avoir
deplie
letrepied. poussez le dispositif
de
verrouillage"
ill
•vers
la
gauche---+ al'etat" m•
pour
le verrouiller
en
place.
Conaeila:
avant
de
retracter
le
tl"E!pied.
vous
devez
pousser
le
dispositif de verrouillage •
Ill
• adroite -a
1·etat
•
ill
•
pour
le
plier.

ES
El
tripode
se
encuentra en
la
ranura del
asa,
abralo
hacia afuera cuando esteen
use.
Despues
de
desplegar
el
tripode,
empuje
el
dispositivo
de
bloqueo " ill "hacia
la
izquierda -
hasta el estado "
111
" para bloquearlo en
su
lugar
Corwejas:
antes
de
retraer el tripode,
debe
empujar
el
dispositivo
de
bloqueo·
fl\·
a
la
derecha
➔
al
estado ·ill"
para plegarlo.
IT
II
treppiede
si
trova nelloslot della maniglia, aprirlo
verso
l'esterno quando e
in
uso.
Dope aver aperto
ii
treppiede, spingere
ii
blocco
del dispositivo
di
"
ill
"a sinistra -allo state "
111
"
per bloccarlo in posizione
Suggerimenti:
prima
di
ritrarre
ii
treppiede.
e
necessario
premere
ii
blocco
del
dispositivo"
Ill
"a
destra
➔
allo
stato
•ill "
per
piegarlo).

EN
The remote control
is
connected
to
the
mobile
phone, and
the
effective distance
of
the
remote
control
is
up
to
l Ometers/33
feet
Tipa
O
The
remote
control
will
automatically
sleep after
5-10mins
if
withoutanyoperation.justclick
the
camera key
to
wake
it
up.
f)
The
remote
control
will
automatically
off
after
30mins
if
without
any
operation,
and
you
need
to
press
the
camera
keyfor 2 seconds
to
tum
it
on.
DE Die Fernbedienung ist
mit
dem
Mobiltelefon
verbunden.
und
die
effektive Entfernung
der
Fernbedienung betragt bis zu l OMeter.
Tippa
O Die Fembedienungwird nach 5 bis
lo
Minuten automatisch
in
den
Ruhezustand
versetzt
Klicken
Sie
einfach
auf
die
Kamerataste.
um
sie zu aktivieren.
6
Die
Fernbedienung
schaltet
sich
automatisch
nach
30
Minuten
aus.
vvenn keine Bedienung
erfolgt
und
Sie mOssen
die
Kamerataste 2
Sekunden
lang
drOcken.
um
sie
einzuschalten.
FR
La
telecommande
est connectee au
telephone
mobile
et
la
distanceeffective
de
la
telecommande
peut
allerjusqu'a lo metres.
Tipa
0
La
telec0mmande
se
met
automatiquement
enveille apres
5
ou
1O
minutes
sans
aucune
operation.
ii
suffit
de
cliquer
sur
la
touche
de
l'appareil
photo
pour
la
reactiver.

8
La
t8I8commande
s'8teindra
automatiquement
apres
30
minutes
si aucune operation n'esteffectuee
et
vousdevez
appuyersur
la
touche
de
l'appareil
photo
pendant
2
secondes
pour
l'allumer.
ES
El
control remotoesta conectado al telefono m6vil.
y
la
distancia
efectiva
del control remotoes
de
hasta
l O
metros/
33
pies.
Tips
0
El
control
remote
se apagara
automalticamente
despues
de
5 -
10mins
si.
sin ningunaoperaci6n,
simplemente
haga
die
en
la
tecla
de
la camara para activarlo.
8
El
control remotoseapagal'a automaticamente
despue:S
de
30
minutes
si
nose
realiza ninguna operaci6n,y
debe
presionar
la
teda
de
la camara
durante
2 segundos para encenderla.
IT
II
telecomandoecollegato al telefonoe
la
distanza
effettiva del telecomandoefino a l Ometri
/33
piedi.
Tips
0
II
telecomando
si
spegnera
automaticamente
dopa
5 - 10
minuti
se senza alcuna operazione. basta fare
die
sul taste
della fotocamera
per
riattivarlo.
8
II
telecomando
si
spegnera automaticamente
dopa
30
minuti
senza alcuna operazione e sara necessario premere ii tasto
della fotocamera
per
2 secondi per accenderlo.

How
to
Use
the
Fill Ught?
~
(!)
DoublePress Po\Neron
Doppeltdn'.lcken
ElnschaltBn
Pressioncleuxlbis Allumer
Hagacllcdosvaces Encandldo
Premereduevolte
""'""=
~l
-·-
, '
"""'"""
Oianga
the
Br1ghtnass
/
Kurzdruckan Rashlng
Speed
DiaHelligkeitiindem/
Pressloncourte
Bllnkgesch'Mndlgkelt
""'--
Modifia-laluminasite/
Premarea
bl'EIII&
la'tlltessedecllgl"IOllll'n9nt
Cembiarelbrillo/
velocldaddeparpadeo
Modlficalalumlnoslta/
la
velocitii di
lampeggiamento
~©
-~-
, '
"'"'"""'
"""'
Langedn'.lckan
...
Presslonlorgue
"'"'
PUlsacl6nlarg
,.,,_.
Premere a
lungo
Lampeggiamento

How
ID
Install a cameraorOoPro on
the
Tripod?
For
camera
II

ForGoPro
0

EN
How
to
install a camara
or
OoPro on
the
tripod
Step!
Adjust
the
l
/4"
screw
to
the
right
position
with
the
adjusting
knob
Step
2.
Connect
the
l
/4"
screw
to
the
screw
thread
at
the
bottom
of
the
camera/GoPro connector and
then
tighten
it
DE
Wie
installieren Sia eine Kamara odereine
OOPro
aufdemStativ?
Schritt 1
Stellen Sie
die
1/4
"-Schraube
mit
dem
Einstellk-
nopf
in
die
richtige
Position
Schrltt2
Verbinden
Sie
die
l /4"-Schraube
mit
dem
Gewinde
an
der
Unterseite
des
Kamera- /
GoPro-Anschlusses
und
ziehen
Sie sie fest
FR
Comment installer une
camtra
ou
OOPro
•ir
le
tr6pled
Bapel
Reglez la vis l
/4"
ala
bonne
position
avec le
bouton
de
reglage
Etape2
Connectez
la
vis
l /4
"au
bas
de
la
camera/
Go
Pro
et
Puis serrez-le

ES Como instalar
una
c:iimara o OoPro
en
el
tripode
Pasol
Ajusteel tornillo
de
l/4 "en
la
posici6n correcta con
la
perilla
de
ajuste.
Paso
2.
Conecteel tomillo
de
l/4
·a
la
rosca
en
la
pa
rte
inferior
de
la
camara / conectorGoPro y luego aprietelo
IT
Come
installaN
una
videocamera o CoProsul
tNppiede
Passo
1
Regolare la
vite
da
1/4"
con
la
manopola
di
regolazione nella posizione corretta
Passo2
Collegare
la
vite
da
1/4"alla filettatura nel
fondo
della videocamera/ connettoreGoPro, poi serrarle.

Charging
Charge
the
fill
light
Charge
the
remote oontrol
Other Mpow Cell Phone Accessories manuals